Peachtree Woodworking Supply 3458 User manual

B
Extendable
Large Dovetail Jig
Instruction
Manual
Part # 3458
CAUTION:
Please read, understand, and follow all manufacturers instructions, guidelines and owners manuals that
come with your power tools. Peachtree Woodworking Inc. and its subsidiaries assume no liability for
accidents or injuries caused by improper use of this product.
© Copyright Peachtree Woodworking Inc. 2010. All images, copy, and graphics are copyrighted by law and may not be copied, or reproduced without our express written consent.

Peachtree Extendable Dovetail System Instructions
Introduction
The Peachtree Extendable Dovetail system takes a simple approach to making beautiful thru-dovetail’s, a hallmark of ne
craftsmanship. The hardest part about cutting dovetails is marking and cutting the matching angles to one another. That’s
what makes this system so easy. We have done the math for you and milled the exact cuts that need to be made in this heavy
duty and easy to use jig. The Peachtree Extendable Dovetail system works in conjunction with bearing guides on the shank
of router bits instead of using those hard to center brass bushing guides. Because the bearing is already centered on the bit it
makes setting up to cut the joint fast and easy. We have milled the template to match the bearing size so that the bit is perfectly
centered and there is no slop, wear or no waste. Unlike other templates you have seen, our jig will work with two different
thickness stock as well as two different widths. We have also added extension tabs to the jig, so you can make dovetail cuts as
long as you need by attaching two Peachtree Dovetail Jigs together. This means the type of projects you can create are endless.
Lets get started making some joints..
But rst - let’s talk about safety.
Read and follow all safety instructions
Caution:
Please read, understand and follow all manufacturers instructions, guidelines and owners manuals that come with
your power tools. Peachtree Woodworking Supply Inc. and its subsidiaries assume no liability for accidents or
injuries caused by improper use of this product.
Safety Tips
Creating dovetails that look like they have been hand cut will add curb appeal or distinction to any of your projects.
To get the best performance and results out of your dovetail jig, we recommend the following tips:
1. Always wear safety glasses, hearing protection and dress properly. No loose clothing, hair, draw strings
or jewelry that might get caught in moving parts.
2. Keep work area clean. Messy work areas invite injuries.
3. Make deeper or larger cuts in multiple passes and NEVER use dull cutters. Forcing a deep cut in one
4. pass or using a dull cutter can result in injury. Inspect bits for loose parts, damage or chips in carbide.
5. Make sure router bit is properly installed in router and do not exceed the recommended rpm
6. Keep all safety guards in place.
7. Always unplug your tools before changing cutters
8. Secure you work. Always use at least two clamps to hold your stock to the jig. Make sure the clamps do
not interfere with the cutters on the under side of the jig.
9. Make sure the jig is clean with no build up or debris for smooth operation.
10. Make sure the bearing on the cutter is spinning freely. If not spinning freely it may damage the jig. Keep
bearing clean and well lubed with bearing lubrication.
11. Follow all manufacturer safety guidelines provided with you router.
12. Support longer stock properly so that it does not shift or change the position of the jig
1
15” Dovetail Package Contents:
1. 15” Aluminum Dovetail Jig
2. Straight Edge Bit
3. 7° Dovetail Bit
4. 3/8” Sleeve adaptor 4
2
3

Mounting The Dovetail Jig
Prepare the mounting block (Not Included):
The 15” Dovetail Jig is mounted to a piece of stock
(mounting block) that acts as a clamping surface for the
work-piece. This will also prevent tear-out on the back
side of your stock when you cut your joints. It it essen-
tial that the mounting block is accurately machined so
it is 90°to the dovetail jig. It can be made from a solid
block or laminated. The block needs to be 2-1/4’’ thick
x 3-1/2’’high x 18’’ long for use with standard router
bits. For different size dovetails we recommend you
change your mounting block to provide solid, continu-
ous support when your bit passes through the back of
your stock.
Mount the Jig to Mounting Block:
The rst thing you need to do to start using your
Peachtree Dovetail jig is mount the jig to the mounting
block. The 15” Dovetail Jig has four elongated holes to
attach the jig to the mounting block. There is a scribed
line that runs across the underside and the top side of
the dovetail jig on the pin side of the jig itself (Fig.
1). The line is used to line up the mounting block to
the dovetail jig. Match this line to the top edge of the
mounting block, it is important that the scribed line on
the template jig and the stock are parallel. Drill through
the four holes and insert the screws into the middle of
the elongated holes. Tighten securely. The 15” Dovetail
Jig can be used either in an upright position locked in a
vise or inverted onto a router table when working with
shorter stock.
Cut a Sample Joint
Before making a “live” cut on your project you will
need to make a sample cut to test the accuracy of the t.
Follow instructions in the next section on how to make
the tail cut and pin cut for your sample joint. When cut-
ting a sample joint, it is important that the stock thick-
ness is the same thickness as your project stock. The
standard bit set that came with your jig is capable of
cutting 3/4” to 1” stock. There is also an accessory bit
set available for your dovetail jig. This bit set will do
1/2” to 3/4” stock.
Cutting The Tails
Making the Tail Cut:
Always start your projects by cutting the tail side rst.
The reason for this is, the tail cut side of the joint is not
able to be adjusted. This makes the joint very accurate
because we are working off of the angles of the dove-
tail router bit. It is the pin side of the joint that can be
adjusted to t the tail cut of the joint.
1. Secure stock to Jig
A. Prepare the stock to be dovetailed by joining all
four edges followed by cutting the ends square.
With the Peachtree Dovetail Jig you can use one
thickness stock for the tail cut and a different
thickness stock for you pin cut.
B. Clamp your stock to be dovetailed vertically into
you workbench vise. Fig 2
Pin Side
Top
Scribe Line
Tail Side
Bottom
Scribe Line
Fig.1
Fig.2
CAUTION
Before using the peachtree
dovetail jig system, be sure that
the 3/8” sleeve is against the
bearing guide before install-
ing either bit into the router.
Failing to do so could result
in damaging the dovetail jig,
router bit or may cause
personal injury.
3/8” SLEEVE
AGAINST
BEARING
GUIDE

Caution:
Make sure when clamping your stock to the jig your
clamp heads are not in the path of the router bit.
See Fig.5
E. Place the dovetail router bit with bearing guide
into your router and secure router bit collet
tightly. Adjust the base of your router for depth
of cut by adding the thickness of the pin stock
piece plus 1/2” for the thickness of the dove
tail jig. If desired, add an additional 1/32” or
more for sanding the edge perfectly ush
after assembly of joint. Another way of
setting your bit height is to place your pin side
stock on top of the jig. Place the router
with bit on top of stock, with bit hanging over
edge between the ngers of the jig. Now lower
the router bit until it touches the top of the tail
stock and then secure router bit in place.
See Fig. 6
Caution:
Make sure bearing contacts dovetail jig by at least
1/8” or more before starting cut. If bearing does not
contact jig properly it may result in injury or damaging
the dovetail jig. See Fig.7. In order cut dovetails into
thinner stock, you must use optional router bits which
are sold separately.
Fig. 6
C. Place the mounted dovetail jig (tail side) on the
end of stock. Position the jig, so that there are
equal distances on either side of the jig. Make
sure dovetail jig rest’s at on the tail stock and
secure in place with F-clamps or C-clamps. To
achieve an exact centered joint, mark the center
of your stock, See Fig. 3, then measure
7/16” to one side of the center mark and scribe
a second line with a pencil. Position the inside
edge of one of the tail side openings exactly with
the second scribed line See Fig. 4. Secure in place
with F-clamps or C-clamps. This method will give
equal spacing of your tails on either side of your
stock.
Pin Stock
Align Bit Flush
Tail Stock
Dovetail Jig
Fig.4
Fig.3
Fig.6
Fig.5

F. (Always wear eye protection) Cut your stock
standing behind mounting block. See Fig. 8a.
This will allow you to pull the router towards you
while making the cut, giving you a smoother,
more controllable cut. This also will keep the
wood chips directed away from you. Place your
router at on top of the dovetail jig surface with
the bit in between one of the openings. Be sure
the cutter is not contacting the wood surface be-
fore turning your router on. Holding the router
rmly, turn it on, and guide the bearing and router
bit through each of the tail side openings, pulling
the router all the way back to each of the tail slots,
See Fig. 8a.
Caution:
To prevent damaging your dovetail jig while router is
turned on - Do not tip the router, always keep the router
at on jig. Do not use the last opening on either end of
the Dovetail Jig during the cutting process, doing so
may tip the router (Fig. 8b)and cause damage to the
jig or cause injury. Do not lift the router up between
the ngers while router is on. Always be sure the router
base is supported while making your cuts on the dove-
tail jig. When routering of joint is complete, turn router
off and wait for bit to come to a complete stop before
removing router off of the dovetail jig.
Completed Tail Cut:
Your completed tail cut stock should look like the pho-
tograph shown below in Fig. 9
Fig.7
Fig.9
Fig.8a
When Stock is Wider Than Dovetail Jig:
When the stock is wider than the jig, cut all of your
tails, then scribe the outline of the last tail opening
on the right side of the jig before un-clamping. Once
scribed, un-clamp jig, slide the jig to the right, aligning
the last tail opening on the left side of the jig with the
scribed lines. Repeat this process for the entire width of
you stock.
Shop Notes:
Do not force the router bit, or cut to fast, as this may
result in tear-out, splintering of the stock or even loss of
control. Moving the router to slow could result in burn-
ing of your stock. Feed the router bit into the stock with
a smooth and controllable rate.
Fig.8b
DO NOT USE THE LAST OPENING ON
EITHER END OF THE DOVETAIL JIG

Caution:
Make sure when clamping your stock to the jig your
clamp heads are not in the path of the router bit.
See Fig.13
E. Place the straight router bit with bearing guide
into your router and secure router bit collet
tightly. Adjust the base of your router for
depth of cut by adding the thickness of the tail
stock piece plus 1/2” for the thickness of the
dovetail jig. If desired, add an additional 1/32” or
more for sanding the edge perfectly ush after
assembly of joint. Another way of setting your bit
height is to place your tail side stock on top of the
jig. Place the router with bit on top of stock, with
bit hanging over edge between the ngers of the
jig. Now lower the router bit until it touches the
top of the pin stock and then secure router bit in
place. See Fig. 14
C. To mark the location of the pins you will use
the tail stock piece you just cut as marking guide.
Position the tail stock on top of the pin board in
the correct right angle position See Fig. 11 . Make
sure all three edges line up ush with the pin
board (piece to be cut). Using a utility knife,
scribing knife or a ne tipped pencil mark
the location of one dovetail opening on the end
grain of the pin board.
D. Place the mounted dovetail jig (pin side) on the
end of stock. Position the jig, so that the two
edges of one of the pins line up with the two
scribed lines. Note: the angles that you marked
with your scribing tool for your dovetail open-
ing will match both side edges of one pin on
your dovetail jig. See Fig.12. Make sure dove
tail jig rest’s at on the pin stock and secure in
place with F-clamps or C-clamps. You will be
removing the stock that is exposed between the
pin openings of the dovetail jig using the straight
router bit.
Cutting The Pins
Making the Pin Cut:
Pin cuts are always made after cutting the tails. The
reason for this is, you will use the tail to cuts to lay
out the positioning of the pins of your joint.
1. Secure stock to Jig
A. Prepare the stock to be dovetailed by joining all
four edges followed by cutting the ends square.
With the Peachtree Dovetail Jig you can use one
thickness stock for the pin cut and a different
thickness stock for you tail cut.
B. Clamp your stock to be dovetailed vertically into
you workbench vise. Fig 10
Fig.10
Fig.12
Fig.13
Fig.11

Caution:
Make sure bearing contacts dovetail jig by at least 1/8”
or more before starting cut. If bearing does not contact
jig properly it may result in injury or damaging the
dovetail jig. See Fig.15. In order cut dovetails into thin-
ner stock, you must use optional router bits which are
sold separately.
F. (Always wear eye protection) Cut your stock
standing behind mounting block. See Fig. 16.
This will allow you to pull the router towards
you while making the cut, giving you a smooth
er, more controllable cut. This also will keep the
wood chips directed away from you. Place your
router at on top of the dovetail jig surface with
the bit in between one of the openings. Be sure
the cutter is not contacting the wood surface
before turning your router on. Holding the router
rmly, turn it on, start by taking very light pass
across the face of your pin stock. This step pre
vents chipping or tear-out of the stock. Proceed to
guide the bearing and router bit along the edge
of each of the pin side openings of the dove
tail jig. Pulling the router all the way back to
each of the pin slots removing the stock down
to the scribed lines, See Fig.16 On wood that
tends to easily chip, a thin light pass from the face
of the stock to the back of the dovetail jig will `
help eliminate tear-out.
Completed Pin Cut:
Your completed pin cut stock should look like the pho-
tograph shown below in Fig. 17
Caution:
To prevent damaging your dovetail jig while router is
turned on - Do not tip the router, always keep the router
at on jig. Do not lift the router up between the ngers
while router is on. When routering of joint is complete,
turn router off and wait for bit to come to a complete
stop before removing router off of the dovetail jig. Do
not force the router bit, or cut to fast, as this may result
in tear-out, splintering of the stock or even loss of con-
trol. Moving the router to slow could result in burning
of your stock. Feed the router bit into the stock with a
smooth and controllable rate.
Fig.14 Fig.16
Fig.15
Fig.17
Pin Stock
Align Bit Flush
Tail Stock
Dovetail Jig
When Stock is Wider Than Dovetail Jig:
When the stock is wider than the jig, cut all of your
pins, then scribe the outline of the last pin opening
on the right side of the jig before un-clamping. Once
scribed, un-clamp jig, slide the jig to the right, aligning
the last pin opening on the left side of the jig with the
scribed lines. Repeat this process for the entire width of
you stock.

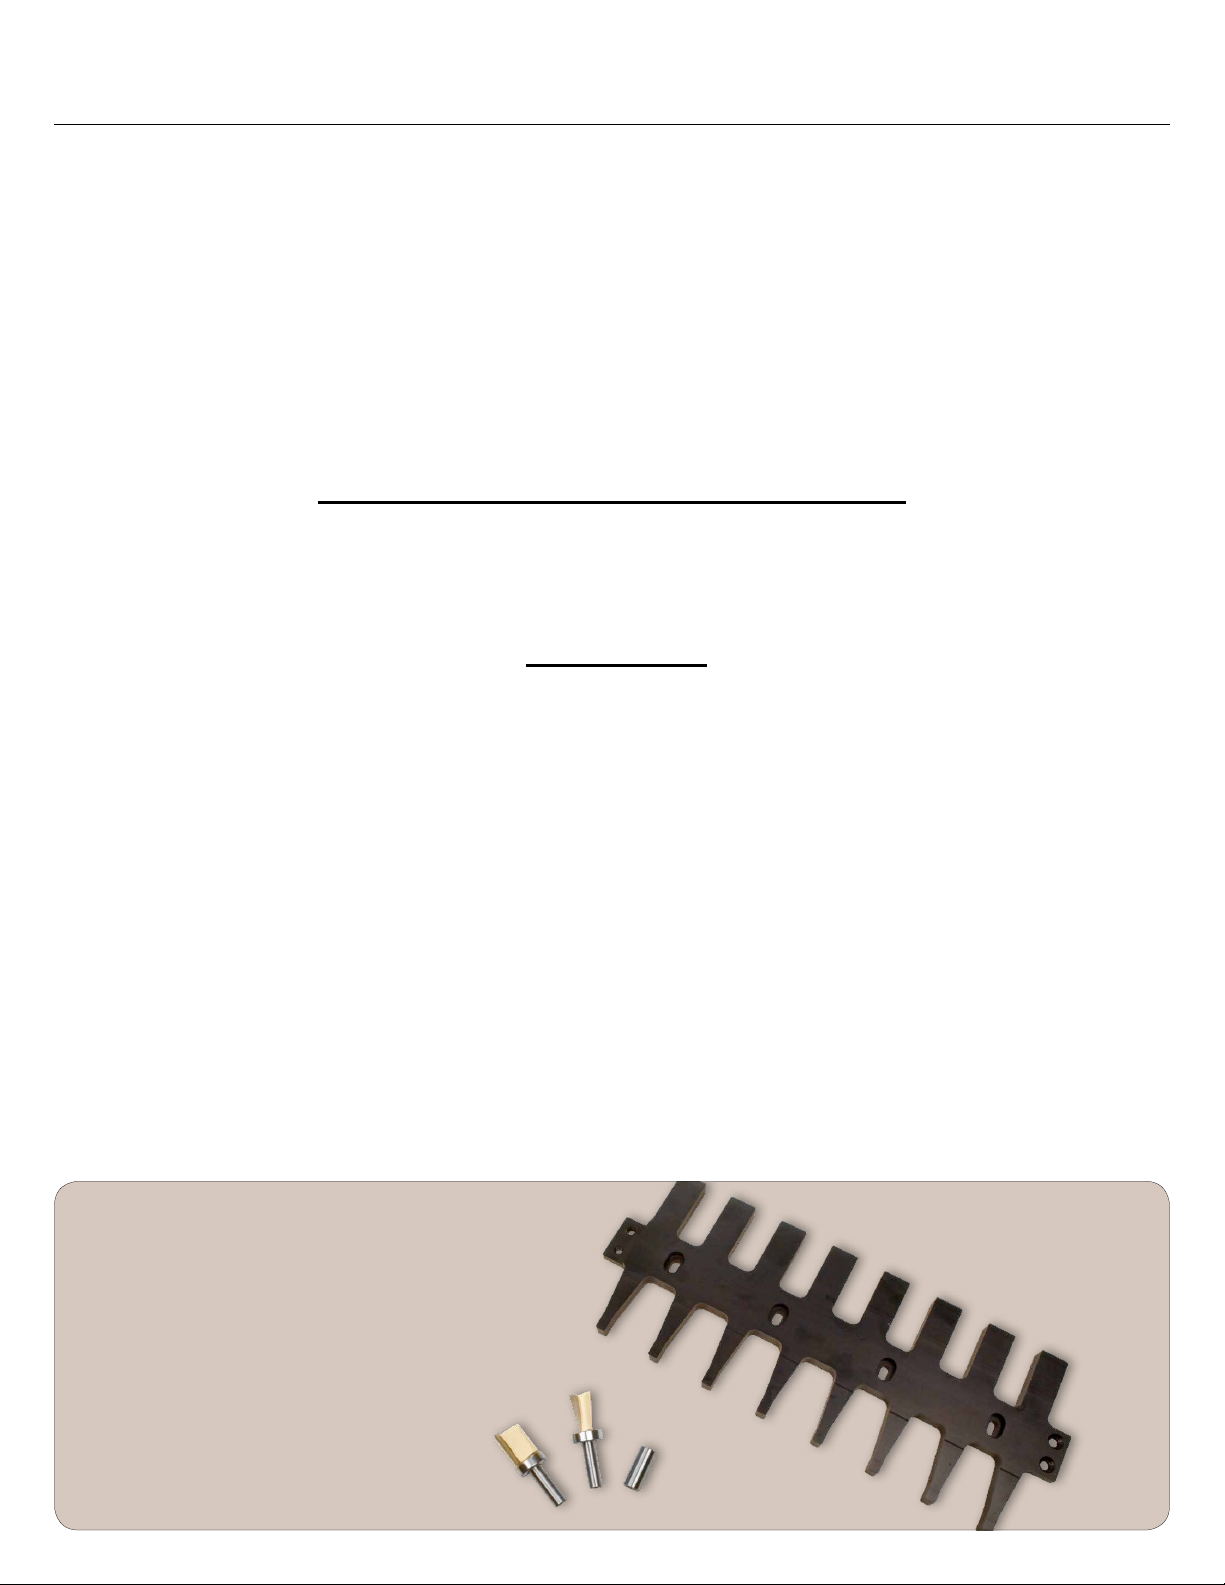
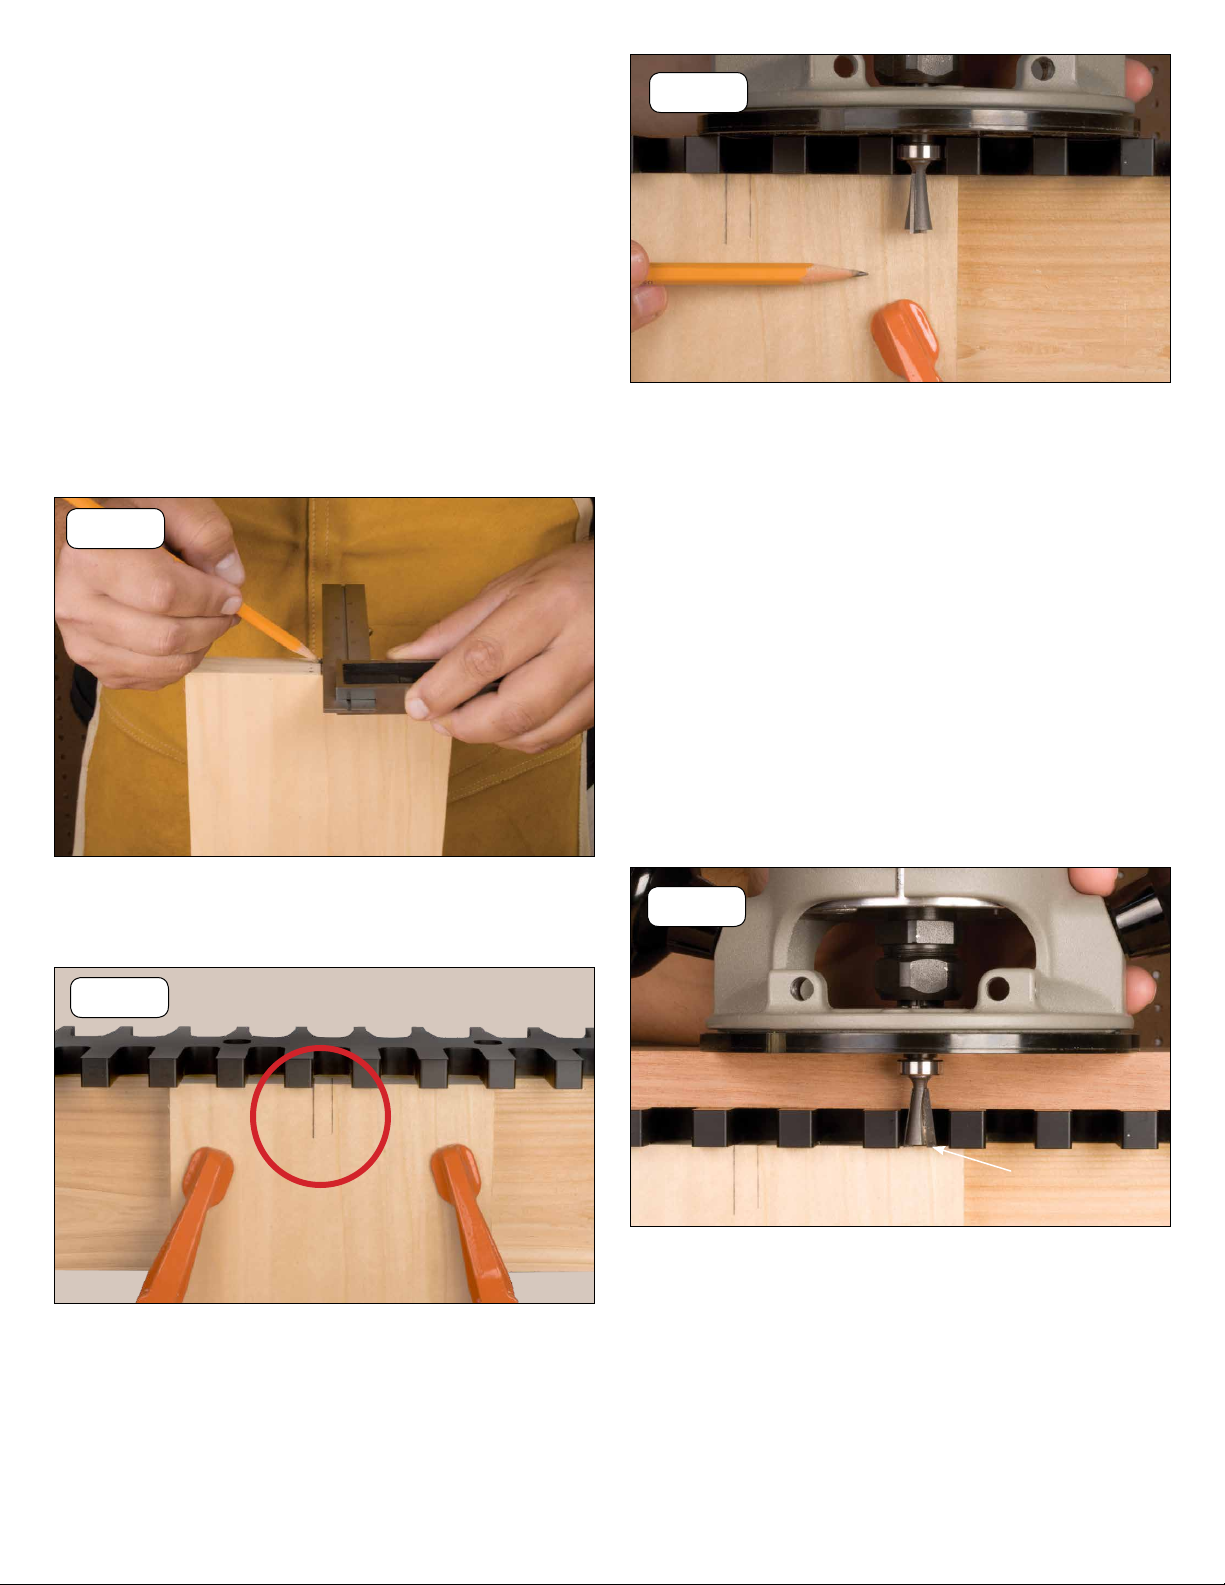
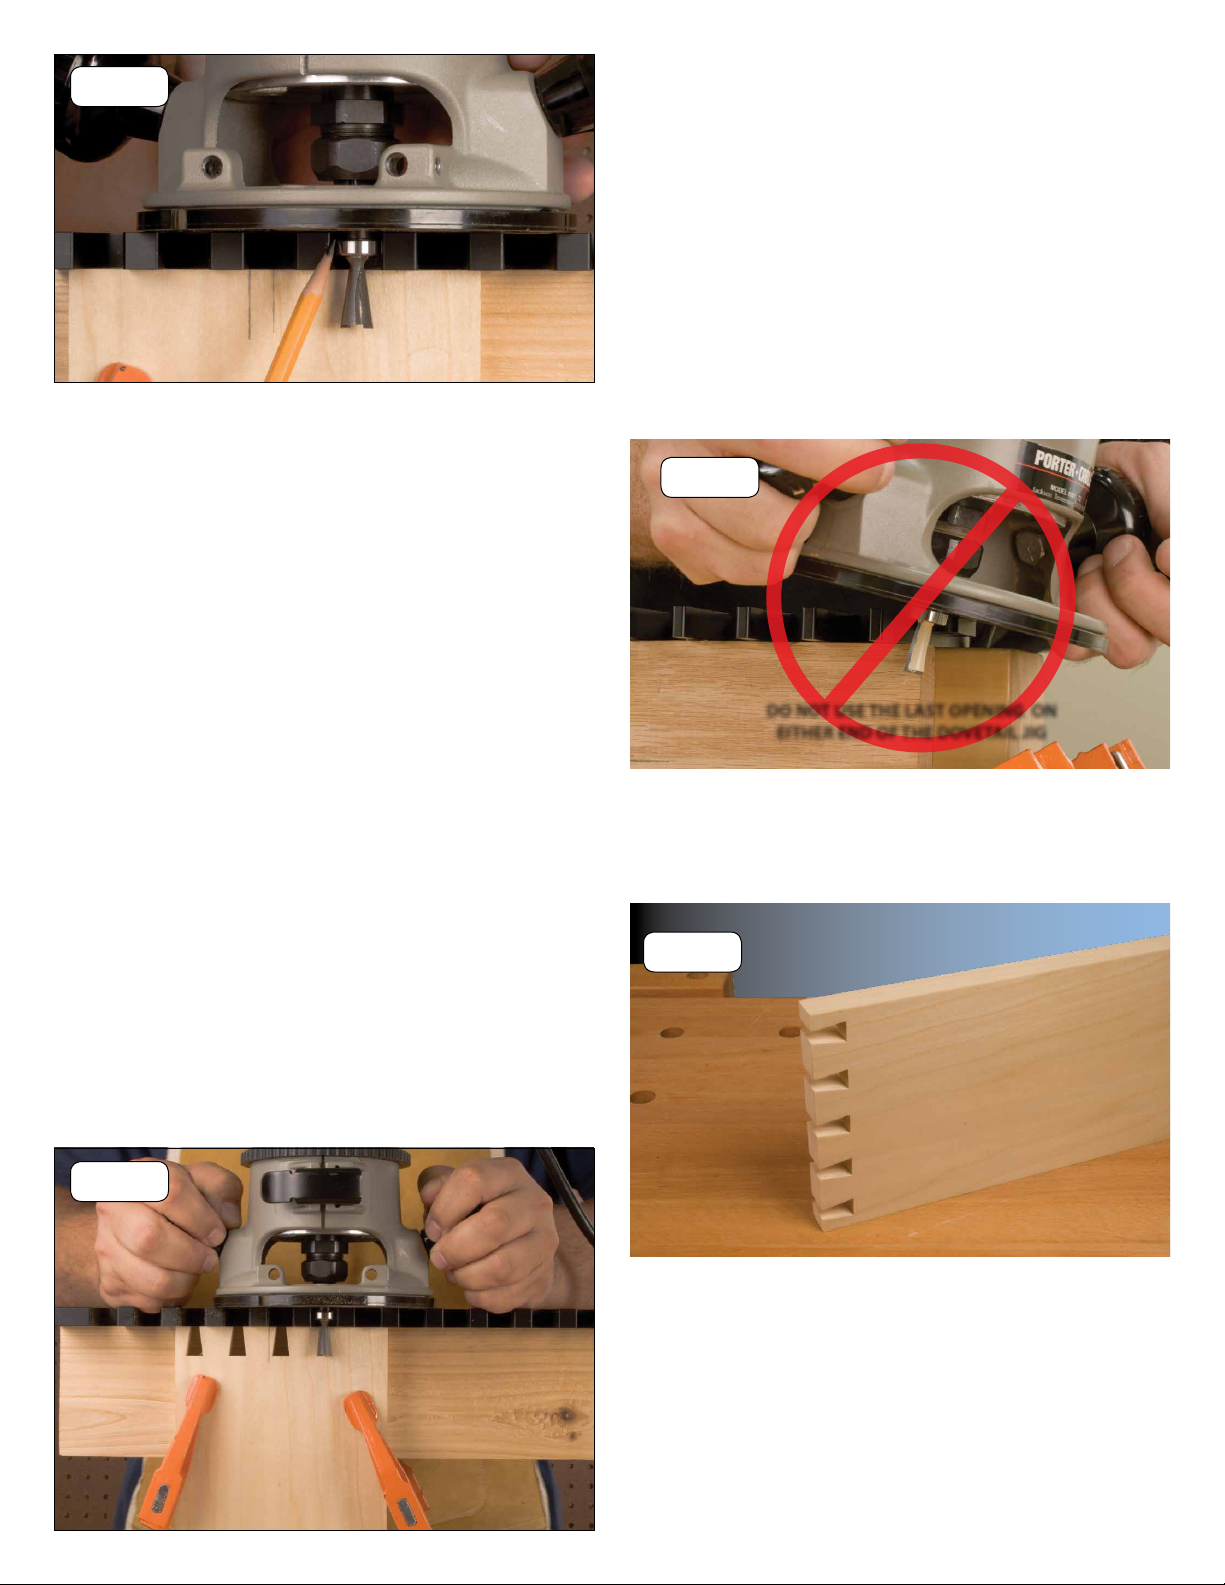
Assemble the Dovetail Joints:
Assemble the pin-board and the tail-board. The Joint
should have a snug - sliding t as shown in Fig. 18.
If you have to force the joint together with a mallet, it
may result in splitting the dovetailed sockets, as well as
forcing the glue out of the joint. To loose of a t, may
produce wobbling and a week dovetail joint. If you
have added the extra 1/32” or more to your joint, it can
now be cleaned up by sanding the joint ush after glu-
ing. If satised with the t of your dovetail joint - glue,
clamp and nish your project. If the dovetails are in
need of adjustment, this is done on the pin side of the
dovetail jig (follow steps below). The tail side or of the
joint remains the same.
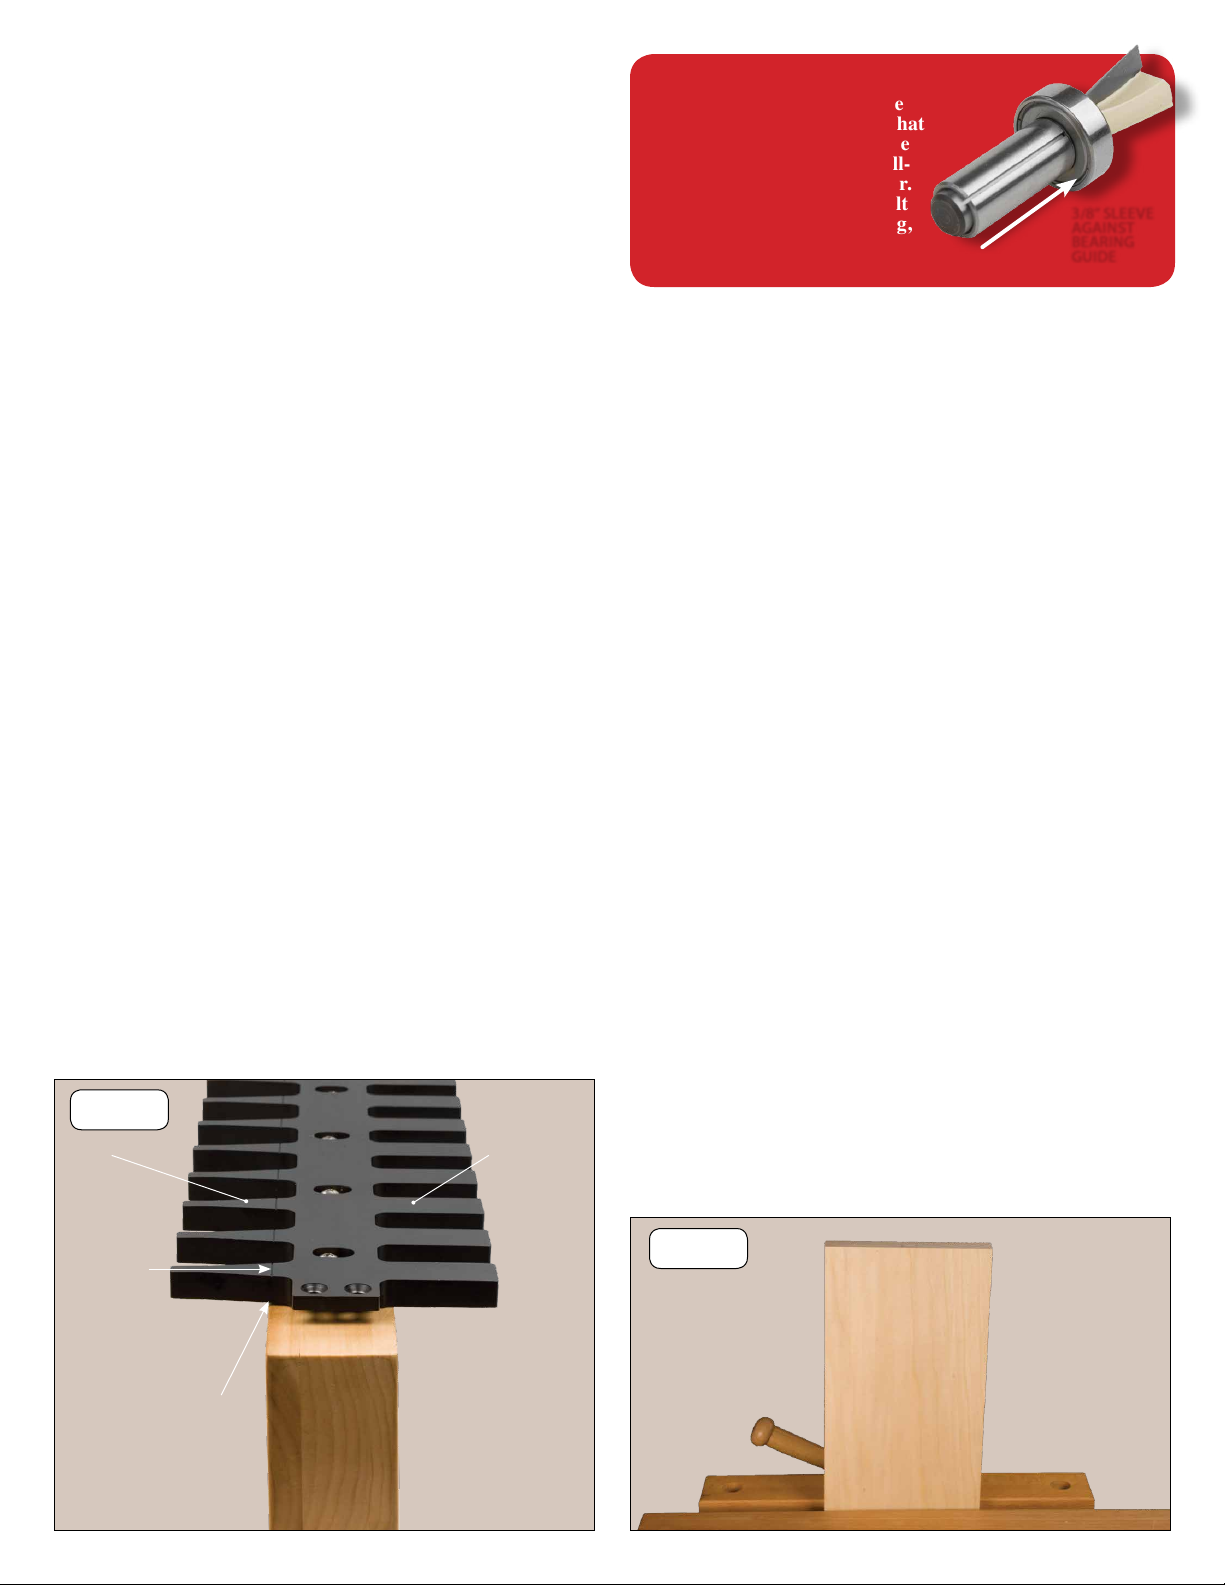
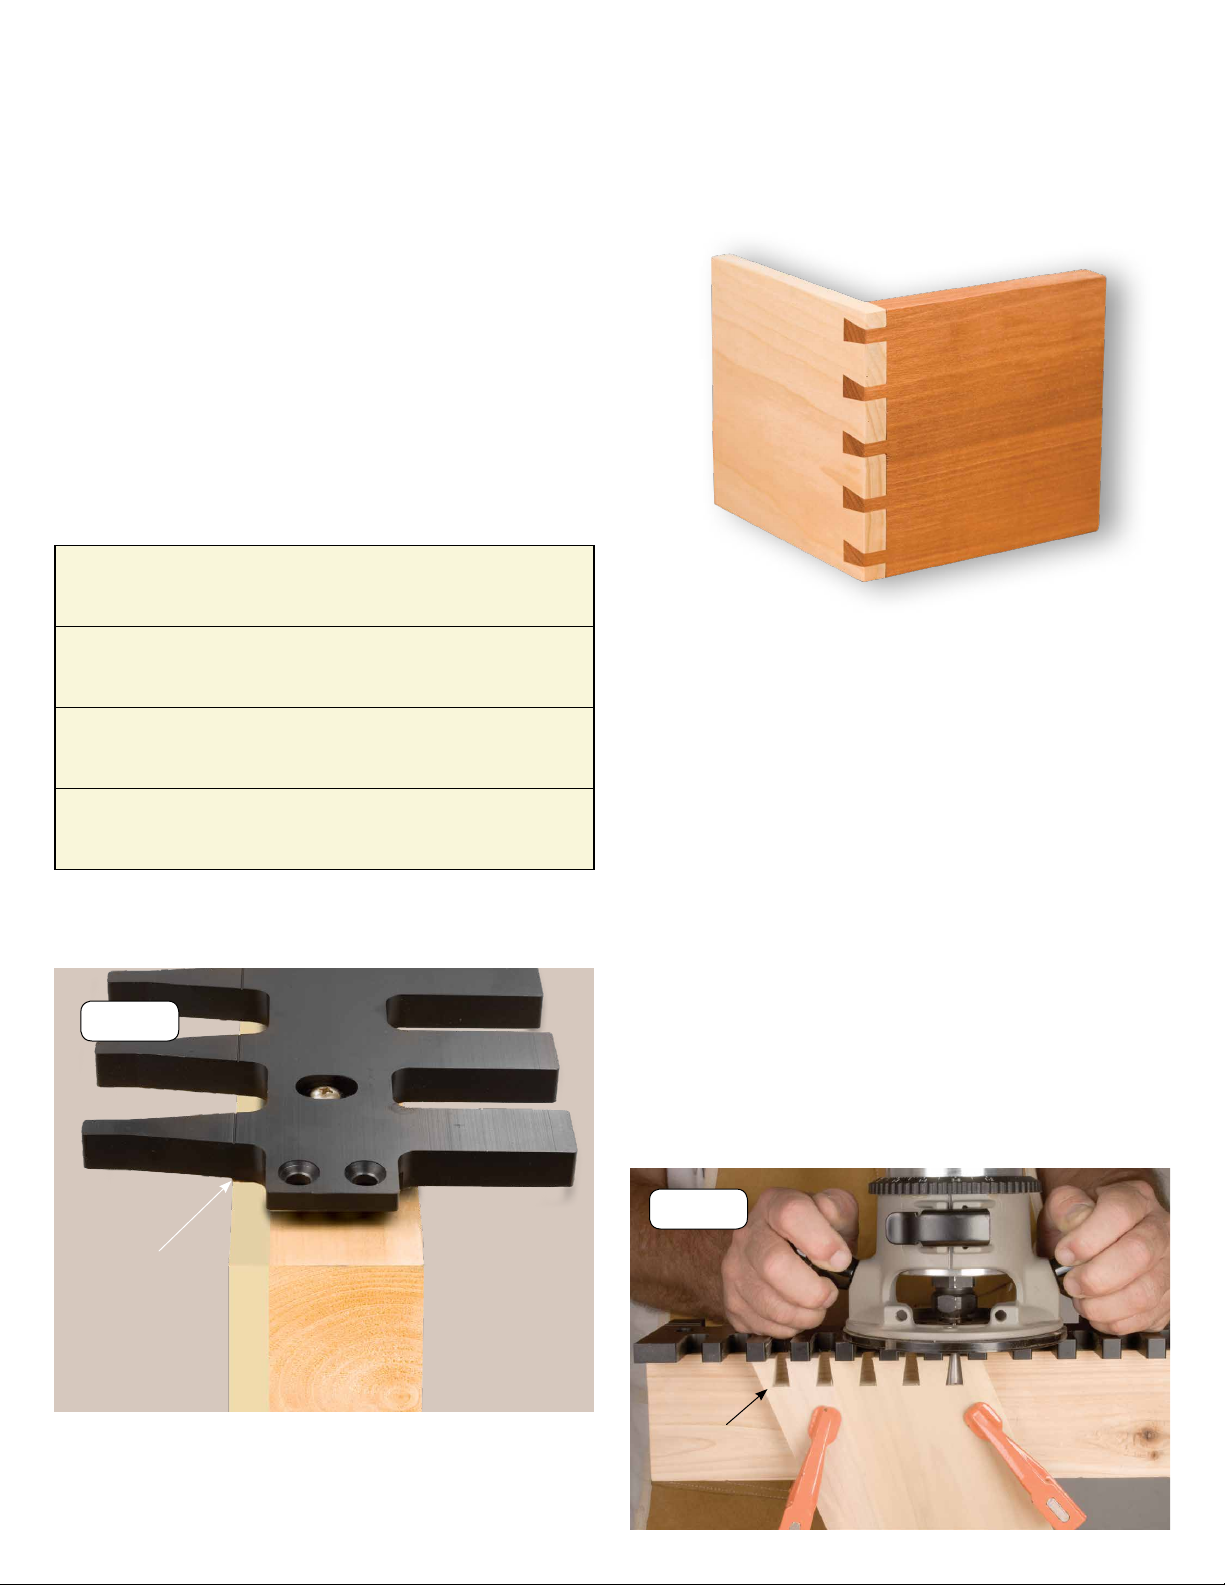
If Joints Are To Loose:
You will need to make the joint tighter, by making
the pins larger, lightly loosen the 4 screws that hold
the dovetail jig to the mounting block, just enough to
be able to tap the jig forward with a wooden mallet
or scrap block of wood (do not use a metal hammer
directly on jig as it may damage the dovetail jig). Tap
the dovetail jig forward on the mounting block. The
distance of this adjustment usually is made in .001”
depending upon how loose the joint is. Start out by
tapping the dovetail jig forward on the block .002” See
Fig. 19. This means that each pin size is increased by
.004” wider (.002” on each side of the pin = .004”).
Make sure your adjustment remains parallel across
the dovetail jig to the mounting block. Once adjusted,
tighten the four screws - repeat cutting process with dif-
ferent piece of stock until you obtain the desired t.
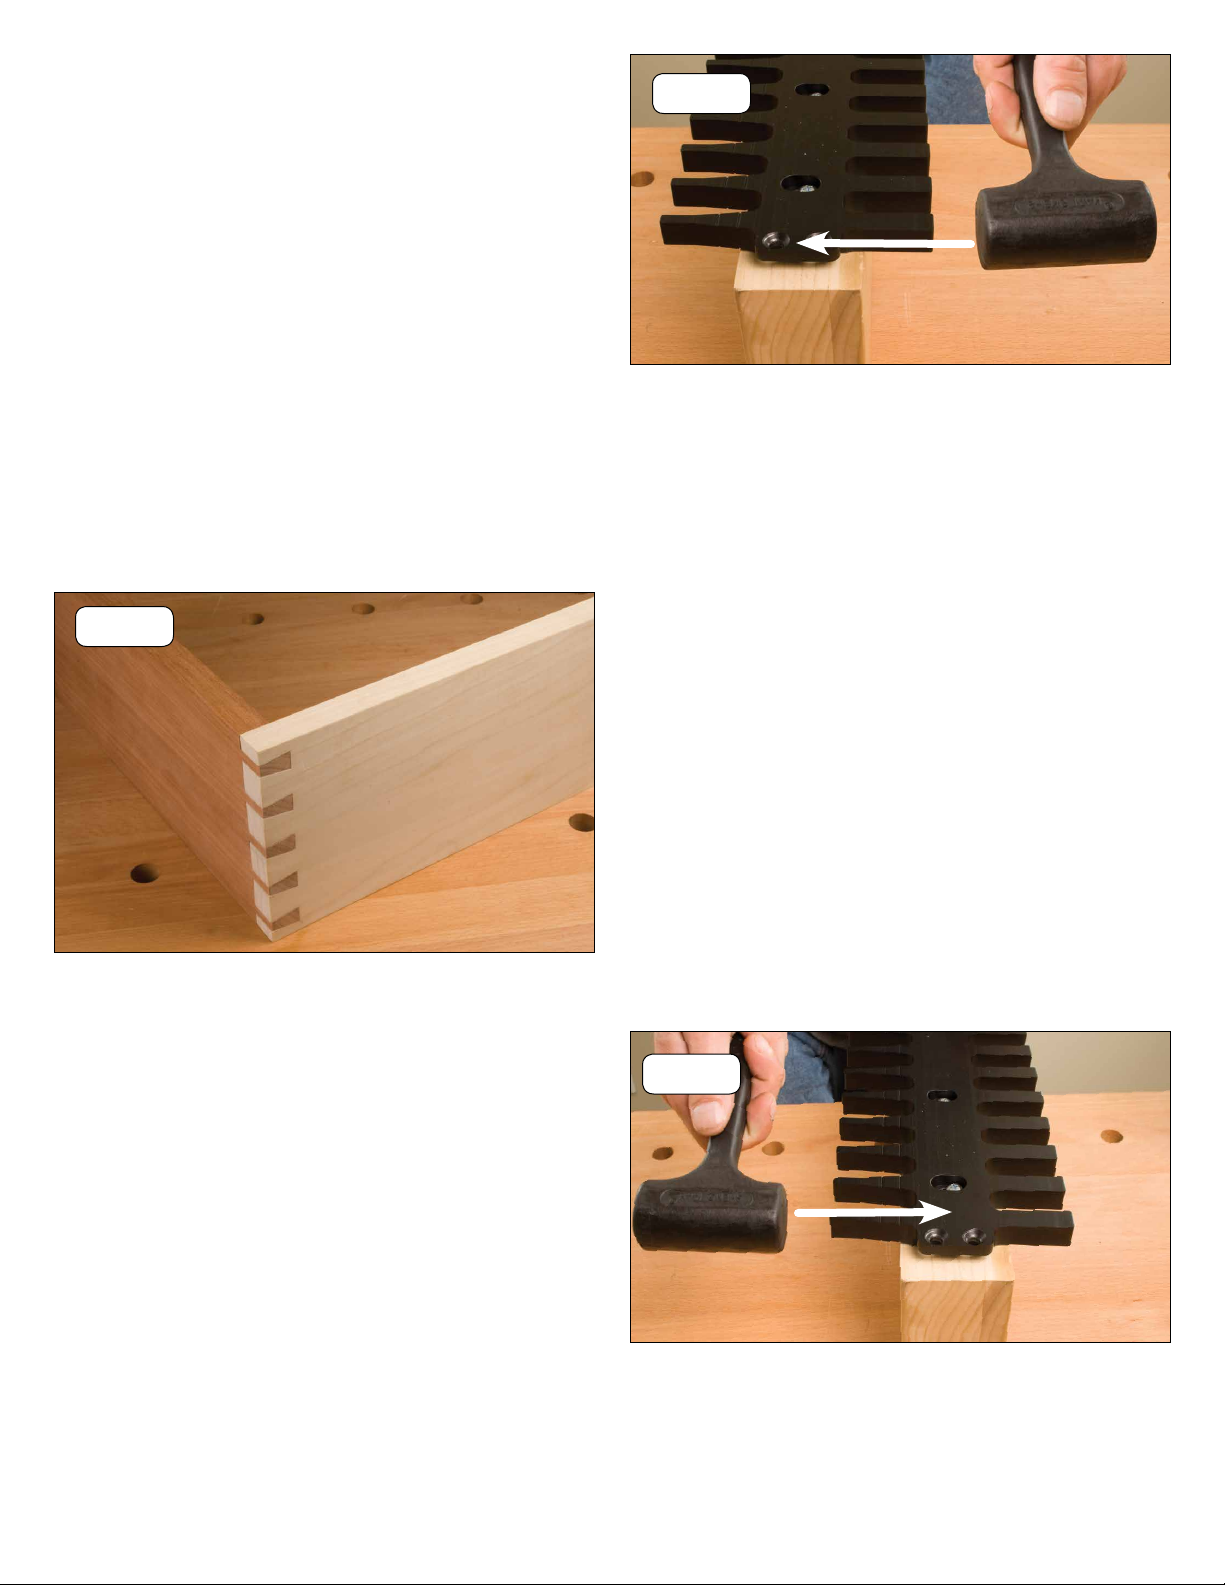
If joints are to tight:
You will need to make the joint looser by making the
pins smaller, slightly loosen the 4 screws that hold
the dovetail jig to the mounting block, just enough to
be able to tap the jig backward with a wooden mallet
or scrap block of wood (do not use a metal hammer
directly on jig as it may damage the dovetail jig). Tap
the dovetail jig backward on the mounting block. The
distance of this adjustment usually is made in .001” de-
pending upon how tight the joint is. Start out by tapping
the dovetail jig backward on the block .002”. See Fig.
20. This means that each pin size is decreased by .004”
smaller (.002” on each side of the pin = .004”). Make
sure your adjustment remains parallel across the dove-
tail jig to the mounting block. Once adjustment is made,
tighten four screws and repeat cutting process with dif-
ferent piece of stock until you obtain desired t.
Fig.20
Fig.19
Fig.18
Tap jig
Tap jig
Shop Notes:
When making test cuts it is important that your test
stock is exactly the same size thickness as your project
stock. Each time you change the thickness of your stock,
you must adjust the dovetail jig accordingly.
Shop Notes:
When making test cuts it is important that your test
stock is exactly the same size thickness as your project
stock. Each time you change the thickness of your stock,
you must adjust the dovetail jig accordingly.

Cutting stock two different thicknesses:
Your dovetail jig is capable of cutting different thick-
ness stock within the same joint. We used the standard
dovetail bit set that came with the dovetail jig to cut this
joint. The only adjustment that needs to be made is for
the height of the router bit for thickness stock we are
cutting. The example below shows the tail cut in 3/4”
stock and the pin cut made in 1” stock (See Fig. 23).
Keep in mind, when setting up for this type of cut, you
would set the bit up for the opposing stock thickness.
Which means the height of the router bit to make the
tail cut would be 1-1/2” and the pin cut router bit height
would be 1-1/4”. We achieved this setting by adding
1/2” (for the dovetail jig thickness) to the opposing
stock thickness.
Cutting stock thickness; 1/2” to 3/4”:
We have designed two optional
smaller router bits for your dovetail
jig. These router bits are used for
cutting 1/2” to 3/4” stock. In order to
use these bits, you must either attach
a spacer fence on you current mount-
ing block or make a wider mounting block.
Item # 3461
Thinner stock using “standard” bits:
You are able to do thinner stock using the bits that came
with your set, leaving a larger amount of cut-off waste.
Since the bearing of the bit must ride in the template by
1/8” or more, the standard bits will leave larger waste to
be removed once the joint is complete. See (Fig. 22)
Using your dovetail jig on a router table:
To use your Peachtree dovetail jig on a router table,
you will follow the exact same directions as detailed in
this instruction manual, with an exception. You do not
clamp your stock into your work bench vise. Once the
stock is clamped into your jig you will then ip the jig
with stock up-side down to be run on your router table.
(See Fig. 21)
Fig.21
Fig.22
Caution:
Make sure bearing contacts dovetail jig by at least
1/8” or more before starting cut. If bearing does not
contact jig properly it may result in injury or damag-
ing the dovetail jig. See Fig.15. In order cut dovetails
into thinner stock, you must use optional router bits
which are sold separately.
This joint shows 3/4” thick stock for the tails and 1”
stock for the pins.
Shop Notes:
When cutting with the optional router bits, follow the
all the instructions previously outlined in this manual.
Make necessary adjustment for thinner stock pieces.
1” thick
pin cut 3/4” thick
tail cut
Various Dovetail Jig Uses
Fig.23

Creating Angled Dovetails
Angled Dovetails:
Cutting angled dovetails is done the same way you
would do 90° dovetails. In this example we have a cut
22½° angle on our tail cut. Follow the instructions pre-
viously outlined in this manual to center the stock, then
clamp your jig to the stock and make the cut. Make sure
you position the jig to have at least 1/4” of stock on the
outer tail. See (Fig. 26)
Fig.24
Prepare The Mounting Block Thinner Stock:
In order to use the small router bit set for stock 1/2” to
3/4”, you must make the pins smaller. This is achieved
by adding a spacer (made out of MDF or solid wood)
to the face of your mounting block (Fig. 24) not in-
cluded. It it essential that the mounting block is accu-
rately machined so it is 90°to the dovetail jig. It can be
made from a solid block or laminated. For different size
dovetails we recommend you change your mounting
block to provide solid, continuous support when your
bit passes through the back of your stock. To determine
the thickness of your spacer, you will need to subtract
the thickness of the stock from 1-1/4”, see example’s
below.
Scribe Line
3/4” spacer
Shop Notes:
When cutting with the optional router bits, follow the
all the instructions for cutting pins and tails previously
outlined in this manual. To the adjust the tightness of
the joint with the small router bit set follow previously
outlined in gure 19 or 20 of this manual.
The example above shows the correct spacer attached
to the original mounting block for cutting 1/2” stock
using the small router bit set.
Fig.26
1/4”
minimum stock
Subtract Stock
Thickness Equals Spacer
Thickness
1¼” - ½” = ¾”
1¼” - ⁄” = ⁄”
1¼” - ¾” = ½”

Creating Skip Spacing Joints
Skip Spacing Dovetail Joints:
One of the unique features of this system is, you can
skip spaces between the tail cut and pin cut to vary the
size of the joint. You can also make and endless amount
of different widths by making one, cut an then sliding
the jig to one side and make a second cut to vary the
width of the joints. This following example will show
you the skip spacing method.
Completed Angled Tail Cut:
Your completed tail cut stock should look like the one
shown below. See (Fig. 27)
Completed Angled Pin Cut:
Your completed tail cut stock should look like the one
shown below. See (Fig. 29)
Making the Pin Cut:
Follow the instructions previously outlined in this
manual to align the stock to the jig, then clamp your jig
to the stock and make the cut. See (Fig. 28)
Please Note:
When using this method you will mark the location of
all the pins on the opposing stock.
Shop Notes:
You can use angled spacing blocks between your stock
and the jig to cut virtually any type of angle from acute
to obtuse. If you can clamp it to the jig you
can dovetail it.
Fig.28
Fig.27
Fig.29
Assemble the Angled Dovetail Joints:
Assemble the pin-board and the tail-board. The Joint
should have a snug - sliding t as shown in Fig. 30.
If you have to force the joint together with a mallet, it
may result in splitting the dovetailed sockets, as well as
forcing the glue out of the joint. To loose of a t, may
produce wobbling and a week dovetail joint. If you
have added the extra 1/32” or more to your joint, it can
now be cleaned up by sanding the joint ush after glu-
ing. If satised with the t of your dovetail joint - glue,
clamp and nish your project. If the dovetails are in
need of adjustment, this is done on the pin side of the
dovetail jig (refer previous instruction for joint adjustment).
Fig.30

Cutting The Tail:
We will be cutting every other tail cut on the jig. Fol-
low the instructions previously outlined in this manual
to center the stock, then clamp your jig to the stock and
make every other tail cut. See (Fig. 31)
Fig.29
Completed Skip Spacing Of Tail Cut:
Your completed tail cut stock should look like the one
shown below. See (Fig. 32)
Marking Stock to be Removed:
Once you have marked the locations of your pins, use a
magic marker or pencil to mark the stock to be removed
between the pins. See (Fig. 34)
Making The Pin Cut:
Pin cuts are always made after cutting the tails. The
reason for this is, you will use the tail cuts to layout the
positioning of the pins of your joint. You will follow the
instructions previously outlined in this manual to align
the stock to the jig with one exception; you must mark
all of the pin locations on the stock to be cut.
Making Pin Cut Locations:
To mark the location of the pins you will use the tail
stock piece you just cut as marking guide. Position the
tail stock on top of the pin board in the correct right
angle position See Fig. 33 . Make sure all three edges
line up ush with the pin board (piece to be cut). Using
a utility knife, scribing knife or a ne tipped pencil
mark the location of ALL dovetail openings on the end
grain of the pin board.
Fig.32
Fig.33
Fig.34
Fig.31

Stock removal of pin cuts:
Follow the instructions previously outlined in this
manual to align the stock to the jig for the pin cut, then
clamp your jig to the stock, set your bit height and
make the cut. The rst pass you will remove the stock
in every pin cut opening. Your completed pin cut should
look like Fig. 35. Take note, the pins that still have the
magic marker on them need to be removed. You can use
your band saw or a hand saw to remove them, or follow
instructions below on how to use your dovetail jig to
remove the excess pin material.
Make The Cut:
When making the cut, be sure to only remove the stock
that has been marked. See (Fig. 37)
After making the cut, remove the jig - and your stock
should look like this, See (Fig. 38). Note, there will be
a small piece of the pin left that needs to be removed.
Removing Excess Pins:
Slide the jig to the Left and align the jig so that the back
edge of the ngers rest on part of the pins See (Fig. 36),
then clamp your jig to the stock. Note that we will be
removing the stock that still has the markings on it.
Removing Excess Pins:
Slide the jig to the Right and align the jig so the back
edge of the ngers rest on part of the pins See (Fig. 39),
then clamp your jig to the stock. Note that we will be
removing the stock that still has the markings on it.
Fig.35
Fig.36
Shop Notes:
The Dovetail jig must rest at on part of the pins to
maintain the correct depth of cut, which will provide a
stable work surface.
Stock to be removed
Fig.37
Fig.38
Stock to
be removed
Fig.39
Stock
to be removed

Make The Cut:
When making the cut, be sure to only remove the stock
that has been marked. See (Fig. 40)
Stock to be removed
Shop Notes:
The Dovetail jig must rest at on part of the pins to
maintain the correct depth of cut, which will provide a
stable work surface.
Shop Notes:
When using either method of skip spacing or slide spac-
ing, the jig must rest at on part of the pins to maintain
the correct depth, which will provide a stable work
surface.
Completed Skip Spacing of Pin Cut:
Your completed tail cut stock should look like the one
shown below. See (Fig. 41)
This method of skip spacing has an endless amount of
possibilities when making your projects. It is up to you
as to which socket to skip. You can cut one, skip one,
cut one, skip one, or cut two, skip one, cut two - simply
mix it up. You will also use this same basic principal to
slide the jig one side to make wider pins and tails.
Fig.40
Fig.41
Assemble the Skip Spacing Joint:
Assemble the pin-board and the tail-board. The Joint
should have a snug - sliding t as shown in Fig. 42.
If you have to force the joint together with a mallet, it
may result in splitting the dovetailed sockets, as well as
forcing the glue out of the joint. To loose of a t, may
produce wobbling and a week dovetail joint. If you
have added the extra 1/32” or more to your joint, it can
now be cleaned up by sanding the joint ush after glu-
ing. If satised with the t of your dovetail joint - glue,
clamp and nish your project. If the dovetails are in
need of adjustment, this is done on the pin side of the
dovetail jig (refer previous instruction for joint adjustment).
Fig. 42

Overlapping the Tabs
The Peachtree Dovetail Jig has tabs on both ends of the
jig. The tabs allow you to secure two or more Peachtree
Dovetail Jigs together. Take 2 Peachtree Extendable
Dovetail Jigs and overlap the tabs (Fig. 43). Install the
two machine screws, but do not completely tighten.
Next, Place the extended jig assembly up against a
straight edge or ruler and make sure the jig is sitting ush
up against it. Check for any gaps between the jig and
the straight edge / ruler. Once the jig is at up against,
tighten the two machine screws rmly (Fig. 44).
Mounting The Extended Jig
Mounting the extended jig works the same way as mount-
ing a single jig. The only difference is the length of the
block. When making the block, follow the instructions
detailed in the beginning of this instruction booklet on
page 3 (Prepare the Mounting Block / Mount the Jig to the
Mounting Block, Fig. 1), but make the length of the block
at least 2½” longer than the jig on each end.
Installing the Micro-adjust Assemblies
The Micro-adjust assemblies (sold separately - part
#3444) t neatly on to the tabs of the dovetail jig tabs
with two machine screws. Before the Micro-adjust
assemblies can be installed, you must rst have your
dovetail jig mounted to the mounting block. When
mounting the jig, follow the instructions on page 3
(Mount the Jig to the Mounting Block, Fig. 1). Make
sure the screws that secure the dovetail jig to the
mounting block are only partially tightened (Fig. 45) to
allow for the installation of the Microadjuster.
Using the Micro-adjust
To make adjustments with the Micro-adjust assemblies,
slightly loosen the screws that hold the dovetail jig
to the mounting block. Next, turn the knob(s) on the
Micro-adjust assemblies clockwise /counter clockwise
to move the jig in and out until you nd your mark
(Fig. 47). Refer back to page 7 (gures 19 and 20) for
details on properly making adjustments to the t of
your dovetail joint. Once the jig is correctly adjusted,
be sure to tighten the screws that hold the dovetail jig to
the mounting block before making another test cut.
Slide the Micro-adjust assemblies under the tabs and
align with the pre-drilled holes. Secure the assemblies
with the machine screws. Next, align the dovetail jig
and the mounting block to the inner scribe line on the
jig. Secure the “L” bracket on the Micro-adjust to the
mounting block with 2 wood screws. Make sure there is
enough space between the “L” bracket and the edge of
the mounting block to prevent any splitting of the wood
(Fig. 46). Once the Micro-adjust assemblies are secured
to the jig and mounting block, tighten the screws that
hold the dovetail jig to the mounting block before mak-
ing your rst test cut.
Fig.45
Fig.46
Fig.47
Extending Your Dovetail Jig
Micro-adjust Your Jig
Note: For proper t
of the Micro-adjust
assemblies, the
mounting block must
extend at least 2½”
longer than jig on
each end.
partially
tighten
screws
attach Micro-adjuster
with machine screws
secure “L” bracket with
wood screws
rotate knob(s)
until you nd
your mark
Fig.44
Fig.43

Peachtree Dovetail Jig
The Peachtree Dovetail Jig is one of the most versatile jigs available. In this manual we have
outlined several dierent types of joints as well as thickness stock that can be made. The
possibilities that can be applied are virtually endless. Thank you for your purchase and we
hope you enjoy your brand new Peachtree Dovetail Jig!
Table of contents
Other Peachtree Woodworking Supply Tools manuals
Popular Tools manuals by other brands

OEM Tools
OEM Tools 27402 Operating instructions and parts manual

M-Power
M-Power DIAMOND STONE instruction manual

Power Fist
Power Fist 8685042 Assembly & installation

PROPOINT
PROPOINT Solid Deck Cargo Ramp manual

Far Tools
Far Tools PM 550T manual

Hellermann Tyton
Hellermann Tyton AT2000 CPK bench mount kit operating instructions

Welbilt
Welbilt 103185 owner's manual

Hellermann Tyton
Hellermann Tyton Autotool CPK hybrid operating instructions

Wesco
Wesco 272301 Operating instructions and parts manual

Equalizer
Equalizer Terminator TSK710 user guide

OEM Tools
OEM Tools 25727 Operating instructions and parts manual

KNECHT
KNECHT USK160S operating instructions