Pedego CITY COMMUTER & INTERCEPTOR Quick start guide

PEDEGO ELECTRIC BIKES
CITY COMMUTER & INTERCEPTOR
ASSEMBLY INSTRUCTIONS AND OWNERS MANUAL

Pg. 2 Pg. 3
Carton Contents 2
Assembly Instructions 4
Safety 8
Operating Procedures 9
Charger 10
To Recharge the Battery 10
Battery and Charger Care 11
Fuse 11
Pedal Assist Mode 12
Meter Programming 13
Hand Throttle Control 14
Lights 14
Gears 15
Brakes 16
Appearance Care 17
Warranty 18
Commonly Asked Questions 20
Warning 21
Your Bike Information / Serial Number 23
Carton Contents
Pedego Bike
Pedals (2)
Owner’s Manual/Assembly Instructions
Lithium Ion Battery
Keys for Battery
Tool Kit
Battery Charger
Table of Contents

Pg. 2 Pg. 3
Pedego Electric Bikes
Welcome to the POG
First of all, we would like to thank you for choosing the Pedego electric bike.
We believe this technology, with the benets of electric propulsion,
provides you with the perfect vehicle to increase your personal mobility.
Our geared, brushless, electric hub motor allows you to run errands
or commute to work while saving money on gas and reducing your
environmental impact on our world. It also gives you the opportunity
to pedal if you want to get exercise along the way.
All this and it is just plain fun to ride!
If you have any concerns, questions or suggestions about the Pedego electric
Pedego!
PLEASE NOTE:
This manual is not intended as a detailed user, service, repair or maintenance manual.
Please seek assistance from a qualied technician for service, repairs or maintenance.

Pg. 4 Pg. 5
5. Insert the handlebar stem into the head tube on the bicycle. You may adjust
the height of the handlebars by moving the stem up or down to your comfort
level. Make sure the handlebars are aligned with the front wheel before tight-
ening and that the stem is not set above the maximum height indicator. Place
your thumb on the black locking mechanism on top of the stem, push down
and lift the lever up exposing the adjustment screws.
Assembly Instructions
Your bike has been pre-assembled and requires only a few simple steps to
get it ready for you to ride:
1. Remove the outside carton after cutting the nylon bands by lifting off the
entire box from the tray at the bottom.
2. Remove all the inside cardboard protection and bubble wrap.
3. Please locate and set aside the kit box containing the battery charger and
tool kit.
4. Carefully remove your bike from the bottom tray and gently rest it in place
with the kickstand down.
If the disc brakes are rubbing after installation, refer to Customer Help on our
website at www.pedegoelectricbikes.com/faqs/customerhelp/
For City Commuter

Pg. 4 Pg. 5
Figure 1. Figure 2.
3
3
Figure 3. Figure 4.
Move the stem so that you can see directly down the hole (Figure 1). Insert
the 6 mm allen wrench, supplied in the kit, into the hole and tighten the screw
clockwise until the handlebars do not move separately from the front wheel
(Figure 3).
In order to get the bolt securely tighten you may need to use a pair of plyers for
leverage (Figure 4).
Position the handlebars to your comfort level and lock handlebars into place
by pushing the handle back down. If handlebars move up or down after
pushing handle down, you can tighten the screw indicated in gure 2 with a
5 mm allen wrench in your kit.

Pg. 6 Pg. 7
5. The handlebars must be adjusted for height and align-
ment. First, remove the rubber protective cap and insert
the handlebar stem into the frame of the bicycle. With the
allen wrench provided in the tool kit, tighten the screw on
top of the stem underneath the rubber protective cap to
secure the handlebars in place. Make sure the handle-
bars are aligned with the front wheel before tightening
and that the stem is not set above the maximum height
indicator.
If need be, the angle of the handlebars may be positioned to your personal prefer-
ence. Loosen the front 2 bolts on the front stem plate and angle the handlebars
to your liking, then securely tighten the 2 bolts on the front stem plate. Make sure
that, when tightening, there is even spacing between the top and bottom bolts to
ensure maximum stability.
For Interceptor

Pg. 6 Pg. 7
6. Make sure the seat is tight enough so
that you can’t twist it out of alignment. Pull
the seat clamp handle away from the seat
post and slide the seat up or down to adjust
it. Move the clamp handle inward toward
the seat post so it is held tight by the clamp.
If necessary, tighten the clamp by twisting
the clamp handle clockwise while in the un-
clamped position. Then, fold the handle in
toward the seat post. This should require a
fair amount of force to ensure the seat post
is held tight. If necessary, the clamp can be
further tightened with an allen key when in
the clamped position. Make sure the seat
is not set with the vertical maximum height
marks above the clamp.
7. PLEASE NOTE – The pedals are marked
“L” for Left and “R” for Right. Using the
wrench provided in the tool kit, attach and
tighten the pedals. The left pedal is at-
tached by turning it counterclockwise and
the right pedal is tightened by turning it
clockwise.
3

Pg. 8 Pg. 9
Helmet:
Always wear an approved helmet while riding your Pedego and follow the helmet
manufacturer’s instructions for t, use and care of your helmet. It is your respon-
sibility to familiarize yourself with the laws of where you ride your Pedego and to
comply with all applicable laws.
Mechanical Safety Check:
Check the condition of your Pedego before every ride. Make sure no nuts, bolts
or xings are loose, with particular attention to the axle nuts and handlebar stem.
Make sure the tires are correctly inated with 30 psi minimum to 65 psi maximum
air pressure. Check the brakes for proper operation.
You must take your bike in to be serviced and checked by a qualied bike me-
chanic before 100 miles of riding. This is a standard good practice for any new
bike as cables will stretch and components will ‘bed in’. The service must include
spoke tensioning for both front and rear wheels.
Your First Ride:
When you buckle on your helmet and go for your rst ride, be sure to pick an
area away from cars, other cyclists, obstacles or other hazards in order to be-
come familiar with the controls, features and performance of your new Pedego.
Additional Passengers:
The Pedego bikes are designed for one passenger only. DO NOT carry any
additional passengers on the front or rear of the bike. The rear carrier is not de-
signed to carry the weight of any additional passengers, including baby carriers.
Safety

Pg. 8 Pg. 9
To be able to use the electric motor, the battery must be mounted by sliding the
fully charged battery forward into the battery holder.
The key locks the battery to the bike when the key is turned counterclockwise to
the locked position. The battery must be locked when riding or it may fall out. The
key does not have to be in to operate the bike.
The on/off switch is located on the bottom of battery. After inserting and locking
the battery into place, turn the battery on by ipping the switch to the “|” position.
Be sure to turn off the power when the Pedego is not in use or is recharging by
turning the battery on/off switch off.
You can ride it like a normal bike by leaving the switch in the off position.
3
On Off
Battery
Operating Procedures
Locked Open

Pg. 10 Pg. 11
Charging plug for 48 volt battery
City Commuter, Interceptor &Comfort
Cruiser
Charging plug for 36 volt battery
City Commuter & Comfort Cruisers
Included with your new Pedego is a lithium
ion battery, along with a charger, which
plugs into a standard 110 volt household
electric receptacle
A lithium ion battery requires specially de-
signed chargers. You should never charge
your battery with a substitute charger that
is not designed for this use. Use of an
unsuitable charger to charge a lithium ion
battery could result in over-heating, re or
even explosion.
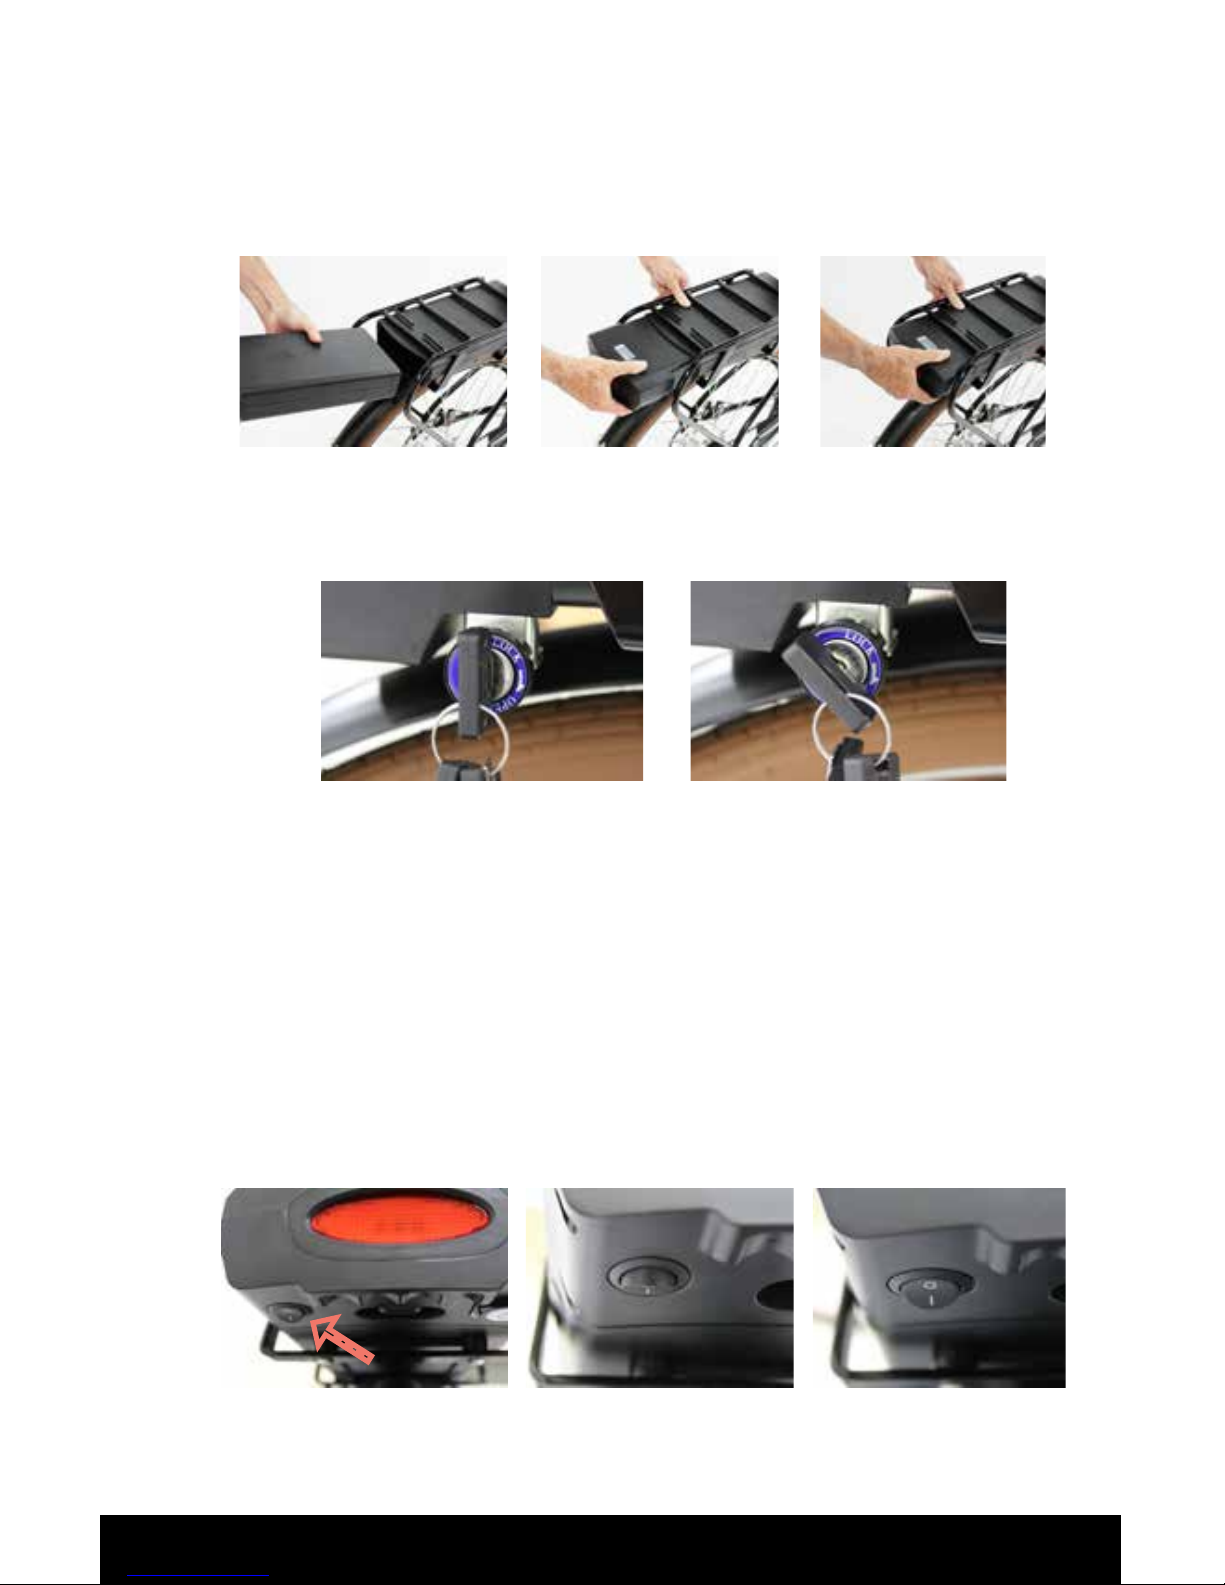
The Pedego battery may be charged while
on the bike or removed and charged at a
location away from the Pedego in a dry
location. The battery is easily removed by
turning the key switch to the open position,
grasping the rear of the battery, and sliding
the battery to the rear of the Pedego.
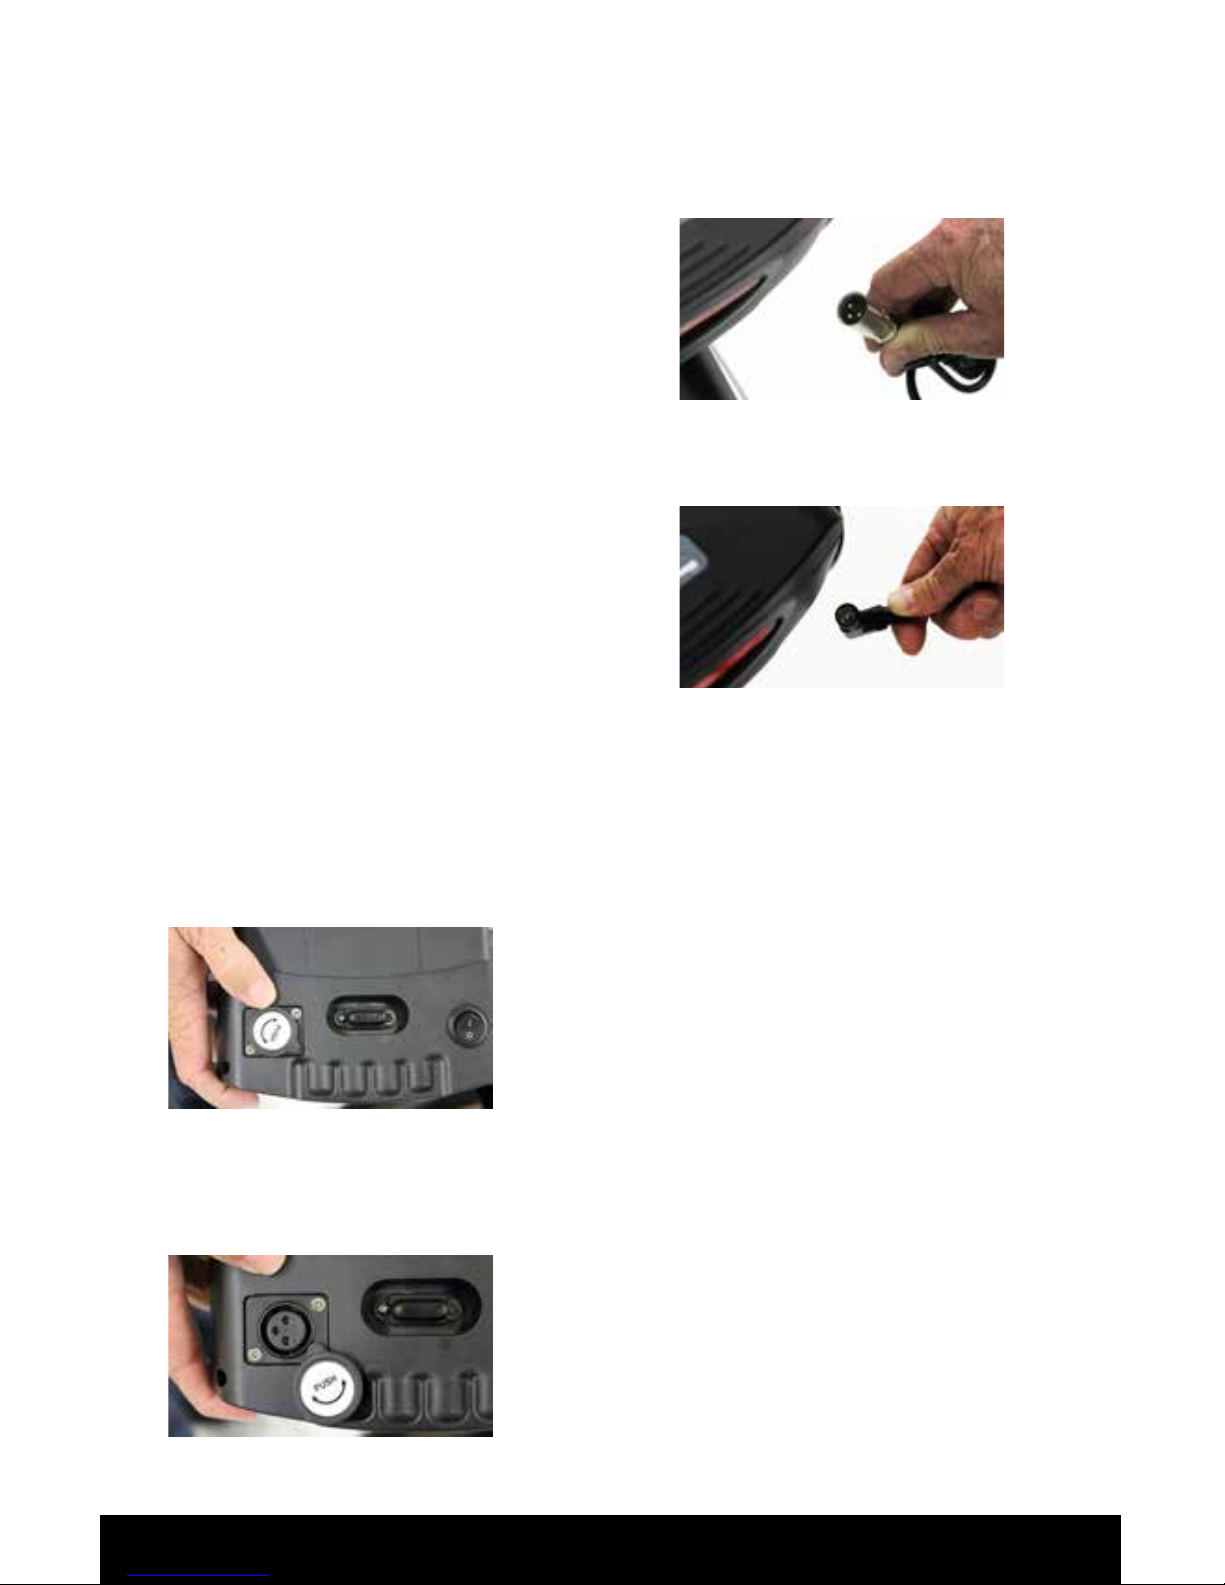
To charge the battery, plug the charger
into an AC outlet. The LED indication light
should be green showing the charger is
working normally. Then plug the char-
ger into the charging port located on the
bottom of the battery by sliding open the
charger cover (Figure 6) and inserting the
plug.
Recharge the Battery
Figure 5.
Figure 6.
Battery and Charger

Pg. 10 Pg. 11
The charger will charge the battery in 4—6 hours. The indicator light on the char-
ger will be red when battery is charging and will turn green when fully charged.
-Recharge battery after every use.
-Do not open or alter the battery or the battery charger.
-Do not place the battery near re or corrosive substances.
-Do not immerse in water or other liquids.
Avoid subjecting the battery to high temperatures, such as directly under the sun,
for prolonged periods of time. Recharge the battery before it becomes com-
pletely discharged. Completely discharging will reduce the numbers of recharging
cycles during the battery’s life and limit the capacity. Never store the battery in a
discharged state. After much use, your battery’s charge holding capacity will de-
crease. If you nd that your battery does not hold sufcient charge even for short
trips, you should contact your dealer to order a replacement.
If the battery will not be used for an extended period of time, charge it fully and
recharge it every 3 months. Store it in a cool, dry place. Your Pedego battery
is engineered with precision for high capacity and a long, useful life. Do not
use it to power other electrical devices. Improper use of the battery will dam-
age the battery and shorten its useful life, and may cause re or an explosion.
If you experience unusual sounds or odors coming from the charger or the
battery, unplug charger immediately and contact Pedego customer service at
There is a fuse located on the bottom side of the battery,
between the charging port and the On/Off switch, which is
designed to protect the battery. If the fuse blows, there will
be no power to any of the electrical components powered
by the battery. You can replace the fuse with a standard
automotive 40 amp fuse or contact Pedego customer
An extra fuse is provided in the kit with every Pedego.
Battery and Charger Care
Fuse
3

Pg. 12 Pg. 13
Operating the Bike
Pedal Assist Mode
Your Pedego is equipped with a meter that monitors the pedal assist power level,
speed, odometer and battery energy level. To turn the meter on, make sure the
battery on/off switch is in the on position. Press the on/off (top) button on the four
button selector located near the left grip on the handlebars to turn the meter on.
You can adjust the pedal assist power level to have more power by hitting the
up arrow button (third button) and can move to a lower level power by hitting the
down arrow (fourth button). If you set the pedal assist power level to “0”, then the
pedal assist function of the bike is disengaged and the bike can be powered by
the throttle on the right grip. When rst riding your Pedego, you will notice that
when the pedal assist function is activated, the motor will supply power when
you turn the pedals forward. In pedal assist level 1, you will get assistance at
around 40% of the maximum power from the motor. In level 5, you will get 100%
assistance from the motor. Experiment with the different levels of pedal assist to
become familiar with how much power you get. You will want different levels of
assist for different riding conditions. When not riding the bike, you can turn off the
meter by holding down the on/off button (top button) for several seconds. Press
set (second button) to switch the display information. The order is: odometer, rid-
ing distance, riding time and maximum speed.
distance/odometer
battery indicator
speedometer
pedal assist level
(power level)
3
3
3
3

Pg. 12 Pg. 13
Meter Programming
The LCD meter on your Pedego can be programmed to change various functions
like tire size, max speed, etc.
To clear the riding distance, riding time and max speed settings, hold down the
DOWN button (fourth button) for 3 seconds.
To change the tire size setting, hold the SET button (second button) for 10
seconds and then select the correct tire size. The City Commuter bike has been
preset to 28 inch, the Interceptor has been preset to 26 inch, and does not need
to be changed.
To change the MPH or Km/H setting, hold the DOWN button (Fourth button)
down for 9 seconds. Your bike is preset for MPH. Press the SET button (second
button) to save program settings and exit.
Tires
The tire tubes contain a chemical substance to reduce the chance of deation
when contacted with a road hazard. Tires should not be deated unless neces-
sary. A green substance will be discharged from the air valve when deated. It is
not harmful unless it is ingested.
To minimize tire wear and for maximum riding safety, comfort and handling,
maintain front and rear tire air pressure between 40 and 60 psi. Use a reliable
tire air pressure gauge to check for proper ination before every ride. At the same
time, inspect tires for excessive wear and cracks in the sidewall. Replace tires
if necessary. Pedego recommends inating tires with SLIME®, or purchasing a
bicycle tube that contains SLIME®, which can be purchased at most bicycle sup-
ply stores.

Pg. 14 Pg. 15
Hand Throttle Control
When the pedal assist mode is set to “0”,
the pedal assist function does not engage
and the throttle will accelerate the bike
forward.
The throttle control is operated on the
right hand side. You control the throttle
by twisting it from its resting position. The
farther the throttle switch is from its rest-
ing position, the more power is delivered to the motor to accelerate the Pedego.
When you want to slow down, you simply release the throttle and let it return to
its resting position, and simultaneously apply the brakes if necessary.
You do not need to pedal the Pedego if you use the hand throttle. However, you
can pedal while commanding the throttle. If you do pedal while using the throttle,
you conserve energy and the battery charge will last longer.
Lights
Your Pedego comes equipped with integrated front and rear lights. To turn the
lights on, push the on/off button (Top button on your display). To turn lights off,
repeat pushing down the on/off button.

Pg. 14 Pg. 15
Keys
The keys do not turn the battery on or off, they are used to lock the battery into
place. Always make sure that the key position is in the “open” setting when
removing or inserting the battery. Move the key to the “lock” position to secure
battery before operating bike. Riding the bike with the key in the “open” position
risks allowing the battery to slide out and damage the battery when dropped
(Refer to page 9).
Always remove battery from bike when transporting on a bike rack.
Gears
Your Pedego is equipped with 7 speeds on the City
Commuter and the Interceptor. The rst gear is for
easier and uphill pedaling, and the last gear is for maxi-
mum speed on level or downhill terrain. Change gears
only while pedaling. The rear wheel contains seven
chain sprockets. When the chain is around the largest
sprocket, you are in 1st gear, or the lowest gear. The
high gear will have the derailleur positioned so that the
chain is directed around the smallest gear.
Every position on the gear selector should
cause a gear change. Adjustments require
ne tuning and should only be made by a
qualied technician.
Avoid changing gears very rapidly from rst
gear to the last gear or vice versa. If you
change multiple gears too quickly, you could
have the chain come off the front sprocket.

Pg. 16 Pg. 17
Brakes
Your Pedego is equipped with disc brakes for maxi-
mum reliability. Applying hand pressure to the brake
levers will cause the wheel brake to cause friction
against the brake disc, slowing the wheel. The more
hand pressure applied to the brake lever, the faster the
Pedego will come to a stop. The rear brake should always be applied before and
while the front brake is applied. Applying only the front brake to slow or stop at
high speeds may result in the rider being ejected from the saddle and continu-
ing forward over the handlebars. It is best to apply even pressure to both brake
levers when slowing or stopping.
Bicycles equipped with disc brakes will occasionally make a slight scraping noise
when the wheels are turning without the brakes being applied. This is normal.
Insure that the brake lever does not contact the handle bar when full hand
pressure is applied (Figure 8). If so, then the brakes must be adjusted by
increasing the tension on the cable.
A quick and small adjustment may be made by unscrewing the threaded
adjuster at the hand lever until the brake is tightened sufciently for
safe stopping (Figure 7). If the brakes are still not functioning correctly, they may
require inspection and further adjustment by an experienced bike mechanic.
3
Figure 7. Figure 8.

Pg. 16 Pg. 17
Kickstand
Appearance Care
Periodically clean your Pedego electric bike with a damp cloth. Avoid spraying
the Pedego with a water hose to avoid electrical issues. Store your Pedego in a
dry shelter area away from direct sunlight and wet or damp environment.
It is also recommended to apply chain lube (such as Tri-Flow or ProLink) to the
drivetrain of your Pedego when you clean it or wipe it down to keep it in good
running condition.
DOWN POSITION
The “side stand” style kickstand has a single leg that ips out to one side and al-
lows the bike to lean against it.
Please do not sit on your Pedego with the kickstand in the down position.

Pg. 18 Pg. 19
ONE YEAR LIMITED WARRANTY BICYCLE COMPONENTS
PEDEGO, LLC (“PEDEGO”) warrants that all new PEDEGO Electric Bikes (“Bikes”) and components therein are warranted to
the original retail purchaser (“Purchaser”) against manufacturing defects in materials and/or workmanship for a period of one
(1) year from the date of original retail purchase.
Terms of LimiTed WarranTy
This warranty becomes eective on the date of original retail purchase. This warranty is not meant to suggest or imply that the
Bikes cannot be broken or will last forever. It does mean that the Bicycle is covered subject to the terms of the warranty. This
warranty applies only to the original Purchaser of a Bicycle and is not transferable to subsequent owners or any other party. This
warranty is void if the Bicycle is subjected to abuse, neglect, improper repair, improper maintenance, alteration, modification, an
accident or other abnormal, excessive, or improper use, at the sole discretion of PEDEGO. During the duration of this warranty,
PEDEGO, at their cost, will either repair the Bicycle or Bicycle component(s), or at PEDEGO’ sole discretion, will replace any
defective Bicycle or component(s) with the same or equivalent component(s). The foregoing warranties are in lieu of and exclude
all other warranties not expressly set forth herein, whether express or implied by operation of law or otherwise, including, but not
limited to any warranties of merchantability or fitness for a particular purpose. In no event shall PEDEGO be liable for inciden-
tal, consequential or punitive damages arising from use or unavailability of the Bicycle or component(s) in any manner, includ-
ing, without limitation, damages for personal injury, property damage, or economic losses, whether based on contract, warranty,
negligence, product liability, or any other theory. PEDEGO’ liability hereunder is expressly limited to the repair or replacement
of Bikes or component(s), or at PEDEGO’ sole discretion, to the net amount paid by the original retail purchaser. If the original
retail Purchaser elects to repair a defective Bicycle or component(s) himself or use the services of someone other than PEDEGO
(or its designee) to repair the Bicycle, or if Purchaser uses a replacement part not authorized by PEDEGO, PEDEGO will not be
liable for any damage, failure or loss caused by the use of such unauthorized service or parts. If the Purchaser has a valid warranty
claim as set forth in the Procedures and Terms and Conditions (the “PTC”), this limited warranty includes the cost of shipment or
transportation of the Bicycle or Bicycle component(s) to or from PEDEGO in accordance with the PTC. If the Purchaser does not
have a valid warranty claim as set forth in the PTC, this limited warranty does not include such shipment or transportation costs.
Under this Limited Warranty, Pedego products purchased in one country or region may not be transferred to another country or
region where Pedego or its authorized service providers oer warranty service for the same product model number. Warranty
terms, service availability, and service response times may vary from country or region to country or region. Warranty service
response time is subject to change due to local parts availability. Your Pedego authorized service provider can provide you with
details. Pedego will not alter form, fit, or function of this Pedego product to make it operate in a country for which it was never
intended to function for legal or regulatory reasons. Pedego is not responsible for any taris or duties that may be incurred in
transferring the products. Transfer of the products may be covered by export controls issued by the United States or other govern-
ments.
excLusions:
This warranty does not cover:
• normal wear and tear;
• damage or failure from abuse, neglect, misuse, or accident;
• damage from stunt riding, ramp jumping, acrobatics, or similar activities or any activity that is not consistent with the intended use
of the Bicycle;
• damages resulting from failure to follow Instructions for Use and Warnings as provided in the Owner’s Manual for the Bicycle;
• damages resulting from improper charging of the battery pack or use of any charger not supplied by PEDEGO;
• installation of any parts, accessories, or electrical component(s) not originally intended for or compatible with the Bicycle as
sold, or any modication of the frame or any component(s) originally supplied; tires, brake pads, chains, lights, motors, battery
packs, displays, or vehicle controllers that have been opened for any purpose whatsoever, other than by PEDEGO or its authorized
agents; and the purchase or use of the Bicycle outside of the United States of America.
All warranties are void if the Bicycle is used for any purpose other than the reasonable intended use of the Bicycle. Additionally,
this warranty does not cover damage associated with commercial use.
Procedures:
Warranty work must be performed by PEDEGO or an authorized agent of PEDEGO. Proof of purchase must be provided. To
qualify for warranty services, a Warranty Product Return Authorization Number (“WPRAN”) must be obtained by the original
retail purchaser from PEDEGO. The original retail Purchaser must contact a PEDEGO representative to discuss the problem
with the Bicycle and to obtain a WPRAN. Upon issuance of a WPRAN, the Bicycle or Bicycle component(s) must be returned to
PEDEGO at its designated location for warranty work. The original retail Purchaser is responsible for the return of the Bicycle,
undamaged in transit, to PEDEGO for warranty work and for the costs associated with shipping and insuring the Bicycle and

Pg. 18 Pg. 19
component(s) when returning them. If PEDEGO’ authorized qualified technicians determine a warranty claim is valid and con-
forms with this warranty, PEDEGO will repair or replace component(s) or replace the entire Bicycle at PEDEGO’ cost, including
materials and labor. For valid warranty claims hereunder, PEDEGO will reimburse the original retail Purchaser for shipping and
insurance costs incurred as a result of returning the Bicycle to PEDEGO for warranty work at standard ground shipping rates,
and PEDEGO will pay for shipping costs to return the Bicycle to the original retail Purchaser.
THree year LimiTed WarranTy BaTTery
PEDEGO ELECTRIC BIKES warrants to the original purchaser that the battery is free of defects in material and workmanship
for 36 Months. The defective product will be replaced or repaired if met under certain pre-conditions. The rst 12 months of the
warranty is covered free of charge, the remaining 24 months is covered under a pro-rata cost. The warranty period for a battery is
calculated from the original battery purchase date. The original receipt of purchase is required to establish proof of purchase and
warranty date, and must be provided to Pedego for all warranty claims.
The warranty for replacement batteries will be based on the original battery purchase date, as identified on the original battery
purchase sale receipt. Under no circumstance will a replacement battery have a warranty date dierent than the original battery
purchase date. If a replacement is necessary due to a defect in materials and/or workmanship, then upon return to PEDEGO
ELECTRIC BIKES: The battery will be replaced free of charge, within the free replacement period from date of original purchase
for one year. After 1 year, we will contact you with the pro-rated cost, asking for your credit card before making shipment of a pro-
rata battery pack. Please supply a daytime phone number. The pro-rata cost will be based on the list price at the time of replace-
ment. Shipping costs are additional.
The original battery sale receipt must be maintained for any further claims. All replacement batteries will be warranted for the
balance of the original warranty period.
PEDEGO ELECTRIC BIKES will have no obligation under this limited warranty in the event the battery is damaged or destroyed
as a result of any of the following events: use on a non Pedego bike, damage or destruction by abusive overcharging; collision; theft;
improper maintenance or mishandling of the battery; natural forces such as wind, lightning, hail, etc.; any willful or negligent act;
penetration, or opening of the battery case in any manner.
Replacement will be honored only by PEDEGO ELECTRIC BIKES. You are responsible for paying all of the following costs asso-
ciated with the replacement: labor for removal or installation; applicable taxes; and any shipping or transportation costs incurred
in returning the battery to PEDEGO ELECTRIC BIKES for evaluation.
THIS IS PEDEGO ELECTRIC BIKES’S EXCLUSIVE WARRANTY. NO PARTY IS GRANTED EXPRESS OR IMPLIED AU-
THORITY TO CHANGE OR ANNUL THIS WARRANTY IN ANY MANNER. IMPLIED WARRANTIES INCLUDING THAT OF
MERCHANTABILITY AND FITNESS FOR A PARTICULAR PURPOSE ARE EXPRESSLY LIMITED IN DURATION TO THE
DURATION OF THIS WARRANTY. PEDEGO ELECTRIC BIKES DISCLAIMS ANY LIABILITY FOR SPECIAL, INCIDENTAL
OR CONSEQUENTIAL DAMAGES.
If you purchase your battery in a state/province that disallows limitations on implied warranty, or exclusion or limitation of spe-
cial, incidental or consequential damages, the limitation and exclusions stated above may not apply to you. This warranty gives
you specific legal rights. You may also have other rights which vary from state/province to state/province. This warranty is ex-
tended to the only to the original retail purchaser.
LIMITATIONS ON GUARANTEE WARRANTY
THE ABOVE GUARANTEE IS THE ONLY REMEDY PROVIDED BY PEDEGO ELECTRIC BIKES TO ITS RE-
TAIL CUSTOMERS. THIS IS PEDEGO ELECTRIC BIKES’S EXCLUSIVE WARRANTY. NO PARTY HAS EX-
PRESS OR IMPLIED AUTHORITY TO CHANGE OR ANNUL THIS WARRANTY IN ANY MANNER.
IMPLIED WARRANTIES INCLUDING THAT OF MERCHANTABILITY AND FITNESS FOR A PARTICU-
LAR PURPOSE ARE EXPRESSLY LIMITED IN DURATION TO THE DURATION OF THIS WARRANTY.
PEDEGO ELECTRIC BIKES DISCLAIMS ANY LIABILITY FOR SPECIAL, INCIDENTAL OR CONSEQUENTIAL DAMAGES.
consumer rigHTs:
This limited warranty gives the consumer specific legal rights. The consumer may also have other legal rights which vary from
state to state or country to country. Some states and countries do not allow the exclusion or limitation of incidental or consequen-
tial damages or warranties, so some of the above limitations or exclusions may not apply to you. If it is determined by a court of
competent jurisdiction that a certain provision of this limited warranty does not apply, such determination shall not aect any
other provision of this limited warranty and all other provisions shall remain in eect.

Pg. 20 Pg. 21
Electric Bikes FAQs
Q. How long does it take to fully charge the battery?
A. Depends on the state of discharge but around 4 hours if completely discharged.
Q. What are the running costs for a Pedego electric bike?
A. You will have no worries about rising fuel prices at the pumps. All our electrically powered vehicles use household
electricity. The average cost per full charge is about 10 cents per charge. If you charged the battery every single day for
a year, it would cost you about $35 per year.
Q. Can I ride up hills and against strong headwinds on my Pedego electric bike?
A. Yes. One of the main advantages of cycling on a Pedego electrical bicycle is that it literally attens hills and increases
your average speed when tackling inclines and headwinds. If you provide a reasonable amount of effort, but you should
be able to tackle anything from a 1 in 10 (10%) gradient up to a 1 in 7 (14%) gradient. You will be amazed at the relative
ease that your new Pedego electric bike can tackle some of the most arduous journeys.
Q. Do I need a driving license, insurance or registration?
A. No, you don’t. According to Federal law, electric bikes that are under 750 watts are classied as bicycles. For all inten-
sive purposes, it’s simply a bicycle that requires very little pedaling to travel 32 Km/H, saving you time and hassle. The
law does require the use of helmet and riders to be at least 16 years old. Check your local state laws for requirements.
Q. Do I need to pedal an electric bike?
A. No but it helps to prolong battery life. The motor on our bikes is both throttle and pedal assist controlled, allowing you
to decide how much power you desire. Have you ever tried to cycle when speeding downhill on your normal bicycle? It’s
just like that. The motor is propelling you faster than you’re cycling so there is pretty much no resistance,
it’s merely a formality!
Q. What happens when I use the brakes under powered assistance?
A. All our bikes are equipped with brake levers that have a built in safety switch that automatically cuts off the motor
power under normal braking conditions. This not only ensures a safe un-powered stopping feature, but also protects
the motor under braking conditions so that it isn’t working against the brakes.
Q. How far will a Pedego take me?
A. This all depends on a few factors. Cycling with pedal assist along a straight road under normal conditions, the standard
battery should last about 15-30 miles. Cycling up steep hills will obviously take more energy out of the battery and factors
such as road surface, wind resistance, weight of the rider and tire pressure will affect your range. Longer range battery is
also available.
Q. What happens if I get a at tire?
A. The tires on our bikes are the same as conventional bicycles. Simply replace the tube with a tube of the right size and
inate it. No special tires or parts will be needed.
Q. How do I know when the battery is low?
A. The bicycles have easily visible indicators located on the meters that show the amount of juice left. If it is getting low
and you don’t think you will make it to your destination, you can switch off your motor and keep it just for the difcult bits.
Q. Do I have to wait for the battery to empty before I charge it?
A. No. The batteries we use are Lithium-ion batteries which do not suffer from ‘memory effect’. This means that there is
no need to discharge a battery completely before you recharge it again. You can partially recharge the battery at any time
without reducing its voltage or lifespan. We recommend recharging the battery after every use, regardless of how far you
rode.
Q. Can I put a child’s trailer on a Pedego?
A. Yes, you can certainly add a trailer to your Pedego. We suggest using one that hooks onto the frame rather than the
axle.
Q. Can I put a Pedego on a bike rack?
A. Yes, just make sure that the bike rack can hold the weight of a Pedego. We advise taking the battery off to make it
easier to lift and to keep the battery safe.
Table of contents
Other Pedego Bicycle manuals
Popular Bicycle manuals by other brands

Bebe Stars
Bebe Stars 814 user manual

Fortis
Fortis 700C URBAN MASTER ROAD BIKE user guide

M1-Sporttechnik
M1-Sporttechnik M1-ERZBERG Pedelec user manual

HASE
HASE Pino installation guide

Kwiggle
Kwiggle Kwiggle instruction manual

Invacare
Invacare Top End Force G COMPONENT VERIFICATION CHECKLIST AND ASSEMBLY INSTRUCTIONS