Pedego electric bike Quick start guide

A S S E M B L Y I N S T R U C T I O N S A N D O W N E R ’ S M A N U A L

Pg. 2 Pg. 3
Carton contents 2
Assembly instructions 4
Safety 8
Operating procedures 9
Charger 11
To recharge the battery 12
Battery and charger care 13
Pedal assist mode 14
Hand throttle control 15
Lights 16
Gears 16
Brakes 17
Meter programming 18
Appearance care 18
Warranty 20
Commonly asked questions 22
Warning 23
Your bike information / serial number 24
Carton Contents
Pedego bike
Pedals (2)
Owner’s manual/assembly instructions
Lithium ion battery
Keys for battery
Tool kit
Battery charger
Table of Contents

Pg. 2 Pg. 3
welcome to the wonderful world
of the electric bike, Pedego
PLEASE NOTE:
This manual is not intended as a detailed user, service, repair or maintenance manual.
Please seek assistance from qualied technician for service, repairs or maintenance.
We would like to thank you for choosing Pedego electric
bike. We believe this technology, with the benets of
electric propulsion, will provide you with the perfect
vehicle to increase your personal mobility.
Our brushless, electric hub motor will allow you to run
errands or commute to work while saving money on gas
and reducing your environmental impact on our world.
It also gives you the opportunity to pedal if you want
to get exercise along the way.
All this and it is just plain fun to ride!
If you have any concerns, questions or suggestions
about the Pedego electric bike, please contact us at
Again, thank you for choosing

Pg. 4 Pg. 5
5. Insert the handlebar stem into the header tube on the bicycle. You adjust
the height of the handlebars stem up or down to your comfort level. Do not
set handlebars stem higher than the maximum height indicator located on the
stem. Place thumb on black locking mechanism on top of stem, push down
and lift lever up exposing adjustment screws.
Assembly Instructions
Your bike has been pre-assembled and requires only a few simple steps to
get it ready for you to ride:
1. Remove the bicycle from carton after cutting the nylon bands and put the
kickstand down.
2. Remove all of the protective wrap covering the bicycle. When removing
the protective wrap on handlebars, be careful to NOT engage the front brake
lever (Left Lever) with the front wheel still unattached.
3. Please locate and put aside the box which includes the pedals, battery
charger and tool kit.
4. Install the front wheel by aligning the brake and fork, and tightening the
axle nuts with the 15mm wrench provided with your kit. Make sure that the
hooked washers are on the outside of the fork, and are properly secured.
If the disc brake is rubbing after installation, refer to Customer Help on our
website at www.pedegoelectricbikes.com/faqs/customerhelp/
For City Commuter

Pg. 4 Pg. 5
Figure 1. Figure 2.
Assembly Instructions
3
3
Figure 3. Figure 4.
Move the stem so that you can see directly down the hole (Figure 1). Insert
the 6 mm allen wrench supplied as a part of your kit into the hole and tighten
screw clockwise until handlebars do not move separately from the front wheel
(Figure 3).
In order to get the bolt securely tighten you may need to use a pair of plyers
for leverage (Figure 4).
Position the handlebars to your comfort level and lock handlebars into
place by pushing the handle back down. If handlebars move up or down
after pushing handle down, you can tighten the screw indicated in gure 2
with a 5 mm allen wrench in your kit.

Pg. 6 Pg. 7
5. The stem is already aligned and installed on the bicycle. Remove
the front plate of the stem to install the handlebars by removing the 2
bolts.
Place the center of the handlebars that are marked with grooves into
the stem and re-install the 2 bolts on the stem front plate.
Position the handlebars to your personal preference and securely
tighten the 2 bolts on the front stem plate. Make sure that, when
tightening, there is even spacing between the top and bottom bolts to
ensure maximum stability.
If need be, the handlebars can be adjusted for height and alignment by
removing the rubber protective cap and loosening the screw (with the allen
wrench included in the tool kit) on top of the stem. Make sure handlebars are
aligned with the front wheel before tightening.
For Comfort Cruiser

Pg. 6 Pg. 7
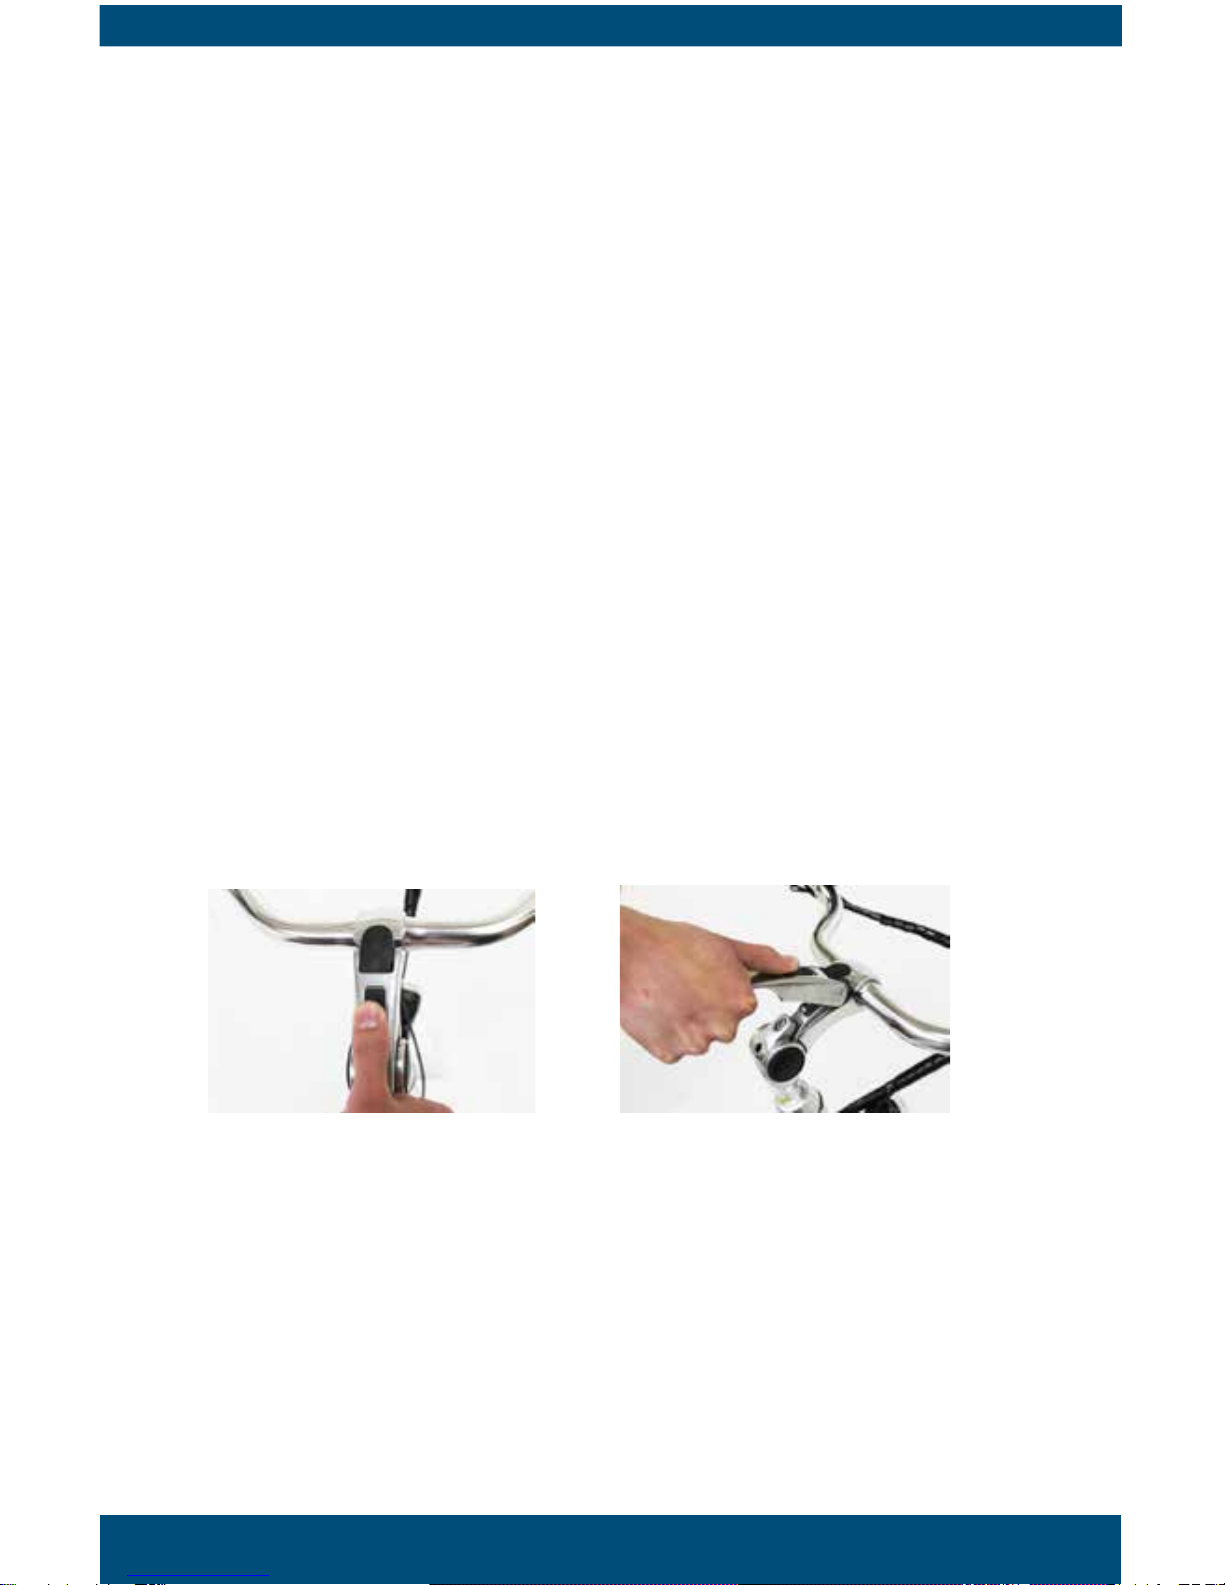
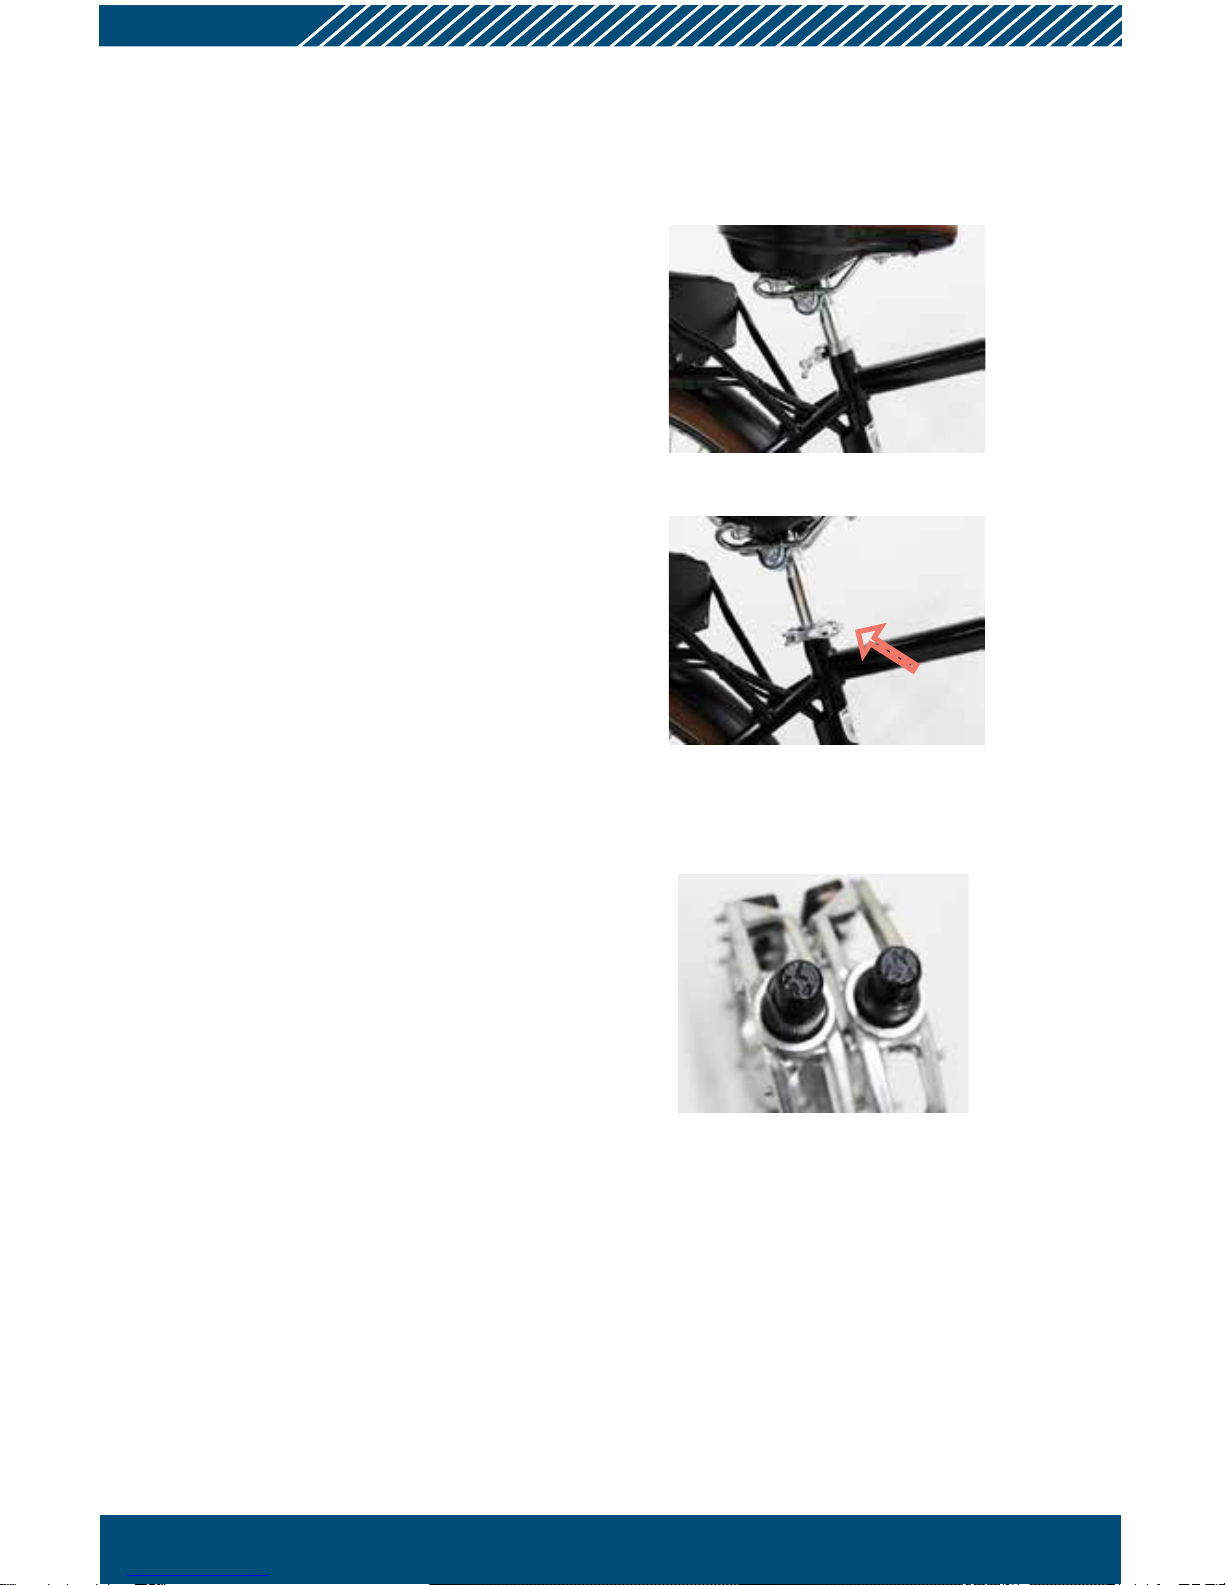
6. Seat Adjustment. Make sure the seat
stem is clamped tight enough so that you
can’t twist it out of alignment. Pull seat
clamp handle away from seat post and
slide seat up or down to adjust. Move
clamp handle inward toward seat post so
post is held tight by clamp.
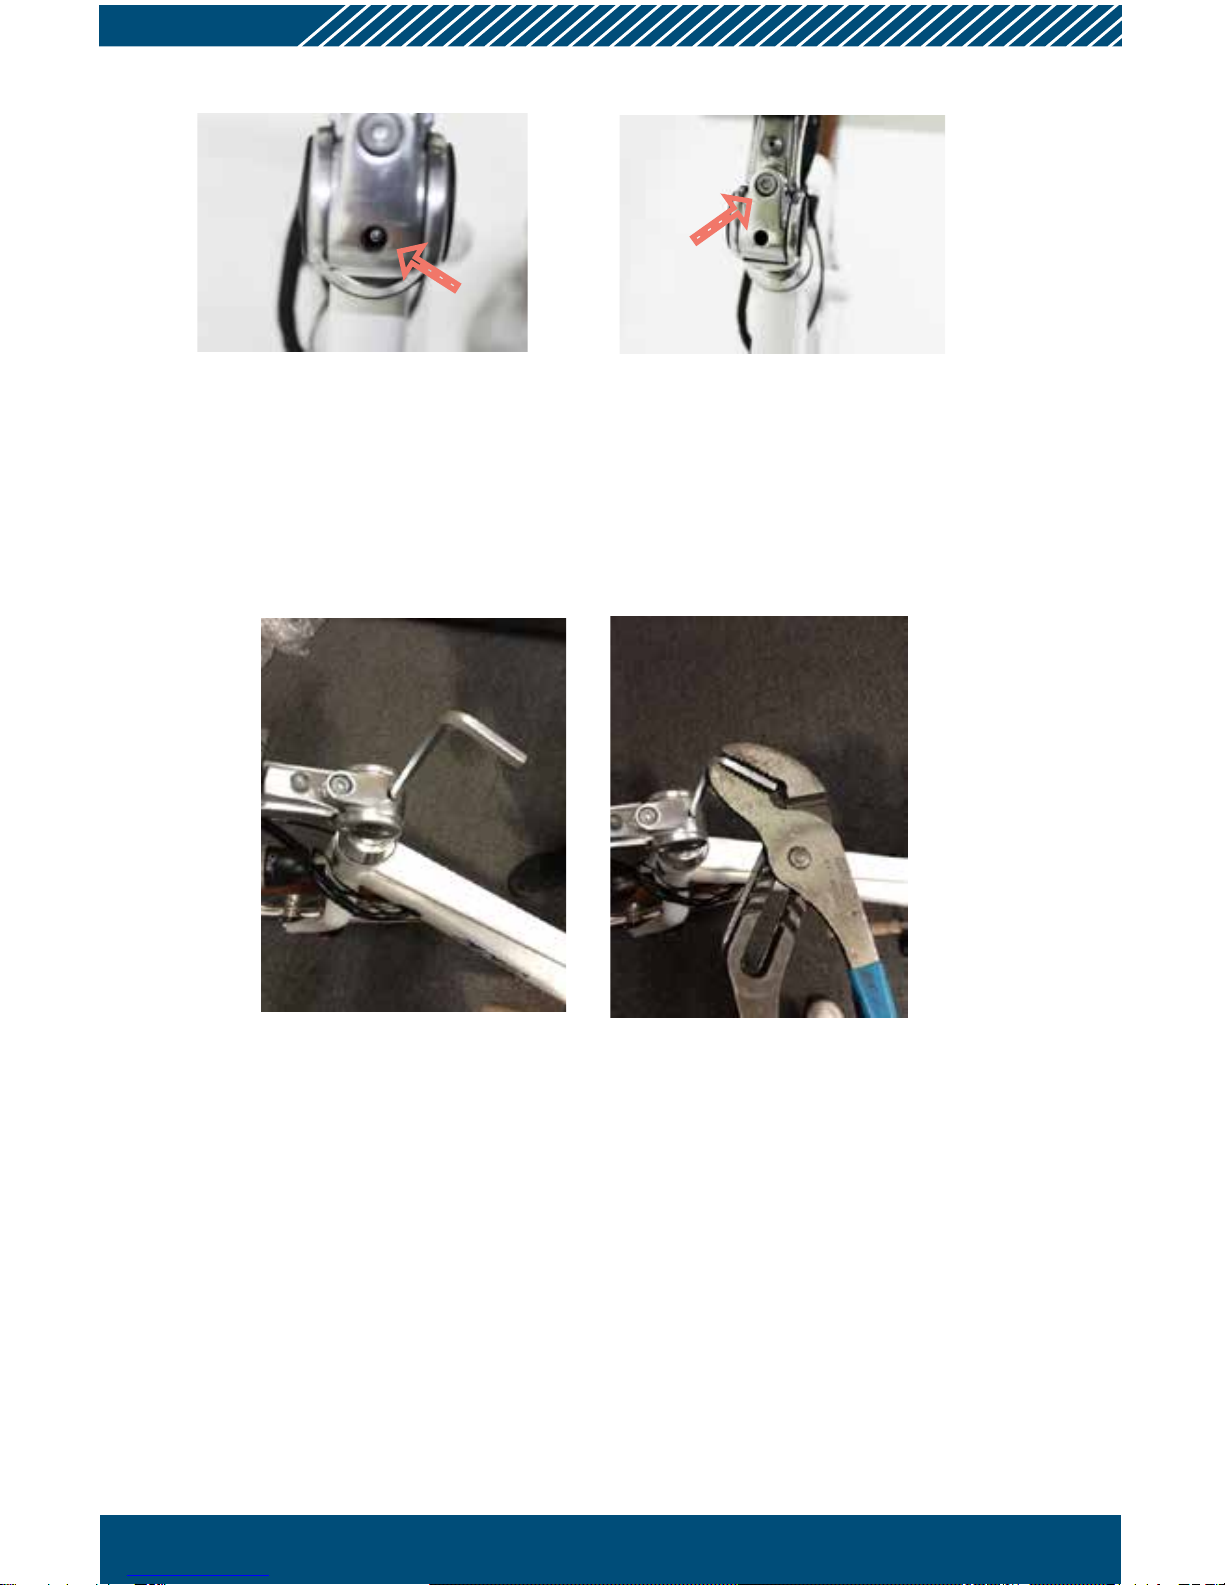
Tighten clamp if necessary by twisting
the clamp handle clock-wise while in the
unclamped position. Then fold handle in
toward seat post. This should require a
fair amount of force to insure post is held
tight. If necessary, the clamp can be further
tightened with an allen key when in the
clamped position. Make sure seat is not
set with the vertical maximum height marks
above clamps.
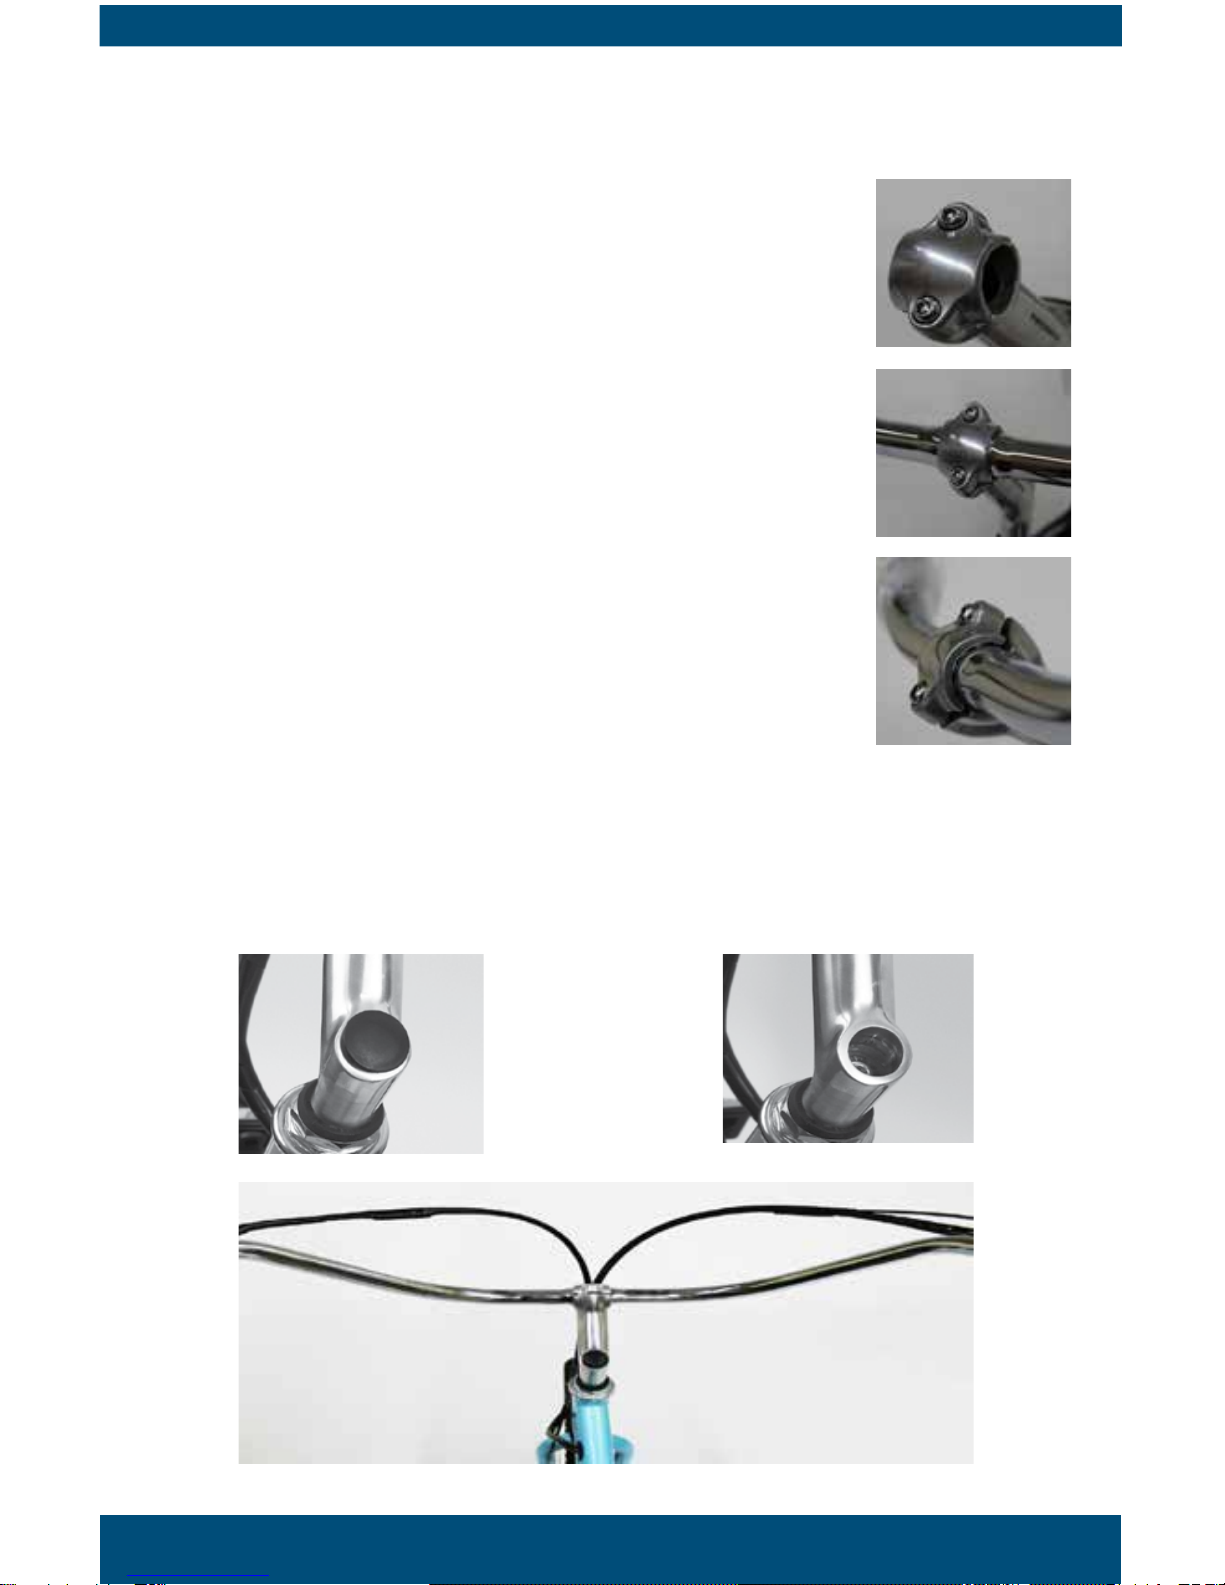
7. Pedal Installation – PLEASE NOTE –
THE PEDALS ARE MARKED “L” for Left
and “R” for Right. Using the wrench pro-
vided in the tool kit, attach and tighten the
pedals. The left pedal is attached by turn-
ing it counter clockwise and the right pedal
is tightened by turning it clockwise.
3
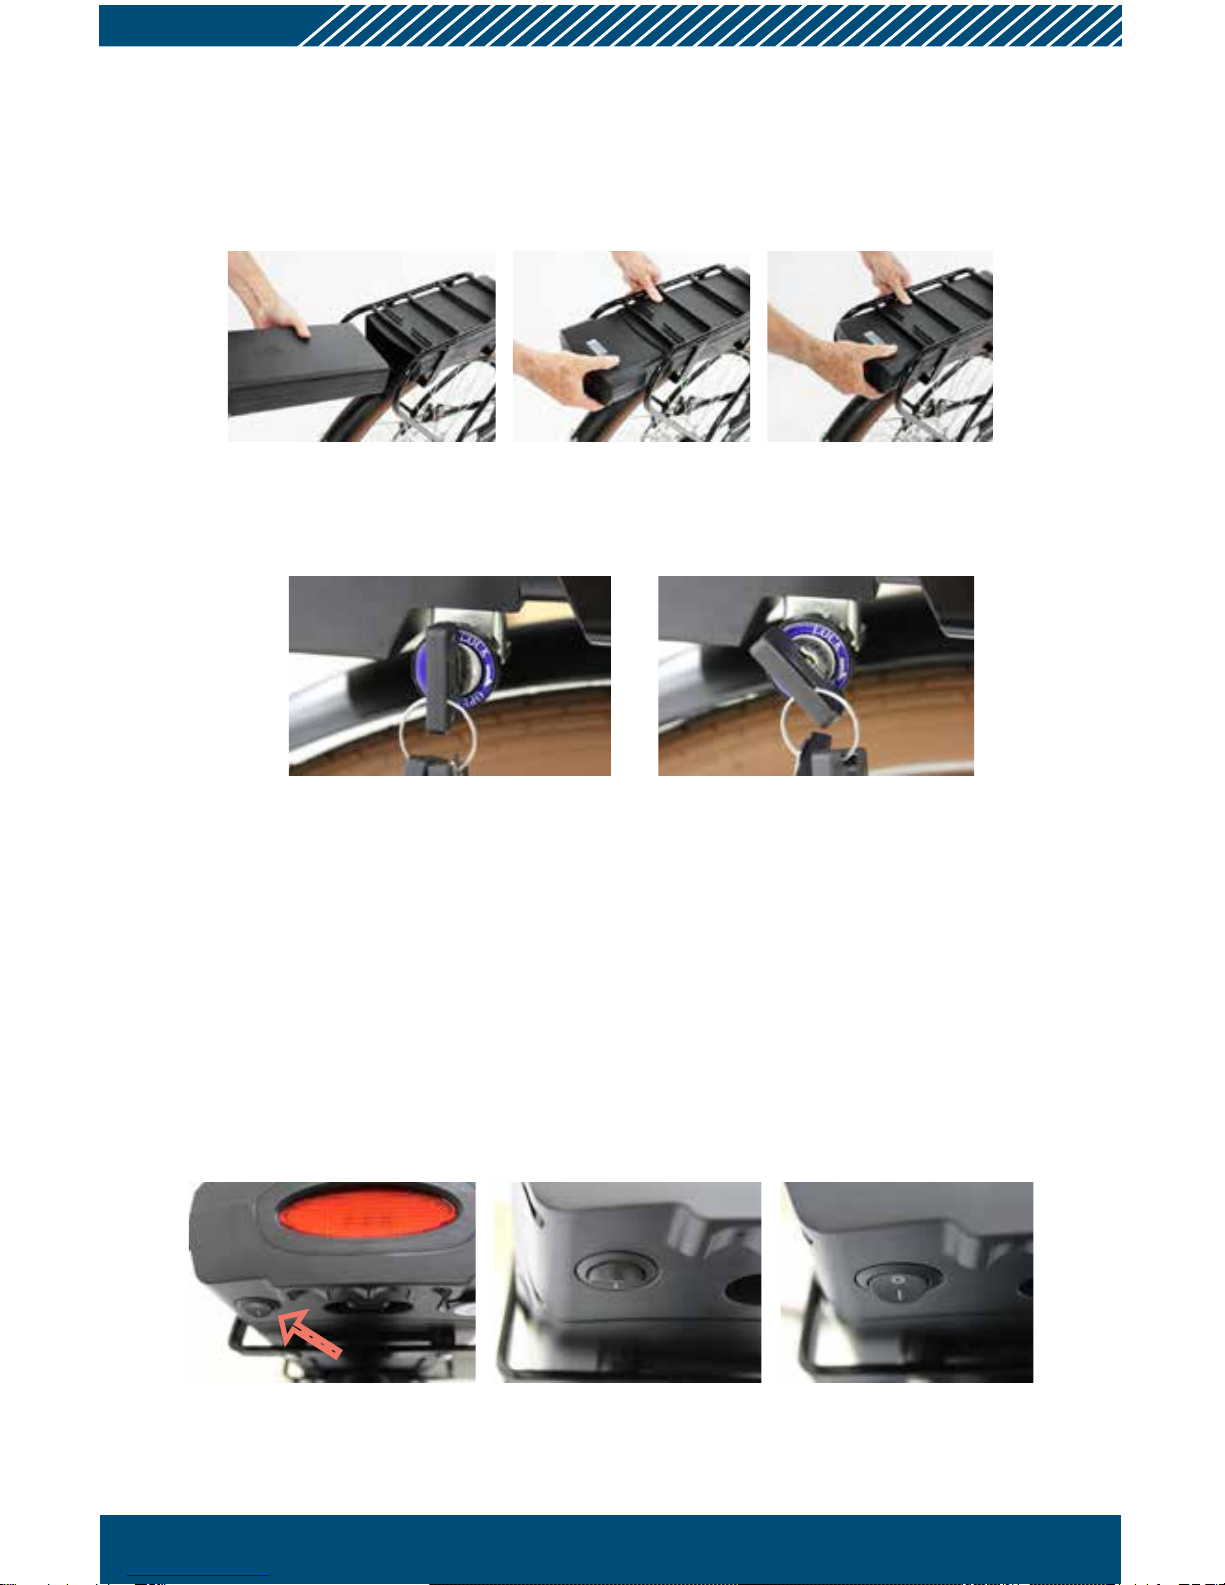
8. For comfort cruisers, plug the cord that comes out from underneath the rear rack
into the battery. Turn the key to the “on” position by turning it clockwise.

Pg. 8 Pg. 9
Helmet:
Always wear an approved helmet while riding your Pedego and follow the
helmet manufacturer’s instructions for t, use and care of your helmet. It is
your responsibility to familiarize yourself with the laws of where you ride your
Pedego and to comply with all applicable laws.
Mechanical Safety Check:
Check the condition of your Pedego before every ride. Make sure no nuts,
bolts or xings are loose, with particular attention to the axle nuts and handle-
bar stem. Make sure tyres are correctly inated with 40 psi minimum to 60 psi
maximum air pressure. Check the brakes for proper operation.
You must take your bike in to be serviced and checked by a qualied bike
mechanic before 161 kilometers of riding. This is standard good practice for
any new bike as cables will stretch and components ‘bed in’. The service must
include spoke tensioning for both front and rear wheels.
Your First Ride:
When you buckle on your helmet and go for your rst ride, be sure to pick an
area away from cars, other cyclists, obstacles or other hazards to become
familiar with the controls, features and performance of your new Pedego.
Additional Passengers:
The Pedego bikes are designed for one passenger only. DO NOT carry any
additional passengers on the front or rear of the bike. The rear carrier is not
designed to carry the weight of any additional passengers, including baby
carriers.
Safety

Pg. 8 Pg. 9
To be able to use the electric motor, the battery must be mounted by sliding the
fully charged battery forward into the battery holder.
The key locks the battery to the bike when the key is turned counter-clockwise
to the locked position. The battery must be locked when riding or it may fall out.
The key does not have to be in to operate the bike.
The on/o switch is located on the bottom of battery. After inserting and locking
the battery into place, turn the battery on by ipping the switch to the “|” posi-
tion. Be sure to turn o the power when the Pedego is not in use or is recharging
by turning the battery on/o switch o.
You can ride the Pedego as a normal bike by just leaving the switch o.
3
On O
Battery
Operating Procedures
Locked Open
For City Commuter

Pg. 10 Pg. 11
Battery
To be able to use the electric motor, the battery must be mounted by sliding the fully
charged battery forward onto the rear rack, over the rear wheel, through the channels
on the battery while the carry handle is positioned at the rear. The key switch position
must be unlocked to slide battery on.
UNLOCK OFF ON
The key switch locks the battery in position when the key
is turned clockwise to either OFF or ON.
Plug the power cord to the battery to turn the key to the on position. Be sure to turn o
power when Pedego is not in use or is recharging.
For Comfort Cruiser

Pg. 10 Pg. 11
Battery and Charger
Charging plug for 48 volt battery
City Commuter
Charging plug for 36 volt battery
City Commuter
Included with your new Pedego is a lithium
ion battery, along with a charger, which
plugs into a standard 240 volt household
electric receptacle
A lithium ion battery requires specially de-
signed chargers. You should never charge
your battery with a substitute charger that
is not designed for this use. Use of an
unsuitable charger to charge a lithium ion
battery could result in over-heating, re or
even explosion.
The 36 volt chargers are interchangeable
between the Comfort Cruiser and City
Commuter batteries, but the 48 volt char-
gers are specic to each model.
Charging plug for 36 volt battery
Comfort Cruiser
Charging plug for 48 volt battery
Comfort Cruiser

Pg. 12 Pg. 13
The Pedego battery may be charged while
on the bike or removed and charged at a
location away from the Pedego in a dry
location. The battery is easily removed by
moving the key switch to the open position
and grasping the handle at the rear of the
battery. Slide the battery to the rear of the
Pedego.
To charge the battery, plug the charger into
an AC outlet. The LED indication light should
be green showing the charger is working
normally. Then plug the charger into the
charging port located on the bottom of the
battery by sliding open the charger cover
(Figure 6) and inserting the plug.
Recharge the Battery
Figure 5.
Figure 6.
The Pedego Battery may be charged while
on the bike or removed and charged at a
location away from the Pedego in a dry
location. The battery is easily removed by
moving the key switch to the unlock position,
unplugging the power cord and grasping the
handle at the rear of the battery and sliding
the battery to the rear of the Pedego.
To charge the battery, plug the charger into
an AC outlet. The LED indication light should
be green showing the charger is working
normally. Then plug the charger into the
charging port located on the side of the bat-
tery underneath the battery handle.
For Comfort Cruiser
Recharge the Battery
For City Commuter

Pg. 12 Pg. 13
The charger will charge the battery in 4—6 hours. The indicator light on the char-
ger will be red when battery is charging and will turn green when fully charged.
-Recharge battery after every use.
-Do not open or alter the battery or the battery charger.
-Do not place the battery near re or corrosive substances.
-Do not immerse in water or other liquids.
Avoid subjecting the battery to high temperature, such as directly under the
hot sun, for prolonged periods of time. Recharge the battery before it becomes
completely discharged. Completely discharging will reduce the numbers of
recharging cycles during the battery’s life and limit the capacity. Never store the
battery in a discharged state. After much use, your battery’s charge holding ca-
pacity will decrease. If you nd that your battery does not hold sucient charge
even for short trips, you should contact your dealer to order a replacement.
If the battery will not be used for an extended period of time, charge it fully and
recharge it every 3 months. Store it in a cool place. Your Pedego battery is
engineered with precision for high capacity and a long useful life. Do not use it
to power other electrical devices. Improper use of the battery will damage the
battery and shorten its useful life, and may cause re or an explosion. If you ex-
perience unusual sounds or odors coming from the charger or the battery, unplug
charger immediately and contact Pedego customer service at support@pedego.
com.
There is a fuse located on the bottom side of the battery
between the charging port and the On/O switch of the
City Commuter, and on the black end cap opposite of
the handle on the Comfort Cruiser. The fuse is designed
to protect the battery. If the fuse blows, there will be no
power to the meter and the pedal assist function will not
work. You can replace the fuse with a standard automotive
40 amp fuse for City Commuters. For a replacement fuse
for the Comfort Cruiser, please contact Pedego customer
Battery and Charger Care
Fuse
3
3

Pg. 14 Pg. 15
Operating the Bike
Pedal Assist Mode
Your Pedego is equipped with a meter that monitors the pedal assist power
level, speed, odometer and battery energy level. To turn the meter on, make
sure the battery on/o switch is in the on position. Press the on/o (top) button
on the four button selector located near the left grip on the handlebars to turn
the meter on. You can adjust the pedal assist power level to have more power
by hitting the up arrow button (third button) and can move to a lower level power
by hitting the down arrow (fourth button). If you set the pedal assist power level
to “0”, then the pedal assist function of the bike is disengaged and the bike
can be powered by the throttle on the right grip. When rst riding your Pedego,
you will notice that when the pedal assist function is activated, the motor will
supply power when you turn the pedals forward. In pedal assist level 1, you will
get assistance at around 40% of the maximum power from the motor. In level
5, you will get 100% assistance from the motor. Experiment with the dierent
levels of pedal assist to become familiar with how much power you get. You will
want dierent levels of assist for dierent riding conditions. When not riding the
bike, you can turn o the meter by holding down the on/o button (top button)
for several seconds. Press set (second button) to switch the display information.
The order is: odometer, riding distance, riding time and maximum speed.
distance/odometer
battery indicator
speedometer
pedal assist level
(power level)
3
3
3
3

Pg. 14 Pg. 15
Hand Throttle
Control
When the pedal assist mode is set to
“0”, the pedal assist function does not
engage and the throttle will accelerate
the bike at about 6KPH
Keys
A set of two keys are included with your new Pedego for the battery.
The City Commuter keys do not turn the battery on or o, they are used to
lock the battery into place. Always make sure that the key position is in the
“open” setting when removing or inserting the battery. Move the key to the
“lock” position to secure battery before operating bike. Riding the bike with the
key in the “open” position risks allowing the battery to slide out and damage
the battery when dropped.
The Comfort Cruiser keys are used to turn the battery on or o, as well as
locks the battery into place. Always make sure that the key position is in the
“unlock” setting when removing or inserting the battery. Move the key to the
“o” position to secure the battery before operating the bike.
Always remove battery from bike when transporting on a bike rack.
Tyres
The tyre tubes contain a chemical substance to reduce the chance of dea-
tion when contacted with a road hazard. Tyres should not be deated unless
necessary. A green substance will be discharged from the air valve when
deated. It is not harmful unless it is ingested.
To minimize tyre wear and for maximum riding safety, comfort ad handling,
maintain front and rear tyre air pressure between 40 and 60 psi. Use a reliable
tyre air pressure gauge to check for proper ination before every ride. At the
same time, inspect tyres for excessive wear and cracks in sidewall. Replace
tyres if necessary.

Pg. 16 Pg. 17
Gears
The twist shift lever is located on the left hand grip.
Your Pedego is equipped with 7 speeds on the City Commuter, 6 speeds for
Comfort Cruiser. First gear is for easier and uphill pedaling. The last gear is for
maximum speed on level or downhill terrain. Change gears only while pedaling.
The rear wheel contains six or seven chain sprockets depending on the Pedego
model. When the chain is around the largest sprocket, you are in 1st gear, or
the lowest gear. High gear will have the derailleur positioned so that the chain is
directed around the smallest gear.
Every position on the gear selector should cause a gear
change. Adjustments require ne tuning and should
only be made by a qualied technician.
Avoid changing gears very rapidly from rst gear to the
last gear or vice versa. If you change multiple gears
too quickly, you could have the chain come o the front
sprocket.
Lights
Your City Commuter comes equipped with front and rear lights. To turn lights
on, push the on/o button (Top button on your display). To turn lights o, repeat
pushing down the on/o button.

Pg. 16 Pg. 17
Brakes
Your Pedego is equipped with disc brakes for maximum reliability. Applying
hand pressure to the brake levers will cause the wheel brake to cause friction
against the brake disc, slowing the wheel. The more
hand pressure applied to the brake lever, the faster
the Pedego will come to a stop. The rear brake should
always be applied before and while the front brake is
applied. Applying only the front brake to slow or stop at
high speeds may result in the rider being ejected from
the saddle and continuing forward over the handlebars. It is best to apply even
pressure to both brake levers when slowing or stopping.
Bicycles equipped with disc brakes will occasionally make a slight scraping
noise when the wheels are turning without the brakes being applied. This is
normal.
Insure that the brake lever does not contact the handle bar when full hand
pressure is applied (Figure 8). If so, then the brakes must be adjusted by
increasing the tension on the cable.
A quick and small adjustment may be made by unscrewing the threaded
adjuster at the hand lever until the brake is tightened suciently for
safe stopping (Figure 7). If the brakes are still not functioning correctly, they may
require inspection and further adjustment by an experienced bike mechanic.
3
Figure 7. Figure 8.

Pg. 18 Pg. 19
Down position
Appearance Care
Periodically clean your Pedego electric bike with a damp cloth.
Avoid spraying the Pedego with a water hose to avoid electrical issues.
Store your Pedego in a dry sheltered area away from direct sunlight and wet
or damp environment.
Kickstand
The motorcycle style kickstand has two legs that
are designed to expand as the kickstand is put
in the down position and contract as it goes into
the up position. The height of the right leg can be
adjusted by turning the lower part of the right leg
1/4 turn clockwise, moving it up or down and then
releasing it back to its original position. If your
Pedego is not level, simply adjust the leg to match
the other. The left leg does not adjust. Please do
not sit on your Pedego with the kickstand in the down position.
Meter Programming
The LCD meter on your Pedego can be programmed to change various func-
tions like tyre size, max speed, etc.
To clear the riding distance, riding time and max speed settings, hold down the
DOWN button (fourth button) for 3 seconds.
To change the tyre size setting, hold the SET button (second button) for 10 sec-
onds and then select the correct tyre size. The City Commuter bike has been
preset to 28 inch, the Comfort Cruiser has been preset to 26 inch, and does not
need to be changed.
To change the MPH or Km/H setting, hold the DOWN button (Fourth button)
down for 9 seconds. Your bike is preset for Km/H. Press the SET button (sec-
ond button) to save program settings and exit.

Pg. 18 Pg. 19
Pedego bikes are designed with comfort in mind. It starts with the bike’s
forward front crank that allows the rider to sit more upright while pedaling. Ad-
ditionally, the Step-thru comfort cruiser oers a sloping frame that makes this
electric bicycle especially convenient for adults and seniors. Even the most
apprehensive biker can jump on and sail down the street on this bike.
The City Commuters are available in classic and step-thru designs and a
choice of black or white. Pedego’s sleek, classy City Commuter has everyone
saying, “fun just got serious!”
Comfort Cruisers
City Commuters

Pg. 20 Pg. 21
ONE YEAR LIMITED WARRANTY BICYCLE COMPONENTS
PEDEGO, LLC (“PEDEGO”) warrants that all new PEDEGO Electric Bikes (“Bikes”) and components therein are warranted to
the original retail purchaser (“Purchaser”) against manufacturing defects in materials and/or workmanship for a period of one
(1) year from the date of original retail purchase.
TERMS OF LIMITED WARRANTY
This warranty becomes eective on the date of original retail purchase. This warranty is not meant to suggest or imply that the
Bikes cannot be broken or will last forever. It does mean that the Bicycle is covered subject to the terms of the warranty. This
warranty applies only to the original Purchaser of a Bicycle and is not transferable to subsequent owners or any other party. This
warranty is void if the Bicycle is subjected to abuse, neglect, improper repair, improper maintenance, alteration, modication, an
accident or other abnormal, excessive, or improper use, at the sole discretion of PEDEGO. During the duration of this warranty,
PEDEGO, at their cost, will either repair the Bicycle or Bicycle component(s), or at PEDEGO’ sole discretion, will replace any
defective Bicycle or component(s) with the same or equivalent component(s). The foregoing warranties are in lieu of and exclude
all other warranties not expressly set forth herein, whether express or implied by operation of law or otherwise, including, but not
limited to any warranties of merchantability or tness for a particular purpose. In no event shall PEDEGO be liable for inciden-
tal, consequential or punitive damages arising from use or unavailability of the Bicycle or component(s) in any manner, includ-
ing, without limitation, damages for personal injury, property damage, or economic losses, whether based on contract, warranty,
negligence, product liability, or any other theory. PEDEGO’ liability hereunder is expressly limited to the repair or replacement
of Bikes or component(s), or at PEDEGO’ sole discretion, to the net amount paid by the original retail purchaser. If the original
retail Purchaser elects to repair a defective Bicycle or component(s) himself or use the services of someone other than PEDEGO
(or its designee) to repair the Bicycle, or if Purchaser uses a replacement part not authorized by PEDEGO, PEDEGO will not be
liable for any damage, failure or loss caused by the use of such unauthorized service or parts. If the Purchaser has a valid warranty
claim as set forth in the Procedures and Terms and Conditions (the “PTC”), this limited warranty includes the cost of shipment or
transportation of the Bicycle or Bicycle component(s) to or from PEDEGO in accordance with the PTC. If the Purchaser does not
have a valid warranty claim as set forth in the PTC, this limited warranty does not include such shipment or transportation costs.
Under this Limited Warranty, Pedego products purchased in one country or region may not be transferred to another country or
region where Pedego or its authorized service providers oer warranty service for the same product model number. Warranty
terms, service availability, and service response times may vary from country or region to country or region. Warranty service
response time is subject to change due to local parts availability. Your Pedego authorized service provider can provide you with
details. Pedego will not alter form, t, or function of this Pedego product to make it operate in a country for which it was never
intended to function for legal or regulatory reasons. Pedego is not responsible for any taris or duties that may be incurred in
transferring the products. Transfer of the products may be covered by export controls issued by the United States or other govern-
ments.
EXCLUSIONS:
This warranty does not cover:
• normal wear and tear;
• damage or failure from abuse, neglect, misuse, or accident;
• damage from stunt riding, ramp jumping, acrobatics, or similar activities or any activity that is not consistent with the intended use
of the Bicycle;
• damages resulting from failure to follow Instructions for Use and Warnings as provided in the Owner’s Manual for the Bicycle;
• damages resulting from improper charging of the battery pack or use of any charger not supplied by PEDEGO;
• installation of any parts, accessories, or electrical component(s) not originally intended for or compatible with the Bicycle as
sold, or any modication of the frame or any component(s) originally supplied; tyres, brake pads, chains, lights, motors, battery
packs, displays, or vehicle controllers that have been opened for any purpose whatsoever, other than by PEDEGO or its authorized
agents; and the purchase or use of the Bicycle outside of the United States of America.
All warranties are void if the Bicycle is used for any purpose other than the reasonable intended use of the Bicycle. Additionally,
this warranty does not cover damage associated with commercial use.
PROCEDURES:
Warranty work must be performed by PEDEGO or an authorized agent of PEDEGO. Proof of purchase must be provided. To
qualify for warranty services, a Warranty Product Return Authorization Number (“WPRAN”) must be obtained by the original
retail purchaser from PEDEGO. The original retail Purchaser must contact a PEDEGO representative to discuss the problem
with the Bicycle and to obtain a WPRAN. Upon issuance of a WPRAN, the Bicycle or Bicycle component(s) must be returned to
PEDEGO at its designated location for warranty work. The original retail Purchaser is responsible for the return of the Bicycle,
undamaged in transit, to PEDEGO for warranty work and for the costs associated with shipping and insuring the Bicycle and
Table of contents
Other Pedego Scooter manuals