pela tools 74109 User manual

Metallskärare, mini
Metal cutter mini
Item No:
74109

Kontaktinformation
Verktygsboden Erlux AB
Källbäcksrydsgatan 1
SE-507 42 Borås
Telefon: 033-202650
Mejl: [email protected]
Miljöskydd/Skrotning
Återvinn oönskat material, släng
det inte bland hushållssoporna. Alla
maskiner, tillbehör och förpackningar
skall sorteras och lämnas till en
återvinningscentral och där kasseras på ett
miljövänligt sätt.
Specifikationer
Maxkapacitet .................................1,6 mm stålplåt
Vikt .................................................................1,8 kg
Monterings- och bruksanvisning
Diagram i den här manualen är kanske inte
proportionerligt framställda. Med anledning av
kontinuerliga förbättringar, kan den faktiska
produkten skilja sig något från produkten som
beskrivs här.
Läs detta material innan du använder denna
produkt. Att inte göra det kan leda till allvarliga
skador.
Säkerhet och försiktighetsåtgärder
VARNING:Grundläggande säkerhetsåtgärder
bör alltid följas vid användning av verktyget för
att minska risken för personskador och andra
skador.
Läs alla instruktioner innan du använder denna
produkt!
• Håll arbetsytan ren. Oordning bjuder in till
olyckor.
• Iaktta förhållandena på arbetsområdet.
Använd inte maskiner eller motordrivna
verktyg på fuktiga eller blöta platser. Utsätt
inte för regn. Håll arbetsområdet ordentligt
upplyst. Använd inte eldrivna verktyg i
närvaro av brandfarliga gaser eller vätskor.
• Håll barn borta. Barn bör aldrig tillåtas vara i
arbetsområdet. Låt dem inte hantera
maskiner, verktyg eller förlängningssladdar.
• Förvara utrustning som inte används. När de
inte används ska verktyg förvaras på en torr
plats för att inte angripas av rost. Lås alltid in
verktyg och håll borta från barn. Tvinga inte
verktyget. Det kommer göra jobbet bättre
och säkrare i den kapacitet det var avsett för.
Använd inte olämpliga tillbehör i ett försök att
överskrida verktygets kapacitet.
• Använd rätt verktyg för jobbet. Försök inte få
ett litet verktyg eller tillbehör att göra ett
större industriverktygs jobb. Modiera inte
detta verktyg och använd det inte i ett syfte
som det inte var avsett för.
• Klä dig rätt. Ha inte löst sittande kläder eller
smycken, då de kan fastna i rörliga delar.
Skyddande, elektriskt icke-ledande kläder och
halkfria skor rekommenderas under arbete.
Ha hårskydd för att hålla undan långt hår.
• Var alert. Håll koll på vad du gör och använd
sunt förnuft. Använd inga verktyg när du är
trött.
• Reservdelar och tillbehör. Använd enbart
identiska reservdelar när du gör service. Att
använda andra delar gör garantin ogiltig.
Använd bara tillbehör som är avsedda för att
användas med detta verktyg.
• Underhåll. För din säkerhet bör service och
underhåll göras regelbundet av en
kvalicerad tekniker.
VARNING: Varningar, försiktighetsåtgärder och
anvisningar i denna bruksanvisning kan inte
täcka alla möjliga förhållanden och situationer
som kan uppstå. Operatören bör förstå att sunt
förnuft och försiktighet är faktorer som inte kan
byggas in i produkten, utan måste komma från
operatören själv.
Spara denna manual
Du lär behöva manualen för säkerhets- och
försiktighetsåtgärder, monteringsanvisningar,
drift- och underhållsförfaranden, lista och
diagram över delar. Förvara din faktura
tillsammans med denna manual. Skriv
fakturanumret på insidan av framsidan. Förvara
manual och faktura på en säker och torr plats för
framtida bruk.
Uppackning
När du packar upp, kontrollera att artikeln är
intakt och oskadd. Om några delar saknas eller är
trasiga ska du kontakta säljaren.
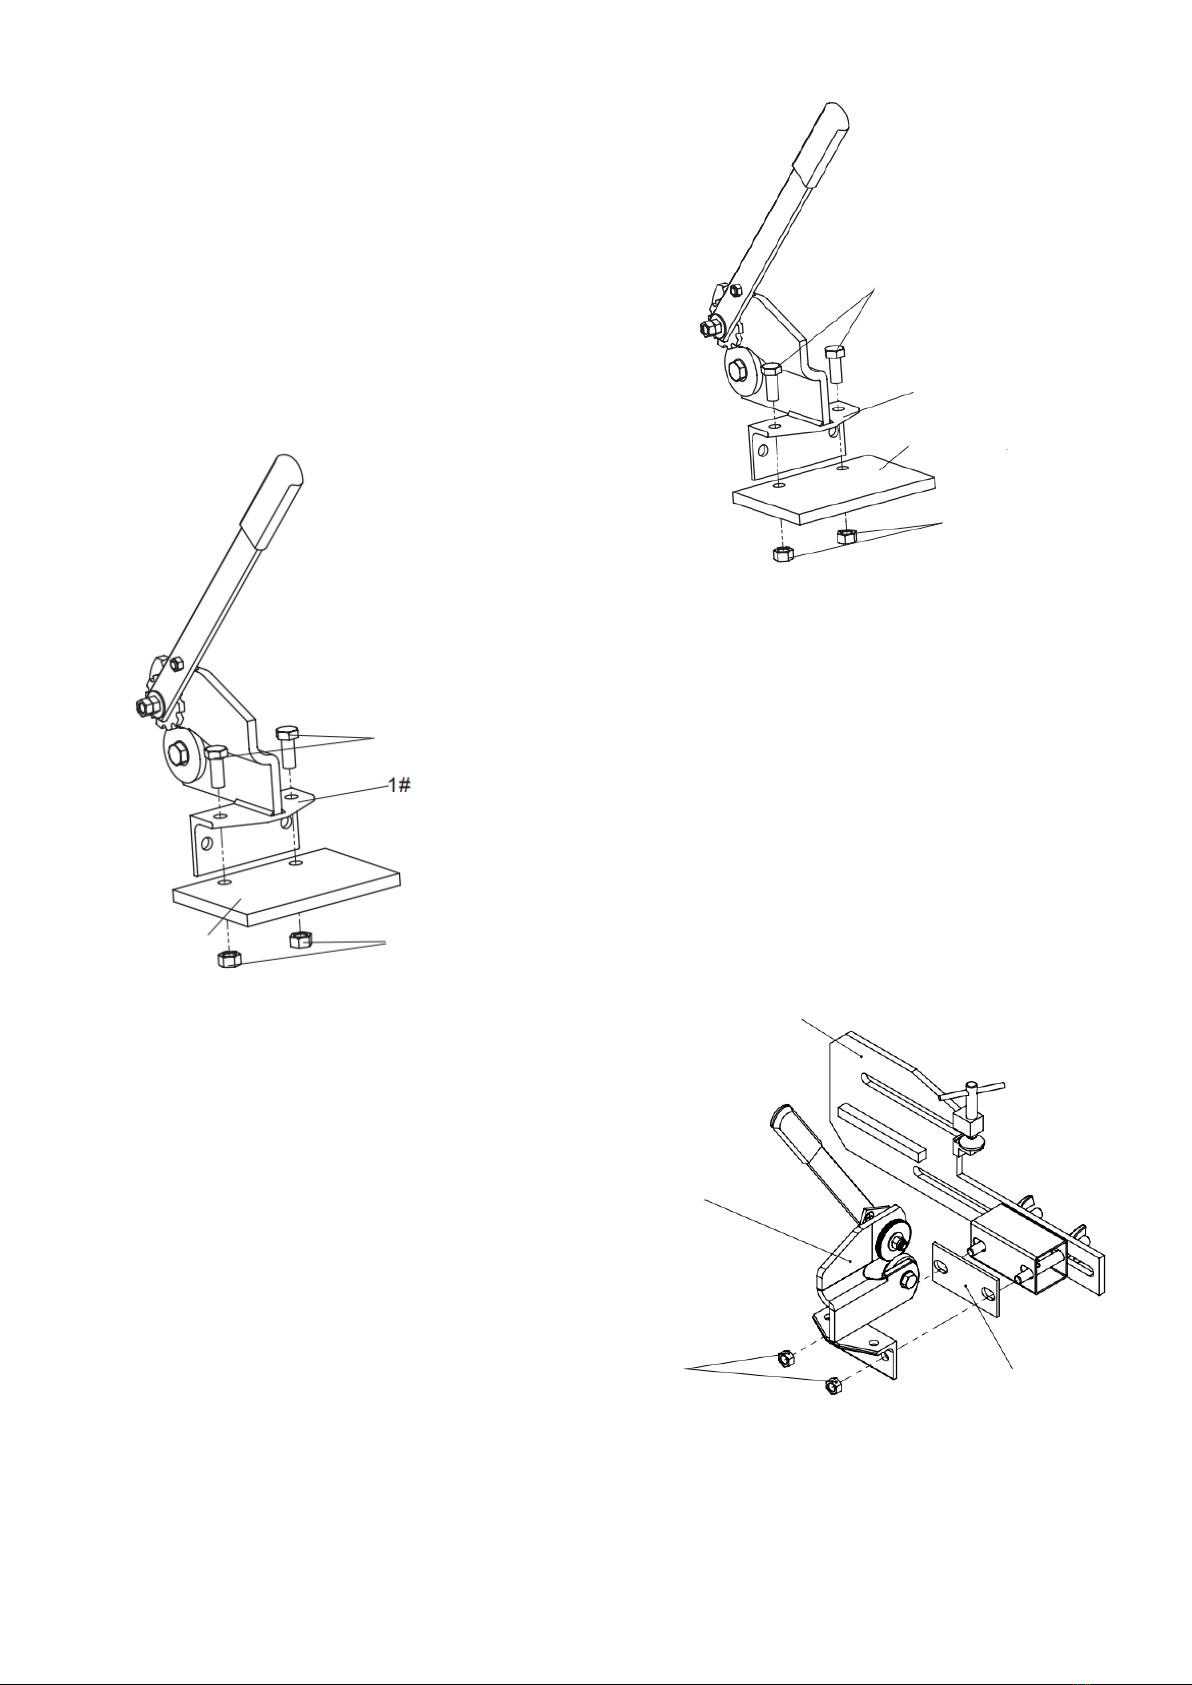
Funktioner
Din metallskärare levereras helt monterad. Följ
stegen nedan för att montera din metallskärare
på din arbetsbänk och förbereda för användning.
Din metallskärare levereras med två fästhål på
basen (#1). Använd lämplig och kraftig
utrustning för att fästa metallskäraren på din
arbetsbänk. Se till att metallskäraren är fäst or-
dentligt innan du använder den.

Montera på en arbetsbänk i trä
1. Mät tjockleken på din arbetsbänk. För att
säkert montera din metallskärare på en
arbetsbänk i trä, rekommenderas det att ha
träet under fästpunkterna.
2. Använd två bultar, muttrar och platta brickor
med lämplig längd för din arbetsbänk.
3. Markera och borra hål genom
arbetsbänken genom att använda basen (#1)
som en mall för de två fästhålen på
metallskärarens bas (#1).
4. Placera metallskäraren på din arbetsbänk och
linjera hålen du borrade i Steg 3 med
fästhålen.
Figur 1 — Montera metallskäraren på en
arbetsbänk i trä
Bultar
Muttrar
Arbetsbänk
Montera på en arbetsbänk i metall
1. Mät tjockleken på din arbetsbänk. Det är
rekommenderat att ha en kapad
förstärkningsplåt i metall redo att monteras
under arbetsbänken i Steg 7.
2. Använd två bultar och muttrar med lämplig
längd för din arbetsbänk.
3. Markera och borra hål genom arbetsbänken
genom att använda basen (#1) som en mall
för de två fästhålen på metallskärarens bas
(#1).
4. Markera och borra förstärkningsplåten
genom att använda basen (#1) som en mall .
5. Placera metallskäraren på din arbetsbänk och
linjera hålen du borrade i Steg 3 med
fästhålen.
6. Montera metallskäraren på arbetsbänken
enligt Figur 2.
7. Kom ihåg att fästa förstärkningsplåten under
arbetsbänken, och sedan gänga på muttrarna
och dra åt bultarna.
Figur 2 — Montera metallskäraren på en
arbetsbänk i metall
Bultar
Bas (#1)
Arbetsbänk
Muttrar
Din metallskärare är redo att användas.
Montera metallskäraren på en
cirkelskärarenhet
1. Skruva loss de två muttrarna (#12) på
cirkelskärarenheten och ta bort
justeringsplattorna (#6, #7, #8, #9, #10).
2. Välj lämplig justeringsplatta och fäst metall-
plåten, justera placeringen och lås in den med
muttrar. (Figur 3).
Cirkelskärarenhet
Metallplåt
#12 Mutter
Justeringsplatta
Figur 3

Användning
1. Se till att spärrhaken (#11) sitter i spärren
(#12) på sidan som är närmast dig, enligt
Figur 4. Om det behövs kan du vända spärren
(#11) över skruven (#13).
2. Höj handtaget (#9) vinkelrätt mot din
arbetsbänk. Se till att spärrhaken (#11) låser i
en av spärrarnas (#12) tänder.
3. Sätt änden av den metallplåt du vill kapa
mellan skärhjulet (#2) och drivhjulet (#14)
enligt Figur 5. Om det är möjligt kan du rista
ett streck på metallplåten enligt den kapning
du vill göra.
Underhåll
Kontinuerlig smörjning av skärhjulet (#2) och
drivhjulet (#14) kommer förlänga livslängden på
skärkanterna och göra skärandet enklare.
Nr Beskrivning Antal
1 Bas 1
2Skärhjul 1
3 Hylsa 1
4Bricka 10 2
5Mutter M10 1
6 Bricka 8 1
7Mutter M8 2
8 Mutter M6 1
9 Handtag 1
10 Handtagsskydd 1
11 Spärrhake 1
12 Spärr 1
13 Skruv M6x20 1
14 Drivhjul 1
15 Stift 1
16 Hylsa 1
17 Bult M8x40 1
18 Bricka 8
19 Bult M10x30 1
4. Dra handtaget (#9) mot dig medan du matar
metallplåten i skärhjulet (#2).
5. Dra upp handtaget (#9) till vinkelrätt, så att
spärren (#11) kan haka fast i en av spärrar-
nas (#12) tänder. Dra handtaget (#9) mot dig
för att fortsätta skära metallplåten.
6. Upprepa steg 4 och 5 tills du har skurit
färdigt.

Contact
PELA Tools
Solängsvägen 13
SE-513 70 Borås
Telefon: 033-202650
E-mail: [email protected]
Environmental protection /
Scrapping
Recycle any unwanted material, do not
throw it in the household rubbish. All
machines, accessories and packaging
must be sorted and left at a recycling center and
disposed of in an environmentally friendly
manner.
Specifications
Maximum capacity ...................1.6 mm steel plate
Weight.............................................................1,8 kg
Installation and operating instructions
Diagrams in this manual may not be drawn to
scale. Due to continuous improvements, the
actual product may differ slightly from the
product described here.
Please read this material before using this
product. Failure to do so may result in serious
injury.
Unpacking
When unpacking, check that the item is intact
and undamaged. If any parts are missing or
broken, please contact the seller.
Functions
Your metal cutter is delivered fully assembled.
Follow the steps below to mount your metal
cutter on your workbench and prepare for use.
Your metal cutter comes with two attachment
holes on the base (#1). Use appropriate and
heavy-duty equipment to secure the metal cutter
to your workbench. Make sure the metal cutter is
attached properly before using it.
Safety and precautions
WARNING: Basic safety precautions should
always be followed when using the tool to reduce
the risk of personal injury and other damage.
Read all instructions before using this product!
Keep the work surface clean. Disorder invites
accidents.
• Observe the conditions in the work area. Do
not use machinery or power tools in damp
or wet locations. Do not expose to rain. Keep
the work area properly lit. Do not use power
tools in the presence of ammable gases or
liquids.
• Keep children away. Children should never
be allowed in the work area. Do not allow
them to handle machinery, tools or extension
cords.
• Store equipment that is not in use. When not
in use, tools should be stored in a dry place
to prevent them from rusting. Always lock
up tools and keep away from children. Do
not force the tool. It will make the job better
and safer in the capacity it was intended for.
Do not use inappropriate accessories in an
attempt to exceed the tool’s capabilities.
• Use the right tool for the job. Do not try to
make a small tool or accessory do the job of
a larger industrial tool. Do not modify this tool
or use it for a purpose for which it was not
intended.
• Dress appropriately. Do not wear loose
clothing or jewelry, as they can get caught in
moving parts. Protective, electrically
non-conductive clothing and non-slip shoes
are recommended during work. Wear hair
protection to keep long hair out.
• Be alert. Watch what you’re doing and use
common sense. Do not use tools when you
are tired.
• Spare parts and accessories. Use only
identical spare parts when servicing. Using
other parts will void the warranty. Use only
accessories intended for use with this tool.
• Maintenance. For your safety, service and
maintenance should be done regularly by a
qualied technician.
WARNING: Warnings, precautions and
instructions in this user manual cannot cover
all possible conditions and situations that may
arise. The operator should understand that
common sense and caution are factors that
cannot be built into the product, but must come
from the operator himself.
Save this manual
You will need the manual for safety and
precautions, assembly instructions, operating
and maintenance procedures, list and parts
diagram. Keep your invoice together with this
manual. Write the invoice number on the inside
of the front cover. Keep the manual and invoice in
a safe and dry place for future use.

Mount on a wooden workbench
1. Measure the thickness of your workbench. To
securely mount your metal cutter to a
wooden workbench, it is recommended to
have the wood under the attachment points.
2. Use two bolts, nuts and at washers of the
appropriate length for your workbench.
3. Mark and drill holes through the workbench
using the base (#1) as a template for the
two mounting holes on the base of the metal
cutter (#1).
4. Place the metal cutter on your workbench
and line up the holes you drilled in Step 3 with
the mounting holes.
Figure 1 — Mount the metal cutter on a
wooden workbench
Bolts
Nuts
Work bench
Mount on a metal workbench
1. Measure the thickness of your workbench. It
is recommended to have a cut metal
reinforcement plate ready to be mounted
under the workbench in Step 7.
2. Use two bolts and nuts of the appropriate
length for your workbench.
3. Mark and drill holes through the workbench
using the base (#1) as a template for the
two mounting holes on the base of the metal
cutter (#1).
4. Mark and drill the reinforcement plate by
using the base (#1) as a template .
5. Place the metal cutter on your workbench
and line up the holes you drilled in Step 3 with
the mounting holes.
6. Mount the metal cutter on the workbench
according to Figure 2.
7. Remember to attach the reinforcement plate
under the workbench, and then thread the
nuts and tighten the bolts.
Figure 2 — Mount the metal cutter on a metal
workbench
Bolts
Base (#1)
Work bench
Nuts
Your metal cutter is ready to use.
Mount the metal cutter on a circle cutter
assembly
1. Unscrew the two nuts (#12) on circle cutter
unit and remove the alignment plates (#6, #7,
#8, #9, #10).
2. Select the appropriate adjustment plate and
attach the metal plate, adjust the position and
lock it with nuts. (Figure 3).
Circle cutter unit
Metal plate
#12 Nut
Adjustment plate
Figure 3

Use
1. Make sure the latch (#11) is in the latch (#12)
on the side closest to you, as shown in Figure
4. If necessary, turn the latch (#11) over the
screw (#13).
2. Raise the handle (#9) perpendicular to your
workbench. Make sure the ratchet (#11)
engages one of the teeth of the ratchet (#12).
3. Place the end of the sheet metal you want
to cut between the cutting wheel (#2) and
the drive wheel (#14) as shown in Figure 5.
If possible, you can score a line on the sheet
metal according to the cut you want to make.
Maintenance
Continuous lubrication of the cutting wheel (#2)
and drive wheel (#14) will extend the life of the
cutting edges and make cutting easier.
No Description Qty
1 Base 1
2Cutting wheel 1
3 Socket 1
4Spacer 10 2
5Nut M10 1
6 Spacer 8 1
7Nut M8 2
8 Nut M6 1
9 Handle 1
10 Handle protection 1
11 Latch 1
12 Block 1
13 Screw M6x20 1
14 Drive wheel 1
15 Pin 1
16 Socket 1
17 Bolt M8x40 1
18 Spacer 8
19 Bolt M10x30 1
4. Pull the handle (#9) toward you while feeding
the sheet metal into the cutting wheel (#2).
5. Pull the handle (#9) up to perpendicular,
allowing the latch (#11) to engage one of the
teeth of the latch (#12). Pull the handle (#9)
towards you to continue cutting the sheet
metal.
6. Repeat steps 4 and 5 until you have nished
cutting.

Verktygsboden Erlux AB Källbäcksrydsgatan 1, SE-507 42 Borås
© Verktygsboden · Borås · Sweden · 0120504-03
Table of contents
Languages:
Other pela tools Cutter manuals