Pelgrim STM550RVS User manual

Handleiding
User Guide
Anleitung
Manual
STM550RVS
STM550MAT
Steamer
Four Vapeur
Dampfgarer
Steamer

EDITORIAL
2
Dear Customer,
You have just acquired a new PELGRIM steamer and we would like to thank you.
Our research teams have created this new generation of appliances to let you show off
your culinary talents and create delicious meals every day.
With pure lines and modern aesthetics, your new PELGRIM steamer will blend
harmoniously into your kitchen and will perfectly combine cooking performance and ease
of use.
In the PELGRIM line of products, you will also find a wide range of cookers, hobs,
ventilation hoods, dishwashers, microwave ovens and built-in refrigerators, which can be
coordinated with your new PELGRIM steamer.
A specialist in all things cooking-related, PELGRIM helps to improve your culinary
success, providing shared pleasure and user-friendliness with products that are ever
more effective, easy to use, environmentally friendly, attractive and reliable.
The PELGRIM brand.

3
TABLE OF CONTENTS
Editorial p. 2
Contents p. 3
Steam cooking
Overview p. 4
The appearance of your steamer p. 5
Accessories p. 6
Installing your steamer
Electrical connection p. 7
Build-in p. 8
Demo mode p. 9
Setting the clock p. 10
Programming for immediate steaming p. 11
Locking display p. 14
Water tank control p. 14
Using the timer p. 15
Cooking chart p. 16
Caring for your steamer p. 19
Changing the interior lighting p. 20
Handling malfunctions p. 20

NOTE TO USER
4
Steam cooking
Overview
Steam cooking presents nothing but advantages if you follow the instructions for use. Healthy and
natural, steam cooking preserves the full flavour of foods. A delicate sauce or aromatic herb
seasonings add that something extra that makes the difference.
This kind of cooking releases no odours. There is no need to season the cooking water with salt,
herbs or spices; however, you can flavour a fish by placing it on a bed of seaweed or make a savoury
poultry dish by adding a bunch of rosemary or tarragon.
You can simultaneously cook meat, fish and vegetables.
Compared to boiling, steaming offers nothing but advantages:
Cooking starts immediately whereas for food in a water-filled pan, the cook time only begins counting
down once the water returns to a full boil.
It is healthy: vitamins (those that are water soluble) and minerals are well preserved because they
scarcely dissolve in the condensation water that touches the food.
Moreover, no fats are used for this type of cooking.
The steam maintains the taste of food. It does not add odours, nor the taste of the grill or the pan.
Furthermore, it takes nothing away because the food is not diluted in the water.
Steam does not spread tastes or odours therefore do not hesitate to save both time and money by
cooking items at the same time, but without touching. For example, you can cook a fish next to a
dessert.
Cut into pieces, food cooks faster and more evenly than if left whole.
Steam is also appropriate for blanching, defrosting and reheating or even keeping foods warm,
especially sauces.
First use a very small amount of fat to heat meats like poultry, veal and pork so that they take on an
appetizing browned appearance. Then finish cooking them using the steam method.
Words of advice: there is no point in using this cooking method to prepare fish that is not fresh or
vegetables left in the refrigerator for a week: the results will be catastrophic!

DESCRIPTION
5
Control panel
Tank
Display
Steam
generator
1. Duration and temperature selection button
2. Time and temperature adjustment button (-)
3. Time and temperature adjustment button (+)
4. Start/Stop button
5. Keypad locking
6. Steam cooking symbol
7. Water circuit problem indicator
8. Temperature indicator
9 Duration and time
6
5
7
4
1
Water
intake tube
8
3
2
Close-up of control panel
Gutter
The Appliance
9

DESCRIPTION
6
Accessories
Tank that allows for independent water supply to the steamer.
Its capacity is approximately one litre (maximum level).
Removable tank
Tap water can sometimes be too hard. Lightly mineralised,
still, bottled water will be more effective in cleaning your
oven.
Using demineralised water is prohibited (not for human
consumption).
Please do not use decalcified water or water treated by a
water decalcifier.
This can cause damage to the steam generator.
Perforated stainless steel dish (fig. 1)
Pierced stainless steel cooking dish to prevent contact
between food and the condensation water.
Stainless steel dish (fig. 2)
Stainless steel dish for recovering condensation water.
When steaming vegetables, potatoes. fish or meat:
place the dish (fig. 1) on the dish (fig. 2) in reverse order
so that they do not fit into each other (see diagram). When
storing, place the dish (fig. 1) on the dish (fig. 2) in the
same order so that they fit into each other.
Stainless steel removable support grid (fig 3):
it must be placed in the oven.
The dishes and the rack may be cleaned in the dishwasher.
fig. 3
fig. 1
fig. 2
KITVAPIX (Optional accessory)
The 2-dish kit for steamer includes:
1 x rack.
1 x perforated stainless steel dish.
1 x condensation dish.

INSTALLATION
7
Before connecting the steamer
Warning:
Ensure that your appliance has not
suffered any damage during transport
(deformed seal or door, etc.). If you see
any kind of damage, before doing
anything else, contact your retailer.
In order to easily locate the reference
information for your appliance, we
recommend that you note this
information on the “After-Sales Service
Department and Customer Relations”
page.
Electrical connections
Ensure that:
- the electrical installation has sufficient
voltage.
- the electrical wires are in good condition.
- the diameter of the wires complies with the
installation requirements.
- your electrical installation is equipped with 16-
ampere thermal-sensitive protection.
In case of doubt, consult your electrician-
installer.
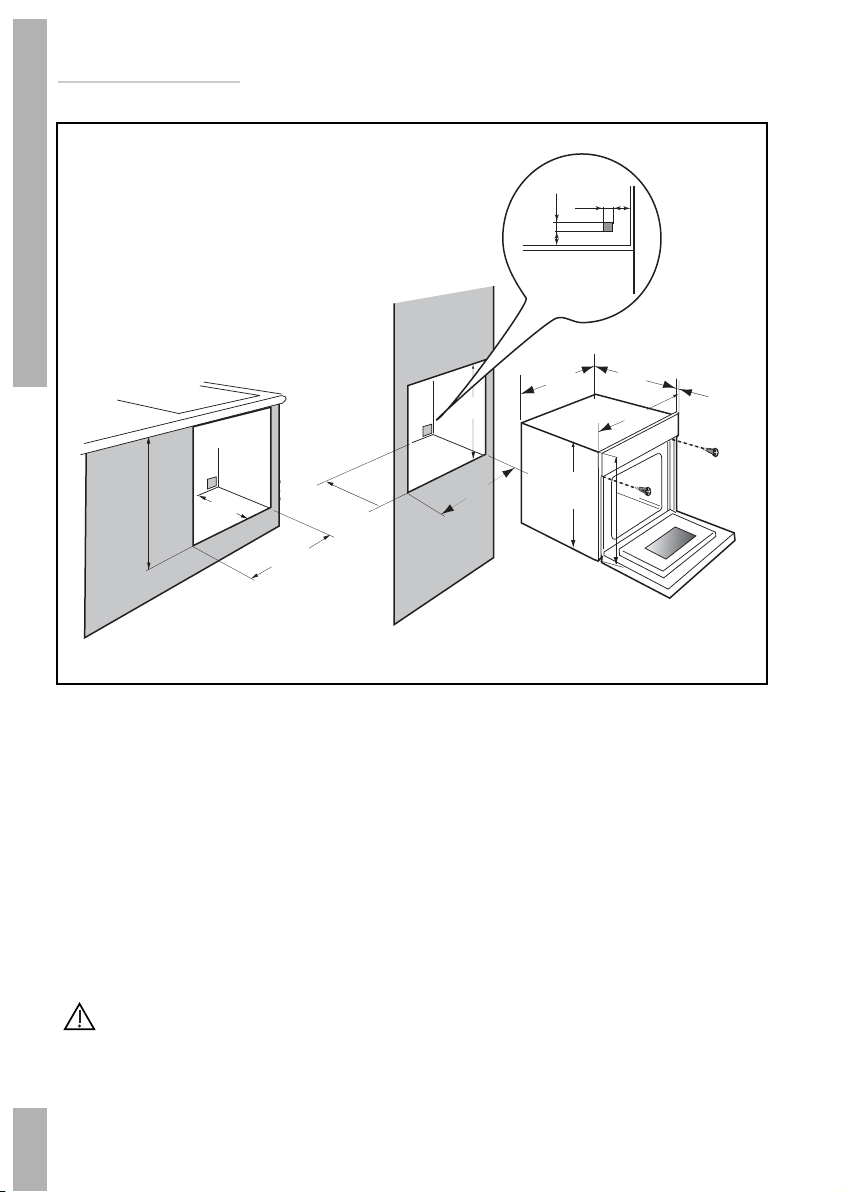
The electrical connections are made before the
appliance is installed in its housing.
The appliance must be installed correctly to
ensure electrical safety. During installation and
maintenance operations, the appliance must be
unplugged from the electrical grid; fuses must
be cut off or removed.
The oven must be connected with a power cable
(standardised) with three 1.5 mm² conductors
(1 ph +1 N + ground) that must be connected to
a monophase 220-240 V network via a CEI 60083
standardised receptacle (1 ph +1 N + ground
lead) or in accordance with installation rules.
The safety wire (green/yellow) is connected to
the appliance’s terminal and must be connected
to the installation earth .
In the case of connections with an electric
receptacle, it must remain accessible after
installation of the appliance.
The oven’s neutral conductor (blue wire) must
be connected to the network’s neutral
conductor.
In the electrical connection, ensure there is a
means available to the user to ensure they are
able to disconnect the appliance from the outlet,
either by pulling the plug from the outlet or by
turning off a switch, in compliance with
installation rules.
If the power cable is damaged, it should be
replaced by the manufacturer, its after-sales
service department or by a qualified person to
avoid danger.
Warning:
We cannot be held responsible for
any accident resulting from a non-
existent, defective or incorrect earth
lead.
If the steamer malfunctions in any way,
unplug the appliance or remove the fuse
corresponding to the sector where the
oven is hooked up.
It is dangerous for anyone other than a
qualified person to perform maintenance
operations or repairs.

INSTALLATION
8
Build-in
550
595
400
26
378
450
560
550
mini
560
550 mini
450
456
445
20
50
10 50
1. Place the appliance in the nook. The appliance must be horizontal.
Check the position.
2. For greater stability, attach the steamer in the cabinet with two
screws through the holes provided for this purpose on either side
of the front inner panels.
3. Make the electrical connection.
Ensure that the plug will be accessible after
installation.

INSTALLATION
9
Demo mode
Activating
fig.1
Set the time to 00:00.
Confirm with button “START”.
fig.2
Press the and – buttons simultaneously for
10 seconds until “DEMO ON” is displayed.
The demo mode is activated.
fig.1
Set the time to 00:00.
Confirm with button “START”.
Press the and – buttons simultaneously for
10 seconds until “DEMO OFF” is displayed.
The demo mode is deactivated.
Deactivating

USE
10
Setting the clock
Press the button until the
clock flashes (2 seconds)
Press the + or – buttons to set the time.
If the time is not confirmed using the START button, it is automatically saved
after one minute.
Confirm with the “START” button.
fig. 3
fig.1
fig. 2

USE
11
Steam cooking
Programming for immediate steaming
Steam cooking at 100 °C
Press the “start” button. A cooking time of
25 minutes is suggested (fig. 1).
Set the duration required (min. 5 mins and max.
60 mins) by pressing + or - (fig. 2).
Confirm using the “START” button (fig. 3).
You MUST fill the water tank with fresh water to the max level before cooking.
Return the tank to its housing by firmly pushing ALL THE WAY until you feel
the tank LOCK INTO POSITION.
The symbol and °C light up. When the temperature has been reached (appr. 10 minutes), the
100 °C display stops flashing and a beep is emitted.
Operating
principle
The water contained in the tank arrives in the cavity via a pipe. This
water is transformed into steam when it comes into contact with a
hot surface located in the lower part of the cavity:
this is the steam generator.
There is no need to add water to the cooking dish. To guarantee
REAL STEAM COOKING, your oven is furnished with specially
designed cookware that will allow for perfect cooking.
When in use, the appliance becomes hot. Hot steam will escape when you
open the door of the appliance. Keep children away.
fig. 3
fig.1
fig. 2

USE
12
To avoid compromising steaming results, do not open the appliance door
during cooking.
Programming for immediate steaming with temperature
change
After setting the cooking duration (fig 1) press the
button .
The temperature flashes; you can change it from
55 °C to 100 °C using the + and - buttons. Confirm
using the “START” button (fig. 2).
Steaming begins. The temperature display flashes
while the temperature is increasing (fig. 3).
When the temperature has been reached, the 80 °C
display stops flashing (fig. 4) and a beep is emitted.
fig. 3
fig.1
fig. 2
fig. 4

Changing the steaming
time
At the end of a steaming
programme
0m00s is displayed. The steaming symbol ceases.
Beeps are emitted once a minute for 10 minutes.
To silence the beeps, press the Off button or open
the door.
Cancelling steaming in
progress
During steaming, you can adjust the steaming time
as follows. Press the button until the time
flashes rapidly. Adjust the time with the + and -
buttons and confirm with button “START”.
You can stop steaming at any time by pressing the
“Stop” button (press and hold for approximately one
second).
If steam generation has not yet begun
(approximately one minute), the steamer stops
immediately and the time display disappears.
If steam generation has already begun, it takes
three minutes; a countdown begins and the steam
escapes before the door is opened.
You MUST empty the tank after steaming.
In order to guarantee good steamer
reliability, the fan continues to
function for a short period after
steaming is complete.
Changing steaming
temperature
During steaming, you can adjust the steaming
temperature as follows. Press the button until
the temperature flashes rapidly. Adjust the
temperature with the + and - buttons and confirm
with button “START”.
13
USE

To unlock, open the door and press the “Stop”
button for a few seconds; a beep is emitted and the
padlock disappears.
Open your steamer door, press the “Start/Stop”
button and hold for several seconds. A beep is
emitted and a padlock appears on the screen. From
this moment on, no button is active.
It is possible to lock the display. The lock can only be used after
steaming, when the time of day is displayed.
Locking display
In the event of a water circuit-related problem during steaming, the
“no water” indicator appears and a beep is emitted.
This error is specifically associated with:
- an empty tank.
- a poorly seated tank.
- after checking these two items, steaming
automatically restarts as soon as the door is
closed.
Water tank control
fig.1
fig. 2
Press the START/STOP button (door closed) until the
screen switches off (5 seconds).
Press any button to restart the screen.
fig.1
Extinction
display
USE
14

USE
15
Timer
Your steamer is equipped with an electronic timer that can be used
independent of the steamer functions.
Press the + or - button for a few seconds.
0m00s flashes.
Set the duration required (max. 59 mins
50 seconds) by pressing the +/- buttons.
Confirm by pressing START/STOP.
When the cooking time is finished, the timer
beeps for a few seconds. 0m00s is displayed and
flashes.
Stop beeping by pressing and holding down
START.
Once the timer starts working, you can change
the remaining time by pressing the + or - buttons
and holding down for a few seconds.
To cancel the timer, press STOP for a few
seconds.
Changing or cancelling the timer program
Using the timer
fig. 3
fig.1
fig. 2

COOKING CHART
16
FUNCTIONS
Temperature
°C
STEAMING STEAMING EXAMPLES
Steam cooking
mode most often
used
For cooking fragile
food
Delicate whole fish
(trout)
The meat remains
iridescent, the
collagen does not
appear
Cooking delicate fish
(sardine fillets, red
mullet)
For cooking
fragile food,
fruit, compotes
Cocotte eggs; stuffed
tomatoes. Ramekins,
custard creams, etc.
Terrines, Heating cooked
dishes
Low heat
Melting chocolate, butter.
Slightly warm fruit for
immediate serving
Slow defrosting
without cooking
Defrosting fish fillets
before breading.
Berries that must remain
cool (for pies and
sauces)
Defrosting meats before
grilling (e.g.: sausages)

Steaming chart
17
COOKING CHART
FOOD
whatever the quantity
TIMES °C PREPARATIONS NOTES
VEGETABLES
Artichokes (small)
40 to 45 min. 100 Placed upside down in the dish
• These times
depend on the
type, size and
freshness of the
vegetables.
Follow the
indications that
appear in the
“Preparations”
column.
• The cooking
time remains
the same
regardless of
the quantity to
be cooked.
Example:
1 or 4
artichokes
require the
same cooking
time.
• To check the
level of cooking,
insert the tip of
a knife into the
thickest part of
the vegetable; if
it is cooked
there should be
no resistance.
Asparagus
35 to 40 min. 100 For tips only, decrease cooking
time
Broccoli
18 min. 100 In small bunches
Carrots
20 to 22 min. 100 In thin, round slices
Celeriac
25 to 30 min. 100 In thin slices
Pumpkin
15 to 20 min. 100 In cubes
Mushrooms
15 min. 100 In thin strips
Cabbage
30 to 35 min.
22 min.
30 to 35 min.
100
Brussels sprouts
Cauliflower in small bunches
Green, chopped
Courgettes
10 to 15 min. 100 In round slices
Chinese artichokes
20 min. 100
Spinach
20 min.
35 min. 100 (fresh) stir while steaming
(frozen) ” ”
Endives
30 min. 100 Core removed, cut in half
lengthwise
Fennel
22 min. 100 Cut in half
Green beans
30 to 35 min. 100
Turnips
15 to 20 min. 100 In cubes
Fresh peas
20 to 25 min. 100 /
Leeks
25 min. 100 Cut in half
Potatoes
25 min.
40 to 45 min. 100 Cut in round slices
Whole
SHELLFISH
CRUSTACEANS
Scallops
10 to 12 min. 90 With seasoning • Place the
scallops on the
grid of the glass
dish, add
aromatic herbs.
• Place the shell
fish on a bed of
e.g. seaweed.
Mussels/periwinkle
20 to 25 min. 95 With seasoning
Crabs/hermit crabs
25 min. 95 /
Lobsters
30 to 35 min. 95 Depending on weight
Langoustines
12 to 15 min. 90 /
FRUITS
PUDDINGS
Apples/pears/
peaches
10 to 15 min. 90 Whole, peeled
• Times depend
on ripeness.
Compote
25 min. 95 Fruit in strips
Custard creams
10 min. 90 In ramekins

18
COOKING CHART
FOOD
whatever the quantity
TIMES °C PREPARATIONS NOTES
FISH
Northern pike
25 to 30 min. 85 Whole (1 kg)
• *Steaks: round
slices of fish of 2
to 3 cm in
thickness
(180/200g) per
person.
• Use only very
fresh products.
• Place whole
fish in the dish
as is or on bay
leaves, fennel or
other aromatic
herbs.
• As soon as
cooking is
complete,
remove the skin,
which will
detach easily.
Cod/hake
13 to 15 min. 85 Steaks (180 g)*
Sea bream
20 to 25 min. 85 Whole (1kg)
Haddock
15 min. 75 Filets
Herring
20 min. 85 Whole (200g)
Pollack/black cod
15 to 20 min. 85 Steaks (180 g)
Monkfish
15 min. 80 Depending on thickness
Mackerel
20 min. 85 Whole (250g)
Atlantic cod
15 min. 75 Filets
Ray
25 to 30 min. 80
Red mullet
15 min. 80 Whole (200g)
Red mullet/Sole
10 min. 75 Filets
Spotted dogfish
20 min. 85 Thick steaks
(6 to 10 cm in length)
Salmon
15 to 20 min. 85 Steaks (180/200 g)
Tuna
20 to 25 min. 10 0 Steaks (180/200 g)
Trout
Whole (1kg)
20 to 25 min. 10 0 Whole (200g)
13 to 15 min.
MEATS
Beef
15 to 30 min. 100 Roast 800 g.: 55 to 60 min.
• Then grill in the
oven or in a grill
pan.
Pork (tenderloin)
25 min. 100
Chicken thighs: 35 to 40 min.
Poultry (breast)
(stuffed)
20 to 25 min.
25 min.
100
95 Roast turkey: 50 -60 minutes.
Sausages
20 min. 90 Morteau 400 g
Boudins
10 to 15 min. 90
EGGS
Start with very fresh
eggs kept at room
temperature
7 min. 100 Boiled: placed directly on the grid.
8 min. 100 Softboiled: placed directly on the grid.
10 to 12 min. 100 Hard-boiled
5 to 6 min. 100
Sunny side up: broken in an individual dish
placed on the grid and covered with cooking
wrap.
90 Cocotte: See detailed recipes.
RICE, PASTA
Place directly in a dish then cover with water or milk. The steam is not enough to saturate
these inflating foods. Place a sheet of aluminium foil on the dish to prevent water droplets
from falling in.
Rice pudding 30 min. 100 100 g rinsed rice - 20 cl milk -
2 dessertspoons sugar • Fluff with a fork
when cooking is
complete.
Semolina 20 min. 100 200 gr (1/4 litre water)

MAINTENANCE
19
Maintenance Cavity (after each use)
Wipe the cavity with a dry cloth after the steam generator has
cooled or let the cavity air dry by leaving the door open.
Water intake tube (once a month)
Remove the water intake tube by turning it toward you.
Remove any hard-water deposits that may be inside (using a thin,
pointed object such as a thin skewer or a knitting needle).
Steam generator (once a month)
Pour 1/2 cup of white vinegar on the generator.
Let sit for a few minutes, then clean and rinse with water.
Do not use sponges or abrasive powders, nor coffee maker
cleaning agents.
Cleaning the Gutter
Remove the gutter by pulling it upward. Wipe it off and return
it to its position using the three notches provided.
The steamer should not be cleaned with a steam
cleaner.
Caring for your steamer

MAINTENANCE
20
Handling malfunctions
WHAT SHOULD YOU DO?
POSSIBLE
CAUSES
Your display does not light
up.
The bulb isn’t working any-
more.
Water or steam leak
around the door during
steaming.
Steamer is not connected
to power source.
Electronic board is not
functioning.
- Check that the appliance
is receiving electricity
(good fuse).
- Call the Service
Department.
- Change the bulb.
- Connect the steamer.
- Change the fuse.
The bulb is out of order.
The steamer is not
connected.
Your fuse is out of order.
The door is not properly
closed.
The door seal is
defective.
- Call the Service
Department.
YOU NOTICE THAT...
- Turn the view port a quarter turn to the left.
- Unscrew the bulb in the same direction.
Bulb specifications:
- 15 W - 220-240 V
- 300°C - E 14 cap
- Replace the bulb then reposition the view port, making sure the
joints are correctly positioned.
- Reconnect your steamer.
The bulb is located at the back right of your
steamer’s cavity.
Disconnect your steamer
before performing any task on
the bulb to avoid the risk of electric
shock.
Changing the interior lighting
This manual suits for next models
1
Table of contents
Other Pelgrim Kitchen Appliance manuals
Popular Kitchen Appliance manuals by other brands

Thermos
Thermos FUNTAINER THERMOSFD23 Care and use guide

Electrolux
Electrolux EKI51300OX user manual

Tiger
Tiger CQE-A11U instruction manual

Silvercrest
Silvercrest SWWS 240 C2 operating instructions

Silvercrest
Silvercrest SCCM 800 A1 operating instructions

Twin Eagles
Twin Eagles TEBK24-B Installation, operation & maintanance manual