manuals.online logo
Brands
  1. Home
  2. •
  3. Brands
  4. •
  5. Pelsis
  6. •
  7. Insect Control Equipment
  8. •
  9. Pelsis CURTIS DYNA-FOG HURRICANE CL User manual

Pelsis CURTIS DYNA-FOG HURRICANE CL User manual

Introduction
Thank you for purchasing the Hurricane CL. Please read this
User Guide to understand and ensure safe, proper, effective and
responsible use of the Hurricane CL.
Safety Precautions
Please ensure you have read and fully understood the safety
precautions before operating this appliance. For further in depth
instructions please refer to the supplementary on-line user manual
(www.hurricane-es.com).
Instructions for use of this product will vary depending on chemical applications.
Always read the product label when preparing your solution.
• Always comply with any requirements for Personal Protective Equipment
(PPE) as required by the formulation label.
• This appliance is to be kept out of reach from children. However, it can be
used by children aged 8 years and above, as well as persons with reduced
physical, sensory or mental capacities or lack of experience and knowledge,
provided they have been given supervision or instruction concerning use of
the appliance in a safe way,and understand the hazards involved.
• Children should not play with the appliance, and cleaning and user
maintenance should not be made by children without supervision.
• Children should be supervised to ensure they do not play with the appliance.
• Users should hold the appliance and manually cover the designated fogging
areas.
• The fogger should not be left operating unattended, and for the most efcient
application it should not be left stationary.
• This fogger can be used with water-based, oil-based, and solvent-based
formulations.
• Never direct fogging at live electrical items, animals,humans,etc.Remember
to cover aquariums before fogging takes place.
• Ensure you are wearing appropriate PPE when operating this fogger.
• Do not use a fogger that is broken or damaged in any way. Do not alter the
fogger by adding or removing parts.
• Do not restrict the motor blower air intake area.
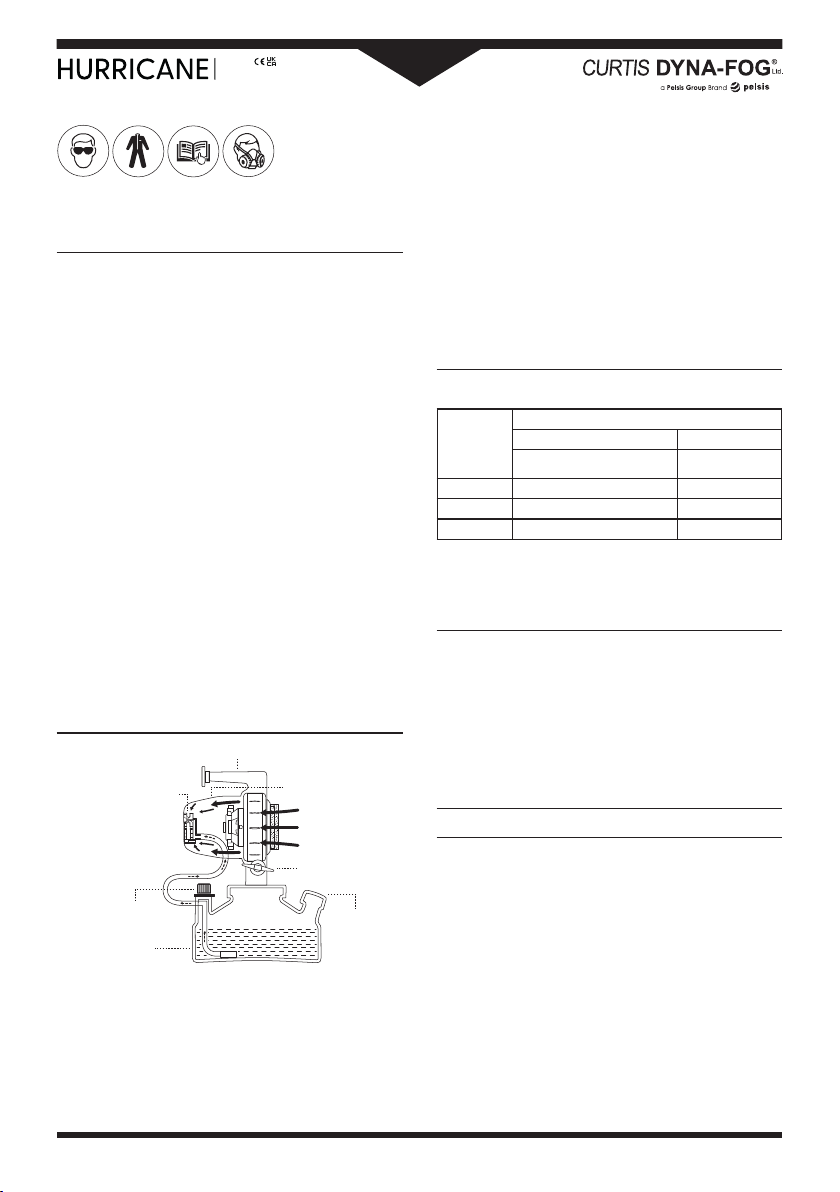
Please take note of the below diagram to familiarise yourself with the design and
structure of the unit: CARRYING HANDLE
AIR INTAKE AREA
ON/OFF SWITCH
WITH LIGHT
REMOVABLE FILLING
CAP WITH TETHER
ADJUSTABLE
LOCKING DEVICE
STAINLESS STEEL
PRECISION METERING
VALVE WITH FILTER
THREE (3) PRECISION
NOZZLES FOR GREATER
OUTPUT CAPACITY
TRANSLUCENT
CORROSION
AND IMPACT
RESISTANT
TANK
Formulation
• Always read the product label when preparing your solution and ensure the
formulation is suitable for the intended application.
• This fogger can be used with water-based, oil-based, and solvent-based
formulations. Ensure that formulation is applied only in strict compliance
with the formulation label and store formulation in its original labelled
container.
• Remove the lling cap to pour formulation into the tank. Add only premixed/
diluted formulations to the tank.
Operation
• With the fogger power off, remove the lling cap and pour your premixed
formulation into the tank, up to a maximum 3.8 litres,and replace the cap.
• Ensuring the fogger is pointing in a safe direction, turn on via the power
switch and select the appropriate ow valve setting.
• The exact method of operation is dependent on a number of factors,
including the application, ow rate, formulation viscosity, but best results
are normally achieved maintaining a distance of 1-4 metres from the items
you want to fog. Keep moving the fogger with slow, steady movements for
an even coverage, starting from the highest point. If there is liquid run-off
then the application is too heavy, either move further away, adjust the ow
rate or speed up.
• Do not allow the fogger to operate unattended.Do not stand in water or hold
over water while operating fogger and do not allow the unit to be submersed
in water.Do not use outdoors when it’s raining.
• Do not block the air intake area.
Flow Rate Information
Please use the below table as a reference for the ow rate of the Hurricane CL.
Metering
Valve
Setting
Hurricane Flow Rate And Droplet Size
Flow Rate Droplet Size
mL/Min Microns - Volume
Median Diameter
#1 60 80 MICRONS
#2 90 80 MICRONS
#3 120 80 MICRONS
• Thicker viscosity liquids will ow at lower rates than demonstrated in the
above table, and produce a bigger droplet size.
• Adjusting the valve will regulate ow rate.
• When the valve is turned clockwise, ow rate will reduce; when turned anti-
clockwise, ow rate will increase.
After Use
• Turn the ow valve to the OFF position after each fogging application while
the motor is still operating to allow the clearing of the lines.
• Turn off the appliance before disconnecting the battery power supply.Do not
turn off the fogger or the battery power supply with wet hands.
• Clean the Air Intake Filter after each application. If the lter becomes saturat-
ed while the fogger is in operation, switch it off and clean the lter.
• Formulation should not be stored in the tank.The tank should be cleaned af-
ter each use with hot water with a detergent solution and ushed thoroughly
with clean water before reuse. To ensure a full ush, fully open the valve and
operate the fogger for 3 to 5 minutes.
Hurricane External Battery System
Safety
This battery is specically designed for the Pelsis Limited Hurricane CL Fogger. Do not
try to use this battery on other products or systems. The battery must be protected at
all times from moisture/water damage. Ensure all cabling is free from nicks, cracks,
and other signs of abuse, however, if found, do not use the appliance and contact
your supplier for repair.
To keep this product safe please:
Store in a cool environment or at room temperature. When possible, charge the
battery at room temperature, keeping the charger in a cool, ventilated area when in
a warm climate. Store the battery fully charged when left idle for longer than a 30-
day period. Do not open the battery pack or attempt to repair and never connect the
Hurricane CL to the mains.
CL
36V Cordless Fogger
USER GUIDE Pelsis UK Contact Number: +44 (0) 800 988 5359
Pelsis Belgium Contact Number: +32 (0) 3 886 22 11
Pelsis UK Contact Number: +44 (0) 800 988 5359
Pelsis Belgium Contact Number: +32 (0) 3 886 22 11
Pelsis Ltd
Sterling House, Grimbald Crag Close,
Knaresborough, HG5 8PJ, UK
Pelsis Belgium NV
Industrieweg 15, 2880
Bornem, Belgium
Flight safety
If you intend to travel with your kit, this battery pack cannot be carried on to aeroplanes
as the pack is over the 165Wh limit for carry-on luggage and lithium-ion batteries are
forbidden to be placed in the hold of the plane. You will need to send this as cargo
with the correct dangerous goods paperwork and procedures. The battery pack has
undergone UN38.3 testing so is safe for ights with the correct procedures.
Instructions for use
Prior to rst use, the battery should be charged for 4-5 hours. This will allow the battery
to supply power to the fogger for around 105 minutes of use.
Attaching your waist strap
A– 2x M3 screws
B– 2x M3 washer
C– Material Waist Strap
D– Stainless Steel Belt Bracket
Adjust strap (C) to your waist size before attaching to unit. Rest the Hurricane battery
pack on it’s back so the screw holes (E) are facing up, place waist strap (C) at between
both holes. Place belt bracket (D) so the top and bottom sit ush with the unit, secure
with screws(A) and washers (B).
Features
Your new battery pack has been designed to power the Pelsis Limited Hurricane CL
Fogger.
The battery pack offers a shoulder strap for convenient carrying whilst boasting a
optional waist strap to keep the battery pack in place allowing the user to work freely
without movement from the battery. Use the straps to tighten or loosen to suit.
A 5-step LED gauge is located on the face of the battery to show actual state of charge,
press the button for this to display. The below product image demonstrates this:
The 3-pin y lead coming out the face of the battery is for power. Please plug this
into the Hurricane CL fogger in order to power the unit. When the battery is not in
use and you need to charge the battery, please only use the charger provided and
charge via this lead.
Battery specications
Power type: 36V DC
Battery type: Lithium Ion
Battery life: 105 minutes
Battery charge time: 4-5 hours
Charger
The charger has a universal AV voltage input and can be used worldwide, using the
appropriate mains power cords. Please contact Pelsis Limited should you require
additional information.
The charger LED system will show a green light once charging is complete. Pressing
the LED gauge button will cycle the LEDs to show charging.
Please only use this charger with the supplied battery pack.
Wiring Instructions
The wires in the mains lead are coloured in accordance with the following code:
Blue = Neutral
Brown = Live
As the colours of the wire in the mains lead of this appliance may not correspond with
the colour marking identifying the terminals on your plug, proceed as follows:
• The wire which is coloured BLUE must be connected to the terminal which is
marked with the letter N.
• The wire which is coloured BROWN must be connected to the terminal which is
marked with the letter L.
• No wire must be connected to the terminal which is marked with the letter E or the
following symbol.
For UK
This charger is supplied with a lead which is tted with a BS1363 mains plug and a
BS1362 3A fuse. If this plug is removed from the lead,please ensure it is disposed of
safely as a disconnected plug is dangerous if reconnected to the mains. If any other
type of plug is used, a 3A fuse must be tted.
For EU
The appliance is supplied with a lead which is tted with a Schuko mains plug. If this
plug is removed from the lead,please ensure it is disposed of safely as a disconnected
plug is dangerous if reconnected to the mains.
For private households: Information on Disposal for Users of WEEE
This symbol (Figure. 1) on the product(s) and / or accompanying documents means
that used electrical and electronic equipment (WEEE) should not be
mixed with general household waste.
For proper treatment, recovery and recycling, please take this
product (s) to designated collection points where it will be accepted
free of charge.
Alternatively, in some countries, you may be able to return your
products to your local retailer upon purchase of an equivalent new product.
Disposing of this product correctly will help save valuable resources and prevent
any potential negative effects on human health and the environment, which could
otherwise arise from inappropriate waste handling.
Please contact your local authority for further details of your nearest designated
collection point.
Penalties may be applicable for incorrect disposal of this waste, in accordance with
your national legislation.
For professional users in the European Union
If you wish to discard electrical and electronic equipment (EEE), please contact your
dealer or supplier for further information.
For disposal in countries outside of the European Union
This symbol is only valid in the European Union (EU). If you wish to discard of this
product, please contact your local authorities or dealer and ask for the correct method
of disposal.
Figure. 1
Pelsis UK Contact Number: +44 (0) 800 988 5359
Pelsis Belgium Contact Number: +32 (0) 3 886 22 11
USER GUIDE
Pelsis Ltd
Sterling House, Grimbald Crag Close,
Knaresborough, HG5 8PJ, UK
Pelsis Belgium NV
Industrieweg 15, 2880
Bornem, Belgium
Pelsis Belgium NV
Industrieweg 15, 2880
Bornem, Belgium

Other Pelsis Insect Control Equipment manuals

Pelsis Curtis Dyna-Fog Hurricane User manual

Pelsis

Pelsis Curtis Dyna-Fog Hurricane User manual

Pelsis Curtis Dyna-Fog Hurricane User manual

Pelsis

Pelsis Curtis Dyna-Fog Hurricane User manual

Pelsis Green Protect Fruit Fly Trap User manual

Pelsis

Pelsis Green Protect Fruit Fly Trap User manual

Pelsis INSECT-O-CUTOR HALO AQUA HL2X45IPX User manual

Pelsis

Pelsis INSECT-O-CUTOR HALO AQUA HL2X45IPX User manual

Pelsis B&G FLEX-A-LITE 2600 User manual

Pelsis

Pelsis B&G FLEX-A-LITE 2600 User manual

Pelsis Insect-O-Cutor Halo Curve User manual

Pelsis

Pelsis Insect-O-Cutor Halo Curve User manual

Pelsis LURALITE PLUS R4 User manual

Pelsis

Pelsis LURALITE PLUS R4 User manual

Pelsis Synergetic Halo 15W User manual

Pelsis

Pelsis Synergetic Halo 15W User manual

Popular Insect Control Equipment manuals by other brands

Coleman Mosquito Deleto 2200 Instructions for use

Coleman

Coleman Mosquito Deleto 2200 Instructions for use

deerma CM1300W manual

deerma

deerma CM1300W manual

Fountainhead Black Flag user manual

Fountainhead

Fountainhead Black Flag user manual

Rentokil Lumnia Slim US instruction manual

Rentokil

Rentokil Lumnia Slim US instruction manual

MistAway GEN III Recommended Maintenance Procedures

MistAway

MistAway GEN III Recommended Maintenance Procedures

Agrimate AF-4000NK-VM user manual

Agrimate

Agrimate AF-4000NK-VM user manual

Zanzar Flexa 0.18 MAINTENANCE AND UTILIZATION MANUAL

Zanzar

Zanzar Flexa 0.18 MAINTENANCE AND UTILIZATION MANUAL

Paraclipse terminator owner's manual

Paraclipse

Paraclipse terminator owner's manual

ThermaCell MR300 Directions for use

ThermaCell

ThermaCell MR300 Directions for use

Gardigo 25302 instruction manual

Gardigo

Gardigo 25302 instruction manual

Stinger Nosquito CT100 Series Operation manual

Stinger

Stinger Nosquito CT100 Series Operation manual

Disinfect&Fog Mini Thermal Fogger manual

Disinfect&Fog

Disinfect&Fog Mini Thermal Fogger manual

ARDES AR6S09 Instructions for use

ARDES

ARDES AR6S09 Instructions for use

Anwis Pleated Insect Screen Assembly manual

Anwis

Anwis Pleated Insect Screen Assembly manual

Manrose MANPFK instructions

Manrose

Manrose MANPFK instructions

SkeeterVac SV3501C owner's manual

SkeeterVac

SkeeterVac SV3501C owner's manual

ThermaCell Backpacker Directions for use

ThermaCell

ThermaCell Backpacker Directions for use

PL Systems Flypod quick start guide

PL Systems

PL Systems Flypod quick start guide

manuals.online logo
manuals.online logoBrands
  • About & Mission
  • Contact us
  • Privacy Policy
  • Terms and Conditions

Copyright 2025 Manuals.Online. All Rights Reserved.