manuals.online logo
Brands
  1. Home
  2. •
  3. Brands
  4. •
  5. Pelsis
  6. •
  7. Insect Control Equipment
  8. •
  9. Pelsis Synergetic Halo 15W User manual

Pelsis Synergetic Halo 15W User manual

Please read these instructions carefully and store in a safe place for
future reference.
HALO
As part of the Synergetic®brand of insect control products, Halo is a
versatile professional flylight which utilizes high powered dual wavelength
Synergetic®UV bulbs and is designed for use with a high specification
glupac®glueboard to retain the caught insects for inspection or hygienic
disposal. Halo is available as a slimline 15, 30 or 45W model which can
be wall or desk mounted.** For demanding environments, Halo Aqua, an
IP45 rated model, is also available.
CONTENTS OF PACKAGE
- 1 x Halo flylight
- 1x Glupac®glueboard
- 1 x Removable aluminum debris tray
- 1/2/3 x High powered Synergetic®UV bulbs (Fitted)
- 1/2 x Attractant trays
- 4 x Screws and wall anchors
- 1 x Servicing key fob and mains cable tidy tie wrap wire
WARNING - THIS APPLIANCE MUST BE GROUNDED
INSECT CONTROL PRODUCTS
WARNING Skin or eye damage may result from direct exposure to
ultraviolet light over prolonged periods. Always turn off the bulbs before
any form of servicing.
WARNING Not to be used by children or persons with reduced physical,
sensory or mental capabilities, or lack of experience and knowledge,
unless they have been given supervision or instruction.
WARNING Children should be supervised to ensure they do not play with
the appliance.
WARNING Halo must only be used in areas which are free of dust and
any possible explosive vapor mixture, is suitable for indoor use only and is
not suitable for use in barns, stables and similar locations.
POSITIONING AND GUIDANCE FOR USE
HALO 15, 30 & 45 IS FOR COMMERCIAL INDOOR USE ONLY. DEVICE NOT
CONSTRUCTED FOR USE OUTDOORS OR IN WET LOCATIONS.
Halo should ideally be fixed around seven feet above the ground,
preferably in the darkest place within the area to be protected. ENSURE
THERE IS A MINIMUM OF 22” BETWEEN ONE SIDE OF HALO AND THE
ADJACENT SURFACE, TO PROVIDE ENOUGH SPACE TO INSERT THE
GLUEBOARD (SEE MOUNTING INSTRUCTIONS.) Do not position the unit
close to windows, skylights or other sources of light, or where it may be
obscured by furniture, doors or other obstacles. Ideally, Halo should be
visible from every part of the area to be protected.
Halo should ideally be in operation for 24 hours a day, ensuring your
premises are kept free of flying insects. Insects are most attracted to
Halo at night when there is no competition from daylight or other light
sources.
INSTALLATION
INSTALLATION SHOULD BE CARRIED OUT BY SERVICE PERSONNEL.
To ensure Halo reaches you in perfect condition, a protective film covers
the aluminum door. Remove this film before use.
For wall mounting, use the supplied wall mounting anchors and screws,
making sure correct wall anchors are used for specialist mounting
materials, such as drywall.
Wall Mounting - For Halo 30 and 45, use the two outer cut outs on the
debris tray to mark the correct wall mounting points, and for the Halo 15
use the inner cut outs as pictured.
Desk mounting - Halo can be installed onto a horizontal surface by using
the two specially designed black steel feet. The feet can be secured in
position by using the two plastic fixing pins.**
Once Halo is installed in position, fit the glupac®glueboard in place as
described in the glueboard replacement section of this document.
Finally, connect the plug on the end of the mains lead to an
appropriate power supply. Use the supplied black mains cable tidy tie
wrap wire to hide any excess mains cable behind the product if
required.
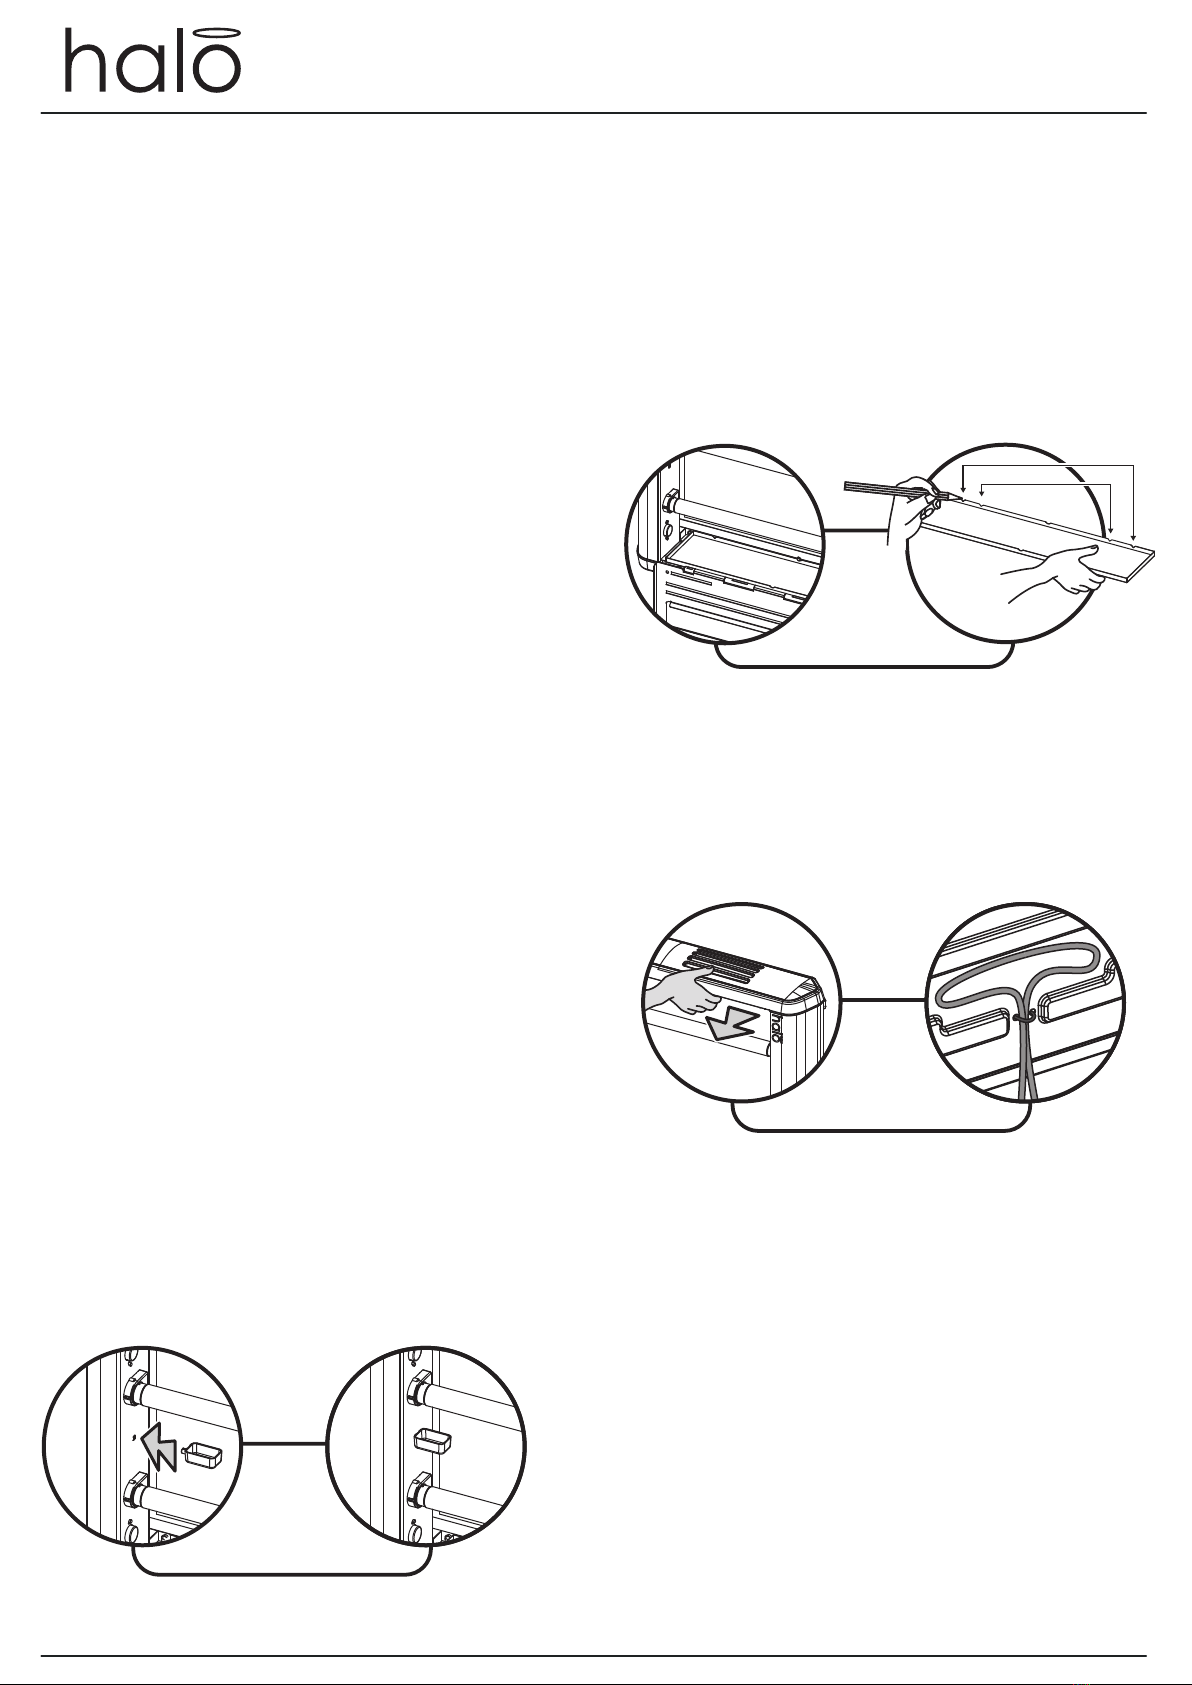
To maximise the effectiveness of Halo in catching flying insects, the top
of the product has light apertures to increase the UV irradiance emitted
from the product. However, these apertures can be covered to protect
the glueboard from debris and prolong its life, by simply sliding the
reflective aluminum cover forward.
To maximise the attractancy potential of Halo, attractant trays have
been provided, which can be used to hold additional atrractants. The
tray(s) should be installed into the holes found on the inside face of the
chassis. SOLID ATTRACTANTS ONLY SHOULD BE USED TO REDUCE THE RISK
OF LIQUIDS GETTING INTO THE ELECTRICS.
CLEANING
CLEANING SHOULD BE CARRIED OUT BY SERVICE PERSONNEL ONLY,
AFTER ENSURING THAT THE UNIT IS DISCONNECTED FROM THE MAINS
SUPPLY.
It is recommended that cleaning is carried out regularly when the
glueboard is replaced. Once the glueboard is removed, the unit should
be thoroughly wiped down with a damp cloth, removing any build up of
dirt. Ensure the unit is completely dry before reconnecting it to the
power supply.
Halo 15, 30 & 45
Professional Glueboard Insect Control
Light Apertures &
Cable Management
Attractant Trays
Wall Mounting
HL15
HL30/45
Bulb Replacement
Starter Replacement
SPECIFICATION / REPLACEMENT PARTS
GLUEBOARD REPLACEMENT
GLUEBOARD REPLACEMENT SHOULD BE CARRIED OUT BY SERVICE PERSONNEL ONLY, AFTER
ENSURING THAT THE UNIT IS DISCONNECTED FROM THE MAINS SUPPLY.
The glueboard should be replaced every month with a genuine glupac®glueboard. Use of
non-approved glueboards may invalidate your warranty. Halo comes supplied with discreet black
glueboards with printed grids for simple insect evaluation and monitoring. High efficacy replacement
yellow glueboards are available.
To replace the glueboard…
1. Remove the used glupac®glueboard by simply pulling it clear from either the left or
right of the unit.
2. HALO 15 ONLY - Tear the GB015 glueboard in half along the perforation line,
retaining the second half for the next service cycle.
3. Remove the protective release paper from the new glupac®glueboard.
4. Slowly slide the new glupac®glueboard into position, until the glueboard ‘drops’ into
the locator, indicating it is in the center of the unit.
Always ensure the selected genuine glupac®glueboards are compatible with your unit, available from
your Pest Management Professional, or Pelsis.
BULB REPLACEMENT
BULB REPLACEMENT SHOULD BE CARRIED OUT BY SERVICE PERSONNEL ONLY, AFTER ENSURING THAT THE
UNIT IS DISCONNECTED FROM THE MAINS SUPPLY.
To ensure the efficiency of Halo in catching flying insects, the UV bulbs should be replaced annually.
After twelve months the phosphor coating that emits the correct wavelength of UV light has burnt away
and the UV output is diminished substantially.
To replace the UV bulbs…
1. Open the swing down front guard, by using the supplied servicing key fob.
2. Rotate the bulb through 90°, freeing it from the bulb holders.
3. Pull the bulb away from the chassis.
4. Dispose of the used UV bulb in conjunction with local regulations.
STARTER REPLACEMENT
STARTER REPLACEMENT SHOULD BE CARRIED OUT BY SERVICE PERSONNEL ONLY, AFTER ENSURING THAT THE
UNIT IS DISCONNECTED FROM THE MAINS SUPPLY.
The starters provide an extra spark to initially light the UV bulbs. Starters wear
out and should be replaced at the same intervals as the UV bulbs.
To replace the starters…
1. Rotate the starter counter-clockwise.
2. Pull the starter free from the unit.
WARRANTY
Halo has a three year warranty and if maintained as recommended in these
instructions should continue to work for many years.* Use of non-approved
consumables may invalidate the warranty. Ensure genuine glupac®
glueboards are used in conjunction with this product.
Glueboard Replacement
R6 190318
*Excludes bulbs, glueboards and starters. Does not cover breakdown due to misuse, incorrect operation
or use in an incorrect application.
** Desk mount feet and feet fixing pins are available if required, please contact Pelsis or your supplier.
SPECIFICATION / REPLACEMENT PARTS
Unit Halo 15
Voltage 110V ~ 60Hz
Dimensions(”) 235/32 x 949/64 x 461/64
Coverage 430 Sq. Feet
Weight 10 lbs
Light Output 15W
Bulbs 1 x TGX15-18
Starter 1 x I154
Glueboards (x6) GB015 (Black)
Unit Halo 30
Voltage 110V ~ 60Hz
Dimensions(”) 235/32 x 1529/32 x 461/64
Coverage 860 Sq. Feet
Weight 121/2lbs
Light Output 30W
Bulbs 2 x TGX15-18
Starters 2 x I154
Glueboards (x6) GB012 (Black)
GB011 (Yellow)
Unit Halo 45
Voltage 110V ~ 60Hz
Dimensions(”) 235/32 x 1529/32 x 461/64
Coverage 1,300 Sq. Feet
Weight 141/3lbs
Light Output 45W
Bulbs 3 x TGX15-18
Starters 3 x I154
Glueboards (x6) GB012 (Black)
GB011 (Yellow)
Pelsis
712 Executive Drive
Princeton, NJ
08540
Toll Free: (877) 928-2847
Fax: 800-973-5562
www.pelsis.com
[email protected]
Information provided on this literature is modified and
updated from time to time, it is not intended that you
should rely on it or that it should form part of any contract.
This is due to the constant redevelopment of our products.
© 2018
MOUNTING INSTRUCTIONS
B
A
A
B
22”
(MINIMUM)
Halo 15, 30 & 45
MOUNTING INSTRUCTIONS
www.synergetic-flylights.com
Professional Glueboard Insect Control
HL15 1019/32”
HL30/45 1325/64”
Desk mount feet optional

This manual suits for next models

2

Other Pelsis Insect Control Equipment manuals

Pelsis Curtis Dyna-Fog Hurricane User manual

Pelsis

Pelsis Curtis Dyna-Fog Hurricane User manual

Pelsis Insect-O-Cutor Halo Curve User manual

Pelsis

Pelsis Insect-O-Cutor Halo Curve User manual

Pelsis B&G FLEX-A-LITE 2600 User manual

Pelsis

Pelsis B&G FLEX-A-LITE 2600 User manual

Pelsis Green Protect Fruit Fly Trap User manual

Pelsis

Pelsis Green Protect Fruit Fly Trap User manual

Pelsis INSECT-O-CUTOR HALO AQUA HL2X45IPX User manual

Pelsis

Pelsis INSECT-O-CUTOR HALO AQUA HL2X45IPX User manual

Pelsis LURALITE PLUS R4 User manual

Pelsis

Pelsis LURALITE PLUS R4 User manual

Pelsis Curtis Dyna-Fog Hurricane User manual

Pelsis

Pelsis Curtis Dyna-Fog Hurricane User manual

Pelsis CURTIS DYNA-FOG HURRICANE CL User manual

Pelsis

Pelsis CURTIS DYNA-FOG HURRICANE CL User manual

Popular Insect Control Equipment manuals by other brands

DynaTrap DT160 owner's manual

DynaTrap

DynaTrap DT160 owner's manual

Bonide Beetle Bagger Instructions for use

Bonide

Bonide Beetle Bagger Instructions for use

MistAway GEN III Operation manual

MistAway

MistAway GEN III Operation manual

Quest Engineering C0023 instructions

Quest Engineering

Quest Engineering C0023 instructions

Dynamic DynaTrap DT160 owner's manual

Dynamic

Dynamic DynaTrap DT160 owner's manual

Andersen Windows & Doors 400 Series Installation and Removal Guide

Andersen Windows & Doors

Andersen Windows & Doors 400 Series Installation and Removal Guide

ThermaCell Tick control tubes quick start guide

ThermaCell

ThermaCell Tick control tubes quick start guide

Chemtex ULV FOGGER Operation and maintenance manual

Chemtex

Chemtex ULV FOGGER Operation and maintenance manual

Airofog AT35 instruction manual

Airofog

Airofog AT35 instruction manual

Isotronic ISOKAT Insect Pro Instructions for use

Isotronic

Isotronic ISOKAT Insect Pro Instructions for use

Flextailgear MAX REPEL user guide

Flextailgear

Flextailgear MAX REPEL user guide

Isotra PS3 V MEASUREMENT AND ASSEMBLY MANUAL

Isotra

Isotra PS3 V MEASUREMENT AND ASSEMBLY MANUAL

ARDES AR6S09 Instructions for use

ARDES

ARDES AR6S09 Instructions for use

INSECT-O-CUTOR EX55 instruction manual

INSECT-O-CUTOR

INSECT-O-CUTOR EX55 instruction manual

Axley 717-002 operating instructions

Axley

Axley 717-002 operating instructions

Ultrasound Tech ZeroBugs PLUS user guide

Ultrasound Tech

Ultrasound Tech ZeroBugs PLUS user guide

ARDES AR6A09 Instructions for use

ARDES

ARDES AR6A09 Instructions for use

sunjoe SJ-BZ15W-BLK user manual

sunjoe

sunjoe SJ-BZ15W-BLK user manual

manuals.online logo
manuals.online logoBrands
  • About & Mission
  • Contact us
  • Privacy Policy
  • Terms and Conditions

Copyright 2025 Manuals.Online. All Rights Reserved.