manuals.online logo
Brands
  1. Home
  2. •
  3. Brands
  4. •
  5. peplink
  6. •
  7. Wireless Router
  8. •
  9. peplink MAX BR1 Mini User manual

peplink MAX BR1 Mini User manual

Have questions? Call Powerful Signal at 435-634-6800 or visit us online at PowerfulSignal.com
Figure 4
Power up the router
•Connect the power supply to the router’s DC IN port. (Figure 4) The release
clip must be facing up for the connector to click into place. Plug the other end
of the power supply into an AC wall outlet.
•Once the router is connected to a power source, the Status light will turn red.
Within 3 to 5 minutes, all three lights—Status, Wi-Fi, and Cellular—should
turn green, indicating that the router is functioning properly.
− +
DC IN
Figure 3
LTE antenna connectors
WiFi antenna connectors
Attach the antennas
•Attach the two flat-end LTE paddle antennas to the router’s threaded Main
(top left) and Diversity/Aux (top right) connectors and hand tighten them.
(Figure 3)
If your system includes a separate MIMO antenna, skip this step and connect
the MIMO antenna to the Main and Diversity/Aux connectors instead.
•Attach the two rounded-end WiFi paddle antennas to the router’s threaded
Wi-Fi Antenna A (bottom left) and Wi-Fi Antenna B (bottom right)
connectors and hand tighten them. (Figure 3)
Figure 2
Figure 1
Install your SIM card
•Use a small Phillips screwdriver to loosen the Cellular SIM cover at the end
of the router. Rotate the cover to expose the SIM slots. (Figure 1)
•Insert an activated nano SIM card into Slot A, beveled corner first and the
gold circuit side facing down. Push the card into the slot with your fingernail
until it clicks into place. (Figure 2)
If you use a second card in
Slot B
, insert it beveled corner first with the gold
circuit side facing up. Push until it clicks into place.
•Rotate the Cellular SIM cover back into position over the SIM slots.
Hand-tighten the cover with the Phillips screwdriver.
Tip:
Keep the manufacturer’s
box and all its contents.
The packaging contains
important information for
technical support and
reordering.
′
Box contents
TS007001
Peplink MAX BR1 Mini HW3 Cellular–WiFi Router
Quick Setup Guide
435-634-6800 | www.PowerfulSignal.com
v.20220929
Figure 9
Advanced settings & resetting your router
•Advanced router settings are available via the router’s web-based dashboard. Connect
your device to the router’s WiFi network, open a web browser, and go to 192.168.50.1.
Log in with the admin password you created in Step 5.
Modify these settings only if you are familiar with them and how they work.
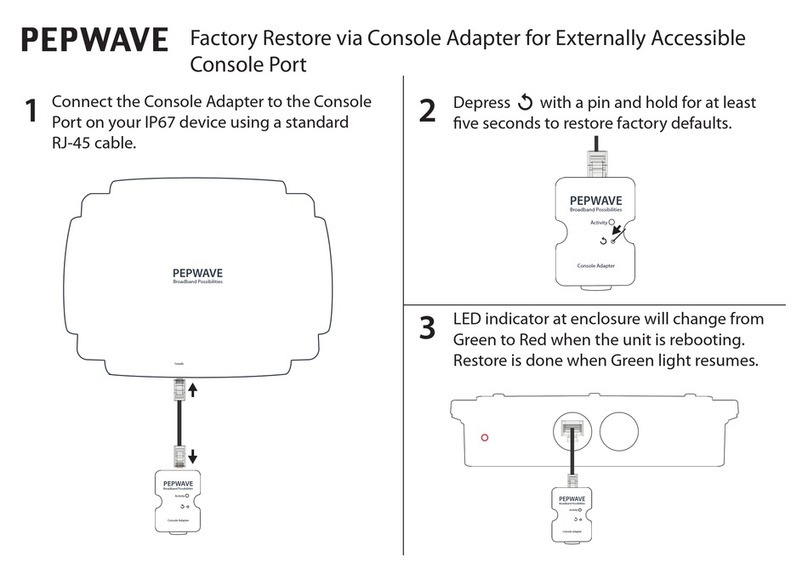
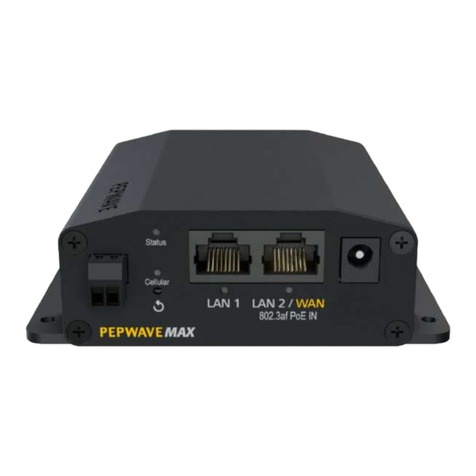
•To perform a factory reset on your router, insert the opened end of a paperclip into the
hole above the ↺symbol next to the power connector. (Figure 9) Push the paperclip into
the hole and hold it there until the Wi-Fi and Cellular lights have gone out and the
Status light has turned solid red. The router will reboot in its original, default
configuration; follow the instructions in Steps 4 and 5 to set it up again.
Figure 8
Figure 7
Figure 6
Log into the router and change the passwords
The router is administered through a web-based dashboard.
•Open a web browser (like Google Chrome, Apple Safari, Mozilla Firefox, or
Microsoft Edge) on your computer, tablet, or smartphone. In the address bar at
the top of the browser, type 192.168.50.1 and press Enter. (The browser may
warn you that you’re connecting to an insecure link; allow it to proceed
anyway.)
•At the Peplink login screen (Figure 6), enter the default username admin and
default password admin and click Login. Both entries are lowercase.
•You’ll be prompted to change the password you’ll use to log into the
dashboard and administer the router. (Figure 7) Choose a strong password
(passwords-generator.org can help), write it down, and keep it in a secure
place. Do not give this password to anyone.
•You’ll next be prompted to change your WiFi AP password. (Figure 8) This is
the password you’ll use to connect computers, tablets, and smartphones to the
router’s WiFi network. Choose a strong password; share it only with others
who are authorized to use your WiFi network (which is created from your cellular data plan).
•After you change the WiFi AP password, the router will reboot, and your device will be disconnected from
the WiFi network. Open the WiFi settings on your device and remove (or “forget”) the Peplink network.
(See powerfulsignal.com/forget for instructions on how to do this.)
•After the router has rebooted (see Step 3), connect your device to the Peplink WiFi network using your new
WiFi AP password (see Step 4).
Figure 5
Connect to the router’s default WiFi network
•Open the WiFi settings on your computer, tablet, or smartphone. Find and
connect to the PEPLINK_xxxx network, where xxxx is the last 4 digits of the
router’s serial number found on the label on the bottom of the router. (Figure 5)
•Use the AP Password on the label on the bottom of the router to connect to
the WiFi network. The password is all uppercase with no dashes or spaces.
Quick Setup continued:
This manual suits for next models

1

Other peplink Wireless Router manuals

peplink Pepwave Surf SOHO User manual

peplink

peplink Pepwave Surf SOHO User manual

peplink Pepwave MAX Series User manual

peplink

peplink Pepwave MAX Series User manual

peplink 210 User manual

peplink

peplink 210 User manual

peplink PEPWAVE AP Pro Series User manual

peplink

peplink PEPWAVE AP Pro Series User manual

peplink PEPWAVE HD2 Dome Operating instructions

peplink

peplink PEPWAVE HD2 Dome Operating instructions

peplink PePLink Surf User manual

peplink

peplink PePLink Surf User manual

peplink Pepwave MAX Series User manual

peplink

peplink Pepwave MAX Series User manual

peplink Pepwave MAX BR1 IP67 Operating instructions

peplink

peplink Pepwave MAX BR1 IP67 Operating instructions

Popular Wireless Router manuals by other brands

D-Link DIR-619L Quick installation guide

D-Link

D-Link DIR-619L Quick installation guide

Telit Wireless Solutions GainSpan GS2200M Hardware user's guide

Telit Wireless Solutions

Telit Wireless Solutions GainSpan GS2200M Hardware user's guide

DataRemote Pots In a Box CDS-9090 user manual

DataRemote

DataRemote Pots In a Box CDS-9090 user manual

Nokia 7705 installation guide

Nokia

Nokia 7705 installation guide

Asante FriendlyNET FR1104-G quick guide

Asante

Asante FriendlyNET FR1104-G quick guide

Cisco SR520W-FE-K9 datasheet

Cisco

Cisco SR520W-FE-K9 datasheet

Motorola WR850G - Wireless Broadband Router Firmware release notes

Motorola

Motorola WR850G - Wireless Broadband Router Firmware release notes

Aztech WL557RT4 Speci?cations

Aztech

Aztech WL557RT4 Speci?cations

Rosewill RNX-BT401 user manual

Rosewill

Rosewill RNX-BT401 user manual

Cradlepoint ARC CBA850 manual

Cradlepoint

Cradlepoint ARC CBA850 manual

Sitecom WLR-4001 user manual

Sitecom

Sitecom WLR-4001 user manual

KANOPI TQ604AUTO Quick installation guide

KANOPI

KANOPI TQ604AUTO Quick installation guide

Belkin F7D4302 user manual

Belkin

Belkin F7D4302 user manual

D-Link DIR-300 - Wireless G Router Quick installation guide

D-Link

D-Link DIR-300 - Wireless G Router Quick installation guide

iBall Baton iB-W4GX150N user guide

iBall

iBall Baton iB-W4GX150N user guide

Solwise NET-PL-200AV11NRT user manual

Solwise

Solwise NET-PL-200AV11NRT user manual

D-Link DPG-2100 - Wireless Presentation Gateway Quick installation guide

D-Link

D-Link DPG-2100 - Wireless Presentation Gateway Quick installation guide

AT&T AT&T Wireless Home Phone Base user guide

AT&T

AT&T AT&T Wireless Home Phone Base user guide

manuals.online logo
manuals.online logoBrands
  • About & Mission
  • Contact us
  • Privacy Policy
  • Terms and Conditions

Copyright 2025 Manuals.Online. All Rights Reserved.