Percon CYGNUS PRO User manual

USER´S MANUAL
CYGNUS PRO
CYGNUS PRO
Hybrid Fiber Optic Tester
Permanyer Griñó Connexions S.L.U
Diputació 203 - bj | 08011 | Barcelona. Spain.
Tel: +34 93 451 78 30 | Fax: +34 93 323 75 88
mail: [email protected]
http://www.percon.es | twitter: @perconbroadcast

Índice Ordering of connectors
Cygnus Main Structures
Composition
Buttons
Display
Screens
Type of Measurements
Auto Power-off
Calibratio
Change of connector
Fiber Optic Test
Current & Continous Mode
Current & Historic Mode
Single Mode
Connector Pinout
Ordering of connectors
Errors detector
2
3
4
4
5
6
6
7
8
9
9
9
10
12
14
11
Lemo SMPTE 1310nm
Lemo SMPTE 1550nm
Cygnus Pro Lemo 3K.93C®
Mini EB Telecast Multimodo 850nm ( 2 Fibras )
Mini EB Telecast Multimodo 1310nm ( 2 Fibras )
Mini EB Telecast Monomodo 1550nm ( 2 Fibras )
Mini EB Telecast Monomodo 1310nm ( 2 Fibras )
Cygnus Pro Mini EB Telecast®/ Tyco®
Stratos HX1080 Multimodo 1310nm
Stratos HX1080 Monomodo 1310nm
Cygnus Pro Stratos HX1080®
Neutrik OpticalCON Duo Monomodo 1310nm
Neutrik OpticalCON Duo Monomodo 1550nm
Neutrik OpticalCON Duo Multimodo 850nm
Neutrik OpticalCON Duo Monomodo 1310nm SMPTE
Neutrik OpticalCON Duo Multimodo 1310nm
Neutrik OpticalCON Duo Monomodo 1550nm SMPTE
Cygus Pro Neutrik OpticalCON Duo®
Neutrik OpticalCON Quad Monomodo 1310nm
Neutrik OpticalCON Quad Monomodo 1550nm
Neutrik OpticalCON Quad Multimodo 850nm
Neutrik OpticalCON Quad Multimodo 1310nm
Cygus Pro Neutrik OpticalCON Quad®
14
If the required connector is not included in the list, please send us an
email indicating the model and manufacturer of the connector and we
will inform you whether it is compatible with the Cygnus Pro system.
Should you require other connectors than the ones included in the case,

Thank you for choosing the CYGNUS PRO Hybrid Fiber Optic tester as a part of
your professional equipment for Broadcast installations.
The CYGNUS PRO Hybrid Fiber Optic tester allows you to check the fiber optics
and copper lines of an installation in a fast and easy way. Its operation is very
simple.
To carry out the measuring you must connect the Cygnus Pro Main to the point
you want to test and the Cygnus Pro Loop in the other end to close the circuit.
Elementos del Cygnus Pro
Thank you!
State
indicators
Attenuation
Battery
Connector
Fiber optic and copper
lines information
Escape
Enter
Power up
Navigation
arrows
Connector
Aluminum body
Captive Screw
Cygnus Pro Main Cygnus Pro Loop
2
13
Cygnus Pro Main Structures
Connector Pinout
Specifications
Specifications
Signal
Signal
Fiber
Fiber
Fiber
Fiber
Fiber
Fiber

3
Módulo de tamaño mucho más reducido
que dispone de una o varias conexiones
de fibra óptica que conectan los puertos
ópticos del conector y de una malla
resistiva entre los diferentes pines de
cobre
Main Module
Cygnus Pro Loop
Header
The Hybrid Fiber Optic Tester CYGNUS PRO have 3 main structures for
checking the F.O lines and copper lines.
12
Cygnus Pro Composition Connector Pinout
Main module with the OLED display and
printed circuit that manages the operation
of the tester.
Smaller size module that has one or
several F.O. connections that link the
optical ports of the connectors and one
resistive shield between the different
copper pins.
Board with the fiber and copper
connectors with the necessary
electronics to adapt the optical signal to
electrical signal that we will share with the
main module through conical centering
signal connectors.

4
Display
·Cal.- If the device is not calibrated, the letters are red. If it is calibrated, the letters
are green.
·Cont / Sing .- defines the type of measurement configurated in the device
Cont.- It appears when you select the continous measuring.
Sing.- It appears when you select a single test when you press the Enter
button.
·Sav .- Green colour shows a particular auto power-off time. Red colour means
no auto power-off.
·Curr / Hist.- Indicates the current or historical measuring.
“Curr”defines a continuous measurement and shows the current status of the
connection at all times.
“Hist” is the option of continuous measurement that registers the status of
the lines in order to see all the detected errors.
·Battery .- indicates the battery status at 20% intervals. When connected to a USB
port the charge status is shown by a lighting on the battery icon.
Errors detection
Error in the optic fiber: If there is a breakdown in the
fiber line, the device shows attenuation > 18 flashing and
increases the counter of fiber errors.
Shortcut in the copper lines: If the device detects a
shortcut in any of the copper lines, it identifies the faulty
one and increases the counter of copper errors. The
picture shows a shortcircuit between pin P- and S+.
Open circuit. If the device detects an open circuit in any
line, it signals the faulty line with a red circle. The picture
shows that pin S- is in open circuit .
Pinout errors: Should the connection have any pinout
error due to a wrong assembling, the device would detect
it and would identify the faulty lines. The picture shows a
crossing between pins S+ and S-.
11
Indicators
Buttons
On ( Power Up) .- Press the button during one second to
switch on the CYGNUS PRO. Press it three seconds to switch
it of.
Esc ( Escape ) .- This button allows you to return to the
previous screen
Arrow Keys .- Allow to choose different menu options.
In some screens you may change from one mode to an
other
Enter .- Allow to access several options and save the
configuration.

5
Pantallas
-Home/start screen (POWER UP). The tester model and SOFT version
are displayed ( pic 1.1). In this initial state, the device checks if there is
a head inserted in the main module. If there is no head a message
appears on the display( pic 1.2) If a correct head is detected it checks
whether the SFP model is correct; if it is not, a message is displayed
and it is not possible to move to the next status until the SFP is the right
one (pic 1.3)
Main Menu Display. Contain the main menu options
and the Cygnus Pro status. ( pic. 2 ) Option selection by
key up/down. The selected option is highlighted in
bright orange color.
Help explain the different options and functionalities
(picture 3)
?When we press ENTER we reset both error counter of fiber(Fi.Err) and
cooper(Cu.err) as well as the status of the testing matrix.
?When we press the DOWN key we change the measurement from HISTORY
(HIST) to CURRENT (CURR)..
?If the tester does not detect any fault the counter is shown in green, otherwise
the number of errors will be shown in red
?The attenuation of the fiber is shown in green up to - 5.99 dB, in orange from - 6
to - 17.99 dB, and in flashing red over 18 dB.
?A line failure occurs when a line that had been correct changes to
malfunctioning status with the exception of the initial status of the measurement
display.
Modo SINGLE: - Test display of the device with the measurement configured in
SINGLE (SING) mode (pic 11). It shows the errors in the copper and fiber lines. If
an error occurs it increases the counter.
?When we press ENTER we make a new measurement in this screen
?A line failure occurs when a line presents any anomaly at the time of the
measurement.
?If no error appears, the counter is shown in green, otherwise it would show the
number of errors in red (max 1 error)
?The attenuation of the fiber is shown in green up to - 5.99 dB, in orange from - 6
to - 17.99 dB, and in flashing red over 18 dB.
10
Screens
Picture 1.1
Picture 2
Picture 3
Picture1.2 Picture 1.3
Picture 11

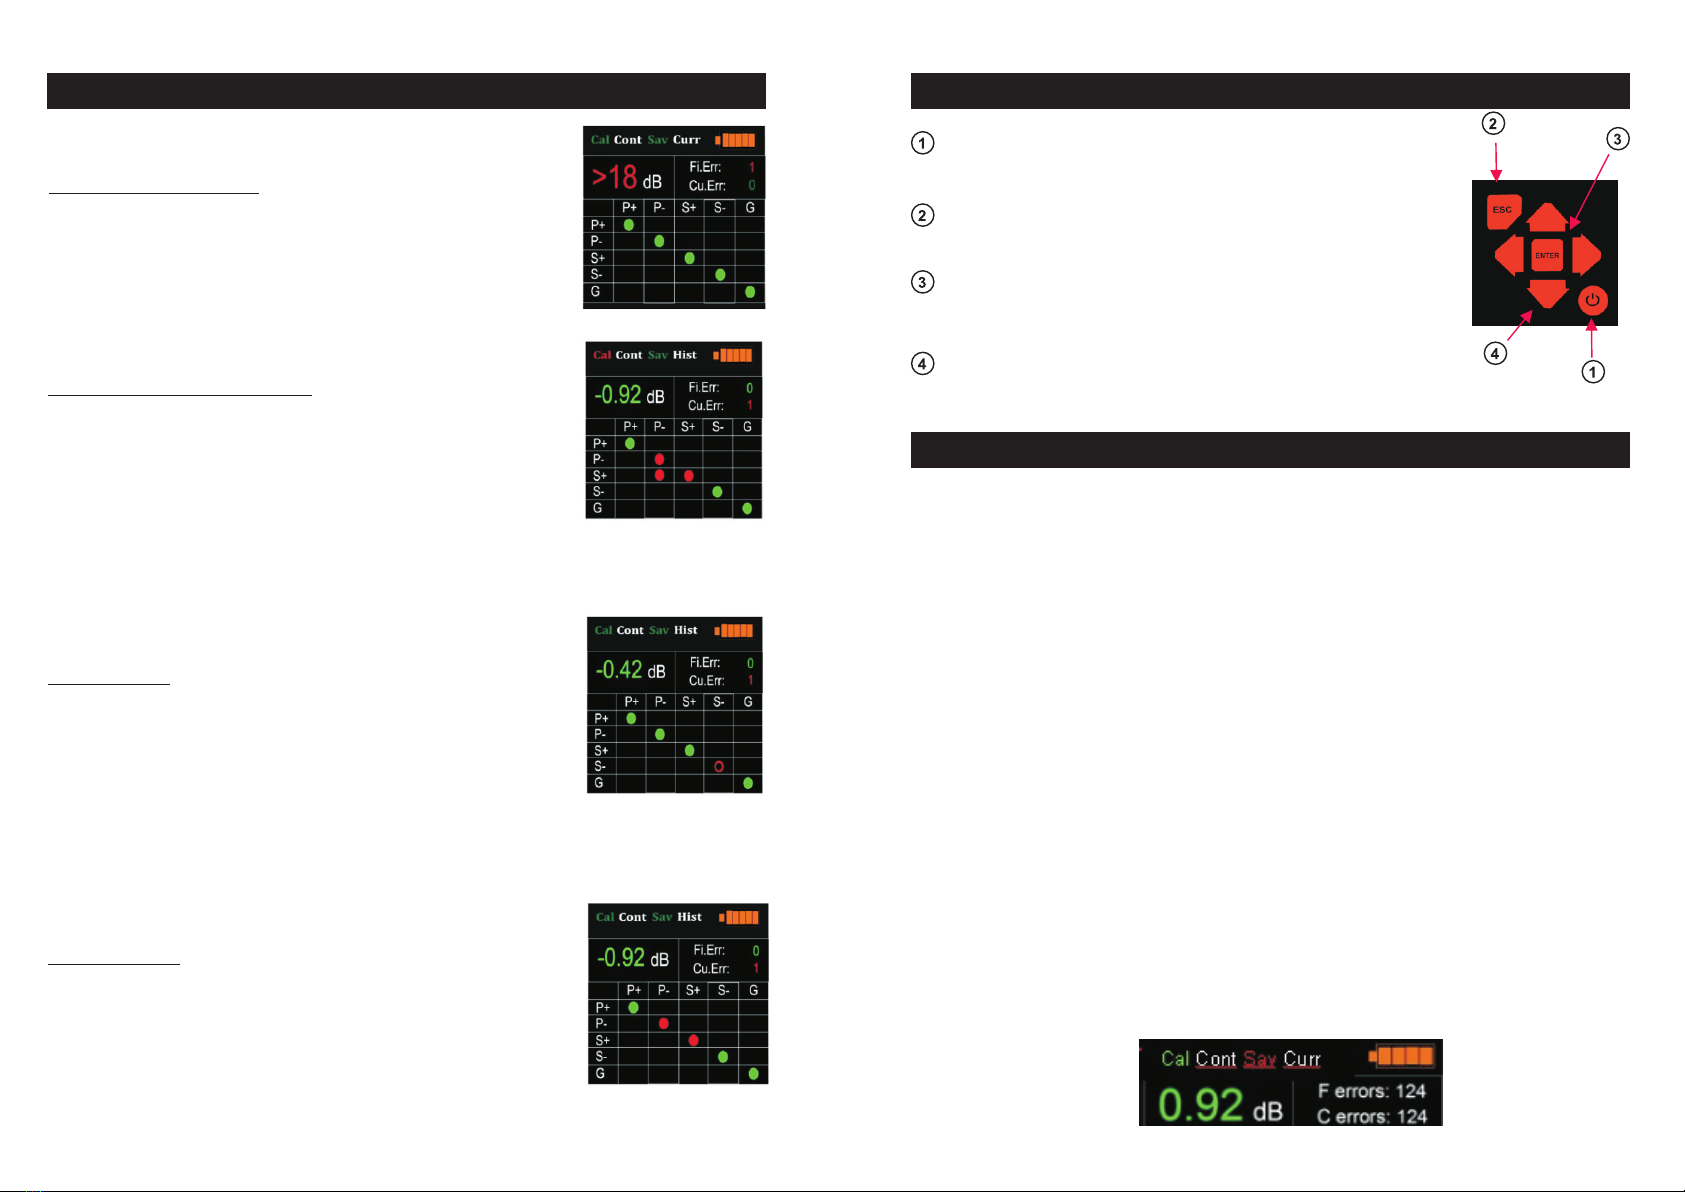
CURRENT & CONTINUOUS MODE: Test display of the device with the
measurement configured in continuous mode (CONT) and real time (CURR). It
shows the current status of the copper lines, the attenuation of the fiber and the
number of errors detected until that moment.
?When we press ENTER we reset the error counter both of fiber (Fi.Err) and
copper (Cu.err).
?When we press the DOWN key we change the measurement from CURRENT
(CURR) to HISTORY (HIST).
?If the tester does not detect any fault the counter is shown in green, otherwise the
number of errors will be shown in red.
?The attenuation of the fiber is shown in green up to - 5.99 dB, in orange from - 6 to -
17.99 dB, and in flashing red over 18 dB.
?A line failure occurs when a line that had been correct changes to malfunctioning
status with the exception of the initial status of the measurement display.
CURRENT & HISTORY MODE: - Test display of the device with the measuring
configured in continuous mode (CONT) and history (HIST). It shows the cumulative
errors in the copper lines, the current status of the fiber and the number of fiber and
copper errors detected until that moment.
9
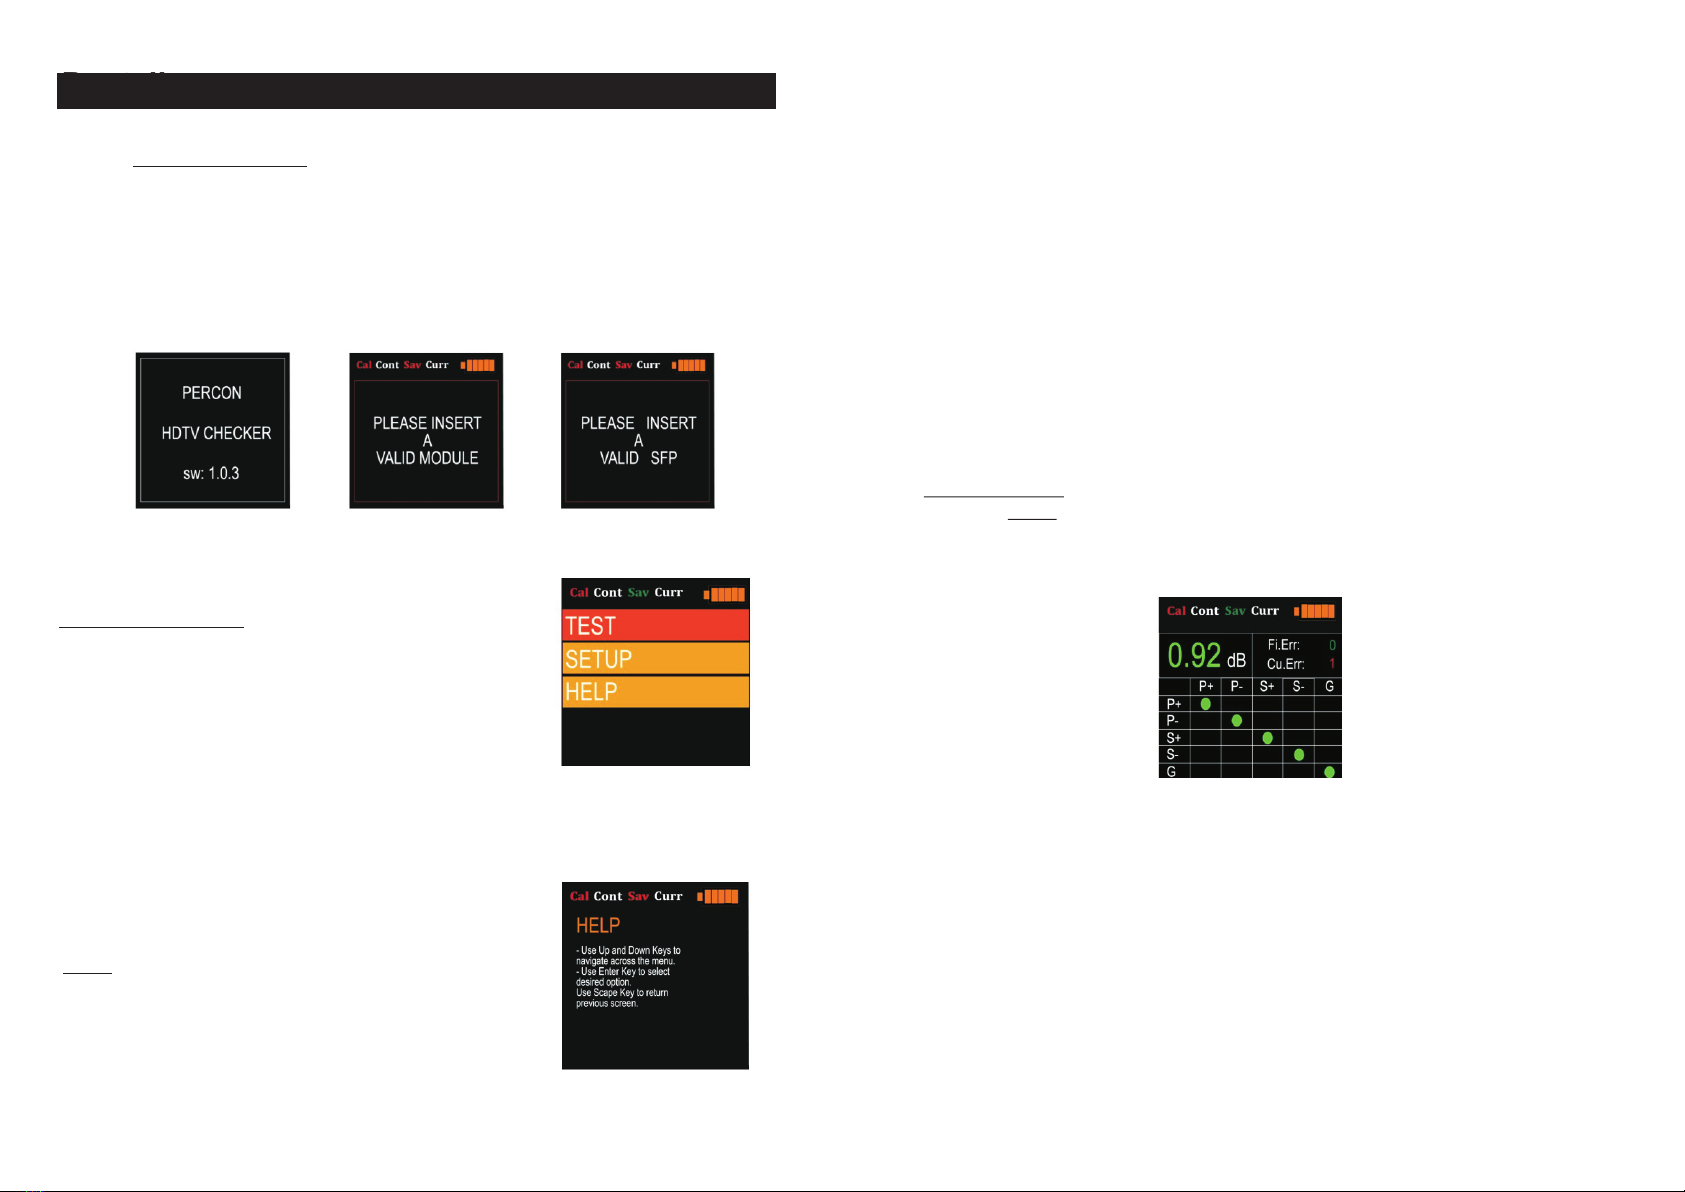
Configuration display (SETUP) Allows to select the type of
measuring “MODE”, the status of the auto power-off
“SAVER” and the calibration of the device “CALIBRATE” (pic
4).
MODE: You can select the type of measurement.
SINGLE or CONTINUOUS: When se modify the type of measuring, the status on
the top of the screen is refreshed. The selected measuring type is reflected in the
indicators on the top of the screen. SINGLE ( Pic 5 ) and CONTINOUS ( Pic 6)
SAVER: Enables to configure the auto power-off of the device or the duration of the
stand-by status. Intervals of , 1 min, 5 min, 10, min,20 min, 30 min, 1 hour, 2 hours,
3 hours, and 4 hours (pic 7).
When the SAVER status is modified, the indicator on the top of the screen is
refreshed and changes to green if it is active of to red if the auto power-off is
activated.
6
Type of Measurement
Mode
Auto Power-off
Picture 4
Picture 5 Picture 6
Picture 7
Picture 10

Calibración del Cygnus Pro
CALIBRATE: It indicates the calibration status, as well as the option to calibrate
or clear the former calibration to make a new one. For the device recalibration,
you must connect the Cygnus Pro Loop at the Cygnus Pro Main and press
ENTER (Picture 8).
To erase the actual calibration, just press DOWN (Picture 9). For recalibrating
the Cygnus Pro, it´s necessary to erase the existing one and calibrate as usual.
The device cannot be calibrated if the attenuation is over 4 dB.
The calibration is associated to the model and serial number of the SFP with the
head. When we change the head with the device switched off or we make a hot
swapped and the SFP serial number has changed, the status will be “not
calibrated” if the SFP inserted is correct; otherwise it will inform the user to insert
a correct SFP.
After the calibration, the display shows the attenuation of the system once
deducted the attenuation of the calibration.
7
Cambio de Cabezal ( cambio conector)
The Cygnus Pro allows one main module and several headers with the most usual
connectors.
The assembling system follows the design of the rack cases with expansion cards.
The system consists of assembling the head in the main module through a slot and
fixing it with two captive ribbed screws. The screws can be comfortably tightened
manually for a standard fixation or use a standard screwdriver for a stronger
fixation.
The Cygnus Pro is composed by a main module, head and loop.
If you require different connectors, you will receive a head and a loop with the
connectors. You can use the Cygnus Pro Main with the connectors you require
without buying the complete system.
Remember to keep the headers protected in case that you have several Cygnus
Pro Systems.
8
Cygnus Pro Calibration Change of connector ( head and loop)
Picture 8
picture 9
Table of contents