Performance Tool W2012 User manual

WARNING
SOLDERING GUN
OWNER’S MANUAL
Item Number W2012
It is the owner and/or operators’ responsibility to study all WARNINGS, operating, and
maintenance instructions contained on the product label and instruction manual prior to operation
of this product. The owner/operator shall retain product instructions for future reference.
The owner and/or operator are responsible for maintenance, maintaining all decals or warning
labels and while in use, maintaining the unit in good working order. If the owner and/or operator
are not fluent in English, the product warnings and instructions shall be read and discussed with
the operators’ native language by the purchaser/owner or his designee. Make sure that the
operator comprehends its contents. Safety information shall be emphasized and understood prior
to usage. The product shall be inspected per the operating instructions.
Users of this product must fully understand these instructions. Each person operating this
product must also be of sound mind and body and must not be under the influence of any
substance that might impair their vision, dexterity, or judgment.
Protect yourself and others by observing all safety information.
Failure to comply with instructions could result in personal injury and/or property damage!
On occasion, after printing of our literature is completed, our manufacturers may make changes
and/or modifications to merchandise which will not be reflected in this manual. Although we strive
to maintain complete and accurate information, it is possible in some instances, that the product
may differ slightly from printed specifications. Illustrations are intended for reference only. Actual
merchandise may vary. Wilmar is not responsible for typographical errors.
Please read these instructions carefully and retain them for future use.

SAFETY GUIDELINES / DEFINITIONS
IMPORTANT SAFETY INFORMATION
WARNING
READ, UNDERSTAND AND FOLLOW ALL INSTRUCTIONS AND WARNINGS BEFORE OPERATING THIS
TOOL. FAILURE TO DO SO MAY RESULT IN PERSONAL INJURYAND/OR PROPERTY DAMAGE AND WILL
VOID WARRANTY.
1. Use personal protective equipment. Always wear
eye protection.
2. Keep your work area clean and well lit.
3. Dress properly. Do not wear loose clothing or
jewelry. Keep your hair, clothing and gloves away
from hot parts.
4. Only use safety equipment that has been approved
by an appropriate standards agency.
5. Do not overreach. Keep proper footing and balance
at all times.
6. Keep bystanders, children, and visitors away while
operating this product.
7. Stay alert. Watch what you are doing, and use
common sense when operating this product. Do not
use this product while tired or under the inuence of
drugs, alcohol or medication.
8. Do not operate power tools in explosive
atmospheres, such as in the presence of
ammable liquids, gases or dust.
9. Tool/equipment service must be performed only by
qualied repair personnel. Service or maintenance
performed by unqualied personnel could result in
a risk of injury.
10. Prevent unintentional starting. Ensure the Trigger
is in the off position before connecting to power
source, picking up or carrying the tool.
11. Maintain labels and nameplates on this product.
These carry important information. If unread-
able or missing, contact Performance Tool for a
replacement.
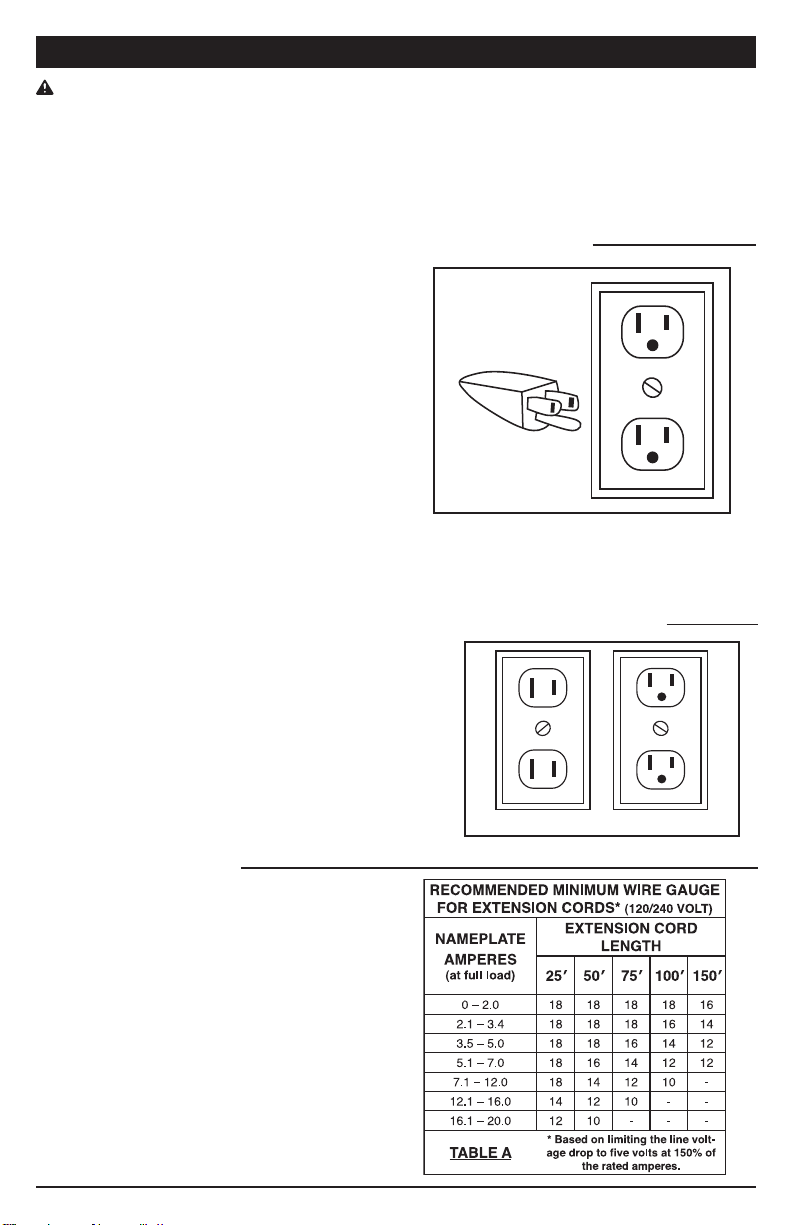
12. Power tool plugs must match the outlet. Never
modify the plug in any way.
13. Do not use any adapter plugs with grounded
power tools.
14. Do not abuse the cord. Never use the cord for
carrying, pulling or unplugging the power tool. Keep
cord away from heat, oil, sharp edges or moving
parts.
15. Do not expose power tools to rain or wet
conditions.
16. If operating a power tool in a damp location is
unavoidable, use a Ground Fault Circuit Interrupter
(GFCI) protected supply.
17. Avoid body contact with grounded surfaces such
as pipes, radiators, ranges and refrigerators.
18. The warnings, precautions, and instructions
discussed in this manual cannot cover all possible
conditions and situations that may occur. The
operator must understand that common sense and
caution are factors, which cannot be built into this
product, but must be supplied by the operator.
WARNING: This product and its packaging contain
a chemical known to the State of California to cause
cancer, birth defects, or other reproductive harm.
WARNING: Read and understand this entire instruction manual before attempting to assemble, install, operate or
maintain this product. Failure to comply with the instructions may result in serious personal injury
and/or property damage!
The following signal words are used to emphasize safety warnings that must be followed when using this product:
This instruction manual is intended for your benefit. Please read and follow the safety, installation, maintenance and troubleshooting steps
described within to ensure your safety and satisfaction. The contents of this instruction manual are based upon the latest product information
available at the time of publication. The manufacturer reserves the right to make product changes at any time without notice.
DANGER Indicates an imminently hazardous situation that, if
not avoided, WILL result in death or serious injury.
WARNING Indicates a potentially hazardous situation that, if
not avoided, COULD result in death or serious injury.
CAUTION Indicates a potentially hazardous situation that, if
not avoided, MAY result in minor or moderate injury.
NOTICE Indicates important information, which if not followed,
MAY cause damage to equipment.
2

SPECIFICATIONS
Specifications are subject to change without notice.
Electrical Rating:............................................................................. 120V~ / 60Hz / 180 W
Maximum temperature:........................................................................................... 1135°F
Light Bulb:...................................................................................................... 6 volt, 3 watt
3
TOOL USE & CARE
1. Do not use the power tool if the Trigger does
not turn it on and off.
2. Do not force the power tool. Use the correct
power tool for your application.
3. Use the power tool, accessories and tool bits
etc. in accordance with these instructions,
taking into account the working conditions
and the work to be performed.
4. Disconnect the plug from the power source
before making any adjustments, changing
accessories, or storing power tools.
5. Maintain power tools. Check for misalignment
or binding of moving parts, breakage of parts
and any other condition that may affect the
power tool’s operation. If damaged, have the
power tool repaired before use.
6. Store idle power tools out of the reach of
children and do not allow persons unfamiliar
with the power tool or these instructions to
operate the power tool.
TOOL SAFETY
1. Avoid Serious Burns. The Soldering Gun
reaches 1135° F. Do not point the Soldering
Gun, or turn yourself toward another person
while soldering.
2. Do not open Soldering Gun. Do not attempt to
open and repair this unit. It must be serviced
by a qualied technician..
3. Do not leave the tool unattended when it is
plugged into an electrical outlet
4. To prevent electric shock, always de-energize
any circuits or wires to be soldered before
making connections and soldering.
5. Keep head out of fumes.
6. Exposure to soldering fumes can increase
the risk of developing certain cancers, such
as cancer of the larynx and lung cancer. Also,
some diseases that may be linked to exposure
to soldering fumes are:
• Early onset of Parkinson’s Disease
• Heart disease
• Ulcers
• Damage to the reproductive organs
• Inammation of the small intestine or
stomach
• Kidney damage
• Respiratory diseases such as emphysema,
bronchitis, or pneumonia
7. Never lay the Soldering Gun down where the
heated parts can contact ammable materials
or electrical wires.
8. WARNING: This product, when used for
welding, plasma cutting, soldering, or similar
applications, produces chemicals known to the
State of California to cause cancer and birth
defects (or other reproductive harm). (Califor-
nia Health & Safety Code § 25249.5, et seq.)
9. WARNING: Handling the cord on this product
will expose you to lead, a chemical known to
the State of California to cause cancer, and
birth defects or other reproductive harm. Wash
hands after handling. (California Health &
Safety Code § 25249.5, et seq.)

4
Figure B
1. Grounded tools require a three wire extension cord.
Double Insulated tools can use either a two or three
wire extension cord.
2. As the distance from the supply outlet increases,
you must use a heavier gauge extension cord.
Using extension cords with inadequately sized wire
causes a serious drop in voltage, resulting in loss of
power and possible tool damage. (See table a.)
3. The smaller the gauge number of the wire, the
greater the capacity of the cord. For example, a 14
gauge cord can carry a higher current than a 16
gauge cord. (See table a.)
4. When using more than one extension cord to make
up the total length, make sure each cord contains at
least the minimum wire size required. (See table a.)
EXTENSION CORDS
1. Tools marked with “Grounding Required” have
a three wire cord and three prong ground-
ing plug. The plug must be connected to a
properly grounded outlet. If the tool should
electrically malfunction or break down,
grounding provides a low resistance path to
carry electricity away from the user, reducing
the risk of electric shock. (See Figure A.)
2. The grounding prong in the plug is connected
through the green wire inside the cord to the
grounding system in the tool. The green wire
in the cord must be the only wire connected to
the tool’s grounding system and must never
be attached to an electrically “live” terminal.
(See Figure A.)
3. Your tool must be plugged into an ap-
propriate outlet, properly installed and
grounded in accordance with all codes and
ordinances. The plug and outlet should look
like those in the following illustration. (See
Figure A)
DOUBLE INSULATED TOOLS: TOOLS WITH TWO PRONG PLUGS
GROUNDED TOOLS: TOOLS WITH THREE PRONG PLUGS
Figure A
1. Tools marked “Double Insulated” do not
require grounding. They have a special double
insulation system which satisfies OSHA
requirements and complies with the applicable
standards of Underwriters Laboratories, Inc.,
the Canadian Standard Association, and the
National Electrical Code. (See Figure B.)
2. Double insulated tools may be used in either
of the 120 volt outlets shown in the following
illustration. (See Figure B.)
WARNING: TO PREVENT ELECTRIC SHOCK AND DEATH FROM INCORRECT
GROUNDING WIRE CONNECTION. Check with a qualified electrician if you are in
doubt as to whether the outlet is properly grounded. Do not modify the power cord plug
provided with the tool. never remove the grounding prong from the plug. Do not use the
tool if the power cord or plug is damaged. if damaged, have it repaired by a service
facility before use. if the plug will not fit the outlet, have a proper outlet installed by a
qualified electrician.
GROUNDING

5
PARTS DESCRIPTION
Soldering Tip
Soldering Tip Nut
Light Trigger
Power Cord
Handle
TOOL SET UP
WARNING!
To prevent serious injury from accidental operation: Make sure that
the trigger is in the off position and unplug the tool from its electrical outlet before
performing any procedure in this section.
1.
Using Wrench, check that the Soldering
Tip Nuts are not loose. Do not overtighten.
2. The Soldering Gun comes with three
Soldering Tips for different applications.
Select desired Soldering Tip and install
following soldering tip replacement direc-
tions outlined in the Maintenance and
Servicing section on Page 6.
1.
Set the Soldering Gun on the workbench,
and plug the Power Cord into an
electrical outlet.
2. Press on the Trigger until the Soldering
Tip heats up.
3. Apply a sufficient amount of rosin-core
solder to melt over the entire Soldering
Tip. Wipe the tip with a rag until the tip is
clean and shiny.
4. Brush on solder flux, as needed, to the
workpiece. Place the Soldering Tip to the
joint, wiring splice, or metal to be soldered.
5. Apply solder to the wire splice or metal to
be soldered, not the Soldering Tip. When
the splice or metal is hot enough, it will
melt the solder causing it to flow within the
splice or between the metal surfaces.
6. When the solder has flowed over the
entire wire splice or metal surface, remove
the Soldering Tip and release the Trigger.
7. To prevent accidents, turn off the tool and
unplug it after use. Clean, then store the
tool indoors out of children’s reach.
OPERATING INSTRUCTIONS

WARNING! To prevent serious injury from accidental operation: Make sure that the trigger
is in the off position, unplug the tool from its electrical outlet, and allow it to cool completely
before performing any procedure in this section.
WARNING!
To prevent serious injury from tool failure: Do not use damaged equipment
if abnormal noise or vibration occurs, have the problem corrected before further use.
MAINTENANCE
1. Before each use, inspect the general
condition of the tool.
Check for:
• Loose hardware
•
Misalignment or binding of
Moving parts
• Damaged cord/electrical wiring
• Cracked or broken parts
• Any other condition that may
affect its safe operation.
2. After use, heat up the Soldering Tip again
and apply a small amount of rosin-core solder
to coat the tip. Wipe off with a rag. This will
leave the tip clean and ready for use.
3. If the Soldering Tip cracks or becomes
eroded, it needs to be replaced:
a. Using Wrench, loosen the Soldering Tip
Nuts by turning counterclockwise.
b. Pull the old Soldering Tip out of the
Transformer Assembly mounting posts.
c. Slide the ends of the new Soldering
Tip into the mounting posts of the
Transformer Assembly.
d. Carefully tighten the Nuts over the
mounting posts by turning clockwise.
Make sure that the Nuts fit squarely
over threads or damage will occur to
the mounting post threads. Do not
overtighten.
4. To replace the Light Bulb:
a. Remove the Light Bulb Lens from the
front of the Soldering Gun.
b. Pull out the burnt Light Bulb and
replace with a new one of the same
voltage andtype. See Specifications on
Page 3.
c. Replace the Light Bulb Lens.
5.
WARNING! If the supply cord of this power
tool is damaged, it must be replaced only
by a qualified service
technician.
6

1 YEAR LIMITED WARRANTY
PERFORMANCE TOOL® extends only the following warranties, and only to original retail
purchasers. These warranties give specific legal rights. Except where prohibited by local law,
the law of the State of Washington governs all warranties and all exclusions and limitations of
warranties and remedies. There may be other rights which vary from state to state.
PERFORMANCE TOOL® warrants the product to be free from defects in materials and
workmanship under normal use and service. A defective product may be returned for a free
replacement within 90 days from the date of purchase, provided that product is returned to
place of purchase immediately after discovery of defect. After 90 days and up to one year
from date of purchase, PERFORMANCE TOOL® will replace at no charge any parts which
our examination shall disclose to be defective and under warranty. These warranties shall be
valid only when a sales receipt showing the date of purchase accompanies the defective
product or defective part(s) being returned.
These warranties exclude blades, bits, punches, dies, bulbs, fuses, hoses, and other
consumables which must be replaced under normal use and service. These warranties shall
not apply to any product or part which is used for a purpose for which it is not designed, or
which has been repaired or altered in any way so as to affect adversely its performance or
reliability, nor shall these warranties apply to any product or part which has been subject to
misuse, neglect, accident or wear and tear incident to normal use and service.
PERFORMANCE TOOL® does not authorize any other person to make any warranty or to
assume any liability in connection with its products.
Except for warranties of title and the limited express warranties set forth above,
PERFORMANCE TOOL® makes no express or implied warranties of any kind with respect to
its products. In particular, PERFORMANCE TOOL® makes no implied warranty of
merchantability and no implied warranty of fitness for any particular purpose, except that for
goods purchased primarily for personal, family or household use and not for commercial or
business use, PERFORMANCE TOOL® makes an implied warranty of merchantability (and,
if otherwise applicable, an implied warranty of fitness for a particular purpose), but only for
the particular qualities or characteristics, and for the duration, expressly warranted above.
The laws on limitation of implied warranties may differ from state to state, so the above
limitations may not apply in all cases.
PERFORMANCE TOOL® shall not be liable for consequential, incidental or special damages
resulting from or in any manner related to any product, or to the design, use, or any inability
to use the product. The sole and exclusive remedy for a defective product or part shall be the
repair, or replacement thereof as provided above. The laws on limitation of remedies or on
consequential, incidental or special damages may vary from state to state, so the above
limitations may not apply in all cases.
Check out the collection of automotive tools we offer.
This manual suits for next models
1
Table of contents
Other Performance Tool Soldering Gun manuals
Popular Soldering Gun manuals by other brands

Indeco
Indeco MFRS400 instruction manual

Parkside
Parkside PLS 48 B1 Operation and safety notes

Rothenberger Industrial
Rothenberger Industrial WWS-SST60 user manual

Kingsom
Kingsom KS-200DH Operation and maintenance manual

Melchioni
Melchioni mkc WS 919 user manual

Fervi
Fervi 443 Operation and maintenance manual