Performance Tool W2019A User manual

2
3
SPECIFICATIONS
Specifications are subject to change without notice
IMPORTANT SAFETY INFORMATION
WARNING!
READ, UNDERSTAND AND FOLLOW ALL INSTRUCTIONS AND
WARNINGS BEFORE OPERATING THIS TOOL. FAILURE TO DO
SO MAY RESULT IN PERSONAL INJURY AND/OR PROPERTY
DAMAGE AND WILL VOID WARRANTY.
Electrical: .......................................... 120 V AC, 60 Hz, .07A
Line Cord:.......................................................55 in. 2 Prong
1. Keep work area clean. Cluttered areas invite injuries.
2. Observe work area conditions. Do not use machines or power tools in damp or wet
locations. Don’t expose to rain. Keep work area well lighted. Do not use electrically
powered tools in the presence of flammable gases or liquids. Do not bring combustible
materials near the tools.
3. Keep children away. Children must never be allowed in the work area. Do not let them
handle machines, tools, or extension cords.
4. Store idle equipment. When not in use, tools must be stored in a dry location to inhibit
rust. Always lock up tools and keep out of reach of children and other untrained
persons. Switch off all unused electrical tools when stored. Tools are dangerous in the
hands of untrained users.
5. Use the right tool for the job. Do not attempt to force a small tool or attachment to do
the work of a larger industrial tool. Don't use a tool whose performance is not adequate
for your work. Do not modify this tool and do not use this tool for a purpose for which it
was not intended.
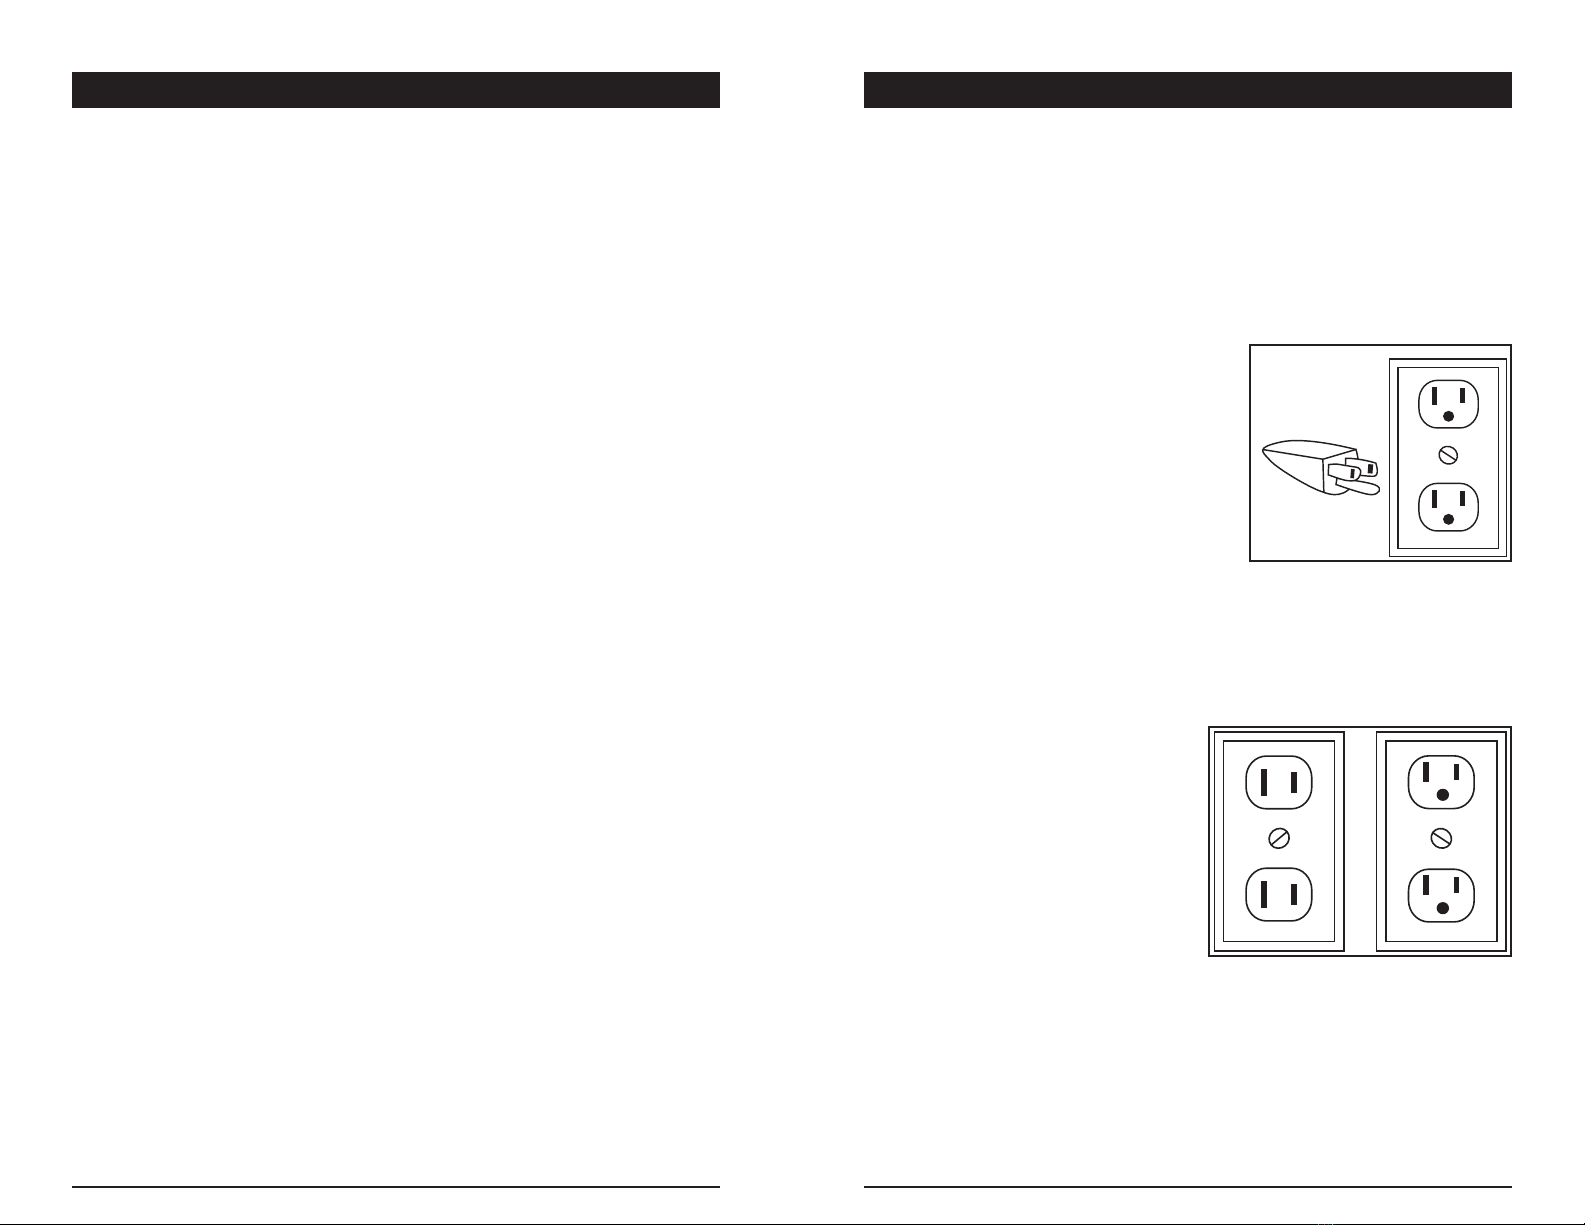
6 Grounded tools must be plugged into an outlet properly installed and grounded in ac-
cordance with all codes and ordinances. Never remove the grounding prong or modify
the plug in any way. Do not use any adapter plugs. Check with a qualified electrician
if you are in doubt as to whether the outlet is properly grounded. If the tools should
electrically malfunction or break down, grounding provides a low resistance path to
carry electricity away from the user.
7. Double insulated tools are equipped with a polarized plug (one blade is wider than the
other). This plug will fit in a polarized outlet only one way. If the plug does not fit fully in
the outlet, reverse the plug. If it still does not fit, contact a qualified electrician to install
a polarized outlet. Do not change the plug in any way. Double insulation eliminates the
need for the three wire grounded power cord and grounded power supply system.
8. Avoid body contact with grounded surfaces such as pipes, radiators, ranges, and
refrigerators. There is an increased risk of electric shock if your body is grounded.
Do not work on electrically live parts. The grip of antistatic designed soldering tools is
conductive. Do not point the Soldering Gun, or turn yourself toward another person
while soldering.
9. When operating a power tool outside, use an outdoor extension cord marked “W-A” or
“W”. These extension cords are rated for outdoor use, and reduce the risk of electric
shock.
10. Do not expose power tools to rain or wet conditions. Water entering a power tool will
increase the risk of electric shock.
11. Do not abuse the Power Cord. Never use the Power Cord to carry the tools or pull
the Plug from an outlet. Keep the Power Cord away from heat, oil, sharp edges, or
moving parts. Replace damaged Power Cords immediately. Damaged Power Cords
increase the risk of electric shock.
12. Disconnect the Power Cord Plug from the power source before making any adjust-
ments, changing accessories, or storing the tool. Such preventive safety measures
reduce the risk of starting the tool accidentally.
13. Do not overload your soldering tool. Use the soldering tool only with the specified
voltage or specified pressure range.
14. Stay alert. Watch what you are doing, and use common sense when operating a
power tool. Do not use a power tool while tired or under the influence of drugs, alco-
hol, or medication. A moment of inattention while operating power tools may result in
serious personal injury.
15. Dress properly. Do not wear loose clothing or jewelry as they can be caught in mov-
ing parts. Protective, electrically non-conductive clothes and non-skid footwear are
recommended when working. Wear restrictive hair covering to contain long hair. There
is a danger of burning yourself with liquid solder. Wear the corresponding protective
clothing in order to protect yourself against burns.
16. Avoid accidental starting. Be sure the Power Switch is off before plugging in. Carrying
power tools with your finger on the Power Switch, or plugging in power tools with the
Power Switch on, invites accidents.
17. Remove adjusting keys, wrenches or other maintenance tools before turning the
power tool on. A wrench, key or maintenance tool that is left attached to a part of the
power tool may result in personal injury.
18. Use safety equipment. Always wear eye protection. Dust mask, non-skid safety shoes,
hard hat, or hearing protection must be used for appropriate conditions. When working
with bonding agents, it is particularly important to observe the warning notices of the
bonding agent manufacturer. Protect yourself against spattering solder. There is a
danger of burning yourself with liquid solder. If devices for solder vapor suction is
available, ensure that these are connected and correctly used. Do not breath
soldering fumes. Never breath soldering fumes as they may make you ill.
19. Work Safe. Keep proper footing and balance at all times. Do not reach over or across
running machines, hoses, etc. Never leave the Soldering Gun unattended when it
is plugged into an electrical outlet. Turn off the tool, and unplug it from its electrical
outlet before leaving. Never lay the Soldering Gun down where the heated parts can
contact flammable materials or electrical wires. Always unplug the Soldering Gun
from its electrical outlet before performing and inspection, maintenance, or cleaning
procedures.
WARNING! People with pacemakers should consult their physician(s) before using
this product. Operation of electrical equipment in close proximity to a heart pacemaker
could cause interference or failure of the pacemaker.

4
5
20. Stay alert. Watch what you are doing, us common sense. Do not operate any tool
when you are tired.
21. Use clamps (not included) or other practical ways to secure and support the work-
piece to a stable platform. This is more secure than using your hands, and leaves
both hands free to work with the tool. Holding the work by hand or against your body
is unstable and may lead to loss of control.
22. Take care of your soldering tool. Keep the soldering tool clean for better and safer
work. Follow the maintenance instructions and the notices concerning changing the
soldering tips. Regularly inspect all connected cords and hoses. Repairs should only
be carried out by a qualified technician. Use only original PERFORMANCE TOOL®
replacement parts.
23. Check for damaged parts. Before using any tool, any part that appears damaged
should be carefully checked to determine that it will operate properly and perform its
intended function. Check for alignment and binding of moving parts; any broken parts
or mounting fixtures; and any other condition that may affect proper operation.Any
part that is damaged should be properly repaired or replaced by a qualified technician.
24. Repairs should only be carried out by a qualified electrician using original
PERFORMANCE TOOLS® replacement parts. Failure to do so can lead to accidents
for the operator. Use of any other parts will void the warranty. Only use accessories
intended for use with this tool. Approved accessories are available from Performance
Tool®.Use only accessories that are recommended by the manufacturer for your
model. Accessories that may be suitable for one tool may become hazardous when
used on another tool.
25. Do not operate any tool if under the influence of alcohol or drugs. Read warning labels
on prescriptions to determine if your judgment or reflexes are impaired while taking
drugs. If there is any doubt, do not operate any tool.
26. Maintenance. For your safety, maintenance should be performed regularly by a quali-
fied technician.
WARNING: Do not pull trigger continuing for more than 1 minute.
WARNING: Performance of this tool may vary depending on variations in local line voltage.
Extension cord usage may also affect tool performance.
WARNING: This product and its packaging contain a chemical known to the State of
California to cause cancer, birth defects, or other reproductive harm.
WARNING: This product, when used for soldering and similar applications, produces
chemicals known to the State of California to cause cancer and birth defects or other
reproductive harm.
WARNING: The warnings, cautions, and instructions discussed in this instruction manual
cannot cover all possible conditions and situations that may occur. It must be understood
by the operator that common sense and caution are factors which cannot be built into this
product, but must be supplied by the operator. Read and understand all of the instructions
provided in the instruction manual of this product, as well as, any other tool (s) used with
this product.
IMPORTANT SAFETY INFORMATION IMPORTANT SAFETY INFORMATION
GROUNDING
WARNING: Improperly connecting the grounding wire can result in the risk of electric
shock. Check with a qualified electrician if you are in doubt as to whether the outlet is prop-
erly grounded. Do not modify the power cord plug provided with the tool. Never remove the
grounding prong from the plug. Do not use the tool if the power cord or plug is damaged. If
damaged, have it repaired by a service facility before use. If the plug will not fit the outlet,
have a proper outlet installed by a qualified electrician.
GROUNDED TOOLS: TOOLS WITH THREE PRONG PLUGS
1. Tools marked with “Grounding Required” have a three wire cord and three prong
grounding plug. The plug must be connected
to a properly grounded outlet. If the tool should
electrically malfunction or break down, ground-
ing provides a low resistance path to carry
electricity away from the user, reducing the risk
of electric shock. (See Figure A.)
2. The grounding prong in the plug is connected
through the green wire inside the cord to the
grounding system in the tool. The green wire
in the cord must be the only wire connected to
the tool’s grounding system and must never be
attached to an electrically “live” terminal. (See
Figure A.)
3. Your tool must be plugged into an appropriate outlet, properly installed and grounded in
accordance with all codes and ordinances. The plug and outlet should look like those in
the following illustration. (See Figure A.)
DOUBLE INSULATED TOOLS: TOOLS WITH TWO PRONG PLUGS
1. Tools marked “Double Insulated” do not
require grounding. They have a special
double insulation system which satises
OSHA requirements and complies with
the applicable standards of Underwriters
Laboratories, Inc., the Canadian Standard
Association, and the National Electrical
Code. (See Figure B.)
2. Double insulated tools may be used in
either of the 120 volt outlets shown in the
following illustration. (See Figure B.)
EXTENSION CORDS
1. Grounded tools require a three wire extension cord. Double Insulated tools can use
either a two or three wire extension cord.
2. As the distance from the supply outlet increases, you must use a heavier gauge exten-
sion cord. Using extension cords with inadequately sized wire causes a serious drop in
voltage, resulting in loss of power and possible tool damage. (See Figure C, next page.)
3. The smaller the gauge number of the wire, the greater the capacity of the cord. For
Figure A
Figure B

6
7
1
3
2
OPERATION
OPERATION
Preparing the Soldering Tip
1. Using a Phillips (#1) screwdriver, check that the Soldering Tip screws (2) are not loose.
Do not overtighten as you may strip the threads.
2. Set the Soldering Gun on the workbench, and plug the Line Cord into an electrical
outlet.
3. Press on the Trigger Switch (12) until the Soldering Tip (1) heats up.
Preparing the Metal to be Soldered
1. If wires are to be soldered, thoroughly clean or scrape the wires so that only the clean
copper is showing. Make the wire splice.
2. If other metals are to be soldered, thoroughly clean or scrape the metal surfaces.
It may be necessary to apply acid ux (not supplied) to the metal surfaces before
soldering.
Caution: If soldering on printed circuit boards, too much heat can soften the plastic form
and loosen the metal eyelet connections. Use minimal heat, or solder with a low wattage
soldering pencil. Never use acid core solder on wiring circuits.
Soldering
1. Press on the Trigger Switch (12) until the Soldering Tip (1) heats up.
2. Brush on solder ux (not included), as needed, to the workpiece. Place the Soldering
Tip to the joint, wiring splice, or metal to be soldered.
example, a 14 gauge cord can carry a higher current than a 16 gauge cord. (See
Fig.C.)
4. When using more than one extension cord to make up the total length, make sure each
cord contains at least the minimum wire size required. (See Fig. C.)
5. If you are using one extension cord for more than one tool, add the nameplate amperes
and use the sum to determine the required minimum cord size. (See FiG. C.)
IMPORTANT SAFETY INFORMATION
3. Apply solder to the wire splice or metal to be soldered, not the Soldering Tip. When the
splice or metal is hot enough, it will melt the solder causing it to ow within the splice or
between the metal surfaces.
4. When the solder has owed over the entire wire splice or metal surface, remove the
Soldering Tip and release the Trigger Switch. If you are new to soldering, you may nd
it helpful to practice soldering rst on scrap wires and splices.
Warning: Before each use, inspect the general condition of the Soldering Gun.
Check for loose screws, misalignment or binding of moving parts, cracked or
broken parts, damaged electrical wiring, and any other condition that may affect
its safe operation. If abnormal noise or vibration occurs, have the problem cor-
rected before further use. Do not use damaged equipment.
Note: Maintenance requiring disassembly of this tool should only be performed
while the product is disconnected from the electrical supply circuit.
1. When you are nished soldering, heat up the Soldering Tip (1) again and apply a small
amount of rosin-core solder to coat the tip. Wipe off with a rag. This will leave the tip
clean and ready for use again.
2. If the Soldering Tip cracks or becomes eroded, the Soldering Tip needs to be replaced.
In this condition, it will not heat up properly.
Replacing the Soldering Tip
1. To replace the Soldering Tip, use a Phillips (#1) screwdriver to remove each screw (1)
by turning counterclockwise.
2. Guide the old Soldering Tip (2) out of the Transformer Assembly mounting posts (3).
3. Guide the prong ends of the new Soldering Tip (2) into the Transformer
Assembly mounting posts (3)
4. Carefully tighten the Screws (1) over the Transformer Assembly mounting posts (3).
Make sure that the Screws t straight into the slots. Do not overtighten.
MAINTENANCE
Figure C

LIMITED WARRANTY
PERFORMANCE TOOL® extends only the following warranties, and only to original retail purchasers. These warranties give specific legal
rights. Except where prohibited by local law, the law of the State of Washington governs all warranties and all exclusions and limitations of
warranties and remedies. There may be other rights which vary from state to state.
PERFORMANCE TOOL® warrants the product to be free from defects in materials and workmanship under normal use and service.A
defective product may be returned for a free replacement within 90 days from the date of purchase, provided that product is returned to
place of purchase immediately after discovery of defect. After 90 days and up to one year from date of purchase, PERFORMANCE TOOL®
will replace at no charge any parts which our examination shall disclose to be defective and under warranty. These warranties shall be
valid only when a sales receipt showing the date of purchase accompanies the defective product or defective part (s) being returned.
These warranties exclude blades, bits, punches, dies, bulbs, fuses, hoses, and other consumables which must be replaced under normal
use and service. These warranties shall not apply to any product or part which is used for a purpose for which it is not designed, or which
has been repaired or altered in any way so as to affect adversely its
performance or reliability, nor shall these warranties apply to any product or part which has been subject to misuse, neglect, accident or
wear and tear incident to normal use and service.
PERFORMANCE TOOL® does not authorize any other person to make any warranty or to assume any liability in connection with its
products.
Except for warranties of title and the limited express warranties set forth above, PERFORMANCE TOOL® makes no express or implied
warranties of any kind with respect to its products. In particular, PERFORMANCE TOOL® makes no implied warranty of merchantability
and no implied warranty of fitness for any particular purpose, except that for goods purchased primarily for personal, family or household
use and not for commercial or business use, PERFORMANCE TOOL® makes an implied warranty of merchantability (and, if otherwise
applicable, an implied warranty of fitness for a particular purpose), but only for the particular qualities or characteristics, and for the
duration, expressly warranted above.
The laws on limitation of implied warranties may differ from state to state, so the above limitations may not apply in all cases.
PERFORMANCE TOOL® shall not be liable for consequential, incidental or special damages resulting from or in any manner related to
any product, or to the design, use, or any inability to use the product. The sole and exclusive remedy for a defective product or part shall
be the repair, or replacement thereof as provided above. The laws on limitation of remedies or on consequential, incidental or special
damages may vary from state to state, so the above limitations may not apply in all cases.
Check out the collection of automotive tools we offer.
This manual suits for next models
1
Table of contents
Other Performance Tool Soldering Gun manuals