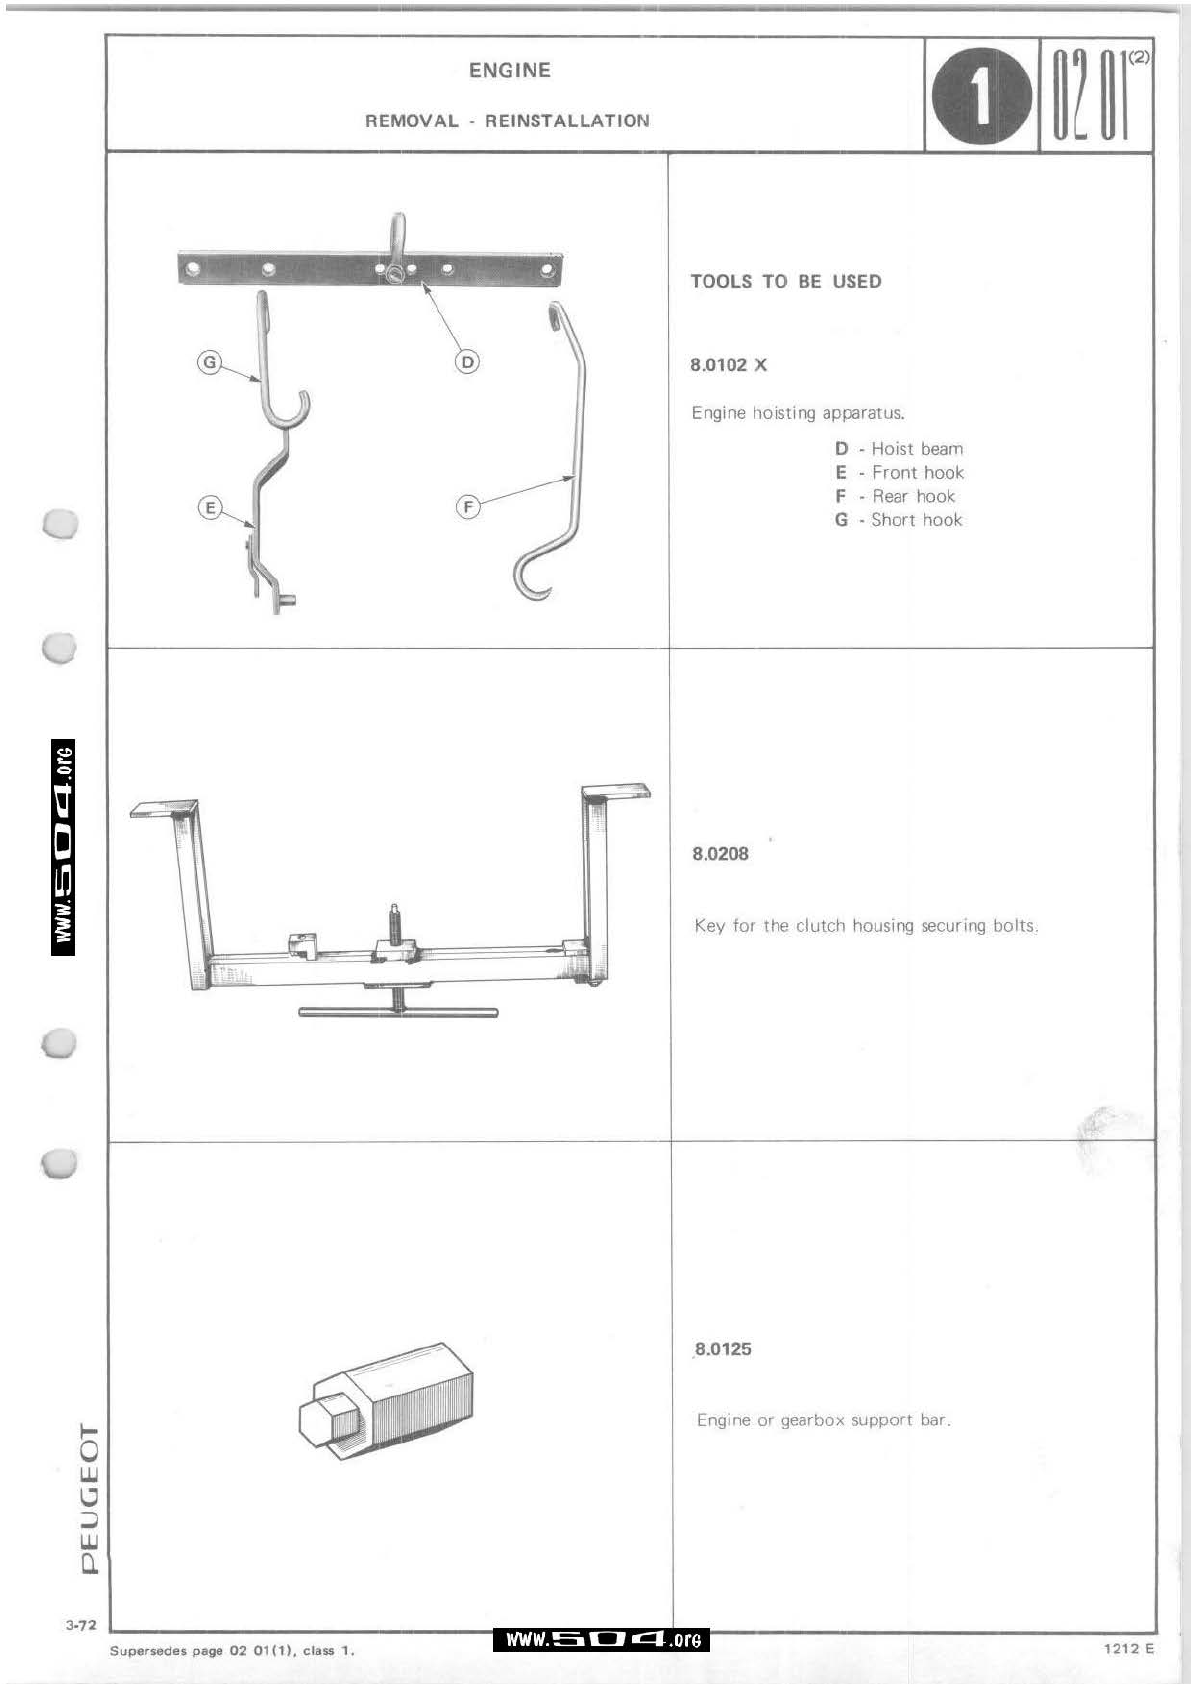
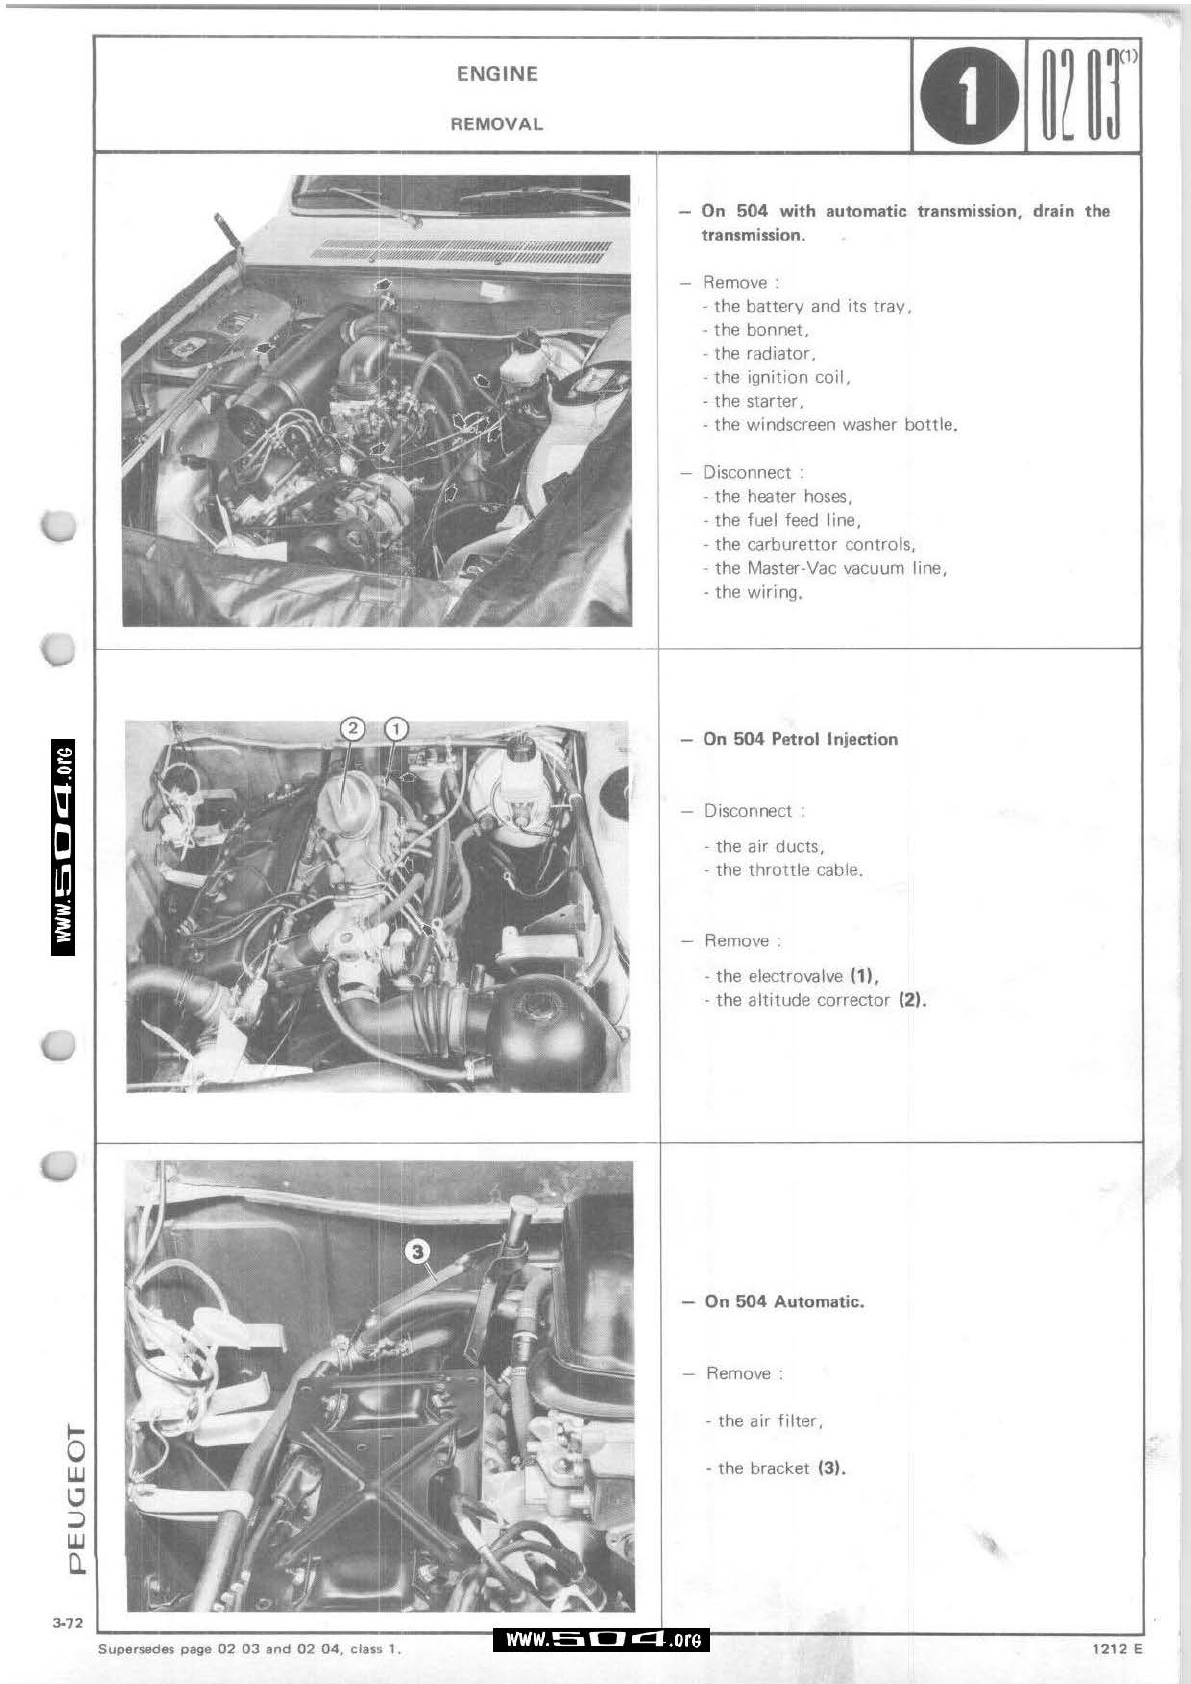
PEUGEOT 504 Series 1970 Instruction manual


I
0
w
~
:J
w
Cl.
ENGINE
CONTENTS
IDENTICATION
AND
CHARACTERISTICS
ldenttf1cat1on
REMOVAL
AND
REFITTING
Tools
to
oe used
Remov<1I
ol
the
engine
Refitting
of
the engine
Engine
tuning
DISMANTLING
·
REASEMBL
Y
Tools
to
be
usi:d
Dismantling
th;; engine
Reassembling
the
engine
CYLINDER
HEAD
ChecKing
me
compression
Tools
to
be
used
Removal
of
the
head
Refitting
the
head
Ret1gt1tcning
the
head
Her 1,000
km
(600
milts)
Refitting
of
thP
spark
plug
tubes
Replac ng a valve
spring
(hPad
in
place)
CYLINDER
LINERS
Toois
to be
u~•~d
F
1tt
mg
free
expanding
liners (
XM
KF G
and
K
FS
crig nes)
Fitting
c.omprossed linPrs IXM7·
XNl
and
XN2 eng1rns)
FLYWHEEL
Replacing
the
llywt eel
Replac.ing tt e
staner
r
mg
geaf
TIMING
Too
s
to
be used
Timing
d1agr<.1m
Check ng
the
timing
Removing
the
timing dr
1vc
D1srn<1ritling
tile
cha111tr11s1oner
RPf1ttmg
sett
mg
the
1m
my
WWW
.
~
CJ
Cl
.
Or
G
0
Pa
ge
01
01
131
02
01
(2)
02
03 <11
to
05
12
1
02
11
and
12
02 51 and
52
..
03
01 c1 1
and
02
<1 1
03
02
121
to
06
121
03
51
131
to
59 111
04
01
111
and
02
111
0411121
04
13
12
1dnd14
121
04
15
(1)
to
19
04
21and22
04
51
and
52
05
61to63
06
01
OG02
06 03
to
05
09 01
11
I
09
02
(1)
10
01
14 )
10
02
(1)
10
03
(2)
10
04
c1 1anci
05
12
1
10
05
(2)
10
06
121
and
07
It

0
CARBURETTOR
XM and XM 7 engines
AdJUS
1ng
tht::
1dl111g
Settings
of
Solex
34
PBICA
carbllrettors
Description
Ad1ust1ng the acceleration
pump
stroke
XN 1 engine
Ad1ust1ng the
idling
Settings
of
Solex
cnrburetlors
Descr1pt1on
Cleaning and ad1ustmg
the
32/35SEI
EA
carburettor
PETROL INJECTION ENGINE
Feed ctrcu1t
Lift
pumps
Electrovalve
F1lter1ng
Injection
system
tools
to
be used
Replacing
the
throttle
flap
spindle
(K
F 5
XN
2l
ln1ectors
Delivery
valves
Suction
valves
ln1cct1on
pump
removal
•
rcf11t1ng
· ad1usting • KF 6
• ad1ust1ng
KF
5
and
XN
2
LUBRICATION
Che
..
mg
the
oil
pressure
WATER PUMP
Re111uva1 -rnf1tting
Tools
to
be used
Dismantling
Reassembly
Che~k1ng
the
tan engagement
EXHAU
ST SYSTEM
Assombly and clearances
of
the exhaust pipe
• Saloon
Family
Saloon
Break •
Statton
Wagon
EN
G
INE
CO
NT
ENTS
WWW
.
~
CJ
Cl
.
OrG
Page
1201111
12
02
(1
l
12
03
12 04
1211111and
12111
1213111and14111
1215(1)
12
16
to
19
12
51
and
52
12
53
to
56
12
57
12
58
13
01
13
03
to
13
08
13
09
13
10
and 13
11
13 12
13
15
and
16
1317t
l'J
13 21
to
27
13 31
to
16
14
01
15
01
(11
15
03
(2)
15
04
I
1)
and
05
I1 I
1506111
008111
15
08
(1
I
16
01
16
02
1212
E
I
I

'
I
b
w
IJ
:l
w
ENGINE
IDENTIFICATION
Identification
letter
p XM
R
KF6/KF5
T XM
ZF
t--
--------~U,_-----------;X~Nl~----------"'."""
}
UA
XNl
US.
7.6 1comp.
UB
XN
7 6 1comp
SERIAL
NUMBER
(1)
The selial
numb11r
stamped
on
the t .H.
eng1r1c
mounting lug
is
·preceded and followed
by
an"
X".
• identical
to
the number stamped on
tl
e maker's
plate
(a)
and
on
tlie
R.
H.
w1119
V'dlance
(b).
WARNING
-
In
the event
of
replacemen1
of
the
cylinde
block
or
the
engine, the number
as
deftned
above, must be stamped on the 1mgine, using 8 mm
letters,
in
the
space
provided
(1)
.
ENGINE NUMBER (2)
The engine numtier stamped on
tl
11'
camshaft
tunnel consists
of
a prOducuon number
(c)
(a
letter followed
by
c ''gur11s).
an identification lern•r
(d)
(see
table below)
WARNING
·
In
the event
of
replacement
the
new
cv
nj1
r b " must be stamr ·
id
with
the
engine
number
111
the space
prov1dEd
(2)
.
Type
of
engine
(Carburettor
10
CV
for
SA7
gearbox)
(ln1ection • 10
CV
for
BA7
gearbox)
!Carburettor 10
CV
for
ZI='
trilnsm
ssron)
lree
expamJ1ng
liners
1--------------------
---.
(Carburettor
11
CV
for
BA7
gea
rbox)
(ln1ewon
1
CV
for
BA7
gearbox
v
w
XN2
XN2
-(ln1ection
11
CV
for ZF transmission) compressed liners•
x
XA
XB
y
E
XNl
l
XNl
US.
7.6 1comp. (Carburettor -
11
CV
for
ZF
transm1ss1011)
XN
I 7.6 1comp.
XM7
XM7
7.5
1comp.
8.3
1 comp.
Q.
1---------
.....
(Cnrburetwr · 10
CV
for
BA7
gearbox) J
(Carburettor·
10
CV
"Expar1'')
-----------
•
Compren•d
llne,.
fi"ed
,
,,.
...
Julv
1970
a
nd
from
se
ri
al
numb
er 1 1
78
001.
2
·7
3
'------------------
WWW.
Ea
c::::J
.:::J.
OrG
Su
persedes
page
01
01
(2),
class 1. 1
211
e

I

0
UJ
~
:J
UJ
a.
3
.72
S
upers
e
des
p a
ge
0 2 0 1 (1) , c
lass
1 .
ENGINE
REMOVAL
-REINSTALLATION
TOOLS TO
BE
USED
8.0102
x
Engine hoisti
ng
apparatus.
8.0208
D -Hoist
beam
E -Front hook
F -
Rea
r hook
G -Short hook
Key
for
the clutch housing securing bolts.
8.0125
Engine
or gearbox support bar.
WVIW.
E.
CJ
.r::::f
.
OrG
12
12 E

www
.
~~CJ
.
orG
'
I

b
UJ
lJ
::J
UJ
a.
3-72
Sup
e
rs
e
des
pa
ge
02 03
and
02
04,
class
1.
ENGINE
R
EMOVAL
-On
504
with automatic
transmission,
drain the
transmission.
Remove:
-the battery and its
tray.
-the bonnet,
-the radiator,
-the ignition
coil,
-the starter.
-the windscreen washer bottle.
Disconnect :
-the heater
hoses,
-the fuel feed line,
-the carburettor control
s.
-the Master-Vac vacuum line,
-the wiring.
-
On
504
Petrol Injection
Disconnect ·
-the air ducts,
-the
throttle
cable.
R
emove:
-the electrovalve
(1),
-the
alt
itude corrector (2).
-On
504
Automatic.
Remove:
-the air
filter,
-the bracket
(3).
WVIW.
E.
CJ
llCJ
.
OrG
1
21
2 E

ENGINE
RE
MOV
AL
<f'~
Lower the steermg rack housing )
~
(turn
the
steering wheel to the
left).
'\)
-
Disengage
the exhaust pipe from the manifold.
Remove·
-
the
flywheel protector plates,
the clutch housing bolts.-J
0'
4
~-.,
~
Position the hoisting apparatus
as
shown opposite
(locate the hooks
1n
the holes marked
"404
").
-
Raise
the apparatus unttl
11
is
under load.
Remove the four bolts securing the engine
mountings
to
the crossmember.
W
AR
NIN
G -Make
sure
that the
front
L.H. brake line
is
hard
up
against the crossmember.
-
Raise
the engine
unti
I the gearbox abuts
on
the
tunnel.
WVIW.
E.
CJ
llCJ.
OrG

Supersedes
page
02
0511),
class
1 .
ENGINE
REMOVAL
-Place the gearbox support bar under
the
gearbox
and bring the centre
bolt
into
contact
with
the
housing.
On
504
Automatic :
Remove the 4 bolts securing the
convenor
to
the flywheel.
-Disengage the convertor.
WARNING
· Never remove
the
engine
with
the
convertor , make sure
that
the convertor remains
attached
to
the transmission.
-Separate the engine from the gearbox
without
altering the position
of
the hoisting apparatus.
WWW
.
!::::.
c:J
Cl
.
Or
G
1212
E

www
.
~~CJ
.
orG
'
I

0
UJ
\J
:::>
I.I.I
Cl
ENGINE
RE
INSTALLATION 0
~~11
-Aeinstallation
procedure.
is
a reversal
of
the
removal
-Particular points .
engage
one
of
the
gears
(BA
71
.
·couple the engine
to
the gearbox
by
lurning
the
flywheel to line the
two
components
up
exactly.
On
504 Automatic.
-
Secure
the convertor housing
to
the cyhnder block.
Bring one
of
the openings in the flywheel to the
bottom.
Rotate the convertor (using a screwdriver
engaged
in the cooling fins)
to
line up one
of
the threaded
holes
with
the coupling plate on the flywheel.
-Tighten the bolts to 2.
25
m.kg
(16
ft.lbs).
-
When
fitting
the radiator, respect the dimension
(a)
: 15 to
20
mm.
121 2 E

ENGINE
REINSTALLATION
Before starting the engine
check the oil level and
top
up
1f
necessary,
slacken
off
the banio
(1).
•
with
the engine being driven
by
the
starter. the
011 should
flow
freely.
On
504 Automatic.
-Refill the
transmission
with
the
correct fluid.
WWW
.
!::::.
c:J
Cl
.
OrG

ENGINE
TUNING
In
addition
to
checking and adjusting
the
ignition
system, an engine tune-up may
include
the
following
0
UJ
lj
::>
w
Q.
operations
-Compression check (page 0401 l
-Valve clearance setting (page
0422)
-
Oil
pressure check (page 1401)
-Cleaning
the
carburettor,
fuel
pump
and
air
filter
(page 1211)
-Checking
the
cooling
fan
air
gap
I0.35
mm
-
0.014")
-
Adjusting
the engine
id
ling (page 1201
or
121
1)
2
.7
3
..._
_______________
_
SPARK
PLUGS
-
Carburettor
engi
nes
:
For
{
XM
XM7
XM and XN1 U.S.
·Marchal
35
HS
-AC 44
XL
·Champion
N9Y
For
XN1
· Marchal
35
HS
-AC 44
XL
·Champion
N7Y
Electrode
gap
: 0.6
mm
(0
.
024
")
-
Inject
i
on
engin
es
-
For
XM
KR>
·Marchal
GT
34
HO
· Champion
N6Y
Electrod
e gap : 0.5
mm
(0.
020
")
-For XM
KF5
XN2
-Marchal
GT
34
HD
·AC
42
XL
Champion
N6Y
Electrode
gap
: 0.6
mm
(0
.0.24
")
.
,.
1212
E

""'
VACUIJM
ADVANCE
,..
...•
s
...
..
-
-,
VACUUM
ADVANCE
M 48
ENTRIFUGAL
ADVANCE
•I
-
•I
I
-r=
=f
-
~
j"
.,
.Y
~
.
t
~-
L
~;
'
J.
_,_
~
I
..
+-
I+
:,,/
,_
'--
•
.,
.~
·. i d•&tribUtQ(
1,p.m.
f"
!SOO
I 1
000
....
2000
VACUUM
ADVANCE
M 53
H-:
-
2500
CEN~~~A~
~i:.v~CE
rt-;:+
·~++l-'-+++-r,-,-,.·...-.-~--.,,....,~~::;,,...
~
-1-l-++--l-l-+-I
,...t!:SB:lli±EaW~ffim:lilis_c_
-
h-.-+++Y+'>r-.fi+-.i-tt+Y-++-HH-i+:~-'-l
~l·
-+H-1-1:'
'1>4''!-+t++
++H-H-H-t-l-l-H-~H-ri
~
-1-+.
}flhH-+-f'
H-'-'-H-H-++IH-H-.!-!-H-+-'
~
.
-1-
1-l<'.iil-J..'..l~
!-W-
-'
W-H!-1-J-H--'-H-L!
~
l
-.-
•
..
. . r
--+H
l
H-!H-!-t-l-h-!
<ii
~
·y i
1 di5trib
ut
or
r.p.m.
tt:++-._
,_,_.,
11
,_,_.'-'
1
_.
1
500
1000
1250
1~00
ENGINE
TUNING
CHECKING
THE
DISTRIBUTOR
Dwell
angle:
57°
±2°
(Dwell
percentage
: 63 % ± 3 %)
which corresponds
to
a points
gap
of
approximately
0.40 mm (0.
016")
except in the
case
of
S.E.V.
Marchal "cassette" points
se
ts
where t
he
gap
is
approximately 0.30
mm
(0.012").
NB -On Ducellier distributors, check t
he
dwell angle :
1 - vacuum
unit
disconnected (atmospheric pressure)
2 -vacuum
unit
submitted
to
a depression
of
300
mm
Hg.
The dwell
an
gle must
be
the
same
in
both
cases
.
If it varies,
wrrect
by
rotating t
he
cam (1).
Advance
curves :
504
with
carb
urettor
engine
M
48
curve
504
with
injection engine
· M 53 curve
WWW
.
~
c::::J
c::i.orG
•

0
w
~
:J
w
a..
I
ENGINE
TU
NI
NG
CENTRIFUGAL ADVANCE
M 48
I -
-r--.--
-
rn-1
I
I ' I I I
LA
15•
14
·45-·
--r·
,-.::.
--
---
-·
-,_
-i..;;r:
~
10"
5•
0
20·
TT30
-
15°
12'30
10·
I I
,_
'-
V'.
J
...
~
..
-
..
,
~
..
, i
~
.....
I
I
~
~
I
/
~~
1
I
! .
"'
.
A•
I I
I
"'
II
' I
..I
I "
'"
Ij I I
.
~
'---'---'
I I I
I/
l/V
t r
-r-i
hot
··"'
' I
--
~--
/VI/
soo
I
800
1000
I I I
1500
2000
CENTRIFUGAL ADVANCE
M
69
--
·-
-· -
·-
-
..
--·
~-
·--
I
·-
..
...
_,_
J
:t
-
'""1
0
.....
i
....
i
..
....
-_,_ --
,_
.....
...
,,...
I .·
·',
.I
1 I
I I
I/
1, I
' I
'
I/
/I
'tUtJ4torr.IU'\.
1 I
500
1000
1500
2000
600
CENTRIFUGAL ADVANCE
M74
.
L-
I
I
I I
I I
I
j
I
' I
; I I
r1-H
2500
..
-
--
~·
-
--
2
500
17
:f-Lj+I r ·
1111
I I f I I I
' • I I I I I I
is•
-I I I I f i v I ' I i I
-
15° ' ' I o I
//
-~·.---
I
~,~
I
///.
f-'-
-~
I
//
:
--
-
1-
-
-n-
II' L
·
~
-
---
_,__
I
-I i : ,_ - ·- _,_
-H+ • I
~
I
I I ' 1 ' I
I
10°
'I' I i -
-1-1-
--
--
I I
I/
-
1-f-
-1--
I/,
I 1
r!-.~
-
/~I/
,__
1-1-
-
'=i=t
J+t~
-
-
---
-;&
,
"'
" ----
j
5•
o•0
500
I
1000
1500
12000
2500
700
1950
Advance curves :
The distributors
fitted
to
504 U.S. models
have
novacuum advance correction.
504
US
"69
Standards"
-
M.
48
curve
504 US
"70
and
71
Standards"
M 69 curve
'104
US
"72
and 73 Standards"
M 74 curve
WVIW.
E.
CJ
llCJ
.
OrG
1212
E

BEFORE
ENGINE
TUNING
SETTING
THE
TIMING
PLATE
WARNING · Make sure
that
rhe timing >llate has
not
m
>1c.J
It
1n
doubt. check the setting and
,1d1ust
as
follows.
-Position No. 4 piston
at
T.D.C.
Move the
timing
plate
to
line
the
'O'
up
with
the
mark
on
the crankshaft pulley.
WWW
.
~
CJ
Cl
.
OrG
I
I

0
UJ
IJ
:;)
UJ
a.
ENGINE
TUNING
STATIC
IGNITION
TIMING
IGNITION
1
IMING
WITH A STROBOSCOPE
Dwell angle
correct
Timing plate set
Set
the
distributor
approximately
Find T.D.C.
(1) ·
w11h
8
mm
diameter rod
(2) · pulley mark lrnt!d
up
with
the
"O"
on
the
plate.
Position
the
distributor
as
shown
(3) • carburettor engine
(4)
• in1ecuon engine
Connect
up
the
low
tension wire
·Switch
on the ignition
-
Rotate
the
distributor
clockwise
to
fully
close
the
µ01ms
-anticloc
~wise
until the points begin
to
open
(spark
v1s1ble
between them).
·Lightly
clamp the
distributor.
Fit
the
distributor
<.ap
and
connect
up
thP
plug
leads.
Disconnect
the
vacuum line from
the
unit
5
(where fitted) and seal
off
the
nozzle
Connect
J
strob
1
cope
lamp
with
the
sensor clamp
on
the
coil
HT
lead.
J 1ev-c..1untcr.
Start
up
tlrn engine.
The
engine speed
must
not exceed
850
r
p.
m.
during
the
setting.
-
Turn
the
dephaser needle
to
"O"
1212
E

ENGINE
TUNING
Point the strobos ope at the liming
plate,
holcJmg
t per J t:nd1culnr
to
the
plate.
Rotate
the
distributor
until
the
:
·
reference
mark
on
the
pulley
is
in
line
with
the
correct
reference
(X)
on
the
timing
plate.
(X)
0°
101
G04
u::,
71
Standards"
(
)(Nl
• XN2 (11
CV)
eng
nes
(X)
=5° B.T.D.C. on 504
US
"70.
72.
73
St
an-
dards"
(X) -
10
0 B l
DC
jXM7
(IOCV)
engines
· • • ·
on
}b04
US
"G~
Standards''
·
or
•
on
engines
with
no
timing
plate
:
until
the
mark
on
the
flywheel
1s
apparent
in
the
8
mm
hole
in
the
clutch
housing.
r1qhllln t
he
di,,trtbtJlO
I Cl
amp
the
l'ngine
spL>cd
the clepr.aser
(on
zero)
the lining
up
of
thP.
timing
marks.
Reconncet
the
vacuum
hne
(where
vacuum
unit
IS
fitted).
WWW
.!::::.
c:J
Cl
.
OrG

'
I
0
w
lJ
:J
w
a.
XI
ENGINE
TUNING
IGNITION
TIM
ING WITH A TEST
LAMP
Dwell angle correct
Timing
plate
set
1 · Engines fitted
with
a timing
plate
Rotate
the
crankshaft clockwise
unt
il
the
mark
on
the
pulley
is in line
with
the
graduation
on
the
timing plate
(X).
(X)
(X)
(X)
0°
for
b04
US
"71 Standards"
50
BT
DC
{
for
XN 1
XN2
(11
CV)
engmes
· • • · for 504
US
"70
72
73
Stan-
rl<1rds"
100
BT
DC
{for
XM/
(10
CV)
.engines
• · · ·
1or
504
US
"G9
St,mdards"
2 · Engines
with
no
timing plate
Rot
ate
the
crankshaft clockwise
until
the
8
mm
rod e
ng•
s m
the
flywheel.
Pos1tton the d1smbutor
as
shown oopos1te
Conm~ct
·
the
low
tension wire
·a
test lamp (5W bulb)
Switch on
the
1gn1t1011
Rotate
the
distributor
·clockwise
ant1clockw1se until
the
light
comes
on
, while
holding
the
rotor
arm "fully
retarded
"
Tighten the
distributor
clamp
Check,
by
turning
the
crankshaft clockwise :
the light must come on
1
·when
the
pulley
reference
is
in
line
with
the
gradua11on
(X)
on
the
timing
plate
2 when the 8
mm
rod
engages
Ill
the flywheel
Remove
the
rod and
the
test
lamp
Fit
tt e distributor cap and
onnel
t
u1
tl
e
HT
leads
WWW.
Ea
c::::J
.:::J.
OrG
12
12 E
This manual suits for next models
3
Table of contents
Other PEUGEOT Automobile manuals

PEUGEOT
PEUGEOT RCZ User manual

PEUGEOT
PEUGEOT BOXER 2018 User manual

PEUGEOT
PEUGEOT 2008 User manual

PEUGEOT
PEUGEOT 4008 Setup guide

PEUGEOT
PEUGEOT 407 2009 User manual

PEUGEOT
PEUGEOT ION User manual

PEUGEOT
PEUGEOT 404 Instruction manual

PEUGEOT
PEUGEOT e-208 User manual

PEUGEOT
PEUGEOT 208 2017 User manual

PEUGEOT
PEUGEOT 208 Rally 4 2021 User manual

PEUGEOT
PEUGEOT 807 User manual

PEUGEOT
PEUGEOT Boxer User manual

PEUGEOT
PEUGEOT 308 User manual

PEUGEOT
PEUGEOT 508 Setup guide

PEUGEOT
PEUGEOT ION User manual

PEUGEOT
PEUGEOT 107 2009 User manual

PEUGEOT
PEUGEOT 308 User manual

PEUGEOT
PEUGEOT 301 User manual

PEUGEOT
PEUGEOT 5008 User manual

PEUGEOT
PEUGEOT 108 User manual