Philco PLS 1051 F User manual

PLS 1051 F
AUTOMATIC WASHING
MACHINE
USER'SMANUAL

Dear customer,
Thank you for buying aPHILCO brand product. So that your appliance serves you well, please read all
the instructions in this user'smanual.

EN - 1
05/2013Copyright © 2013, Fast ČR, a. s.
CONTENTS
PART 1: BEFORE PUTTING INTO OPERATION................................................................................................. 2
Important safety instructions.....................................................................................................................................................2
General safety information..........................................................................................................................................................2
Recommendations.........................................................................................................................................................................3
PART 2: INSTALLATION.................................................................................................................................... 4
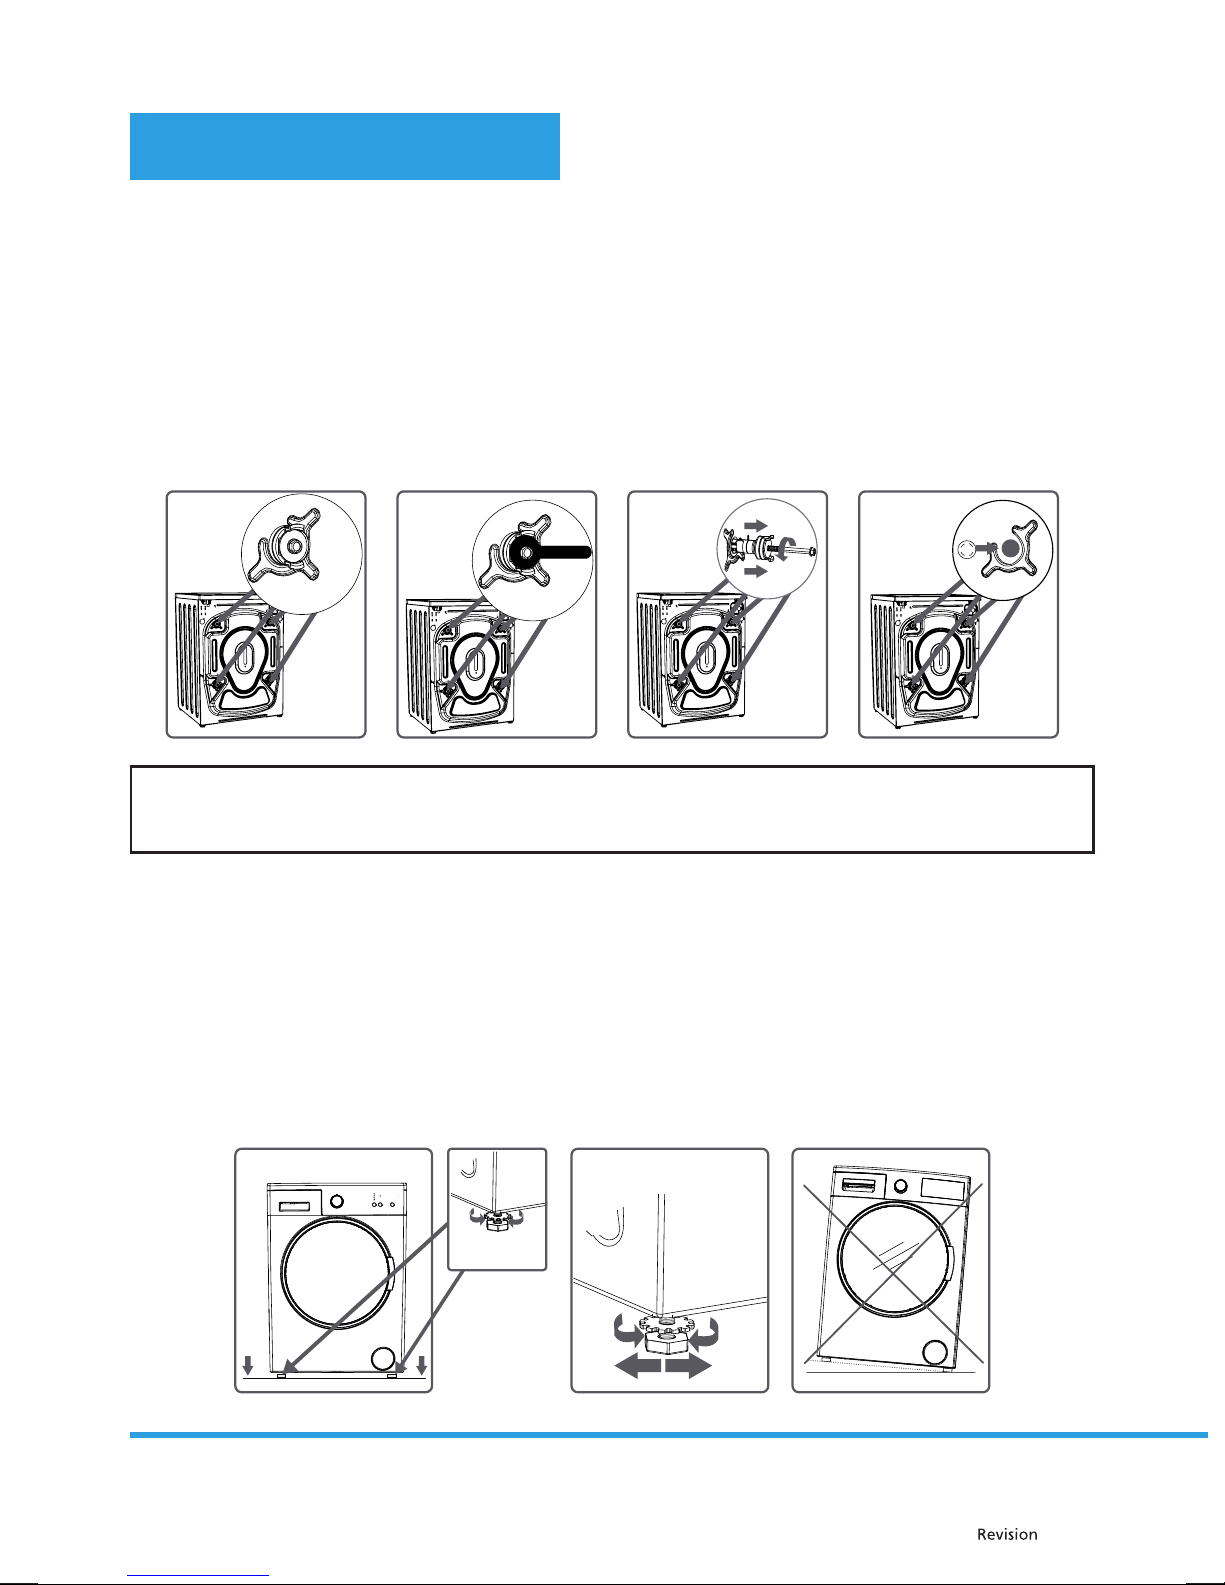
Removal of the transportation screws....................................................................................................................................4
Levelling the washing machine.................................................................................................................................................4
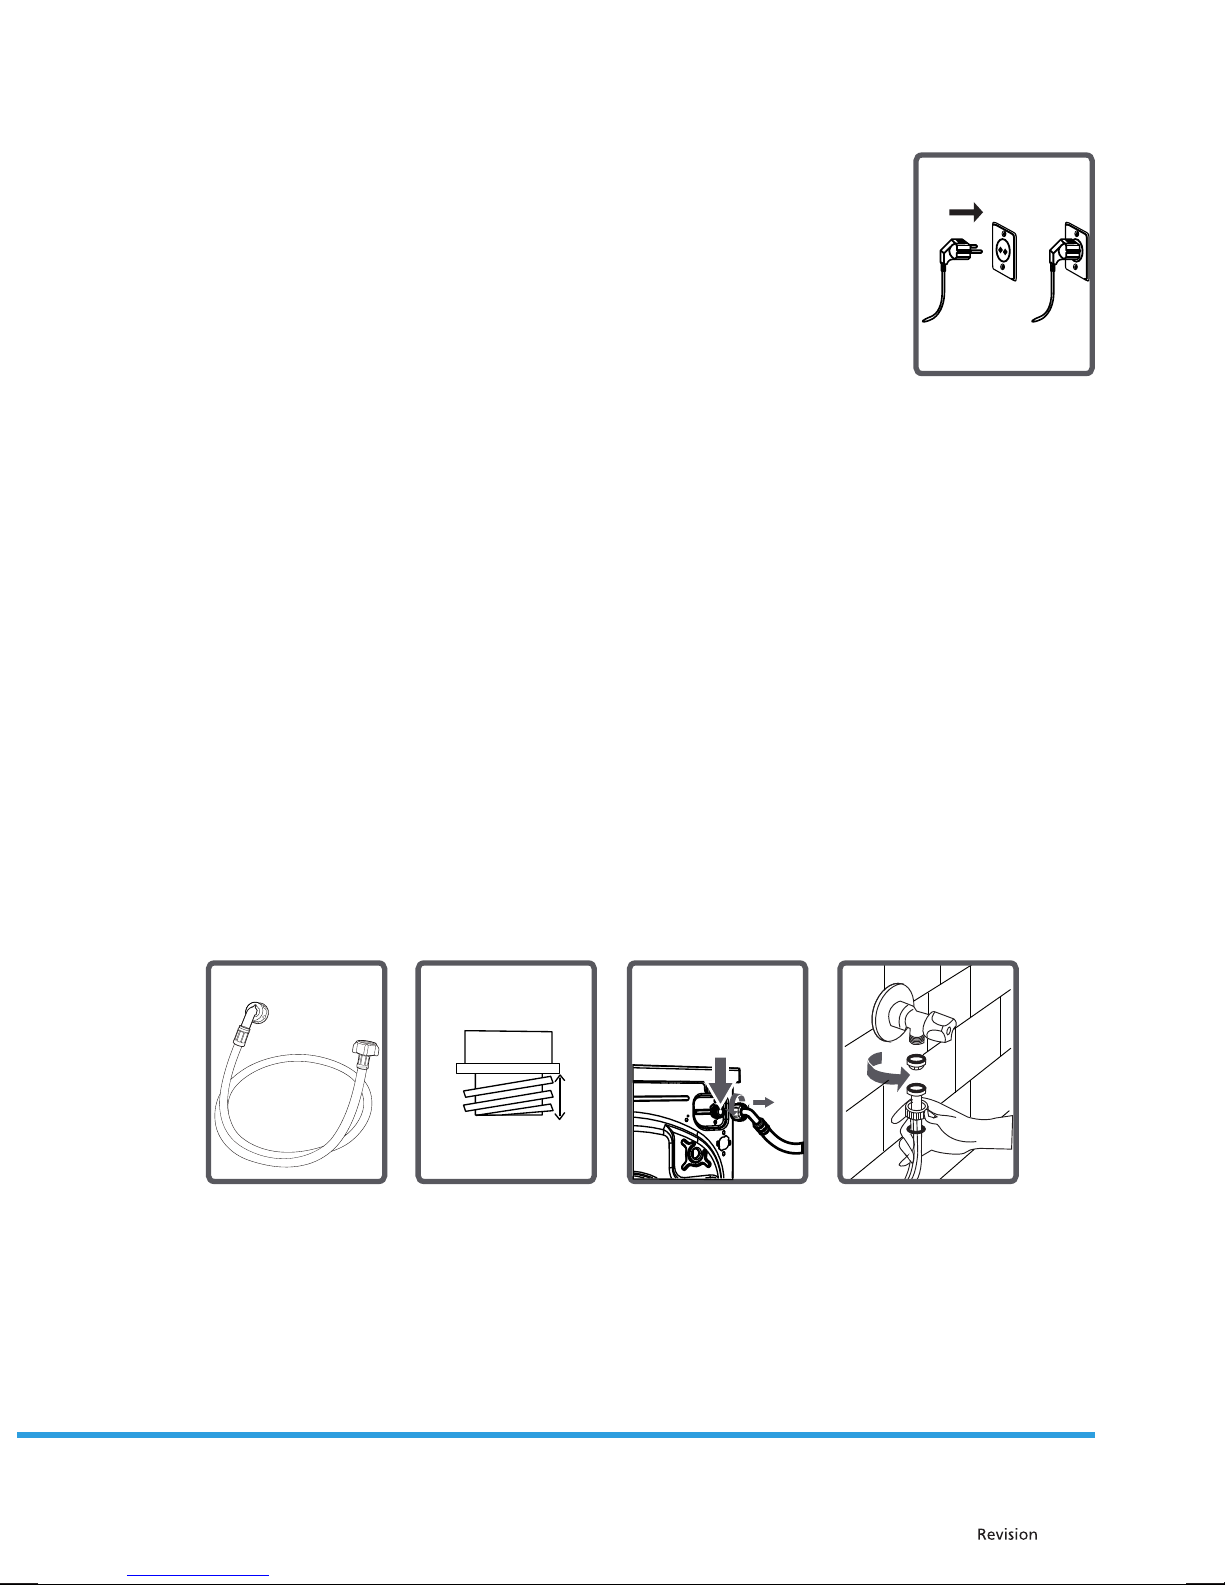
Electrical connection.....................................................................................................................................................................5
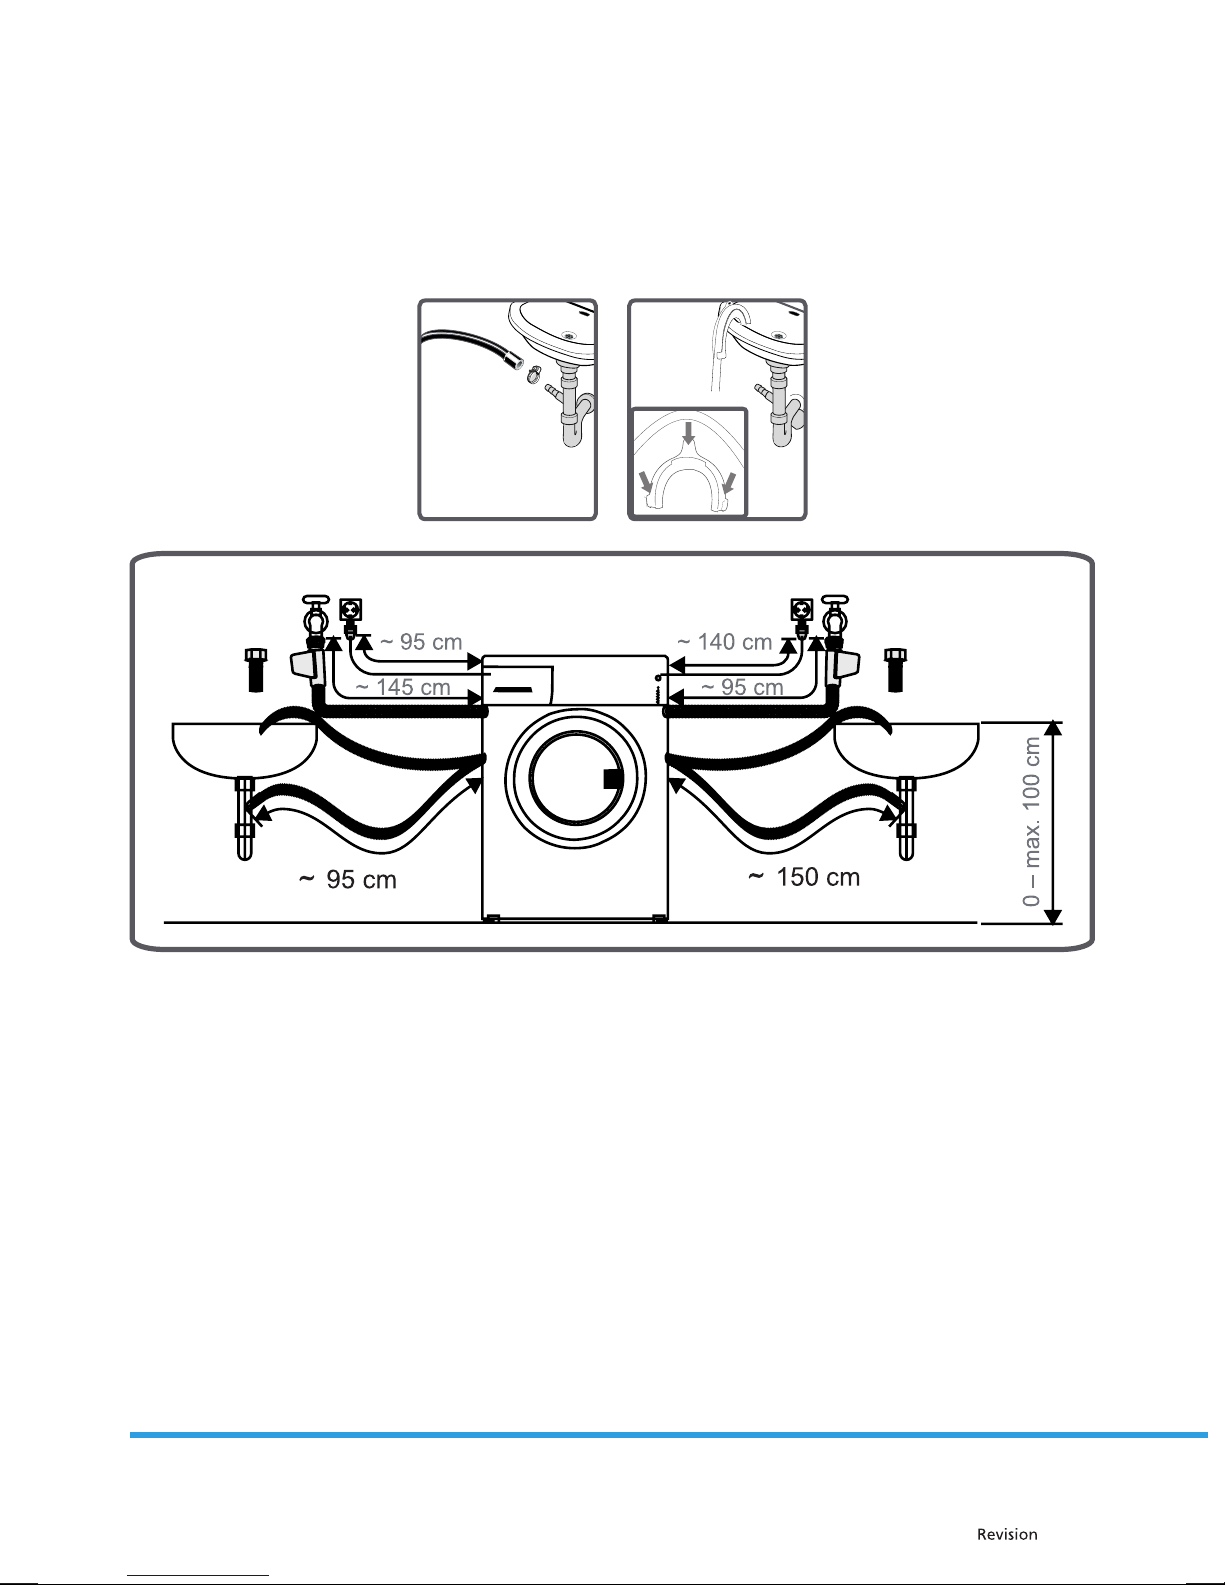
Water supply connection.............................................................................................................................................................5
Water drain connection................................................................................................................................................................6
PART 3: DESCRIPTION OF THE APPLIANCE AND THE CONTROL PANEL....................................................... 7
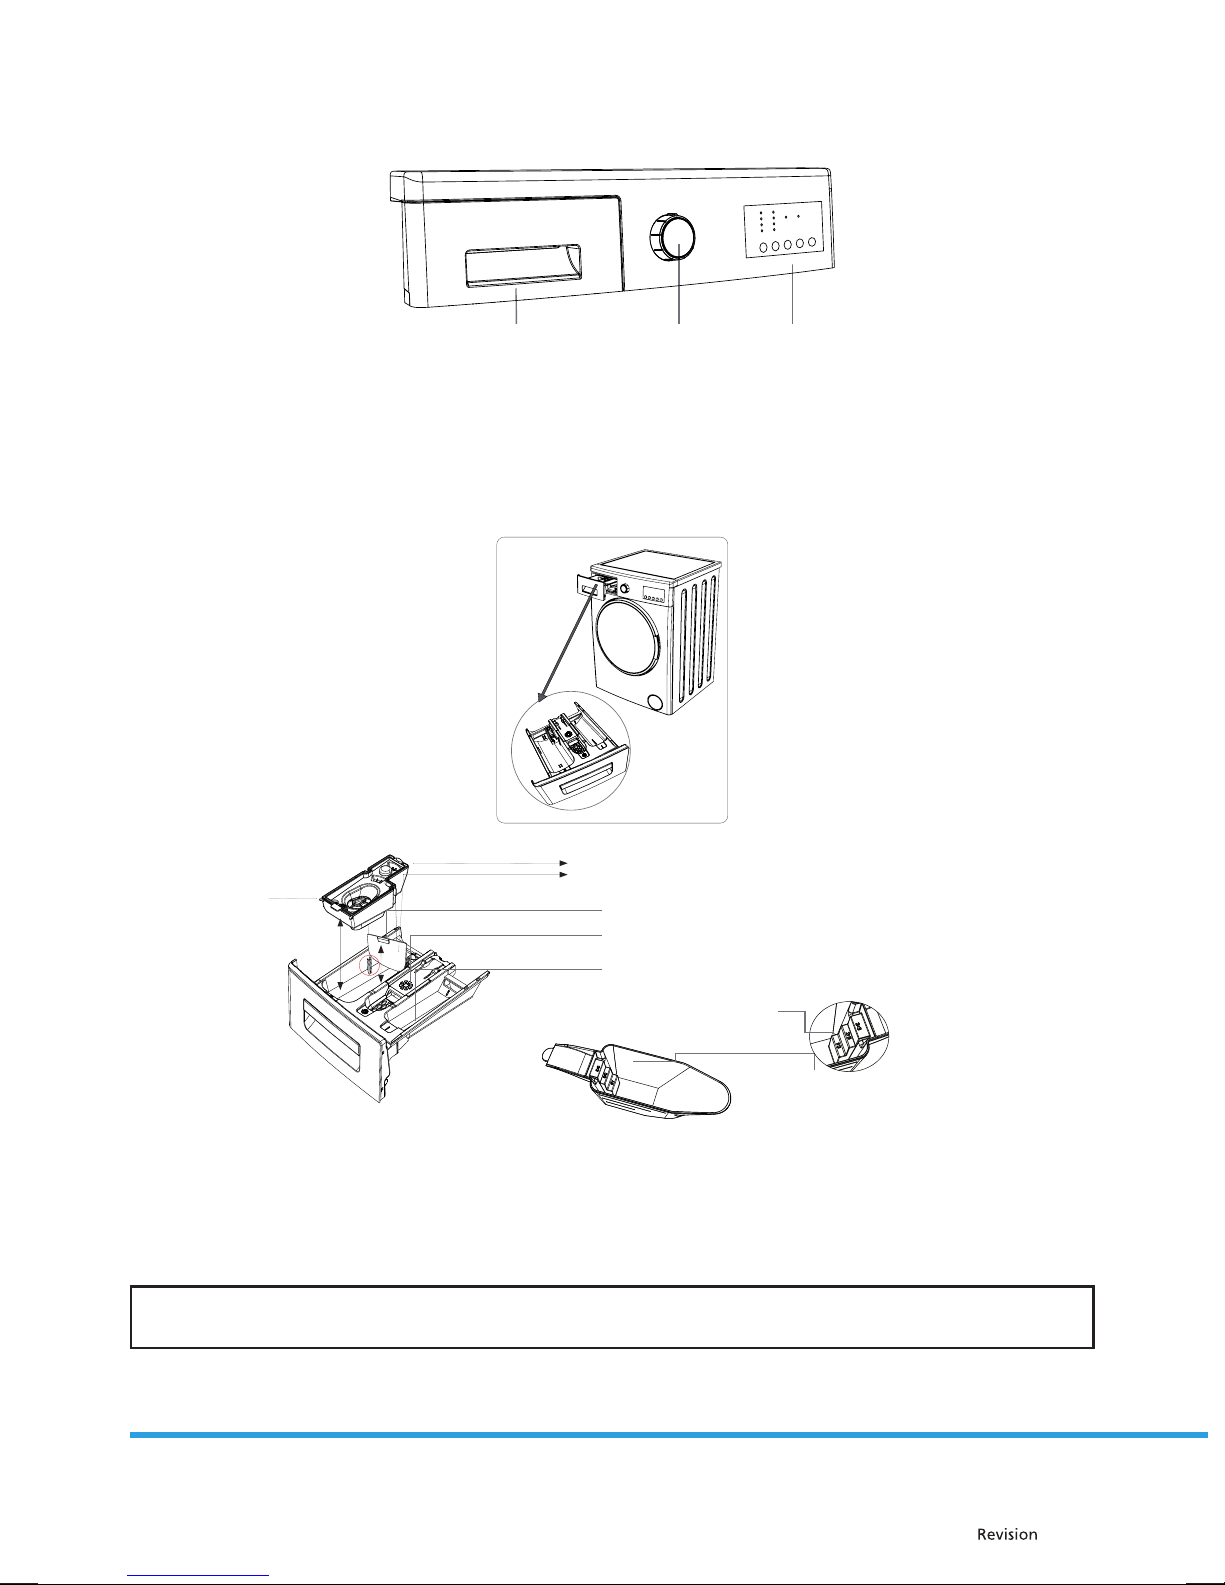
Description of the appliance......................................................................................................................................................7
Control panel....................................................................................................................................................................................8
Washing detergent drawer .........................................................................................................................................................8
Program selection dial ............................................................................................................................................................... 10
Display ............................................................................................................................................................................................. 11
PART 4: WASHING YOUR LAUNDRY .............................................................................................................. 12
First wash cycle............................................................................................................................................................................. 12
Operating the washing machine ........................................................................................................................................... 13
Additional functions................................................................................................................................................................... 13
Child safety lock ........................................................................................................................................................................... 16
PART 5: PROGRAM CHART ............................................................................................................................ 17
PART 6: MAINTENANCE AND CLEANING...................................................................................................... 18
Water inlet lters.......................................................................................................................................................................... 18
Pump lter...................................................................................................................................................................................... 19
Washing detergent drawer ..................................................................................................................................................... 19.
Siphon plug ................................................................................................................................................................................... 20
Cabinet of the washing machine...........................................................................................................................................20
Drum................................................................................................................................................................................................. 20
Removal of scale deposits from the washing machine..................................................................................................20
PART 7: PRACTICAL INFORMATION.............................................................................................................. 21
PART 8: PREVENTION OF MINOR MALFUNCTIONS ..................................................................................... 22
PART 9: AUTOMATIC MALFUNCTION DETECTION SYSTEM ........................................................................ 24
PART 10: INFORMATION SHEET .................................................................................................................... 25

EN - 2
05/2013Copyright © 2013, Fast ČR, a. s.
PART 1: BEFORE PUTTING INTO OPERATION
Important safety instructions
Read carefully and store for future use.
The safety of this appliance complies with industry norms and meets legal appliance safety requirements.
However, as manufacturers, we consider it our duty to provide you with the following safety instructions.
It is essential that you store this user'smanual in asafe place so that you can use it in the future. If you intend
to sell the appliance, give it to another owner, or if you move, always make sure that the user'smanual is
attached to the appliance, so that the new owner can learn about the operation of the appliance and the
relevant warnings.
Before installation or operation of the appliance you MUST carefully read all the safety instructions and
the user'smanual.
Before putting the appliance into operation for the rst time, check that it has not been damaged during
transport.
Never connect adamaged appliance. If some parts are damaged, contact the supplier.
If the washing machine is supplied in the winter months, when the temperature falls under 0°C, store the
appliance at room temperature for 24 hours before rst use.
General safety instructions
Changing the technical parameters or making any other modications to the appliance is dangerous.
During the course of the high temperature program the door heats up to ahigh temperature. Do not
touch the door!
Ensure that small household pets cannot get into the drum. It is therefore better to always check the inside
of the drum before use.
Items such as coins, safety pins, nails, bolts, stones and other heavy or sharp items can cause considerable
damage and do not belong in the appliance.
Use only the recommended amount of fabric softener and washing detergents. If you use ahigher amount
than is recommended, the fabric could be damaged.
Always use the amount of detergent recommended by the manufacturer.
Small pieces of laundry such as socks, shoelaces, washing bands, etc. should be washed in a special
purpose washing bag or in apillow case, because the individual items could become jammed between
the tube and the rotating drum.
Do not use the washing machine to wash products from metal skeletons, fabrics which are not hemmed
or that snag.
After use, before cleaning or maintenance always disconnect the washing machine from the power supply
and turn o the water inlet.
Never attempt to repair the appliance yourself. Repairs carried out by inexperienced persons may lead to
injuries or serious damage to the appliance. Contact your local service centre for repairs. Always request
original spare parts.
Do not use multi-sockets or extension cords.
Do not plug in the appliance with adefective power cord.
If the power cord is damaged, have it replaced by the manufacturer or an authorised service technician to
prevent hazardous situations.
Do not pull the power plug out of the power socket by pulling on the cord. Hold the power cord by holding
the power plug directly.
Do not connect the power plug if you have wet hands.
Never touch the appliance if you have wet hands or feet.

EN - 3
05/2013Copyright © 2013, Fast ČR, a. s.
Never open the detergent drawer while washing.
Never attempt to open the washing machine door while washing.
Because the washing machine can become very hot during operation, do not touch the hose during the
draining or lling process.
In the event of any defect, rst turn o the appliance, disconnect it from the power supply and shut o the
water inlet. Do not attempt to repair the device yourself. Contact the nearest authorised service.
Do not forget that the packaging material from the washing machine may present adanger to children.
Do not allow children to play with the washing machine.
Keep household pets at asafe distance from the washing machine.
The washing machine should only be used by persons fully instructed about the instructions, provisions
and controls described in this user'smanual.
This washing machine is designed for domestic use only. The use of the washing machine for commercial
purposes voids the
warranty.
Do not install the appliance on acarpet or another similar surface, which could block the ventilation vents
on the underside.
Do not place the drain hose into acontainer, bucket or sink.
Recommendation
Long term contact of washing detergents and fabric softeners with air will cause them to dry out and stick
to the walls of the compartments. To prevent this from happening, ll the drawer with washing detergent
and fabric softener immediately before washing.
We recommend the use of aprewash only for heavily soiled laundry.
Do not exceed the maximum loading capacity of the drum.
This appliance must not be used by persons (including children) with physical, sensory or psychological
impairments or by inexperienced persons, unless properly trained or schooled in the safe use of the
appliance, or unless they have been properly supervised by aperson who will be responsible for their
safety. Children should be supervised so as not to play with the appliance.
If you will not be using the washing machine for an extended period of time, disconnect it from the power
socket, shut o the water inlet and leave the door open so that the inside of the washing machine can dry
out and so unpleasant odours are not created.
As aresult of quality control procedures some water may remain in the washing machine. This will not
damage the washing machine in any way.
We recommend that the rst wash is performed in the White 90 - 95° program (depending on the model)
without any laundry, put 1/2 ameasuring cup of washing agent into the second draw for the washing
agent.
Install the washing machine in alocation where it will be possible to fully open the door of the washing
machine. (Do not install the washing machine in alocation where it will not be possible to fully open the
door).
Make sure that there is sucient ventilation and air circulation around the washing machine.

EN - 4
05/2013Copyright © 2013, Fast ČR, a. s.
PART 2: INSTALLATION
Carefully read the entire user'smanual before putting your washing machine into operation and store it in
asafe place for future reference.
Removal of the transportation screws
You must remove the transportation screws located in the back part of the washing machine before
putting it into operation.
Loosen the bolts using acorrectly sized spanner, turning it anticlockwise.
Remove the bolts by pulling them out.
Insert the plastic plugs found in the accessories pouch into the transportation screw holes.
Carefully store the transportation screws removed from the washing machine for future transport purposes.
X4X4
X4
NOTE:
Defects caused by startng the washng machne wth the transportaton screws nstalled are not covered
by the warranty.
Levelling the washing machine
Do not place the washing machine on carpets or similar surfaces.
To ensure quiet and vibration free operation of your washing machine, you should place it on an even,
non-slip and rigid surface.
You can level the washing machine by adjusting the adjustable feet:
First loosen the plastic nut.
Adjust by screwing out the feet upwards or downwards.
After levelling the washing machine, re-tighten the plastic nut by screwing it upwards.
Never level the washing machine on an uneven surface by placing cardboard, wooden blocks, etc. under the feet.
X4

EN - 5
05/2013Copyright © 2013, Fast ČR, a. s.
Electrical connection
Technical specications of your washing machine: 220-240 V~ 50 Hz.
Aspecial grounding plug is attached to the power cord of your washing machine.
This plug must be fully inserted into agrounded power socket (with 10 A). The
fuse or circuit breaker to which the washing machine is connected should be 10A.
If you do not have such sockets and fuses/circuit breakers at home, have them
installed by aqualied electrician.
Our company takes no responsibility for any damages caused by using the washing
machine without grounding.
Water supply connection
Depending on the functions of your washing machine, the washing machine is equipped with either
asingle water inlet (cold) or adouble water inlet (cold/hot). The hose with the white end is intended for
the cold water inlet and the hose with the red end is intended for the hot water inlet (on washing machines
with ahot and cold water inlet).
To prevent water from leaking from the connection points, the hose kit also includes 1 seal (for washing
machines with acold water inlet) or 2 seals (for washing machines with hot and cold water inlets). Install
these seals on the end of the water inlet hose connected to the tap.
Connect the hose with the white end to the water inlet valve with the white lter and the hose with the red
end to the water inlet valve with the red lter (the second mentioned option applies to washing machines
with ahot and cold water connection). Tighten the plastic connecting parts using your hand. Aqualied
plumber will provide asafer connection.
The water pressure of 0.1 - 1 MPa in your water tap will ensure amore ecient operation of your washing
machine (the pressure of 0.1 MPa equates to aow rate of more than 8 litres of water per minute from
afully open tap).
After completing all connections, check that the connections do leak, by fully opening the tap.
Check that the supply hoses are not bent, broken or cracked.
Connect the supply hose to a3/4" threaded water tap.
If the washing machine has adual water supply (for hot and cold water), the temperature of the hot water
should not exceed 70 °C.
3/4”
10 mm

EN - 6
05/2013Copyright © 2013, Fast ČR, a. s.
Water drain connection
Check that the supply hoses are not bent, twisted, cracked or excessively stretched.
The drain hose should be installed at aheight of min. 60 cm and max. 100 cm above the ground.
The end of the drain hose may be inserted directly into the drain opening or to a special end tting
attached to the drain of the wash basin.
Never attempt to extend the length of the drain hose by adding extra parts.

EN - 7
05/2013Copyright © 2013, Fast ČR, a. s.
PART 3: DESCRIPTION OF THE APPLIANCE AND THE
CONTROL PANEL
Description of the appliance
1.
2.
3.
4.
5.
6.
7.
8.
9.
10.
7.
7.
7.
1. Display
2. Program selection dial
3. Top cover
4. Drawer for washing detergents
5. Drum
6. Pump cover
7. Transportation screws
8. Water inlet valve
9. Drain hose
10. Power cord

EN - 8
05/2013Copyright © 2013, Fast ČR, a. s.
Control panel
1. 2. 3.
1. Drawer for washing detergents
2. Program selection dial
3. Display
Washing detergent drawer
Liquid washing detergent adapter
Main washing compartment
Fabric softener compartment
Prewash compartment
Washing detergent
dosage measure
Close up of powder
measurement
If you are going to use aliquid washing detergent, it is necessary to use aspecial liquid detergent adapter.
(You will nd it in the washing machine'saccessories.) You can use liquid detergents for all washing programs
without aprewash. Place the adapter into the main wash compartment – see illustration above; and pour in
the liquid washing detergent as necessary. Do not go over the maximum mark. Always remove the adapter
when using apowder washing detergent.
NOTE:
Accessories may vary depending on the model.

EN - 9
05/2013Copyright © 2013, Fast ČR, a. s.
Main washing compartment
Into this part of the drawer, place only washing detergent (liquid or powder), lime scale remover, etc. When
using aliquid washing detergent use the special adapter. You will nd it in the washing machine'saccessories.
Fabric softener compartment
In this part, only use fabric softener (we recommend that you use the amount and type of fabric softener according
to the instructions of the manufacturers of the fabric softener and the laundry). Sometimes remains of the fabric
softener may remain in the compartment. This is because fabric softeners are viscous (sticky). To prevent this from
occurring, we recommend that you use afabric softener that is less viscous (i.e. sticky) or you can dilute it using water.
Prewash compartment
Fill this compartment only if the prewash function is selected. We recommend that you use this function only
for heavily soiled laundry. More information further in the user'smanual.

EN - 10
05/2013Copyright © 2013, Fast ČR, a. s.
Program selection dial
Jemné
Rychlý
Using the program selection dial, select aprogram, in which you wish to wash your laundry. The program
selection may be done by turning the program selection dial in both directions. When making settings, ensure
that the symbol on the program selection dial exactly matches your selected washing program. If you switch
the program selection dial to position O(o), the washing machine will drain the water so as to complete
(cancel) the program cycle. After completing the draining operation the washing machine will switch to the
stand-by mode. Now you can select another program that you want to start.

EN - 11
05/2013Copyright © 2013, Fast ČR, a. s.
Display
Start/Pauza
Odložení
3h
6h
9h
12h
Snadné
žehlení Extra
Máchání
1000
800
600
Display
Wash
Rinse
Spin
End
Delayed start button
Temperature and spin settings button
Additional functions 1 button
Additional functions 2 button
Start/Pause button
Additional
functions
indicator light
The display shows the set time of the delayed start, the spinning speed, selected additional functions and the
status of the current program (
prewash / washing cycle / rinsing / spinning).
At the same time, LED lights indicate the current status of the washing program; also combinations of LED
lights communicate warning messages.

EN - 12
05/2013Copyright © 2013, Fast ČR, a. s.
PART 4: WASHING LAUNDRY
Connect the washing machine to apower socket.
Open the water inlet.
First wash cycle
There may be some water left over inside the washing machine from the factory tests.We therefore recommend
to perform the rst wash without laundry so as to drain this water; put half ameasure of standard detergent
into compartment 2, which is used for washing detergents and select the program for cotton at 90 °C.
Sorting laundry
Sort the laundry according to its type (cotton, synthetics, delicates, wool, etc.), washing temperature and
the level of dirtiness.
Never wash whites together with coloured laundry.
Because your new coloured laundry may release some of its colour, wash it separately.
Before placing the laundry into the washing machine check pockets for any forgotten items. In this way
you will prevent damaging your clothes and the washing machine.
Do up zips and buttons on the laundry.
From curtains and drapes remove the plastic or metal hooks or insert the into awash bag and tie it up.
Turn clothing such as pants, knitted fabrics, T-shirts and singlets inside out.
Wash small items such as socks and handkerchiefs in awash bag.
Washing symbols
Suitable for bleaching Do not bleach.
Standard washing Maximum ironing temperature
is 150 °C
Maximum ironing temperature
is 200 °C Must not be ironed.
Dry cleaning possible Must not be dry cleaned.
Dry on aat underlay. Hang after spin drying.
Hang to dry. Do not spin dry.
Cleaning only with
perchloroethylene, gas, alcohol
or R113
Cleaning only with
perchloroethylene, gas, alcohol
or R113
Dry cleaning with all types of
agents

EN - 13
05/2013Copyright © 2013, Fast ČR, a. s.
Operating the washing machine
Placing laundry into the washing machine
Open the door of the washing machine.
Check that there are no foreign objects, laundry or animals in the drum. The drum could contain laundry
from the previous wash. Remove the laundry from the washing machine.
Arrange the laundry evenly inside the washing machine. Fold large items such as bed sheets or covers in
the manner shown in the illustration below.
Insert one item at atime.
When closing the door, make sure that no laundry has been caught in the door.
Check that the washing machine door is properly closed.
Firmly close the washing machine door, otherwise the washing machine will not start.
NOTE:
Maximum loading capacity may wary based on the laundry type you will wash, degree of contamination
and the programme you have chosen etc. Do not exceed maximum dry loading capacity indicated in the
programme table for washing programmes.
You can take the following table of weights as an example.
Laundry type Weight (g)
Towel 200
Linen 500
Bathrobe 1200
Quilt cover 700
Pillow slip 200
Underwear 100
tablecloth 250
Detergent dosage
The amount of detergent you use in the washing machine depends on the following criteria:
The consumption of detergent changes with the degree of dirtiness of the laundry.
Do not use aprewash for lightly soiled laundry and use asmall amount of detergent in compartment 2 of
the drawer for washing detergents.
We recommend the use of the prewash only for heavily soiled laundry.
For excessively soiled laundry select aprogram with aprewash, put 1/4 of adetergent measuring cup into
compartment 1 for washing detergents and put the remainder of the measuring cup into compartment 2.
Use washing detergents specially made for automatic washing machines. The dosage of the detergent is
shown on the packaging.
Increased water hardness necessitates the use of an increased amount of detergent in the wash.
Increased laundry loads also necessitate the use of an increased amount of detergent in the wash.
Pour fabric softeners (conditioners) into the fabric softener compartment in the detergent drawer. Do
not go over the MAX mark. Otherwise the fabric softener will ow out the siphon into the water used for
washing. If the fabric softener is very thick then dilute it with water before placing it in the compartment.
The thick fabric softener could clog up your siphon and so prevent the fabric softener from entering the
washing machine.
You can use liquid detergents for all washing programs without aprewash. Place the adapter into the 2nd
compartment intended for the main wash and pour in the liquid washing detergent as necessary.

EN - 14
05/2013Copyright © 2013, Fast ČR, a. s.
Selecting programs and functions
Select aprogram and additional functions appropriate for your laundry using the program selection dial.
Additional functions
Before starting aprogram, you can add additional functions to improve washing results.
Press the respective button of the additional function. The symbol of the additional function will start ashing
on the display. If the symbol of the additional function ashes only for an instant then the function is not
available.
NOTE:
Additional functions are not compatible with all the programs.
There is only alimited time period for the selection of an additional function.
The combination of individual additional functions is not available for all programs.
Half load detection system
The washing machine is equipped with asystem that detects ahalf drum load. If you place half the maximum
laundry load or even less into the drum, the washing machine will automatically identify this fact and shorten
the washing cycle, thus lowering water and power consumption.
Delayed start function
This function makes it possible to delay the start of the wash by 3h, 6h, 9h and 12h.
1. Press the delayed start button. The "3h" indicator light will turn on.
2. Repeatedly press the delayed start button and select the delayed start duration. Each time it is pressed, the
respective indicator light will be lit.
3. To activate the delayed start, press any button except for the Start/Pause button.
If you accidentally skip the desired delayed start duration, repeatedly press the delayed start button until you
select the correct duration.
If you need to cancel the delayed start function, repeatedly press the delayed start button until the indicator
lights turn o.
To start the delayed start function, press the Start/Pause button.
Spinning settings
You can change the spinning rotation speed using this button.
The preset spinning rotation speed will appear on the display after the program is selected.
By repeatedly pressing the spin button you can change the set rotation speed. If you skip the symbol,
repeatedly press the spin button until you set the desired value.
Extra rinse
You can add the extra rinse function to aprogram.
Simultaneously press the additional function buttons 1 and 2, and the symbol will appear on the display.
Prewash
The prewash function can be added to the main wash, which is especially suitable for heavily soiled laundry.
When using this function, it is necessary to put washing powder into the prewash compartment.
Simultaneously press the additional function buttons 1 and 2 repeatedly until the indicator light of the
symbol is lit.

EN - 15
05/2013Copyright © 2013, Fast ČR, a. s.
NOTE:
The prewash function will extend the selected program by acertain amount of time. This time depends
on the type of selected program. Do not use liquid washing detergents in the prewash compartment.
Anti-allergenic function
It is possible to supplement selected programs with an anti-allergenic function, which will add an extra rinse
to the selected program.
Simultaneously press the additional function buttons 1 and 2 repeatedly until the indicator light of the
symbol is lit.
Quick wash
Selecting this function makes it possible to shorten the washing program time, thus reducing water and energy
consumption. We recommend that you use this function if the amount of laundry is less than half aload.
Simultaneously press the additional function buttons 1 and 2 repeatedly until the indicator light of the
symbol is lit.
NOTE:
If you place half the maximum laundry load or even less into the drum, the washing machine will
automatically identify this fact and shorten the washing cycle, thus lowering water and power
consumption. As soon as the washing machine detects ahalf load, the indicator light of the symbol
will start ashing on the display.
Cold wash
This function makes it possible to wash laundry in cold water.
Repeatedly press the temperature and spin button until the indicator light of the symbol is lit.
Easy iron
This function helps make ironing easier by crumpling the laundry less.
Simultaneously press the additional function buttons 1 and 2 repeatedly until the indicator light of the
symbol is lit.
No spin
If you do not wish to spin the laundry, select this function.
Simultaneously press the additional function buttons 1 and 2 repeatedly until the indicator light of the
symbol is lit.
NOTE:
The extra rinse, prewash, anti-allergenic, quick wash, cold wash, easy iron, no spin functions are only
available on selected models.
Starting aprogram
Start the selected program by pressing the Start/Pause button.
If you press this button while aprogram is running then this program will be paused.
If the washing machine goes into the stand-by mode, the Start/Pause indicator light will ash shortly.

EN - 16
05/2013Copyright © 2013, Fast ČR, a. s.
Cancelling aprogram
Cancelling aprogram that is currently running
Turn the program selection dial to the 0 position.
The washing machine will stop and the program will be cancelled.
To drain the water, turn the program selection dial to any position.
The water will be drained automatically.
Now you can select anew program.
End of aprogram
The selected program will be ended automatically after the last stage.
The end of program indicator light will start ashing on the display.
Move the program selection dial to the 0 position.
Pull the power cord out of the power socket.
Shut o the water inlet.
Open the drum door and take the laundry out.
After completing the wash, leave the door of the washing machine open so that the water remaining in the
drum can dry out.
Important
You will only be able to open the door after 2 minutes because they will be blocked. This time is not
included in the total washing cycle time.
Child Safety Lock
The child safety lock function serves to block the washing machine controls and prevent an unauthorised
change to the program or the washing machine'ssettings.
Press and hold down simultaneously the additional function buttons 1 and 2 for approximately 3 seconds. The
indicator light of the child safety lock will be lit.
If you press any button while the child safety lock is activated, apadlock symbol will appear on the display for
amoment.
An activated child safety lock enables the restart of aprogram if it was interrupted by the program selection
dial being turned to the 0 position.
To deactivate the child safety lock, press and hold down simultaneously the additional function buttons 1 and
2 for approximately 3 seconds. The indicator light of the child safety lock will be lit for amoment.

EN - 17
05/2013Copyright © 2013, Fast ČR, a. s.
PART 5: PROGRAM TABLE
Program Temperature Max. amount
of dry laundry Compartment Duration Laundry description
Bavlna 90°
(Cotton 90°) 90 °C 5.0 kg 2 190 min Heavily soiled cotton, linen laundry
(underwear, table cloths, towels
(max.2.5kg), bed linen, etc.)
Bavlna
předpírka
(Cotton
prewash)
60 °C 5.0 kg 1 + 2 150 min Soiled cotton, linen laundry
(underwear, table cloths, towels
(max.2.5kg), bed linen, etc.)
Bavlna Eco
(Cotton Eco) 60 °C 5.0 kg 2 170 min Soiled cotton, linen laundry
(underwear, table cloths, towels
(max.2.5kg), bed linen, etc.)
Bavlna 40°
(Cotton 40°) 40 °C 5.0 kg 2 155 min Soiled cotton, linen laundry
(underwear, table cloths, towels
(max.2.5kg), bed linen, etc.)
Eko 20°
(Eco 20°) 20 °C 2.5 kg 2 98 min Lightly soiled cotton, linen laundry
(underwear, table cloths, towels
(max.2.0kg), bed linen, etc.)
Jemné
(Delicates) 40 °C 3.0 kg 2 91 min Soiled synthetic laundry (nylon
socks, shirts, blouses, other
synthetic laundry, etc.)
Vlna (Wool) 30 °C 2.0 kg 2 55 min Woollen laundry suitable for
washing in awashing machine.
Máchání
(Rinse) - 5.0 kg - 36 min If you need to include an additional
rinse in the washing program.
Odstředění
(Spin) - 5.0 kg - 15 min If you need to include an additional
spin cycle in the washing program.
Ruční praní /
Jemné
(Hand wash /
Delicates)
30 °C 2.0 kg 2 91 min Laundry suitable for washing by
hand or delicate laundry suitable
for washing in awashing machine.
Sport (Sport) 30 °C 3.0 kg 2 80 min Sports apparel
Mix
(Mix) 30 °C 3.0 kg 2 84 min Soiled cotton, synthetic, coloured
or linen laundry
Košile (Shirts) 60 °C 2.5 kg 2 106 min Soiled cotton, synthetic shirts and
blouses
Denní 60min
(
Daily 60min
)
60 °C 2.0 kg 2 60 min Short program for soiled cotton,
coloured and linen laundry – 60 °C
for60minutes.
Rychlý 15min
(Quick 15min)
30 °C 2.0 kg 2 15 min Short program for lightly soiled
cotton, coloured and linen laundry.
NOTE:
The resulting washing cycle time may vary depending on the amount of laundry, type of water, ambient
temperature, selection of additional functions, etc.
Dose the amount of washing powder based on the amount of laundry placed into the drum of the
washing machine.

EN - 18
05/2013Copyright © 2013, Fast ČR, a. s.
PART 6: MAINTENANCE AND CLEANING
Disconnect the washing machine from the power socket.
Shut o the water inlet.
CAUTION!
The washing machine and its components could be damaged if you use agents containing solvents. Do
not use washing detergents or fabric softeners containing solvents.
Water inlet lters
There are lters connected to the hose ends at the tap end and at the end of the inlet valves, which prevent dirt
and foreign materials contained in water entering the washing machine. If the washing machine is not lling
up with asucient amount of water despite the water inlet being open, clean these lters.
Disconnect the supply hose.
Using tweezers take the lters out of the inlet valves and clean them with abrush.
Using your hand, take out the lters on the supply hoses at the end connected to the tap together with
the seals and clean them.
After cleaning the lters, put them back in the same way.
WARNING:
The water inlet lters may become clogged as aresult of aconnection to poor quality water or insucient
maintenance, etc. Dirty lters result in water leaks that may cause damage to the washing machine
and property. Damages caused by incorrect maintenance of the lters are not covered by the warranty
conditions.
Table of contents
Languages:
Other Philco Washer manuals

Philco
Philco PLD 1272 User manual

Philco
Philco PLD 1061M User manual

Philco
Philco PWF 6100VS User manual

Philco
Philco PLS 1040 DSF User manual

Philco
Philco PLDI 148 AJW steam User manual

Philco
Philco PLDS 106 DG User manual

Philco
Philco PLD 106 E User manual

Philco
Philco PLS 1061 User manual

Philco
Philco PSW81400V User manual

Philco
Philco PLD 106 E User manual

Philco
Philco PLD 1473 User manual

Philco
Philco PLS 1061 F User manual

Philco
Philco PSW71400V User manual

Philco
Philco SM2894 User manual

Philco
Philco PTL7100P User manual

Philco
Philco PTL7145D Manual

Philco
Philco GJW55P User manual

Philco
Philco PLWD 16170 Crown User manual

Philco
Philco PLCE06GGPWT User manual

Philco
Philco PLD 1061M User manual