Philips AVENT AVENT SCF870 User manual

SCF870

2

3
A
B
C
D
E
F
J
H
M
L
I
K
G
1

4

SCF870
ENGLISH 6
DEUTSCH 15
25
FRANÇAIS 35
한국어 44
NEDERLANDS 53
70

6
Introduction
Congratulations on your purchase and welcome to Philips AVENT! To fully benet from the support
that Philips AVENT offers, register your product at www.philips.com/welcome.
This combined steamer and blender is particularly suitable for preparing small amounts of baby
food.The combined steamer and blender supports all parents in preparing fresh meals for their
babies with a simple steaming and blending function combined in one appliance.
General description (Fig. 1)
ALid with steam hole
BSieve
CBlade unit
DJar with blade holder
ESteam outlet on motor unit
FLocking area for handle
GFilling opening of water tank
HMotor unit
ISteaming light
JControl knob
KBottom of the appliance with mains cord
LMeasuring cup
MSpatula
Important
Read this user manual carefully before you use the appliance and save it for future reference.
Danger
- Never immerse the motor unit in water or any other liquid, nor rinse it under the tap.
Warning
- Check if the voltage indicated on the appliance corresponds to the local mains voltage before
you connect the appliance.
- Do not use the appliance if the plug, the mains cord or the appliance itself is damaged.
- If the mains cord is damaged, you must have it replaced by Philips, a service centre authorised by
Philips or similarly qualied persons in order to avoid a hazard.
- This appliance is not intended for use by persons (including children) with reduced physical,
sensory or mental capabilities, or lack of experience and knowledge, unless they have been given
supervision or instruction concerning use of the appliance by a person responsible for their
safety.
- Children should be supervised to ensure that they do not play with the appliance.
- Keep the appliance out of the reach of children.
- Do not touch the blades, especially when the appliance is plugged in.The blades are very sharp.
- If the blades get stuck, unplug the appliance before you remove the ingredients that block the
blades.
- The appliance becomes very hot during steaming and may cause burns when touched. Only lift
the jar by its handle.
- Beware of hot steam that comes out of the jar and the water tank during steaming and
when you remove the lid.
- After steaming, hot steam continues to come out of the water tank, the steam valve on the
motor unit and the steam hole in the lid of the jar for some time.
- If the appliance is used improperly, hot steam could come out of the lling opening. Consult the
chapter ‘Troubleshooting’ in order to avoid or to resolve this.
- Never let the appliance operate unattended.
ENGLISH

Caution
- Never use any accessories or parts from other manufacturers or that Philips does
not specically recommend. If you use such accessories or parts, your guarantee becomes
invalid.
- Do not place the appliance on or near an operating or still hot stove or cooker.
- Always unplug the appliance before you assemble, disassemble or make adjustments to any of
the parts and before you clean it.
- Always unplug the appliance and let it cool down before you clean it.
- Never sterilise the jar or any other part of the appliance in a microwave or in a steriliser.
- This appliance is intended for household use only. If the appliance is used improperly or for
professional or semi-professional purposes or if it is not used according to the instructions in
the user manual, the guarantee becomes invalid and Philips refuses any liability for damage
caused.
- Place the appliance on a stable, horizontal and level surface and make sure there is enough free
space around it to prevent damage to e.g. cabinets or other objects.
- Do not use the appliance if it has fallen or is damaged in any way.Take it to an authorised Philips
service centre for repair.
- Never use the steaming function without water.
- Always pour the water out of the water tank after use.
- Make sure that you do not overll the water tank. Do not exceed the maximum level indicated
on the measuring cup.
- Always make sure that the blades are not covered with food when ready for steaming.
- Do not exceed the maximum level indicated on the jar when you blend liquids.
- Do not lift and move the appliance while it is operating.
- Never rell the water tank during the steaming process. Hot water and steam may come out of
the appliance.
- Always make sure that the lid has cooled down after steaming before you open it to add more
ingredients for blending, if necessary.
- Do not insert any object into the lling opening or the steam valve.
- Never connect this appliance to a timer switch or remote control system in order to avoid a
hazardous situation.
- Always check the temperature of the baby food on the back of your hand before you feed your
baby.
- Always check the consistency of the baby food. Make sure there are no chunks in the food.
- Do not use the jar to heat food in a microwave.
- Only use the spatula supplied to take the food out of the jar.
- Regular descaling prevents damage to the appliance.
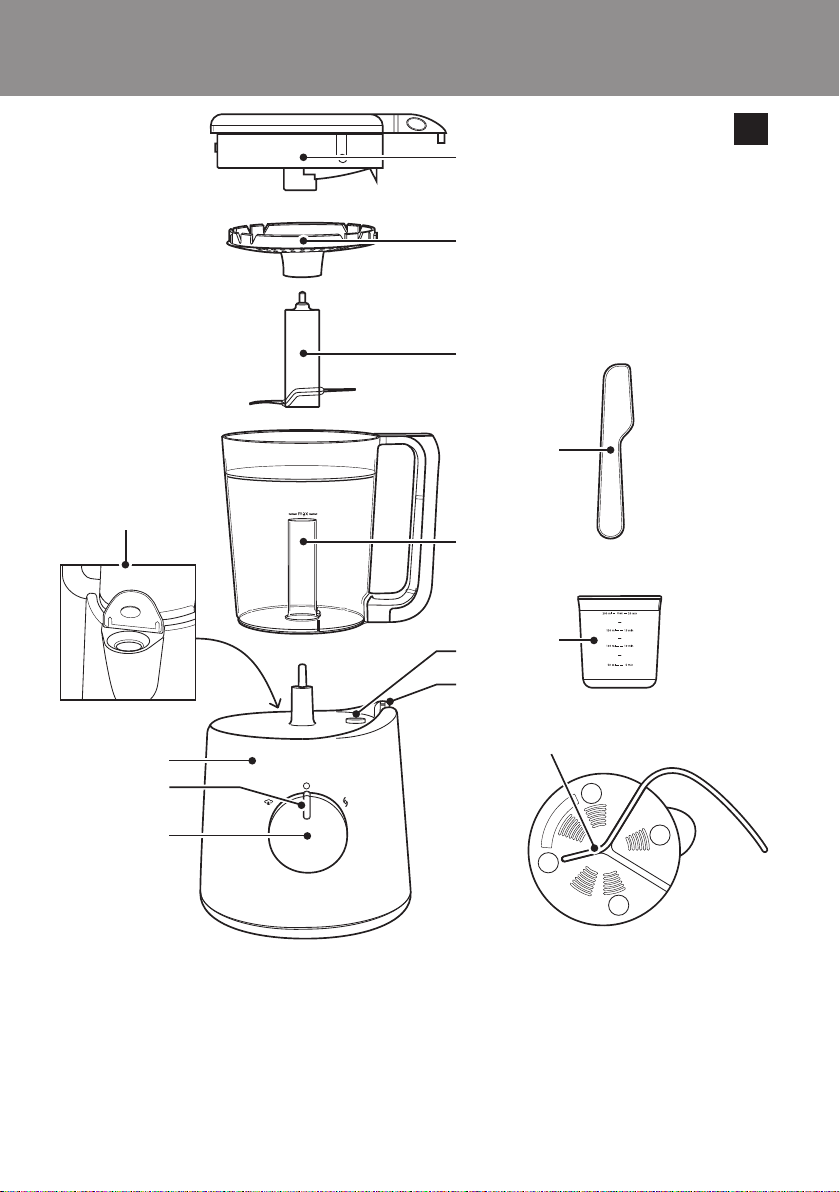
Safety system
The appliance is equipped with a built-in safety system.The appliance only functions if you have
properly assembled all parts on the motor unit. If all parts are assembled correctly, the built-in safety
lock will be unlocked.
This Philips appliance complies with all standards regarding electromagnetic elds (EMF). If handled
properly and according to the instructions in this user manual, the appliance is safe to use based on
scientic evidence available today.
1 Remove all packaging material from the appliance.
2 Clean all parts except the motor unit (see chapter ‘Cleaning and maintenance’).
ENGLISH 7

Using the appliance
Always check the temperature of the baby food on the back of your hand before you feed your
baby.
Do not process a large quantity of solid ingredients at the same time. Process these ingredients
in a series of small batches instead.
Always make sure that the lid has cooled down after steaming before you open it to add more
ingredients for blending, if necessary.
Always make sure that the blades are not covered with food when ready for steaming..
Do not exceed the maximum level indicated on the jar when you blend liquids.
This appliance is intended for steaming and blending baby food. Normally you would rst steam the
food and then blend it. However, you can also use the appliance for steaming or blending only. When
you use the appliance for blending only, skip the sections ‘Filling the water tank’ and ‘Steaming’ and
only follow the instructions in section ‘Blending’.
Filling the water tank
1 Fill the measuring cup with water up to the required level (Fig. 2).
The measuring cup shows millilitres and the corresponding steaming time in minutes. See the
separate recipe booklet for the recommended quantities for the included recipes.
Note: Do not exceed the maximum level indicated on the measuring cup (200ml).
2 Pourthewaterintothellingopeningandclosethelid(Fig.3).
Steaming
If certain vegetables and fruits are steamed gently, they are perfect for babies who start to eat solid
food. Steaming is the healthiest way of preparing food, as the food retains lots of vitamins and other
healthy nutrients.
Note: You can nd recipes and the cooking times required for these recipes in the separate recipe
booklet. Note that the recipes are related to the age of the child.
Note: Make sure that the steamed food has reached at least 75°C. Do not steam big pieces of frozen
vegetables.
1 Put the blade unit on the tool holder in the jar (Fig. 4).
2 Cut solid ingredients into small pieces (cubes not bigger than 1cm ³) before you put them in
the jar.
Tip: Do not process a large quantity of solid ingredients at the same time. Process these ingredients in a
series of small batches instead.
3 Put the ingredients in the jar (Fig. 5).
4 Put the sieve in the lid of the jar (‘click’) (Fig. 6).
5 Placethelidonthejarandslideitinposition.Thesmallprojectionsonthelidhavetotin
the grooves in the jar. Make sure that the extension of the lid is placed exactly over the
handle of the jar (Fig. 7).
6 Place the jar upside down on the motor unit, i.e. with the lid downwards. Make sure the
handle is on the right-hand side (Fig. 8).
7 Turn the control knob to the steaming position.
,The steaming light lights up orange to indicate that the appliance is steaming (Fig. 9).
ENGLISH8

Hotsteamorhotwatercouldburnyourngers.Donottouchandneverletchildrentouchhot
parts and steam.They may cause scalds (Fig. 10).
,Whenthesteamingprocessisnished,theapplianceproducesabuzzingsoundandthe
steaming light goes off.
8 Set the control knob to the off position.Wait 2 minutes until no steam comes out of the
steam inlet. (Fig. 11)
If you want to serve the steamed baby food without blending it, test the food on the back of
your hand to make sure it is at a safe temperature for your baby.
9 If you want to continue steaming, turn the control knob to the steaming position again.
10 If you want to proceed with blending the steamed food, follow the steps below.
- Grab the jar handle and lift the jar off the motor unit.Turn the jar around and shake it so that
the food falls down onto the blade unit (Fig. 12).
Only touch the jar handle.The lid, bottom and outer surface of the jar are hot (Fig. 13).
- If necessary, remove the lid and add additional ingredients for blending (e.g. water or oil).
Always make sure that the lid has cooled down after steaming before you open it to add more
ingredients or to remove remaining water from the water tank.
- Continue with steps 7-9 of section ‘Blending’.
Blending
The appliance is intended for:
- pureeing steamed and cooked ingredients for baby food
- blending uids and fruits for baby drinks
Note: When you blend uids, make sure you do not ll the jar beyond the MAX indication on the jar.
The appliance is not intended for chopping hard ingredients such as ice cubes and sugar cubes.
1 Put the blade unit on the tool holder in the jar (Fig. 4).
2 Cut solid ingredients into small pieces (cubes not bigger than 1cm) before you put them in
the jar.
Tip: Do not process a large quantity of solid ingredients at the same time. Process these ingredients in a
series of small batches instead.
3 Put the ingredients in the jar. (Fig. 5)
4 Place the jar upright on the motor unit, i.e. with the lid opening upwards. Make sure the
handle is on the right-hand side and positioned between the two ridges of the locking
area (Fig. 14).
5 Put the sieve in the lid of the jar (‘click’) (Fig. 6).
6 Placethelidonthejarandslideitinposition.Thesmallprojectionsonthelidhavetotin
the grooves in the jar. Make sure that the extension of the lid is placed exactly over the
handle of the jar. (Fig. 7)
7 Turn the control knob to the blending position. Hold the knob in this position for as long as
you need but for not more than 30 seconds (Fig. 15).
Note: If the ingredients stick to the wall of the jar, switch off the appliance and loosen them with the
spatula or add some liquid.
Note: Make sure that the blended baby food has the right consistency (e.g. no lumps) before you serve it.
ENGLISH 9

Note: If the baby food is still too solid add some uid (e.g. water) until the baby food is soft and smooth.
Donotlettheapplianceblendformorethan30secondsatatime.Ifyouhavenotnished
blending after 30 seconds, switch off the appliance and wait a few seconds before you continue. If
the appliance becomes hot, let it cool down for a few minutes before you continue.
Make sure the baby food is at a safe temperature for your baby.
8 Whenyouhavenishedblending,simplyreleasethecontrolknob.(Fig.16)
,The knob automatically returns to the off position.
9 Unplug the appliance.
Cleaning and maintenance
Clean the appliance after every use.
Never immerse the motor unit in water.
Never use bleach or chemical sterilising solutions/tablets in the appliance.
Never use scouring pads, abrasive cleaning agents or aggressive liquids such as petrol, acetone or
alcohol to clean the appliance.
1 Unplug the appliance and remove the jar from the motor unit (Fig. 17).
2 Remove the sieve from the lid and remove the blade unit from the jar (Fig. 18).
3 Clean the blade unit under the tap thoroughly, immediately after use. Make sure you also
rinse the inside of the tube of the blade unit (Fig. 19).
Clean the blade unit very carefully.The cutting edges are very sharp.
Note: If you want to clean the blade unit more thoroughly, you can also place it in the dishwasher after
you have rinsed it.
4 Clean the other parts that have come into contact with food in hot water with some
washing-up liquid immediately after use.
Note: All parts, except the motor unit, can also be cleaned in the dishwasher.
5 If necessary, clean the motor unit with a moist cloth.
Descaling
Descale the appliance every four weeks to ensure it continues to work 100% effectively.To reduce
scale build-up, it is helpful to use pre-boiled or ltered water in the appliance.
Never use the steaming function when there is descaling solution in the water tank.
1 Make sure the appliance is switched off and unplugged.
2 Add one sachet of citric acid (10g) to 200ml of warm water.
3 Fill the water tank with the descaling solution.
4 Leave the solution in the water tank overnight.
5 Pour the used descaling solution out of the tank. (Fig. 20)
6 Rinse the tank thoroughly with fresh water.
7 Fill the tank with 200ml water and let the appliance complete one long steaming process (20
min) with the jar empty before you use the appliance with food again.
ENGLISH10

Environment
- Do not throw away the appliance with the normal household waste at the end of its life, but
hand it in at an ofcial collection point for recycling. By doing this, you help to preserve the
environment (Fig. 21).
Storage
1 Empty the water tank before you store the appliance (Fig. 20).
2 Make sure all parts are clean and dry before you store the appliance (see chapter ‘Cleaning’).
3 Store the appliance with the blade unit in the jar to prevent damage.
4 Do not place the lid on the jar to avoid any bacterial growth.
Guarantee and service
If you need service or information or if you have a problem, please visit the Philips AVENT website
at www.philips.com/AVENT or contact the Philips Consumer Care Centre in your country
(you nd its phone number in the worldwide guarantee leaet). If there is no Consumer Care
Centre in your country, go to your local Philips dealer.
Troubleshooting
This chapter summarises the most common problems you could encounter with the appliance. If
you are unable to solve the problem with the information below, contact the Consumer Care
Centre in your country.
Problem Possible cause Solution
The appliance does not
work. The appliance is equipped
with a safety lock. If the parts
have not been assembled
properly onto the motor
unit, the appliance does not
work.
Assemble all parts properly. See chapter
‘Using the appliance’.
The steaming light does
not go on. The appliance is not
connected to the mains. Put the plug in the wall socket.
The jar is not properly
placed on the motor unit. Place the jar properly on the motor
unit.
You want to start a second
steaming process just after
one has nished.
Switch off the appliance and allow it to
cool down for a few minutes before
you start a second steaming process.
Ingredients do not heat
up completely. The pieces in the jar are too
big, there is too much food
in the jar or you have not
steamed the food long
enough.
Cut the food into smaller pieces,
decrease the amount of food in the jar
or select a longer steaming time.
The appliance does not
steam. You have not put water in
the appliance. Switch off the appliance and put the
right amount of water in the appliance.
ENGLISH 11

Problem Possible cause Solution
Steaming takes too long
or the steam function
does not work at all.
There is too much scale in
the water tank. Descale the water tank. See chapter
‘Cleaning and maintenance’ section
‘Descaling’.
Steam is coming out of
the lling opening. The lid of the lling
opening is not closed
properly.
Close the lid of the lling opening until
you hear a clear click.
The steam outlet is blocked
by food or by limestone. Clean the steam outlet with a pointy
object without damaging the seal and
follow the descaling instructions in the
future. See chapter ‘Cleaning and
maintenance’ section ‘Descaling’.
The steam hole of the lid is
blocked. Clean the steam hole of the lid properly.
The steaming light goes
on again after the
steaming process is
nished. After some
time, the appliance
buzzes again.
You have accidentally left the
jar on the base for more
than 10 minutes without
switching off the appliance.
Switch off the appliance within 10
minutes after the steaming process is
nished and then blend the food or
remove it from the jar.
The blade unit or
motor unit is blocked. There is too much food in
the jar. Switch off the appliance and process a
smaller quantity.
The motor unit gives
off an unpleasant smell
during the rst few
times of use.
This is normal. If the appliance continues to give off this
smell after you have used it a few times,
check whether the processing quantity
and processing time are correct.
The appliance continues
to give off an
unpleasant smell after I
used it a few times.
You put too much food in
the jar or you let the
appliance blend too long.
Process smaller quantities and do not
let the appliance blend for more than
30 seconds at a time.
The appliance makes a
lot of noise, produces
an unpleasant smell,
feels hot to the touch,
emits smoke, etc.
There is too much food in
the jar. Switch off the appliance and process a
smaller quantity.
You let the appliance
operate too long without
interruption.
Do not let the appliance blend for
more than 30 seconds at a time.
The lid of the jar leaks. You have not assembled the
lid properly on the jar. Assemble the lid properly on the jar.
See chapter ‘Using the appliance’.
There is too much food in
the jar. Switch off the appliance and process a
smaller quantity.
ENGLISH12

Problem Possible cause Solution
There are white spots
on the lling opening
and/or on the jar, sieve
and lid.
Scale has built up on these
parts. This is normal. Remove the scale
periodically. See chapter ‘Cleaning and
maintenance’.
The appliance produces
a lot of noise while it is
blending.
The sieve is not attached to
the lid of the jar. Make sure that the sieve is attached to
the lid of the jar.
- Voltage/wattage: see type plate on the bottom of the appliance.
- Maximum capacity of water tank: 200ml.
- Maximum capacity of jar, solid ingredients: 700ml.
- Maximum capacity of jar, liquids: 450ml.
- Operating temperature: 10°C to 40°C
- Protection: temperature-controlled heating system.
Ingredients and steaming times
Type of food Ingredient Approximate steaming time*
Fruit Apple 5 min
Orange 10 min
Peach 10 min
Pear 5 min
Pineapple 15 min
Plum 10 min
Vegetables Asparagus 10 min
Broccoli 20 min
Carrot 15 min
Cauliower 15 min
Celery 15 min
Courgette 15 min
Fennel 15 min
French beans 20 min
Leek 15 min
Onion 15 min
Peas 20 min
Pepper 15 min
Potato 20 min
Pumpkin 15 min
ENGLISH 13

Type of food Ingredient Approximate steaming time*
Spinach 15 min
Swede 15 min
Sweet potato 15 min
Tomato 15 min
Meat Chicken, beef, lamb, pork etc. 20 min
Fish Salmon, sole, cod, trout etc. 15 min
* All food has to be cut in small cubes, no bigger than 1cm ³.
ENGLISH14

15
Einführung
Herzlichen Glückwunsch zu Ihrem Kauf und willkommen bei Philips AVENT! Um den Support von
Philips AVENT optimal zu nutzen, registrieren Sie Ihr Produkt bitte unter www.philips.com/welcome.
Dieser kombinierte Dampfgarer und Mixer eignet sich besonders für die Zubereitung kleiner
Mengen Babynahrung. Mit der in diesem Gerät kombinierten Dampfgar- und Mixfunktion können
Eltern ganz einfach frische Mahlzeiten für ihre Babys zubereiten.
Allgemeine Beschreibung (Abb. 1)
A Deckel mit Dampoch
BSieb
CMessereinheit
DMixbecher mit Messerhalterung
EDampfauslass auf Motoreinheit
F Verriegelungsbereich für Griff
G Einfüllöffnung des Wasserbehälters
HMotoreinheit
I Dampfanzeige
JDrehschalter
K Geräteunterseite mit Netzkabel
LMessbecher
MTeigschaber
Wichtig
Lesen Sie diese Bedienungsanleitung vor dem Gebrauch des Geräts aufmerksam durch, und
bewahren Sie sie für eine spätere Verwendung auf.
Gefahr
- Tauchen Sie die Motoreinheit niemals in Wasser oder andere Flüssigkeiten; spülen Sie sie auch
nicht unter ießendem Wasser ab.
Warnhinweis
- Prüfen Sie, bevor Sie das Gerät in Betrieb nehmen, ob die Spannungsangabe auf dem Gerät mit
der örtlichen Netzspannung übereinstimmt.
- Verwenden Sie das Gerät nicht, wenn der Netzstecker, das Netzkabel oder das Gerät selbst
defekt oder beschädigt sind.
- Ist das Netzkabel defekt, darf es nur von einem Philips Service-Center oder einer von Philips
autorisierten Werkstatt durch ein Original-Ersatzkabel ausgetauscht werden, um Gefährdungen
zu vermeiden.
- Dieses Gerät ist für Benutzer (einschl. Kinder) mit eingeschränkten physischen, sensorischen
oder psychischen Fähigkeiten bzw. ohne jegliche Erfahrung oder Vorwissen nur dann geeignet,
wenn eine angemessene Aufsicht oder ausführliche Anleitung zur Benutzung des Geräts durch
eine verantwortliche Person sichergestellt ist.
- Achten Sie darauf, dass Kinder nicht mit dem Gerät spielen.
- Halten Sie das Gerät außerhalb der Reichweite von Kindern.
- Berühren Sie die Messer nicht. Das gilt insbesondere, wenn das Gerät an das Stromnetz
angeschlossen ist. Die Klingen sind sehr scharf.
- Wenn die Messer blockiert sind, ziehen Sie stets den Netzstecker aus der Steckdose, bevor Sie
die blockierenden Zutaten entfernen.
- Das Gerät wird während des Dampfgarvorgangs sehr heiß und kann bei Berührung
Verbrennungen verursachen. Heben Sie den Mixbecher nur am Griff an.
- Vorsicht vor heißem Dampf, der während des Dampfgarvorgangs aus dem Mix- und
Wasserbehälter sowie beim Abnehmen des Deckels entweicht.
DEUTSCH

- Nach dem Dämpfen tritt für eine Zeit lang weiterhin heißer Dampf aus dem Wasserbehälter,
dem Dampfventil auf der Motoreinheit und dem Dampoch im Deckel des Mixbechers.
- Bei unsachgemäßem Gebrauch des Geräts kann Dampf aus der Einfüllöffnung entweichen.
Informationen dazu, wie Sie dieses Problem vermeiden bzw. beheben können, nden Sie im
Kapitel “Fehlerbehebung”.
- Lassen Sie das eingeschaltete Gerät niemals unbeaufsichtigt.
Achtung
- Verwenden Sie keine Zubehörteile anderer Hersteller oder solche, die von Philips nicht
ausdrücklich empfohlen werden. Falls Sie derartiges Zubehör benutzen, erlischt die Garantie.
- Stellen Sie das Gerät niemals auf oder in die Nähe eines Herds oder Kochers, der in Betrieb
oder noch heiß ist.
- Ziehen Sie stets den Netzstecker aus der Steckdose, bevor Sie ein Teil aufsetzen, abnehmen,
dessen Position verändern oder es reinigen.
- Ziehen Sie vor dem Reinigen stets den Netzstecker aus der Steckdose, und lassen Sie das Gerät
abkühlen.
- Sterilisieren Sie den Mixbecher oder andere Geräteteile niemals in einer Mikrowelle oder in
einem Sterilisator.
- Dieses Gerät ist nur für den Gebrauch im Haushalt bestimmt. Bei unsachgemäßem Gebrauch
oder Verwendung für halbprofessionelle oder professionelle Zwecke oder bei Nichtbeachtung
der Anweisungen in der Bedienungsanleitung erlischt die Garantie. In diesem Fall lehnt Philips
jegliche Haftung für entstandene Schäden ab.
- Stellen Sie das Gerät auf eine stabile, ebene und waagerechte Unterlage, und achten Sie darauf,
dass um das Gerät herum genügend Platz frei ist, um Beschädigungen an Schränken oder
anderen Gegenständen zu vermeiden.
- Verwenden Sie das Gerät nicht, wenn es herunter gefallen ist oder irgendwelche
Beschädigungen aufweist. Lassen Sie es nur von einem autorisierten Philips Service-Center
reparieren.
- Verwenden Sie die Dampfgarfunktion nie ohne Wasser.
- Gießen Sie das Wasser nach dem Gebrauch immer aus dem Wasserbehälter.
- Achten Sie darauf, nicht zu viel Wasser in den Wasserbehälter zu füllen. Überschreiten Sie nicht
die am Messbecher angegebene Füllstandsmarkierung.
- Vergewissern Sie sich vor dem Dampfgaren immer, dass die Messer nicht von Lebensmitteln
bedeckt sind.
- Überschreiten Sie beim Mixen von Flüssigkeiten nicht die am Mixbecher angegebene
Füllstandsmarkierung.
- Heben Sie das Gerät nicht an, und bewegen Sie es nicht, während es in Betrieb ist.
- Füllen Sie während des Dampfgarvorgangs niemals den Wasserbehälter nach. Heißes Wasser
und Dampf könnten aus dem Gerät austreten.
- Vergewissern Sie sich, dass der Deckel nach dem Dämpfen ausreichend abgekühlt ist, bevor Sie
ihn öffnen, um ggf. neue Zutaten zum Mixen beizugeben.
- Führen Sie keine Gegenstände in die Einfüllöffnung oder das Dampfventil ein.
- Um Gefährdungen zu vermeiden, schließen Sie das Gerät nie an einen Zeitschalter oder ein
Fernbedienungssystem an.
- Prüfen Sie stets die Temperatur der Babynahrung auf Ihrem Handrücken, bevor Sie Ihr Baby
füttern.
- Prüfen Sie stets die Beschaffenheit der Babynahrung. Achten Sie darauf, dass sich keine Klumpen
in der Nahrung benden.
- Verwenden Sie den Mixbecher nicht dazu, Nahrung in der Mikrowelle aufzuwärmen.
- Verwenden Sie ausschließlich den mitgelieferten Teigschaber, um die Nahrung aus dem
Mixbecher zu entnehmen.
- Entkalken Sie das Gerät regelmäßig, um Schäden am Gerät zu vermeiden.
DEUTSCH16

Sicherheitssystem
Dieses Gerät ist mit einem Sicherheitssystem ausgestattet. Das Gerät funktioniert nur, wenn alleTeile
richtig auf der Motoreinheit sitzen. Ist dies der Fall, wird die integrierte Sicherheitssperre deaktiviert.
Elektromagnetische Felder
Dieses Philips Gerät erfüllt sämtliche Normen bezüglich elektromagnetischer Felder (EMF). Nach
aktuellen wissenschaftlichen Erkenntnissen ist das Gerät sicher im Gebrauch, sofern es
ordnungsgemäß und entsprechend den Anweisungen in dieser Bedienungsanleitung gehandhabt
wird.
Vor dem ersten Gebrauch
1 Entfernen Sie sämtlichesVerpackungsmaterial vom Gerät.
2 Reinigen Sie alle Teile mit Ausnahme der Motoreinheit (siehe Kapitel “Reinigung und
Wartung”).
Das Gerät benutzen
Prüfen Sie stets die Temperatur der Babynahrung auf Ihrem Handrücken, bevor Sie Ihr Baby
füttern.
Verarbeiten Sie keine großen Mengen fester Zutaten auf einmal, sondern in mehreren kleinen
Portionen.
Vergewissern Sie sich, dass der Deckel nach dem Dämpfen ausreichend abgekühlt ist, bevor Sie
ihnöffnen,umggf.neueZutatenzumMixenbeizugeben.
Vergewissern Sie sich vor dem Dampfgaren immer, dass die Messer nicht von Lebensmitteln
bedeckt sind.
Überschreiten Sie beim Mixen von Flüssigkeiten nicht die am Mixbecher angegebene
Füllstandmarkierung.
Dieses Gerät ist für das Dämpfen und Mixen von Babynahrung vorgesehen. Üblicherweise wird die
Nahrung zuerst gedämpft und anschließend gemixt. Sie können das Gerät allerdings auch nur zum
Dämpfen oder nur zum Mixen verwenden. Wenn Sie das Gerät ausschließlich zum Mixen von
Babynahrung verwenden, überspringen Sie die Abschnitte “Den Wasserbehälter füllen”’ und
“Dämpfen”, und befolgen Sie nur die Anleitungen im Abschnitt “Mixen”.
Den Wasserbehälter füllen
1 FüllenSiedenMessbecherbiszurunterstenMarkierungmitWasserauf(Abb.2).
Auf dem Messbecher sind die Milliliter und die entsprechenden Garzeiten in Minuten angegeben. Im
beigefügten Rezeptheft nden Sie auch Informationen zu den jeweils empfohlenen Mengen.
Hinweis: Überschreiten Sie nicht die am Messbecher angegebene Füllstandmarkierung (200 ml).
2 Füllen Sie das Wasser in die Einfüllöffnung, und schließen Sie den Deckel (Abb. 3).
Dämpfen
Werden bestimmte Gemüse- und Obstsorten schonend gedämpft, eignen sie sich hervorragend für
Babys, die gerade damit begonnen haben, feste Nahrung zu sich zu nehmen. Das Dämpfen ist die
gesündeste Art der Nahrungszubereitung, da viele Vitamine und andere wichtige Nährstoffe in den
Lebensmitteln erhalten bleiben.
Hinweis: Im beigefügten Rezeptheft nden Sie nicht nur Rezepte, sondern auch die entsprechenden
Garzeiten. Beachten Sie, dass die Rezepte dem jeweiligen Alter Ihres Kindes entsprechen.
DEUTSCH 17

Hinweis: Stellen Sie sicher, dass die Temperatur der gedämpften Nahrung mindestens 75 °C beträgt.
Dämpfen Sie keine großen Stücke gefrorenen Gemüses.
1 SetzenSiedieMessereinheitaufdenZubehörhalterimMixbecher(Abb.4).
2 Schneiden Sie feste Zutaten in kleine Stücke (max. 1 cm³große Würfel), bevor Sie sie in den
Mixbecher geben.
Tipp: Verarbeiten Sie keine großen Mengen fester Zutaten auf einmal, sondern in mehreren kleinen
Portionen.
3 Geben Sie die Zutaten in den Mixbecher (Abb. 5).
4 SetzenSiedasSiebindenDeckeldesMixbechers(esrastethörbarein)(Abb.6).
5 SetzenSiedenDeckelaufdenMixbecher,undschiebenSieihnindierichtigePosition.Die
kleinenVorsprünge am Deckel müssen in die Rillen des Mixbechers passen. Prüfen Sie, ob das
VerlängerungsstückdesDeckelsgenauüberdemGriffdesMixbechersplatziertist(Abb.7).
6 SetzenSiedenMixbecherumgekehrtaufdieMotoreinheit,d.h.mitdemDeckelnachunten.
StellenSiesicher,dasssichderGriffaufderrechtenSeitebendet(Abb.8).
7 Drehen Sie den Drehschalter auf die Position “Dämpfen”.
,WährenddesDampfgarvorgangsleuchtetdieDampfanzeigeorange(Abb.9).
HeißerDampfoderheißesWasserkannzuVerbrühungenandenHändenführen.VermeidenSie
jeden Kontakt mit heißen Geräteteilen oder Dampf, und lassen Sie Kinder nicht damit in
Berührung kommen (Abb. 10).
,Wenn der Dampfgarvorgang abgeschlossen ist, ertönt ein summendes Geräusch, und die
Dampfanzeigeerlischt.
8 Schalten Sie das Gerät mithilfe des Drehschalters aus.Warten Sie 2 Minuten, bis kein Dampf
mehr entweicht. (Abb. 11)
WennSiediegedämpfteBabynahrungservierenmöchten,ohnesievorherzumixen,prüfenSie
dieTemperaturderBabynahrungaufIhremHandrücken,umsicherzustellen,dasssienichtzuheiß
ist.
9 Wenn Sie weitere Lebensmittel garen möchten, drehen Sie den Drehschalter wieder auf die
Position “Dämpfen”.
10 Wenn Sie anschließend die gegarte Nahrung mixen möchten, befolgen Sie die unten
aufgeführten Schritte.
- Heben Sie den Mixbecher am Griff von der Motoreinheit. Drehen Sie den Mixbecher um, und
schütteln Sie ihn, sodass die Nahrung auf die Messereinheit fällt (Abb. 12).
BerührenSiedenMixbechernuramGriff.Deckel,BodenundäußereOberächedesMixbechers
sind heiß (Abb. 13).
- Nehmen Sie den Deckel ab, um ggf. weitere Zutaten zum Mixen hinzuzufügen. (z. B. Wasser
oder Öl).
Stellen Sie immer sicher, dass der Deckel nach dem Dampfgaren abgekühlt ist, bevor Sie ihn
öffnen,umweitereZutatenhinzuzufügenoderdasrestlicheWasserausdemWasserbehälterzu
entfernen.
- Fahren Sie mit den Schritten 7 bis 9 im Abschnitt “Mixen” fort.
Mixen
Das Gerät eignet sich für Folgendes:
- Pürieren gedämpfter und gekochter Zutaten für Babynahrung
DEUTSCH18

- Mixen von Flüssigkeiten und Obst für Babysäfte
Hinweis: Achten Sie beim Mixen von Flüssigkeiten darauf, dass Sie die MAX-Markierung am Mixbecher
nicht überschreiten.
DasGeräteignetsichnichtzumZerkleinernharterZutaten(z.B.Eis-oderZuckerwürfel).
1 SetzenSiedieMessereinheitaufdenZubehörhalterimMixbecher(Abb.4).
2 Schneiden Sie feste Zutaten in kleine Stücke (max. 1 cm große Würfel), bevor Sie sie in den
Mixbecher geben.
Tipp: Verarbeiten Sie keine großen Mengen fester Zutaten auf einmal, sondern in mehreren kleinen
Portionen.
3 Geben Sie die Zutaten in den Mixbecher. (Abb. 5)
4 SetzenSiedenMixbecheraufrechtaufdieMotoreinheit,d.h.mitderDeckelöffnungnach
oben.AchtenSiedarauf,dassderGriffaufderrechtenSeitezwischendenbeidenLeistendes
Verriegelungsbereichsplatziertist(Abb.14).
5 SetzenSiedasSiebindenDeckeldesMixbechers(esrastethörbarein)(Abb.6).
6 SetzenSiedenDeckelaufdenMixbecher,undschiebenSieihnindierichtigePosition.Die
kleinenVorsprünge am Deckel müssen in die Rillen des Mixbechers passen. Prüfen Sie, ob das
VerlängerungsstückdesDeckelsgenauüberdemGriffdesMixbechersplatziertist.(Abb.7)
7 Drehen Sie den Drehschalter auf die Position “Mixen”. Halten Sie den Drehschalter so lange
wie nötig in dieser Position, jedoch nicht länger als 30 Sekunden (Abb. 15).
Hinweis: Wenn die Zutaten innen am Mixbecher haften bleiben, schalten Sie zunächst das Gerät aus.
Lösen Sie dann die Zutaten mit dem Teigschaber, oder geben Sie etwas Flüssigkeit hinzu.
Hinweis: Vergewissern Sie sich, dass die gemixte Babynahrung die richtige Konsistenz aufweist (ohne
Klumpen), bevor Sie Ihr Baby füttern.
Hinweis: Wenn die Babynahrung noch zu fest ist, geben Sie etwas Flüssigkeit (z. B. Wasser) hinzu, bis die
Babynahrung weich genug ist.
Lassen Sie das Gerät nicht länger als 30 Sekunden ohne Unterbrechung mixen. Ist die
Verarbeitung nach 30 Sekunden noch nicht abgeschlossen, lassen Sie das Gerät für einige
Sekunden ausgeschaltet, bevor Sie fortfahren.Wird das Gerät heiß, lassen Sie es vor der weiteren
Verarbeitung von Zutaten für einige Minuten abkühlen.
AchtenSiedarauf,dassdieNahrungfürIhrBabynichtzuheißist.
8 Lassen Sie den Drehknopf einfach los, wenn der Mixvorgang abgeschlossen ist. (Abb. 16)
,DerSchalterkehrtautomatischindiePosition“Aus”zurück.
9 ZiehenSiedenNetzsteckerausderSteckdose.
Reinigung und Wartung
Reinigen Sie das Gerät nach jedem Gebrauch.
Tauchen Sie die Motoreinheit keinesfalls inWasser.
Geben Sie niemals Bleichmittel oder chemische Sterilisierungslösungen/-tabletten in das Gerät.
BenutzenSiezumReinigendesGerätskeineScheuerschwämmeund-mitteloderaggressive
FlüssigkeitenwieBenzin,AzetonoderAlkohol.
DEUTSCH 19

1 ZiehenSiedenNetzsteckerausderSteckdose,undentfernenSiedenMixbechervonder
Motoreinheit (Abb. 17).
2 Nehmen Sie das Sieb vom Deckel und die Messereinheit aus dem Mixbecher (Abb. 18).
3 ReinigenSiedieMessereinheitsofortnachGebrauchunterießendemWasser.AchtenSie
auchdarauf,dieInnenseitederRöhrederMessereinheitauszuspülen(Abb.19).
Reinigen Sie die Messereinheit mit äußersterVorsicht. Die Klingen sind sehr scharf.
Hinweis: Wenn Sie die Messereinheit gründlicher reinigen möchten, können Sie sie nach dem Abspülen in
die Spülmaschine geben.
4 Reinigen Sie die anderen Teile, die mit Lebensmitteln in Berührung gekommen sind, sofort
nach Gebrauch in heißem Wasser und etwas Spülmittel.
Hinweis: Alle Teile mit Ausnahme der Motoreinheit können in der Spülmaschine gereinigt werden.
5 Reinigen Sie die Motoreinheit, falls notwendig, mit einem feuchten Tuch.
Entkalken
Entkalken Sie das Gerät alle vier Wochen, um sicherzustellen, dass es auch weiterhin einwandfrei
funktioniert. Kalkablagerungen können reduziert werden, indem Sie im Gerät abgekochtes oder
geltertes Wasser verwenden.
Verwenden Sie niemals die Dampffunktion, wenn sich Entkalkungslösung imWasserbehälter
bendet.
1 Überprüfen Sie, ob das Gerät tatsächlich ausgeschaltet und von der Steckdose getrennt ist.
2 Geben Sie ein Päckchen Zitronensäure (10 g) in 200 ml warmes Wasser.
3 Geben Sie die Entkalkungslösung in den Wasserbehälter.
4 Lassen Sie die Lösung über Nacht im Wasserbehälter stehen.
5 Gießen Sie die gebrauchte Entkalkungslösung aus dem Wasserbehälter. (Abb. 20)
6 Spülen Sie den Wasserbehälter gründlich mit frischem Wasser aus.
7 Füllen Sie 200 ml Wasser in den Wasserbehälter, und lassen Sie das Gerät bei leerem
Mixbecher einen kompletten Dampfgarvorgang (20 Minuten) durchlaufen, bevor Sie es
wieder für die Zubereitung von Nahrung verwenden.
Umweltschutz
- Werfen Sie das Gerät am Ende der Lebensdauer nicht in den normalen Hausmüll. Bringen Sie es
zum Recycling zu einer ofziellen Sammelstelle. Auf diese Weise helfen Sie, die Umwelt zu
schonen (Abb. 21).
Aufbewahrung
1 Leeren Sie den Wasserbehälter, bevor Sie das Gerät verstauen (Abb. 20).
2 Stellen Sie sicher, dass alle Teile sauber und trocken sind, bevor Sie das Gerät verstauen (siehe
Kapitel “Reinigung”).
3 SetzenSiedieMessereinheitindenMixbecher,bevorSiedasGerätverstauen,um
Beschädigungenzuvermeiden.
4 SetzenSiedenDeckelnichtaufdenMixbecher,umBakterienwachstumzuverhindern.
DEUTSCH20
Other manuals for AVENT SCF870
4
Table of contents
Languages:
Other Philips AVENT Blender manuals

Philips AVENT
Philips AVENT AVENT SCF870 User manual

Philips AVENT
Philips AVENT AVENT SCF870 User manual

Philips AVENT
Philips AVENT SCF860/24 User manual

Philips AVENT
Philips AVENT AVENT SCF870 User manual

Philips AVENT
Philips AVENT AVENT SCF870 User manual

Philips AVENT
Philips AVENT SCF860/20 User manual

Philips AVENT
Philips AVENT SCF883 User manual

Philips AVENT
Philips AVENT SCF860/20 User manual