Installation Guide / Guía de instalación
Registeryour productand get supportat
www.philips.com/welcome
EN Usermanual
CED229
Installation guide /
Instalación Guía
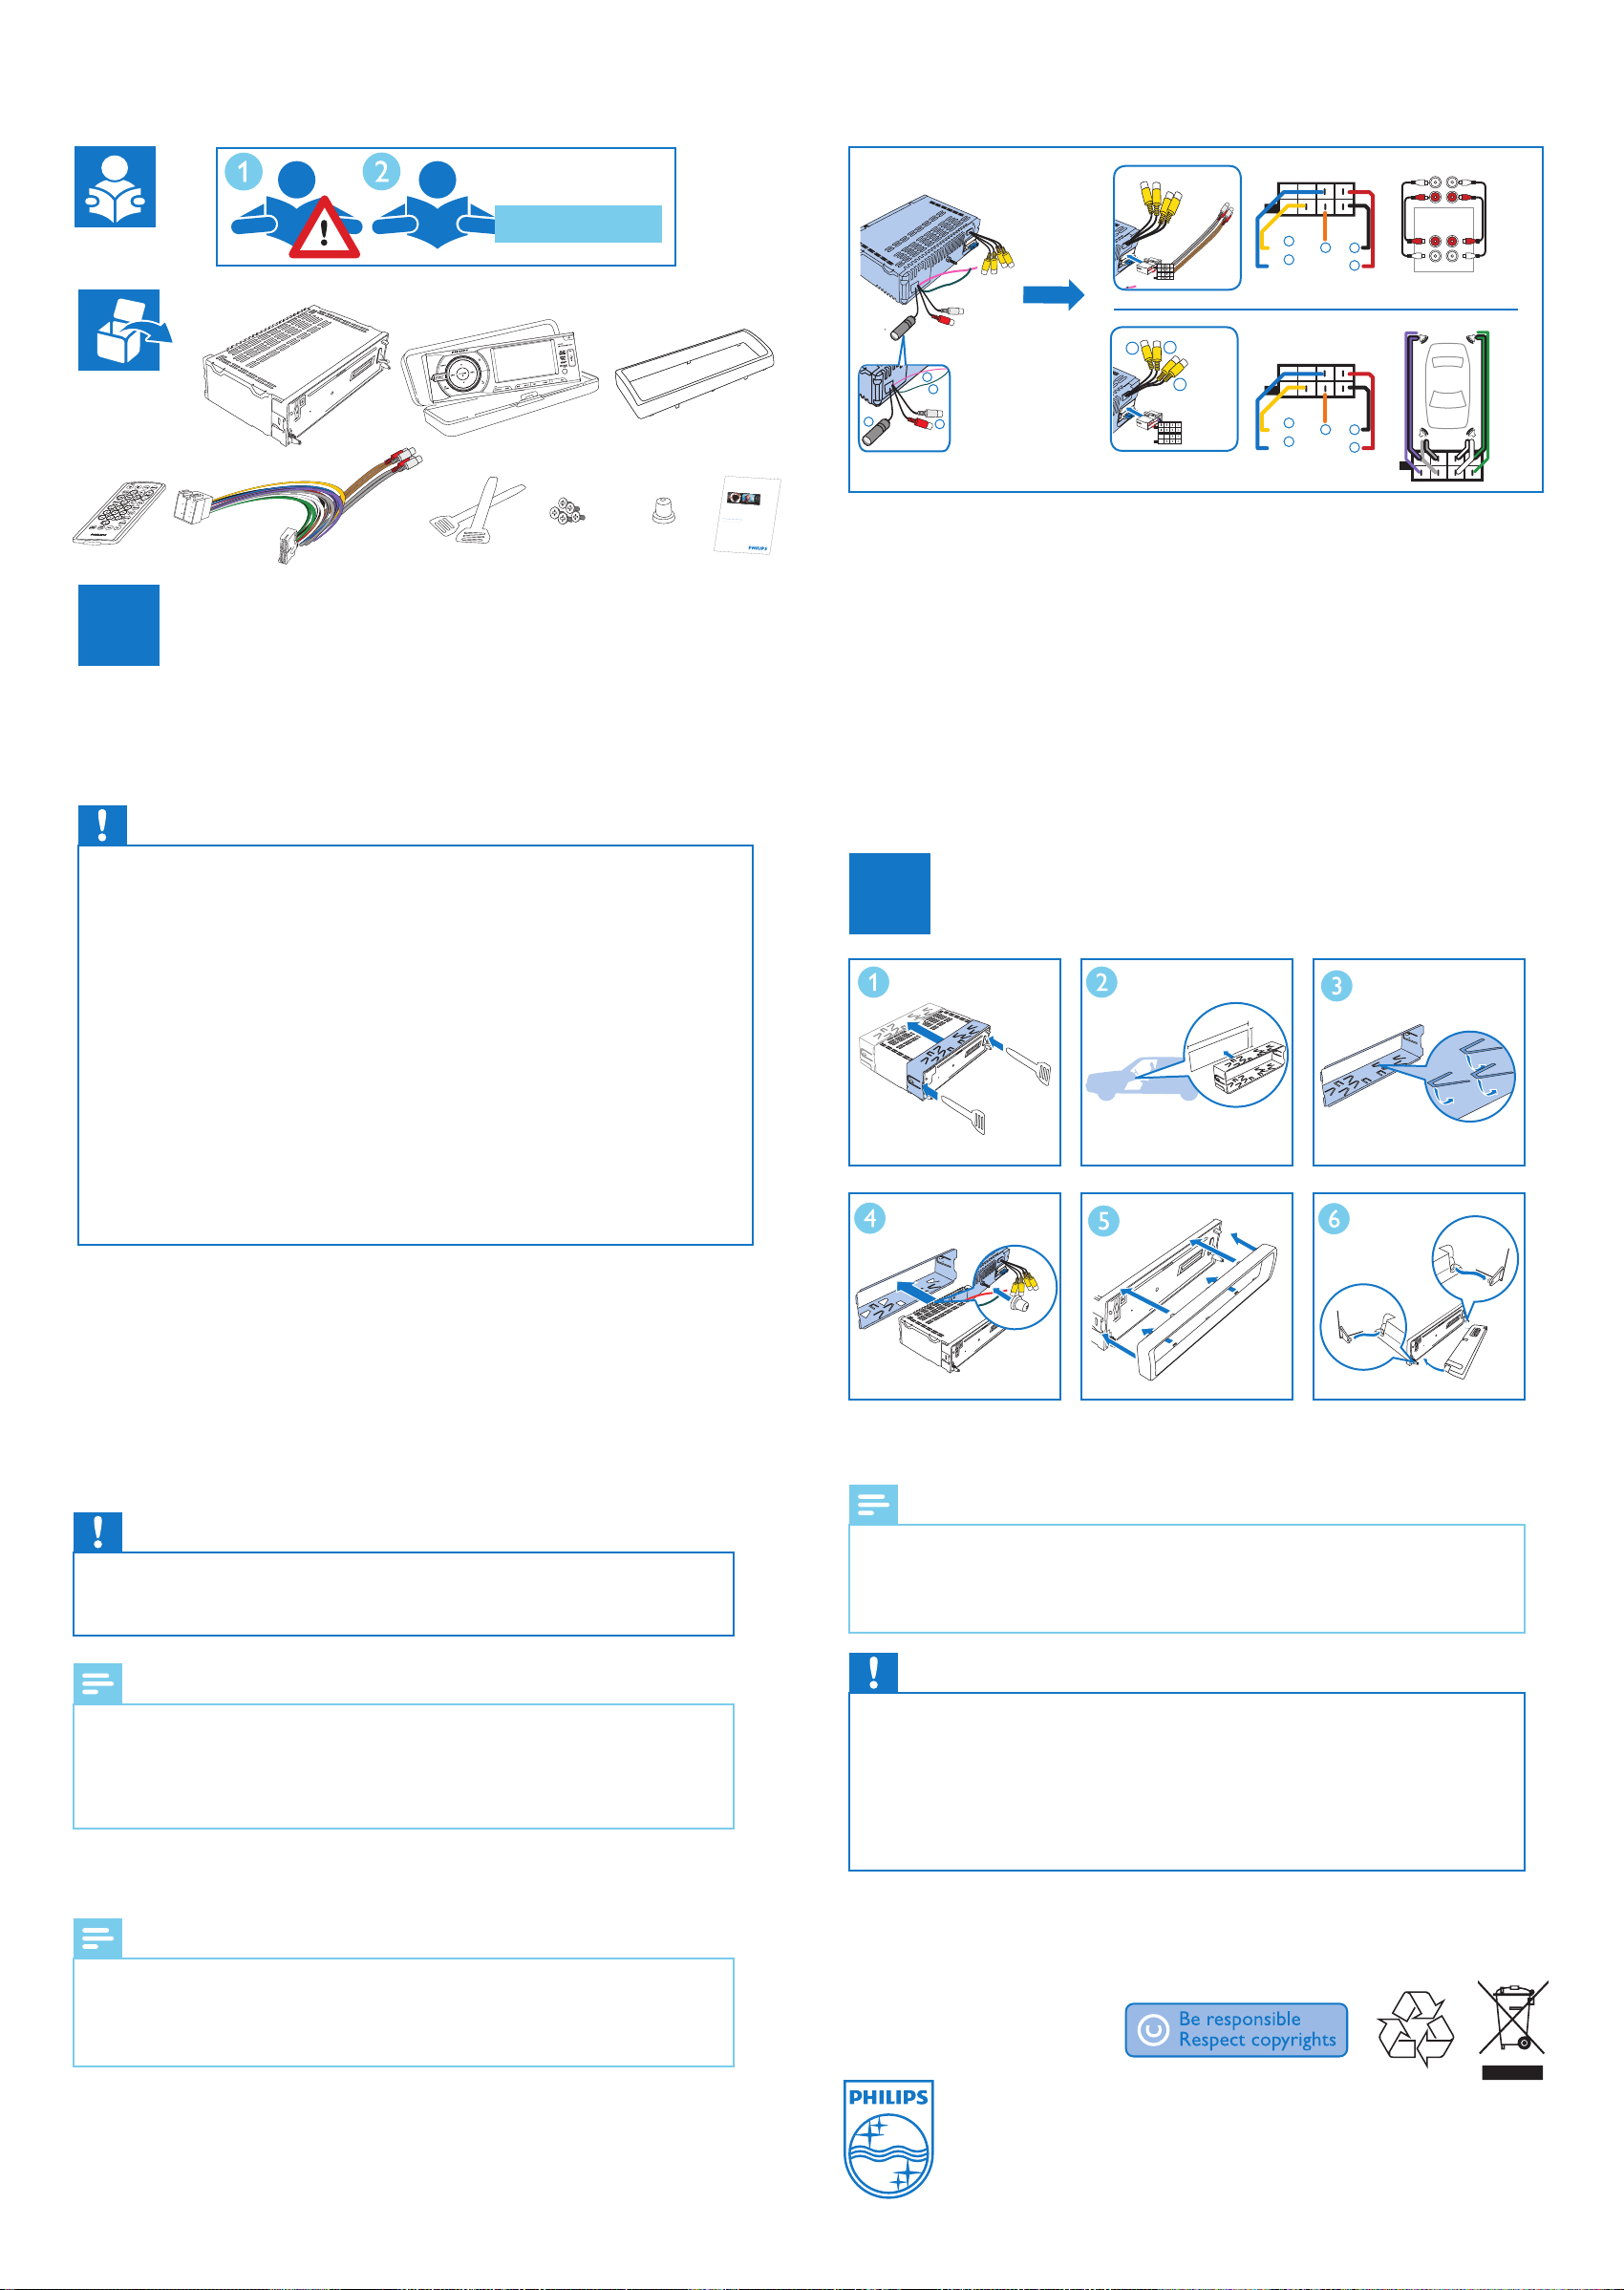
1Connect / Conexión
These instructions are for a typical installation. However, if your car has different requirements, make the corresponding adjustment.
If you have any questions regarding installation kits, consult your Philips car audio dealer.
Estas instrucciones son para una instalación típica. Sin embargo, si su auto requiere otro tipo de instalación, realice los ajustes
correspondientes. Si tiene dudas sobre los kits de instalación, comuníquese con su distribuidor de productos de audio para autos
de Philips.
• This unit is designed for negative ground (earth) 12 V DC operation only.
• Always install this unit in the car dashboard. Other locations can be dangerous as the rear of the unit heats up during
use.
• To avoid short-circuit: before you connect, ensure that the ignition is off.
• Ensure that you connect the yellow and red power supply leads after all other leads are connected.
• Ensure that all loose leads are insulated with electrical tape.
• Ensure that the leads do not get caught under screws orin parts that will move (e.g. seat rail).
• Ensure that all ground (earth) leads are run to a common ground (earth) point.
• Use only the supplied mounting hardware for a safe and secure installation.
• Improper fuses can cause damage or fire. When you need to change the fuse, consult a professional.
• Esta unidad ha sido diseñada para funcionar sólo con alimentación de CC de 12 V con conexión a tierra negativa.
• Siempre instale la unidad en el tablero del auto. Otras ubicaciones pueden resultar peligrosas ya que la parte trasera
de la unidad se calienta durante el uso.
• Antes de realizar la conexión, asegúrese de que el auto esté apagado para evitar cortocircuitos.
• Antes de conectar los cables de alimentación de color rojo y amarillo, conecte todos los demás cables.
• Recuerde proteger todos los cables sueltos con cinta aisladora.
• Verifique que los cables no queden enganchados en los tornillos ni en piezas que puedan moverse (por ejemplo, en el
riel del asiento).
• Verifique que todos los cables con conexión a tierra estén dirigidos a un mismo punto.
• Para una instalación segura, utilice sólo los accesorios que se proveen con la unidad.
• El uso de fusibles inadecuados puede provocar daños o incendios. Si necesita cambiar un fusible, consulte con un
profesional.
Caution / Precaución
Note on the power supply lead (yellow)
• When you connect other devices to this apparatus, ensure that the rating of the car circuit is higher than the total fuse
value of all the connected devices.
Notes on speaker connection
• Never connect speaker wires to the metal body or chassis of the car.
• Never connect speaker wires with stripes to one another.
Nota sobre el cable de alimentación (amarillo)
• Cuando conecte otros dispositivos a esta unidad, asegúrese de que la potencia del circuito del vehículo sea superior a
la del valor total de fusible de todos los dispositivos conectados.
Notas sobre la conexión del parlante
• Nunca conecte los cables del parlante en la estructura de metal o chasis del automóvil.
• Nunca conecte los cables de los parlantes que tienen franjas unos con otros.
• Make sure that all bare wires are insulated with electrical tape.
• Aísle todos los cables expuestos con cinta aisladora.
• As different cars have different requirements, you might need to connect CED229 differently from the user
manual’s instructions. In that case, consult a professional mechanic to connect.
• Como cada auto requiere un método de instalación diferente, es posible que deba instalar el sistema CED229 de
un modo distinto al descripto en el manual de instrucciones. En ese caso, consulte con un mecánico profesional
para realizar la conexión.
Note / Nota
Caution / Precaución
This car audio video system allows you to connect to the rear view backup camera. You can view the things that happens
behind your car in the display,especially you are driving a big vehicle.This helps protecting your bumper and anything it might
contact.
Este sistema de audio y video para automóviles le permite conectar una cámara de asistencia trasera. Puede ver lo que
ocurre detrás de su auto en la pantalla. Esto es especialmente útil si maneja un vehículo grande porque le permite proteger su
paragolpe y cualquier objeto con el que pueda entrar en contacto.
• Check your local driving regulations on whether it is legally required to install the rear view backup camera.
These connections require a professional mechanic to install.
• Consulte las normas de tránsito locales para saber si es legal instalar una cámara trasera en el vehículo. Es posible
que la instalación de este tipo de conexiones requiera la intervención de un mecánico profesional.
Note / Nota
Connect parking brake cable and reverse driving cable to a rear view backup camera
Conecte el cable del freno y el cable de la marcha atrás a la cámara de asistencia trasera
++
++
--
--
mn
FR
FLRL
RR
1
2
3
4
5
1
2
3
4
5
aIllumination switch
b To the +12V car battery which is energized at all time
c Motor/electric antenna relay control lead. Amplifier relay
control lead
d Ground
e Ignition key +12V DC when ON/ACC
f Antenna
g Subwoofer Out
h Aux-In
i Parking switch cable
j Reverse driving cable
k Video-In
l Camera-In
m Video-out 1 and 2
n Rear line-out
o Front line-out
a Interruptor de iluminación
b A la batería del auto de +12 V que recibe alimentación
constante
c Cable de control del relé de la antena eléctrica / del
motor - Cable de control del relé del amplificador
d Tierra
e Llave de encendido+12 V de CC en ON/ACC
f Antena
g Salida del subwoofer
h Entrada auxiliar
i Cable del interruptor de estacionamiento
j Cable de marcha atrás
k Entrada de video
l Entrada de cámara
m Salidas de video 1 y 2
n Salida de línea trasera
o Salida de línea delantera
183mm
53.5mm
Mount / Montaje
g Reconnect the negative terminal of the car battery.
Vuelva a conectar el terminal negativo de la batería del auto.
• For proper operation of the DVD player, the chassis must be mounted within 20 degree horizontal. Ensure that the
unit is mounted within this limitation.
• Para un uso correcto de este reproductor de DVD,el chasis debe estar montado a 20 grados en posición horizontal.
Verifique que la unidad esté montada según estas instrucciones.
Note / Nota
• Keep the connection of the car battery if there is an on-board drive or navigation computer.Otherwise, the
computer may lost its memory.
• To avoid short circuit, ensure the bare wires do not touch each other and disconnect the negative terminal of the car
battery.
• No apague la batería del auto si hay un sistema o computadora de navegación conectado para evitar que el sistema
pierda la memoria.
• Para evitar cortocircuitos, verifique que los cables expuestos no se toquen entre sí y desconecte el terminal negativo
de la batería del automóvil.
Caution / Precaución
All rights reserved.
www.philips.com
Specification are subject to change without notice.
Trademarks are the property of Koninklijke Philips Electronics N.V. or their respective owners.
© 2011 Koniniklijke Philips Electronics N.V.
CED229/55 , CED229/56
Installation Guide_BR-PT and AR-ES_110919.indd 2 9/19/2011 4:44:02 PM


