manuals.online logo
Brands
  1. Home
  2. •
  3. Brands
  4. •
  5. Philips
  6. •
  7. Chassis
  8. •
  9. Philips L01.1A User manual

Philips L01.1A User manual

Published by RB 0267 Service PaCE Printed in the Netherlands Subject to modification EN 3122 785 12730
©
Copyright 2002 Philips Consumer Electronics B.V. Eindhoven, The Netherlands.
All rights reserved. No part of this publication may be reproduced, stored in a
retrieval system or transmitted, in any form or by any means, electronic,
mechanical, photocopying, or otherwise without the prior permission of Philips.
Colour Television Chassis
L01.1A
AB
CL 16532008_066.eps
150601
(LARGE SCREEN)
Contents Page Contents Page
1. Technical Specifications, Connections and
Chassis Overview 2
2. Safety & Maintenance Instructions, Warnings and
Notes 4
3. Directions for Use 5
4. Mechanical Instructions 19
5. Service Modes, Error Codes and Faultfinding 21
6. Block Diagram, Testpoints, I
2
C And Supply
Voltage Overview
Block Diagram 27
Testpoint Overview 28
I
2
C And Supply Voltage Overview 29
7. Electrical Diagrams and PWB’s Diagram PWB
Power Supply (Diagram A1) 30 44-50
Diversity Table Power Supply 31
Line Deflection (Diagram A2) 32 44-50
Frame Deflection (Diagram A3) 33 44-50
Tuner IF (Diagram A4) 34 44-50
Video IF and Sound IF (Diagram A5) 35 44-50
Synchronization (Diagram A6) 36 44-50
Control (Diagram A7) 37 44-50
Audio Amplifier (Diagram A8) 38 44-50
NICAM (Stereo/SAP) Decoder (Diagram A9) 39 44-50
Audio/Video Source Switching (Diagram A10) 40 44-50
Front I/O + Control, Headphone(Diagram A12) 41 44-50
Rear I/O Cinch (Diagram A13) 42 44-50
Tilt and Rotation (Diagram A15) 43 44-50
CRT (Diagram B1) 51 53
ECO SCAVEM (Diagram B2) 52 53
Side AV and Headphone (Diagram C) 54 54
Side AV (Diagram E) 55 55
Side AV and Headphone (Diagram E1) 56 56
Front Interface & Control Panel (Diagram Q) 57 58
Front Interface (Diagram Q1) 59 59
Top Control (RF) (Diagram T) 60 60
Top Control (FSQ) (Diagram T1) 60 60
Top Control (Diagram T2) 61 61
8. Alignments 63
9. Circuit Description 70
List of Abbreviations 80
10 Spare Parts List 82
Technical Specifications, Connections and Chassis Overview
EN 2 L01.1A1.
1. Technical Specifications, Connections and Chassis Overview
Index:
1. Technical Specifications.
2. Connections.
3. Chassis Overview.
Note:
• Described specifications are valid for the whole product
range (see Product Survey for specific models).
• Figures can deviate slightly from the actual situation, due
to different set executions.
1.1 Technical Specifications
1.1.1 Reception
Tuning system : PLL
Colour systems : NTSC 3.58, 4.43
: PAL B/G, B/H, D/K, I
: SECAM B/G, D/K, K1
Sound systems : FM-stereo
: 2CS (B/G, China,
Korea)
:BTSCDBX
: NICAM B/G, D, D/K, I
: BI-NICAM B/G, D, D/
K, I
A/V connections : NTSC 3.58, 4.43
:PAL60
Channel selections : 100 or 125 channels
: UVSH or full cable
Aerial input : 75 Ω, IEC- or F-type
1.1.2 Miscellaneous
Audio output : 2 x 5 W (with SAP)
: 2 x 5 W + 10 W
(subwoofer)
: 2 x 5 W + 10 W + 2 x
3 W
Mains voltage : 90 - 276 V or 150 -
276 V
Mains frequency : 50 or 60 Hz
Ambient temperature : + 5 to + 45 deg. C
Maximum humidity : 90 %
Standby Power consumption : < 3 W
1.2 Connections
1.2.1 Front (or Side) Connections and Front (or Top) Control
Figure 1-1
IR
RED
- VOLUME +
- PROGRAM +
V+V-
P-
P+
L
Audio
R
Video
Mono
V- C+C-V+
CL 26532082_044.eps
020802
C+C-V+V-
TOP CONTROL
FRONT CONTROL SIDE I/O
VOLUME-+-+PROGRAM
P
Technical Specifications, Connections and Chassis Overview EN 3L01.1A 1.
Audio / Video In
1 - Video CVBS (1 Vpp / 75 Ω) 
2 - Audio L (0.2 Vrms / 10 kΩ) 
3 - Audio R (0.2 Vrms / 10 kΩ) 
4 - Headphone
(3.5 mm) 8 - 600 Ω/ 4 mW 
1.2.2 Rear Connections
Figure 1-2 .eps
Monitor Out
1 - Video CVBS (1 Vpp / 75 Ω) 
2 - Audio L (0.5 Vrms / 1 kΩ) 
3 - Audio R (0.5 Vrms / 1 kΩ) 
YUV In (if present)
1 - Y 0.7 Vpp / 75 Ω
2 - U 0.7 Vpp / 75 Ω
3 - V 0.7 Vpp / 75 Ω
AV1 In
4 - Video CVBS (1 Vpp / 75 Ω) 
5 - Audio L (0.5 Vrms / 10 kΩ) 
6 - Audio R (0.5 Vrms / 10 kΩ) 
AV2 In
1 - Video CVBS (1 Vpp / 75 Ω) 
2 - Audio L (0.5 Vrms / 10 kΩ) 
3 - Audio R (0.5 Vrms / 10 kΩ) 
AV2 In (SVHS)
1 - gnd !
2 - gnd !
3 - Y 1 Vpp / 75 Ω
4 - C 0.3 Vpp / 75 Ω
1.3 Chassis Overview
Figure 1-3
V
L
R
Y
U
V
V
L
R
V
L
R SVHS
MONITOR
OUT
75 Ohm
FM
AV1
IN AV2
IN
CL 16532008_005.eps
120601
CRT PANEL
SIDE AV PANEL + HEADPHONE
E1EC
MAIN
CHASSIS
PANEL
A1
B2B1
T1 T2T
A2
A3
A4
A5
A12
A9
A10
A8
A13
POWER SUPPLY
Q1Q
FRONT INTERFACE
LINE DEFLECTION
FRAME DEFLECTION
A6
SYNCHRONISATION
TUNER IF
VIDEO + SOUND IF
FRONT I/O + CONTROL +
HEADPHONE
A7
CONTROL (µP)
NICAM + 2CS +
BTSC DECODER
A/V SWITCHING
AUDIO AMPLIFIER
REAR I/O CINCH
CL 26532082_013.eps
190701
A15
TILT & ROTATION
TOP CONTROL PANEL
Safety & Maintenance Instructions, Warnings, and Notes
EN 4 L01.1A2.
2. Safety & Maintenance Instructions, Warnings, and Notes
2.1 Safety Instructions For Repairs
Safety regulations require that during a repair:
•Due to the ‘hot’parts of this chassis, the set must be
connected to the AC power via an isolation transformer.
•Safety components, indicated by the symbol , should be
replaced by components identical to the original ones.
•When replacing the CRT, safety goggles must be worn.
Safety regulations require that after a repair, the set must be
returned in its original condition. Pay particular attention to the
following points:
•General repair instruction: as a strict precaution, we advise
you to re-solder the solder connections through which the
horizontal deflection current is flowing, in particular:
–all pins of the line output transformer (LOT)
–fly-back capacitor(s)
–S-correction capacitor(s)
–line output transistor
–pins of the connector with wires to the deflection coil
–other components through which the deflection current
flows.
Note: This re-soldering is advised to prevent bad connections
due to metal fatigue in solder connections and is therefore only
necessary for television sets more than two years old.
•Route the wire trees and EHT cable correctly and secure
them with the mounted cable clamps.
•Check the insulation of the AC power cord for external
damage.
•Check the strain relief of the AC power cord for proper
function, to prevent the cord from touching the CRT, hot
components, or heat sinks.
•Check the electrical DC resistance between the AC plug
and the secondary side (only for sets that have an isolated
power supply). Do this as follows:
1. Unplug the AC power cord and connect a wire between
the two pins of the AC plug.
2. Turn on the main power switch (keep the AC power
cord unplugged!).
3. Measure the resistance value between the pins of the
AC plug and the metal shielding of the tuner or the
aerial connection of the set. The reading should be
between 4.5 MΩand 12 MΩ.
4. Switch the TV OFF and remove the wire between the
two pins of the AC plug.
•Check the cabinet for defects, to prevent the possibility of
the customer touching any internal parts.
2.2 Maintenance Instructions
It is recommended to have a maintenance inspection carried
out by qualified service personnel. The interval depends on the
usage conditions:
•When the set is used under normal circumstances, for
example in a living room, the recommended interval is
three to five years.
•When the set is used in an environment with higher dust,
grease or moisture levels, for example in a kitchen, the
recommended interval is one year.
•The maintenance inspection includes the following actions:
1. Perform the 'general repair instruction' noted above.
2. Clean the power supply and deflection circuitry on the
chassis.
3. Clean the picture tube panel and the neck of the picture
tube.
2.3 Warnings
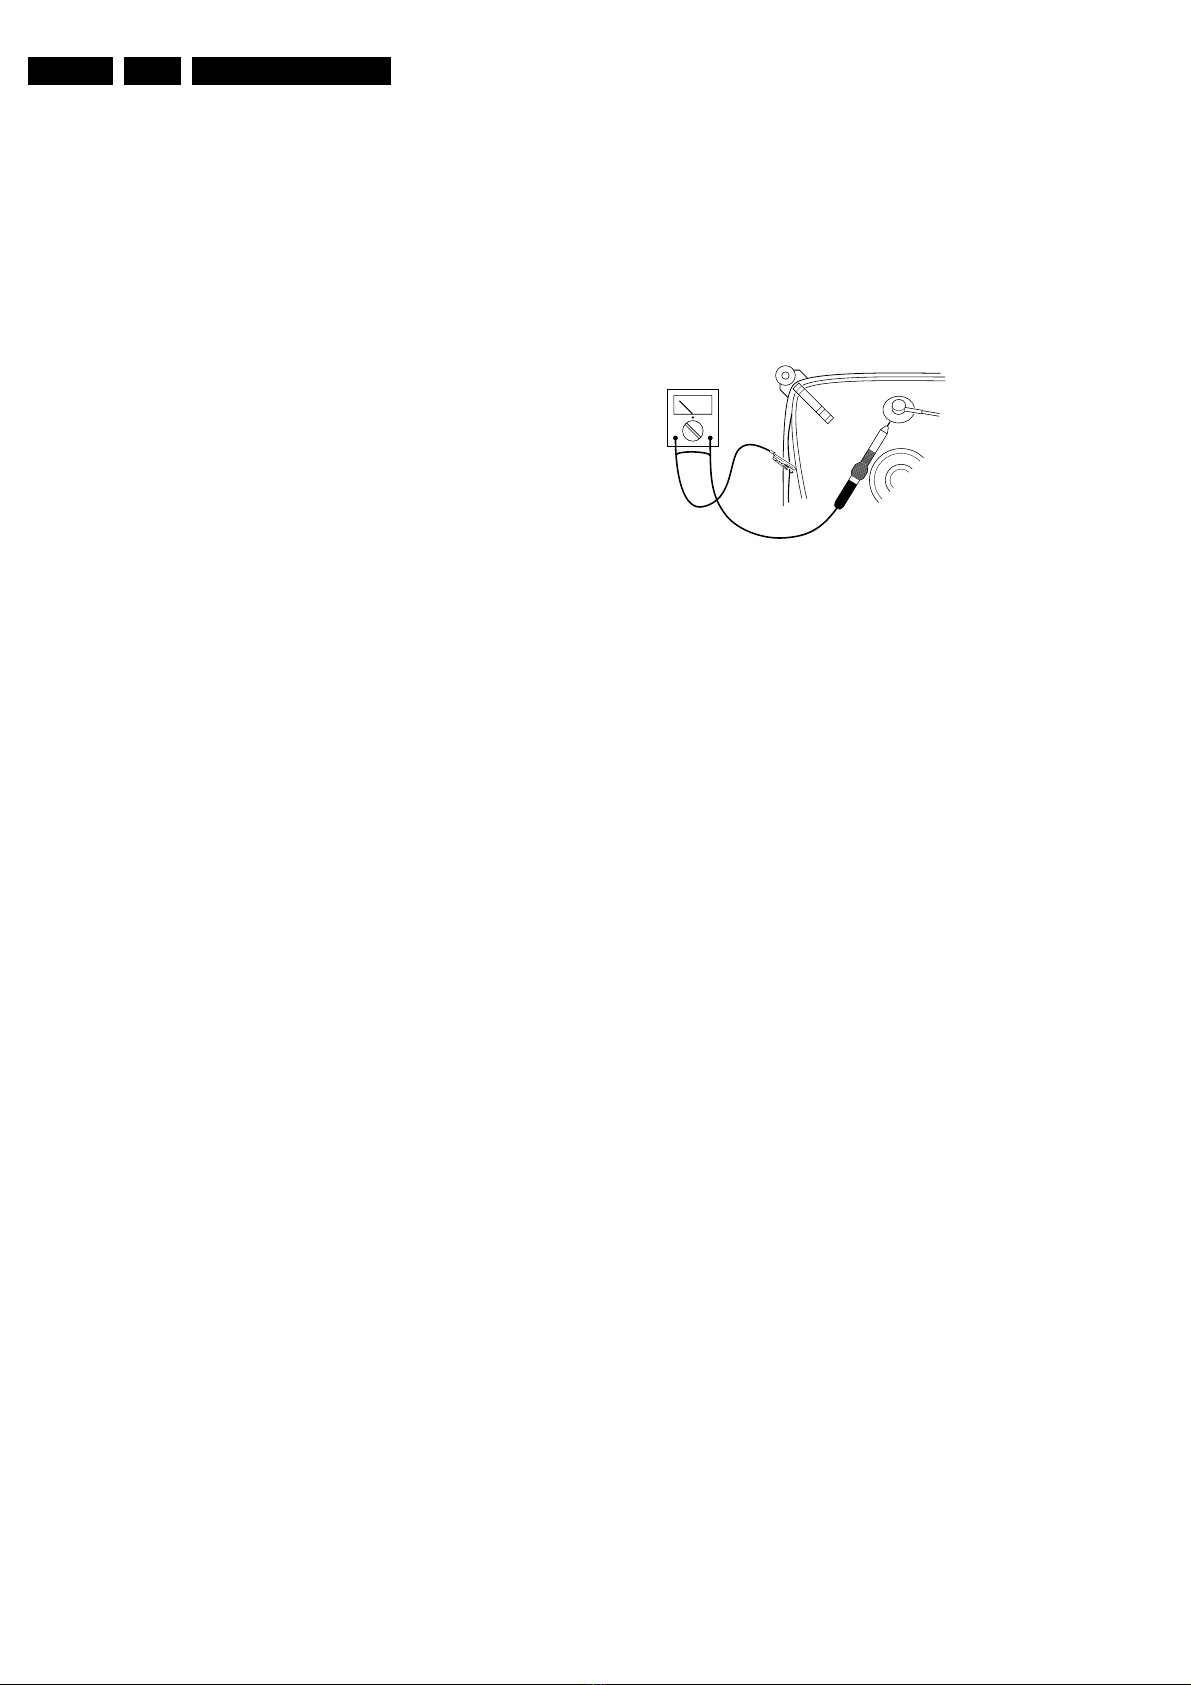
•In order to prevent damage to ICs and transistors, avoid all
high voltage flashovers. In order to prevent damage to the
picture tube, use the method shown in Fig. 2-1, to
discharge the picture tube. Use a high voltage probe and a
multi-meter (position VDC). Discharge until the meter
reading is 0 V (after approx. 30 s).
Figure 2-1
•All ICs and many other semiconductors are susceptible to
electrostatic discharges (ESD)". Careless handling
during repair can reduce life drastically. When repairing,
make sure that you are connected with the same potential
as the mass of the set by a wristband with resistance. Keep
components and tools also at this potential. Available ESD
protection equipment:
–Complete kit ESD3 (small tablemat, wristband,
connection box, extension cable, and ground cable)
4822 310 10671.
–Wristband tester 4822 344 13999.
•Together with the deflection unit and any multi-pole unit,
flat square picture tubes form an integrated unit. The
deflection and the multi-pole units are set optimally at the
factory. Adjustment of this unit during repair is therefore not
recommended.
•Be careful during measurements in the high voltage
section and on the picture tube.
•Never replace modules or other components while the unit
is switched ON.
•When you align the set, use plastic rather than metal tools.
This will prevent any short circuits and the danger of a
circuit becoming unstable.
2.4 Notes
•Measure the voltages and waveforms with regard to the
chassis (= tuner) ground (,), or hot ground (-), depending
on the area of circuitry being tested.
•The voltages and waveforms shown in the diagrams are
indicative. Measure them in the Service Default Mode (see
chapter 5) with a color bar signal and stereo sound (L: 3
kHz, R: 1 kHz unless stated otherwise) and picture carrier
at 475.25 MHz (PAL) or 61.25 MHz (NTSC, channel 3).
•Where necessary, measure the waveforms and voltages
with ()) and without (*) aerial signal. Measure the
voltages in the power supply section both in normal
operation (+) and in standby (/). These values are
indicated by means of the appropriate symbols.
•The picture tube panel has printed spark gaps. Each spark
gap is connected between an electrode of the picture tube
and the Aquadag coating.
•The semiconductors indicated in the circuit diagram and in
the parts lists are completely interchangeable per position
with the semiconductors in the unit, irrespective of the type
indication on these semiconductors.
V
CL 26532098/042
140792
Directions for Use EN 5L01.1A 3.
3. Directions for Use
6
You can view the playback of VCR tapes (Video Disc players, camcorders, etc.) by using the AUDIO
and VIDEO INPUT sockets on the rear of the TV.
– Connect the VIDEO and AUDIO IN sockets on the rear of the TV to the AUDIO and
VIDEO OUT sockets on theVCR.
The S-Video connection on the rear of theTV is used for the playback of S-VHS VCR tapes,Video Discs,
Video Games or Compact Disc-Interactive (cd-i) discs. Better picture detail and clarity is possible with
the S-Video playback as compared to the picture from a normal antenna (RF) connection.
– Connect the S-VIDEO socket on the rear of the TV to the S-VHS OUT socket on a
S-VHS VCR.
– Connect the AUDIO IN sockets from the rear of the TV to the AUDIO OUT sockets
on the VCR. Note : You need not connect the VIDEO IN socket of the TV if S-VIDEO IN
socket is connected.
C
ONNECTING THE A UDIO/VIDEO SOCKETS (PLAYBACK)
ANTENNA
OUT
IN
OUT
IN
AUDIO RL
VIDEO
IN
OUT
L
R
S-VIDEO
VIDEO
AUDIO
AV1
in AV2
in
Monitor
out
Back of VCR
VCR (Equipped with
Video andAudio
Output sockets
AV sockets on
rear of TV
ANTENNA
OUT
IN
OUT
IN
AUDIO RL VIDEO
IN
OUT OUT
S-VIDEO
L
R
S-VIDEO
VIDEO
AUDIO
AV1
in AV2
in
Monitor
out
Back of S-VHS VCR
AV sockets on
rear ofTV
5
Antenna Connection
•Connect the aerial plug to the antenna socket ¬¬
¬¬
¬
on the backcover.
•Insert the mains plug into the wall socket.
Mains Connection
• For correct mains voltage, refer to type sticker at
the rear of the TV set
• Consult your dealer if mains supply is different.
Note :This diagram is not representative of the
actual plug and socket.
Switching on the Set
• Press the main power button to switch on/
off theTV.
• If the set is on standby (indicator is red),
press the Power button on the remote
control to switch on set.
75 Ω
g
PREPARATION
Using the Remote Control
• Insert the correct type of batteries into the
compartment.
• Ensure the batteries are placed in the right
direction.
+
–
Directions for Use
EN 6 L01.1A3.
8
&Power button
–Switch set off temporarily to standby mode.
(The red light indicator lights up when the set
is on standby mode).
–To switch on set from standby mode, press
Channel +/–, Digit (0 -9) or Power button.
éTeletext Colour/Personal Zapping buttons
–In teletext mode, the colour buttons allow you to
access directly an item or corresponding pages.
–As Personal Zapping buttons, you can surf up to
10 personal channels for each button. For detailed
description of functions, refer to section on
“Personal Zapping ”.
“Teletext buttons
Allows you to access teletext information. For
detailed description of functions, refer to section
on “Using the Teletext”
‘Smiley button
Allows to add and store your personal preference
channels in your Personal Preference list. For
detailed description of functions, refer to section
on “Using your Personal Zapping feature”.
(Timer Button
Allows you to set the clock to switch to another
channel at a specified time while you are watching
another channel or when the set is on standby mode.
§Smart Sound Button
Press the Smart Sound button repeatedly to
access 4 different types of sound settings and
choose your desired setting.
èMenu Button
Displays the main menu.Also exits menu from screen.
!Cursor Up Button
Allows you to select the next item on the menu.
çCursor Left Button
Allows you to select the sub-menus and adjust the settings.
0Volume + / – Button
Increases or decreases volume.
144
44
4
Allows you to switch from Stereo to Mono sound during
stereo transmission or to choose between language5or
language6during dual sound transmission.
2A/CH(Alternate channel) Button
Allows you to change between the current
channel and the previous channel.
F
UNCTIONS OF
R
EMOTE
C
ONTROL
&
“
(
§
ç
0
‘
1
é
2
!
è
7
CONNECTING THE AUDIO/VIDEO SOCKETS (RECORDING)
Connection for recording from the TV channel
–Connect the corresponding INPUT sockets of the VCR to the MONITOR OUTPUT
sockets on the rear of the TV.
–To enhance the sound of your TV, connect the AUDIO L and Rsockets to an external audio
system instead of the VCR. For mono equipment, connect only the AUDIO L socket.
Connection for recording from one VCR to another VCR
–Connect the sockets of theVCR which you wish to record from, to the corresponding
sockets at either AV1 or AV2
–Connect the sockets of the receiving VCR to the MONITOR OUTPUT sockets on the
rear of the TV.
ANTENNA
OUT
IN
OUT
IN
AUDIO R
L
VIDEO
IN
OUT
L
R
S-VIDEO
VIDEO
AUDIO
AV1
in AV2
in
Monitor
out
Back of VCR
VCR (Equipped
withVideo and
Audio Output
sockets
AV sockets on rear of TV
ANTENNA
OUT
IN
OUT
IN
AUDIO R
L
VIDEO
IN
OUT
VCR (Equipped
withVideo and
Audio Input
sockets
ANTENNA
OUT
IN
OUT
IN
AUDIO R
L
VIDEO
IN
OUT
L
R
S-VIDEO
VIDEO
AUDIO
AV1
in AV2
in
Monitor
out
Back of VCR
AV sockets on
rear of TV
VCR (Equipped
withVideo and
Audio Input
sockets
Directions for Use EN 7L01.1A 3.
10
&Mains Power button Switch mains power on or off.
éStandby light indicator Indicate red light when standby mode is activated.
“Remote Sensor Acts as a sensor for activating the controls of the
TV when remote control handset is aimed at it.
‘Headphone socket Connect headphone jack to socket for personal
listening.
(Volume 8/9buttons Adjust sound volume softer/louder.
§Channel 7/ 6buttons Select channel in descending/ascending order.
Note
•You can enter the main menu by pressing both the Volume 8and 9buttons at the
same time.
•Press the 7or 6 button to select the next item on the menu.
•Press Volume 8or 9button to access sub-menu and adjust the settings.
é“ ‘ (§
VOLUME
LK
˙
˝˚
¸
CHANNEL ˚
¸
INSTALL /
MENU
FUNCTIONS
OF
TV
CONTROLS
➩
&
9
F
UNCTIONS OF
R
EMOTE
C
ONTROL
3Main Index Button
In teletext mode, press button to return to the
main index page.
4Frownie button
Allows to delete stored personal preference
channels in your Personal Preference list. For
detailed description of functions, refer to section on
“Personal Zapping ”.
5Smart Picture Button
Press the Smart Picture button repeatedly to
access 5 different types of picture settings and
choose your desired setting.
61Incredible Surround Button
–Allows you to select Incredible Surround sound
when transmission is in stereo mode.
–Allows you to select Spatial Sound when
transmission is in mono mode.
71\Cursor Right Button
Allows you to access the sub-menus and adjust
the settings.
8Cursor Down Button
Allows you to select the next item on the menu.
9Channel + / –Buttons
Allows you to select channels in ascending or
descending order.
20 Mute Button
Mutes sound.To restore sound, press button again.
21 Teletext Button
Refer to section on “Using the Teletext”
22 OSD button
Allows you to display the current channel number.
It also allows to exit menu from the screen after
control adjustments.
23 Digit (0 -9) Buttons
Press to select a channel. For a 2-digit channel
number, press the first digit and followed
immediately by the second digit.
24 A/V Button
Allows you to select the AV channels.
25 Sleeptimer Button
Allows you to select a time period after which the
setwill switch to standby mode automatically.
3
4
5
6
7
8
9
21
20
22
23
24
25
Directions for Use
EN 8 L01.1A3.
12
AUTOMATIC T UNING OF CHANNELS
Automatic tuning of channels allows you to store each programme automatically.
Enter main menu.
Press button repeatedly until
Install is selected.
Enter install menu.
Select Auto Store.
Start automatic tuning of
channels.
When tuning is completed,
exit menu from screen.
¸
Main o
✔Picture πBrightness
■
Sound Colour
■
Features Contrast
■
Install Sharpness
Colour Temp.
More...
œ
Main o
■
Picture Language
■
Sound Auto Store
■
Features Manual Store
✔Install πSort
Channel Edit
Name
œ
Install o
✔Language πEnglish
■
Auto Store
■
Manual store
■
Sort
■
Channel Edit
■
Name
œ
˙
¸
Install o
■
Language
✔Auto Store π
■
Manual store
■
Sort
■
Channel Edit
■
Name
œ
˙
Auto Store
■
Channel 1
■
TV 142 MHz
♦♦♦♦♦♦♦♦♦♦♦♦♦♦π♦♦♦♦♦♦♦♦♦♦♦♦♦♦♦♦
Install o
■
Language
✔Auto Store π
■
Manual store
■
Sort
■
Channel Edit
■
Name
œ
MENU
Step
Result on TV Screen
Press button
m
11
¸
Operating instructions generally explains the operation of the TV
set using the buttons on the remote control unless otherwise stated.
Please read the following instructions carefully and follow the steps
as shown to familiarise yourself with the installations and all features
available in your set.
The Language feature allows you to set the TV’s on-screen menu to be shown in your
desired language.
S
ELECTING
THE
M
ENU
L
ANGUAGE
Enter main menu.
Select Install.
Enter the Install menu.
Press button repeatedly to cycle
through the language list and
select the language of your choice.
Exit menu from screen.
A
UTOMATIC
T
UNING
Main o
✔Picture πBrightness
■
Sound Colour
■
Features Contrast
■
Install Sharpness
Colour Temp.
More...
œ
Main o
■
Picture Language
■
Sound Auto Store
■
Features Manual Store
✔Install πSort
Channel Edit
Name
œ
Install o
✔Language English π
■
Auto Store
■
Manual store
■
Sort
■
Channel Edit
■
Name
œ
˙
Step
Press button
Result on TV Screen
MENU
m
˙
Directions for Use EN 9L01.1A 3.
14
C
HANNELS
M
ANUAL
T
UNING
OF
C
HANNELS
¸
Manual Store o
■
Colour System
■
Sound System
■
Search
✔Channel No. 2 π
■
Fine Tune
■
Store
œ
Manual Storeo
■
System
■
Search
■
Channel No.
■
Fine Tune
✔Store Store?π
œ
˙
¸
9
10
11
Manual Storeo
■
System
■
Search
■
Channel No.
■
Fine Tune
✔Store Stored
œ
12
˙
Start manual searching. Searching
stops once a transmitting signal is
found.
Select Channel No.
Key in the channel number.
Press button repeatedly until
Store is selected.
Store tuned channel.
Note : If you want to
continue searching for
another transmitting
channel, repeat steps
7 to 11.
Exit menu from screen.
Manual Store o
■
Colour System
■
Sound System
✔Search 128 MHz π
■
Channel No.
■
Fine Tune
■
Store
œ
Step
Result on TV Screen
Press button
5
13
2
46
79
8
0
m
13
M
ANUAL
T
UNING
OF
C
HANNELS
Manual tuning of channels allows you to select your preferred channel number for every
available programme.
MENU
¸
˙
¸
˙
Enter main menu.
Press button repeatedly until
Install is selected.
Enter install menu.
Press button repeatedly until
Manual Store is selected.
Enter manual store menu.
Press button repeatedly until
Search is selected.
M
ANUAL
T
UNING
OF
Main o
✔Picture πBrightness
■
Sound Colour
■
Features Contrast
■
Install Sharpness
Colour Temp.
More...
œ
Main o
■
Picture Language
■
Sound Auto Store
■
Features Manual Store
✔Install πSort
Channel Edit
Name
œ
Install o
✔Language πEnglish
■
Auto Store
■
Manual Store
■
Sort
■
Channel Edit
■
Name
œ
Install o
■
Language Colour System
■
Auto Store Sound System
✔Manual Store πSearch
■
Sort Channel No.
■
Channel Edit Fine Tune
■
Name Store
œ
Manual Store o
■
Colour System
■
Sound System
✔Search 79 MHz π
■
Channel No.
■
Fine Tune
■
Store
œ
Step Result on TV Screen
Press button
¸
Directions for Use
EN 10 L01.1A3.
16
F
INE
T
UNING
OF
C
HANNELS
This feature allows you to adjust picture reception in areas of weak reception.
Enter main menu.
Press button repeatedly until
Install is selected.
Enter install menu.
Press button repeatedly until
Manual Store is selected.
Enter manual store menu.
Press button repeatedly until
Fine Tune is selected.
Fine tune until the best reception
is obtained.
Select Store.
Store last fine-tuned status.
Exit menu from screen.
Main o
✔Picture πBrightness
■
Sound Color
■
Features Contrast
■
Install Sharpness
Tint
More...
œ
Main o
■
Picture Language
■
Sound Auto Store
■
Features Manual Store
✔Install πSort
Channel Edit
Name
œ
¸
˙
¸
˙
¸
˙
¸
˙
9
Install o
■
Language Colour System
■
Auto Store Sound System
✔Manual Store πSearch
■
Sort Channel No.
■
Channel Edit Fine Tune
■
Name Store
œ
Manual Storeo
■
Colour System
■
Sound System
■
Search
■
Channel No.
✓Fine Tune
p
❘❘❘❘❘❘❘❘❘❘❘
❘❘
❘❘❘❘❘❘❘❘❘❘❘
π
■
Store
œ
Manual Storeo
■
Colour System
■
Sound System
■
Search
■
Channel No.
✓Fine Tune
p
❘❘❘❘❘❘❘❘❘❘❘❘❘❘❘❘❘❘
❘❘
❘❘❘❘
π
■
Store
œ
Manual Storeo
■
System
■
Search
■
Channel No.
■
Fine Tune
✔Store Stored
œ
10
Step
Press button
Result on TV Screen
MENU
m
or
˝
15
SELECTING THE COLOUR/SOUND SYSTEM
This feature allows you to select your desired Colour and Sound system. If Auto
is selected, the respective colour and sound system will be automatically selected according
to the transmission system. Note : Select your desired colour and sound system manually if
reception is poor at Auto mode.
Repeat step 1 Colour System is selected.
to step 5 as in
“Manual Tuning
of TV Channels”
Select the desired colour
system (Auto, PA L ,
NTSC 3.58, NTSC 4.43
or SECAM).
Press button repeatedly
until STORE is selected.
Store selected system.
Proceed to select Sound
System.
Select the desired sound
system (Auto, BG, I,
DK or M.
Press button repeatedly
until STORE is selected.
Store selected system.
Exit menu from screen.
Step
Press button
Result on TV Screen
Manual Store o
✔Colour System Auto π
■
Sound System
■
Search
■
Channel No.
■
Fine Tune
■
Store
œ
Manual Store o
✔Colour System PAL π
■
Sound System
■
Search
■
Channel No.
■
Fine Tune
■
Store
œ
˝
˙
or
¸
˙
˝
Manual Store o
■
Colour System
✔Sound System
■
Search
■
Channel No.
■
Fine Tune
■
Store Stored
œ
9
¸
˙
Manual Store o
■
Colour System
✔Sound System Auto π
■
Search
■
Channel No.
■
Fine Tune
■
Store
œ
Manual Store o
■
Colour System
✔Sound System DK π
■
Search
■
Channel No.
■
Fine Tune
■
Store
œ
or
¸
˙
m
Manual Store o
■
Colour System
✔Sound System
■
Search
■
Channel No.
■
Fine Tune
■
Store Stored
œ
10
11
12
13
or
˚
Directions for Use EN 11L01.1A 3.
18
EDITING OF CHANNELS
This feature allows you to skip or edit channels which have bad or weak TV signal or channels
that you do not watch often. Note : Once a channel is skipped, you cannot have access to it by
theCH (Channel) + or –button.You can only have access to the channel by the Digit (0 -9)
buttons.
Main o
■
Picture Language
■
Sound Auto Store
■
Features Manual Store
✔Install πSort
Channel Edit
Name
œ
Install o
■
Language Channel No.
■
Auto Store Skipped
■
Manual Store
■
Sort
✔Channel Edit π
■
Name
œ
Enter main menu.
Press button repeatedly until
Install is selected.
Enter install menu.
Press button repeatedly until
Channel Edit is selected.
Enter Channel Edit menu.
Key in the channel number to be
skipped.
Select Skipped.
Select On to skip channel.
Exit menu from screen.
Channel Edit o
✔Channel No. 2 π
■
Skipped
œ
Channel Edit o
■
Channel No.
✔Skipped On
œ
9
H
OW
TO
R
ESTORE
S
KIPPED
C
HANNELS
•Repeat Steps 1 to 5as in”Editing of Channels”.
•Key in the channel number to be restored by the
Digit (0 - 9) button.
•Select Skipped by the Cursor Dow button.
•Select Off to restore channel by the Cursor Right button.
•Exit menu from screen by the OSD button.
Channel Edit o
■
Channel No.
✔Skipped Off
œ
Step
Result on TV Screen
Press button
MENU
m
5
13
2
46
79
8
0
¸
˙
¸
˙
¸
˙
17
S
ORTING
OF
C
HANNELS
This feature rearranges channel numbers.
Enter main menu.
Press button repeatedly until
Install is selected.
Enter install menu.
Press button repeatedly until
Sort is selected.
Enter sort mode.
Select the channel number you want
to change from (e.g. 002).
Confirm selection.
Select the channel number you want
to change to (e.g. 005).
Confirm selection.
The change is done.
Note : Channel numbers 5, 4 and 3
will move upwards accordingly. that
is, Channel 5 will move up to Channel
4, Channel 4 to 3 and Channel 3 to 2.
Exit menu from screen.
Main o
■
Picture Language
■
Sound Auto Store
■
Features Manual Store
✔Install πSort
Channel Edit
Name
œ
Install o
■
Language 000
■
Auto Store 001
■
Manual Store 002
✔Sort π003
■
Channel Edit 004
■
Name 005
œ
Install o
■
Language 000
■
Auto Store 001
■
Manual Store 002 π
✔Sort π003
■
Channel Edit 004
■
Name 005
œ
˙
˙
¸
¸
˙
¸
¸
Install o
■
Language 000
■
Auto Store 001
■
Manual Store 002 p
✔Sort π003
■
Channel Edit 004
■
Name 005
œ
Install o
■
Language 000
■
Auto Store 001
■
Manual Store 002
✔Sort π003
■
Channel Edit 004
■
Name 005 p
œ
9
10
Step Result on TV Screen
Press button
MENU
m
or
˚
Install o
■
Language 000
■
Auto Store 001
■
Manual Store 002
✔Sort π003
■
Channel Edit 004
■
Name 005 π
œ
˝
Directions for Use
EN 12 L01.1A3.
20
¸
A
DJUSTING
THE
TV P
ICTURE
The picture menu allows you to make adjustments to the picture.
Main o
✔Picture πBrightness
■
Sound Colour
■
Features Contrast
■
Install Sharpness
Colour Temp
More...
œ
Picture o
✔Brightnessp
❘❘❘❘❘❘❘❘❘❘❘
❘
❘❘❘❘❘❘❘❘❘❘❘
59π
■
Colour
■
Contrast
■
Sharpness
■
Colour Temp
■
NR
œ
˙
Display the main menu on screen.
Enter Picture menu.
Select item.
Adjust level or select desired
setting.
Exit menu from screen.
˝
˙
or
Picture menu items Activities
Brightness Increase or decrease brightness level.
Colour Increase or decrease color level.
Contrast Increase or decrease contrast level.
Sharpness Increase or decrease sharpness level to improve detail
in picture.
Color temperature Choose from 3 settings (Normal,Warm or Cool).
NR (Noise Reduction) Select “On”to reduce “noisy”picture (little dots on
picture) due to weak signal.
Contrast + Select “On”to allow you to optimise the total contrast
for improved picture quality.
˚
or
Step
Result on TV Screen
Press button
MENU
m
Picture o
✔Colour p
❘❘❘❘❘❘❘❘❘❘❘
❘
❘❘❘❘❘❘❘❘❘❘❘
59π
■
Contrast
■
Sharpness
■
Colour Temp
■
NR
■
Contrast +
œ
19
N
AMING
OF
C
HANNELS
This feature enables you to name or rename channels.
Enter main menu.
Press button repeatedly until
Install is selected.
Enter install menu.
Press button repeatedly until
Name is selected.
Enter name mode.
Select the channel you want to
name.
Move to first character slot.
A cursor appears for you to start
the input of characters. Select the
character you want. Move to next
character slot by the Cursor Right
button and select the next character.
You can enter up to a
maximum of 5 characters.
Exit menu from screen.
Main o
■
Picture Language
■
Sound Auto Store
■
Features Manual Store
✔Install πSort
Channel Edit
Name
œ
Install o
■
Language 000
■
Auto Store 001
■
Manual Store 002
■
Sort 003
■
Channel Edit 004
✔Name π005
œ
¸
˙
¸
˙
¸
˚
˙
or
¸
˚
or
Install o
■
Language 000
■
Auto Store 001
■
Manual Store 002
■
Sort 003π
■
Channel Edit 004
✔Name π005
œ
Install o
■
Language 000
■
Auto Store 001
■
Manual Store 002
■
Sort 003π
■
Channel Edit 004
✔Name π005
œ
9
Step Result on TV Screen
Press button
MENU
m
Directions for Use EN 13L01.1A 3.
22
¸
USING THET IMER
The Timer feature allows you to set the timer to switch to another channel at a specified
time while you are watching another channel or when the TV is on standby mode.
Note : For the timer to function, the set must not be switched off. Once the set is switched
off, the timer is disabled.
Main o
✔Picture πBrightness
■
Sound Colour
■
Features Contrast
■
Install Sharpness
Colour Temp.
More...
œ
Main o
■
Picture Timer
■
Sound Child Lock
✔Features πFormat
■
Install
œ
Features o
✔Timer πTime
■
Child Lock Start Time
■
Format Stop Time
Channel Activate
Display
œ
˙
Display the main menu on screen.
Select Features.
Enter the Features menu.
Enter Timer menu.
Key in the current time starting from
the hour follow by minute.
This is the time where the “start time”
and “stop time”will take reference
from.
Select Start Time.
Key in the time you want the
programme to be switched on.
Timer o
✔Time π08:30
■
Start Time
■
Stop Time
■
Channel
■
Activate
■
Display
œ
˙
Timer o
■
Time
✔Start Timeπ10:30
■
Stop Time
■
Channel
■
Activate
■
Display
œ
¸
MENU
5
13
2
46
79
8
0
5
13
2
46
79
8
0
Step
Press button
Result on TV Screen
21
A
DUSTING THE TV SOUND
The sound menu allows you to make adjustments to the sound.
Display the main menu on screen.
Select Sound menu.
Enter Sound menu.
Select item.
Adjust level or select desired
setting.
Exit menu from screen.
Main o
✔Picture πBrightness
■
Sound Colour
■
Features Contrast
■
Install Sharpness
Colour Temp.
More...
œ
Main o
■
Picture Treble
✔Sound πBass
■
Features Balance
■
Install AVL
Incr. Surround
Ultra Bass
œ
Sound o
✔Treble p
❘❘❘❘❘❘❘❘❘❘❘
❘
❘❘❘❘❘❘❘❘❘❘❘
0π
■
Bass
■
Balance
■
AVL
■
Incr. Surround
■
Ultra Bass
œ
¸
˙
˝
˙
or
˚
or
¸
Sound menu items Activities
Treble Increase or decrease high frequency level.
Bass Increase or decrease low frequency level.
Balance Increase or decrease to adjust balance level.
AVL (Auto Volume Leveller) Select On to enable volume to remain at a pre-
determined level should there be a sudden change in
volume during commercial breaks or channel switching.
Incredible Surround Select On to boost the effect of stereo sound.
Ultra Bass Select On to enjoy enhanced bass output.
Step Result on TV Screen
Press button
MENU
m
Directions for Use
EN 14 L01.1A3.
24
ACTIVATING THE CHILD LOCK (ACCESS CODE)
The Child Lock feature allows you to lock channels to prevent your children from watching
programmes you deem undesirable.
Note :You can only have access to the locked channels via the remote control. Keep the
remote control out of reach so as to prevent your children from having access to it.
Display the main menu on screen.
Press button repeatedly until
Features is selected.
Enter the Features menu.
Select Child Lock.
Enter Child Lock mode.
Key in the 4-digit access code.
For the first time or if you have
forgotten the access code, enter
the universal access code 0711
twice. It will now prompt you to
key in a New Code.
Key in your preferred code (4-digit).
Key in the new code the second
time to confirm code.
The Child Lock menu will now
appear. You can proceed to lock
channel (refer to section on
“Lock Channel”). If not, exit menu
from screen.
Note : After you have exit menu from screen and you want to
enter the child lock menu again, you need to key the new
access code only once.
Main o
■
Picture Timer
■
Sound Child Lock
✔Features πFormat
■
Install
œ
Features o
■
Timer
✔Child Lock π
■
Format
œ
¸
˙
¸
˙
Features o
■
Timer Access Code
✔Child Lock πxxxx
■
Format Correct
œ
Features o
■
Timer New Code
✔Child Lock πxxxx
■
Format
œ
Features o
■
Timer Confirm Code
✔Child Lock πxxxx
■
Format Confirmed
œ
Child Lock o
■
Lock Channel π002
■
Change Code 003
■
Clear All 004
■
Lock All 005
006
007
œ
9
5
13
2
46
79
8
0
5
13
2
46
79
8
0
MENU
5
13
2
46
79
8
0
m
Step
Result on TV Screen
Press button
23
U
SING
THE
T
IMER
Select Stop Time.
Key in the time you want the
programme to be switched off.
Select Channel.
Key in the channel you want to
switch to.
Select Activate.
Activate timer.You can select
Once, Daily or Off.
Select Display.
Select On mode if you want to
display the time on theTV screen.
Exit menu from screen.
Note :After the Stop Time is activated,
the TV will go on standby mode. To
switch on set from standby mode, press
Channel +/–, Digit (0 -9) or
Power button.
¸
Timer o
■
Time
■
Start Time
✔Stop Time π12:30
■
Channel
■
Activate
■
Display
œ
Timer o
■
Time
■
Start Time
■
Stop Time
✔Channel π
5
■
Activate
■
Display
œ
9
10
¸
11
12
¸
˙
¸
˙
Timer o
■
Time
■
Start Time
■
Stop Time
■
Channel
✔Activate π
Once
■
Display
œ
Timer o
■
Time
■
Start Time
■
Stop Time
■
Channel
■
Activate
✔Display π
On
œ
13
14
15
5
13
2
46
79
8
0
5
13
2
46
79
8
0
m
Result on TV Screen
Press button
Step
Directions for Use EN 15L01.1A 3.
26
ACTIVATING THE CHILD LOCK (LOCK CHANNEL)
Repeat Steps 1 to 8as The Child Lock menu will
in “C
HILD
Lock (A
CCESS
now appear. You can proceed
C
ODE
)”to lock channel.
Enter lock channel mode.
Select the channel you want
to lock.
Activate blocking of channel.
A keylock symbol will appear
beside the channel number
indicating that it is locked.
Note :To lock more than one
channel, repeat Steps 10 to 11
before exiting menu from
screen.
Exit menu from screen.
Child Lock o
✔Lock Channel π002
■
Change Code 003
■
Clear All 004
■
Lock All 005
006
007
œ
Child Lock o
✔Lock Channel π002
■
Change Code 003
■
Clear All 004
■
Lock All 005
006
007 π
œ
Child Lock o
✔Lock Channel π002
■
Change Code 003
■
Clear All 004
■
Lock All 005
006 π
007
œ
˙
¸
˙
10
11
12
9
or
˚
Child Lock o
✔Lock Channel π002
■
Change Code 003
■
Clear All 004
■
Lock All 005
006 π
F
007
œ
m
Step
Result on TV Screen
Press button
25
A
CTIVATING
THE
C
HILD
L
OCK
(C
HANGE
C
ODE
)
Note : You need to key the access code only once.
Repeat Steps 1 to 8as
The Child Lock menu will
in “ACTIVATING THE
now appear. You can proceed
CHILD LOCK
to change
code.
(ACCESS CODE)”
Select Change Code.
Enter change code mode.
Key in your preferred code
(4-digit).
Key in the new code the
second time to confirm
code.
Exit menu from screen.
Child Lock o
✔Lock Channel π002
■
Change Code 003
■
Clear All 004
■
Lock All 005
006
007
œ
10
12
11
¸
˙
5
13
2
46
79
8
0
Child Lock o
■
Lock Channel New Code
✔Change Code π----
■
Clear All
■
Lock All
œ
Child Lock o
■
Lock Channel New Code
✔Change Code πxxxx
■
Clear All
■
Lock All
œ
Child Lock o
■
Lock Channel Confirm Code
✔Change Code πxxxx
■
Clear All Confirmed
■
Lock All
œ
5
13
2
46
79
8
0
Step
Press button
Result on TV Screen
m
13
9
Directions for Use
EN 16 L01.1A3.
28
USING THE SCREEN FORMAT
You can have a choice of two formats for your viewing pleasure, namely : - 4:3 mode and the
EXPAND 4:3 mode through the FORMAT menu.
Display the main menu on screen.
Press button repeatedly until
Features is selected.
Enter the Features menu.
Press button repeatedly umtil
Format is selected.
Press the button repeatedly to
cycle through the different formats
(4:3 or Expand 4:3) or and select
your desired format.
Exit menu from screen.
When to use the Screen Formats
4:3 format
Select the 4:3 format if you want to
display the 4:3 picture using the full
surface of the screen.
Expand 4:3 format
Select the Expand 4:3 format if you
want to expand movie images
recorded in the letterbox format.
When this format is selected, the
black horizontal bars at the top and
bottom are expanded thus filling
up the entire TV screen.
¸
Main o
■
Picture Timer
■
Sound Child Lock
✔Features πFormat
■
Install
œ
Features o
■
Timer
■
Child Lock
✔Format 4:3 π
œ
Features o
■
Timer
■
Child Lock
✔Format 4:3 Expand π
œ
¸
˙
˙
➩
➩
➩
MENU
Step
Result on TV Screen
Press button
m
27
ACTIVATING THE CHILD LOCK (LOCK A LL)
You can choose to lock all channels in the Lock All mode in the Child Lock menu.
Repeat Steps 1 to 8as
The Child Lock menu will
in “C
HILD
Lock (A
CCESS
now appear. You can proceed
C
ODE
)”
to lock all channels.
Select Lock All.
Select the On option to
lock all channels.
Exit menu from screen.
Child Lock o
✔Lock Channel π002
■
Change Code 003
■
Clear All 004
■
Lock All 005
006
007
œ
ACTIVATING THE CHILD LOCK (CLEAR A LL)
To unlock channels that you have locked, enter the Child Lock menu and select the Off option
Clear All mode.
Repeat Steps 1 to 8as
The Child Lock menu will
in “C
HILD
Lock (A
CCESS
now appear. You can proceed
C
ODE
)”
to clear all channels.
Select Clear All.
Select the Off option to
unlock all channels.
Exit menu from screen.
Child Lock o
✔Lock Channel π002
■
Change Code 003
■
Clear All 004
■
Lock All 005
006
007
œ
Child Lock o
■
Lock Channel
■
Change Code
■
Clear All
■
Lock All πOn
œ
¸
˙
¸
˙
9
10
11
10
9
11
Step
Result on TV Screen
Press button
m
Step Result on TV Screen
Press button
Child Lock o
■
Lock Channel
■
Change Code
✔Clear All πOff
■
Lock All
œ
m
Directions for Use EN 17L01.1A 3.
30
SMART SOUND CONTROL
Whether you are watching a movie or video game, your TV has automatic sound control
settings matched to your current program source or content.The Smart Sound feature quickly
resets your TV’s sound controls of program for a number of different types of programs and
viewing conditions you may have in your home. Each Smart Sound setting is preset at the
factory to automatically adjust the TV’s Treble and Bass levels.
Press botton repeatedly to cycle through the 4 settings namely,
Personal, Voice, Music and Theatre and select your desired
sound setting.
Exit menu from screen.
Step
Press button
Personal
Voice
Music
Theatre
Definition of Sound Settings
Personal : Sound settings are set to your preference.
Voice : Emphasize high tone (treble boosted).
Music : Emphasize low tone (Bass boosted).
Theatre : Emphasize sensation to action.
(Bass and Treble boosted)
q
m
29
SMART PICTURE CONTROL
Whether you are watching a movie or video game, your TV has automatic video control
settings matched to your current program source or content.The Smart Picture feature quickly
resets your TV’s video controls of program for a number of different types of programs and
viewing conditions you may have in your home. Each Smart Picture setting is preset at the
factory to automatically adjust the TV’s Brightness, Colour, Picture and Sharpness levels.
Step
Press button
Press botton repeatedly to cycle through the 5 settings namely,
DVD/VCD, Rich, Natural, Soft and Personal and select
your desired picture setting.
Exit menu from screen.
DVD/VCD
Defintion of Picture Settings
DVD/VCD : For optimal picture setting, whenever
the source is connected to DVD/VCD
player, select DVD/VCD setting for AV
mode.
Rich : Emphasize very vibrant colours.This
setting is the optimal setting when you
are viewing TV programmes in a
brightly-lit room.
Natural : Emphasize original colours.
Soft : Emphasize “warm”colours.
(Suitable for dimly-lit room condition and
givescinema-like effect when light is
switched off).
Personal : Picture settings are set to your preference.
`
m
Rich
Natural
Soft
Personal
Directions for Use
EN 18 L01.1A3.
Personal Notes:
34
S
PECIFICATIONS
29PT2152
Picture tube screen size 72 cm
Picture tube visible area 68 cm
Audio Output :
Speaker 2 x 5 W
TV System NTSC M
PAL B/G
PAL D/K
PAL I
SECAM B/G
SECAM D/K
SECAM K1
Set Dimensions :
Width 75.9 cm
Depth 51 cm
Height 57.5 cm
Net Weight of Set approximate 35 kg
Note
For OperatingVoltage, Frequency, Power Consumption and Version Number, refer to the
type number at the rear of the set.
Mechanical Instructions EN 19L01.1A 4.
4. Mechanical Instructions
Index:
1. Rear Cover Removal
2. Service Position Main Panel
3. Side I/O Panel Removal
4. Rear Cover Mounting
Note:
Figures can deviate slightly from the actual situation, due to
different set executions.
4.1 Rear Cover Removal
1. Remove all fixation screws of the rear cover.
2. Now pull the rear cover backward to remove it.
4.2 Service Position Main Panel
There are two configurations. With and without panel bracket.
Both have a different service position:
Main panel without bracket.
1. Disconnect the strain relief of the AC power cord.
2. Remove the main panel, by pushing the two center clips
outward [1]. At the same time, pull the panel away from the
CRT [2].
3. Disconnect the degaussing coil by removing the cable from
(red) connector 0201.
4. Turn the panel 90 degrees counter clockwise [3].
5. Flip the panel 90 degrees [4], with the components towards
the CRT.
6. Turn the panel with the rear I/O towards the CRT [5].
7. Slide the metal heatsink (near the mains transformer 5520)
underneath the right chassis bracket, so the panel is
secured [6].
Figure 4-1
Main panel with bracket.
1. Disconnect the strain relief of the AC power cord.
2. Disconnect the degaussing coil by removing the cable from
(red) connector 0201 [1].
3. Remove the panel bracket from the bottom tray, by pulling
it backward [2].
4. Turn the chassis tray 90 degrees counter clockwise.
5. Move the panel somewhat to the left and flip it 90 degrees
[3], with the components towards the CRT.
6. Turn the panel with the rear I/O towards the CRT.
7. Place the hook of the tray in the fixation hole of the cabinet
bottom [4] and secure it.
Figure 4-2
B
1
A
CL 16532016_007.ai
040401
3
6
45
1
1
2
A
CL 16532016_009.eps
220501
B
4
3
2
1
Mechanical Instructions
EN 20 L01.1A4.
4.3 Side I/O Panel Removal
1. Remove the complete Side I/O assembly after unscrewing
the two fixation screws [1].
2. Release the 2 fixation clamps [2] and lift the board out of
the bracket.
Figure 4-3
4.4 Rear Cover Mounting
Before you mount the rear cover, perform the following checks:
1. Check whether the AC power cord is mounted correctly in
its guiding brackets.
2. Replace the strain relief of the AC power cord into the
cabinet.
3. Check whether all cables are replaced in their original
position.
CL 06532012_004.eps
030200

Other manuals for L01.1A

1

This manual suits for next models

1

Other Philips Chassis manuals

Philips TPM16.1E LA User manual

Philips

Philips TPM16.1E LA User manual

Philips H8 Installation guide

Philips

Philips H8 Installation guide

Philips TES1.0E LA User manual

Philips

Philips TES1.0E LA User manual

Philips ML1.2U LA User manual

Philips

Philips ML1.2U LA User manual

Philips VES1.1E User manual

Philips

Philips VES1.1E User manual

Philips L04LAA User manual

Philips

Philips L04LAA User manual

Philips LC4.1HE User manual

Philips

Philips LC4.1HE User manual

Philips FL9.1 Installation guide

Philips

Philips FL9.1 Installation guide

Philips FTL13U User manual

Philips

Philips FTL13U User manual

Philips LC4.1E A User manual

Philips

Philips LC4.1E A User manual

Philips L01.1L AC User manual

Philips

Philips L01.1L AC User manual

Philips LC8.1E User manual

Philips

Philips LC8.1E User manual

Philips PL22.06 User manual

Philips

Philips PL22.06 User manual

Philips B8 Series User manual

Philips

Philips B8 Series User manual

Philips EM6E User manual

Philips

Philips EM6E User manual

Philips LC4.41A AA User manual

Philips

Philips LC4.41A AA User manual

Philips LC7.2E User manual

Philips

Philips LC7.2E User manual

Philips F21RE User manual

Philips

Philips F21RE User manual

Philips EJ3.0UPA User manual

Philips

Philips EJ3.0UPA User manual

Philips G90AE Administrator Guide

Philips

Philips G90AE Administrator Guide

Philips EM1A Building instructions

Philips

Philips EM1A Building instructions

Philips L01.2E AB User manual

Philips

Philips L01.2E AB User manual

Philips L9.1A User manual

Philips

Philips L9.1A User manual

Philips LC4.6L AA User manual

Philips

Philips LC4.6L AA User manual

Popular Chassis manuals by other brands

Supero SC823i user guide

Supero

Supero SC823i user guide

Omnitron Systems iConverter XM5 8261-0 user manual

Omnitron Systems

Omnitron Systems iConverter XM5 8261-0 user manual

Supermicro SC113MFAC2-605CB user manual

Supermicro

Supermicro SC113MFAC2-605CB user manual

Overland Storage SnapServerXSR 40 Replacement instructions

Overland Storage

Overland Storage SnapServerXSR 40 Replacement instructions

HP StorageWorks P2000 Replacement instructions

HP

HP StorageWorks P2000 Replacement instructions

Cisco ONS 15454 manual

Cisco

Cisco ONS 15454 manual

Traxxas 4-Tec 2.0 owner's manual

Traxxas

Traxxas 4-Tec 2.0 owner's manual

Fiberplex SAC?1?AC user manual

Fiberplex

Fiberplex SAC?1?AC user manual

Chenbro RM253 Series user manual

Chenbro

Chenbro RM253 Series user manual

IDK NJR-TW01UHD Command reference guide

IDK

IDK NJR-TW01UHD Command reference guide

Intel NUC7i7BNH user guide

Intel

Intel NUC7i7BNH user guide

TYAN GT24B-B5542 Service manual

TYAN

TYAN GT24B-B5542 Service manual

Advantech AIMB-C300 user manual

Advantech

Advantech AIMB-C300 user manual

Solid State Logic MYNX installation guide

Solid State Logic

Solid State Logic MYNX installation guide

IEI Technology RACK-360 Quick installation guide

IEI Technology

IEI Technology RACK-360 Quick installation guide

OWC Mercury Helios 2 Assembly manual & user guide

OWC

OWC Mercury Helios 2 Assembly manual & user guide

Pickering 60-102D user manual

Pickering

Pickering 60-102D user manual

iStarUSA E1M4 Product Quick Guide

iStarUSA

iStarUSA E1M4 Product Quick Guide

manuals.online logo
manuals.online logoBrands
  • About & Mission
  • Contact us
  • Privacy Policy
  • Terms and Conditions

Copyright 2025 Manuals.Online. All Rights Reserved.