manuals.online logo
Brands
  1. Home
  2. •
  3. Brands
  4. •
  5. Philips
  6. •
  7. DVD Recorder
  8. •
  9. Philips ARV663 Operating manual

Philips ARV663 Operating manual

QUICK USE GUIDE DVD Recorder 663
12nc: 3139 245 23141
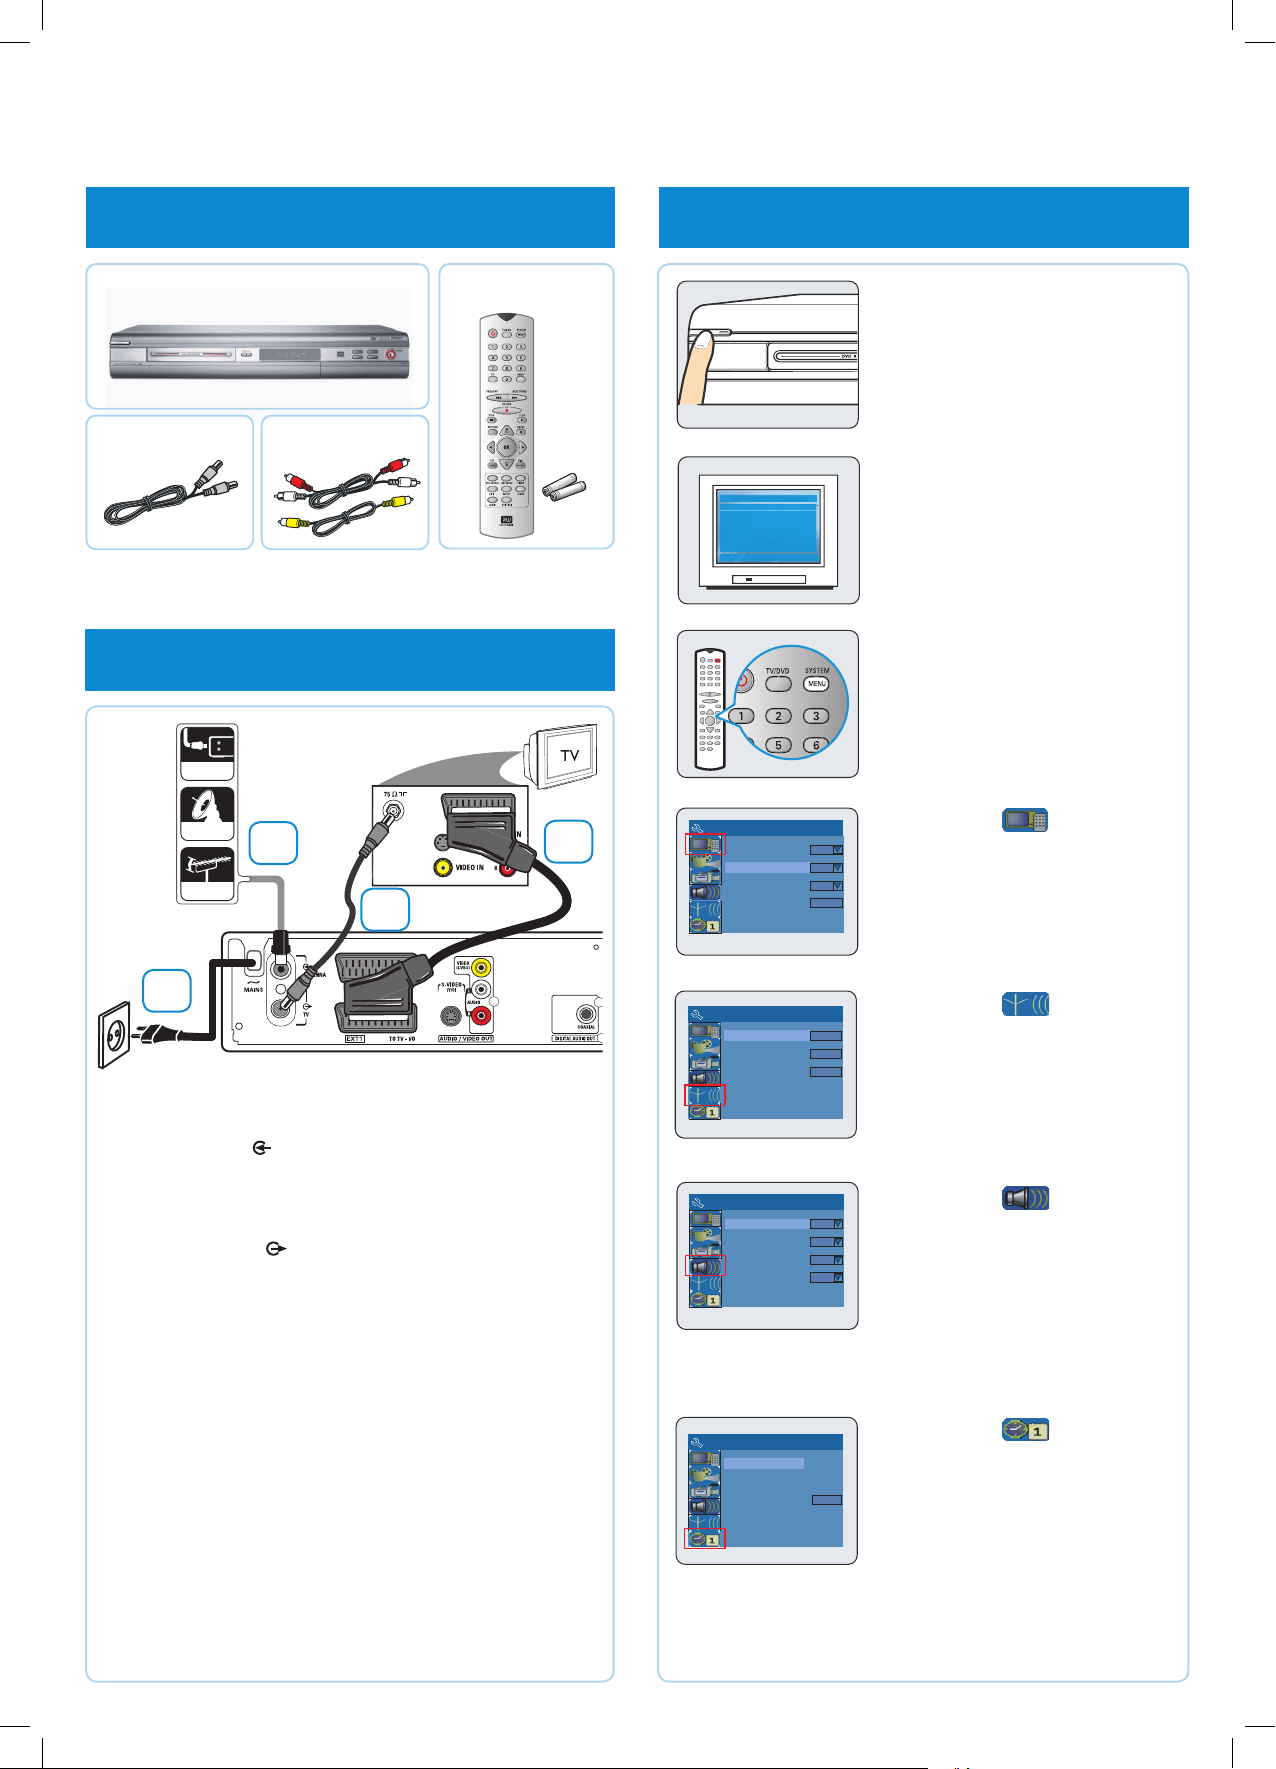
1 what’s in the box
2 connect DVD recorder
CABLE
SATELLITE
ANTENNA
2a Connect existing antenna cable/satellite signal (or from
the Cable/ Satellite Box [RF OUT or TO TV]) to the
ANTENNA input socket at the back of the DVD
recorder.
2b Use the supplied RF coaxial cable to connect the DVD
recorder’sTV output socket to your TV’s antenna
input socket.
2c Use the scart cable to connect the DVD recorder’s
EXT 1 TO TV-I/O socket to the matching SCART input
socket at the back of your TV.
2d Connect the power cable from the DVD recorder’s
~ MAINS to the AC power outlet.
Helpful Hint:
For additional types of connections, see User
Manual, pages 10 ~ 16.
3 start initial setup
System Menu - Channel Setup
Modify Channel Information
Search
Edit
System Menu - Language
Default Disc Menu Language
Default Subtitle Language
On Screen Display Language English
Default Audio Language
English
English
English
System Menu - Clock
Time (hh:mm:ss}
Show DivX® Registration Code
Date (dd/mm/yy) 31/01/06
10 : 33 : 57
OK
Sort Channel Sort
Channel Search
System Menu - General
Video Output Format
Screen Saver On
Restore Factory Settingd
Germany
PAL
OK
Country
3a Press STANDBY-ON on
the DVD recorder to turn it on.
Note: For successful installation,
your cable/satellite box must be
turned on.
3b Turn on the TV to the correct
programme channel for the
input socket (‘EXT’,‘0’,‘AV’).
The blue DVD background
screen will appear on the TV.
3c Press SYSTEM MENU on
the remote control.
Use ST keys to go through
the menu. Select an item by
pressing X, and conrm a
setting by pressing OK.
3d Highlight and press X.
Select the country of your
residence.
Select { Country } and press
OK on the remote control.
3e Highlight and press X.
Setup and install TV channels.
Select { Channel Search }
and press OK on the remote
control to start automatic TV
channel search.
3f Highlight and press X.
Select the language.
– select TV On-Screen Display
language.
– select default Disc Menu
language.
– select default subtitle language.
– select default audio language.
3g Highlight and press X.
Set the Date and Time.
Use the numeric keypad 0-9
to input the date/time, then
press OK to conrm.
3h Press SYSTEM MENU to
exit.
2a
2b
2c
2d
The DVD recorder is ready for use!
See next page for basic recording and playback.
aMain Unit bRemote Control
includes 2 x AAA batteries
cRF coaxial
cable
dVideo/Audio
AV cables
4 start manual recording 5 start playback
4a Insert a recordable
DVD±R/±RWwith the label
facing up.
4b To record TV programme,
press REC SOURCE to
select { Tuner }.
To record from an additional
device connected to this
DVD Recorder, press REC
SOURCE repeatedly to
select the corresponding
external input channel :
{ Front CVBS } { Front
S-Video }, { EXT 2 }.
4c Press REC MODE to select
a desired recording mode.
It denes the picture quality
and the maximum recording
time for a disc.
4d Press RECORD âto start
recording.
4e To pause the recording,
pressÅ. To resume record
ing, press RECORD â.
To stop the recording, press
STOPÇ.
Wait until the message
disappears from the display
panel before you remove
the disc.
Record
Mode
Picture Quality Maximum Recording
Time per Disc
1 Hour Mode
2 Hour Mode
4 Hour Mode
6 Hour Mode
High quality
DVD quality-Standard Play
VHS quality-Extended Play
VHS quality-Super Long Play
1 hour
2 hours
4 hours
6 hours
To playback a disc
5a Insert a disc with the label
side facing up.
5b Playback may start
automatically.
If not, press PLAY X.
If a disc menu appears,
use WXST keys to navigate
within the menu, highlight a
title and press OK to start
playback.
5c To stop playback, press
STOPÇ.
To watch the TV
programmes
5d Press REC SOURCE to
select { Tuner }, then use
ST keys to select the
programme number.
SUPER VIDEO
ALL
2
GET PICTURE
• Check the AV mode on TV. It may be called FRONT, A/V IN,
or VIDEO. Choose the different modes using TV remote
control.
• Or, use the TV remote control to select Channel 1 on TV, then
press Channel down button until you get the picture.
• See your TV manual for more details.
GET SOUND
• Use the supplied scart cable to connect the DVD recorder to
your TV, the picture and sound will output through the TV.
• Or, connect the AUDIO L/R (red/white) sockets at the back
of the DVD recorder to the corresponding AUDIO input
sockets on a TV, stereo system or receiver. Turn on the
connected system and select the appropriate channel.
NEED HELP? Read the accompanying User Manual.

Other Philips DVD Recorder manuals

Philips DVDR7310H User manual

Philips

Philips DVDR7310H User manual

Philips DVDR70/001 User manual

Philips

Philips DVDR70/001 User manual

Philips DVD RECORDER DVDR77 - Firmware Upgrade Readme... User manual

Philips

Philips DVD RECORDER DVDR77 - Firmware Upgrade Readme... User manual

Philips DVDR980 Reference guide

Philips

Philips DVDR980 Reference guide

Philips DVDR3435H/93 User manual

Philips

Philips DVDR3435H/93 User manual

Philips DVDR3510V User manual

Philips

Philips DVDR3510V User manual

Philips DVDR7260H/05B User manual

Philips

Philips DVDR7260H/05B User manual

Philips DVDR615/05 Operating manual

Philips

Philips DVDR615/05 Operating manual

Philips DVDR1500 User manual

Philips

Philips DVDR1500 User manual

Philips CRYSTAL 665 Operating manual

Philips

Philips CRYSTAL 665 Operating manual

Philips DVDR3590H User manual

Philips

Philips DVDR3590H User manual

Philips ShowView DVDR3300H User manual

Philips

Philips ShowView DVDR3300H User manual

Philips HDRW720 User manual

Philips

Philips HDRW720 User manual

Philips DVDR3390 User manual

Philips

Philips DVDR3390 User manual

Philips ShowView DVDR70 User manual

Philips

Philips ShowView DVDR70 User manual

Philips HDR3800 User manual

Philips

Philips HDR3800 User manual

Philips DVDR3360H User manual

Philips

Philips DVDR3360H User manual

Philips DVDR3455H User manual

Philips

Philips DVDR3455H User manual

Philips DVDR985 User manual

Philips

Philips DVDR985 User manual

Philips DVDR560H User manual

Philips

Philips DVDR560H User manual

Philips DVDR3355 User manual

Philips

Philips DVDR3355 User manual

Philips DVDR985 User manual

Philips

Philips DVDR985 User manual

Philips DVDR 615/17 User manual

Philips

Philips DVDR 615/17 User manual

Philips HDR3700/05 User manual

Philips

Philips HDR3700/05 User manual

Popular DVD Recorder manuals by other brands

LG RH397D owner's manual

LG

LG RH397D owner's manual

JVC SR-MV50US Service manual

JVC

JVC SR-MV50US Service manual

Samsung DVD-HR733 instruction manual

Samsung

Samsung DVD-HR733 instruction manual

Panasonic Diga DMR-EZ28 operating instructions

Panasonic

Panasonic Diga DMR-EZ28 operating instructions

Panasonic DMR-ES36V Setup guide

Panasonic

Panasonic DMR-ES36V Setup guide

Toshiba D-R3 owner's manual

Toshiba

Toshiba D-R3 owner's manual

Grundig GDR 5530 HDD user manual

Grundig

Grundig GDR 5530 HDD user manual

THOMSON DTH8640 user manual

THOMSON

THOMSON DTH8640 user manual

Yamaha DRX-1 Service manual

Yamaha

Yamaha DRX-1 Service manual

THOMSON DTH 8657 manual

THOMSON

THOMSON DTH 8657 manual

Samsung DVD-HR753 instruction manual

Samsung

Samsung DVD-HR753 instruction manual

Panasonic WJ-NV200VK operating instructions

Panasonic

Panasonic WJ-NV200VK operating instructions

Samsung DVD-R120 Quick setup guide

Samsung

Samsung DVD-R120 Quick setup guide

Pioneer DVD Recorder operating instructions

Pioneer

Pioneer DVD Recorder operating instructions

Pioneer DVR-220-S Service manual

Pioneer

Pioneer DVR-220-S Service manual

Pioneer DVR-310 operating instructions

Pioneer

Pioneer DVR-310 operating instructions

Pye Video E7A02UD Service manual

Pye Video

Pye Video E7A02UD Service manual

Pioneer DVR-320 operating instructions

Pioneer

Pioneer DVR-320 operating instructions

manuals.online logo
manuals.online logoBrands
  • About & Mission
  • Contact us
  • Privacy Policy
  • Terms and Conditions

Copyright 2025 Manuals.Online. All Rights Reserved.