manuals.online logo
Brands
  1. Home
  2. •
  3. Brands
  4. •
  5. Philips
  6. •
  7. DVD Recorder
  8. •
  9. Philips DVDR1000/051 User manual

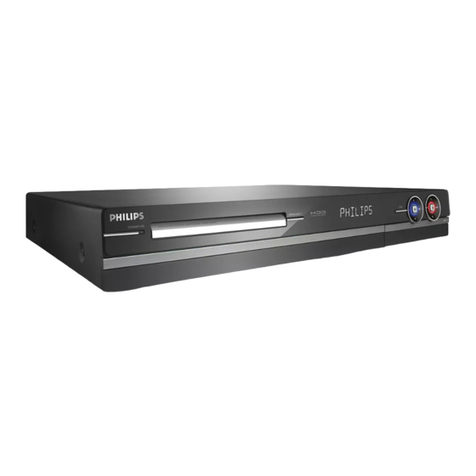
Philips DVDR1000/051 User manual

Instructions for use
Laser safety
This unit employs a laser. To prevent possible eye injury,
only a qualified service person should remove the cover
or attempt to service this device.
USE OF CONTROLS OR ADJUSTMENTS OR
PERFORMANCE OF PROCEDURES OTHER
THAN THOSE SPECIFIED HEREIN MAY
RESULT IN HAZARDOUS RADIATION
EXPOSURE.
WARNING OCATION: INSIDE ON ASER COVERSHIE D
NEVER MAKE OR CHAN E CONNECTIONS
WITH THE POWER SWITCHED ON.
The DVD recorder is in conformity with
the EMC directive and low-voltage
directive.
CAUTION ON Y QUA IFIED SERVICE PERSONNE
SHOU D REMOVE THE COVER OR
ATTEMPT TO SERVICE THIS DEVICE.
For Customer Use:
Read carefully the information located on the back of your
DVD recorder and entered below the Serial N°. Retain this
information for future reference.
Model N°. DVDR1000
Serial N°. __________________________
CAUTION VISIB E AND INVISIB E ASER RADIATION. WHEN OPEN
AVOID EXPOSURE TO BEAM
ADVARSE SYN IG OG USYN IG ASERSTRÅ ING VED ÅBNING
UNDGÅ UDSÆTTE SE FOR STRÅ ING
ADVARSE SYN IG OG USYN IG ASERSTRÅ ING NÅR DEKSE ÅPNES
UNNGÅ EKSPONERING FOR STRÅ EN
VARNING SYN IG OCH OSYN IG ASERSTRÅ NING NÄR DENNA DE
ÄR ÖPPNAD BETRAKTA EJ STRÅ EN
VARO! AVATTAESSA O ET A TTIINA NÄKYVÄ E JA
NÄKYMÄTTÖMÄ E ASER SÄTEI Y E. Ä Ä KATSO SÄTEESEEN
VORSICHT SICHTBARE UND UNSICHTBARE ASERSTRAH UNG
WENN ABDECKUNG GEÖFFNET NICHT DEM STRAH AUSSETSEN
DANGER VISIB E AND INVISIB E ASER RADIATION. WHEN OPEN
AVOID DIRECT EXPOSURE TO BEAM
ATTENTION RAYONNEMENT ASER VISIB E ET INVISIB E EN CAS
D’OUVERTURE EXPOSITION DANGEREUSE AU FAISCEAU
CLASS 1
LASER PRODUCT
ÊÄÊÄÊÄÊÄÊÄÊÄÊÄÊÄÊÄÊÄÊÄLASER
ÊÄÊÄÊÄÊÄÊÄÊÄÊÄÊÄÊÄÊÄÊÄÊÄÊÄÊÄÊÄÊÄÊÄType 7ý7ý7ýSe
ÊÄÊÄÊÄÊÄÊÄÊÄÊÄÊÄÊÄÊÄÊÄÊÄÊÄÊÄÊÄÊÄÊÄW
ÊÄÊÄÊÄÊÄÊÄÊÄÊÄÊÄÊÄÊÄÊÄÊÄÊÄÊÄÊÄÊÄ7
ÊÄÊÄÊÄÊÄÊÄÊÄÊÄÊÄÊÄÊÄÊÄÊÄÊÄÊÄÊÄÊÄÊÄOutput Power2
ÊÄÊÄÊÄÊÄÊÄÊÄÊÄÊÄÊÄÊÄÊÄÊÄÊÄÊÄÊÄÊÄÊÄ(out of o
ÊÄÊÄÊÄÊÄÊÄÊÄÊÄÊÄÊÄÊÄÊÄÊÄÊÄÊÄÊÄÊÄÊÄ 7ý7ý0
ÊÄÊÄÊÄÊÄÊÄÊÄÊÄÊÄÊÄÊÄÊÄÊÄÊÄÊÄÊÄB
eneral information
Manufactured under license from Dolby
aboratories. “Dolby”, “Pro ogic” and the
double-D symbol are trademarks of Dolby
aboratories. Confidential Unpublished Works.
©1992-1997 Dolby aboratories, Inc. All rights
reserved.
“VIDEO Plus+” and “PlusCode” are registered
trademarks of the Gemstar Development
Corporation. The Video Plus+ system is
manufactured under licence from the Gemstar
Development Corporation.
TRUSURROUND, SSRRSS, and symbol are
trademarks of SRS abs,Inc. TRUSURROUND
technology is manufactured under license from
SRS abs, Inc.
This product incorporates copyright protection
technology that is protected by method claims of
certain U.S. patents and other intellectual
property rights owned by Macrovision
Corporation and other rights owners.
Use of this copyright protection technology must
be authorized by Macrovision Corporation, and is
intended for home and other limited viewing uses
only unless otherwise authorized by Macrovision
Corporation. Reverse engineering or disassembly
is prohibited.
English
Contents
Introduction
DVD Video Recorder________________________________________6
Box contents_______________________________________________7
Placement _________________________________________________7
Cleaning discs ______________________________________________7
Remote control ____________________________________________7
Loading the batteries_______________________________________7
Installation
Connections - back side of yo r DVD recorder __________________8
Connecting to the antenna____________________________________8
Connecting to a TV set ______________________________________8
S-video (Y/C) connection ___________________________________8
Video (CVBS) connection ___________________________________8
Connecting to a dio eq ipment________________________________9
Connecting to A/V receiver or A/V amplifier with digital
M lti-channel decoder______________________________________9
Connecting to a receiver eq ipped with two channel digital
stereo (PCM)_____________________________________________9
Connecting to a receiver eq ipped with Dolby Pro Logic _________9
Connecting to a TV set eq ipped with a Dolby Pro Logic decoder__9
Connecting to a receiver with two channel analog e stereo _______9
Connecting to other eq ipment ______________________________10
Connections - frontside of yo r DVD recorder __________________10
Camcorder connection ____________________________________10
Power s pply _____________________________________________11
First time set- p: virgin mode ________________________________11
A tomatic setting ________________________________________11
Man al setting ___________________________________________12
Quick start
Switching on ______________________________________________14
Man al recording __________________________________________14
Checking inp t___________________________________________14
Recording_______________________________________________14
Recording with a tomatic switch-off (OTR One-To ch Recording) _14
Timer programming ________________________________________15
Timer programming with ’VIDEO Pl s+’ ______________________15
Timer programming witho t ’VIDEO Pl s+’ ___________________15
Playing a pre-recorded DVD-Video disc ________________________16
Playing a recordable DVD+RW disc ___________________________16
Functional overview
Front of recorder __________________________________________17
Rear of recorder___________________________________________18
Display___________________________________________________19
Remote control ___________________________________________20
CONTENTS 3
English
Operation
Important notes for operation________________________________21
Loading discs______________________________________________21
Disc types _______________________________________________21
The following disc types can be sed for recording and playback __21
The following disc types can be sed for playback only __________21
The following disc types cannot be sed at all, neither for
recording nor for playback _________________________________22
On-screen display information ________________________________22
System men bar_________________________________________22
User preference men operation ____________________________23
Stat s box ______________________________________________23
T ner info box __________________________________________24
Timer info box __________________________________________24
Warning box ____________________________________________24
Index Pict re Screen________________________________________25
User preferences __________________________________________26
Setting ser preferences __________________________________26
Pict re settings __________________________________________26
So nd settings ___________________________________________26
Lang age settings_________________________________________27
Feat re settings __________________________________________27
Remote control settings ___________________________________28
Record settings __________________________________________28
Installation ______________________________________________29
Recording
Before yo start recording___________________________________31
Switching on ______________________________________________31
Man al recording __________________________________________32
Checking inp t___________________________________________32
Recording_______________________________________________32
Man al a dio control _____________________________________32
Recording with a tomatic switch-off (OTR One-To ch Recording) _33
Timer programming ________________________________________33
Timer programming with ’VIDEO Pl s+’ ______________________33
Timer programming witho t ‘VIDEO Pl s+’ ___________________34
Programming with ’NEXTVIEW Link’ __________________________35
If a timer setting is incorrect _________________________________35
How to check or alter a timer block _________________________36
How to clear a timer block ________________________________36
Play ack
Playing a pre-recorded DVD-Video disc ________________________37
Playing a (S per) Video CD disc ______________________________37
Playing a DVD+RW disc_____________________________________38
General feat res ___________________________________________38
Moving to another title/track _______________________________38
Moving to another chapter/index ____________________________38
Slow Motion ____________________________________________39
Still Pict re and Step Frame ________________________________39
Search _________________________________________________39
Repeat _________________________________________________39
Repeat A-B _____________________________________________40
Scan ___________________________________________________40
Time search_____________________________________________40
Zoom__________________________________________________40
4CONTENTS
English
Special DVD-Video feat res__________________________________41
Men s on the disc ________________________________________41
Camera Angle ___________________________________________41
Changing the a dio lang age________________________________41
S btitles ________________________________________________41
Special VCD-Feat res_______________________________________42
Playback Control (PBC) ___________________________________42
Playing an a dio CD ________________________________________42
Pa se __________________________________________________42
Search _________________________________________________42
Moving to another track ___________________________________42
Repeat track/disc_________________________________________43
Repeat A-B _____________________________________________43
Scan ___________________________________________________43
Access control
Child Lock (DVD and VCD) _________________________________44
Activating/deactivating the child lock _________________________44
A thorizing discs when Child Lock is activated _________________44
Sec ring discs ___________________________________________44
Parental Level (DVD-Video only)______________________________45
Activating/Deactivating Parental Control ______________________45
Co ntry__________________________________________________45
Changing the 4-digit code____________________________________45
Managing disc content
Title settings ______________________________________________46
Changing the title name ___________________________________46
Play f ll title _____________________________________________46
Erasing a title ____________________________________________46
Disc Info Screen ___________________________________________46
Disc Settings ______________________________________________47
Changing the Disc Name __________________________________47
Protection of recordings___________________________________47
Erasing a disc ____________________________________________47
Making yo r edits DVD compatible __________________________47
Favo rite Scene Selection____________________________________48
Edit in playback mode _____________________________________48
Edit in record mode ______________________________________49
Trou leshooting
Tro bleshooting checklist ___________________________________50
Diagnosis programme_______________________________________52
System limitations __________________________________________52
Glossary
Appendix
Using yo r DVD recorder remote control with yo r TV set _______55
CONTENTS 5
English
INTRODUCTION 6
Introduction
DVD Video Recorder
DVD (Digital Versatile Disc) is the new storage medi m
that combines the convenience of the Compact Disc
with the latest advanced digital video technology.
DVD Video ses state-of-the-art MPEG2 data
compression technology to register an entire movie on a
single 5-inch disc. DVD’s variable bitrate compression,
r nning at p to 9.8 Mbits/second, capt res even the
most complex pict res in their original q ality.
The crystal-clear digital pict res have a horizontal
resol tion of over 500 lines, with 720 pixels (pict re
elements) to each line. This resol tion is more than
do ble that of VHS, s perior to Laser Disc, and entirely
comparable with digital masters made in recording
st dios.
DVD+ReWritable (DVD+RW) is the next step in video
technology. DVD+RW ses phase-change media, the
same technology that formed the basis for CD-
ReWritable. A high-power laser is sed to change the
reflectivity of the recording layer. This process can be
repeated more than a tho sand times.
Yo r Philips DVD recorder is a recorder and player
for digital video discs, with a two-way compati ility
to the niversal DVD Video standard. This means that:
- existing pre-recorded DVD Video discs can be
played on yo r Philips DVD recorder and
- recordings, made on yo r Philips DVD recorder, can
be played on existing DVD Video players and
DVD-ROM drives.
With it, yo will be able to record TV programmes or
to edit and archive yo r own camcorder recordings.
S perb digital pict re and so nd q ality, q ick access to
the tracks yo have recorded and extensive playback
feat res contrib te to a completely new video
experience.
From now on yo will enjoy f ll-length movies with tr e
cinema pict re q ality, and stereo or M lti-channel
so nd (depending on the disc, and on yo r playback set-
p).Yo will find yo r recorder remarkably easy to se,
by way of the On-Screen Display and recorder display,
in combination with the remote control.
pre-recorded DVD DVD+RW
DVD Video
player Philips DVD
recorder
English
INTRODUCTION 7
Box contents
First check and identify the contents of yo r DVD
recorder package, as listed below:
- DVD recorder
- Remote Control Handset with separately-packed
batteries
- 2-core power cord
- SCART cable
- S-video cable
- Antenna (aerial) cable
- A dio cable
- Video cable
- DVD+RW disc
- User Man al
- Warranty card
If any item sho ld be damaged or missing, please inform
yo r s pplier witho t delay.
Keep the packaging materials; yo may need them to
transport yo r recorder in the f t re.
Placement
lPlace the recorder on a firm, flat s rface.
lKeep away from domestic heating eq ipment and
direct s nlight.
lIn a cabinet, allow abo t 2.5 cm (1 inch) of free
space all aro nd the recorder for adeq ate
ventilation.
lThe lense may clo d over when the DVD recorder
is s ddenly moved from cold to warm s rro ndings.
Playing a CD/DVD is not possible then. Leave the
DVD recorder in a warm environment for two
ho rs before se, so the moist re can evaporate.
lThe recorder sho ld not be exposed to dripping or
splashing, no objects filled with liq ids, s ch as vases,
sho ld be placed on the recorder.
Cleaning discs
Some problems may occ r beca se the disc inside the
recorder is dirty. To avoid these problems clean yo r
discs reg larly, in the following way:
lWhen a disc becomes dirty, clean it with a cleaning
cloth. Wipe the disc from the centre o t.
Caution:
Do not use solvents such as enzine, thinner,
commercially availa le cleaners, or anti-static
spray intended for analogue discs.
Do not use commercially availa le cleaning discs
to clean the lens, as these discs may damage the
optical unit.
Remote control
Loading the atteries
lOpen the battery compartment cover.
lInsert two 'AA' (LR-6) batteries as indicated inside
the battery compartment.
lClose the cover.
Caution:
Do not mix old and new atteries. Never mix
different types of atteries (standard, alkaline,
etc.). This may reduce the lifetime of the
atteries.
English
8INSTALLATION
Installation
Connections - ack side of your
DVD recorder
- Please refer to yo r TV set, VCR, Stereo System and
any other User Man al(s) as necessary to make the
optimal connections.
- Do not connect the power ntil all other connections
are made.
- Do not connect yo r DVD recorder to yo r TV set
via yo r VCR, beca se the video q ality co ld be
distorted by the copy protection system.
- For better so nd reprod ction yo can connect the
recorder a dio o tp ts to yo r amplifier, receiver,
stereo system or A/V eq ipment. For this see
‘Connecting to A/V receiver or A/V amplifier’.
Caution:
Do not connect the recorder’s audio output to
the phono input of your audio system in order to
avoid damage to your equipment.
Connecting to the antenna
lRemove the antenna (aerial) cable pl g from yo r
TV set and insert it into the antenna socket at the
back of the DVD recorder.
lPl g one end of the antenna (aerial) cable s pplied (1)
into the TV socket on the DVD recorder and the other
end into the antenna inp t socket on yo r TV set.
Connecting to a TV set
To obtain the highest possible pict re and so nd q ality
from yo r TV set it is recommended to se the SCART
connector on both DVD recorder and TV set.
lConnect the bottom SCART connector (EXT 1) to
the corresponding connector on the TV set, sing
the SCART cable s pplied (2) as shown in the
drawing.
If yo r TV set is not eq ipped with a SCART connector,
yo can connect the DVD recorder with the S-video
(Y/C) sockets.
S-video (Y/C) connection
lConnect the S-video o tp t socket to the
corresponding inp t socket on the TV set, sing the
s pplied S-video cable (3).
lConnect the a dio Left and Right o tp t sockets to
the corresponding sockets on the TV set sing the
a dio cable s pplied (5).
If yo r TV set is not eq ipped with S-video sockets, then
connect the DVD recorder with the CVBS sockets to
yo r TV set.
Video (CVBS) connection
lConnect the Video (CVBS) o tp t socket (yellow)
to the corresponding inp t socket on the TV set
sing the video cable s pplied (4).
lConnect the a dio Left (white) and Right (red)
o tp t sockets to the corresponding sockets on the
TV set sing the a dio cable s pplied (5).
AUX- I/0
EXT 2
TO TV I/0
EXT 1
5
TV
EXT 4 EXT 3
AUX- I/0
EXT 2
TO TV I/0
EXT 1
5
TV
EXT 4 EXT 3
AUX- I/0
EXT 2
TO TV I/0
EXT 1
2
TV
EXT 4 EXT 3
English
INSTALLATION 9
Connecting to audio equipment
Connecting to A/V receiver or A/V
amplifier with digital Multi-channel
decoder
The best possible so nd q ality is obtained by
connecting yo r DVD recorder to an A/V receiver with
M lti-channel decoder (Dolby Digital, MPEG 2 and DTS).
Digital Multi-channel sound
Digital M lti-channel connection provides the optim m
so nd q ality. For this yo need a M lti-channel A/V
receiver that s pports one or more of the a dio types
s pported by yo r DVD recorder (MPEG 2, Dolby
Digital and DTS). For this yo can check the receiver
man al and the logos on the front of the receiver.
lConnect the recorder’s digital a dio o tp t to the
corresponding inp t on the receiver. Use a digital
coaxial cable (7) or a digital optical a dio cable (8).
If yo do not have a digital coaxial a dio cable, yo may
se the s pplied video cable (4).
Note:
If the audio type of the digital output does not match the
capabilities of your receiver, the receiver will produce a
strong, distorted sound. The audio type of the DVD disc in
play is displayed in the Status indow, when changing the
language. 6 Channel Digital Surround Sound via digital
connection can only be obtained if your receiver is equipped
with a Digital Multi-channel decoder.
If yo cannot connect yo r DVD recorder to an A/V
receiver with M lti-channel decoder, choose one of the
following alternatives.
Connecting to a receiver equipped with
two channel digital stereo (PCM)
lConnect the recorder’s digital a dio o tp t to the
corresponding inp t on yo r receiver. Use the
s pplied video (CVBS) cable (7) or an optional
digital optical a dio cable (8).
lAfter installation yo will need to activate PCM on
the DVD recorder’s digital o tp t (see ‘User
Preferences’).
Connecting to a receiver equipped with
Dol y Pro Logic
lConnect the recorder to the TV set and connect the
recorder’s a dio Left and Right o tp t sockets to the
corresponding inp ts on the Dolby Pro Logic
A dio/Video receiver, sing the a dio cable s pplied (6).
lMake the appropriate So nd settings for Analog e
O tp t in the ser preferences men .
Connecting to a TV set equipped with a
Dol y Pro Logic decoder
lConnect the recorder to the TV set as described in
chapter ‘Connecting to a TV set’.
Connecting to a receiver with two channel
analogue stereo
lIf yo have a receiver with two-channel analog e
stereo witho t any of the above mentioned so nd
systems, connect the a dio Left and Right o tp t
sockets to the corresponding sockets on yo r
receiver, amplifier or stereo system. Use the a dio
cable s pplied (6).
AMPLIFIER
AUX- I/0
EXT 2
TO TV I/0
EXT 1
TV
687
EXT 4 EXT 3
English
10 INSTALLATION
Connecting to other equipment
Use the top SCART connector (EXT 2) on yo r DVD
recorder to make connections to a:
- Satellite receiver or Set top ox,
- VCR,
- DVD Video player
Most pre-recorded video cassettes and DVD discs are
copy protected. If yo try to copy them the display
shows ‘COPY PROTECT’.
For installation of a decoder, see ‘User Preferences’ -
‘Installation’.
Note:
If the power is off or Low Power Standby is selected (see
User Preferences - features), the signal from EXT 2 will not
be passed on to the TV set on EXT 1.
Connections - frontside of your
DVD recorder
Camcorder connection
lIf yo have a DV or Digital 8 camcorder, connect
the i-link DV inp t socket (1) to the corresponding
o tp t socket on the camcorder sing the i-link
cable of yo r camcorder.
lIf yo have a Hi-8 or S-VHS(C) camcorder, connect
the S-video inp t socket to the corresponding
o tp t socket on the camcorder, sing the S-video
cable s pplied (2) and connect the a dio cable (4)
s pplied.
lOtherwise connect the Video inp t socket (yellow)
to the corresponding o tp t socket on the
camcorder sing the video cable s pplied (3) and
connect the a dio Left (white) and Right (red) inp t
sockets to the corresponding sockets on the
camcorder sing the a dio cable s pplied (4).
PANEL
43
21
Camcorder
Camcorder
TV
Set top box
432 5
1
AUX- I/0
EXT 2
TO TV I/0
EXT 1
EXT 4 EXT 3
English
INSTALLATION 11
Power supply
lMake s re that all necessary connections are made
before connecting the DVD recorder to the power
s pply.
lPl g the power cable s pplied into the Power
connector on the rear of the recorder.
lPl g the mains pl g into an AC o tlet.
Note:
Always check if the local mains voltage matches the required
220V - 240V.
hen the recorder is in the Standby position, it is still
consuming some power.
If you wish to disconnect your DVD recorder completely from
the mains, withdraw the plug from the AC Outlet.
hen the DVD recorder is disconnected from the mains, TV
channels and timer data will be stored typically 1 year.
First time set-up: virgin mode
After switching on the DVD recorder for the very first
time the ‘virgin mode screen’ will appear.
In ‘virgin mode’ yo may have to set yo r preferences
for some of the recorder feat res.
If the ‘virgin mode screen’ does not appear, yo r DVD
recorder has been installed already. Yo may still change
the settings via the ‘installation men ’.
Depending on the kind of TV set, preferences will have
to be set man ally or they will be taken over
a tomatically from the TV set.
Automatic setting
When yo r TV set is eq ipped with EasyLinkTM, Cinema
LinkTM, NEXTVIEW LinkTM, SmartLinkTM, Q-LinkTM or
MegaLogicTM, the TV settings will be taken over from the
TV set b t they cannot be changed man ally afterwards.
When preferences are taken over from yo r TV set, the
message ‘
Easy Link loading data from TV
-
please
wait
’ will appear.
Men s for which no preferences are available will be
displayed. They have to be set man ally.
Notes:
Preferences have to be set in the order in which the item
menus will appear on the screen.
If the recorder is switched off while setting user preferences,
all preferences have to be set again after switching the
recorder on again.
The ‘virgin mode’ will only be concluded after the
preferences for the last item have been confirmed.
Follow TV
Easy Link
loading data from TV -
please wait
English
12 INSTALLATION
Manual setting
When a men is displayed:
lUse the w v (down p c rsor) keys to go thro gh
the options in the men . The icon of the selected
option will be highlighted.
lUse OK to confirm yo r selection and to select the
next men .
The following items may have to be set in virgin mode:
Menu language
The on-screen men will be displayed in the lang age
yo choose.
Audio language
The so nd will be in the lang age yo choose, provided
this is available on the disc in play. If not, speech will
revert to the first spoken lang age on the disc. Also the
DVD Video disc men will be in the lang age yo
choose, provided this is available on the disc.
Su title language
The s btitles will be in the lang age yo choose provided
this is available on the disc in play. If not, s btitles will
revert to the first s btitle lang age on the disc.
TV Shape
Yo can choose:
- 16:9 if yo have a wide screen (16:9) TV set.
- 4:3 if yo have a reg lar (4:3) TV set. In this case yo
can also choose between:
- Letter ox for a ‘wide-screen’ pict re with black
bars at the top and bottom,
- Pan Scan, for a f ll-height pict re with the sides
trimmed. If a disc has Pan Scan, the pict re then
moves (pans) horizontally to keep the main action
on the screen.
Virgin mode
TV Shape
Press OK to contin e
4:3 letterbox
4:3 panscan
16:9
Virgin mode
S btitle lang age
Press OK to contin e
English
Español
Français
Port g ês
Italiano
Virgin mode
A dio lang age
Press OK to contin e
English
Español
Français
Port g ês
Italiano
Virgin mode
Men lang age
Press OK to contin e
English
Español
Français
Italiano
De tsch
English
INSTALLATION 13
Country
Select yo r co ntry. This is sed as inp t for the
‘Parental Control’ feat re (see ‘Access Control’) as well
as the searching of TV channels.
Auto TV Channel Search
Make s re the antenna is connected. See ‘Connecting to
the antenna’. Yo r DVD recorder will search for all TV
channels.
It stores channels in the seq ence they are fo nd.
lConfirm with OK.
‰A to search starts. This can take several min tes.
‰When A to search is completed ‘
Autom.
search complete
-
XX channels found
’ appears
on the TV screen.
After A to channel search yo can have TV channels
stored a tomatically in the same order as yo r TV set.
See ‘User preferences installation’ - ‘Follow TV’.
Time/Date
When Channel a to search is completed the act al Time
and Date are also set a tomatically.
If the time in the DVD recorder display is not correct,
the clock m st be set man ally.
lAdj st ’
Time
’, ’
Year
’, ’
Month
’, ’
Date
’ if req ired,
with the w(down c rsor) or v( p c rsor) key.
lChange val es with the the t(left c rsor) or u
(right c rsor) key or the digit keys 0-9.
lTo end, press OK.
Note:
All these items may have to be set after first start up (‘virgin
mode’). After that they can always be adapted in the user
preferences menu. hen your TV set is equipped with Easy
Link the TV set presets will be taken over from the TV set
but they cannot be changed manually afterwards.
virgin mode settings are now completed.
All settings can still be changed. See ‘User preferences’.
Autom.search
To continue
Press OK
Autom.search complete
XX channels found
Time
Year
Month
Date
09: 40
2001
02
09

Please wait
A tom.search
Searching for TV channels

XX channels fo nd
Virgin mode
Co ntry
Press OK to contin e
A stria
Belgi m
Denmark
Finland
France
English
14 QUICK START
Quick start
Recording and playback are the basic f nctions of yo r
DVD recorder. In this chapter the elementary
operations for recording or playing a disc are presented
separately for q ick reference p rposes.
Detailed information on different modes, settings and
feat res can be fo nd in the chapter ‘Operation’.
Switching on
lSwitch on the TV set and select the programme
n mber that yo have chosen for video playback
(see operating man al for yo r TV set).
lPress BBSTANDBY/ON.
‰The recorder display lights p, and the ‘virgin
mode screen’ appears.
The virgin mode will only occ r after the very first start
p of the recorder. In virgin mode yo may have to set
yo r personal preferences for some of the recorder’s
most relevant items. See virgin mode in the previo s
chapter.
Manual recording
Checking input
Normally, the DVD recorder displays the contents of
the disc on screen. Use the TUNER key in order to
switch to the internal t ner, or whichever other so rce
is selected, if yo want to check the inp t before starting
a recording. Press TUNER again to go back to disc
mode.
Recording
lInsert a recordable DVD+RW disc.
lUse CHANNEL 3or CHANNEL 4(on the
recorder) or P+,P- or the digit keys 0-9 (on the
remote control) to select the programme n mber
(programme name) from which yo wish to record.
When a TV channel transmits a channel name, it will be
shown on the display and on screen.
lPress RECORD (on recorder) or REC/OTR
(on remote control).
‰RECORD is shown on the display.
lPress 9STOP to stop recording.
‰MENU UPDATE is shown on the display.
Recording with automatic switch-off (OTR
One-Touch Recording)
lInsert a recordable DVD+RW disc.
lUse CHANNEL 3or CHANNEL 4(on the
recorder) or P+,P- or the digit keys 0-9 (on the
remote control) to select the programme n mber
(programme name) from which yo wish to record.
lPress RECORD (on recorder) or REC/OTR (on
remote control) twice.
‰A recording will be made of 30 min tes.
‰The req ired end time of the recording is shown
in the timer box on screen. The remaining recording
time is shown in the stat s box on screen and on
the display.
lPress RECORD or REC/OTR again to obtain a
30-min te increment.
lShortly after pressing REC/OTR, OTR can be
cancelled by pressing CLEAR.
10: 15
TV/DVD STANDBY
REC/OTR PLAYSTOP
FORWARDREVERSE
NEXT PREVIOUS
PAUSE SLOW
CLEAR
aP
SELECT
TIMER
MUTE
T/C TUNER
TV/DVD STANDBY
REC/OTR PLAYSTOP
FORWARDREVERSE
NEXT PREVIOUS
PAUSE SLOW
aP
MUTE
T/C TUNER
STANDBY/ON
English
QUICK START 15
Timer programming
Timer programming with ’VIDEO Plus+’
A Pl sCode is a n mber of p to nine digits, printed in
most TV g ides next to the start time of a TV
programme.
It contains all information yo need for programming a
timer.
lPress TIMER on the remote control.
lSelect ‘
VIDEO Plus
+
programming
’ with v( p
c rsor) or w(down c rsor).
lPress u(right c rsor).
lEnter the entire Pl sCode n mber. Yo can correct
it if yo made a mistake, with CLEAR.
lConfirm with OK.
‰The data will appear on the TV screen.
lConfirm with the OK key.
‰The data has been stored in a timer block.
lTo end, press TIMER.
lPlease make s re that yo inserted a disc witho t
erase protection. If yo inserted a disc with erase
protection, it will be ejected.
lSwitch off with BBSTANDBY/ON.
Timer programming without ’VIDEO
Plus+’
lPress TIMER on the remote control.
lSelect ‘
Timer programming
’ with v( p c rsor) or
w(down c rsor).
lPress u(right c rsor).
lEnter the date with v( p c rsor) or w(down
c rsor), or with the digit keys 0-9.
lPress u(right c rsor).
lEnter the programme n mber from which yo want
to record.
lPress u(right c rsor).
lEnter the Start time.
lPress u(right c rsor).
lEnter the End time.
lIf yo made a mistake, yo can go back with t(left
c rsor).
lConfirm with OK.
‰The data has been stored in a timer block.
lTo end, press TIMER.
‰Make s re that yo inserted a disc witho t write
protection. If yo inserted a write-protected
(locked) disc, recording will be ref sed.
lSwitch off with BBSTANDBY/ON.
Timer
Timer programming

Date
09 N E D 1 09: 35 11: 35 S P

Prog. 
Start VPS
PDC 
End Rec
Mode
Mo Fr Weekly
Press SELECT To store
Press OK
Timer
Mo Fr Weekly
Press SELECT To store
Press OK
VIDEO Pl s+ programming
Timer
To exit 
Press TIMER
VIDEO Pl s+ programming
Timer programming
Timer list
English
16 QUICK START
Playing a pre-recorded DVD-
Video disc
lInsert a pre-recorded DVD-Video disc.
‰When ‘A tores me’ is set to ‘
On
’ (see ‘User
Preferences’) playback starts a tomatically from the
point where it was stopped, the last time the disc
was played.
‰When ‘A tores me’ is set to ‘
Off
’, the disc will
play from the start of the disc. Yo can however
res me play from the point at which yo stopped,
the last time the disc was played, by pressing
2PLAY shortly after the disc starts to play.
lThe disc may invite yo to select an item from a
men . If the selections are n mbered, press the
appropriate n merical key; if not, se the wv
(down p c rsor) or tu(left right c rsor) keys to
highlight yo r selection, and press OK.
‰The c rrently playing title and chapter n mber
are displayed in the system men bar and the
recorder display. The elapsed time is shown in the
disc stat s window and the recorder display.
lTo stop playback at any time, press 9STOP or
DISC MENU.
Playing a recorda le DVD+RW
disc
lInsert a recordable DVD+RW disc.
‰If the disc is a new blank disc, the display will
show ‘EMPTY DISC’.
‰If the inserted disc is write-protected, playback
always starts a tomatically.
lWhen yo press 2PLAY, playback always starts
a tomatically from the point where it was stopped
the last time the disc was played or recorded. If yo
want to start playback from the beginning of the
disc, yo can do so via the Index Pict re Screen (see
‘Index Pict re Screen’).
lWith JPREVIOUS and KNEXT yo can go to
the previo s or next title.
lTo stop playback at any time, press 9STOP or
DISC MENU.
‰Yo ret rn to the Index Pict re Screen.
DVD
TITLE CHAPTER TIME
English
FUNCTIONAL OVERVIEW 17
Functional overview
Front of recorder
DIGITAL
BSTANDBY/ON
- switches the recorder to power/standby mode
Standby indicator
- lights p red when the recorder is in standby mode
- lights p green when the recorder is operative
PANEL
- to open and close the panel
DISPLAY
- displays the c rrent stat s of the recorder
/OPEN/CLOSE
- opens/closes the disc tray
9STOP
- stops video/a dio play or recording
2PLAY
- starts video/a dio play
0RECORD
- direct recording of the selected programme
on TV or the recorder (depending on the
DIRECT RECORD setting)
SEARCH
- Qsearch backward
- Rsearch forward
AUTO/MAN REC VOLUME
- to adj st the recording level
a tomatically or man ally
MANUAL
- 34to increase/decrease
the recording level
CHANNEL
- to select channels man ally
TITLE
- Jselects previo s title
/chapter/track/index or beginning
c rrent title/chapter/track/index
- Kselects next title/
chapter/track/index
AUDIO (Left/Right)
- A dio inp t socket left/right to
connect a camcorder or video
recorder
VIDEO (CVBS)
- Video inp t socket to connect a
camcorder or video recorder
S-VIDEO
- Video inp t socket to connect a
camcorder or video recorder
DV
- A dio/Video inp t socket to connect a digital camcorder
DV-indicator
- Lights p red when DV inp t is active
Disc loading tray
English
18 FUNCTIONAL OVERVIEW
Rear of recorder
Apparatus Claims of U. S. Patent Nos.
,631,603, ,577,216, ,819,098, and ,907,093
licensed for limited viewing uses only.
AUX- I/0
EXT 2
TO TV I/0
EXT 1
EXT 4 EXT 3
MAINS
- connection to the mains
ANTENNA
- RF connection to antenna/cable TV signal
VIDEO (CVBS)
- OUT: for connection to a TV, receiver or amplifier with CVBS video inp ts
- IN: for connecting a video so rce with CVBS o tp ts
S-video (Y/C)
- OUT: for connection to a TV, receiver or amplifier with S-video (Y/C) inp ts
- IN: for connecting a video so rce with S-video (Y/C) o tp ts
AUX I/O (EXT II)
- for connection to a satellite receiver, decoder, video recorder, set top box
etc. via SCART
TV
- RF connection to TV set
TO TV I/O (EXT I)
- for connection to a TV with SCART
AUDIO OUT L/R
- connection to an amplifier, receiver, stereo system or
to a TV that is not eq ipped with a SCART connector
AUDIO IN L/R
- connection to the a dio o tp t of a video so rce that
is not eq ipped with a SCART connector
OUT OPTICAL
- connection to an amplifier, receiver or stereo system
with a digital (optical) a dio inp t
OUT COAX
- connection to an amplifier, receiver or stereo system
with a digital (coaxial) a dio inp t
English
FUNCTIONAL OVERVIEW 19
Display
PCMDTS DIGITALMPEG
HQ SP LP EP+
VPS/PDC
DECODER
CHANNEL
DVD CDVRW
TITLE TRACK CHAPTER TOTAL TIME REMAINTRACK
MANUAL
TIMERSAT
-30-40 -10-20 0 OVER-30-40 -10-20 0 OVER
SA
NICAM STEREO
RECORD
DVD
- DVD Video disc inserted
DVD+RW
- DVD+Rewritable disc inserted
TITLE
- DVD title n mber
TRACK
- VCD/CD track n mber
VCD
- Video CD inserted
CD
- A dio CD inserted
SVCD
- S per Video CD inserted
HQ - SP - LP - EP
- Selected recording mode: High Q ality,
Standard Play, Long Play or Extended Play
CHAPTER
- DVD chapter n mber
SAT
- Recorder prepared for or engaged in satellite
recording
NICAM
- NICAM digital stereo so nd on c rrent
preset
STEREO
- Stereo so nd from t ner
dB scale
- indicates recording vol me when sing
man al level control
Disc bar
- Displays disc content, recording level or
formatting progress
MANUAL
- Man al recording level control
DIGITAL - DTS - MPEG - PCM
- Active a dio format
DECODER
- Decoder activated for c rrent preset
VPS/PDC
- Video Programming System/Programme
Delivery Control active on c rrent preset
CHANNEL
- Preset name or n mber
RECORD
- Recording in progress
TIMER
- Timer programmed or active
TRACK TIME
- Track time in min tes and seconds
TOTAL TIME
- Total playback or recording time in ho rs,
min tes and seconds
TOTAL REMAIN
- Total remaining playback or recording time
in ho rs, min tes and seconds
- Remote control active (flashing)
English
20 FUNCTIONAL OVERVIEW
Remote control
TV/DVD STANDBY
REC/OTR PLAYSTOP
FORWARDREVERSE
NEXT PREVIOUS
PAUSE SLOW
EDIT
CLEAR
aP
SELECT
TIMER
MUTE
T/C
ZOOM ANGLE SUBTITLE AUDIO
DIM REPEAT REPEAT SCAN
TUNER
ZYa
TV/DVD switch
- DVD mode/TV mode selector
for TV set*
9
- stop
0
- direct recording of the c rrently
selected programme
2
- play
Q
- search backward
;
- pa se
H
- slow motion
R
- search forward
J
- previo s chapter, track or title
EDIT
- displays edit men for DVD+RW
disc
K
- next chapter, track or title
EE+/–
- TV vol me p/down
c
- TV M te ON/OFF
P +/–
- programme p/down
aaZOOM
- enlarge video image
}}ANGLE
- select DVD camera angle
ZZSUBTITLE
- s btitle lang age selector
YYAUDIO
- a dio lang age selector
STANDBY BB
DISC MENU
- displays DVD disc men or index
pict re screen
SYSTEM MENU
- displays recorder system men
bar
w v u t
- down/ p/right/left c rsor
movement
RETURN
- go back to previo s men step
CLEAR
- delete last entry/clear TIMER
TIMER
- displays the ‘timer men ’
SELECT
- switches between different val es
in a men
OK
- acknowledge men selection
0-9
- n merical key pad
T/C
- select title
- select chapter
TUNER
- switches between disc mode and
t ner mode
SIDE SWITCH
- enables other keys to operate
the TV set (see Appendix)
DIM
- changes brightness setting of
display
REPEAT
- repeat chapter, track, title, disc
REPEAT A-B
- repeat seq ence
SCAN
- playback of the first 10 seconds
of each chapter within a title
(DVD) or the first 10 seconds of
each track on a disc (VCD/CD)
*Note:
In a TV - DVD recorder - Set top box configuration use the ‘TV/DVD’ switch to switch back and forth between Set top box reception and DVD recorder reception.
This only functions when you used a Scart cable to connect the DVD recorder to your TV set and if your TV set responds to this switch-over. This function is useful
when, for example, you want to watch a channel from the Set top box on your TV and make at the same time a recording from another source.

This manual suits for next models

1

Other Philips DVD Recorder manuals

Philips DVDR3350H User manual

Philips

Philips DVDR3350H User manual

Philips ShowView DVDR3300H User manual

Philips

Philips ShowView DVDR3300H User manual

Philips DVDR615/69 User manual

Philips

Philips DVDR615/69 User manual

Philips DVDR3480/05B User manual

Philips

Philips DVDR3480/05B User manual

Philips DVDR1000 MkII User manual

Philips

Philips DVDR1000 MkII User manual

Philips DVDR 77/00 User manual

Philips

Philips DVDR 77/00 User manual

Philips DVDR3455H User manual

Philips

Philips DVDR3455H User manual

Philips DVDR3597H/05 User manual

Philips

Philips DVDR3597H/05 User manual

Philips DVDR3575H/ User manual

Philips

Philips DVDR3575H/ User manual

Philips DVDR520H/00 User manual

Philips

Philips DVDR520H/00 User manual

Philips DVDR3570H User manual

Philips

Philips DVDR3570H User manual

Philips DVDR5350H User manual

Philips

Philips DVDR5350H User manual

Philips DVDR985 User manual

Philips

Philips DVDR985 User manual

Philips DVDR3600/31 User manual

Philips

Philips DVDR3600/31 User manual

Philips ShowView DVDR3460H User manual

Philips

Philips ShowView DVDR3460H User manual

Philips DVDR3383/51 User manual

Philips

Philips DVDR3383/51 User manual

Philips DVDR3576H User manual

Philips

Philips DVDR3576H User manual

Philips DVDR75/001 User manual

Philips

Philips DVDR75/001 User manual

Philips DVDR990 User manual

Philips

Philips DVDR990 User manual

Philips DVDR616 User manual

Philips

Philips DVDR616 User manual

Philips DVDR3588H/93 User manual

Philips

Philips DVDR3588H/93 User manual

Philips DVDR985 User manual

Philips

Philips DVDR985 User manual

Philips DVDR980 User manual

Philips

Philips DVDR980 User manual

Philips DVDR3360H User manual

Philips

Philips DVDR3360H User manual

Popular DVD Recorder manuals by other brands

Samsung DVD-R100 Manual de instrucciones

Samsung

Samsung DVD-R100 Manual de instrucciones

Samsung DVD-R120 instruction manual

Samsung

Samsung DVD-R120 instruction manual

Pye Video E7A02UD Service manual

Pye Video

Pye Video E7A02UD Service manual

Panasonic DMR-EZ47VP Service manual

Panasonic

Panasonic DMR-EZ47VP Service manual

Apacer Technology Disc Steno AD330 instructions

Apacer Technology

Apacer Technology Disc Steno AD330 instructions

Targa DRH-5500x User's guide and service information

Targa

Targa DRH-5500x User's guide and service information

Samsung DVD-HR749 instruction manual

Samsung

Samsung DVD-HR749 instruction manual

Magnavox MDR515H quick start guide

Magnavox

Magnavox MDR515H quick start guide

Panasonic Diga DMR-ES20 operating instructions

Panasonic

Panasonic Diga DMR-ES20 operating instructions

Panasonic DMR-ES30VS operating manual

Panasonic

Panasonic DMR-ES30VS operating manual

Panasonic DMR-HS2EB Service manual

Panasonic

Panasonic DMR-HS2EB Service manual

LG RH277 owner's manual

LG

LG RH277 owner's manual

Pioneer DVR-310 operating instructions

Pioneer

Pioneer DVR-310 operating instructions

Apricorn EZ Writer II quick start guide

Apricorn

Apricorn EZ Writer II quick start guide

TruTech ZV450TT8 Service manual

TruTech

TruTech ZV450TT8 Service manual

Pioneer DVR-433H-S Service manual

Pioneer

Pioneer DVR-433H-S Service manual

Sony RDR-GX257 operating instructions

Sony

Sony RDR-GX257 operating instructions

Tascam DV-RA1000HD Release notes

Tascam

Tascam DV-RA1000HD Release notes

manuals.online logo
manuals.online logoBrands
  • About & Mission
  • Contact us
  • Privacy Policy
  • Terms and Conditions

Copyright 2025 Manuals.Online. All Rights Reserved.