manuals.online logo
Brands
  1. Home
  2. •
  3. Brands
  4. •
  5. Philips
  6. •
  7. Iron
  8. •
  9. Philips EasyCare GC8351 User manual

Philips EasyCare GC8351 User manual

ServiceManual
Philips Consumer Lifestyle
Published by Philips Consumer Lifestyle Printed in the Netherlands © Copyright reserved Subject to modification
Boiler Steam Iron
GC8351
11/03
PRODUCT INFORMATION
Features
Iron
- SteamGlide Soleplate
- Continuous steam in horizontal & vertical position
- Adjustable steam rate up to 120 g/min
- Shot Of Steam up to 230 g/min
- Steam activator lock
- Automatic drip stop
- Soft touch hand grip
- Steam tip for hard-to-reach places
- Steam hose length : 1.7 m
Stand
- Anti-corrosion Inox boiler
- Boiler sensing : Electronic
- Boiler pressure : 5.0 bar
- Fast heat-up : steam ready in 2 mins.
- Cord length : 2.5 m
- Hose cord storage
- Easy to rinse
- Iron lock for safe storage
- Detachable tank : 1.4 L
- Anti-calc cartridge in water tank
Safety Information
- This product meets the requirements regarding
interference suppression on radio and TV.
- After the product has been repaired, it should function
properly and has to meet the safety requirements as
officially laid down as this moment.
TECHNICAL INFORMATION
Voltage : 220 - 240 V
Frequency : 50 - 60 Hz
Power Iron : 800 W
Boiler : 1370 W
Dimension (F-box) : 350 x 350 x 250 mm (L x W x H)
Weight (with packing) : 6.4 kg
Water advice
If the tap water in your area is very hard, it is advisable to mix
the tap water with an equal amount of demineralised water.
SteamGlide Soleplate
Scratch resistant, non-stick, easy to clean & very durable.
Fast ironing
Steam ready in 2 minutes & up to 5 bar of steam pressure
penetrating deeper into the fabrics.
Iron lock
Safely store the iron on the stand.
Easy to rinse
The new design of the rinse cap makes it very easy to rinse
the boiler regularly. Simply unscrew the cap and pour out the
“dirty” water into the sink.
No hassle with coins, extra tubes or anything of this sort.
Large detachable water tank
1.4 Liter water tank allows up to 3 hours freedom of ironing
without refilling.
GC8351
2-8
BACKPLATE 18
HOSE CORD ASSY 19
Remove Screw A
Disassemble BACKPLATE 18
Remove Screw B1, B2
Remove Clamping plate
Remove Power cord quick-connect S, E, L, N
Remove Hose clip (a)
Disassemble Steam hose
Disassemble HOSE CORD ASSY 19
Steam hose
S
Black
Hose clip(a)
Power cord
N
Blue
Clamping
plate
BlueGreen
NLE
B2 B1
Brown
Fig 1. Wiring at rear HOUSING (Part 1)
Blue
(Micro switch)
Black
(Microswitch)
White
(Lamp assy)
Blue
(Lamp assy)
NS
Fig 2. Wiring at rear HOUSING (Part 2)
DISASSEMBLY ADVICE - IRON
INLAY 17
STEAM LOCK 13
LAMP MOUNTED ASSY 8
MICROSWITCH ASSY 11
TRIGGER 12
THERMOSTAT DIAL ASSY 15
HOUSING PRINTED 10
SOLEPLATE COVER 6
THERMOSTAT BUSH 9
RUBBER HOSE 3
SOLEPLATE ASSY 1
Remove Screw A
Disassemble BACKPLATE 18
Release Inlay rear catch
Disassemble INLAY 17
Disassemble STEAM LOCK 13
Disassemble MICROSWITCH ASSY 11
Remove Screw C
Disassemble TRIGGER 12
Disassemble THERMOSTAT DIAL 15
Fig 3.
Remove Screws D1, D2, D3
Disassemble HOUSING PRINTED 10
Remove Screws E1, E2, E3
Disassemble SOLEPLATE COVER 6
Remove Hose clip (b)
Disassemble RUBBER HOSE 3
GC8351
3-8
PARTS LIST - IRON & ELECTRICAL DIAGRAM
STAND IRON
L
N
Boiler Electronics
On/Off switch
Steam up switch
Steam down switch
Thermal
Fuse
Thermal
Fuse
L
N
L
S
N
Boiler
Heating
Element
Reed
Switch
Thermistor
1
Ther-
mostat
Heating
Element
Pump
M
Electro-
valve
Thermistor
2
Power LED x 1
Steam LEDs x 4
Tank Empty LED x 1
Rinse Reminder LED x1
Fig 4 . Electrical diagram
Pos Service code Description
1
2
3
4
5
6
7
8
9
10
11
12
13
14
15
16
17
18
19
4239 021 41330
4239 015 56120
4239 015 56510
4239 010 10110
4239 015 70150
4239 021 32873
4239 021 31780
4239 021 36861
4239 026 13220
4239 021 64631
4239 021 31790
4239 026 42111
4239 026 42121
4239 010 09290
4239 021 61151
4239 026 43641
4239 026 42131
4239 026 24161
4239 021 61351
Soleplate assy 230 V (Steamglide-SOS)
Rubber hose (SOS)
Rubber hose (Dosing)
Hose clip
Ryton ring
Soleplate cover
Steam deviator assy
Lamp mounted assy
Thermostat bush
Housing printed (Purple)
Microswitch assy
Trigger (Dark Purple)
Steam lock (Purple)
Trigger spring
Thermostat dial assy (Purple)
SOS knob (Purple)
Inlay SOS (Dark Purple)
Backplate (White)
Hose cord mounted assy
GC8351
4-8
EXPLODED VIEW - IRON
13
14
4
17
18
16
11
10
6
7
2
9
1
3
8
19
12
15
5
A
S
NLE
B1
B2
D3
Hose
clip (a)
Hose
clip (b)
E2
D2
C
D1
E1
E3
4
GC8351
5-8
TRAY RUBBER CAP 37
BMC TRAY 36
STAND TOP 24
FRONT PANEL PRINTED 31
BOILER ASSY EE 20
ELECTROVALVE 21
POWER BOARD 35
CONTROL BOARD 41
PUMP ASSY 27
RINSE RUBBER COUPLING 38
RINSE BUSH 39
SAFETY CAP ASSY 29
REED SWITCH ASSY 33
Remove WATER TANK ASSY 42
Remove TRAY RUBBER CAP 37 (3x)
Remove Screws F1, F2, F3
Disassemble BMC TRAY 36
Remove Screws G1, G2, G3, G4
Remove SAFETY CAP ASSY 29
Remove RINSE BUSH 39
Remove RINSE RUBBER COUPLING 38
Disassemble STAND TOP 24
Remove Screws H1, H2
Disassemble BOILER ASSY 20
Remove Screws J1, J2
Disassemble FRONT PANEL PRINTED 31
K1
K2
K3
12 11
109
Pos. Connected to Pos. Connected to
9 Reed switch 11 Thermistor
10 Power board 12 Hosecord (Black)
Fig 5. Connections on CONTROL BOARD 41
DISASSEMBLY ADVICE - STAND & DETACHABLE WATER TANK
Remove Connections 9, 10, 11, 12 (Fig 5)
Remove Screws at K1, K2, K3 (Fig 5)
Disassemble CONTROL BOARD 41
21
20
15
14
18
13
22
16
17
19
Pos. Connected to Pos. Connected to
13 Pump-Control 18 Electrovalve-Live
14 Pump-Live (Brown) 19 Hosecord (Blue)
15 Boiler-Heating Element 20 Hosecord (Brown)
16 Boiler-Fuse 21 Cordset (Brown)
17 Electrovalve-Control 22 Cordset (Blue)
Fig 6. Connections on POWER BOARD 35
WATER TANK ASSY 42
GC8351
6-8
PARTS LIST - STAND & BOILER WIRING DIAGRAM
Thermistor
ELECTROVALVE 21
Earth
POWER BOARD 35
Tab 9009 Boiler-HE
Wire WE3
CONTROL BOARD 41
Thermistor Input 9013
POWER BOARD 35
Tab 9002 Evalve-Live
Brown WE5
POWER BOARD 35
Tab 9007 Evalve-Control
Wire WE5
POWER BOARD 35
Tab 9005 Boiler-Fuse
Wire WE4
Fig 7 . Boiler assy - Wiring Diagram
Pos Service code Description
20
21
22
23
24
25
26
27
28
29
30
31
32
4239 021 61051
4239 017 09892
4239 010 11111
4239 021 62041
4239 021 62181
4239 026 26113
4239 026 26123
4239 021 62461
4239 010 10260
4239 022 62500
4239 026 21930
4239 021 61161
4239 015 59101
Boiler assy EE
Electrovalve
Electrovalve mesh
Stand bottom EE (Purple)
Stand top assy (White)
Spacer bottom
Spacer top
Pump assy
Inox clamp
Safety cap assy
Nipple plate
Front panel printed
Power button cap (Purple)
Pos Service code Description
33
34
35
36
37
38
39
40
41
42
43
44
4239 021 31820
4239 015 56160
4239 021 31970
4239 026 42201
4239 015 59111
4239 015 56050
4239 026 22330
4239 000 11351
4239 021 56881
4239 021 61171
4239 015 58201
4239 026 42081
Reed switch assy
Braided rubber hose
Power board
BMC tray (Dark purple)
Tray rubber cap front
Rinse rubber coupling
Rinse bush
Cordset EU
Control board
Water tank assy (Transp. purple)
O-ring
De air valve
GC8351
7-8
EXPLODED VIEW - STAND
F1
G2
H1
J1
K2
J2
K1
K3
H2
G3
G1
F3
G4
F2
30
37
35
42
31
23
32
41
36
38 39
43
29
44
27
40
34
24
28
21
22
33
20
26
25
GC8351
8-8
- Due to the high wattage of the iron, only the specified cord set must be used.
- Should damage be observed on the HOSE-CORD ASSY 19 or CORDSET 40, they must be replaced.
Continued usage is not allowed.
- When replacing the MICROSWITCH ASSY 11, please dress the 2 attached wires such that they are free of tension. Pulling force
on the wires may affect the steam triggering.
- To avoid damage to the sealing & components of the BOILER ASSY 20, NEVER clean the boiler assy with vinegar, descaling
agent or other corrosive chemicals.
- When replacing ELECTROVALVE 21 or PUMP ASSY 27, please be reminded to apply loctite at the joints for good sealing.
- After the product has been repaired, it should function properly and has to meet the safety requirements & legal regulations as
laid down & officially established at this moment.
- The following tests are common checks that are conducted on a repaired product before it is returned to the consumer.
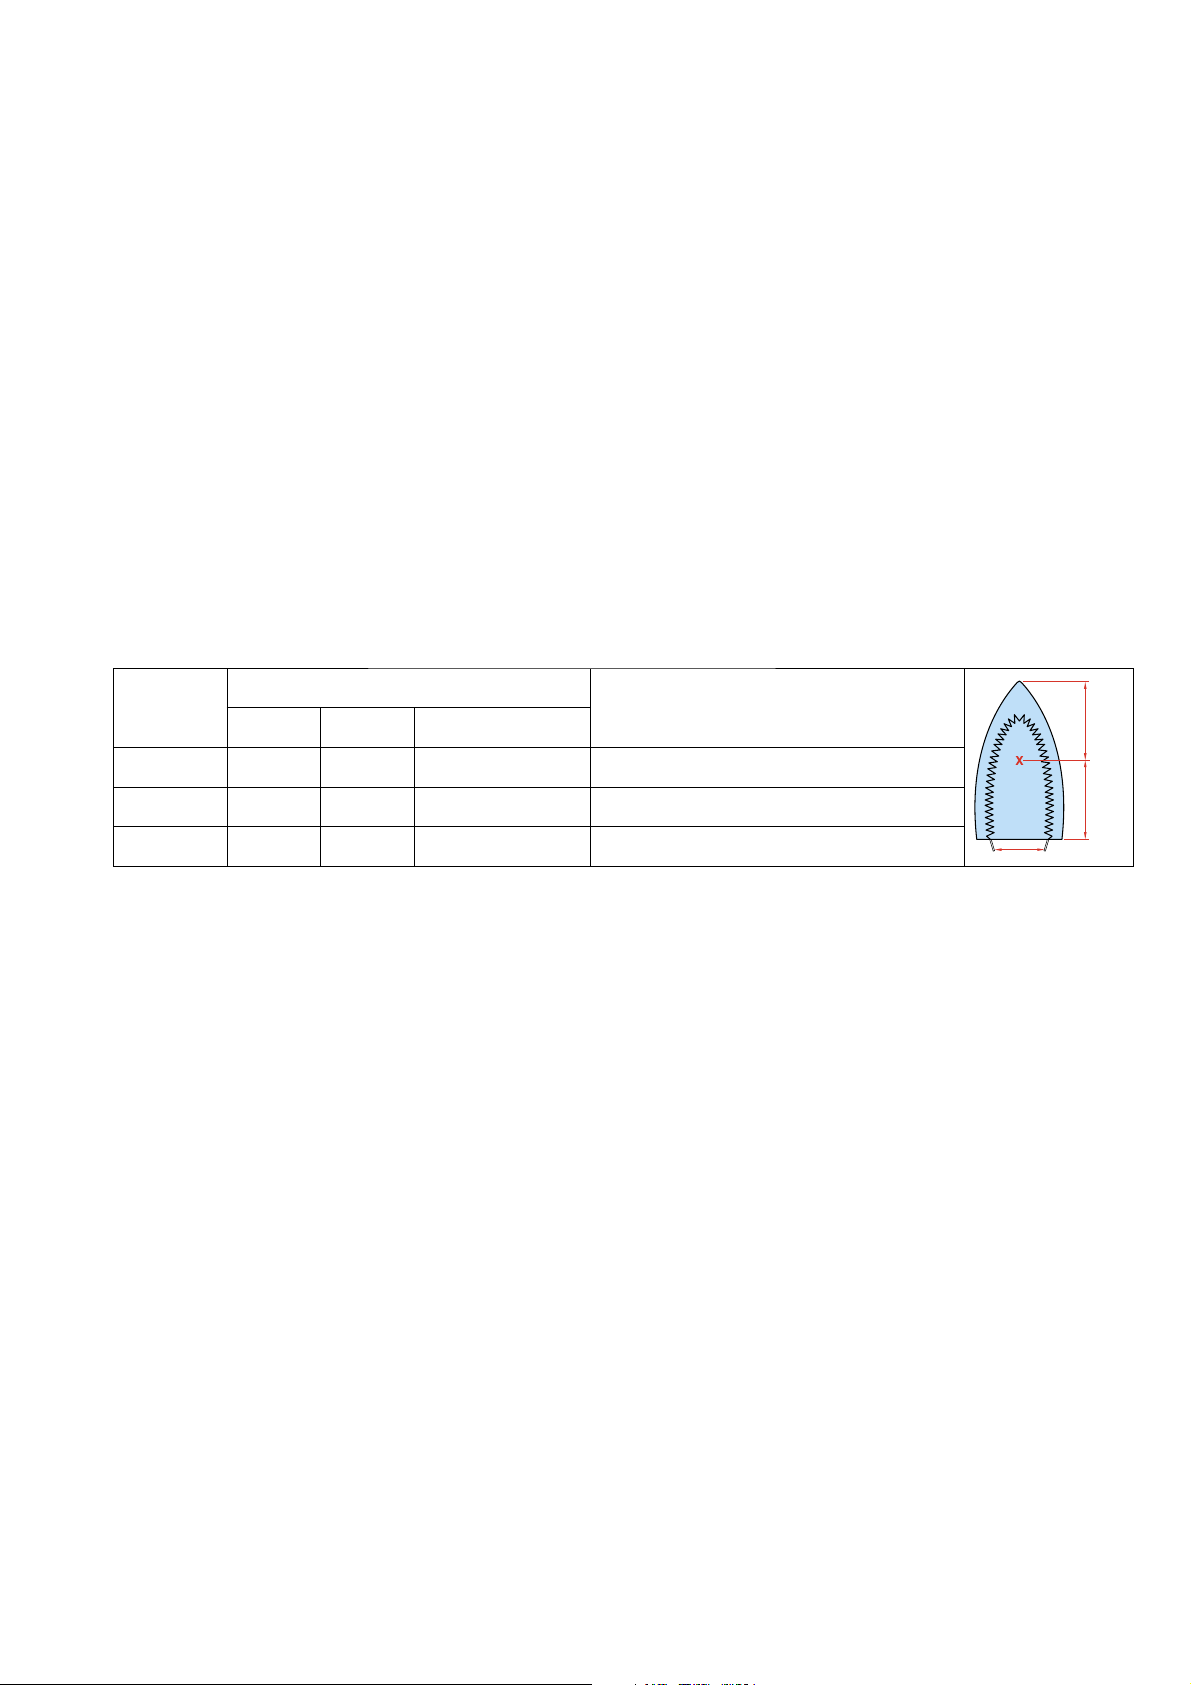
1. Soleplate temperature
Check that soleplate temperature is within IEC requirement.
Measure the temperature of the soleplate after the iron has reached steady state i.e connected to the mains for at least 15 minutes.
The table below shows the temperature requirement.
Marking
Soleplate temperature (Deg C)
Material, for example
Test-
point
==
Minimum Maximum Nominal + Tolerance
•(1 dot) 70 120 95 ± 25 Acetate, elastane, polyamide, polyproylene
•• (2 dots) 100 160 130 ± 30 Cupro, polyester, silk, triacetate, viscose, wool
••• (3 dots) 140 210 175 ± 35 Cotton, linen
2. Leakage current
Check that leakage current is within IEC requirement.
Measure leakage current between LIVE/NEUTRAL & EARTH.
IEC requirement is that at 230 V supply, the EARTH leakage current must be less than 0.75 mA.
3. Water leakage / Functionality
Check that there is no water leakage from any part of the product during operation.
Check that the functionality of the product (product dependent) eg. steaming, variable steam, SOS, ASO etc is working properly.
4. Loose part
Check that there are no loose parts eg. extra screw in the product that can cause short-circuit or product malfunction.
REPAIR INSTRUCTIONS

Other Philips Iron manuals

Philips GC1800 SERIES User manual

Philips

Philips GC1800 SERIES User manual

Philips GC7600 series User manual

Philips

Philips GC7600 series User manual

Philips GC7440 User manual

Philips

Philips GC7440 User manual

Philips GC4600 SERIES User manual

Philips

Philips GC4600 SERIES User manual

Philips GC9600 SERIES User manual

Philips

Philips GC9600 SERIES User manual

Philips GC9600 SERIES User manual

Philips

Philips GC9600 SERIES User manual

Philips Double Speed GC6107 User manual

Philips

Philips Double Speed GC6107 User manual

Philips GC9671/50 User manual

Philips

Philips GC9671/50 User manual

Philips PerfectCare Pure GC7600 series User manual

Philips

Philips PerfectCare Pure GC7600 series User manual

Philips PerfectCare Pure GC7636/30 User manual

Philips

Philips PerfectCare Pure GC7636/30 User manual

Philips GC4521/20 User manual

Philips

Philips GC4521/20 User manual

Philips PerfectCare PSG7014 User manual

Philips

Philips PerfectCare PSG7014 User manual

Philips PerfectCare Elite GC96 Series User manual

Philips

Philips PerfectCare Elite GC96 Series User manual

Philips Mistral GC2225 User manual

Philips

Philips Mistral GC2225 User manual

Philips GC9600 SERIES User manual

Philips

Philips GC9600 SERIES User manual

Philips GC8215 User manual

Philips

Philips GC8215 User manual

Philips Azur FreeMotion GC4595/40 User manual

Philips

Philips Azur FreeMotion GC4595/40 User manual

Philips Azur Performer Plus GC4521/00 User manual

Philips

Philips Azur Performer Plus GC4521/00 User manual

Philips GC4908/80 User manual

Philips

Philips GC4908/80 User manual

Philips GC9247/30 User manual

Philips

Philips GC9247/30 User manual

Philips EasySpeed GC1020 series User manual

Philips

Philips EasySpeed GC1020 series User manual

Philips GC2930/02 User manual

Philips

Philips GC2930/02 User manual

Philips GC2830 User manual

Philips

Philips GC2830 User manual

Philips GC7900 Series User manual

Philips

Philips GC7900 Series User manual

Popular Iron manuals by other brands

Rowenta Pro Master DW8111D1 manual

Rowenta

Rowenta Pro Master DW8111D1 manual

Vitek VT-8306 G Manual instruction

Vitek

Vitek VT-8306 G Manual instruction

TEFAL Effectis Easy manual

TEFAL

TEFAL Effectis Easy manual

Saturn ST-CC7113 manual

Saturn

Saturn ST-CC7113 manual

Hamilton Beach Easy-Touch 14417 Read before use

Hamilton Beach

Hamilton Beach Easy-Touch 14417 Read before use

Rohnson R-397 instruction manual

Rohnson

Rohnson R-397 instruction manual

Qilive Q.5815 user manual

Qilive

Qilive Q.5815 user manual

TEFAL SUPERGLISS FV4491 manual

TEFAL

TEFAL SUPERGLISS FV4491 manual

Steamfast SF-623 owner's guide

Steamfast

Steamfast SF-623 owner's guide

Rowenta DW5000 manual

Rowenta

Rowenta DW5000 manual

Bestron AST8000 instruction manual

Bestron

Bestron AST8000 instruction manual

Singer 92-6 instruction manual

Singer

Singer 92-6 instruction manual

Beko BKK 2174 user manual

Beko

Beko BKK 2174 user manual

Tchibo 280 962 Instructions for use

Tchibo

Tchibo 280 962 Instructions for use

TEFAL FV9844E0 manual

TEFAL

TEFAL FV9844E0 manual

Braun IS 5022 manual

Braun

Braun IS 5022 manual

Exquisit BD3102web instruction manual

Exquisit

Exquisit BD3102web instruction manual

POLTI VAPORELLA FOREVER 440 Usage instructions

POLTI

POLTI VAPORELLA FOREVER 440 Usage instructions

manuals.online logo
manuals.online logoBrands
  • About & Mission
  • Contact us
  • Privacy Policy
  • Terms and Conditions

Copyright 2025 Manuals.Online. All Rights Reserved.