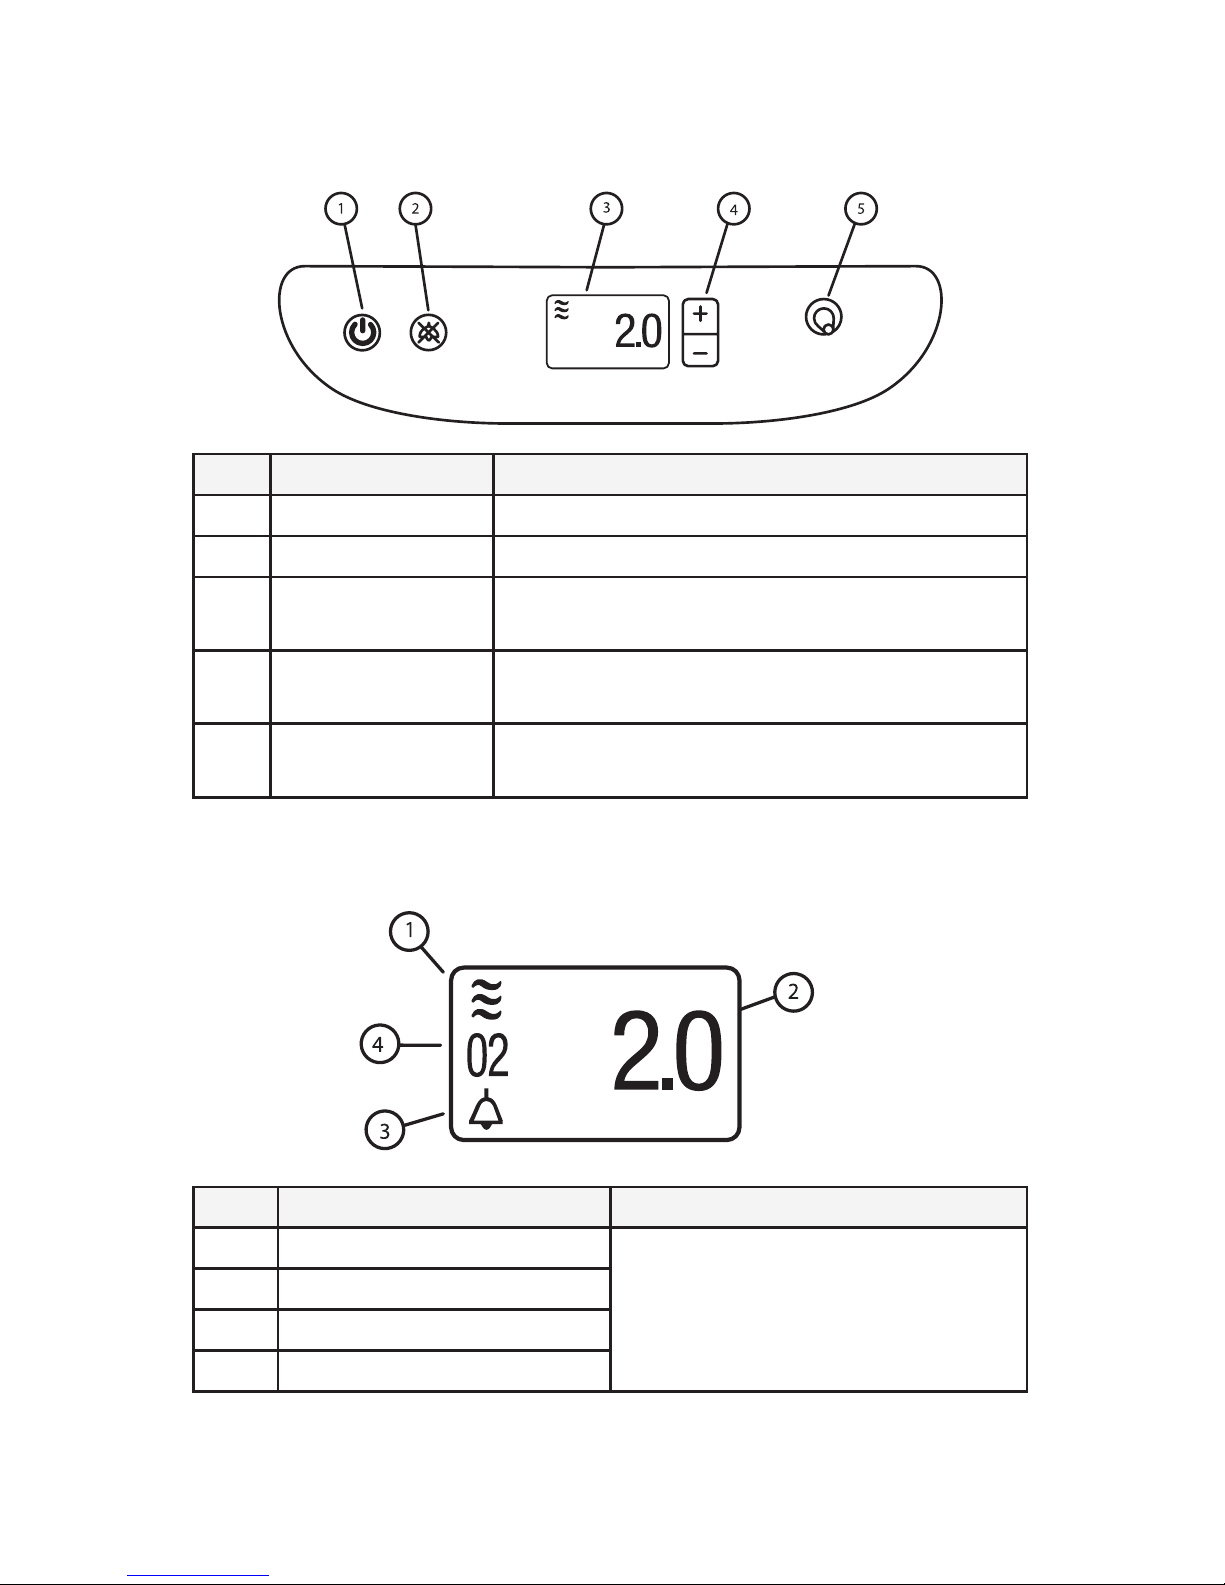
Philips simplyFLO User manual

1076809
1076808 R03
LZ 04/10/2013 simplyFLO

Table of Contents
Introduction ��������������������������������������������������������������������������������������������������������������������������������1
Intended Use������������������������������������������������������������������������������������������������������������������������1
Contraindications���������������������������������������������������������������������������������������������������������������1
Device and Accessories Description����������������������������������������������������������������������������1
simplyFLO System �������������������������������������������������������������������������������������������������������������1
Warnings and Cautions�����������������������������������������������������������������������������������������������������������2
Symbol Key���������������������������������������������������������������������������������������������������������������������������5
How to Contact Philips Respironics�����������������������������������������������������������������������������5
System Overview����������������������������������������������������������������������������������������������������������������6
Operating the simplyFLO Device�����������������������������������������������������������������������������������������8
Alarm Indicators and Screen Symbols����������������������������������������������������������������������������11
Troubleshooting���������������������������������������������������������������������������������������������������������������������14
Connecting the Optional Humidier �����������������������������������������������������������������������������15
Caring for your simplyFLO System�����������������������������������������������������������������������������������16
Cleaning the Device �������������������������������������������������������������������������������������������������������16
Cleaning the Accessories����������������������������������������������������������������������������������������������16
Device Storage �����������������������������������������������������������������������������������������������������������������17
Preventive Maintenance����������������������������������������������������������������������������������������������� 17
Device Disposal����������������������������������������������������������������������������������������������������������������17
Traveling With Your System�����������������������������������������������������������������������������������������������17
Specications���������������������������������������������������������������������������������������������������������������������������18
Standards Compliance ��������������������������������������������������������������������������������������������������19
Classication ���������������������������������������������������������������������������������������������������������������������19
EMC Information���������������������������������������������������������������������������������������������������������������������20
Limited Warranty��������������������������������������������������������������������������������������������������������������������22
© 2013 Koninklijke Philips Electronics N�V� All rights reserved.
English


1
simplyFLO User Manual
Introduction
Your health care professional has determined that supplemental oxygen is
of benet to you and has prescribed a portable oxygen concentrator set at
a specic ow setting to meet your needs� DO NOT change the ow settings
without consulting with your health care professional� Please read and
understand this entire manual before using the device�
Intended Use
The Philips Respironics simplyFLO transportable oxygen concentrator is for
prescription use by patients requiring high concentrations of oxygen on a
supplemental basis�
Contraindications
• Thisdeviceisnotintendedtobelife-sustainingorlife-supporting.
• Thisdeviceisnotintendedfornewbornandinfantuse.
Device and Accessories Description
The simplyFLO transportable oxygen concentrator, its features, and its
accessories are described in detail in this manual� Read and understand it
completely before operating the device�
This manual applies to the AC Power Supply and AC Power Cord accessories�
This manual does not apply to the following accessory items sold separately:
• StandardSingleLumenNasalCannula
• Humidier
• DCPowerSupply
• TravelCase
simplyFLO System
The device comes with the following items� If any are missing, contact your
equipment provider�
• ThisUserManual
• ACPowerSupplyandCord

2
simplyFLO User Manual
Warnings and Cautions
Caution: U�S� federal law restricts this device to sale by or on the order of a
physician�
Warnings
A warning represents the possibility of harm to the operator or patient�
• Theoperatorshouldreadandunderstandthisentiremanualbefore
using the device�
• Thedeviceisnotintendedforlifesupport.Wheretheprescribing
health care professional has determined that an interruption in the
supply of oxygen, for any reason, may have serious consequences
to the user, an alternate source of oxygen should be available for
immediate use�
• Geriatricoranyotherpatientunabletocommunicatediscomfort,or
hear or see the alarms while using this device, may require additional
monitoring�
• Oxygensupportscombustion.Oxygenshouldnotbeusedwhile
smoking or in the presence of an open ame�
• Donotusethedeviceinthepresenceofaammableanaesthetic
mixture in combination with oxygen or air, or in the presence of
nitrous oxide�
• Donotuseoilorgreaseontheconcentratororitscomponentsas
these substances, when combined with oxygen, can greatly increase
the potential for a re hazard and personal injury�
• Ifyounoticeanyofthefollowing,discontinueuseandcontactyour
home care provider:
- unexplainedchangesintheperformanceofthisdevice
- unusualorharshsounds
- droppedormishandleddeviceorthepowersupply
- waterspilledintotheenclosure
- brokenenclosure
• UseonlywithPhilipsRespironicssimplyFLO AC power supply�
• UseonlyapprovedsimplyFLO accessories�

3
simplyFLO User Manual
• RepairsandadjustmentsmustbeperformedbyPhilipsRespironics
authorized service personnel only� Unauthorized service could cause
injury, invalidate the warranty, or result in costly damage�
• Periodicallyinspectelectricalcords,cables,andthepowersupplyfor
damage or signs of wear� Discontinue use and replace if damaged�
• Toavoidelectricshock,unplugthedevicebeforecleaning.DONOT
immerse the device in any uids�
• Yourhomecareproviderisresponsibleforperformingappropriate
preventive maintenance at the intervals recommended by Philips
Respironics�
• Forproperoperation,yourdevicerequiresunobstructedventilation.
Always make sure any openings in the case are not obstructed by
items which may impede ventilation� Do not place the device in a
small closed space (such as a closet)� The device should not be used
adjacenttoorstackedwithotherequipment.Formoreinformation,
contact your home care provider�
• Donotuseanextensioncord.
• Deviceoperationaboveoroutsideofthevoltage,temperature,
humidity and/or altitude values specied may decrease oxygen
concentration levels�
• Neverdroporinsertanyobjectintoanyopening.
• Beawarethattheelectricalcordand/ortubingcouldpresenta
tripping or strangulation hazard�
• UseonlypowercordssuppliedbyPhilipsRespironicsforthisdevice.
Use of power cords not supplied by Philips Respironics may cause
overheating or damage to the device and may result in increased
emissions or decreased immunity of the equipment or system�
• Theusershouldbeawarethatthereisnobackuppower.
• MedicalElectricalEquipmentneedsspecialprecautionsregarding
EMC and needs to be installed and put into service according to the
EMC information provided in this manual�
• Placethedeviceinalocationsoastoavoidpollutantsandfumes.
• PortableandMobileRFCommunicationsEquipmentcanaect
Medical Electrical Equipment� See the EMC section of this manual
fordistancestoobservebetweenRFGeneratorsandthesimplyFLO
device to avoid interference�
Warnings (continued)

4
simplyFLO User Manual
Cautions
A caution represents the possibility of damage to the equipment�
• Donotimmersethedeviceorallowanyliquidtoentertheenclosure.
Note: Additional warnings, cautions, and notes are located throughout the
manual�

5
simplyFLO User Manual
Symbol Key
Consult
accompanying
instructions
for use
REF Model number
No smoking SN Serial number
No oil or grease TypeBFAppliedPart
Keep away from open
ames
Drip proof equipment
Do not disassemble ~AC Power
DC power Class II (Double
Insulated)
Caution: U�S� federal
law restricts this
device to sale by or
on the order of a
physician�
Note: Also see the section on alarm indicators and screen symbols�
How to Contact Philips Respironics
To have your device serviced, contact your home care provider� If you need
to contact Philips Respironics directly, call the Customer Service department
at1-724-387-4000or1-800-345-6443(USorCanada).Youcanalsousethe
following address:

6
simplyFLO User Manual
System Overview
BeginbybecomingfamiliarwithyoursimplyFLO device�
1
2
3
4
5
6
7
Item Description Function
1 Control Panel Control switches and LCD display
2 Carrying Handle Hand grip area for lifting and transporting
the device
3 Patient Cannula
Connector
Oxygen output and connection point for
patient cannula
4 Power Input
Connector
ConnectionpointforPhilipsRespironics-
provided external power supplies: AC line
voltage
5Air Exhaust Vent Air outlet for enclosure ventilation fan
6Air Intake Vent Air inlet for enclosure ventilation fan
7 Data Port Input-Outputdatacommunicationwiththe
device�
Caution: For use by authorized service
personnel only.

7
simplyFLO User Manual
Control Panel
Item Description Function
1Power TurnsthedeviceOnandO
2 Alarm Silence Turnsaudiblealarmso
3 Display Screen Shows information about the operating
status of the device
4 Plus (+)/Minus (–) + Increases the displayed setting; – Decreases
the displayed setting
5 Patient Cannula
Connector
Oxygen output and connection point for
patient cannula
Run Time Screen Description
Item Symbol Description Function
1 Operating Mode Fordetaileddescriptions,referto
the“Alarm Indicator and Screen
Symbols”section�
2 Setting
3 Audible Alarm Status
4Alarm Type

8
simplyFLO User Manual
Operating the simplyFLO Device
1� Select a location that allows the concentrator to draw in room air
without being restricted� Make sure that the device is at least 15
to 30 cm away from walls, furniture, and especially curtains that
could impede adequate airow to the device� Do not place the
device near any heat source�
2� After reading this entire manual, connect the output cable of the
AC Power Supply to the simplyFLO power input connector�
3� Connect the AC Power Cord’s connector into the AC power
supply�
4� Connect the AC Power Cord’s plug into an AC outlet installed to
meet national or regional electrical code�
Note: The AC Power Supply is equipped with a green light, which illuminates
when it is connected to an energized AC power source�
5� Connect a nasal cannula to the patient cannula connector on top
of the device� Ensure that the cannula is routed to prevent it from
being pinched or kinked to avoid a disruption of oxygen ow�
Note: A standard single lumen nasal cannula and tubing (not supplied)
should be used to deliver oxygen from the device� The device works
with cannula tubing up to 100 ft� (30�5m)�
6� To start the device, press the Power button� After the rst press,
the display screen and the 4 button backlights turn on and you
will see a screen similar to the one shown below�
12
3
4

9
simplyFLO User Manual
Item DescrIptIon
1Push Power again to turn the device on�
2Total number of operating hours for the device�
3Software version in the device�
4Indicates the allowable modes conguration
of the device� Note: This may not display on all
devices�This is normal�
7� Press the Power button a second time to place the device in
operating mode� This second press helps prevent unwanted starts
or inadvertent changes in oxygen ow� The Introductory screen
momentarily appears, shown at left below, followed by the nal
operating mode screen, shown at right�
Every time it starts up, the device starts producing oxygen to meet
the specied setting� It may take up to twenty minutes to reach the
specied purity levels for the setting� It is safe to begin breathing
from the simplyFLO device immediately�
Note: When it is turned on, the device will automatically start at the ow
ratesettingusedwhenthedevicewaslastturnedo.Asaprecaution,
each time you start the device, verify the ow setting�
8� To set the device’s ow setting, press either the + or – button�
To increase the ow setting, press the + button� To decrease the ow
setting, press the – button�
The device can be set to �5, 1, 1�5, and 2 liters per minute (LPM) of
continuous ow�
Warning: It is very important to set your device to your prescribed level
of oxygen ow� Do not increase or decrease your ow rate from
your prescribed level until you rst consult with your health care
professional�
9. Besureoxygenisowingthroughthecannula.Ifitisnot,refertothe
Troubleshooting section of this manual�

10
simplyFLO User Manual
10� Position the nasal cannula on your face, as shown below, and breathe
normally through your nose�
11� When you are ready to turn your simplyFLO device off, press the
Power button� The screen below appears�
12� Press the Power button a second time and the simplyFLO device will
turn off�
13� Rather than pressing the Power button a second time, when this
screen is displayed, the backlight intensity may be increased or
decreasedbyrepeatedlypressingthePlus(+)orMinus(-)keyuntil
the desired backlight intensity is achieved� The device may then be
powered off using steps 11 and 12 above�

11
simplyFLO User Manual
Alarm Indicators and Screen Symbols
Visual, Audio
Indicators Description What To Do
A sequence of
3 long beeps
+
1 short beep
that repeats
every 4 seconds�
Low Oxygen
Concentration Alarm
This alarm occurs when
the device is delivering
a lower concentration of
oxygen than specied�
This alarm can be
silenced by pressing the
Silence button�
Note: This alarm occurs
when the internal O2
sensor reads <82% O2�
Thisalarmwillturno
if the system is able to
recover from the fault
and achieve >84% O2�
Change to another
source of oxygen and
contact your home
care provider�
A sequence of
3 short beeps
+
3 long beeps that
repeats every 4
seconds�
Technical Fault Alarm
This alarm occurs when
the device has a general
malfunction and the
device is no longer
operating properly�
The device may or
may not shut down
depending on the
severity of the alarm�
This alarm can be
silenced if the
symbol appears
on-screen.Ifnot,the
usermustturnothe
power to silence the
alarm�
If this alarm occurs
again, change to
another source of
oxygen and contact
your home care
provider�

12
simplyFLO User Manual
Visual, Audio
Indicators Description What To Do
A sequence of
3 long beeps
+
1 short beep
that repeats every
4 seconds�
No Flow Alarm
This alarm occurs when
the device detects there
is no oxygen owing in
the patient cannula� This
alarm can be silenced
by pressing the Silence
button�
Check the cannula
for kinks or other
obstructions that are
stopping oxygen ow
through it�
Alarm Symbol
This symbol appears
when an event occurs
that generates an
audible alarm�
Refer to the
associated alarm
indicator also being
displayed�
Alarm Silenced
Symbol
This symbol appears
when you have pressed
the alarm silence button
on the control panel to
silence an audible alarm�
Refer to the
associated alarm
indicator also being
displayed�
Attention
This symbol appears
when corrective action
is required�
Ensure that the intake
and exhaust vents
are not blocked�
Allow the device to
warm up� If the alarm
continues, contact
your home care
provider�

13
simplyFLO User Manual
Visual, Audio
Indicators Description What To Do
1st press of the
Power button
= 1 beep�
2nd press of the
Power button to
turndeviceOFF
= 3 beeps
On/O Symbol
This symbol appears
when the device is
powered on, or is ready
tobeturnedonoro.
Press the Power
button to turn the
deviceonoro.
Note: To prevent
inadvertent starts
and stops, the device
requires two presses
of the Power button
toturnitonando.
1 short beep
Flow Control Setting
The large number
on the right side of
the screen shows the
oxygen ow setting�
(In this example, it is
2�) This number can
range from �5 to 2 for
ContinuousFlow.
If this is your ow
setting, no action is
needed�
If this is not your
ow setting, press
the + button to
increase this number
or press the – button
to decrease this
number�
Constant audible
alarm
Loss of Power alarm
The simplyFLO will
sound a constant
audible alarm if the
device detects it has
lost sucient power to
operate properly�
Verify that the device
is plugged into an
appropriate external
power source� On the
simplyFLO AC power
supply, verify that the
green LED is illuminated�
If the device has in fact
lost power, the alarm
can be silenced by tilting
the device 90 degrees to
the left or right� If power
cannot be restored to the
device, change to another
source of oxygen and
contact your home care
provider�

14
simplyFLO User Manual
Troubleshooting
The table below lists common problems and actions you can take� If you are
unable to resolve a problem, please contact your home care provider�
Problem Possible Cause What You Should Do
Device Won’t
Turn On
Power button not
pressed twice�
Check that the power cord is
plugged in� Press the power button
twice�
Device Will Not
Deliver Oxygen
simplyFLO is not
turned on�
Press the power button twice�
Cannula tubing is
kinked or twisted�
Make sure the tubing is connected
properly to the oxygen outlet port
and that it is free of any obstruction�
Device malfunction� Contact your home care provider�
Oxygen
NotAtFull
Concentration
Device is warming
up�
Wait 10 minutes for the device to
deliver oxygen at the prescribed
concentration� If the condition
persists, contact your home care
provider�
Alarm Occurs The device needs
your attention�
See the Alarm Indicators and Screen
Symbols section for information
about specic alarms and what you
should do�

15
simplyFLO User Manual
Connecting the Optional Humidier
Note: Application accessories shall include a means to reduce the
propagation of re�
Note: A bubble humidier may be used with the simplyFLO�
Warnings
• Onlyusethehumidierconnectortubingsuppliedwiththe
SimplyGo/simplyFLOHumidierConnectingTubekit(REF1101172).
• Donotoverllhumidier.
• Donotreversetheoxygeninputandoutputconnections.Waterfrom
the humidier bottle will travel through the cannula back to the patient�
Note: Only connect the humidier if prescribed�
To connect the humidier:
1� Remove the cap from the humidier bottle�
2. Fillthehumidierwithdistilledwatertothelevelindicatedbythe
manufacturer�
3� Replace the cap and make sure it is tightened securely�
4� Attach the humidier bottle adapter tube to the humidier bottle
by turning the wing nut on the bottle counterclockwise until it is
fastened securely�
5� Place the humidier bottle in a secure location on a level surface, or
use the simplyFLOHumidierBottleholder(REF1076829).
6� Attach the oxygen tubing from the humidier bottle assembly to the
oxygen outlet connector on the simplyFLO�
7� Attach the cannula tubing to the humidier bottle outlet�
8� After assembly is complete, make sure the oxygen is owing through
the cannula�

16
simplyFLO User Manual
Caring for your simplyFLO System
Cleaning the Device
Warning: To avoid electrical shock, do not remove the simplyFLO covers� The
covers should only be removed by authorized service personnel� Do
not apply liquid directly to the covers� Do not use alcohol, solvents,
polishes or any oily substances on the device, as they are ammable�
Caution: Do not allow liquids into any of the controls, the interior of the case,
or the oxygen tubing connector� If this occurs, contact your home
care provider for assistance�
The exterior cover of the device should be cleaned as needed:
1. Turnthedeviceoanddisconnectfromthepowersourcebefore
cleaning�
2� Clean the device exterior using a damp cloth with a mild household
cleaner and wipe it dry� Or, if you use medical disinfectants, be sure
tofollowthemanufacturer’sinstructions.Fordisinfection,Philips
Respironics recommends the following:
- DiscideUltraTowelettes:Manufacture-Palmero,www.palmero-
health�com (or equivalent)
Cleaning the Accessories
Followtheinstructionsbelowwhencleaningtheaccessories.
AC Power Supply/Power Cord
The AC power supply and power cord should be cleaned as needed�
1� Disconnect cords from device before cleaning�
2� Clean the cords using a cloth with a mild household cleaner and wipe
dry�
Cannula and Tubing
Clean and replace the cannula and tubing as instructed by the manufacturer
and your home care provider�

17
simplyFLO User Manual
Humidier
Clean and replace both the humidier bottle and humidier tubing according
to the manufacturer’s and your home care provider’s recommendations�
Device Storage
Store your device in a place where it will remain clean and dry�
Caution: Do not store your device or accessories in extreme temperatures,
below-4°F(-20°C)orabove140°F(60°C).
Preventive Maintenance
This device does not require routine servicing� Please refer to the simplyFLO
Service Manual for detailed maintenance instructions�
Device Disposal
Dispose of the device in accordance with local regulations or contact your
home care provider�
Traveling With Your System
With your simplyFLO system and proper advance planning, you can enjoy
travelingwithinyourcommunityandbeyond.Beforeyouleave,makesure
you pack the following:
• ACpowersupplyandconnectorcord
• Travelcase(optional)
• Extracannulas
Also, be sure to take the telephone numbers of your home care provider and
physician in case of an emergency�
This manual suits for next models
1
Table of contents
Languages:
Other Philips Oxygen Equipment manuals