ー3ー
PKI-0045
ー6ー
PKI-0045
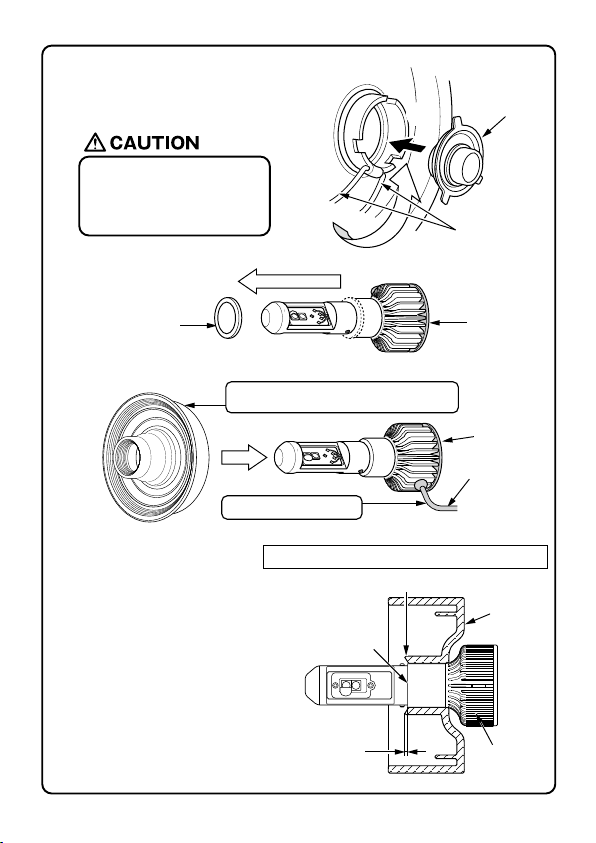
(6)Take the O-ring that was removed in Step (4) and install it to the LED bulb.
(7)Install the metal cap section to the LED bulb following procedures (Steps ① to ⑥) as
shown in the following illustrations.
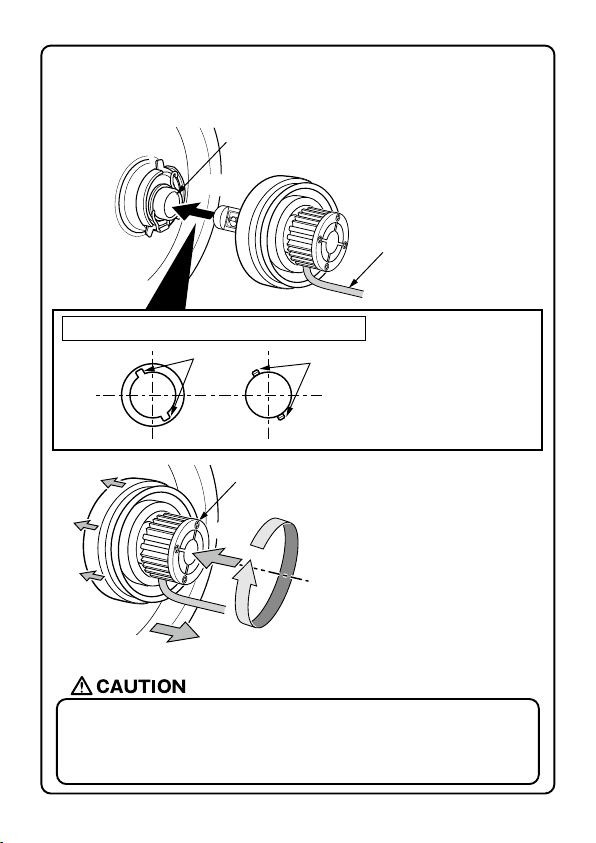
● If the LED bulb is not firmly inserted and then forcibly rotated in this condition it may
break the plastic section of the metal cap. Be extremely careful when inserting the
LED bulb. Make sure to follow instructions when inserting the LED bulb as described
above (Step ③) before rotating it in a clockwise direction.
① Prepare the harness that will be
attached to the LED bulb face down.
② Insert the small screw part
of the LED bulb into the
depressed groove section
of the metal cap.
③ While pressing it in firmly.
④ Turn it clockwise until it does not turn
anymore (approx. 30°) and then lock
the LED bulb in place.
⑤ Verify the LED bulb is firmly locked in
place. If it comes loose, repeat Steps
③ and ④.
⑥ Insert the original rubber cap into the
headlamp unit.
metal cap
groove section Small screw
LED bulb
LED bulb
Illustration of LED bulb assembly viewed from the back
①
②
③
④
⑤
⑥
●
If there is abnormal vibration or sound when the vehicle is in motion, immediately stop the vehicle in
a safe location and inspect the vehicle.
●
Keep the product out of reach of infants. Otherwise infants may swallow or break the product, leading
to injury.
●
When the lamp is lit, the lens becomes extremely hot. Do not wash the vehicle while the lights are on
or immediately after turning them off.
●
When this bulb/lamp is tuned on, there is a possibility that noise interference may influence the radio
or other such devices. Please note that this is not a malfunction of any kind.
●
During heavy rain or when putting the vehicle through a car wash, condensation may build up inside
the lamp due to the difference in temperature inside and outside the lamp. Please note that is will not
affect the overall function of the lamp.
●
Do not leave the lamp on for an extended period of time while the vehicle is stopped.
Precautions for Use
●
As a result of replacing the bulb, the axis of the light may become misaligned. Therefore, after
replacement, check the lamp position and make necessary adjustments to the alignment.
●
Make sure not to touch the base part or the area that illuminates light. Also, prevent any type of oil
or dirt from adhering to the product. If the light is turned on in this condition, it may cause a lighting
malfunction.
●
Make sure to prevent moisture from adhering to the product. If the light is turned on in this condition,
it may cause a lighting malfunction. If moisture is present, let it dry out thoroughly before use.
●
Bulb replacement should be done safely in a flat place where a wide space is available.
Before replacement, stop the vehicle engine, apply the side brake, place the shift in parking or neutral
position, and pull out the key.
●
Do not yank on the harness when disassembling. Doing so may damage the harness leading to
overheating and potential failure.
●
Be careful not to lose the original bulbs by keeping them in a safe place after removal.
●
Verify the position of the product as well as the metal base of the connector. Check the proper
direction and the install it securely.
●
In the case of connector or terminal desorption, hold the connector terminal and straighten it out.
Please note that if excessive force is applied to the terminal it may break or it may no longer connect.
As a result it may cause damage leading to overheating and potential failure.
●
Make sure not to apply excessive force to the light emitting part. If this part is damaged, it may cause
a lighting malfunction. Please handle this product with extreme care.
Precautions for Replacement
lamp unit
lamp unit
metal cap
harness