Piaa 2000 Back-Up User manual

-1- PKI-0031
●Makesurethelampisinstalledsecurelybeforedrivingthevehicle.Ifanabnormalityisfound,adjustitimmediately.
●Avoidneedlessdisassemblyoflamporharnessasitmaycauseittofail.
●Ifthelensiscrackedordamagedinanyway,verifywhetherthereisanydamagetotheharnessortherelayharnessthatitis
connectedto.Ifthereisanydamagetothecordcovering,replaceitimmediately.
●Whenwashingthevehiclewithahose,donotapplyexcesswaterpressuretothelamp.Watermayseepinandcauesdamage
tothelamp.
※ The and marksindicatedinthismanualare
cautionarypointsrelatedtotheinstallationoftheproduct.
Toensuresafeandsecureinstallationoftheproduct,pleasefollowthesepointsclosely.
Touser … Whengivingthisproducttoathirdparty,alwaysincludethismanual
togetherwiththeproduct.
Toshopownersinstallingtheproduct … Afterinstallationoftheproduct,makesurethecustomerisprovided
withthismanual.
●Donottouchthelampwhilelitorimmediatelyafterswitchingitoffbecausethelampremainsextremelyhot.Severeburnsmay
occurasaresult.
●Donotlookdirectlyintothelightforlongperiods.Doingsomaycauseeyeirritationorvisualimpairment.
2000Back-Up
InstallationInstructions
ThankyouverymuchforpurchasingPIAAproduct.
Pleasereadthisentiremanualbeforeinstallationanduseofthisproduct.
●Thislampisprovidedwithabracketforuseasahangingtypelamp.Whenusingitinanuprightposition,makesure
thelogoiscorrectlydisplayed.Installbyrearrangingthebracket.
●Lampsarespecifiedtheattachmentpositiononeitherside.Makesurenottoinstallright-and-leftcontrary.
●Allworkproceduresshouldbecarriedoutinalocationwithadequatespace.Placetheshiftleverinneutralorintheparking
position.Turnofftheengineandsetthesidebrake.
●Donotbeginworkifenginepartssuchasradiator,oil-coolerorturbopartarestillhot.
●Donotmodifythelampsysteminanywayoritwillvoidthewarranty.
BEFORINSTALLATION
LAMPINSTALLATION

-2- PKI-0031
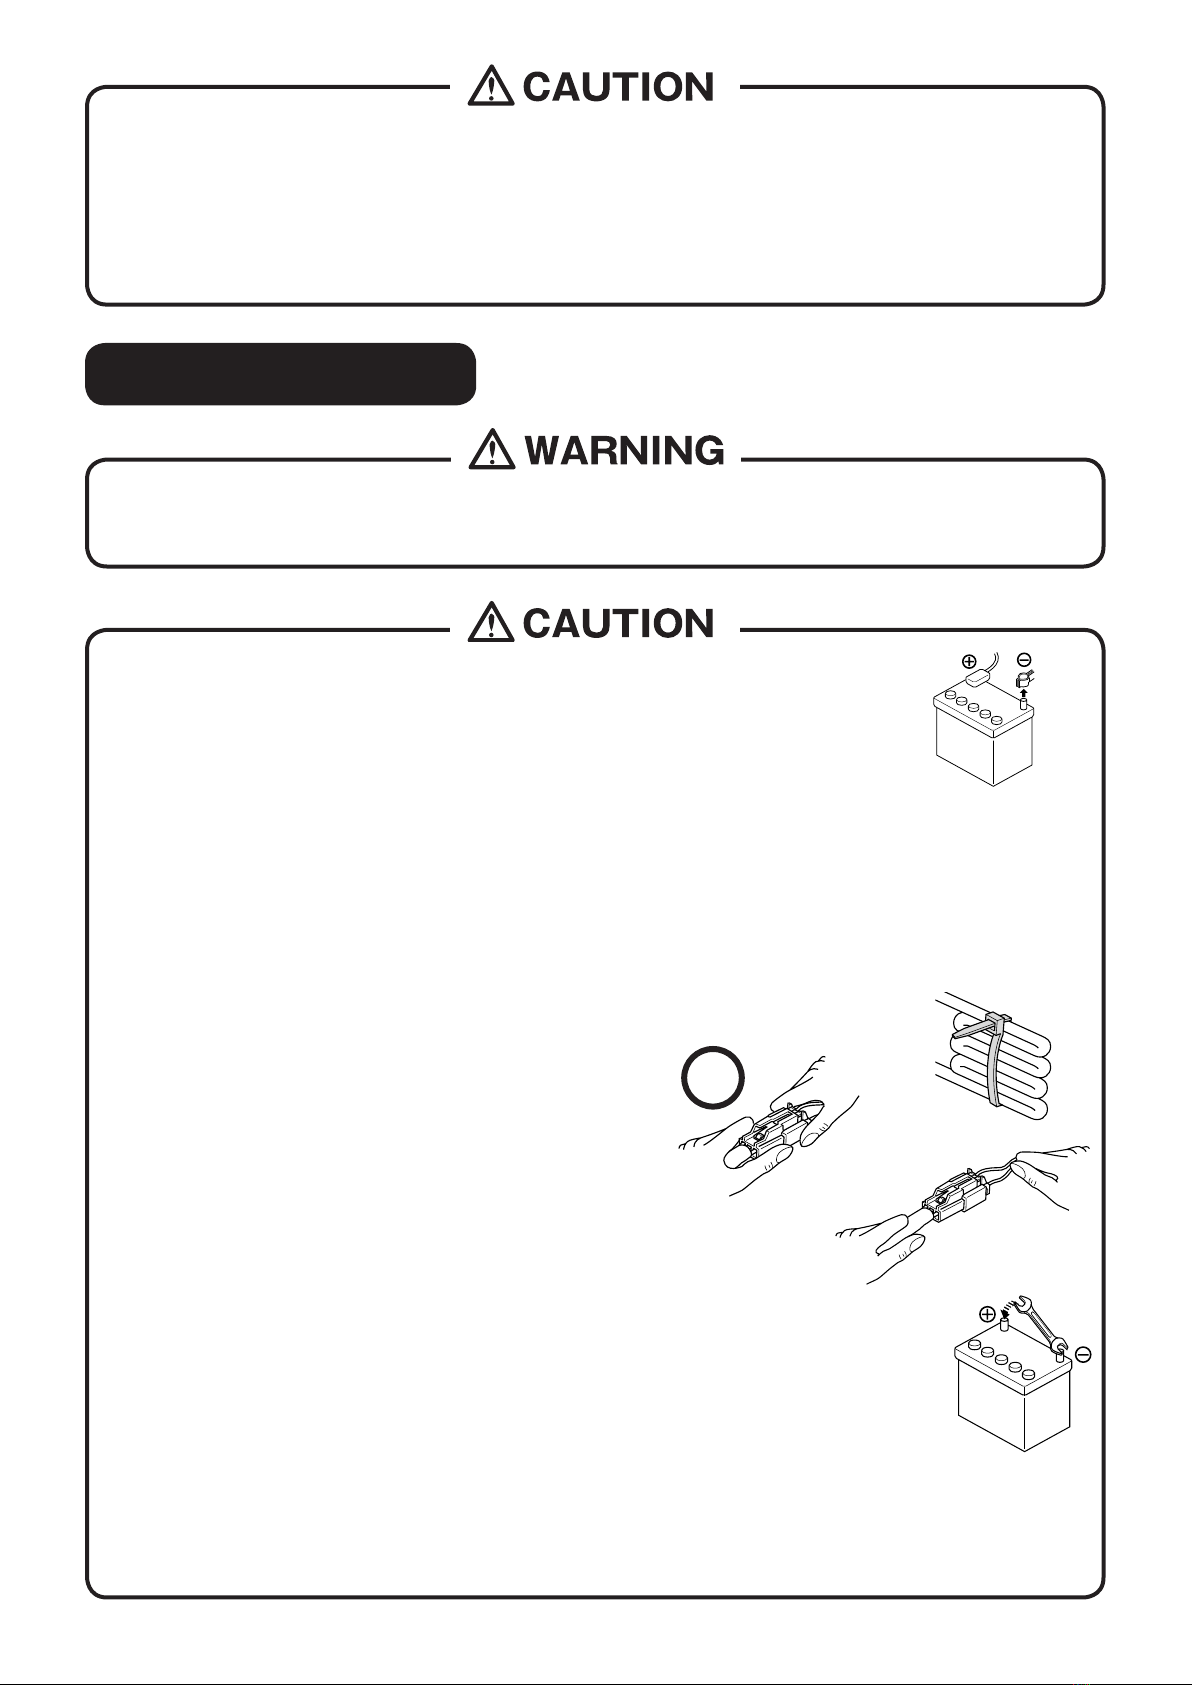
●Beforeyoubeginalwaysremovethe(-)terminal.
●Whenremovingthebatteryterminals,alwaysturnthekeytoOFFandremoveit.
Turnallotherelectricalunitsoffsuchasthelightswitch.
●Verifythe(+)harness(white),(-)harness(black)and(+)switchharness(white/black)beforeconnecting.
●Installtheharnessinapositionwhereitwillnotmakecontactwithhightemperaturesurfacessuchastheengine,
radiatororenginecompartment.
●Arrangetheharnesssothatitdoesnotmakecontactwithmovingparts.
●Donotplacetheharnessonhigh-voltagewiressuchasbrakeorair-conditioningwires.
●Iftheharnessmakescontactwithapartoftheengine,applyalengthofordinarycushionedtapearoundtheharness.
●Donottietheharnessinabundlebybendingintotoomanyfolds.Therelayharnessmayoverheated.
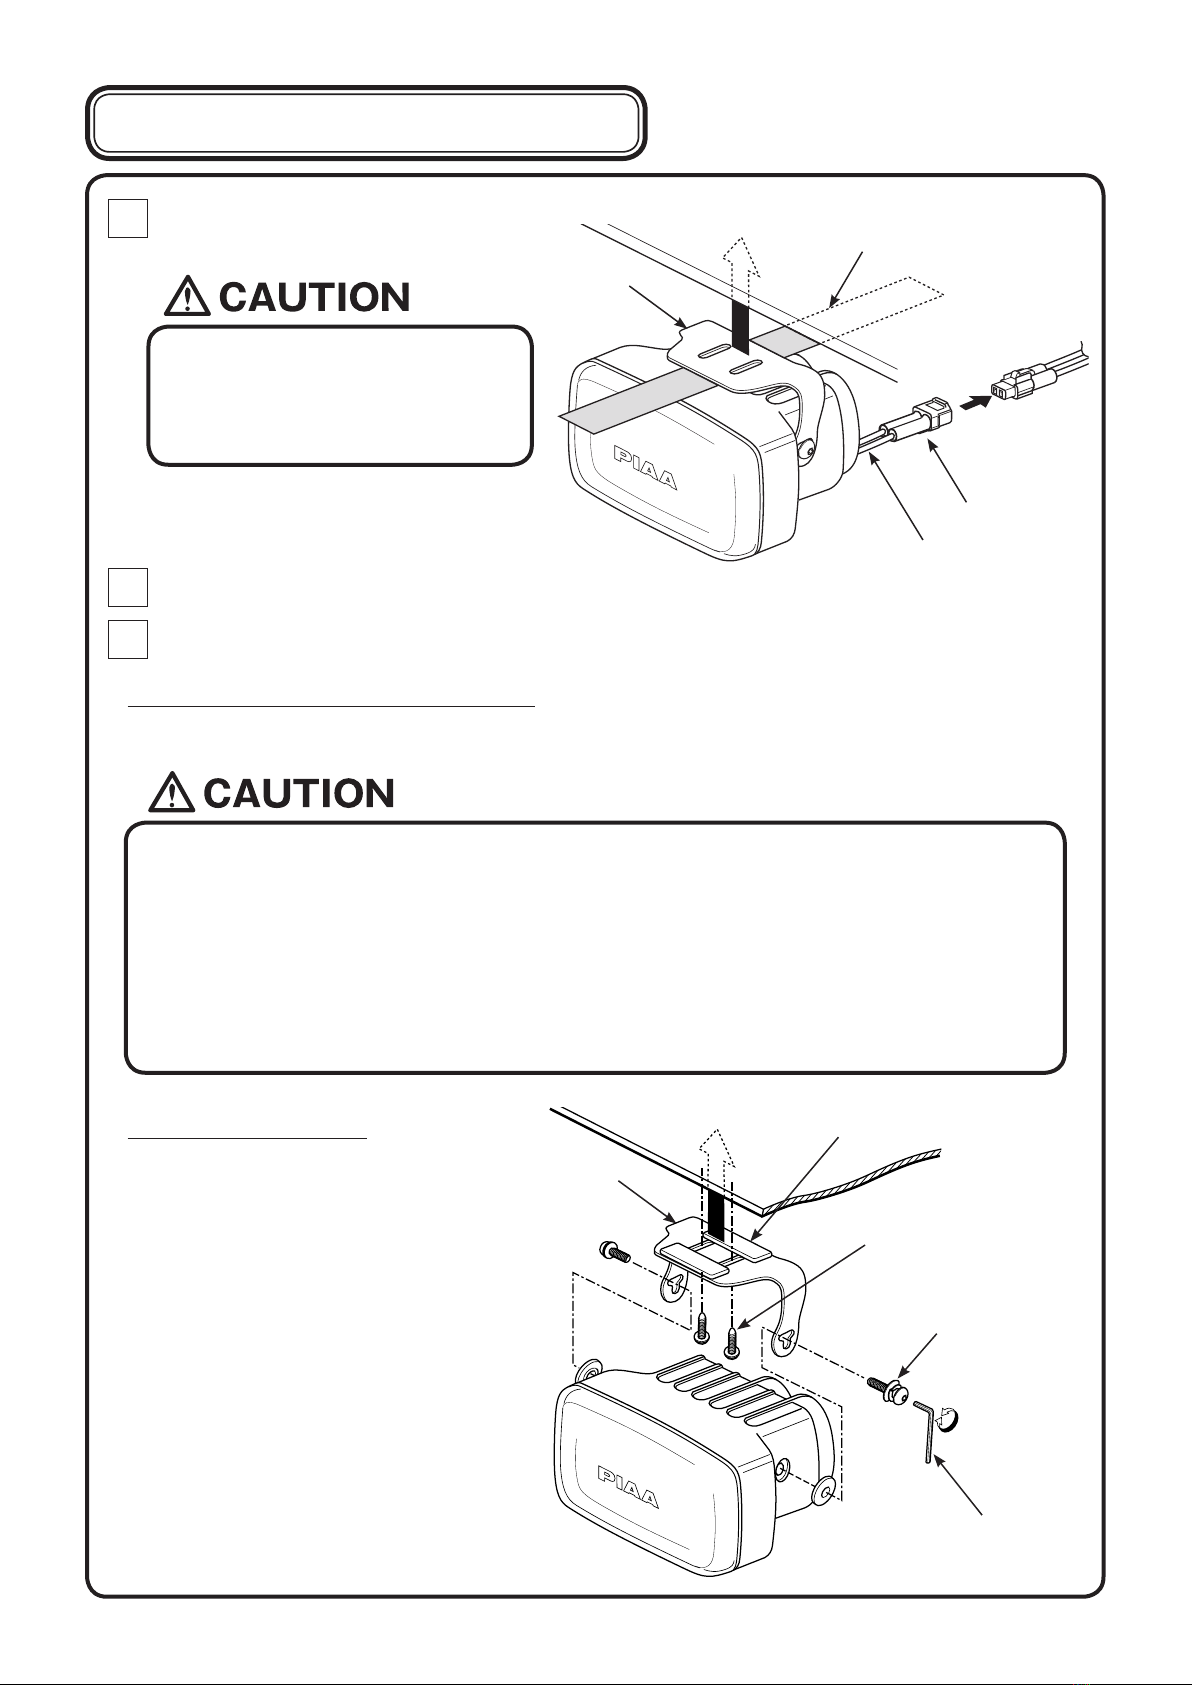
●Whenconnectingtheterminal,makesuretoinstallitcorrectlyand
secureitintoposition.
●Makesuretheharnessdoesnotsag.Useaharnessband
ofvinyltapetosecureitinplaceinsidetheenginecompartment.
●Whenremovingtheterminal,holdthemainbodyoftheterminal
andpullitout.Ifexcessforceisusedtopullthecord,itmaydamage
theconnection,whichcouldcauseittooverheat.
●Beforeconnectingittothebattery,verifythewiringarrangement.
●Afterallwiringiscomplete,confirmthatitworksproperly.
●Donotdrawpowerfromthebatteryonaregularbasisasitmaycauseabatterydrain.
●Donotmodifythelampharnessinanyway.Suchmodificationsmaycauseittooverheat
orshort.Insomecases,itmaycausethevehicletocatchfire.
PIAAwillnotbeliablefordamagecausedbysuchmodifications.
●Whenremovingthebatteryterminals,donottouchthe(-)and(+)terminals
simultaneously.Anelectricalshockmayoccur.Wearrubbergloveswhencarryingoutsuchworkprocedures.
●Makesurethe(-)and(+)terminalsdonotmakecontactwithmetal.
Itcanbeextremelydangerousifashortoccurs.
●Whenthebatteryterminalisremoved,memoryrelatedtotheclock,radio,audiosystemetc,willbeaffected.
Afterallworkproceduresarecompleted,resettotheoriginalsettings.
(Foradjustmentproceduresrefertoyourcarʼ sinstructionmanual)
●Whendoingwiringwork,strictlyfollowthecautionarypointsmentionedbelow.Incorrectorfaultywiringmaycausethelamp
tooperateimproperly.Insomecases,itmaycausethevehicletocatchfire.
●Beextremelycarefulwhenhandlingthelampandharness.Ifdroppedorexcessiveshockisappliedtothelens,bulbor
harness,itmaycauseirreversibledamage.
●Donotaddadditionalholestothemainbodyofthelamp.Also,donotapplyadhesivesorstickerstothelampparts.
●Makesureallboltsaretightlysecure.Ifthereareanylooseboltstightenthemaccordingly.
●Afterinstallingthelamp,makesuretheheadlamps,wipersandhornareworkingnormally.
×
×
×
WIRINGINSTALLATION

-3- PKI-0031
※Pleaseusethetoolsindicatedbelow.
● Philipʼ sheaddriver
※ Verifythatallthepartsareincluded.Ifapartismissing,pleasecontactyoulocaldistributor.
ProductDetails
● Vinyltape ● Pliers
ToolsRequired
① Lampmainunit(2units)
⑦ Hexagonwrench(1pc)
⑤ One-touchconnector(1pc)
⑥ Wiretie(10pcs)
③Double-sticktape
(6pcs.-2spare)
④Screw(4pcs)
② Relayharnessset
(LR-22E)[1set]

-4- PKI-0031
Bracket
Double-sidetape
(Item3)
HexagonBolt
● Makesurethelampcanbeadjustedupanddown(beammustbeadjustedsothatitshinesatleast40maheadof
thevehicle.)Ifitcannotbeadjusted,itmustbere-installed.
●Theremustbebetween30mmto35mmoneithersideofthelamptoallowforproperadjustment.
●Ifusingascrew,makesurethereisadequatespacebetweenthebracketandthelamp
(wherescrewwillbeinserted).
● Installthelampbodysoitdoesnotrubagainstthesurfaceofthebumper.Heatmaycausetheplastictodeform.
Allowbetween5mmto10mmbetweenlampbodyandvehiclepart.
● Whenusingabracketavailableonthemarket,makesuretheboltsyouremovefromthevehicledoesnothinderits
performance.
● Donotinstallonanunstablelocation,itmaycomelosewhiledriving.Thismayaffecttheoveralllifeofthebulb.
Inadditionitmaydamagethevehicleorthemainbodyofthelamp.Makesureyouinstallthelamponastableand
securelocation.
◆Whenyouhavedecidedtheinstallationmethod……
(1) Rearrangethebracketaccordingtoyourneeds,
andapplydouble-sidetape(Item3)andone-side
tapeasshowninthediagrambelow.
(2) Holdthelampuptowhereitwillbeinstalledonthevehicle.Verifythegapbetweenthelampand
surroundingobstacles.
Morethan3mmisrequired
Lampbody
Spacer
Sectionwithatleast
3mmgap(slantline)
Screwstop.
Makesuretheinstallation
positioniscorrectandthe
logowillnotbeupside
down.
Check!
Hexagonwrench
(Item7)
【1】PreparationforInstallation

-5- PKI-0031
OFF
ON1 ON2
Thenumbersshowninthefigurebelowindicatethesequencethepartsshouldbeinstalled.
Removethe(-)terminal
fromthebattery.
Connectthelampground(-)wiretochassy
ground.Thisconnectionshouldbemetalto
metal. Scrape all rust, paint, dirt and under-
coatingfromtheconnectionlocation.
Connectthelampharnessto
theconnector.
Firstgroundtheterminalthen
takethe(-)cord(black)and
connectittothe(-)terminal.
Takethe(+)terminal
cord(white)andattach
ittothe(+)terminaland
connecttothebattery
Attachthe(-)terminalto
thebattery
【2】RelayHarnessInstallationSequence
Securerelaybolt
sothatconnector
isfacingdownward.
Facing
down
Connecttheswitchpower(+)wiretoa
positive(+)leadforthereverselights.
Todosousethesuppliedconnectoror
anyconnectorthatissuitableforthis
application.
Afterallwiresareconnectedtestthesystem
foroperation.
Cord
One-touchconnector
RunthePIAAharnessfromtheenginecompartmentnext
to the battery back to the PIAA back-up lamp.Run the
switchintothedriverscompartmentandmountitina
locationthatiseasyforthedrivertocontrolandsothatit
isoutofthewayofotherautomotivefunctions.
Afterlamphasbeeninstalled,verify
therelayharnessdoesnotmake
contactwiththeengineʼ smoving
partsorsectionsthatemitextreme
heat.Usethewiretieincluded(Item6)
andsecuretoharnessesinsideengine
compartment.
Harness Wiretie
IftheswitchisinpositionON1thePIAAback-uplampwillbeon.
IftheswitchisinpositionON2thePIAAback-uplampwillonlycomeonwhenthevehicleisinreverseandthe
vehiclesfactoryreverselightsareon.
IftheswitchintheOFFpositionthePIAAback-uplampsystemwillbeoff.
Wiresfromfusebox
andrelaymustbe
pointingdown
Battery
Black
Black
Black
Ground(-)
Ground(-)
Whitewith
RedDots
WhiteWith
RedDots
Main
Power(+)
(+)Switch
Power
WhiteWithRedDots
WhiteWithRedDots
WhiteWith
RedDots
Removethe(+)terminal
fromthebattery.

-6- PKI-0031
Temporarilysetthebracketwithmaskingtape
andthenmarkthecorrectposition.
Removethelampharnessandtakeoutthelamp.
◆Ifusingonlythedouble-sidetape.
Installthelampaccordingtothemarkingmadepriortoinstallation.
Peeltheprotectivesheetfromthedouble-sidedtape(Item3)andapply.
●Whenusingthedouble-sideadhesivetape,cleanthesurfacewheretapewillbeapplied.Useacleanclothorsponge
andmakesuredirt,grease,waxetc.,arecompletelyremoved.Ifsubstancescannotberemoved,itmaynotadhere
properly.Inparticular,avoidusingleatherwax,tirewaxandalsoanytypeoforganicsolvent.
●Whenusedinlowtemperatures,theadhesivesubstancetendstoloseitsstrength.Useadrierorsimplywarmup
theadhesivesurfacebeforeapplying.Whenusingadrier,avoidmovingittooclosetothebumperasitmaycause
ittodeform.
●Afterinstallation,avoidexcessspeedsanddonotwashfor1to2days.
●Ifappliedincorrectly,aspecialdouble-sidedadhesivetapeisavailableatyourlocalPIAAdealer.
◆Ifscrewsareused.
(1) Loosenthehexagonboltwiththewrench
providedandremovethebracketfromthe
lamp.
(2) Peelofftheprotectivesheetfromthe
double-sidedtapeandapplyittothe
bracket.
(3) Fixthebracketinplacewiththescrews.
(4) Installthelampontothebracket.
【3】LampInstallationProcedures
●Makesuretosetpositionproperlybefore
permanentlysettingthelamp.Also,
thoroughlycleanthesurfaceofthe
installationpositionbeforehand.
1
2
3
Connector
LampHarness
Bracket
MaskingTape
Bracket
Screw
Hexagonbolt
Hexagonwrench
(Item7)
Double-sidedtape(Item3)

-7- PKI-0031
Pleasethoroughlyreadthereplacementprocedures.
● Becausethereishigh-pressureinsidethebulb,donotapplyexcesspressureorscratchordamageitinanyway.
Damagetothebulbmaycauseinjury.Itmayalsoaffecttheoverallperformanceofthelightingsystem.
● Lightingthelampwithoutprotectionmaycauseittoburstandcanbepotentiallydangerous.
Donotactivatewithoutpropercovering.
● Donotlookdirectlyintothelightforlongperiods.Doingsomaycauseeyeirritationorvisualimpairment.
● Thelampandbulbcanradiateconsiderableheatwhileitisonorimmediatelyafteritisturnedoff.Considerablecaremustbe
takentovoidgettingburned.Donottouchwithbarehandsormakecontactwithskin.
WhencarryingoutreplacementproceduresalwaysswitchthepowerOFFandallowadequatetimeforittocooldown.
【4】CautionWhenReplacingtheBulb.
● Donottouchtheglasssectionofthebulborallowanygreaseoroiltogetontotheglass.Ifitisnotwipedcleanitmay
causetheglasstocrackorworseitmayburst.Ifyoutouchitaccidentlyorifstainedinanyway,usealcoholtowipeitclean
beforeuse.
● Donotallowwatertopermeatethebulb.Ifthebulbisusedundersuchconditionsitmaycauseittobreak.Ifthereisany
evidenceofwater,wipeitawayandallowittodrybeforeusing.
● Allworkproceduresshouldbecarriedoutinalocationwithadequatespace.Thesurfaceareashouldalsobeflatandlevel.
Placetheshiftleverinneutralorintheparkingposition.Turnofftheengineandsetthesidebrake.
● AlwayssetthefoglampswitchtoOFFwhencarryingoutworkprocedures.
● Ifdisassemblingthelampforreplacementpurposes,donotpulltheharnesswithexcessiveforce.Iftheconnectingsection
oftheharnessisdamageditmayoverheatposingsignificantdanger.
● Holdthemainunitfirmlywhenconnectingorremovingtheconnectororterminal.Faultyconnectionmaycauseunnecessary
damagetothebulb.Pullingthecableitselfmayalsocausedamageandoverheating.
● Removeorinsertconnectorandterminalsatastraightangle.Ifexcessiveforceisapplied,itmaydamagetheterminalorbulb.
● Verifytheshapeofthebulbʼ smetalfitting,andchecktheproperdirectionbeforeinserting.Also,makesuretoverifythe
harnessconnection.Improperinstallationmaycausetothebulbtocomeloseoroverheat.Itcanalsominimizethelifeofthe
bulb.
● Afterreplacingthelampandreassemblingtheunit,makesuretheharnessisnotinadvertentlycaughtintheassembly.
Suchconditionsmaycauseashort.
● Disposeofusedbulbsproperly(non-combustible)andavoidbreakingtheunit.
● Donotusethebulbwithoutitsprotectivecovering.Inflammablematerialplacednearitmaycatchfire.

-8- PKI-0031
Loosenthe4screwsonthebackofthelamphousing.Re-
movethelensunitfromthehousingunit.
Screw
Lampbody
● Whendisassemblingthelamp,
donotpullwithexcessiveforce.
Iftheharnesssectionisdamaged
itmaycauseittooverheat.
● Makesurenottomisplacethe
screwsthatwereremoved.
Lensunit
【5】BulbReplacementProcedures
1
Clasp
Prong Roundnotch
Squarenotch
Movethesleeveasideandremovethe(+)harnessfromthebulbʼ sleadline.
Settheendofthebulbholdertotheroundnotchofthebulbʼ smetalfitting.Setsothattheclaspcatchesonthe
squarenotchlocatedontheuppersectionofthebulb.
Bulbholder Cross-sectionofbulb
Sleeve
(-)Harness(black)
Leadline
Bulb
Whilepushingtheclaspholdingthebulbholder,removethebulbfromthelensholder.
2
3
2
3
Clasp
Cross-section
Bulb
Clasp
4
Bulbholder
(+)Harness
● Donottouchtheglasssectionofthebulborallowanygreaseoroiltogetontotheglass.
Ifitisnotwipedcleanitmaycausetheglasstocrackorworseitmayburst.
Ifyoutouchitaccidentlyorifstainedinanyway,usealcoholtowipeitcleanbeforeuse.
● Makesuretosetaccordingtotheshapeofthenotchesprovided.

-9- PKI-0031
Connectthebulbʼ sleadwiretotheharnessforthe(+)terminal.Makesurethesleevecompletelycoverstheterminal.
Sleeve
(-)Harness(black)
Leadline
Bulb
(+)Harness
5
4
Clasp
Bulb
Clasp
5
①
②
● Improperconnectionmayleadtoashortorcanbeapotentialfirehazard.
● Makesurethesleevecoverstheterminalsectioncompletely.
Cross-section
Combinethemainunitofthelensandlamphousing.Usethe4screwstofirmlyfixtheunitintoplace.
Gentlypullthelampharnessandpulloutexcessslackfrominsidethelamp.
Re-adjusttheangleofthelampsbeam
Screw
Lampbody
LensUnit
6
7
8
Figureseenfromfront
Sleeve
As shown in the figure, place the sleeve
overthelamphousing.
● Afterreassemblingtheunit,makesuretheharnessisnotinadvertentlycaughtinthelamp
assembly.Suchconditionsmaycauseashort.Itmayalsocausewatertoseepintotheunit.

-10- PKI-0031
Verifyeachsectionaccordingtothefollowing.
1 Afterinstallation,ifthelampdoesnotactivate
→ Checkthewiringandmakesuretherearenofaultyorirregularconnections.
●Iftheswitchilluminationdoesnotlightup.
→ Verifythe(+)wirefromtheswitchisproperlyconnected.Ifitisnotcorrectlyconnectitwillnotactivate.
→ Verifythefuselocatedonthevehicleʼ swiringsystem.(theswitchʼ s(+)wireshouldbeconnectedtothe
fusebox).Ifitisburnedout,connectittoanothercircuit.
→ Checkthefusefortherelayharness.Ifitisburnedout,followinstructionsindicatedin
[3FusereplacementProcedures].
●Theswitchilluminationlightsupbutwhenoperatingitanaudible“click”isnotheard.
→ Iftheswitchitselfisfaulty,thesamesymptomsmayexist.Werecommendthattheentireswitchunit
bereplaced.
●Theswitchilluminationlightsupbutwhenoperatingitanaudible“click”canbeheard.
→ Checkthebulb.Ifitisburnedoutreplaceitaccordingly.
2 Ifthebulbsuddenlyfailstolightup…
→ Checkthebulbinsidethehousingandifitisburnedoutreplaceaccordingly.
→ Checkthefuselocatedinthevehicle.Ifitisburnedout,replaceaccordingly.
→ Checkthefusefortherelayharness.Ifitisburnedout,followinstructionsindicatedin
[3FusereplacementProcedures].
→ Theremaybecaseswhereeachterminalrelatedtospecificsectionsmaybeincorrectlyconnected.
Checkforanylosewiresandalsofordirtorgrime.
→ Waterorincorrectconnectionmaycauseanirregularelectriccurrentflow,whichcoulddamagethe
relay.Replacetherelayandcheckeachsectionoftherelayinstallationpositionandwiring.
→ Checktheswitch.Ifanabnormalityisfound,replaceitaccordingly.
3 FusereplacementProcedures
→ Ashortcircuitmayhaveoccurred.Checkthelampinteriorandwiringsystem.Ifanytypeofdamageis
foundreplaceaccordingly.(Non-replacementmayposeapotentialdanger)(Shortcircuitsaremainly
causedwhenwiresarecaughtintheassemblyorwhenthereisagapinthesleeveconnectedtothe
lampharness.Beextremelycarefulwhenreassemblingthelensunitorreplacingabulb.
→ Verifythewattagecapacityoftherelayharnessisaccurate.Usingabulbthatexceedstherelayharness
wattagecanbepotentiallydangerous.Alwaysusebulbsthatcorrespondtothewattagespecified.
4 Iflightfailstoturnoff
→ Therelaymayhavebeendamagedduetopermeationofwaterorfaultyconnection.Replacerelayand
makethoroughcheckofinstallationandwiringsystem.
→ Checktheswitchbutton.Ifanabnormalityisfound,replaceaccordingly.
5 Ifwaterpermeatestheinteriorofunit
※ Thelampgoesthrougha“breathing”action.Afterthelampisturnedon,ifitfogsupandthenclears
after2or3minutesthereisnoproblem.
→ Checktheproperdirectionoflens.AlwayssetlampsothatthePIAAlogoisupright.
→ Checktomakessurethattheventilationontherearsectionofthelampisnotrubbingagainstthe
bumper.Alsocheckthatitisnotfacingupwards.Makesuretheventilationfacesdownwardanddoes
notrubagainstthebumper.
【6】Troubleshooting……

-11- PKI-0031
【7】PIAALIMITEDWARRANTY
Withtheexceptionofbulbs,PIAACorporation,USA("PIAA")warrantsitsproductstobefreefrom
defectsinworkmanshipandmaterialsundernormaluseforaslongastheoriginalpurchaserowns
them.
EXCLUSIONS
ThisLimitedWarrantyspecificallyexcludesdefectsresultingfrommisuse,abuse,neglect,alteration,
modification,improperinstallation,unauthorizedrepairs,submersion,theft,vehiclecrash,orbyany
othertypeofimpact.ExceptfortheLimitedWarrantystatedabove,therearenowarrantiesofPIAA
productsoranypartthereof,whetherexpressorimplied.Anyimpliedwarrantyofmerchantability
oranywarrantyoffitnessforaparticularpurposeisexpresslydisclaimed.Somestatesdonot
permitthedisclaimerofimpliedwarranties.
LENSCRACKS
Crashorimpactdamageisnotcovered.Thiscanbedeterminedbyachiporscrapeonthelensor
thehousing.Stresscrackssometimesoccurwhenthelensissubjectedtosuddenandextreme
temperaturechanges.Astresscrackhasnochiporothersignofimpact.Stresscracksarecovered
underwarranty.
EXCLUSIONOFDAMAGES
InnoeventshallPIAAbeliableforanydamageswhatsoever(including,withoutlimitation,
consequentialdamages,incidentaldamages,ordamagesforlossofuse,lossofbusinessprofits,
businessinterruption,lossofbusinessinformation,lossoftime,inconvenience,orotherlosses)
arisingoutoftheuse,misuse,orinabilitytouseaPIAAproduct.PIAAreservestherighttochange
thedesignitsproductswithoutanyobligationtomodifyanypreviousproduct.Thiswarrantygives
youspecificlegalrights.Youmayalsohaveotherrightsthatvaryfromstatetostate.
REPAIRANDREPLACEMENT
IfaPIAAproductissuspectedofbeingdefective,itmustbesubmittedfreightprepaid,toeitheran
authorizeddealerordistributorforwarrantyinspection.Thereceiptorotherproofofpurchaseand
adescriptionoftheproblemmustbeincluded.Thereturnedproductwillbeinspected.Iftheproduct
isfoundtobedefectiveandcoveredbythisLimitedWarranty,thesoleremedyisrepairor
replacement,atPIAA'soption.Arepairedorreplacementproductwillbeshippedbackatnocharge,
andwillbewarrantedtobefreefromdefectsinworkmanshipandmaterialsundernormalusefor
aslongastheoriginalpurchaserownsit.Removal,installation,orreinstallationcostsarenot
coveredbythisLimitedWarranty.
PIAA CORPORATION, USA
For assistance call 503-489-6666 or 1-800-525-7422
www.piaa.com
PIAA CORPORATION
www.piaa.co.jp
Table of contents
Other Piaa Lighting Equipment manuals