manuals.online logo
Brands
  1. Home
  2. •
  3. Brands
  4. •
  5. PIKO
  6. •
  7. Motorized Toy Car
  8. •
  9. PIKO 56424 User manual

PIKO 56424 User manual

ffi#56424 PIKO SmartDecoder 4.1 Sound PluX22
for diesel locomotives BR V60
multiprotokoll
Description
The PIKO SmartDecoder 4.1 Sound PluX22 is a powerful multiprotocol sound decoder of the latest generation with
12 bit sounds, high sample frequencies, an output power of 2.5 watts and a significantly larger memory depth for a
highquality sound experience without interferences. lt can be used with DCC-, Selectrix and Motorola digital systems
and also with analog AC or DC systems. The decoder is RailCom@ and RailComPlus@ capable, the AC sound versions
as are also mfx-capable. The innovative P|KO SmartDecoder 4.1 Sound with its many braking distance functions is
capable to automatically recognize the operating mode and hasvarious configurationaloptionsforthe additionalfeatures.
The decoder works on a frequency of 18.75 kHz is therefore not only suitable for DC current but also for bell-shaped
armature motors ( {e.9. Faulhaber, Maxon, Escap) up to a permanent current of 1.2 A. Temporary higher currents up to
2 A are well tolerated. Setting of the motor characteristics is done via minimum, medium and maximum speed (simple
characteristic) or via the extended characteristic with individual adjustments for 28 drive positions. The decoder has
two headlight outputs depending upon direetion of travel and (depending on decoder version) up to seven additional
special function outputs. Over and above that, there are 3 sensor inputs, e.g. Reed Contacts or Hall Type Sensors on
the decoder, two are in the SUS|-lnterface with one as a solder pad. Slow moving extended shunting operations and
the three possibilities in starting out and brake action delays can be set by function keys.
Characteric'tics
' Suitable for DC cunent and bell-anchor motors up to 1.2 A,
. Quiet motor running by motor controlwith 18.75 kHz
,14,27,28, 128 gears, depending upon data format.
. Short (1-127) and long (128-9999)Addresses
. NMRAconformity
. RailCom@ and RailCom Pluso
. Adjustable minimum, maximum and medium speeds.
. Extended driving gear characteristics are adjustable.
. Shunting gear (half-speed) adjustable.
. 3 settings for startup and brake delay, individually
adjustable via F0 - F28,
. Headlight outputs in direction of kavel dimmable.
. 7 Specialfunction outputs, dimmable and adjustable in
direction of travel.
.4 logical outputs
. Adjustable activation of the light- and function outputs
adjustable for analog openation.
. Second dim function for lights adjustable from A1 toA7.
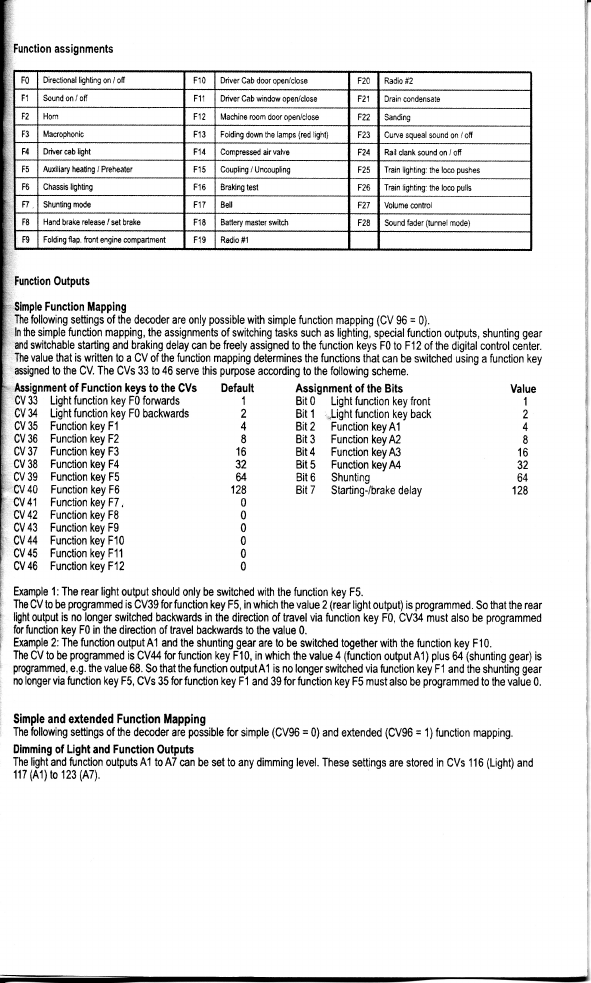
. Simple function mapping F0 - F12 for lighting A1 to A7,
startup, brake delay and shunting operations.
' Extended Function Mapping, F0 -F44 for switching
multiple outputs depending on linked conditions
. Train illumination disengageable.
. Function outputs: Blinking with variable shutoff time.
. Function exists: 2 phase for altemative flashers.
. Load dependent smoke generator controls.
. Firebox with adjustment parameters for brightness
changes and flicker rhythm.
'Shunting coupling and shunting tango.
. Fading in, or out of the lighting- and function outputs,
adjustable.
. Energy saving lighting efiect:After attaining maximum
brightness after time setting,
. Fluorescent' lighting, switching-on effect with adjustable
flash time and -number.
. I PWM banks with 6,4 modulation entries each for e. g.
American light effects such as Mars Light, Glra Light,
Strobe etc.
. Brakes with DCC braking signal, braking track with DC
cunent orABGBrakes.
.ABC-Slow Moving Distance with LENZ BM2
. 2 settings for braking distance in cm, activated byABC-,
DC- and D00-brake signal, as wellwith driving speed 0
with adjustable speed level step.
. 2 motor conhol types for a precise motor control with
many eontrol settings
. Motorola with 3 points for the functions F1 - F12 by
deploying the Motorola-Centers
. All outputs are secured against short circuits.
. Error memory for motor and function outputs as well as
temperature shutoff.
. ConventionalAC and DC operation with automatic
switch-over to the individual mode of operation.
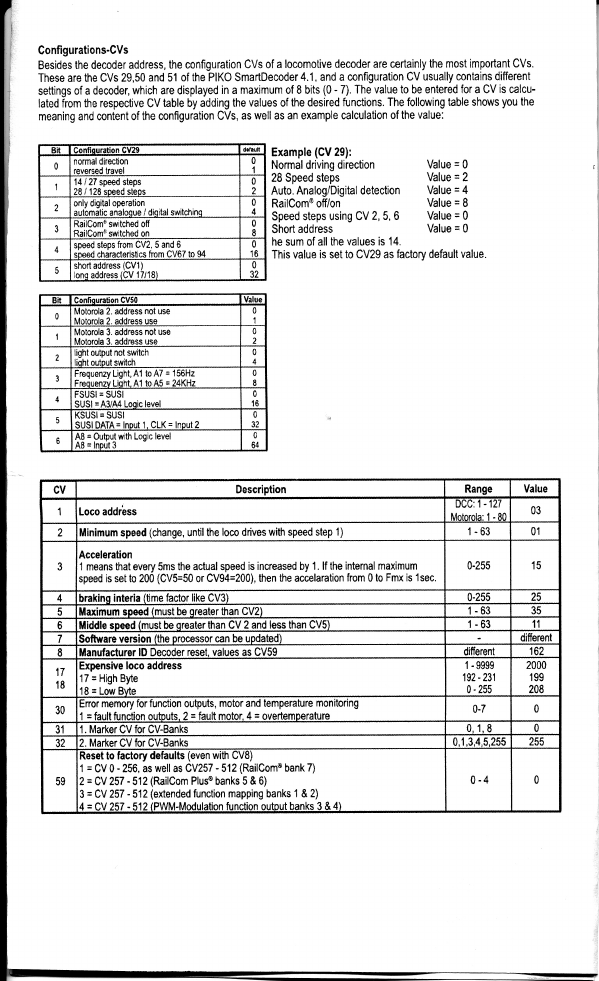
. All CVs must be programmed with digital devices with
DCC formats and Motorola.
. ln DCCoperation, programmable per register, CV
directly or page programming.
. Main track programming (DCC)
. Decoder programming lock.
Connection of the PIKO SmartDecoder 4.1 Sound
Remove the socket plug from the PluX 22 interface of your vehicle. Stick the locomotive decoder carefully into the same
place of the interface socket. Please note code above the missing PIN 11.
Make sure that no conductive connection is possible anywhere. Make sure that no short-circuits can occur even after
closing the locomotive. The first start-up should be canied out on the programming track when the programming mode
of the control unit is called up. Usually very small cunents flow during reading or programming, which do not damage the
decoder in the event of a short circuit
FrIK
Special Functions Al to A7
The special functions A1 to A7 of the decoder can only be used when the designated user are already connected to the
interfaces PluX22 in the vehicle or on when there are solder pads available on the main circuit board.
A short circuit with the motor, lighting, third rail pickup and wheels can destroy the device
and eventually the locomotive electronics!
Decoder Startup (delivered condition)
Enter address 3 into the control unit. The decoder operates depending on the data format used in DCC-Operation
with 28 speeds or in Motorola operation. Wth a RailCom Plus@ capable digitalcenter or with an mfxo capable digital
center, the decoder is up and running within a few seconds and can be operated immediately. lf the decoder is used on
conventional systems, it can be controlled with a DC orAC drive unit. The operating mode is automatically recognized
by the decoder. The status of functions F0 - F12 can be set for analog operation via CVs 13 and 14.
Analog Operation with AC or DC Voltage
The locomotive decoder is suitable for analogue operation with DC orAC voltage, which is seltdetected.
NOTE: ln DC operation, your vehicle will only start up at higher voltage (speed controller turned up furlhe$ than you
might have been used to in operation with analogue vehicles.
Function outputs in analog operation
It is possible to set the decoder in such a way that the function keys F0 - F12, as assigned in Function Mapping, can
also be switched on in analog mode. For this purpose, CVs 13 & 14 must first be programmed with a digital control
unit. The conesponding values can be found in the CV table.
Motorola
ln order to be able to reach the functions F1 - F12 when used with Motorola command stations, the decoder has
3 Motorola addresses, which are stored trinary in CV4749. These 3 addresses are also used for decoding. lf an
address is programmed decimal in CV1, the decoder automatically stores the trinary equivalent in CV47 up to ad-
dress 79. For example, in order to use Motorola locomotive addresses up to 255, CVs 47 - 49 must be programm€d-,,,,,.n,,...,,,
directly decimal via Motorola programming.
These CVs can be read but not programmed on the DCC programming track.
lf the CV47 is programmed via Motorola, CV1 is not changed and therefore the DCC data format in CV12 is
switched off, so that the decoder cannot be accessed by mistake via 2 addresses.
lf bit 5 (DCC Long address) is set in CV29, the Motorola data format is switched off except for Motorola program-
ming, so that the decoder cannot react to 2 addresses.
RailComo, RailCom Plus@
The RailComo technology developed by LENZ@ is based on the transmission of data from the decoder into the
specially prepared (Cut0ut) DCC digital signal on the track. Detectors must be located on the track to evaluate this
decoder data and, if necessary fonrvard it to the control center. The decoder sends, depending on the setting, the
decoder address and, when read out via the main track programming, CV values which can be displayed by the
digital control panel (depending on the detector and control panel). The CV29 RailComo can be switched on or off in
the decoder via bit 3 of the CV29 RailComE. Further RailComo settings can be made in CV 28. There, for example,
RailCom Plus@ is also switched on via bil 7. lf RailCom Plus@ is switched on, the decoder will automatically log on
to a RailCom Plus@ capable control unit (e. g. PIKO SmartControl) wilh its locomotive symbol, decoder name and
special function symbols within a few seconds. Thanks to this RailCom Plus8 technology, there is no need to store
locomotive data in the central control unit and no locomotive addresses have to be programmed into the decoder.
mft'
The PIKO SmartDecoder 4.1 for Sound supports the mff data format.
lf the digital central unit used is mfxcapable, the decoder with its locomotive symbol, decoder name and special
function symbols automatically logs in within a few seconds. Due to this mfxo technology, no locomotive data has to
be stored in the control center and no locomotive addresses have to be programmed into the decoder,
SUSI lnterface
The SUSI lnterface of this decoder is executed via the PluXZZlnterface.
Configurations-CVs
Besides the decoder address, the configuration CVs of a locomotive decoder are certainly the most important CVs.
These are the CVs 29,50 and 51 of the PIKO SmartDecoder 4.1, and a configuration CV usually contains different
settings of a decoder, which are displayed in a maximum of I bits (0 - 7). The value to be entered for a CV is calcu-
lated from the respective CV table by adding the values of the desired functions. The following table shows you the
meaning and content of the configuration CVs, as well as an example calculation of the value:
cv29 d.hult
0normal direction 0
1
114 / 27 speed steps
28 i 128 soeed steos 0
2
2only digitaloperation
automatic analoque / dioital switchinq 0
4
3RailComo switched off
RailCorno switched on 0
8
4speed sleps ftom CV2. 5 and 6
soeed characleristics from CV67 to 94 0
16
5shod address (CVl)
lono address iCV 17118) 0
32
Bit cvs{l Value
0Motorola 2. address not use
Motorola 2- address use 0
I
Motorola 3. address not use
Motorola 3. address use 0
2
2light output not switch
Iioht oulnut switch 0
4
3Frequenzy Light, Al to A7 = 156H2
Fruouenzv Lioht- A1 to.A5 = 24KHz 0
I
4FSUSI = SUSI
SUSI =A3/A4 Looic level 0
't6
5KSUSI = SUSI
SUSI DATA= lnout'1. CLK = lnpul2 0
32
6A8 = Output wtth Logic level
A8 = lnout 30
64
Example (CV 29):
Normaldriving direction Value = 0
28 Speed steps Value = 2
Auto. Analog/Digital detection Value = 4
RailComo off/on Value = I
Speed steps using CV 2, 5, 6 Value = 0
Short address Value = 0
he sum of all the values is 14.
This value is set to CV29 as factory default value.
cv Description Range Value
1Loco addr'ess DCC: 1 - 127
Motornla: 1 - 80 03
2Minimum speed (change, until the loco drives with speed step 1) 1-63 01
3Acceleration
1 means that every 5ms the actual speed is increased by 1. lf the internal maximum
speed is set to 200 (CV5=50 or CV94=200), then the accelaration from 0 to Fmx is 1sec. 0-255 15
4b,rakino interia {time factor like CV3) 0-255 25
5Maximum soeed (must be oreater than CV2) 1-63 35
6Middle speed (must be qreater than CV 2 and less than CVS) 1-63 11
7Sofinare version (the processor can be updated) different
8Manufacturer lD Decoder reset, values as CV59 difierent 162
17
18
Expensive loco address
17 = High Byte
18 = Low Bvte
1 - 9999
192"231
0-255
2000
199
248
30 Enor memory for function outputs, motor and ternperature monitoring
1 = fault function outDuts. 2 = fault motor, 4 = overtemperature 0-7 0
3t 1. Marker CV for CV-Banks 0.1.8 0
32 2. Marker CV for CV-Banks 0,1,3,4,5,255 255
59
Reset to factory defaults (even with CVE)
1 = CV 0 - 256, as well as CV257 - 512 (Rail0omo bank 7)
2 = 0V 257 -512 (RailCom Pluso banks 5 & 6)
3 = CV 257 -512 (extended function mapping banks 1 & 2)
4 = CV 257 -512 (PWM-Modulation function outout banks 3 & 4)
0-4 0
unction assignments
FO Directional lighting on / off F10 Driver Cab door open/close F20 Radio #2
F1 Sound on / off F11 Driver Cab vnndow opentclose F21 Drain condensate
F2 Horn F12 Machine room door openlclose F22 Sanding
F3 Mactophonic F13 Folding down the lamps (red light) F23 Curve squeal sound on / off
F4 Ddver cab lighl F14 Compressed air vafue F24 Rail clank sound on / ofi
F5 Auxiiiary heating / Preheater F15 Coupling / Uncoupling F2s Train lighting: the loco pushes
F6 Chassis lighting F16 Braking test F26 Train lighting: the loco pulls
n, Shunting mode F17 Bell F27 Volume conkol
F8 Hand brake release / set brake F1E Battery master switch F28 Sound fader (tunnel mode)
Ft) Folding flap, front engine compartment F19 Radio f1
Function 0utputs
Simple Function Mapping
The following settings of the decoder are only possible with simple function mapping (CV 96 = 0).
ln the simple function mapping, the assignments of switching tasks such as lighting, special function outputs, shunting 1
and switchable starting and braking delay can be freely assigned to the function keys F0 to F12 of the digital control cer
Ihe value that is wriften to a CV of the function mapping determines the functions that can be switched using a function
assigned to the CV. The CVs 33 to 46 serve this purpose according to the following scheme.
ksignment of Function keys to the CVs Default Assignment of the Bits
CV 33 Light function key F0 fonrards 1 Bit 0 Light function key front
CV 34 Light function key F0 backwards 2 Bit 1 :,Light function key back
CV 35 Function key F1 4 Bit 2 Function key A1
CV 36 Function key F2 8 Bit 3 Function keyM
;V 37 Function key F3 16 Bit 4 Function key A3
lV 38 Function key F4 32 Bit 5 Function keyA4
)V 39 Function key F5 64 Bit 6 Shunting
1
2
4
I
16
32
64
128
lV 40 Function key F6 128 Bit 7 StartingJbrake delay
lV 41 Function key F7, 0
iV 42 Function key F8 0
]V 43 Function key F9 0
)V44 Function key F10 0
]V 45 Function key F11 0
]V 46 Function key F12 0
ixample 1: The rear light output should only be switched with the function key F5.
IheCVto h programmed is CV39 forfunction key F5, in which the value 2(rear lightoutput) is programmed. So thatthe
ight output is no longer switched backwards in the direction of travelvia function key F0, CV34 must also be program
'or function key F0 in the direction 0f travel backwards to the value 0.
ixample 2: The function outputAl and the shunting gear are to be s,vitched together with the function key F10.
19 gear
center.
,ion key
Value
I ne uv ro oe Programmea rs uvJv ror runflon Key rc, rn wncn rne varue z (rear rqnl ouiput) ts programmeq. uo mat me rear
light output is no longer switched backwards in the direction of travelvia function key F0, CV34 must also be programmed
for function key F0 in the direction 0f travel backwards to the value 0.
Example 2: The function output A1 and the shunting gear are to be s,vitched together with the function key F 1 0.
The CV to be programmed is CV,l4 forfunction key F10, in which the value 4 (function outputAl) plus M (shunting geafl is
programmed, e.g. the value 68. So that the function outputAl is no longer switched via function key F1 and the shunting gear
no longer via function key F5, CVs 35 forfunction key F1 and 39 for function key F5 must also be programmed to the value 0.
Simple and extended Function Mapping
The following settings of fre decoder are possible for simple (CV96 = 0) and extended (CV96 = 1) function mapping.
Dimming of Light and Function Outputs
The light and function outputs A1 to A7 can be set to any dimming level. These settings are stored in CVs 116 (Light) and
117 (A1)to 123 (A7).
A combination (total of the single values) is individually possible.
The setting of the CV187 determines how fast the glare function should work. The step size is CV value * 1ms.
Blinking of the Light- and Function Outputs
The locomotive decoder has a flashing generator which can be assigned to the outputs. Both the switchon
and switch-off time of the flashing generator can be set separately from each other.
ln CV109, you can specify which output is to use the flash generator. ln addition, the CVl10 can be used to
determine which otttput is to use the blinking generator with 180" phase rotation. For example, a variable
flasher can be implemented.
CV 109: Value CV 110: Value
Bit 0 Light output w/ flashing generalor 1 Bit 0 Light output wl flashing generator 180" 1
Bit 1 A1 with flashing generator 2 Bit 1 A1 with flashing generator 180" 2
Bit 2 M with flashing generator 4 Bit 2 M with flashing generator 180" 4
Bit 3 A3 with flashing generator I Bit 3 A3 with flashing generator 180" I
Bit 4 A4 with flashing generator 16 Bit 4 A4 with flashing generator 180' 16
Bit 5 A5 with flashing generator 32 Bit 5 A5 with flashing generator 180' 32
BitO AGwithflashinggenerator 64 Bit6 A6withflashinggenerator 180" 64
Bit 7 A7 with flashing generator 128 Bit 7 A7 with flashing generator 180" 128
A combination (total of the single values) is individually possible.
ln CV111 the switch-on time can be set in steps of 100ms and in CV11?the switch-off time in steps of 100ms.
Turn-on Efhct of a Neon Tube / Fluorescent Tube
The switch-on effect of a defective fluorescent lamp can also be output at the light and function outputs. This
effect consists of an adjustable, maximum number of flashes (accidentally a flash up to a maximum number of
flashes) and an adjustable flash time, e.g. how fast the flashes should follow each other
Softly fade in and out light and function outputs
lf the output is switched on or off, it is softly faded in or out.
ln CV186, you can specify which output should receive this dazzle function.
Value
Bit 0 Light output with dazzle function 1
Bit 1 A1 with dazzle function 2
Bit 2 A2 with daule function 4
Bit 3 A3 with daule function I
Value
Bit 4 A4 with dazzle function 16
Bit 5 A5 with dazzle function 32
Bit 6 A6 with dazzle function 64
Bit 7 A7 with dazzle function 128
Value
Bit 4 A4 wl fluorescent lamp effect 16
Bit 5 A5 w/ ffuorescent lamp effect 32
Bit 6 A6 wl fluorescent lamp efiect 64
Bit 7 A7 w/ fluorescent lamp effect 128
Value
Bit 4 ,A4 as energy-saving lamp 16
Bit 5 A5 as energy-saving lamp 32
Bit 6 A6 as energy-saving lamp 64
Bit 7 A7 as energy-saving lamp 128
A combination (sum of the single values) is of course also possible here.
The flash time is set in 5ms increments via CV 189. The maximum number of flashes in CV 190.
Energy-saving lamp effect when switching on the light and function outputs
When an energy-saving lamp is switched on, it first produces a basic brightness before it slowly reaches its
maximum brightness. This effect can be assigned to the outputs of the decoder as follows.
CV 188: Value
Bit 0 Light output wl fluorescent lamp effect 1
Bit 1 A1 M fluorescent lamp effect 2
Bit 2 A2 w/ fluorescent ldmp effect 4
Bit 3 A3 wl fluorescent lamp effect I
CV 183: Value
Bit 0 Light ouput as energy-saving lamp 1
Bit 1 A1 as energy-saving lamp 2
Bit 2 A2 as energy-saving lamp 4
Bit 3 A3 as energy-saving lamp 8
A combination (total of the single values) is of course again possible here.
The basic brightness can be adjusted via CV184. The setting of CV185 determines how fast the final
brightness value (PWMI in CVs 116 - 123) should be reached. The step size is CV value * Sms. The
basic brightness can be adjusted via CV184.
Firebox flickering
The outputs light, Al to A7 can be assigned a random flickering. This effect is used for example for the flickering of a
firebox.
CV 181: Value
Bit 0 Light output with flickering 1
Bit 1 A1 with flickering 2
Bit 2 A2 with flickering 4
Bit 3 A3 with flickering I
Value
Bit 5 A5 for coupling 32
Bit 6 A6 for coupling M
Bit 7 A7 for coupling 128
Bit 4 A4 with flickering
Bit 5 A5 with flickering
Bit 6 A6 with flickering
Bit 7 A7 with flickering
Value
16
32
64
128
A combination of (the total of the single values) is of course possible here again.
ln CV182, the settings for the flicker rhythm and the brightness change are entered:
Bits 0 - 3 change the flicker rhythm (value range 1 to 15).
Bits 4 - 6 change the brightness (value range 16, 32,48,64, 80, 96,112).
With the value 128 the output is always bright, but can be combined with the value range 16 to '112.
As only one value can be programmed in a CV the flickering results from the sum of the single values of the flicker rhythm
plus the sum of the single values of the brightness (sum of bits 0 -3 plus sum of bits 4 - 6).
The combination of all bits leads to different random flicker images. The rule here is 'try it out".
Smoke Generator Control
A smoke generator can be connected to outputs A1 to A7, which is controlled by the decoder depending on the load. When
stationary the output of the smoke generator has PWM according to CV133. When the locomotive is running. the output
will get PWM=100%. The locomotive engine can be stopped for 0-15 seconds (start-up delay) so that the smoke generator
heats up when stationary. After this time has elapsed, the locomotive starts.
Adiustable PWM - Frequency of light and function outputs
The output voltage of a function output is pulse width modulation (PWM) at a given frequency.
The function outputs of the decoder are factory set to a frequency of 156 Hz, This frequency can be increased to 24 kHz
for outputs A0 to A5. The frequency switching can be set in the CV50 in bit 3. Bit 3 = 0 -> 156H2, Bit 3 = 1 -> 24KHz
Control of an electric Coupling
Eleckical couplings consist of the finest copper wire windings. Ad a rule, these react sensi$vely to continuous cunent
flow because they become relatively hot. With appropriate settings, the decoder can automatically switch off the function
outputs after an adjustable time without having to switch off the function key. Furthermore, the decoder can ensure that
the clutch is controlled only for a short engagement torque with an adjustable high PWM in order to raise the clutch safely.
After this moment, less energy is needed to keep the clutch on top. This lower PWM and the required holding time are also
adjustable. lf the couplings used are not safely uncoupled during the first attempt, a number of coupling repetitions can
also be set. When adjusting the clutch repetitions, "as many as necessary as few as possible 'applies. To ensure that a
permanent repetition does not lead to the destruction of the clutch windings, a switch-off time must be entered in steps of
0.1s, which the decoder always wails for before carrying out a further decoupling process.
CV124 = Number of coupling repetitions
CV125 = Switch-on time in 100ms steps wiilr PWM from CVl17 (A1)to CV123 (A7)
CV126 = Stopping time in 100ms steps
CV127 = Switch-off time in 100ms steps, (O=no eoupling conkol)
CV128 = Stop PWM
CV129 = Coupling forAl to A7
CV 129: Value
Bit 1 A1 for coupling 2
Bit 2 M for coupling 4
Bit 3 A3 for coupling 8
Bit 4 A4 for coupling 16
Shunting tango, autornatic decoupling drive
A maneuvering tango can only be activated if he electric clutch control via CV124-129 is acUvated.
A maneuvering tango is triggered by one of the clutch outputs when the decoder speed = 0:
Function of a shunting tango:
1. The locomotive drives with an adjustable gearing for a certain setting in time ff1) opposite the present direction of travel.
(press on)
2. The locomotive stops and changes the direction of travel.
3. Uncoupling procedure and locomotive drives with the same speed step for an adjustable time T2 (press on)
4. The locomotive stops, now the locomotive has the original direction of travel again.
The settings for CV's are:
CV135 for the shunting tangos (1-255). The value 0 specifies that no shunting tango takes place.
CV136 for pressing time T1 in 100ms steps
CV137 for pressing time T2 in 100ms steps
Shunting tango with automatic coupling and decoupling
Changing the mode of operation for two connected couplings on two outputs:
t . tn dVIZg, always use the least significant output A1 to A7 for the front clutch, so when using A1 and M, use Al for
the front coupling and M for the rear coupling. lf more or less than 2 outputs are defined, there is no difference in the
sequonce of the different travel directions (see automatic decoupling travel).
2. lf the front coupling is released by means of a function key and the driving direction is forward at this point in time, the
coupling is swiiched off when the driving direction is reversed in the automatic maneuvering sequence (coupling proqe-
Ouri;. Ftne rear clutch is released and [he direction of travel is backwards at this point in time, the coupling process is
alsoiriggered now. ln the opposite direction of travel, the coupling is controlled according to the setting of the automatic
decoupling movement.
3. The entire duration of the coupling control must be adapted to the times of the maneuvering tango in CVs 136
and 137 via CVs 124-127.CV124 - (CV125 + CV126 + CV127) applies, it is biggerthan CV136 + CV137.
Here, encores may have to be made on the right side of the inequality, because in the maneuvering tango the decoder
only reverses the direction of travel when it realizes that the motor is really stopped.
Servo Control
Deployment of a serve on the decoder requires expert knowledge in electronics.
ln CVi66, it is specified via which output a servo is to be controlled. lf the corresponding bit is set, a control.signal for a
model building servo is output at the desired output (A6 and/or A7, or SUSI). The following assig.nment applies to the con'
nection pins oi the SUSI inierface: Servol = CLK, Servo2 = Data. The wiring of the_ outputs can be found in the FAQ PIKO
in the giaphic'Servo connection for operating a servo on SUSI or solder pads for PIKO SmartDecoder 4.1".
CV166 Value
Bit 0 SUSI with servo signal 1
Bit 6 - AO with servo signal 64
Bit 7 A7 with servo signal 128
ln CV167 (SUSIServoi)and/or 16S (SUSI Servo2)the respective function key number F0 - F28 is entered, via which the
serYos are to be switched.
The servo settings and cycle time can be set with the following CVs:
CV160 Servo 1, position 1 (function key otr) CV163 Servo 2, positbn 1 (function key off)
CV161 Servo 1, position 2 (function key on) CV164 Servo 2, position 2 (function key on)
CV162 Servo 1, rotation time in 100ms steps CV165 Servo 2, rotation time in 100ms steps
Braking Behavior
Mirklin Braking Track
The decoder reicts to a Mfrrklin braking distance (brakes with analogue DC voltage on the track) when CV29 bit 2 and
CV27 bit 4 or bit 5 are set to 1 (factory setting 1 and 0).
CV27 Bit 4 = 1 -> DC with opposite direction of travel.
CV27 Bit5 = 1 -> DC with direction of travel.
ABC - Brakes
lf the decoder detects a lower amplitude of the digital voltage on one side of the track, a braking process begins.
0n which side of the rail the digital voltage should be more positive in order to activate the braking process can be set via
CV27:
CY27 = 1, brake when right rail is more positive
CY27 = 2, brake when left rail is more positive
CY27 = 3, brake inespective of which rail is more positive
The voltage differenci can be set in CV97. The desired difference conesponds to th9 CV value * 0.12V.
lf an ABCilow speed signal is detected according to a Lenz BM2 module, the decoder brakes to the intemal speed range
(0 - 255) which can be set in CV98.
Return to Factory Setting {Reset}
Two CVs (CV8, CV59)can be used in DCC programming and one CV (CV59) in Motorola programming to retum the
decoder to factory settings. lf you do not want to rewrite all available areas, you can decide which areas should be set to
default.
The to be programmed value 1-5 places the following CVs into factory setting:
1 = CVO - 256, as wellas CV257 - 512 (RailComo Bank 7) CV31=0, CV32=255
2= CV257 - 512 (RailCom PlusCI Banks 5 & 6) CV31=1, CV32=0 and CV31=1, CV32=1
3 = CV257 - 512 (extended function Mapping Banks 1 & 2) CV31=8, CV32=0 and CV31=8, CV32=1
4 = CY257 - 512 (PwM-Modulation Function outputs banks 3 & 4) CV31=8, CV32=3 and CV31=8, CV32=4
Please note! After a reset of the decoder, all default configurations are ovenrritten! Therefore, please only do a reset in
case of an important and urgent emergency. lf you still reset your decoder, you eventually have to reprogram the individual
function mapping (see FAQ for more information)!
Programming
Configurations variables (CVs) form the basis of all possible settings of the decoder. The decoder can be programmed
with DCC and Motorola controlpanels.
Technical Data
Addresses:
Max. motor cunent / Load:
Function outputs:
Size:
1-9999 (extended DCC address)
1,2 A* short-term to 2 A
0,4 Aeach
30,2 x 16 x 3,8 mm
*Continuous load, may vary depending on the installation situation
Note: This product is not a toy and is not suitable for children under the age of 14. Any liability for damages of any kind
caused by improper use or not observing these instructions is excluded.
Note: ii
You can find a detailed instruction manual for the PIKO SmarlDecoder 4.1 Sound on the web page of the respective
product in our web shop.
Service:
lnternet: www.piko,de
E-Mail:[email protected]
Hotline: Di+ Pe 16-18 Uhr
ln case of a possible defect, please send us the module with the proof of purchase, a short error description and the
decoder address.
Warranty Declaration
Each component is checked for its complete functionality before delivery. Should an eryor nevertheless occur within the
warranty period of 2 years, we will repair the module free of charge upon presentation of the proof of purchase. The
wananty claim is void if the damage was caused by improper handling. Please note that, according to the EMC'law, the
module may only be operated within vehicles bearing the CE mark.
Subject to technical alterations, enors and misprints excepted.
Version 1112018. Reprinting or reproduction only with the permission of the publisher"
The mentioned brand names are registered trademarks of the respective companies.
€
o
*l
e
ts
o
o)
tf
(\
t
(o
'rO
PIKO Spielwaren GmbH
Lutherstr. 30
96515 Sonneberg
GERMANY * EC€

Other manuals for 56424

1

This manual suits for next models

1

Other PIKO Motorized Toy Car manuals

PIKO BR 218 User manual

PIKO

PIKO BR 218 User manual

PIKO SmartMeasure Car User manual

PIKO

PIKO SmartMeasure Car User manual

Popular Motorized Toy Car manuals by other brands

Team C Torch N manual

Team C

Team C Torch N manual

KID Trax Baja McQueen KT1149 owner's manual

KID Trax

KID Trax Baja McQueen KT1149 owner's manual

KID Trax KT1596AZ owner's manual

KID Trax

KID Trax KT1596AZ owner's manual

Team C Jekyll TR02EVO manual

Team C

Team C Jekyll TR02EVO manual

REVELL Monogram '32 Ford 3-Window Coupe Assembly manual

REVELL

REVELL Monogram '32 Ford 3-Window Coupe Assembly manual

Yokomo MR-4TC manual

Yokomo

Yokomo MR-4TC manual

Xray SCX instruction manual

Xray

Xray SCX instruction manual

Traxxas RUSTLER VXL owner's manual

Traxxas

Traxxas RUSTLER VXL owner's manual

Reely Free Men 2.0 operating instructions

Reely

Reely Free Men 2.0 operating instructions

Jamara Jeep Wrangler Police 2,4 GHz instructions

Jamara

Jamara Jeep Wrangler Police 2,4 GHz instructions

Traxxas LaTrax RALLY 75054-5 owner's manual

Traxxas

Traxxas LaTrax RALLY 75054-5 owner's manual

REVELL Shelby GT350R Assembly manual

REVELL

REVELL Shelby GT350R Assembly manual

RC4WD Carbon Assault 1/10th Monster Truck Builder's... manual

RC4WD

RC4WD Carbon Assault 1/10th Monster Truck Builder's... manual

Ofna Racing DM-1 Spec instruction manual

Ofna Racing

Ofna Racing DM-1 Spec instruction manual

Baghera PORTEUR RACER Assembly instruction

Baghera

Baghera PORTEUR RACER Assembly instruction

Enabling Devices Go Go School Bus1004 user guide

Enabling Devices

Enabling Devices Go Go School Bus1004 user guide

Team Losi 8IGHT-E 2.0 instruction manual

Team Losi

Team Losi 8IGHT-E 2.0 instruction manual

Tekno RC EB48.4 Building instructions

Tekno RC

Tekno RC EB48.4 Building instructions

manuals.online logo
manuals.online logoBrands
  • About & Mission
  • Contact us
  • Privacy Policy
  • Terms and Conditions

Copyright 2025 Manuals.Online. All Rights Reserved.