Pinnacle PCTV To Go User manual

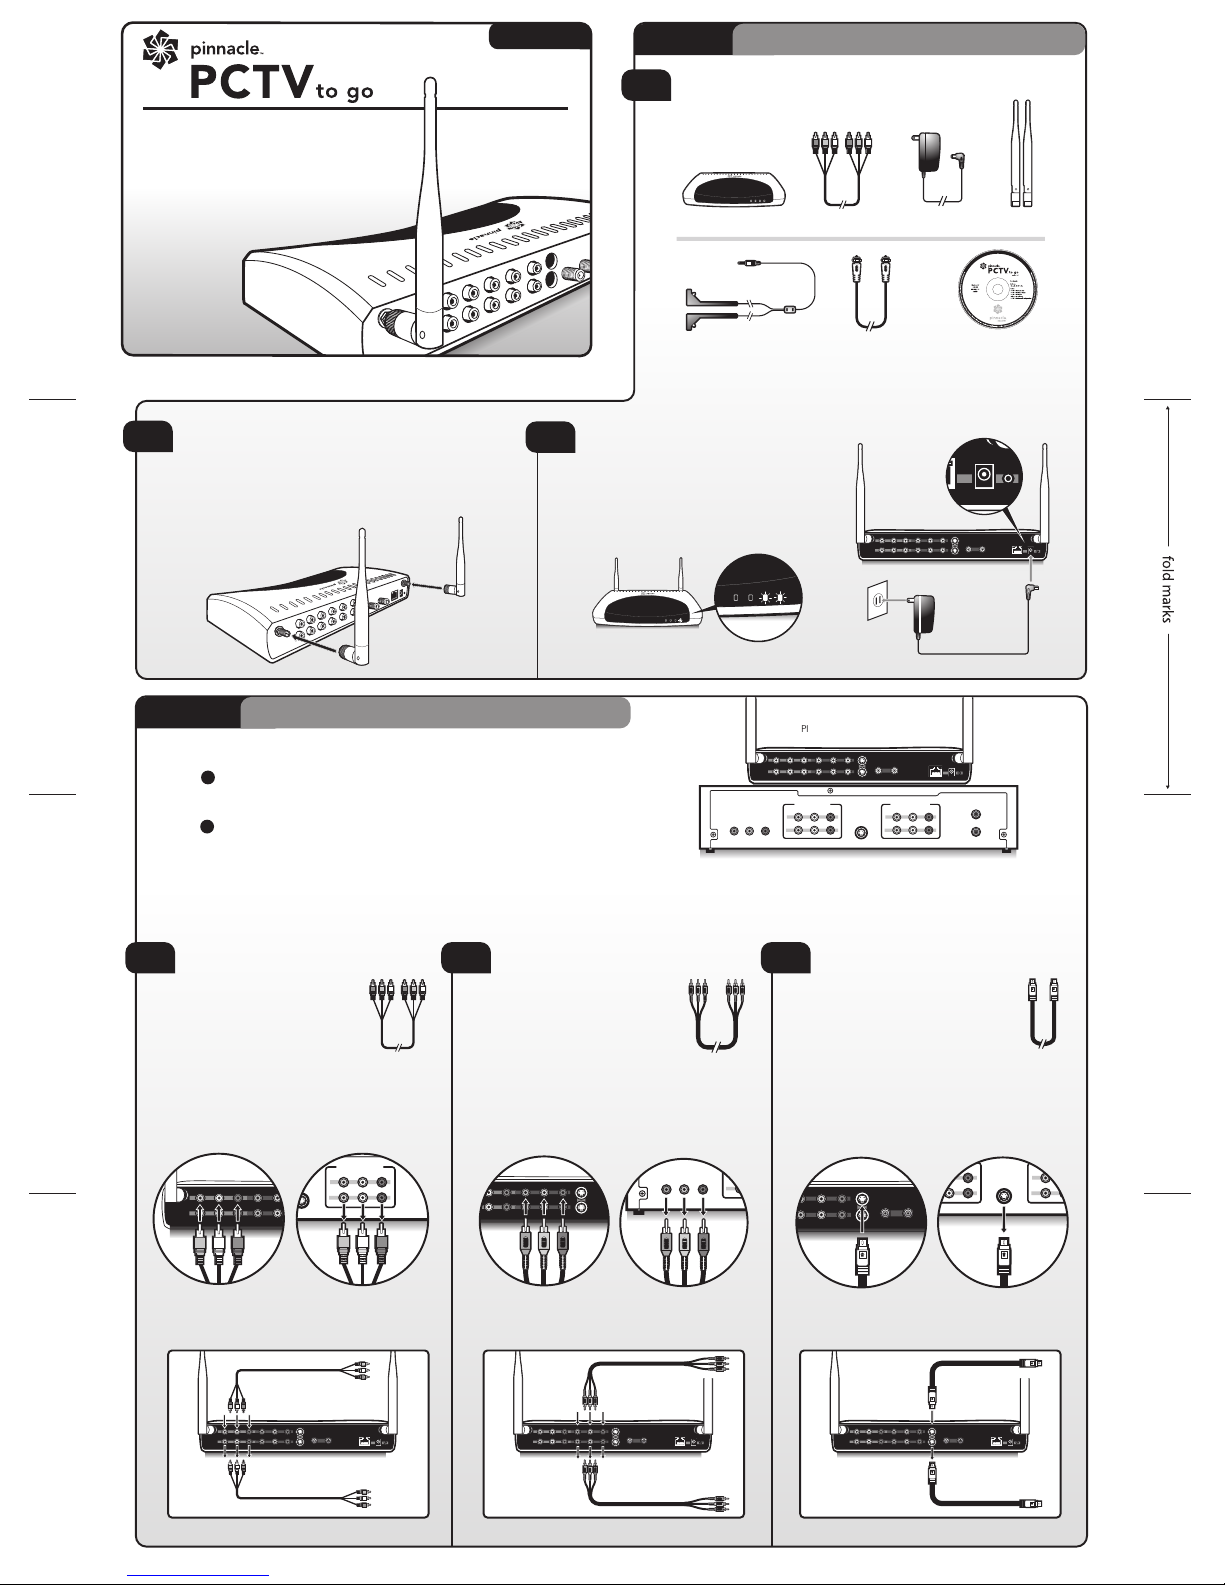
CONNECTING THE ANTENNAS (2.4 GHZ)
Hold the antenna at its base and gently twist each onto the
threaded jack connectors on either side of the back of your
Pinnacle PCTV To Go. Adjust the ends of the antenna to
point upwards.
POWER UP PINNACLE PCTV TO GO
Connect the power cord to the back of
your Pinnacle PCTV To Go and the power
adapter to a power source. Wait until the 2
rightmost LEDs are solid green.
Pinnacle PCTV To Go is then ready for
setup and operation.
Step 1 Pinnacle PCTV To Go setup
2
1
3
UNPACK: Check that your package includes the following:
Unit ready
Coaxial/RF cable
Power adapter
IR blaster cable CD-ROM with
Pinnacle PCTV To Go
software and documentation
Antennas
Composite cable
Pinnacle PCTV To Go
COMPOSITE VIDEO
COMPONENT VIDEO ANTENNA IN
ETHERNET
12VDC 3A
IR BLASTER
ANTENNA OUT
WLAN ANTENNA #1
WLAN ANTENNA #2
AUDIO LEFT AUDIO RIGHT S-VIDEO
Y Pb Pr
IN
OUT
IN
OUT
ETHERNET
9VDC 2A
IR BLASTER
WLAN ANTENNA #2
ETHERNET
12VDC 3A
IR BLASTER
WLAN ANTENNA #2
ANTENNA OUTCOMPONENT VIDEO ANTENNA IN
AUDIO RIGHT S-VIDEO
Y Pb Pr
IN
OUT
COMPOSITE VIDEO
WLAN ANTENNA #1
AUDIO LEFT
IN
OUT
ETHERNET
12VDC 3A
IR BLASTER
WLAN ANTENNA #2
ANTENNA OUTCOMPONENT VIDEO ANTENNA IN
AUDIO RIGHT S-VIDEO
Y Pb Pr
IN
OUT
COMPOSITE VIDEO
WLAN ANTENNA #1
AUDIO LEFT
IN
OUT
ETHERNET
12VDC 3A
IR BLASTER
WLAN ANTENNA #2
ANTENNA OUTCOMPONENT VIDEO ANTENNA IN
AUDIO RIGHT S-VIDEO
Y Pb Pr
IN
OUT
COMPOSITE VIDEO
WLAN ANTENNA #1
AUDIO LEFT
IN
OUT
A
Step 2 Connecting to your TV signal
Direct Connection Direct Connection Direct Connection
COMPOSITE VIDEO
COMPONENT VIDEO ANTENNA IN
ETHERNET
12VDC 3A
IR BLASTER
ANTENNA OUT
WLAN ANTENNA #1
WLAN ANTENNA #2
AUDIO LEFT AUDIO RIGHT S-VIDEO
Y Pb Pr
IN
OUT
IN
OUT
VIDEO
ANT/CATV IN
ANT/CATV OUT
AUDIO LEFT AUDIO RIGHT
IN
1
2
S-VIDEO OUT
VIDEO AUDIO LEFT AUDIO RIGHT
1
2
AUDIO-VIDEO INPUTS AUDIO-VIDEO OUTPUTS
Y Pb Pr
PINNACLE PCTV TO GO
CABLE SET-TOP / SATELLITE / DVR BOX
Pinnacle PCTV To Go DevicePinnacle PCTV To Go DevicePinnacle PCTV To Go Device
In from Cable,
Satellite or DVR box
In from Cable,
Satellite or DVR box
Pass-through Connection
B
COMPOSITE VIDEO
COMPONENT VIDEO
WLAN ANTENNA #1
AUDIO LEFT AUDIO RIGHT S-VIDEO
Y Pb Pr
IN
OUT
VIDEO
ANT/CATV IN
ANT/CATV OUT
AUDIO LEFT AUDIO RIGHT
IN
1
2
S-VIDEO OUT
VIDEO AUDIO LEFT AUDIO RIGHT
1
2
AUDIO-VIDEO INPUTS AUDIO-VIDEO OUTPUTS
Y Pb Pr
COMPOSITE CABLE CONNECTION
Use the included Composite
Cable to connect one end from
the available outputs on your
cable/satellite/DVR box to the IN
inputs labeled COMPOSITE
VIDEO, AUDIO LEFT, and AUDIO
RIGHT on your Pinnacle PCTV To Go.
COMPONENT CABLE CONNECTION
Use a Component cable (not
included) to connect one end
from the available Y, Pb, Pr
outputs on your cable/satellite/
DVR box to the corresponding
COMPONENT VIDEO inputs on
your Pinnacle PCTV To Go. For audio,
follow the connection settings for the
Composite connection (Option A), but don’t
connect the video input.
CS-VIDEO CONNECTION
Use an S-Video cable (not included)
to connect one end from the
S-VIDEO OUT on your cable/
satellite/DVR box to the S-VIDEO IN
on your Pinnacle PCTV To Go. For
audio, follow the connection settings
for the Composite connection (Option A), but
don’t connect the video input.
COMPONENT VIDEO ANTENNA IN
ETHERNET
ANTENNA OUT
AUDIO LEFT AUDIO RIGHT S-VIDEO
Y Pb Pr
IN
OUT
VIDEO AUDIO LEFT AUDIO RIGHT
IN
1
2
S-VIDEO OUT
VIDEO AUDIO LEFT AUDIO RIGHT
1
2
AUDIO-VIDEO INPUTS AUDIO-VIDEO OUTPUTS
Y Pb Pr
IN
OUT
VIDEO
ANT/CATV IN
ANT/CATV OUT
AUDIO LEFT AUDIO RIGHT
IN
1
2
S-VIDEO OUT
VIDEO AUDIO LEFT AUDIO RIGHT
1
2
AUDIO-VIDEO INPUTS AUDIO-VIDEO OUTPUTS
Y Pb Pr
COMPOSITE VIDEO
COMPONENT VIDEO
WLAN ANTENNA #1
AUDIO LEFT AUDIO RIGHT S-VIDEO
Y Pb Pr
IN
OUT
Out to TV, VCR
or DVD recorder
In from Cable,
Satellite or DVR box
Out to TV, VCR
or DVD recorder
Out to TV, VCR
or DVD recorder
1 Disconnect the current incoming Coaxial/RF cable from your TV’s
RF/Antenna In connector and reconnect it to the Antenna In connector of
your Pinnacle PCTV To Go.
2 Using the supplied Coaxial/RF cable, connect one end to the Antenna Out
connector of your Pinnacle PCTV To Go and the other to the RF/Antenna In
connector of your TV.
If your TV source is an antenna or analog cable
Choose one of the 3 following connection options. If you don’t have the available outputs required, you can use the pass-through connections of PCTV To Go as
described below. Note that the connectors may be positioned differently on your PCTV To Go than they are pictured here.
If you use a set-top box or DVR for your TV input
A.
B.
41007283 R1
251006
Quick Start Guide
Welcome! Thank you for purchasing a
Pinnacle PCTV To Go. Follow these
instructions to quickly start playing
your TV anywhere on your PC.
Vers. 1.0
TM
Fold to 16 panels TOP
Bottom
This panel will be the the front panel Final size is 5.534” x 4.2852”

!
The IR blaster cable allows Pinnacle PCTV To Go to send commands
to your video device, just like a remote. Make sure you properly
connect the IR blaster cable before you install the Pinnacle PCTV To
Go software so that the PCTV To Go Setup Wizard software can
control your device.
FINDING THE INFRARED SENSOR
The IR sensor is on the front of your cable/satellite box or DVR. Often you can
locate it by using your remote and seeing the flashing sensor light it activates.
CONNECTING TO YOUR PINNACLE PCTV TO GO
Connect the IR cable to the IR blaster port on the back of
your Pinnacle PCTV To Go.
CONNECT THE IR CABLE TO YOUR VIDEO DEVICE
Locate the IR sensor on the video device you wish to operate. Place the IR
emitter so that it faces the IR sensor on the device (see diagram). Once you
have tested the IR emitter using the PCTV To Go Setup Wizard and can
verify that it is placed properly on the video device, peel the sticker off and
fix the emitter to the device.
Step 3 Connecting the infrared (IR) blaster cable
1
2
IR sensor
IR emitter
Connecting your AV devices
The following are a few of the many devices that
can be connected to your Pinnacle PCTV To Go:
• Cable box
• DVD player
• Satellite receiver
• TiVo® or other DVR device
Step 4 Connecting to a network
CONNECTING PINNACLE PCTV TO GO
TO YOUR HOME NETWORK
Pinnacle PCTV To Go can be connected to any high
speed internet connection or broadband network via
a router. You can connect Pinnacle PCTV To Go to
your router either A wirelessly (you will need an
802.11g compatible wireless access point or router)
or B via an Ethernet cable (not supplied). If you
want to use a computer with a wired connection, you
will need to connect Pinnacle PCTV To Go with an
Ethernet cable to your router. Note that you will also
be able to use wireless PC clients at the same time.
(see Step 5 for setup instructions)
COMPOSITE VIDEO
COMPONENT VIDEO ANTENNA IN
ETHERNET
12VDC 3A
IR BLASTER
ANTENNA OUT
WLAN ANTENNA #1
WLAN ANTENNA #2
AUDIO LEFT AUDIO RIGHT S-VIDEO
Y Pb Pr
IN
OUT
IN
OUT
ETHERNET
12VDC 3A
IR BLASTER
WLAN ANTENNA #2
Ethernet connection
Ethernet cable
Router Pinnacle PCTV To Go
A
B
Step 5 Installing the software
Congratulations!
INSTALL THE SOFTWARE
If you are using anti-spyware software on your PC, please turn
it off before installing the PCTV To Go software. Insert the
supplied installation CD into your computer and install the
PCTV To Go software and run the PCTV To Go Setup Wizard.
Follow the on-screen steps to complete the setup process.
The Pinnacle PCTV To Go Setup Wizard is designed to take
you through the configuration process step-by-step. This
includes set-up of your wireless settings, video settings and
device settings. It is important to note that your PC needs an
802.11g adapter in order to set up for a wireless
configuration and that you will need to run the PCTV To Go
Setup Wizard from that wireless PC to configure your
Pinnacle PCTV To Go for wireless use.
You have just completed the Quick Start Guide. Enjoy.
For more advanced instructions or for troubleshooting, please
consult the Pinnacle PCTV To Go user manuals and guides available
on the installation CD.
If you need further assistance, please contact:
Pinnacle Customer Support
(650) 267 5196 Monday - Friday 8am-10pm EST
www.pinnaclesys.com/support
Knowledge Base and Email support:
www.pinnaclesys.com/selfhelp
Live Chat: www.pinnaclesys.com/livehelp
Discussion Forum: webboard.pinnaclesys.com
COMPOSITE VIDEO
COMPONENT VIDEO ANTENNA IN
ETHERNET
12VDC 2A
IR BLASTER
ANTENNA OUT
WLAN ANTENNA #1
WLAN ANTENNA #2
AUDIO LEFT AUDIO RIGHT S-VIDEO
Y Pb Pr
IN
OUT
IN
OUT
ETHERNET
12VDC 2A
IR BLASTER
WLAN ANTENNA #2
IR blaster
!
MCE (Windows Media Center Edition) users will have to go through the TV Signal settings in
MCE and select Pinnacle PCTV To Go Wireless Device as the default tuner if their system has a
hardware tuner installed. If the TV source is a cable/satellite/DVR box, an MCE IR Emitter/Receiver
unit, such as the Pinnacle PCTV Remote Kit for MCE, needs to be connected to the PC to allow
PCTV To Go to control the box from within MCE. MCE supports local viewing only. Pinnacle PCTV
Remote kit for MCE sold separately.
CD-ROM contents:
Software
Pinnacle PCTV To Go
Guides
PCTV To Go Quick Start
PCTV To Go Setup Wizard
PCTV To Go Player
MCE TV Signal Setup
PCTV To Go Network Configurations
TOP see page 1 for folding instructions
Bottom
Table of contents
Other Pinnacle TV Tuner manuals

Pinnacle
Pinnacle PCTV HDTV Sat Pro USB Assembly Instructions

Pinnacle
Pinnacle PCTV 60E User manual

Pinnacle
Pinnacle PCTV Quatro Stick 510e User manual

Pinnacle
Pinnacle PCTV 100I User manual

Pinnacle
Pinnacle PCTV teleScope 73a User manual

Pinnacle
Pinnacle PCTV DVB-T PCI User manual

Pinnacle
Pinnacle PCTV 300I User manual

Pinnacle
Pinnacle PCTV Analog (Pro) USB 150e User manual

Pinnacle
Pinnacle PCTV HD PCI User manual

Pinnacle
Pinnacle PCTV User manual