PIONEER DJ PLX-CRSS12 User manual

2
Contents
Before you start ................................................................................... 4
How to read this manual .........................................................................4
What’s in the box.....................................................................................5
User guides .............................................................................................6
Setup..................................................................................................... 7
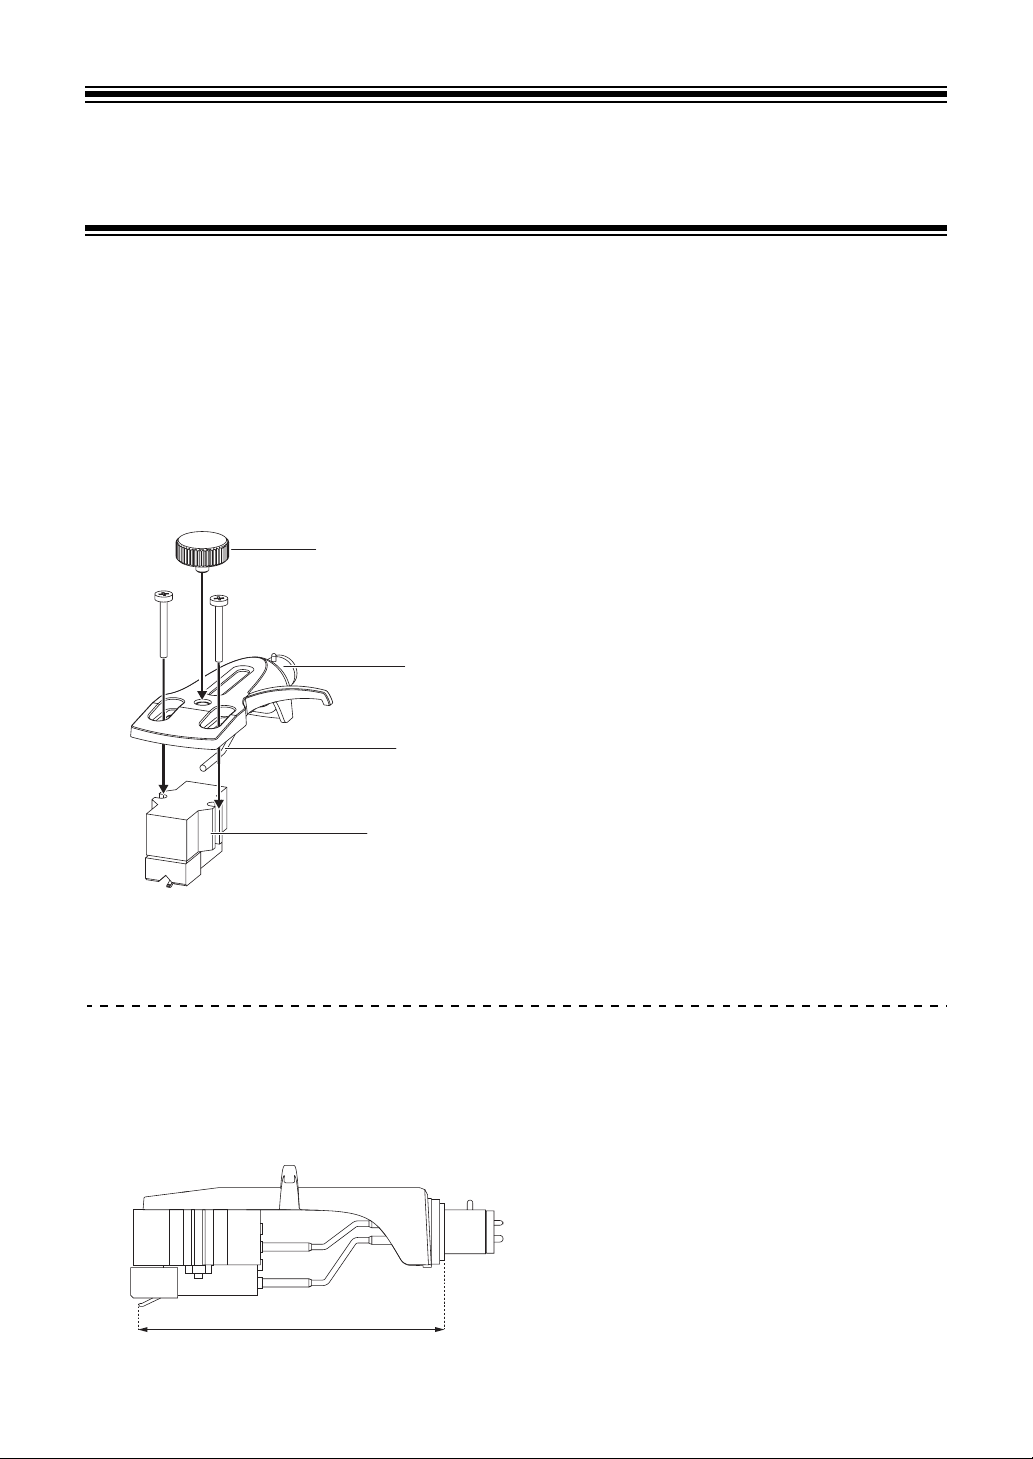
Installing a cartridge to the headshell......................................................7
Installation ...............................................................................................8
DJ software ........................................................................................ 13
Serato DJ Pro........................................................................................13
rekordbox ..............................................................................................14
Part names ......................................................................................... 15
Top panel ..............................................................................................15
Front panel ............................................................................................16
Rear panel.............................................................................................17
Side panel .............................................................................................18
OLED display ........................................................................................19
Adjustment ......................................................................................... 20
Tone arm section ..................................................................................20
Playing with the stylus...........................................................................21
Using DVS without using the tone arm .................................................28
Connections (basic styles) ............................................................... 29
Connecting a DJ mixer..........................................................................29
Installation location................................................................................30
Playback ............................................................................................. 31
Play section...........................................................................................31
Playing an analog record ......................................................................33

3
Using DVS without using the tone arm .................................................38
Using the Performance Pads............................................................ 39
Performance Pad section......................................................................39
Serato DJ Pro........................................................................................41
rekordbox ..............................................................................................49
Settings............................................................................................... 58
Changing the settings ...........................................................................58
Utility settings ........................................................................................59
Using DJ software (MIDI) .................................................................. 60
Specifications .................................................................................... 61
Additional information ...................................................................... 63
Troubleshooting ....................................................................................63
Cautions on use ....................................................................................65
Cleaning ................................................................................................66
Trademarks and registered trademarks ................................................67
Software license notice .........................................................................68
Cautions on copyrights..........................................................................69

4
Before you start
How to read this manual
•Thank you for choosing this Pioneer DJ product.
Be sure to read this manual, the Quick Start Guide and the Precautions for Use which are
also included with this product. These documents include important information that you
should understand before using the unit.
•In this manual the names of buttons, knobs and terminals that appear on the product, and
the names of buttons, menus etc. in the software on your PC/Mac or mobile device, are
indicated within square brackets ([ ]). (e.g. [File], [CUE] button)
•Please note that the software screens and their specifications, as well as the external
appearance and specifications of the hardware, are subject to change without notice.
•Please note that depending on the operating system version, web browser settings, etc.
operation may differ from the ways described in this manual.
•Please note that the language on the screens of the software described in this manual may
differ from the language on your screen.

5
Before you start
What’s in the box
•Platter
•Screws for platter x 6
•Screwdriver
•Magvel Clamp
•Slip mat
•Slip sheet
•Dust cover
•Balance weight
•Sub weight
•Headshell
•Shell weight
•Power cord
•Audio cable (with ground wire)
•USB cable
•Quick Start Guide
•Warranty (for some regions)*1
•Precautions for Use
*1 Only products in Europe.
Products in North America and Japan include warranty information in the Precautions for
Use.
WARNING
Keep small parts out of the reach of children. If a part is swallowed,
immediately consult a doctor.
WARNING
Magvel Clamp
•The Magvel Clamp of this product has a magnet inside.
•
Keep the Magvel Clamp away from people wearing medical devices. It
may lead to failure or malfunction of devices such as cardiac pacemakers.
CAUTION
Magvel Clamp
•The Magvel Clamp of this product has a magnet inside.
•Keep magnetic products (watches, magnetic cards, precision
instruments, etc.) away from the Magvel Clamp, or it may lead to
malfunction.

6
Before you start
User guides
Serato DJ Pro software manual
Refer to the following Serato DJ site.
serato.com/dj/pro/downloads
rekordbox Introduction, Instruction Manual
Refer to the rekordbox Introduction to find out how to set up rekordbox, and see the
Instruction Manual to find out how to use rekordbox.
Visit the URL below to find these user guides.
rekordbox.com/manual

7
Setup
Installing a cartridge to the headshell
A cartridge isn’t included with the unit.
•For details on a cartridge, refer to its user guide.
1 Firmly connect the color-coded lead wire of the headshell to
the corresponding terminal on the cartridge using tweezers,
etc.
•If the cartridge is too light to balance horizontally, use the shell weight included with the
unit.
Adjusting the overhang
Adjust the position with a cartridge mounting screw so the stylus tip is positioned 54 mm from
the tone arm attachment part.
Shell weight
Headshell
Lead wire
Cartridge
54 mm

8
Setup
Installation
Installing the platter
•Do not hit the platter against the main unit or drop it.
•Do not put anything in the center of the unit.
•Make sure that no dust or iron powder adheres between the back of the platter and the
unit.
1 Align the center hole of the platter with the center circle on
the unit, and fit the pin on the unit into the hole of the platter.
2 Firmly tighten 6 screws to fix the platter to the unit.
Hole of the platter
Pin on the unit
Screw

9
Setup
3 Install the slip mat and slip sheet.
Slip mat
Slip sheet

10
Setup
Playing using the stylus
•Install the headshell to the cartridge beforehand (page 7).
1 Insert the headshell with the cartridge installed into the tone
arm.
2 Keeping the headshell horizontal, tighten the locking nut.
3 Install the balance weight to the rear shaft of the tone arm.
Locking nut
Balance weight

11
Setup
•If the cartridge is too heavy to balance horizontally, attach the sub weight to the rear
shaft of the tone arm.
Using DVS without using the tone arm
Install the Magvel Clamp to the unit to use DVS without using a tone arm. By installing the
Magvel Clamp, you can adjust the rotation torque of the control disk.
•You can use any 12-inch vinyl record as a control disk.
•Since the Magvel Clamp contacts closely with the control disk, be sure to keep dust, metal
objects, iron powder, etc. from adhering to the back of the Magvel Clamp.
1 Set a control disk on the turntable.
2 Install the Magvel Clamp to the spindle.
•Firmly press the top of the Magvel Clamp from above. If it’s not firmly pressed in, it
may affect the performance of the HEAVY setting.
Sub weight

12
Setup
Adjusting the rotation torque
1 Put your fingers on the ribs on the top of the Magvel Clamp
and turn it to adjust the marker between [LIGHT] and
[HEAVY].
Removing the Magvel Clamp
1 Pinch the Magvel Clamp with your fingers as shown and pull it
upwards to remove it.
Rib

13
DJ software
Serato DJ Pro
Serato DJ Pro is DJ software from Serato.
The Serato DJ Pro software isn’t included with the unit. Download the software from the URL
below.
serato.com
•Use the unit with Serato DJ Pro hardware. You may need to purchase a separate license
depending on the Serato DJ Pro hardware. For more information, visit the URL below.
serato.com/dj/hardware
•For information on the latest system requirements, compatibility, and supported operating
systems, visit the URL below.
serato.com/dj/pro/downloads
•Operation isn’t guaranteed on all PC/Mac models, even if the system requirements are
met.
•Depending on power-saving settings and other conditions of your PC/Mac, the CPU and
hard disk may not provide sufficient processing capabilities. For laptops in particular, make
sure the PC/Mac is in the best condition to provide constant high-level performance when
using Serato DJ Pro (for example by keeping the AC power connected).

14
DJ software
rekordbox
rekordbox is a complete DJ application you can use to manage your music and perform.
•This unit is a Hardware Unlock device. If you connect a PC/Mac running rekordbox to the
unit, you can use Performance mode (rekordbox DJ functions) for free.
•For information on functions supported by Hardware Unlock, access [Support]
[Hardware Unlock] from the URL below.
rekordbox.com
•The rekordbox software isn’t included with the unit. Download the software from the URL
below.
rekordbox.com
•For information on the latest system requirements, compatibility, and supported operating
systems, access [Support] [System Requirements] from the URL below.
rekordbox.com
•To use the internet, a separate contract with, and payment to, a provider is required.
•Operation isn’t guaranteed on all PC/Mac models, even if the system requirements are
met.
•Depending on power-saving settings and other conditions of your PC/Mac, the CPU and
hard disk may not provide sufficient processing capabilities. For laptops in particular, make
sure the PC/Mac is in the best condition to provide constant high-level performance when
using rekordbox (for example by keeping the AC power connected).

15
Part names
Top panel
1. Performance Pad section (page 39)
2. Tone arm section (page 20)
3. Play section (page 31)
4. NEEDLE MODE button (page 31)
Switches between Analog mode and Digital Vinyl mode.
5. APPLICATION button (page 31)
6. DECK/UTILITY button
Selects a deck to use with the Performance Pads when using DJ software.
•Press and hold to display the Utility settings (page 58).
7. OLED display (page 19)
3
1
5
6
7
3
3
2
4

16
Part names
Front panel
1. Brake adjusting switch
Sets the amount of time it takes the turntable to stop after you press the [START/STOP]
button.
—: The turntable stops quickly.
—: Intermediate setting between and .
—: The turntable stops gradually.
1

17
Part names
Rear panel
1. button
Turns the unit on or puts it in standby mode.
2. USB port
Connect a DJ mixer or PC/Mac when using the Performance Pads with DJ software.
3. SIGNAL GND terminal
Connect a turntable’s ground wire.
4. PHONO OUT terminals
Connect the supplied audio cable (with ground wire).
The signal GND terminal reduces unwanted noises that occur when an amplifier or a
DJ mixer is connected to the unit.
1234

18
Part names
Side panel
1. Kensington security slot
Connect a cable lock.
2. AC IN
Connect to a power outlet with the supplied power cord.
•Use the supplied power cord.
•Connect the power cord after all the connections are complete.
12

19
Part names
OLED display
Settings, the deck number of the DJ software, BPM, and key information are displayed on the
OLED display.
1. Playback speed adjustment range (page 34)
When the Step Pitch isn’t turned on, the adjustable range from the original playback
speed is displayed.
When the Step Pitch is turned on, the key adjusted by the Tempo slider is displayed.
•The displayed key isn’t the current key but a rough estimate.
2. Application
Displays the name of the DJ software used in Digital Vinyl mode.
3. Deck number
Displays the number of the deck to use with the Performance Pads.
•The deck number is displayed when you press the [DECK/UTILITY] button or when a
PC/Mac is connected to the unit via USB.
4. Key
Displays the current key of the track.
•The key is displayed only when a PC/Mac is connected to the unit via USB.
5. BPM
Displays BPM (beats per minute, i.e. tempo) for the track.
•BPM is displayed only when a PC/Mac is connected to the unit via USB.
2
1
3 4 5

20
Adjustment
Tone arm section
1. Height adjustment dial
Adjusts the height of the tone arm.
2. Balance weight
Adjusts the balance of the tone arm and the stylus pressure.
3. Stylus pressure adjustment ring
Use this to set the stylus pressure to the appropriate value for the cartridge.
4. Magvel Clamp storage
Attach the Magvel Clamp here when you're not using it.
5. Height adjustment lock
Locks the height of the tone arm.
6. Anti skating dial
Counteracts the force that pulls the stylus tip inward during record playback when it’s set
to the same value as the stylus pressure.
7. Lifter lever
Raises and lowers the tone arm.
1
2
3
4
57
9
8
6
10
Table of contents
Other PIONEER DJ Turntable manuals

PIONEER DJ
PIONEER DJ rekordbox XDJ-700 User manual

PIONEER DJ
PIONEER DJ PLX-500-K User manual

PIONEER DJ
PIONEER DJ rekordbox CDJ-2000NXS2 Instruction Manual

PIONEER DJ
PIONEER DJ rekordbox XDJ-1000MK2 User manual

PIONEER DJ
PIONEER DJ PLX-500-K User manual

PIONEER DJ
PIONEER DJ PLX-500-W User manual

PIONEER DJ
PIONEER DJ rekordbox XDJ-700 User manual