PISTER PMK Series Installation and user guide

Service- und Wartungsanleitung
Handbetätigte PISTER Multikupplung PMK®
1/4
1 Allgemeine Hinweise
Die Service- und Wartungsanleitung beschreibt mögliche Fehlerursachen bei Undichtheiten und den Austausch von
Dichtungen bei Pister Multi upplungen PMK .
Die handbetätigte PISTER Multi upplung wird in der Service- und Wartungsanleitung mit PMK abge ürzt, die
hydraulische Verriegelung mit HV. Die Service- und Wartungsanleitung ist sorgfältig zu lesen und aufzubewahren.
Die Hinweise in der allgemeinen Bedienungsanleitung (Do ument Nr. 75-007-078) sind zu beachten, insbesondere die
dort genannten Sicherheitshinweise.
Bei Nichtbeachtung der Service- und Wartungsanleitung übernimmt der Hersteller eine Haftung.
Alle Arbeiten sind durch sach undiges, qualifiziertes Personal durchzuführen. Nationale Vorschriften zur Unfallverhütung
sowie ortsgebundene Sicherheitsvorschriften des Betreibers werden durch diese Betriebsanleitung nicht ersetzt und sind
in jedem Falle als vorrangig zu betrachten.
Der Hersteller behält sich das Recht von technischen Änderungen und Verbesserungen jederzeit vor.
2 Kupplungssystem undicht
Hinweis!
Ein geringer Ölfilm um die Kupplungen nach dem Ent upplungsvorgang ist normal und deutet nicht auf eine Undichtheit
hin. Sind größere Lec agen er ennbar, muss geprüft werden, welche Kupplung undicht ist. Bei längerer Nutzungsdauer
erhöht sich die Lec age der Kupplungsstec er.
Dichtungen austauschen und die Kupplungen haben wieder ihren Neuzustand.
HINWEIS: Dichtungen önnen nur beim Kupplungstyp 2 gewechselt werden. Bei PMK mit Kupplungstyp 1 muss
grundsätzlich die defe te Kupplungsmuffe oder Kupplungsstec er ausgetauscht werden!
Motor abstellen, System druckentlasten!
PMK System ent uppeln
Undichtheiten Kupplungsmuffe
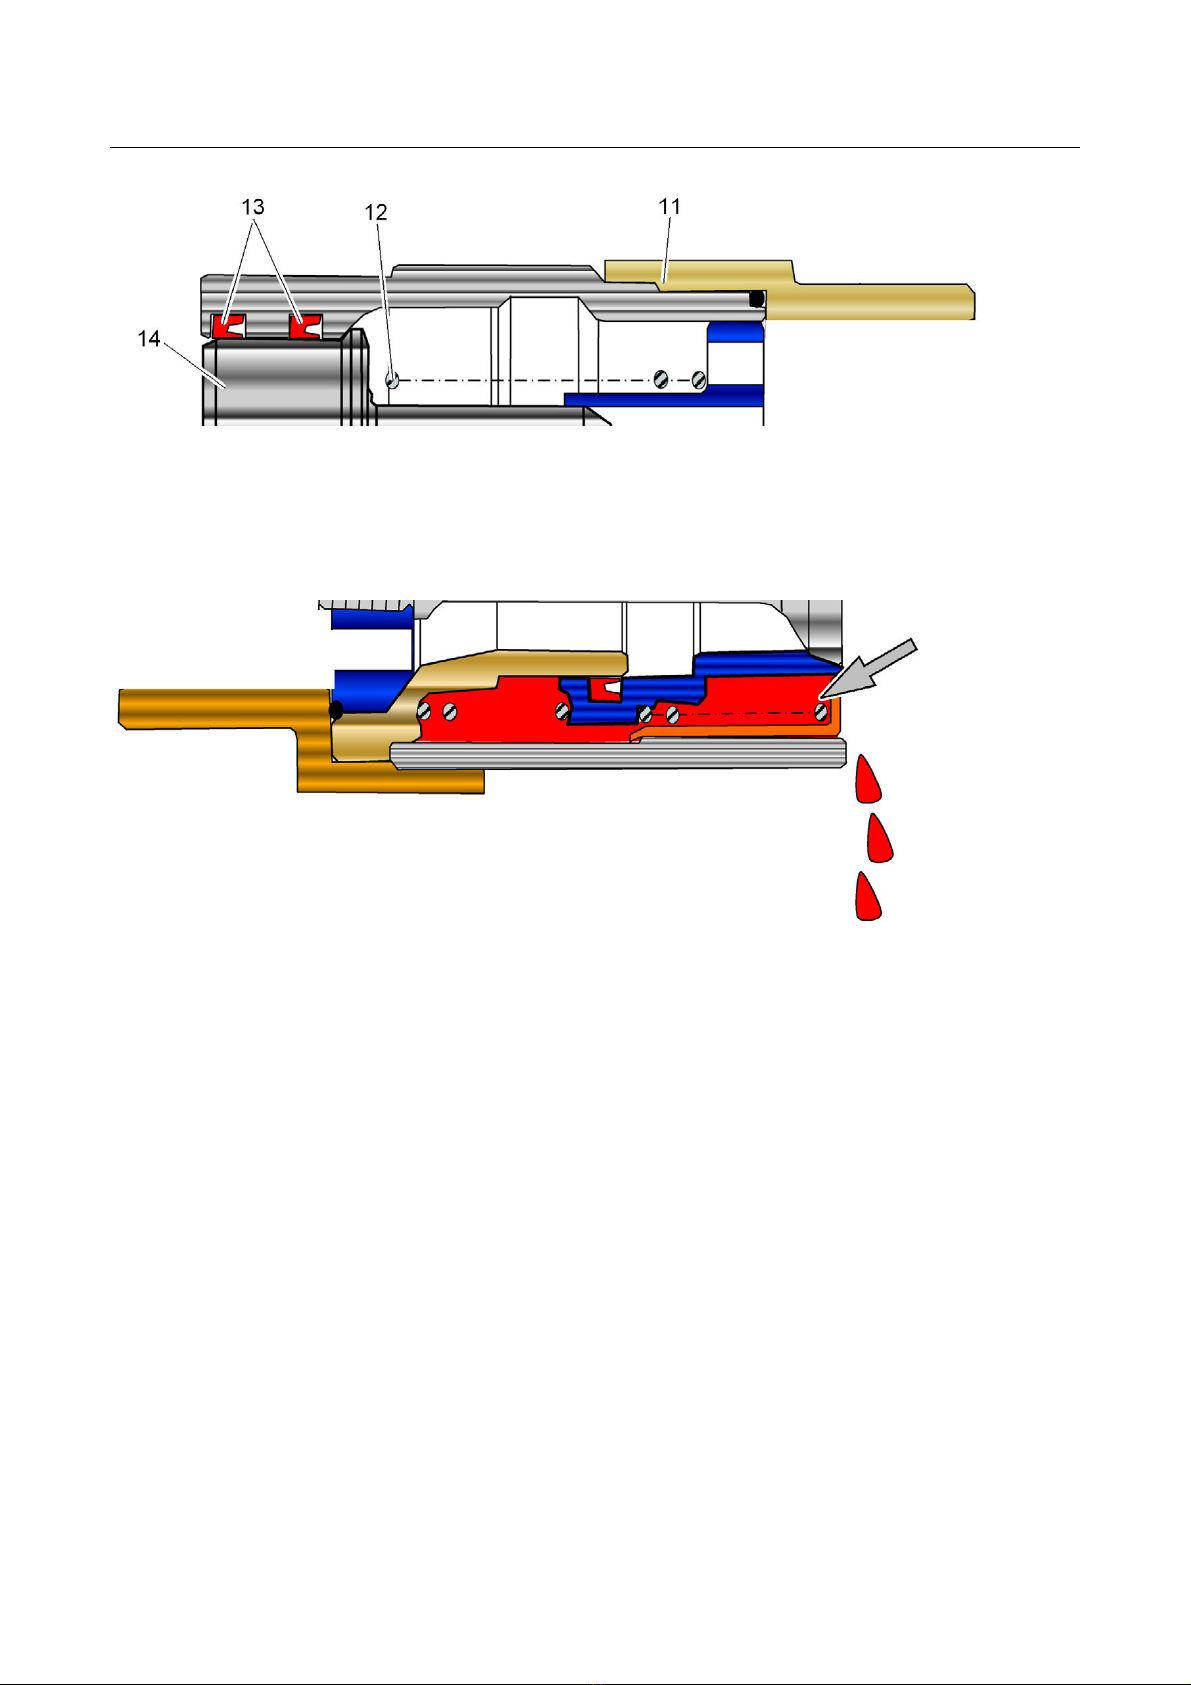
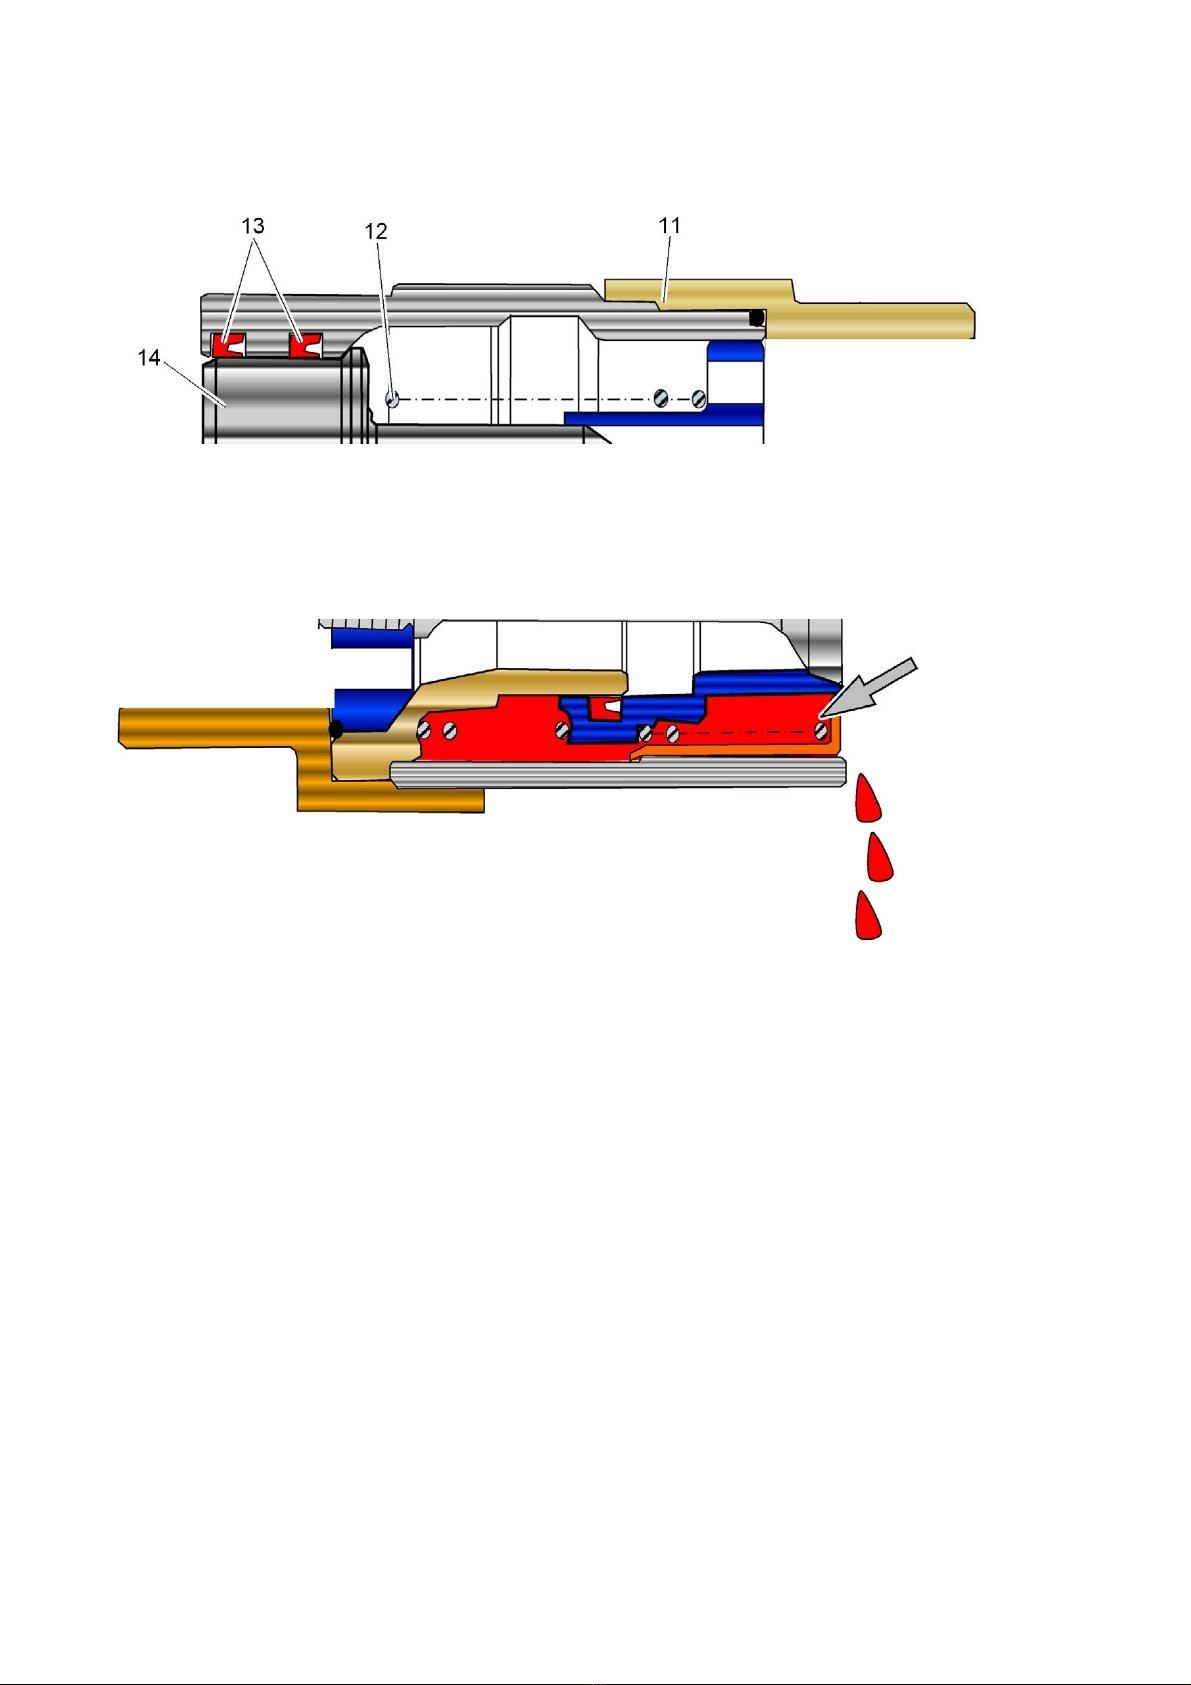
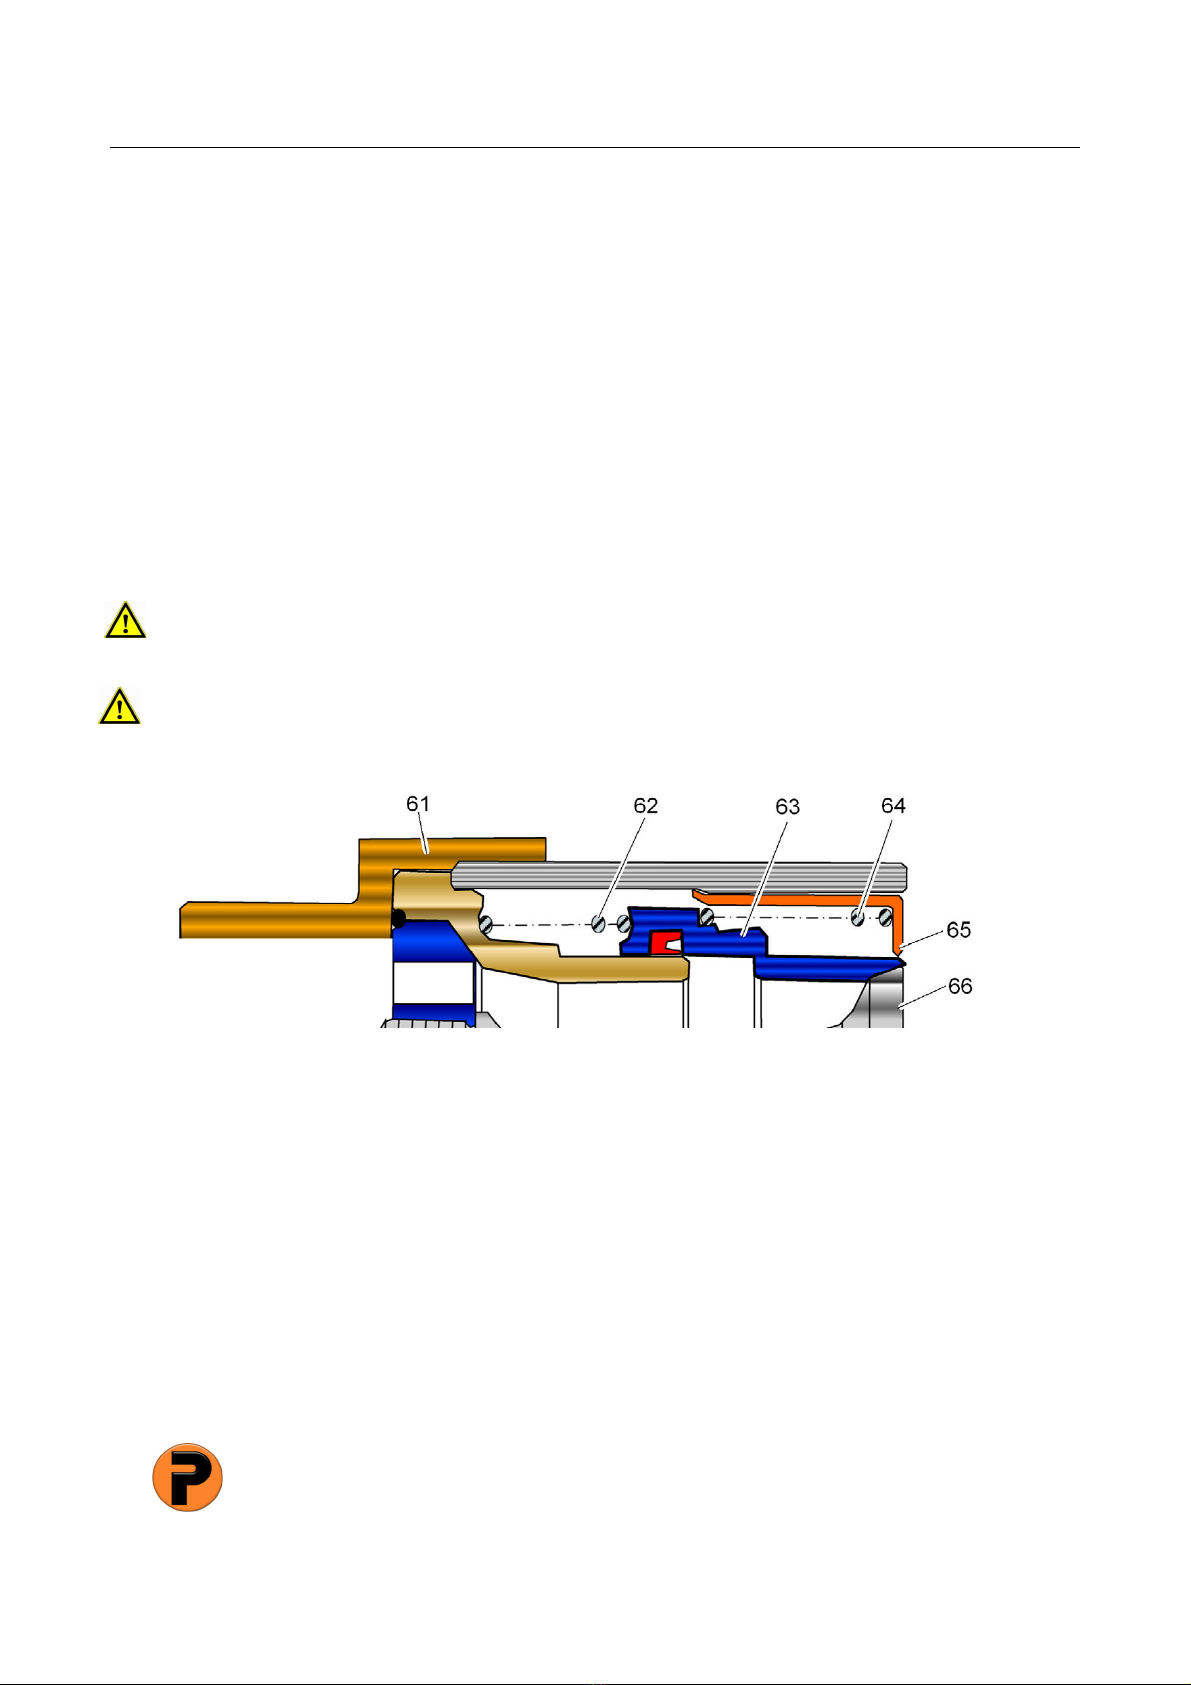
Bild 1: Fehlersuche an der Kupplungsmuffe
Vorgehensweise Kupplungsmuffe (Bild 1):
• Ölbehälter zum Auffangen des Lec öls bereitstellen
• Sicht ontrolle an den Kupplungen durchführen. Tritt Öl zwischen Staubdec el 65 und Ventil 66 aus, deutet dies auf
eine äußere Undichtheit hin
• Dichtring im Ventil 66 ist beschädigt oder ein Fremd örper einge lemmt
• Staubdec el 65 mittels Schraubendreher eindrüc en. Beim Drüc en der Staubdec el 65 in den Kupplungsmuffen
fließt Öl aus
• Fremd örper vorsichtig entfernen
Kupplungsmuffe tauschen, wenn das Problem nicht beseitigt werden kann
Pister – Kugelhähne GmbH • Vogesenstr. 37 • D-76461 Muggensturm • Tel.: +49 (0)7222-5002 0
www.pister-gmbh.com • techni @pister-gmbh.com
75-007-089_a 10/2017

Service- und Wartungsanleitung
Handbetätigte PISTER Multikupplung PMK®
2/4
Undichtheiten Kupplungsstecker
Bild 2: Fehlersuche am Kupplungsstec er
Hinweis!
Bei Undichtheiten am Kupplungsstec er verteilt sich das Lec öl, siehe Pfeil Bild 3, im gesamten vorderen Bereich der
Kupplungsmuffe. Der undichte Kupplungsstec er spritzt Öl beim Kupplungsvorgang in diesen Federraum, so dass an der
Muffe im unge oppelten Zustand eine Tropfenbildung zu er ennen ist.
Bild 3: Ölgefüllter Bereich der Kupplungsmuffe
• Lo alisieren des undichten Kupplungsstec ers
• Kupplungen öl- und fettfrei machen (z.B. mit Bremsenreiniger)
• PMK uppeln
• Alle Leitungen mit Druc beaufschlagen
• Sofort wieder aus uppeln
• Kupplungen überprüfen (Ölfilm an Kupplungsmuffe weist auf undichten Kupplungsstec er hin)
• Dichtringe wechseln s. Bild 5

Service- und Wartungsanleitung
Handbetätigte PISTER Multikupplung PMK®
3/4
Dichtringe der Kupplungsstecker wechseln
Motor abstellen, System druckentlasten!
PMK System ent uppeln
Hinweis!
Sollten sich die Kupplungsstec er nicht eindrüc en lassen, ist noch Restdruc im Hydrauli reislauf vorhanden. System
druc entlasten!
Bild 4: Aufbau Kupplungsstecker
Bild 5: Dichtring wechseln
A. Undichte Kupplungsstec er identifizieren
B. Das Ventil 14 des Kupplungsstec ers mit dem Schraubendreher niederdrüc en und den defe ten Dichtring 13 mit
einem spitzen Gegenstand heraushebeln.
C. Neuen Dichtring zusammendrüc en und mit der offenen Seite nach unten auf das Ventil 14 auflegen.
D. Das Ventil 14 bis zur Nut niederdrüc en, Schraubendreher in die Mitte des Dichtrings ansetzen und die Hand
entfernen.
E. Den Dichtring in die Nut springen lassen.
F. Schraubendreher entfernen. Das Ventil 14 muss sich nach oben bewegen. Gegebenenfalls den Dichtring
nachdrüc en bis das Ventil beweglich ist.
Kupplungsstecker tauschen, wenn das Problem nicht beseitigt werden kann

Service- und Wartungsanleitung
Handbetätigte PISTER Multikupplung PMK®
4/4
Undichtheit an Hydraulischer Verriegelung HV
Bild 6: Hydraulische Verriegelung HV
Hinweis!
Ein geringer Ölfilm am Kolben der Hydraulischen Verriegelung HV ist normal und deutet nicht auf eine Undichtheit hin.
Sind größere Lec agen zwischen Kolben und Kolbendec el er ennbar, muss die Hydraulische Verriegelung
ausgetauscht werden.
Tritt die Undichtheit zwischen HV und der Hohlschraube bzw. HV und dem Kupplungsstec er auf, ann hier der jeweilige
Dichtring getauscht werden
Motor abstellen, System druckentlasten!
PMK System ent uppeln
• Verdrehsicherungsblech entfernen, dazu die 3 Schrauben auf Oberseite lösen
• Die Hohlschraube lösen, dabei unbedingt mit einem geeigneten Wer zeug am Kupplungsstec er gegenhalten. Den
defe ten Dichtring tauschen
• PMK ein uppeln. Prüfen ob Kolben der HV bei Druc beaufschlagung ausfährt und somit ein Unbeabsichtigtes
Ent uppeln unter Druc verhindert!
Hydraulische Verriegelung tauschen, wenn das Problem nicht beseitigt werden kann
Achtung!
Sicherheitsbauteil ! Reparaturen an der Hydraulischen Verriegelung sind nicht zulässig!
Hohlschraube
Kolben Kolbendec el
Kupplungsstec er
Dichtringe
Verdrehsicherungs-
blech

Service and maintenance manual
Hand-operated PISTER Multicoupler PMK®
1/4
1. General
The service and maintenance manual describes possible failure causes at leakages and the replacement of seals at the
PISTER Multicoupler PM .
The hand-operated PISTER Multicoupler is abbreviated in the service and maintenance manual with PM , the hydraulic
locking device with HV. The service and maintenance manual has to be read carefully and has to be retained.
The instructions of the general operating manual (document no. 75-007-078) have to be followed, especially the safety
instructions.
For non-observance of the service and maintenance manual, the manufacturer assumes no liability and warranty.
Qualified personnel are necessary to the application of this manual. It is the responsibility of the operator or planner to
ensure that national regulations for accident prevention such as local safety regulations of the operating company are not
replaced by this manual, they should rather be considered with priority. The manufacturer maintains all rights for
technical changes and improvements at any time.
2. Lea age of multicoupler system
Attention!
A small oil film on the couplings after the disconnection is normal and is not a leakage. If larger leakages are visible,
check which coupling is leaky. Longer operating time increases the leakage of the coupling plugs.
Replace the seals and the couplings are in new condition.
ATTENTION: seals can only be replaced at the coupling plug type 2. At the PM with coupling type 1 the defective
female coupling or plug has to be replaced!
Switch off motor, depressurize system!
Disconnect PM system
Lea age at female coupling
Figure 1: troubleshooting at female coupling
Chec the female coupling (figure 1):
• Prepare oil container to collect the leak oil
• Visual control of the couplings. Is there a leakage between the dust cover 65 and the valve 66, there is outer
leakage
• Seal ring in valve 66 is damaged or a particle is trapped
• Push down the dust cover 65 with a screwdriver. While pushing down the dust cover 65 oil is running out
• Remove the foreign particle
Replace the female coupling if the problem cannot be solved
Pister – ugelhähne GmbH • Vogesenstr. 37 • D-76461 Muggensturm • Tel.: +49 (0)7222-5002 0
www.pister-gmbh.com • technik@pister-gmbh.com
75-007-089_a 10/2017

Service and maintenance manual
Hand-operated PISTER Multicoupler PMK®
2/4
Lea age coupling plug
Figure 2: troubleshooting at plug
Attention!
If the coupling plug is leaky the leak oil spreads in the front area of the female coupling, please see arrow in figure 3.
The leaky coupling plug splatters the oil when connected in this spring chamber of the female coupling. At disconnected
condition there are oil drops recognizable at the female coupling.
Figure 3: oil-filled area in the female coupling
• Localise the leaky coupling plug
• Remove the oil and grease from the female couplings (e.g. with brake cleaner)
• Connect PM
• Pressurise all lines
• Disconnect immediately after releasing pressure
• Check couplings (oil film at the female coupling indicates a leaky coupling plug)
• Replace the seal rings please see figure 5

Service and maintenance manual
Hand-operated PISTER Multicoupler PMK®
3/4
Replacing the seal rings at the coupling plugs
Switch off motor, depressurize system!
Disconnect PM system
Attention!
If the valve 14 of the coupling plug can't be pushed in, there is residual pressure in the hydraulic cycle. Release pressure
in the system!
Figure 4: Assembly coupling plug
Figure 5: Replace of seal ring
A. Identify leaky coupling plug
B. Push in the valve 14 of the plug with a screwdriver and pick out the defective seal ring 13 with a spiky object.
C. Press the new seal ring together and put it with the open side downwards on the valve 14.
D. Push the valve 14 downwards to the notch, locate the screwdriver in the middle of the seal ring and remove the
hand.
E. Let the seal ring spring into the notch.
F. Remove the screwdriver. The valve 14 has to move upwards. If necessary push the seal ring again until the valve
moves up.
Replace the coupling plug if the problem cannot be solved

Service and maintenance manual
Hand-operated PISTER Multicoupler PMK®
4/4
Lea age at the hydraulic loc ing device HV
Figure 6: Hydraulic locking device HV
Attention!
A small oil film on the piston of the hydraulic locking is normal and is not a leakage.
Are there larger leakages between the piston and the piston cover, the hydraulic locking device has to be replaced.
Is the leakage between the HV and the hollow screw or rather between the HV and the coupling plug, the particular seal
ring can be replaced.
Switch off motor, depressurize system!
Disconnect PM system
• Remove the anti-twist plate, unscrew the 3 screws on the top
• Untighten the hollow screw by holding the coupling plug with an adequate tool. Replace the defective seal ring
• Connect PM . Check if the piston of the HV moves out under pressure. Only this prevents an unintentional
disconnection under pressure!
Replace the hydraulic loc ing device if the problem cannot be solved
Attention!
safety device ! Repair of the hydraulic loc ing device is not allowed!
hollow screw
piston piston cover
coupling plug
seal rings
anti-twist plate
Table of contents
Languages:
Other PISTER Industrial Equipment manuals
Popular Industrial Equipment manuals by other brands

Crest Audio
Crest Audio FORWARD TECHNOLOGY F-100 Operation and maintenance manual

WPG
WPG MRTALPCH611DC3 operating instructions

Leister
Leister UNIROOF AT operating instructions

KiloVault
KiloVault HAB SCHNEIDER XW PRO UL9540 installation guide

Laguna Tools
Laguna Tools Smartshop II Series manual

JUKI
JUKI 72005824 installation manual

TRI tool
TRI tool BEVELMASTER 216B Operation manual

SCHUNK
SCHUNK SDV-P Assembly and operating manual

GIGAIPC
GIGAIPC QBiX-Pro-WHLA8565H-A1 quick start guide

HEIDENHAIN
HEIDENHAIN ERN 9080 Mounting instructions

Nidec
Nidec LEROY-SOMER LSA 49.1 IC 06 Installation and Maintenance

ABB
ABB HT846804 Operation manual