planeo 211L User manual

2
A
B SOLD SEPARATELY
SEPARAT ERHÄLTLICH
DISPONIBLE SÉPARÉMENT
C
[1]
[1]
1
[3][2]
2
DO NOT CUT HERE
CONNECTOR
DO NOT CUT HERE
CONNECTOR
[4]
LED Strip
Connector
211L
175L

3
D[1]
[2]
[3]
[5]
[4]
[6]

4
E
C
2
1
3
1
2
C
D
2
3
2
1
3
C
D
2
4
[4]
[1]

6
LED Streifen und Verbinder
Benutzeranleitung
Vielen Dank für den Kauf des Planeo LED-Streifens und
Verbinders. Dieses Dokument enthält die notwendigen
Informationen für den korrekten,effizienten und sicheren
Gebrauch des Produkts.Weitere Informationen zur Instal
lation und zum Anschluss Ihres Beleuchtungsplans fin
den Sie in Ihrer Transformator-Benutzeranleitung oder
besuchen Sie unsere Website www.planeo.de
Bitte lesen Sie die Informationen in diesem Handbuch
sorgfältig durch, bevor Sie das Produkt in Betrieb
nehmen. Bitte bewahren Sie dieses Handbuch zusammen
mit dem Produkt auf, um zukünftig nachschlagen zu
können.
PRODUKTBESCHREIBUNG
Der Planeo LED-Streifen ist ein Lichtschlauch für den Au
ßenbereich. Der Streifen kann vor der Installation auf die
gewünschte Länge zugeschnitten werden. Hinweis:
Beachten Sie vor dem Schneiden die Hinweise in dieser
Anleitung!
Dieses Produkt eignet sich als Außenbeleuchtung in
Kombination mit dem 12-Volt-System von Planeo
Eine unsachgemäße Verwendung des Produkts kann
Auswirkungen auf die Sicherheit, die Gewährleistung
und den ordnungsgemäßen Betrieb des Produkts und /
oder anderer Teile des Systems haben.
SPEZIFIKATIONEN LED-STREIFEN
Artikelnummer 175L
Leistung (pro Meter) 2,2W
Lichtstrom (pro Meter) 80-100lm
Schutzart IP67
Umgebungstemperatur -20°C bis 50°C
Dimmbar Nein
SPEZIFIKATIONEN LED-STREIFEN-VERBINDER
Artikelnummer 176L
Maximale Leistung 36W
Afmetingen (l x b x h) 1m x 28mm x 28mm
Schutzart IP44 + IP67
Umgebungstemperatur -20°C bis 50°C
Kabellänge 1m
ANWENDUNG
Verpackungsinhalt
[Bild A]
1.Verbinder
2. Gummiabdichtung
3.Abschlusskappe
4. F-Verbinder (Artikelnummer 137A)
Überprüfen Sie,ob alle Teile in der Verpackung
vorhanden sind.Bei Fragen zu Einzelteilen, Service,
Reklamationen oder anderen Angelegenheiten können
SEPARAT ERHÄLTLICH
[Bild B]
1. LED Steifen (Artikelnummer 175L)
SCHNEIDEN
[Bild C]
Der LED-Streifen kann auf die gewünschte Länge
zugeschnitten werden.Von der transparenten Seite in
einer Bewegung durchschneiden.
Sie die folgenden Anweisungen zum Schneiden:
1.Auf dem LED-Streifen befindet sich eine Markierung
mit dem Aufdruck DO NOT CUT HERE. In diesen Teil des
Streifens darf niemals geschnitten werden.
2. Der Streifen kann nach Bedarf gekürzt werden.Der Teil
des Streifens,der an den Verbinder angeschlossen
wird, muss mindestens eine Markierung enthalten.
3. Kurze (verbleibende) Teile des LED-Streifens,an
denen keine Markierung vorhanden ist, leuchten beim
Anschluss an den Verbinder nicht auf.
4. Es ist möglich,dass am Ende des Streifens einige
Zentimeter nach dem Schneiden nicht aufleuchten.
MONTAGE
[Bild D]
1. Lösen Sie den Schraubverschluss und schieben Sie ihn
nach hinten.
Der LED-Streifen muss in der richtigen Richtung
an den Verbinder angeschlossen werden. Beachten Sie
beim Anschließen die Pfeilrichtung mit dem Aufdruck
CONNECTOR.Der Pfeil zeigt in Richtung des Verbinders.
2. Platzieren Sie die Gummiabdichtung ca.5 cm auf dem
LED-Streifen.
3.Verbinden Sie den LED-Streifen mit dem Verbinder.
Stellen Sie sicher, dass die Stifte im Verbinder einen
guten Kontakt zu den Leitern im Streifen haben.
4. Drücken Sie die Gummiabdichtung gegen den
Verbinder.
5. Setzen Sie den Schraubverschluss auf den Verbinder
und ziehen Sie ihn fest an.
6. Platzieren Sie die Abschlusskappe am Ende des
LED-Streifens.
IP44IP67

7
LED Strip and Connector
User manual
Thank you for buying the Planeo LED Strip and
Connector. This document contains the required
information for correct, efficient,and safe use of the
product. Consult the user manual of your transformer
for more information about the set up and connection of
your Planeo plan or visit our website www.planeo.de
Read the information in this manual carefully before
using the product. Keep this manual near the product for
consultation in the future.
PRODUCT DESCRIPTION
The Planeo LED Strip is a lighting chain for outdoor use.
The strip can be cut to the desired length before
installation. Attention: before cutting, read the
instructions in this manual carefully!
This product can be used as outdoor lighting in
combination with the Planeo 12 Volt system. Improper
use of the product can have consequences for the safety,
warranty, and correct functioning of the product and/or
other parts of the system.
SPECIFICATIONS LED STRIP
Article number 175L
Power (per meter) 2,2W
Luminous flux (per meter) 80-100lm
Protection class IP67
Ambient temperature -20°C to 50°C
Dimmable No
SPECIFICATIONS LED STRIP CONNECTOR
Article number 176L
Maximum Power 36W
Afmetingen (l x b x h) 1m x 28mm x 28mm
Protection class IP44 + IP67
Ambient temperature -20°C to 50°C
Cable length 1m
USE
Packaging content
[Figure A]
1. LED Strip Connector
2. Sealing rubber
3. End cap
4. F-Connector (Article number 137A)
Check if all parts are present in the packaging. For
questions about parts,service, and any complaints or
other remarks,you can always contact us.
E-mail: [email protected]
AVAILABLE SEPARATELY
[Figure B]
1. LED Strip (Article number 175L)
CUTTING
[Figure C]
The LED Strip can be cut to any desired length. Cut
through in one movement from the transparent side.
Carefully follow these instructions when cutting the
strip:
1. The LED Strip has been marked with the print DO NOT
CUT HERE.Never cut in this part of the strip.
2. The strip can be shortened as desired. The part of the
strip that is connected to the connector has to have at
least one marking.
3. Short (remaining) parts of the LED Strip which do not
have a marking will not light when connected to the
connector.
4. It is possible that a small part of a few centimetres at
the end of the strip will not light up after cutting.
ASSEMBLE
[Figure D]
1. Unscrew the screw cap and move it to the back.
The LED Strip has to be connected in the right
direction to the connector. When connecting, pay
attention to the direction of the arrow with the print
CONNECTOR.The arrow points in the direction of the
connector.
2. Place the sealing rubber at around 5 cm on the LED
Strip.
3. Connect the LED Strip to the Connector. Make sure the
pins in the connector make proper contact with
the conductors in the strip.
4. Press the sealing rubber to the connector.
5. Place the screw cap on the connector and tighten
properly.
6. Place the end cap at the end of the LED Strip.
IP44IP67

8
Bande LED et connecteur
Mode d’emploi
Nous vous remercions pour l’achat de la bande LED et
du connecteur Planeo. Ce document comprend les
informations utiles pour une utilisation correcte, efficace
et sûre du produit. Consultez le manuel de l’utilisateur de
votre transformateur pour de plus amples informations
sur l’aménagement et le raccordement de votre plan
d’éclairage ou visitez notre site Web www.planeo.de
Lisez attentivement les informations du présent mode
d’emploi avant la mise en service du produit. Conservez
le présent mode d’emploi près du produit pour pouvoir
vous y référer à l’avenir.
DESCRIPTION DU PRODUIT
La bande LED Planeo est un ruban lumineux à usage
extérieur. La bande peut être découpée sur mesure selon
vos souhaits avant l’installation.Attention: avant de
la couper, suivez bien les instructions du présent mode
d’emploi !
Ce produit s’utilise comme éclairage extérieur en
combinaison avec le système 12 Volts de Planeo.
Une utilisation incorrecte du produit peut avoir
des conséquences pour la sécurité, la garantie et le
fonctionnement adéquat du produit et/ou d’autres
composants du système.
SPÉCIFICATIONS BANDE LED
Numéro article 175L
Puissance (par mètre) 2,2W
Flux lumineux (par mètre) 80-100lm
Classe de protection IP67
Température ambiante -20°C à 50°C
Variateur Non
SPÉCIFICATIONS CONNECTEUR BANDE LED
Numéro article 176L
Puissance maximum 36W
Dimensions (l x L x h) 1m x 28mm x 28mm
Classe de protection IP44 + IP67
Température ambiante -20°C à 50°C
Longueur de câble 1m
UTILISATION
Contenu de l’emballage
[Image A]
1. Connecteur Bande LED
2. Caoutchouc d’étanchéité
3. Embout
4. Connecteur F (Numéro article 137A)
Vérifiez bien que toutes les pièces se trouvent bien
dans l’emballage.Vous pouvez toujours nous contacter
pour toute question sur les pièces,le service, des
réclamations éventuelles ou toute autre chose.E-mail:
Disponible individuellement
[Image B]
1. Bande LED (Numéro article 175L)
DECOUPER
[Image C]
On peut découper la bande LED sur mesure.
Couper en un seul mouvement du côté transparent.
Suivez les instructions suivantes pour découper :
1. Sur la bande LED,vous trouverez une marque imprimée
comportant le texte DO NOT CUT HERE (ne pas couper
ici). Il ne faut jamais découper dans cette partie de
la bande.
2. On peut raccourcir la bande comme on le souhaite.La
partie de la bande qui est raccordée au connecteur doit
au moins contenir une marque.
3. Les parties courtes (restantes) de la bande LED sur
lesquelles il n’y a pas de marque ne s’allumeront pas
lorsqu’elles seront raccordées au connecteur.
4. Il est possible qu’une petite partie de quelques
centimètres à la fin de la bande n’éclaire pas après
avoir découpé.
RACCORDER
[Image D]
1. Dévissez le bouchon à vis et placez-le en arrière.
La bande LED doit être raccordée dans le bon sens au
connecteur. Lors du raccordement,faites attention au
sens de la flèche associée à l’impression CONNECTOR
(connecteur).La flèche indique le sens du connecteur.
2. Placez le caoutchouc d’étanchéité à environ 5 cm sur
la bande LED.
3. Reliez la Bande LED au connecteur.Veillez à ce que les
broches dans le connecteur fassent bien contact avec
les conducteurs dans la bande.
4. Serrez le caoutchouc d’étanchéité contre le connecteur.
5. Placez le bouchon à vis sur le connecteur et serrez-le
à fond.
6. Placez l’embout à l’extrémité de la bande LED.
IP44IP67

9
Transformer (144A/145A)
Connector
Type Y (143A)
Connector
Type M (138A)
Connector
Type F (137A)
JUST TURN IT!
Connection to make a branch
Connection to transformer
Just twist and connect!
The system

10
INSTALLATION DER LAMPEN
• Installieren Sie das Produkt in der gewünschten
Position und verlegen Sie die Kabel so, dass sie
einfach mit dem Transformator oder dem Hauptkabel
verbunden werden können.
• Wenn Produkte über eine Wasserablauföffnung
verfügen,muss diese nach unten zeigen.
• Wenn Sie die Produkte fest in Boden verankern
möchten,verwenden Sie dazu Befestigungsmaterial
aus nicht-rostenden Materialien (als Standard
mitgeliefert).
• Verbinden Sie die Leuchten an den Hauptkabel mit dem
Konnektor wie auf Bild auf Seite 5 gezeigt wird.
• Weitere Informationen finden Sie in Ihrer Anleitung
zum Transformator.
SICHERHEIT
• Bringen Sie dieses Produkt stets so an, dass es zu
Bedienungs- und Wartungszwecken zugänglich bleibt.
• Schalten Sie das System aus,indem Sie den
Transformator zur Wartung aus der Steckdose ziehen.
• Reinigen Sie das Produkt regelmäßig mit einem
weichen, sauberen Tuch.Vermeiden Sie Schleifmittel,
die die Oberfläche beschädigen können.
• Reinigen Sie Produkte mit Edelstahlteilen einmal alle
6 Monate mit Edelstahlreiniger.
• Verwenden Sie bei der Reinigung des Produkts
keine Hochdruckreiniger oder aggressive chemische
Reinigungsmittel,da dies zu irreparablen Schäden am
Produkt führen kann.
• Schutzklasse III: Dieses Produkt darf nur mit Schutz-
Kleinspannung bis maximal 12 Volt verbunden werden.
• Geeignet für Umgebungstemperatur ca: -20 tot 50°C.
• Verwenden Sie diese Produkt nicht in Bereichen,in
denen brennbare Gase, Dämpfe oder Flüssigkeiten
auftreten oder gelagert werden können.
Dieses Produkt entspricht den EU-Standards für
Gesundheit, Sicherheit und Umweltschutz.
Wenn Sie Fragen zu Einzelteilen oder zum Service
haben, oder wenn Sie uns eine Beschwerde oder
andere Hinweise übermitteln möchten, können Sie
sich jederzeit an uns wenden. E-Mail: info@planeo.de
Entsorgen Sie elektrische Geräte nicht im Hausmüll.
Nutzen Sie die Sammelstellen in ihrer Gemeinde.
Fragen Sie Ihre Gemeindeverwaltung nach den
Standorten der Sammelstellen.

11
INSTALLATION OF THE LIGHTS
• Install the products in the desired position and lay the
cables so they can be comfortably connected to the
transformer or main cable.
• If products are provided with a drain hole for water, this
hole must be pointing downwards.
• Use non-corrosive fixing materials (supplied as
standard) if you want to bolt the products down.
• Connect the lights to the main cable by using the
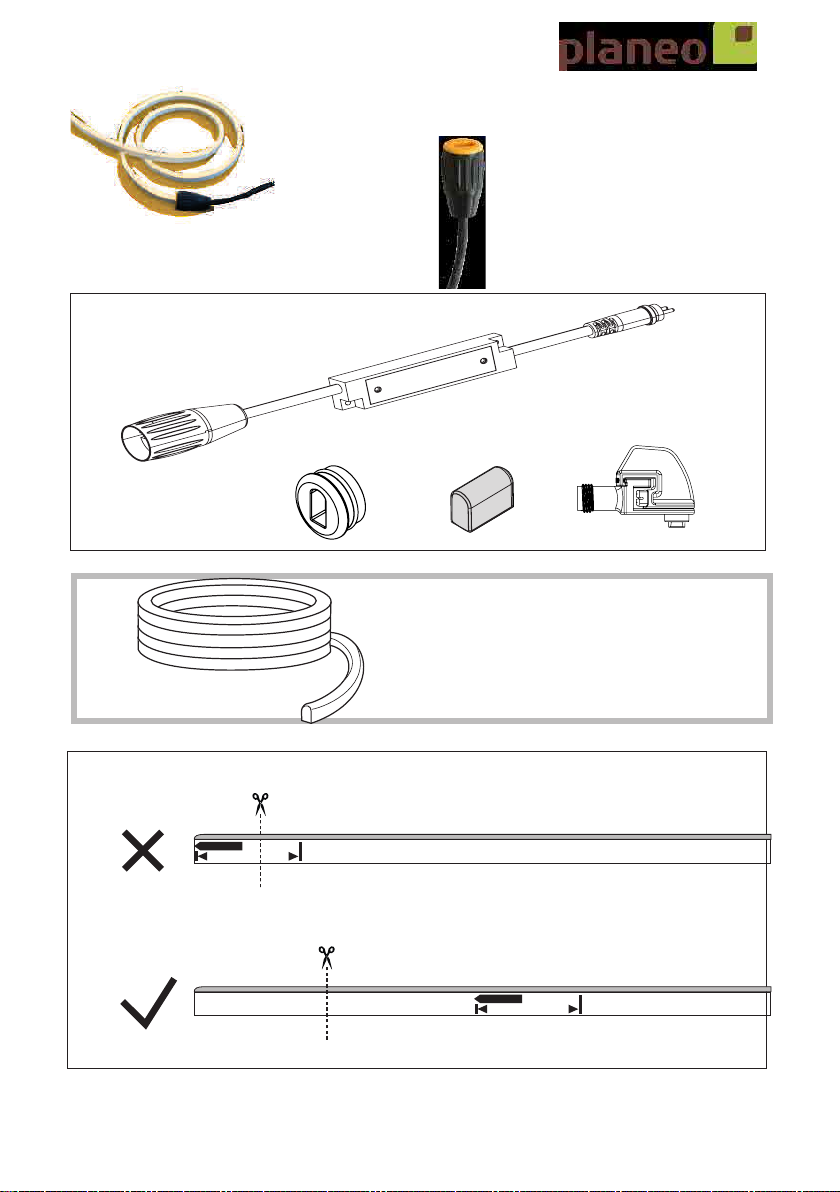
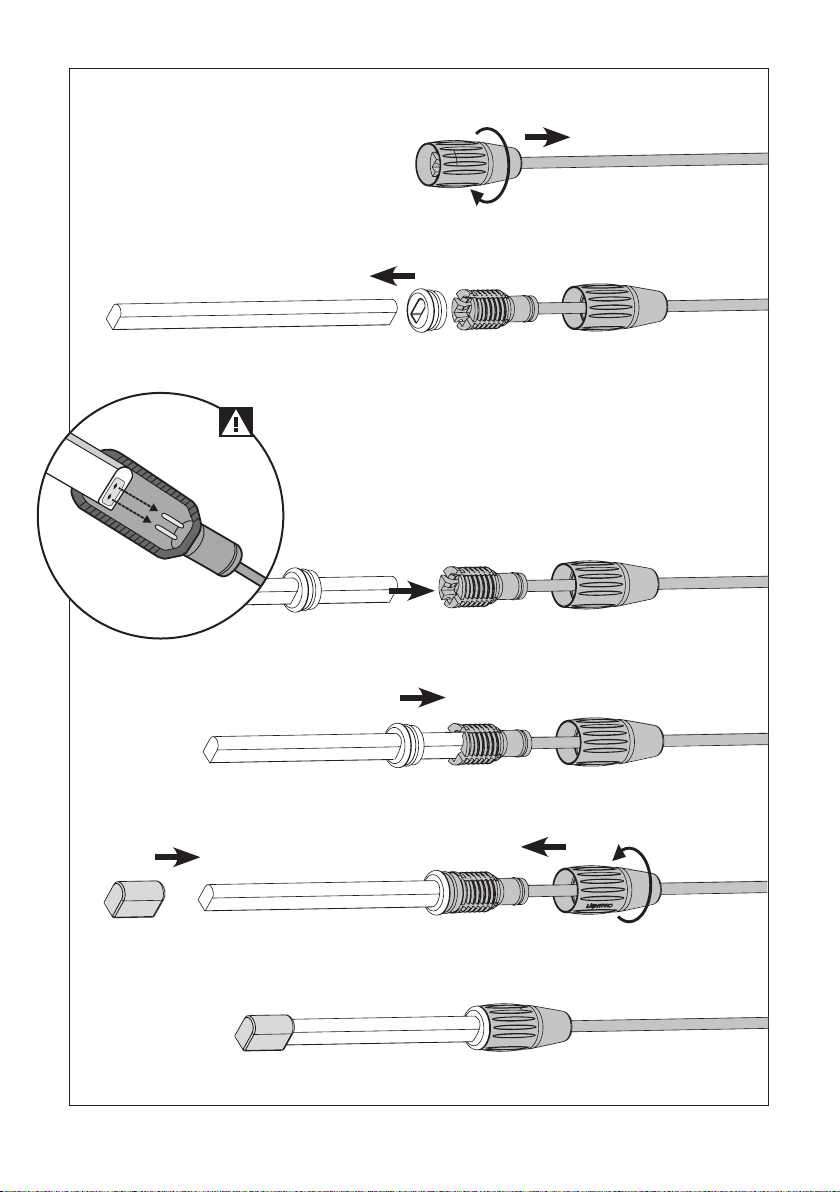
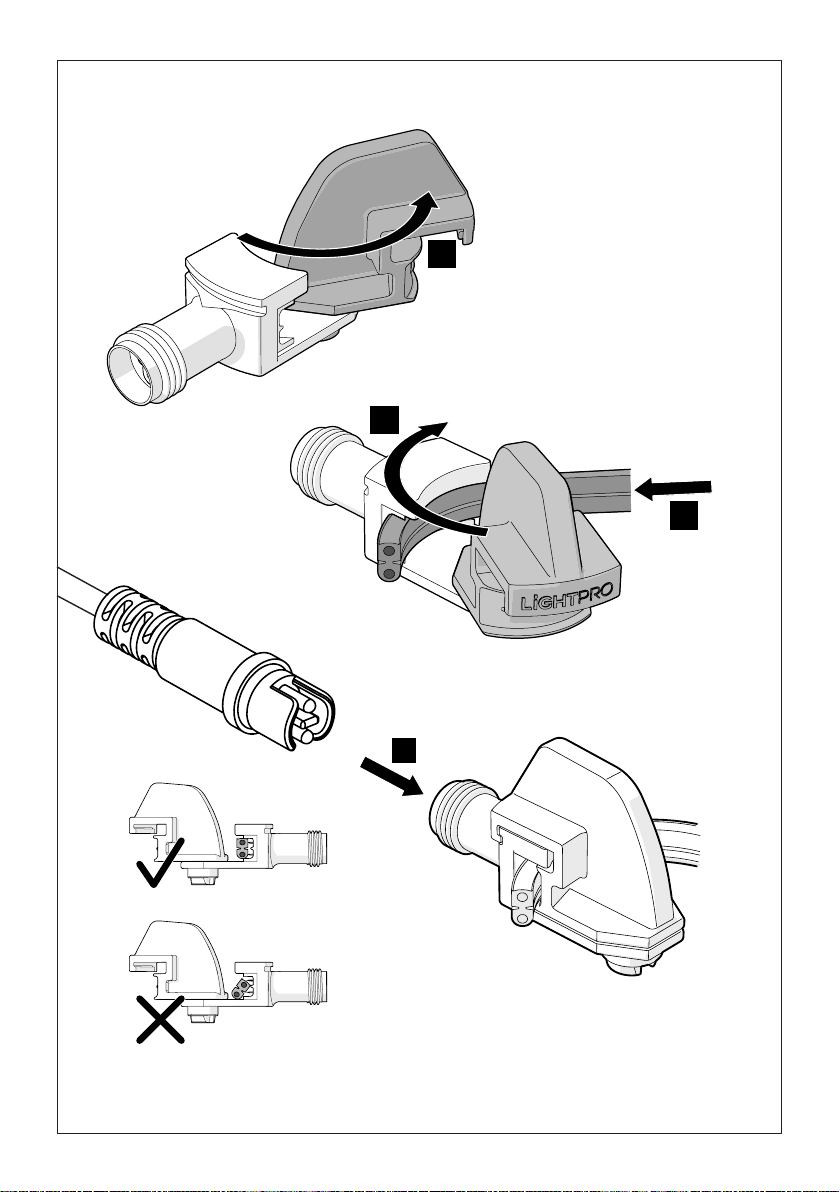
connector as shown in figure on page 5.
• Consult the manual of your transformer for more
information.
SAFETY
• Always fit this product so that it can still be accessed
for servicing or maintenance. This product must not be
permanently embedded or bricked in.
• Turn off the system by pulling the plug of the
transformer from the socket for maintenance.
• Regularly clean the product with a soft,clean cloth.
Avoid abrasives that can damage the surface.
• Clean products with stainless steel parts with a
stainless steel cleaning agent once per six months.
• Do not use a high pressure washer or aggressive
chemical cleaning agents when cleaning the product.
This can cause irreparable damage.
• Protection class III: this product may only be connected
to safety extra-low voltage up to a maximum of 12 Volt.
• This product is suitable for outside temperatures of:
-20 to 50°C.
• Do not use this product in areas where combustible
gases,fumes or liquids may be stored.
This product meets the EU standards for health,
safety and environmental protection.
For questions about parts, service, any complaints
or other matters,you can contact us at any time.
E-mail: [email protected]
Discarded electrical equipment must not be put in
the household waste. If possible,take it to a recycling
company. For details of recycling,contact a municipal
waste processing company or your dealer.
INSTALLATION DES LAMPES
• Installez les produits dans la position désirée et
positionnez les câbles de telle sorte qu’ils puissent
être raccordés confortablement au transformateur ou
au câble principal.
• Si les produits sont équipés d’un orifice d’évacuation
de l’eau, orientez celui-ci vers le bas.
• Utilisez des équipements de fixation non corrosifs
(fournis en standard) si vous souhaitez visser les
produits.
• Raccordez les prises des produits au câble principal
comme indiqué dans l’image à la page 5.
• Consultez le mode d’emploi de votre transformateur
pour de plus amples informations.
SÉCURITÉ
• Installez ce produit de telle sorte qu’il soit accessible
pour la réparation ou l’entretien. Ce produit ne doit
jamais être encastré ou imbriqué de façon permanente.
• Débranchez le système en retirant la fiche de la prise
de courant murale avant d’effectuer l’entretien
• Nettoyez régulièrement le produit avec un chiffon
doux et propre. Evitez les produits abrasifs qui peuvent
endommager la surface.
• Nettoyez les produits avec des éléments en inox une
fois tous les 6 mois avec un nettoyant pour acier
inoxydable.
• N’utilisez pas de nettoyeur haute-pression ou de
nettoyants chimiques agressifs pour nettoyer
le produit, cela peut entrainer des dommages
irréparables pour le produit.
• Classe de protection III: ce produit ne peut être
raccordé qu’à une très faible tension de sécurité d’une
puissance maximale 12 Volts.
• Ce produit est adapté à une température extérieure de:
-20 à 50°C.
• N’utilisez pas ce produit dans des lieux de stockage
de gaz inflammables,de sources d’émanations ou de
liquides.
Ce produit répond aux normes de l’UE en matière
de santé, de sécurité et de protection de
l’environnement.
Pour tout renseignement concernant les pièces de
rechange et les réparations ou pour les éventuelles
plaintes et autres problèmes, n’hésitez pas à nous
Ne pas jeter les équipements électriques usagés
dans la poubelle domestique. Si possible,remettez-
les à une entreprise de recyclage.Pour tout détail
concernant le recyclage,contactez un organisme
municipal de traitement des déchets ou votre
revendeur.
YEARS
This manual suits for next models
2
Table of contents
Languages: