Planet ICF-1000P User manual

Trademarks
Copyright © PLANET Technology Corp. 2003.
Contents subject to revision without prior notice.
PLANET is a registered trademark of PLANET Technology Corp. All other trade-
marks belong to their respective owners.
Disclaimer
PLANET Technology does not warrant that the hardware will work properly in
all environments and applications, and makes no warranty and representa-
tion, either implied or expressed, with respect to the quality, performance,
merchantability, or tness for a particular purpose.
PLANET has made every effort to ensure that this User’s Manual is accurate;
PLANET disclaims liability for any inaccuracies or omissions that may have
occurred.
Information in this User’s Manual is subject to change without notice and does
not represent a commitment on the part of PLANET. PLANET assumes no re-
sponsibility for any inaccuracies that may be contained in this User’s Manual.
PLANET makes no commitment to update or keep current the information in
this User’s Manual, and reserves the right to make improvements to this User’s
Manual and/or to the products described in this User’s Manual, at any time
without notice. If you nd information in this manual that is incorrect, mislead-
ing, or incomplete, we would appreciate your comments and suggestions.
FCC Warning
This equipment has been tested and found to comply with the regulations for
a Class B digital device, pursuant to Part 15 of the FCC Rules. These limits
are designed to provide reasonable protection against harmful interference
when the equipment is operated in a commercial environment. This equipment
generates, uses, and can radiate radio frequency energy and, if not installed
and used in accordance with this user’s guide, may cause harmful interference
to radio communications. Operation of this equipment in a residential area is
likely to cause harmful interference, in which case the user will be required to
correct the interference at his own expense.
CE Mark Warning
In a domestic environment, this product may cause radio interference, in
which case the user may be required to take adequate measures.
Revision
User’s manual for PLANET Internet Conferencing Phone
Model: ICF-1000P
Rev: 1.0 (August. 2003)
Part No. EM-ICF1KP

Safety Instructions
Please read and understand all instructions before using this product.
• All openings on the housing of this product are designed for ventilation. Do not
block or cover them. Do not insert any foreign objects in the openings. Doing
so might cause a short circuit, electrical shock and/or fire.
• Before cleaning, unplug the machine and wipe it gently with soft cloth damped
with water or diluted liquid soap. To avoid damage or malfunction to the ma-
chine, do not use alcohol or other strong solutions.
• Avoiding Electrical Shock:
§ Be sure to ground your machine so that the built-in shock arrester will
function and reduce the chance of being shocked.
§ Do not connect the grounding wire to a gas or water pipe.
§ If possible, switch power off and unplug the machine during a thunder-
storm.
• Do not try to disassemble the machine. Unplug the machine and call for service
in the following situations:
§ The power cord or plug is damaged or frayed.
§ Some liquid is spilled into the machine.
§ The machine appears wet with water.
§ The machine appears faulty and cannot be repaired despite having fol-
lowed all instructions in the manual.
§ The machine is damaged from being dropped or the housing is bro-
ken.
• Power Requirements and Power Cords:
§ Use a single wall outlet with the power of 100-240 V AC, 50/60 Hz 1A
depending on label indication.
§ Do not place anything on the power cord. Avoid having people step on
it.

Table of Contents
Chapter 1 Introduction 1
1.1 Features 1
1.2 Specification 2
Chapter 2 Installation 5
2.1 Package Contents 5
2.2 Front Panel introduction 6
2.3 Back panel introduction 8
2.4 Hardware Installation 9
Chapter 3 System Configuration 11
3.1 Power On and Access Configuration Menu 11
3.2 General Settings 12
3.3 Network 16
3.4 H.323 20
3.5 Exit the System Configuration 23
3.6 Phone Book Setup 23
Chapter 4 Getting Started 25
4.1 Making Video Calls 25
4.2 Using the Hand-free function 25
4.3 Using the Phone Book 26
4.4 Receiving Video Calls 27
Chapter 5 On-line Operation 29
5.1 Snapshot 29
5.2 Switch the Video and Audio source 30
5.3 Activate Video/Audio Mute 31
5.4 View 32
5.5 Picture Quality 32
5.6 Adjust on-line video and audio quality 32
Chapter 6 Troubleshooting 39

1
Chapter 1
INTRODUCTION
PLANET’s Video Conferencing Phone, the ICF-1000P, brings you a vivid video conferencing
experience through the Internet. No PC is required and none of the usual complications of
complex web camera, sound card and software settings and specialized data connections.
The ICF-1000P is an easy-to-use integrated system. All that is needed is a high speed
Internet connection. Using simple setup procedures through keypad on the phone, you
can install and use voice and video conferencing in a few minutes. Furthermore, the ICF-
1000P has a built-in 6.8” LCD monitor in a telephone form factor ideal for desktop use.
ICF-1000P is H.323 compliant, which means you can have a seamless conferencing
experience with other H.323 compliant video conferencing systems, VoIP gateway/
phones and Microsoft NetMeeting. With Gatekeeper and MCU support, the ICF-1000P from
PLANET makes communication with your business partners quick and cost-effective.
The ICF-1000P has two video inputs which can be used to connect to external cameras
for group meetings and/or a document camera for showing detailed documents or
photographs. With up to 30 fps frame rate, outstanding picture and sound quality,
the PLANET Internet Video Conferencing Phone offers you a superior communications
experience using the Internet.
1.1 Features
• ITU H.323 version 2 compliant
• Support H.263 Video Codec and G.723,1, G.711 Audio Codec
• Compatible with H.323 VoIP gateway, Gatekeeper , MCU (Multipoint Control
Unit) and Microsoft NetMeeting
• Built-in High Quality CCD Camera
• Full-duplex Voice Conversation
• Superior voice quality with Voice Activity Detection(VAD), Automatic
Gain Control(AGC), Acoustic Echo Cancellation(AEC) and Electrical Echo
Cancellation(EEC) support
• Support Static IP, PPPoE, DHCP Connection
• Support Dynamic DNS
• 3 video resolution mode supported, CIF, QCIF and SQCIF
• Control bandwidth to 128K, 256K, 384K, 512K, 768K and no limit
• Supports frame rate up to 30 fps
• Phone book of 100 Names/Addresses and quick search
• On-line change of remote / local video size (PIP)

2
3
• On-line video/audio mute function
• On-line snapshot of remote video function
• On-line call status information about Tx/Rx frame rate and bandwidth usage
• Provide Auto-answer mode which allow you to surveil remote location with
real-time picture and voice
• Built-in 6.8” TFT LCD monitor, angle adjustable
• Built-in High sensitive microphone
• Built-in high volume speaker
• 2 x mini-din A/V input interfaces for multiple camera connection
• 1-pair RCA Audio/Video Output for TV connection
1.2 Specication
Product Internet Video Conferencing Phone
Model ICF-1000P
Hardware
LAN 1 x 10/100Mbps RJ-45 port
Camera Built-in High quality CCD Camera, adjustable focus/
tilt
Audio/Video Input 2 mini-din audio/video input
1 telephone handset
1 built-in microphone
Audio/Video Output 1 built-in 6.8" TFT LCD, adjustable angle
1 pair RCA Audio/Video output
1 built-in speaker
LED indicator 1 PWR/LNK LED
Dimension(WxDxH) 320 x 225 x 247 mm
Weight 2.4 kg
Operating Environment 0~40 degree C, 10~90% humidity
Power Requirement 12V DC, 3A
Power Consumption 20W, 68 BTU
EMC/EMI CE, FCC
Protocols and Standard

2
3
Standard ITU-T H.323 v.2
Video Standard H.263, H.263+
Audio Standard G.723.1, G.711
Control Standard H.245
Compatibility Compatible with Gatekeeper, H.323 Videophone,
H.323 VoIP gateway, Microsoft NetMeeting, Multipoint
Control Unit (MCU)
LAN standard IEEE 802.3 Ethernet
IEEE 802.3u Fast Ethernet
Network and Configuration
Connection Type ADSL, Cable, VPN, LAN
Access Mode Static IP, PPPoE, DHCP
Bandwidth Usage 128K, 256K, 384K, 512K, 768K and No Limit
Video Resolution CIF(352x288), QCIF (176x144) and SQCIF (128x96)
Configuration Interface Keypad with On Screen Display (OSD)

4
5

4
5
Chapter 2
INSTALLATION
2.1 Package Contents
Check the contents of your package for following parts and quantity:
1. Videophone ICF-1000P x1 2. Power Adapter & AC Cord x1
3. RCA Cable x1 4.Mini-din cable x 2
5. User Manual x1
&
If any of these pieces are missing or damaged, please contact your dealer immediately, if
possible, retain the carton including the original packing material, and use them against
to repack the product in case there is a need to return it to us for repair.
6
7
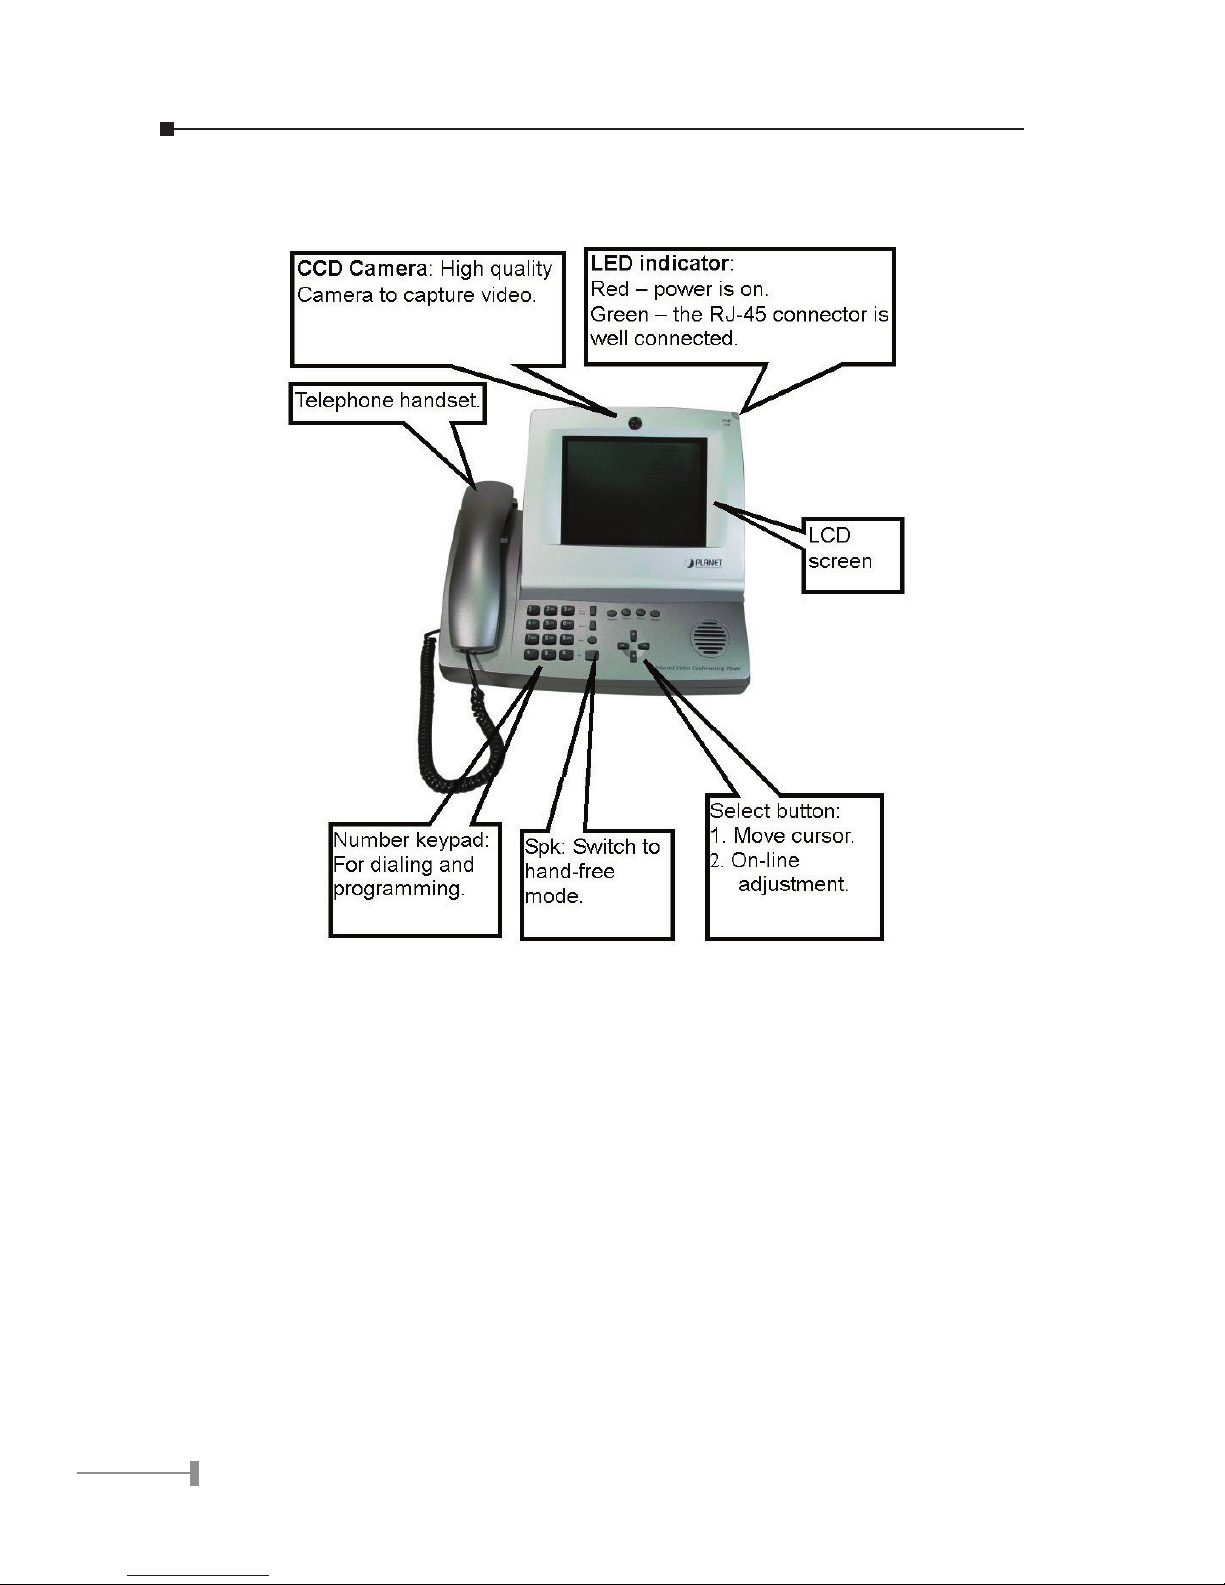
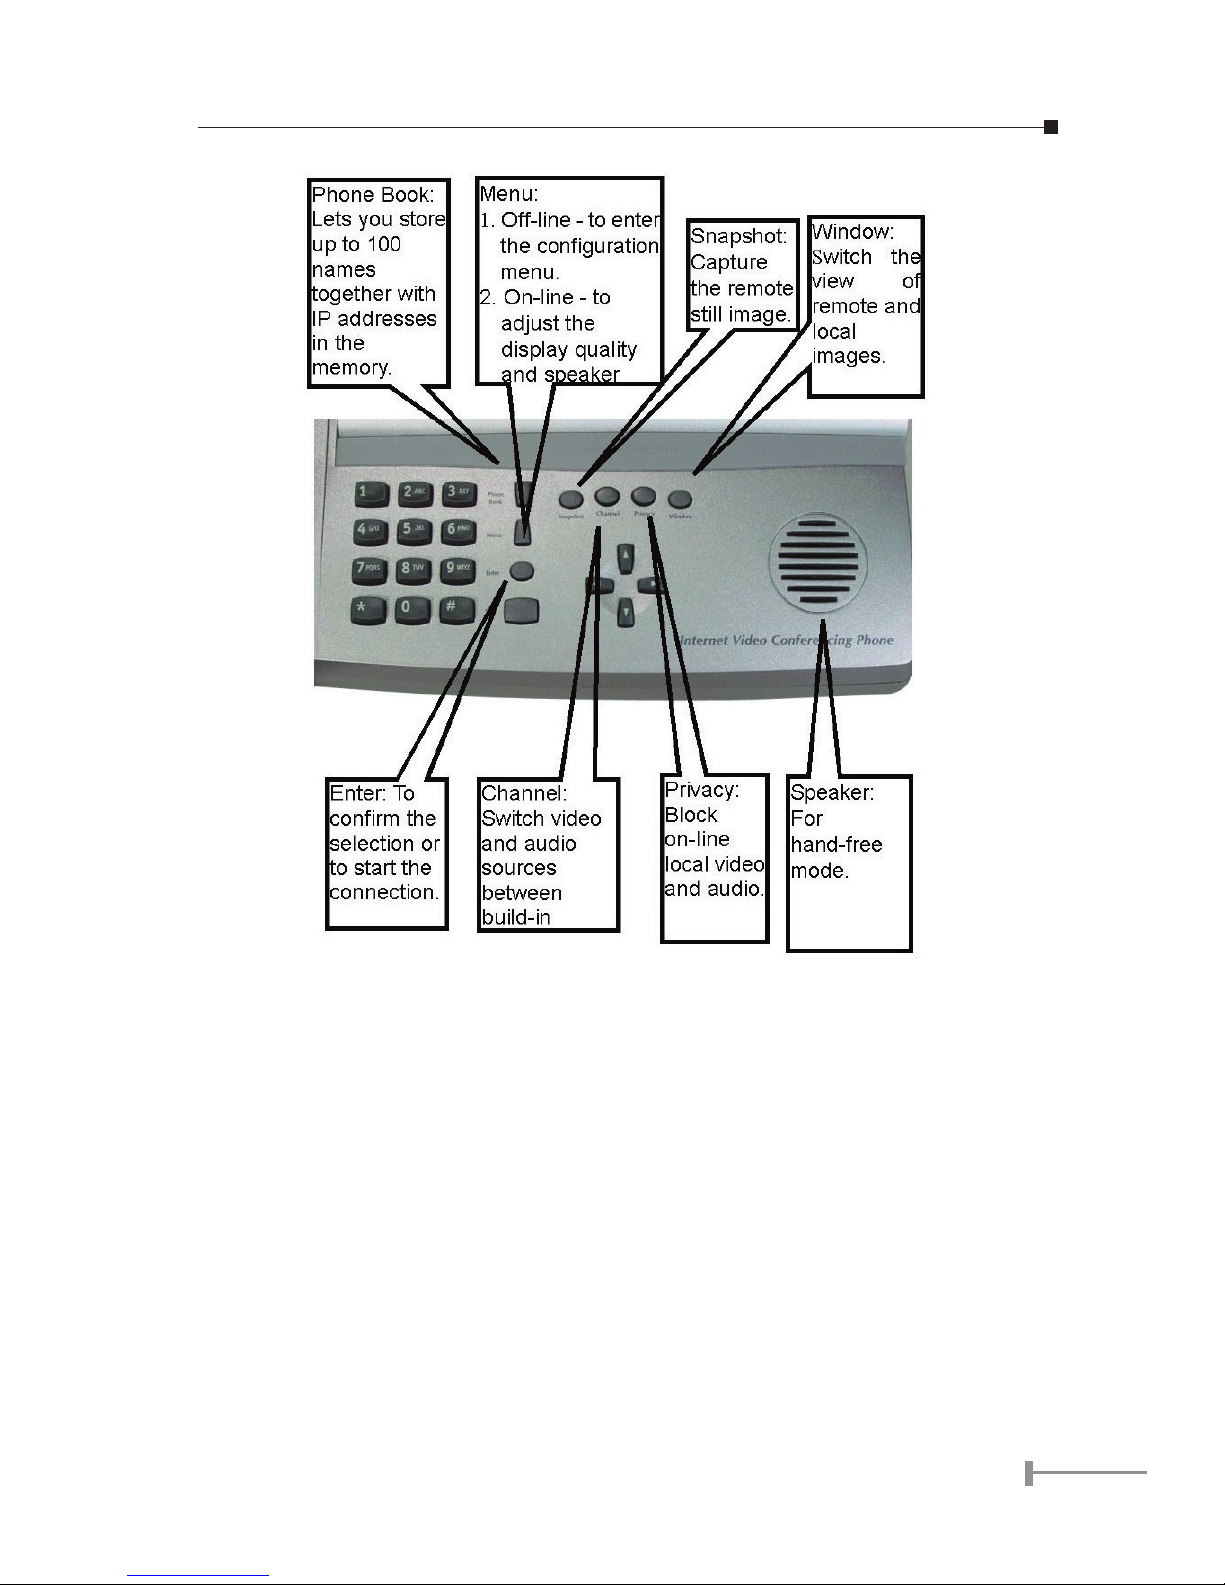
2.2 Front Panel introduction
The following show the front panel of ICF-1000P and its button denition.
6
7

8
9
2.3 Back panel introduction
The real panel of ICF-1000P has two video inputs which can be used to connect to external
cameras for group meetings and/or a document camera for showing detailed documents
or photographs. It also provides 1 set of RCA AV output connector for connecting to TV,
projector or stereo.
The following table lists all the connectors on the back panel of ICF-1000P and their
function.

8
9
Connector Function
12V DC Connect to the DC output of supplied power adapter. This device
requires at least 12V DC, 2.5A power input
Video Out* Connect to TV or stereo
Audio Out Connect to TV or projector
A/V In 1 Connect to other camera, microphone or VCD/DVD player
Console Reserved for factory use
A/V In 2 Connect to other camera, microphone or VCD/DVD player
Ethernet Connect to your local network or Cable/DSL modem. This port
supports both 10Mbps and 100Mbps speed
Note
1. For PAL-M model, the Video out connector can only supply black/white
image.
2. The device is a power-required device, it means, the device will not
work until it is powered. If you need to use it all the time, please con-
sider use an UPS (Uninterrupted Power Supply) for this device.
3.In some area, installing a surge suppression device may also help to
protect your device from being damaged by unregulated surge or cur-
rent to the device or the power adapter.
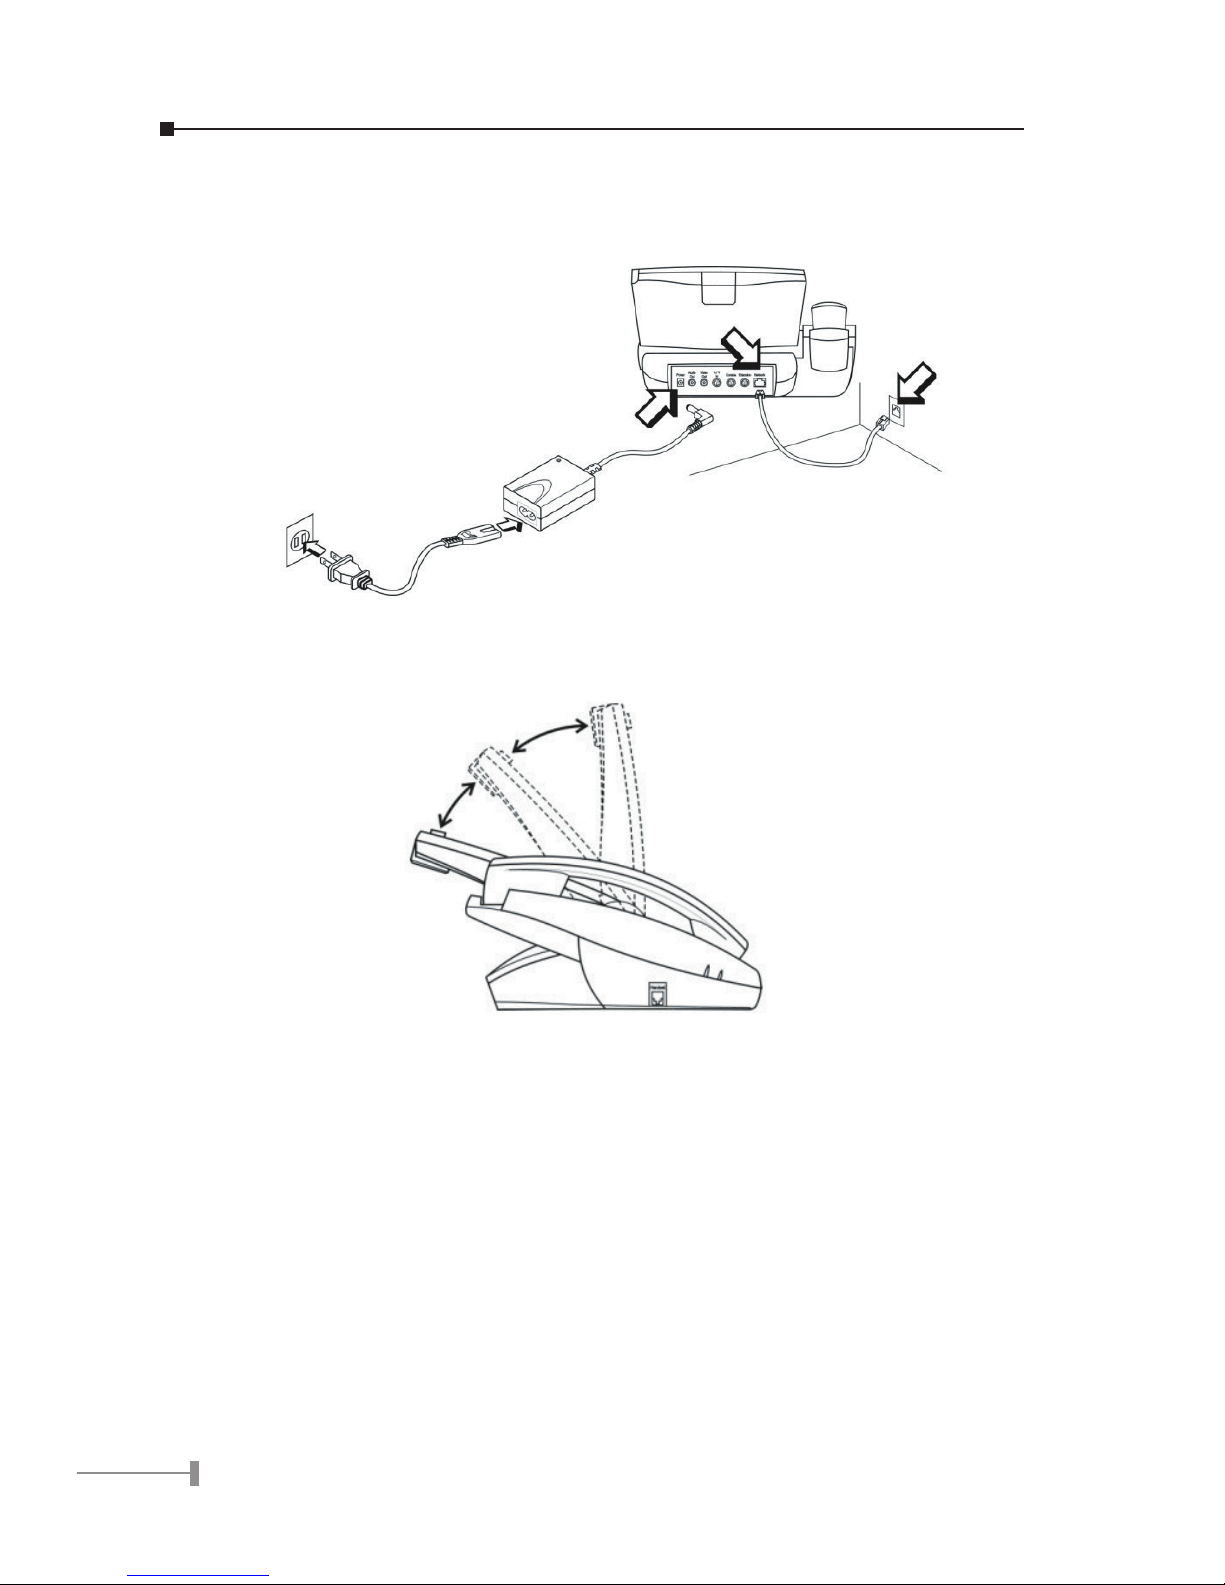
2.4 Hardware Installation
Please follow below steps to install the ICF-1000P on a suitable location:
1. Insert the handset cord into the socket upon the handset and the other end
into the socket on the left side of the ICF-1000P.
10
11
2. Plug in power cord and use the supplied cable to connect the ICF-1000P. Con-
nect the network cable to your switch / hub, cable modem, xDSL modem or the
wall-socket which connect to switch/hub.
3. The LCD panel can be tilted up or down to obtain the most comfortable viewing
position.
10
11
Chapter 3
System Configuration
3.1 Power On and Access Conguration Menu
After power on, the PWR/LNK LED on the top-right of LCD monitor turn red to indicate it
have received power. The LED will then turn green if the Ethernet network connection is
established. The conferencing phone should take about 50 seconds to make power on
self-test and system start up. In this period, the screen is still blank. Please do not press
any button on this period.
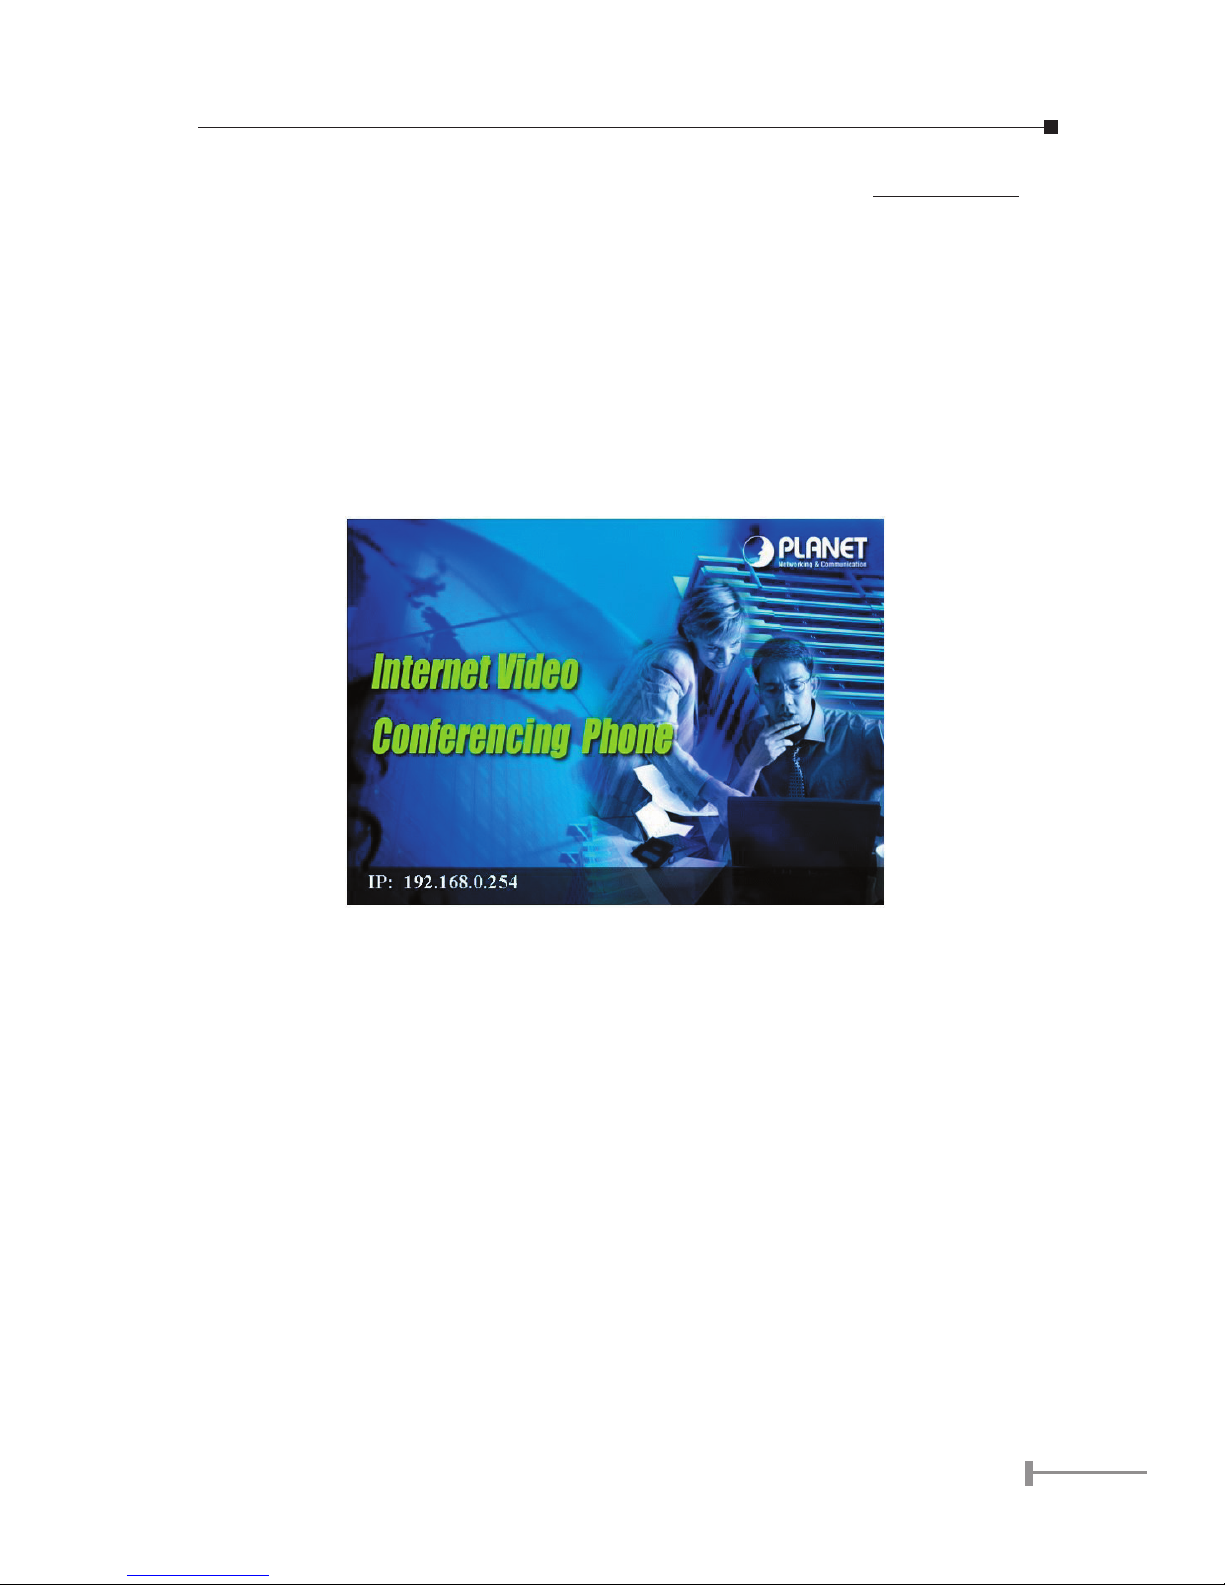
After the booting process is completed, the following page is shown on the LCD monitor.
Press [Menu] button, a System Conguration page is shown. Please use [p], [u], [q]
and [t] to move the highlight to the function you need to congure and [Enter] to enter
the function menu.
12
13
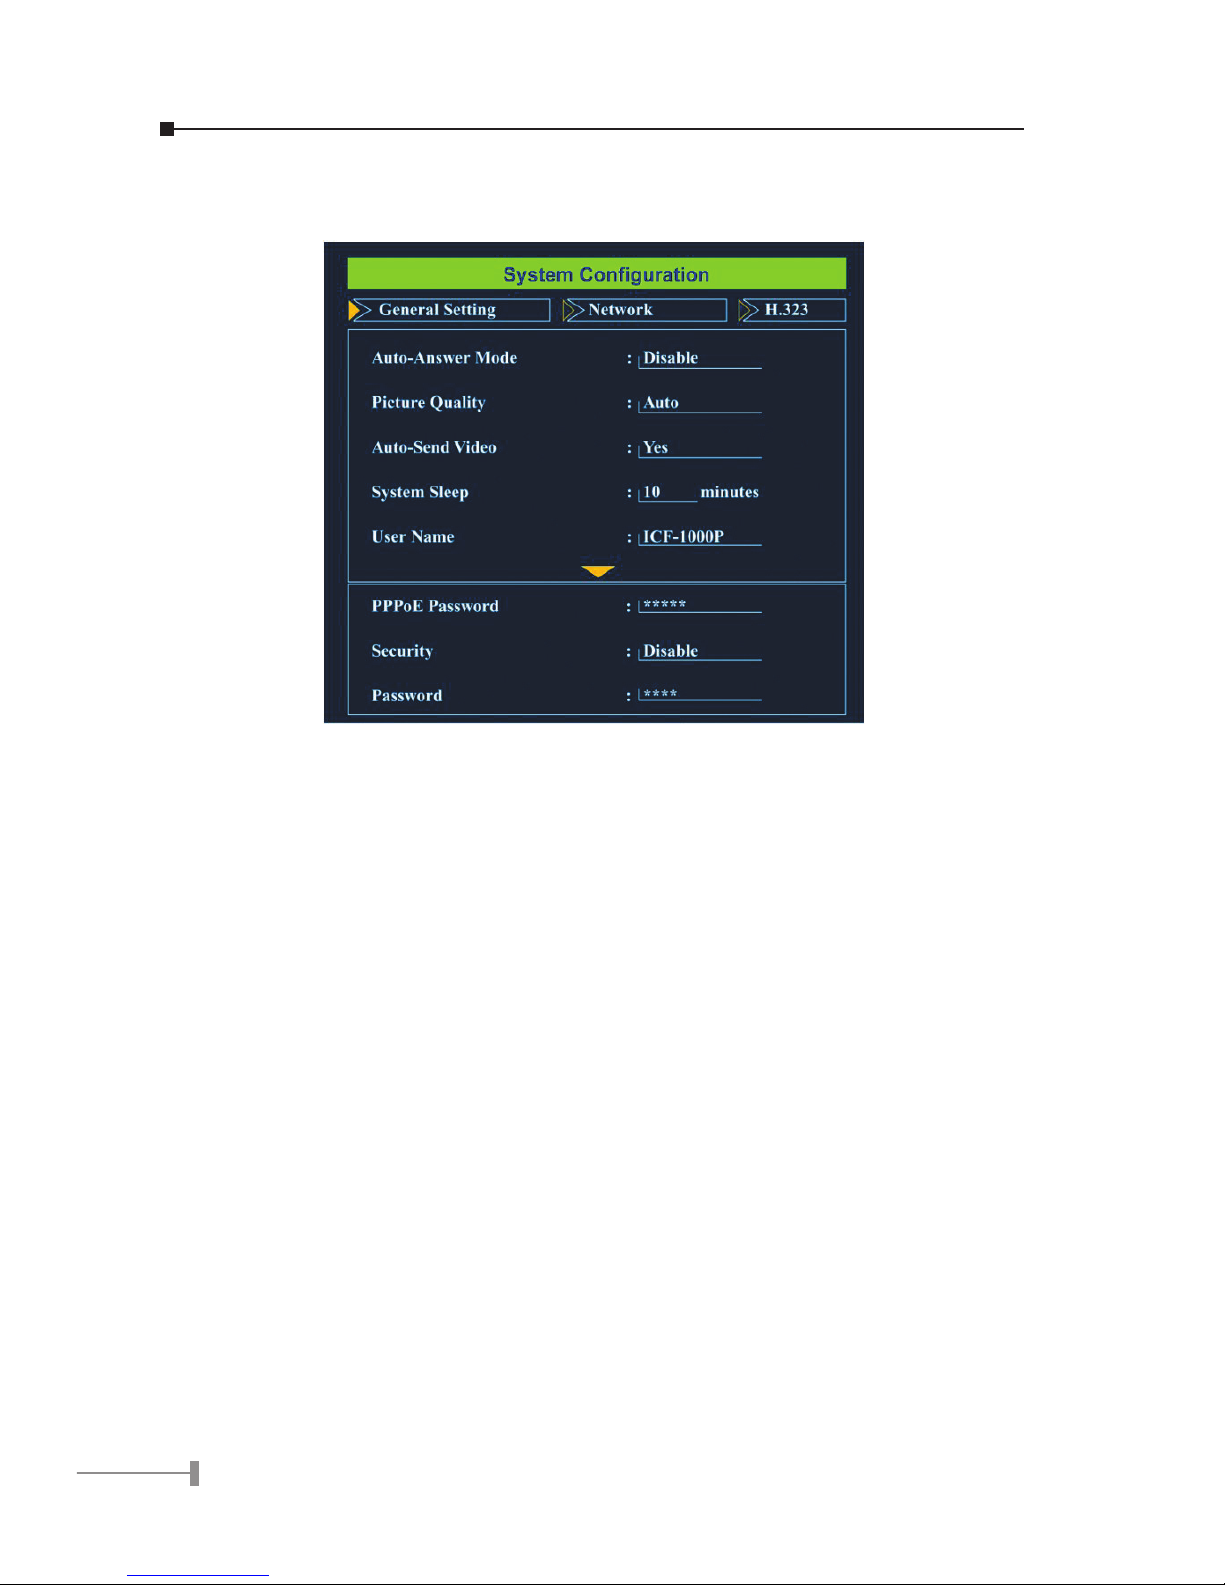
3.2 General Settings
General Settings provides some general parameters on using the ICF-1000P.
3.2.1 Auto-Answer Mode
This feature allows the videophone to answer incoming calls automatically.
1. Press [Menu] key to enter the Main Menu of System Configuration.
2. Press [p] or [q] key to highlight “Auto-Answer Mode”.
3. Press [Enter] key to show the choice list.
4. Press [p] or [q] key to select the setting you want.
Enable – ICF-1000P automatically answers any incoming calls.
Disable – Incoming calls can be answered only when receiver picks up
the handset or presses the [Spk] key.
5. Press [Enter] key to confirm the setting.
3.2.2 Picture Quality
This function is responsible for the video quality that is sent to the remote site. There are
three kinds of format (CIF, QCIF, SQCIF) provided.
1. Press [Menu] key to enter the Main Menu of System Configuration.
2. Press [p] or [q] key to select the Picture Quality.
3. Press [Enter] key to show the choice list.

12
13
4. Press [p] or [q] key to select the setting you want.
CIF – Common Intermediate Format, also known as Full CIF (FCIF). The
video resolution is 352 x 288 pixels.
QCIF – Quarter CIF. The video resolution is 176 x 144 pixels.
SQCIF – Sub-Quarter CIF. The video resolution is 128 x 96 pixels.
Auto switch –The system automatically switches to a suitable quality.
5. Press [Enter] key to confirm the setting.
NOTE: While bandwidth is low, low-resolution image format (QCIF or SQCIF)
is suggested for getting real-time image. The following table shows
the maximum frame rate for each picture format on different band-
width settings.
Bandwidth(Kbps) Picture Format Maximum frame rate (fps)
NTSC PAL
No Limit CIF 30 25
QCIF 30 25
SQCIF 30 25
768 CIF 30 25
QCIF 30 25
SQCIF 30 25
512 CIF 25 25
QCIF 30 25
SQCIF 30 25
384 CIF 20 20
QCIF 30 25
SQCIF 30 25
256 CIF 15 15
QCIF 15 15
SQCIF 20 20
128 CIF 10 10
QCIF 15 15
SQCIF 20 20

14
15
3.2.3 Auto-Send Video
Allows the user to decide whether to send local image to the remote site automatically or
not. If disabled, no image of local site can be sent to the remote site during the call.
1. Press [Menu] key to enter the Main Menu of System Configuration.
2. Press [p] or [q] key to select the Auto-Send Video.
3. Press [Enter] key to show the choice list.
4. Press [p] or [q] key to select the setting you want.
Yes –> Auto Send Video enabled
No –> Auto Send Video disabled
5. Press [Enter] key to confirm the setting.
3.2.4 System Sleep
System Sleeping mode will be on when system is idle for a pre-set period.
1. Press [Menu] key to enter the Main Menu of System Configuration.
2. Press [p] or [q] key to select the System Sleep.
3. Press [Enter] key and use number key to input sleep time. (Up to 99 min-
utes)
NOTE: To disable the System Sleep mode, please set the time to “0” minute.
4. Press [t] key for correction.
5. Press [q] key to select the “Exit” and press [Enter] to return to the previous
page.
NOTE: When system is under sleeping mode, press any key to wake up the
system.
3.2.5 User Name
The User Name is the name assigned to the PPPoE server.
Press [Menu] key to enter the Main Menu of System Conguration.
1. Press [p] or [q] key to select the User Name.
2. Press [Enter] key to enter the on-screen keyboard to input your name. Select
the “Å” and press the [Enter] to delete the word.
3. Press [q] key to select “Exit” and press [Enter] to return to the previous
page.

14
15
3.2.6 PPPoE Password
The PPPoE Password is the name assigned to the PPPoE server.
1. Press [Menu] key to enter the Main Menu of System Configuration.
2. Press [p] or [q] key to select the PPPoE password.
3. Press [Enter] key to enter the on-screen keyboard to input your PPPoE pass-
word. Select the “Å” and press the [Enter] to delete the word.
4. Press [q] key to select the “Exit” and press [Enter] to return to the previous
page.
3.2.7 Security
When this function is enabled, you need to input the password for entering the System
Conguration.
1. Press [Menu] key to enter the Main Menu of System Configuration.
2. Press [p] or [q] key to select the Security.
3. Press [Enter] key to show the choice list.
4. Press [p] or [q] key to select the setting you want.
Yes –> Security function is enabled.
No –> Security function is disabled.
5. Press [Enter] key to confirm the setting.
If the security is set to be enabled, a Password eld is shown below Security. To congure
the password:
1. Press [Menu] key to enter the Main Menu of System Configuration.
2. Press [p] or [q] key to select the Password.
3. Press [Enter] key to enter the on-screen keyboard to input your password.
Select the “Å” and press the [Enter] to delete the word.
4. Press [q] key to select the “Exit” and press [Enter] to return to the previous
page.
NOTE: The default password is “0000”.
16
17
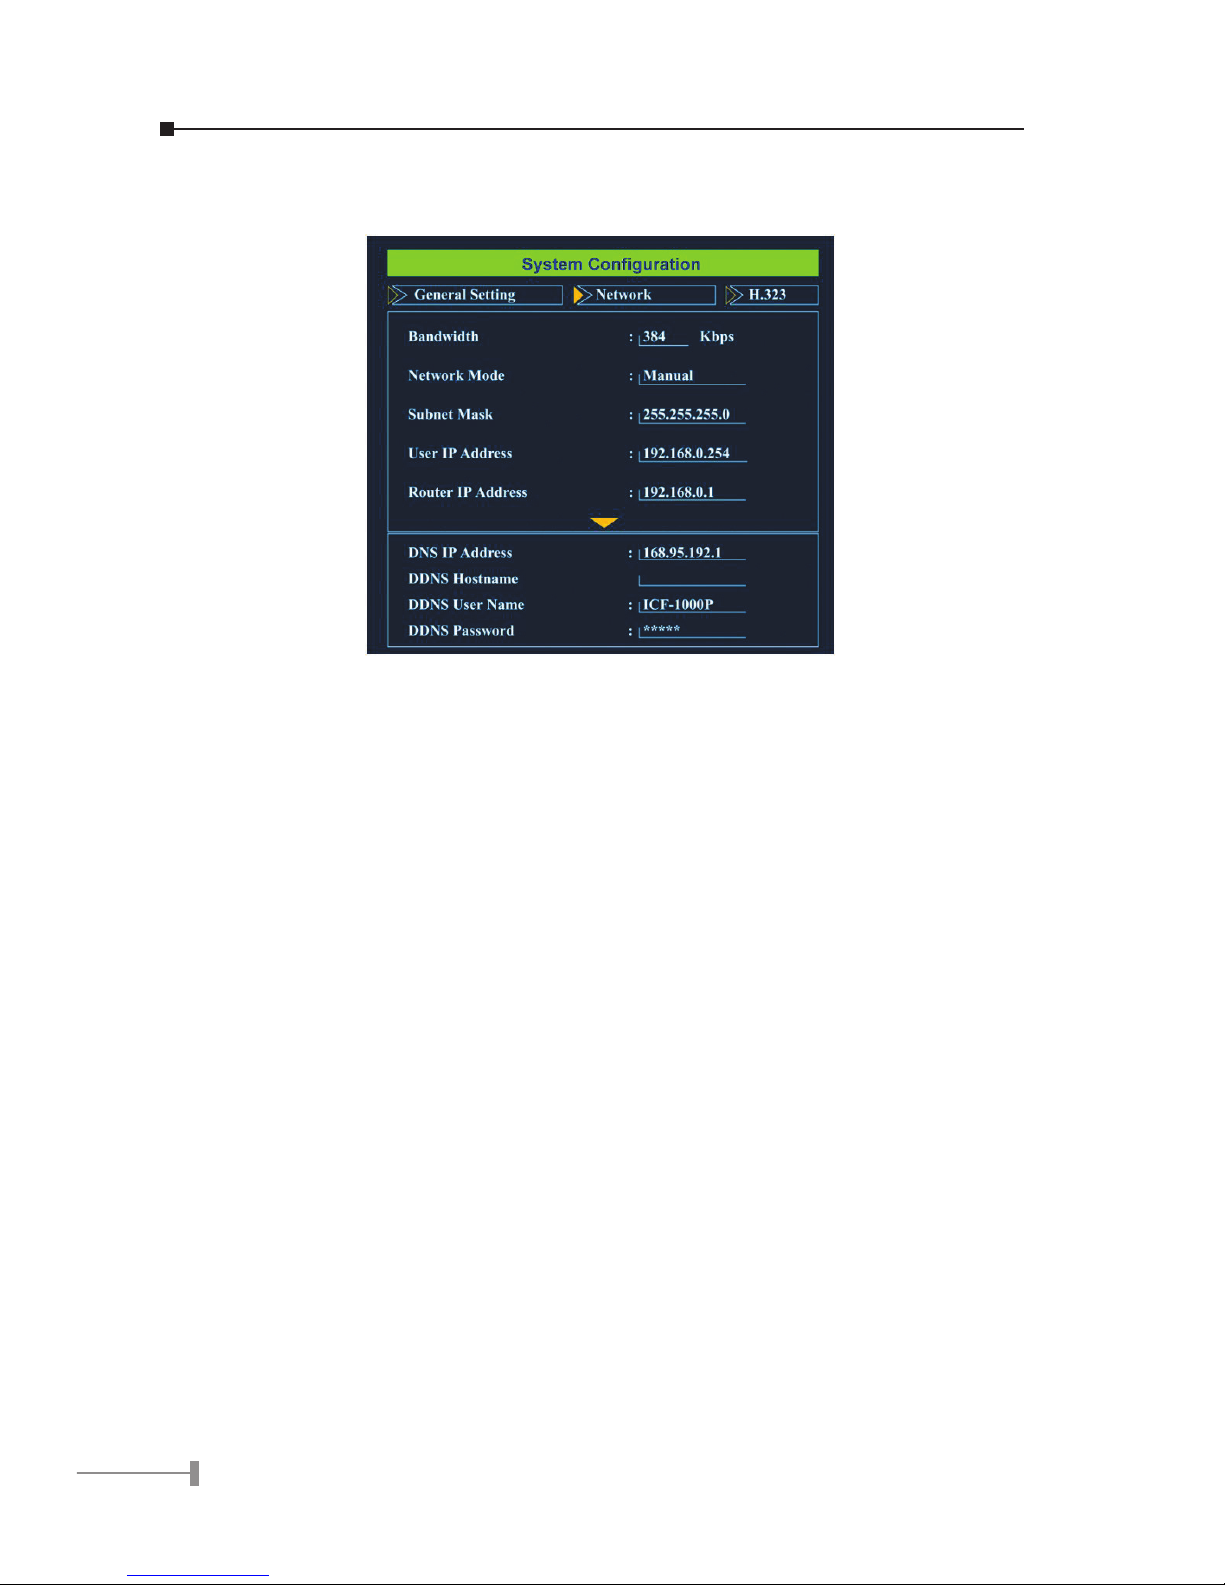
3.3 Network
Network page allows you to set network relative parameters.
3.3.1 Bandwidth
Select appropriate bandwidth in compliance with your Internet transmission speed when
placing a call.
1. Press [Menu] key to enter the Main Menu of System Configuration.
2. Press [t] or [u] key to go to the Network page.
3. Press [Enter] key to show the choice list.
4. Press [p] or [q] key to select the bandwidth you need. ICF-1000P supports
the following bandwidth settings.
No Limit, 768k, 512k, 384k, 256k and 128k
5. Press [Enter] key to confirm the setting.
3.3.2 Network Mode
The Network Mode function is used for network conguration.
NOTE: You can get the network setup information from your Internet Service
Provider (ISP).
1. Press [Menu] key to enter the Main Menu of System Configuration.
2. Press [t] or [u] key to go to the Network page.
3. Press [p] or [q] key to select the Network Mode.
4. Press [Enter] key to show the choice list.

16
17
5. Press [p] or [q] key to select the setting you need.
Manual – Fixed IP Mode. Acquire the IP address, default gateway ad-
dress, and subnet mask address from your ISP or your net-
work administrator.
DHCP – Dynamic Host Configuration Protocol is used to automatically
assign IP addresses within a LAN. Most cable modem Internet
connection also use DHCP to dynamically assign IP address.
PPPoE – PPPoE (Point-to-Point Protocol over Ethernet) is a protocol used
by many Internet Service Providers with ADSL Internet connec-
tion. A User Name and PPPoE Password should be provided.
6. Press [Enter] key to confirm the setting.
3.3.3 Subnet Mask
Enter the subnet mask for the LAN. (Please acquire Subnet Mask address from your
ISP.)
1. Press [Menu] key to enter the Main Menu of System Configuration.
2. Press [t] or [u] key to go to the Network page.
3. Press [p] or [q] key to select the Subnet Mask.
4. Press [Enter] key and use the number key to input your Subnet Mask Address.
Press [t] for correction.
5. Press [q] key to select “Exit” and press [Enter] to return to the previous
page.
3.3.4 User IP Address
Enter the static IP address assigned to the ICF-1000P. (Please acquire Subnet Mask
address from your ISP.)
1. Press [Menu] key to enter the Main Menu of System Configuration.
2. Press [t] or [u] key to go to the Network page.
3. Press [p] or [q] key to select the User IP Address.
4. Press [Enter] and use the number key to input your Router IP Address. Press
[t] to delete the word.
5. Press [q] key to select “Exit” and press [Enter] to return to the previous
page.
3.3.5 Router IP Address
Enter the network’s default router IP address. (Please acquire Subnet Mask address from
your ISP or your network administrator.)
Table of contents
Other Planet Conference Phone manuals


