Plustek NVR X840P User manual

Setup
Configuration
Technical Guides

©2015.All rights are reserved. No portion of this document may be reproduced
without permission. All trademarks and brand names mentioned in this publication are
property of their respective owners.
While all efforts have been made to ensure the accuracy of all contents in this manual,
we assume no liability for errors or omissions or by statements of any kind in this
manual, whether such errors are omissions or statements resulting from negligence,
accidents, or any other cause. The contents of this manual are subject to change
without notice.
This NVR device is intended to be used in a lawful manner. Certain uses of the NVR
device may be prohibited by local laws in some countries of states, such as the
surreptitious recording of audio and/or video communications for certain purposes. If
you have any question about whether a proposed use of your products is lawful, you
should consult a local legal authority before proceeding.
The product is designed and produced to achieve sustainable environmental
improvement. We strive to produce products in compliance with global environmental
standards. Please consult your local authorities for proper disposal. The product
packaging can be recycled.
Attention to recycling (For EU countries only)
Protect your environment! This product should not be thrown into the household waste
container. Please give it to the free collecting center in your community.
The screen shots in this guide were made with Windows 7. If you are using Windows
XP / Vista / 8, your screens will look somewhat different but functions are the same.

Table of Contents
Introduction ...................................................................................................1
How to Use This Guide ..........................................................................................1
Conventions of This Guide ..............................................................................1
A Note about Icons..........................................................................................1
Safety Precautions...........................................................................................2
Main NVR Features................................................................................................3
Minimum System Requirements ............................................................................3
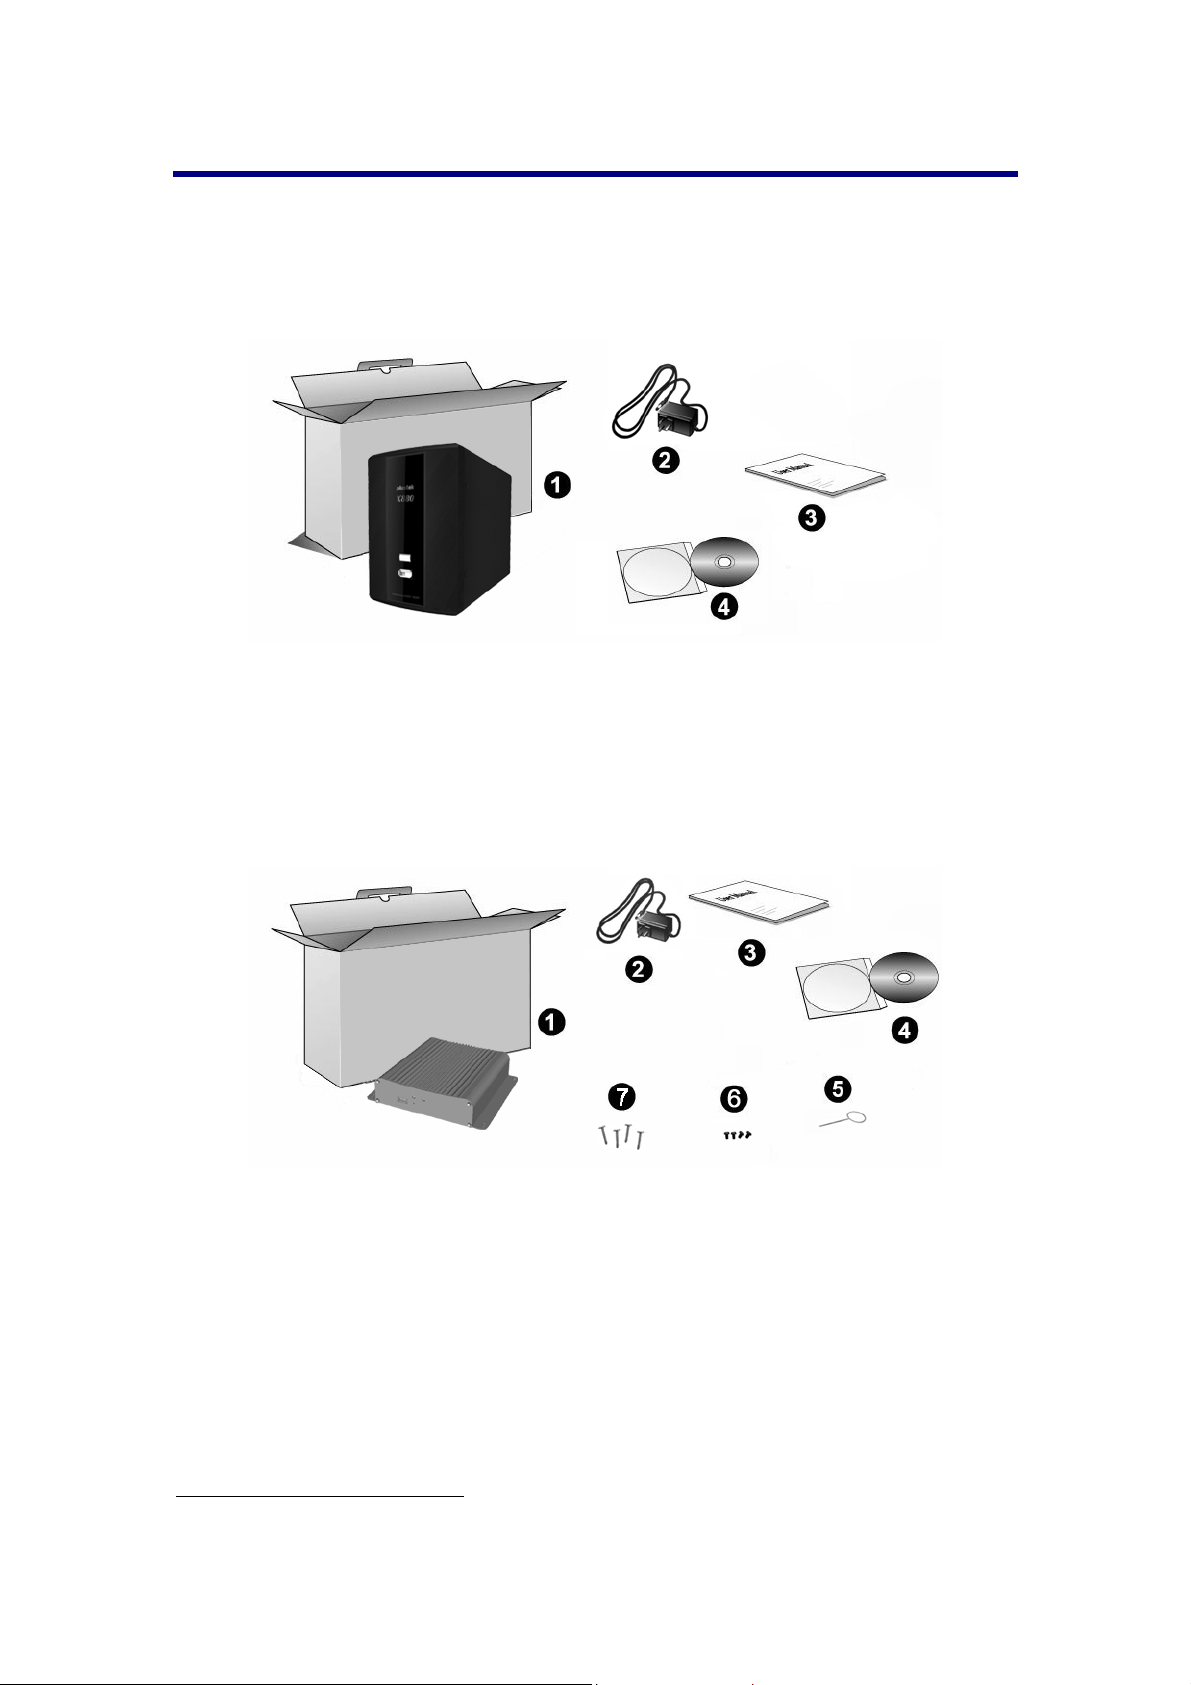
Box Contents..........................................................................................................4
NVR X840P / X880P / X888P..........................................................................4
NVR Slim388Pro / Slim380Pro........................................................................4
Overview ................................................................................................................5
NVR X840P / X880P / X888P..........................................................................5
NVR Slim388Pro / Slim380Pro........................................................................6
Chapter I. Setup the NVR...............................................................................7
Setup the NVR System ..........................................................................................7
Chapter II. Getting Started with the NVR......................................................9
Log in to the NVR...................................................................................................9
Log in to the NVR - Method I. - by using the Network Device Search Tool
Application.......................................................................................................9
Log in to the NVR - Method II. - by using the Internet Explorer (IE) ..............10
Log in to the NVR - Method III. - by using EasyLink and UDID .....................10
Easy Accessibility with EasyLink and UDID.........................................................11
How to obtain the UDID.................................................................................11
Connect to your NVR from any computer using EasyLink and UDID............12
NVR Viewer Windows..........................................................................................13
Live................................................................................................................13
Playback........................................................................................................15
Alarm .............................................................................................................18
Log out of the NVR...............................................................................................18
Chapter III. Advanced NVR Configuration...................................................19
System .................................................................................................................20
Status.............................................................................................................20
Server............................................................................................................20
Date/Time......................................................................................................21
Maintenance..................................................................................................22
Network................................................................................................................23
Settings..........................................................................................................23
Camera.................................................................................................................24
Channel .........................................................................................................24
Video..............................................................................................................29
Audio..............................................................................................................30
Recording.............................................................................................................31
Policy.............................................................................................................31
Event..............................................................................................................31
Hard Disk.......................................................................................................32
Event....................................................................................................................32
Channel .........................................................................................................32
System...........................................................................................................35
Management ........................................................................................................35
Users .............................................................................................................35
Services.........................................................................................................36
GPIO..............................................................................................................39

Logs .....................................................................................................................39
System...........................................................................................................39
Camera..........................................................................................................40
Chapter IV. Technical Guides .......................................................................41
LED Indicators......................................................................................................41
Search Tool..........................................................................................................42
IP Configuration Information.................................................................................43
Use the NVR with Dynamic IP Address ...............................................................44
Proxy Server.........................................................................................................45
RTSP Server Feature...........................................................................................47
Reset the NVR .....................................................................................................47
Appendix A: Glossary....................................................................................48
Appendix B: Customer Service and Warranty..............................................52
Statement of Limited Warranty.............................................................................52
FCC Radio Frequency Statement........................................................................53

1
Introduction
Thank you for choosing us as your NVR supplier. Like all of our products, your new
NVR is thoroughly tested and backed by our reputation for unsurpassed dependability
and customer satisfaction. We hope you will continue to turn to us for additional
quality products as your computing needs and interests grow.
How to Use This Guide
This User’s Guide provides instructions and illustrations on how to setup and
configure your NVR. This guide assumes the user is familiar with Microsoft Windows.
If this is not the case, we suggest you learn more about Microsoft Windows by
referring to your Microsoft Windows manual before using your NVR.
The Introduction section of this manual provides an outline of this manual, and
describes the minimum system requirements, the main features and box contents.
Chapter I describes how to set up basic NVR and IP Camera system in the network
environment.
Chapter II describes how to log in to the NVR interface and the NVR viewer window
operations.
Chapter III provides you with plenty of illustrations and information about advanced
configuration of the NVR. You may get familiar with it and try out all functions provided
with the NVR.
Chapter IV provides useful technical information and usage tips.
Appendix A covers the glossary that may help you to know more about the network
and network devices.
Appendix B contains our customer service, limited warranty agreement and FCC
statement.
Conventions of This Guide
“XXX” — Represents commands or contents on your computer screen.
Bold — Represents important notes.
A Note about Icons
This guide uses the following icons to point out information that deserves special
attention.
Warning
Warning: A procedure that must be followed carefully to
prevent injury, or accidents.
Attention
Attention: Instructions that are important to remember and
may prevent mistakes.
Information Information: Optional tips for your reference.

2
Safety Precautions
Before using this device, please read the following important information carefully to
eliminate or reduce any possibility of causing damage and personal injury.
1. Do use the AC adapter that comes with this device (if it is available). Use of other
AC adapters may lead to malfunction, hard disk damage, overheating, electrical
shock, fire or injury.
2. Keep the space around the adapter clear in case you need to quickly unplug the
adapter during emergencies.
3. Keep the NVR protected from liquids.
4. Do not install the device near any heat sources such as radiators or other devices.
Install the device only in environments that meet the factory specifications.
5. Ensure that the NVR is properly secured to a stable surface. Major shocks, jolts
and/or excessive vibration may damage the sensitive electronics inside the NVR.
6. Ensure there is ample room for any cables leading to and coming from the NVR.
7. Use only attachments/accessories such as cover and plates specified by the
manufacturer.
8. Do not touch the unit or the AC adapter when they are powered on.
9. Unplug the device if you don’t need to use it for a certain period of time to avoid
any risks of causing fire.
10. Do not disassemble the NVR case. This device contains no user-serviceable parts.
Leave servicing to qualified personnel.
11. Do not remove the NVR's hard disk(s) while the device is still turned on and
operating. Please make sure the power is disconnected from the NVR or your
hard disk may be damaged.
12. Please contact your distributor to obtain a list of compatible IP cameras.
13. Damaged wire could cause fire or electrical shock. Keep the power cord straight
and without twisting, bending or scraping it.
14. Moisture condensation may occur inside this device and cause malfunction under
these conditions:
• When this device is moved directly from a cold to a warm location.
• After a cold room is heated.
• When this device is placed in a damp room.
To avoid moisture condensation, you are recommended to follow below procedure:
• Seal this device in a plastic bag for it to adapt to room conditions.
• Wait for 1 ~ 2 hours before removing this device from the bag.
15. Avoid excessive smoke, mechanical, dust, or direct sunlight.
16. Do not incorrectly replace the battery on the Server main board. There is risk of
explosion if the battery is replaced with an incorrect type. Dispose of used
batteries according to the instructions.

3
Information
The mark shown to the left is in compliance with the Waste
Electrical and Electronic Equipment Directive 2002/96/EC
(WEEE). The mark indicates the requirement NOT to dispose
the equipment as unsorted municipal waste, but use the return
and collection systems according to local law. If the batteries,
accumulators and button cells included with this equipment,
display the chemical symbol Hg, Cd, or Pb, then it means that
the battery has a heavy metal content of more than 0.0005%
Mercury, or more than 0.002% Cadmium, or more than 0.004%
Lead.
Main NVR Features
Easy one-push button for quick installation
Easy remote accessibility via Plustek EasyLink®& UDID (Unique Device
Identification)
Effective video preview over Internet via Plustek Dual-Stream Recording
Technology®
Intuitive and powerful playback functions for investigation
Alarm View for alarm monitoring and instant playback
Minimum System Requirements1
The NVR is recommended to work with personal computer or network that meets the
following requirements:
Operating System Microsoft Windows XP / Vista / 7 / 8
CPU Intel Core 2 Duo, 2.6GHz or above
Web Browser Microsoft Internet Explorer 9.0 or above2, Chrome, FireFox
RAM 1 GB or above
Network 10/100/1000 Mbps (RJ-45)
1The system requirements here are only a guideline, as in general the better the computer
(motherboard, processor, hard disk, RAM, video graphic card), the better the results.
2The program is available with Microsoft Windows and therefore is not included in the
Setup/Application CD-ROM of this product.

4
Box Contents3
Before you start installing your NVR, check the box contents to make sure all parts
are included. If any items are damaged or missing, please contact the vendor where
you purchased your NVR or our customer service directly.
NVR X840P / X880P / X888P
1. NVR
2. AC Adapter
3. Quick Guide
4. Installation CD
NVR Slim388Pro / Slim380Pro
1. NVR
2. AC Adapter
3. Quick Guide
4. Installation CD
5. MFB (Multi-Function Button) Pin / Reset Pin
6. Hard Disk Screws x 4
7. Device Mounting Screws x 4
3Save the box and packing materials in case you need to transport this NVR in the future.
The product packaging can be recycled.

6
NVR Slim388Pro / Slim380Pro
1. Power/Status Indicator
2. HDD Indicator
3. USB Port
4. MFB (Multi-Function Button) Hole
5. DC-Jack
6. GPIO terminal
Pin (from left to right, top to bottom row) Function
1 (Output 2) Output 2
2 (Output 1) Output 1
3 (Input 2) Input 2
4 (Input 1) Input 1
5 (Ground) Ground
6 (Console) Console
7 (Console) Console
8 (Console) Console
7. VGA Port
8. LAN Port
9. RESET Hole

7
Chapter I. Setup the NVR
Before you setup the NVR, please make sure all components are available and ready.
A list of the package contents is provided in the Box Contents section of this guide. If
any items are damaged or missing, please contact the vendor where you purchased
your NVR or our customer service directly.
Attention
Please make sure a hard disk is installed in the NVR before you
use the NVR system.
Setup the NVR System
To set up the NVR system in your LAN environment:
Attention
Please properly configure the IP addresses of the NVR and the
IP cameras before connecting to the Switch. For example,
assuming the NVR’s IP address is 192.168.10.1, an IP camera’s
address should range from 192.168.10.2~240.
1. Connect IP cameras to the Switch’s LAN port.
2. Plug the RJ-45 connectors into the NVR’s LAN port and the Switch’s LAN port.
3. Plug the AC adapter into the DC-Jack of the NVR. Plug the other end of the
power cable into a standard AC power outlet. After the NVR has booted, it will
beep three times and the HDD indicator will blink slowly to indicate that the
hard disk has not yet been formatted for use.
Note: If no hard disk is installed when the NVR is powered on, the NVR will
beep every 10 seconds and the HDD indicator will blink slowly.
4. Press and hold the “Multi-function” button on the front panel of the device for 3
seconds to begin the fully automatic setup of the NVR. The hard disk will be
formatted first. The HDD indicator will blink quickly to indicate that the hard
disk format is in process.

8
5. The NVR will beep twice when the format process is finished and the status
indicator will blink quickly. The NVR will now add all available IP-cameras in
your network to the NVR automatically. When the cameras are added, the
NVR will reboot, indicated by a long beep.
Note: The IP-cameras need to be in their factory default configuration for
automatic setup to work.
6. Connect a PC or Laptop to the Switch’s LAN port.
7. Insert the Installation CD, included with your NVR, into your CD-ROM drive.
8. Double click the “vcredist_x86.exe” file in your language on the CD-ROM to
install the “Microsoft Visual C++ 2008 SP1 Redistributable Package (x86)”.
Attention: If you are running on Windows XP / 8, you must install this patch
before you can start monitoring. Otherwise please proceed with the next step.
9. Run the “Network Device Search Tool” application on the CD-ROM to search
for NVRs.
10. Your NVR works properly when the NVR appears in the Network Device
Search Tool window.
11. Double-click on your NVR. The NVR’s login page should be opened
automatically. Enter the NVR’s “Username” and “Password” and change the
“Language” if necessary, then click on the “Login” button to log in to the NVR.
The “admin” and “admin” are the default user name and password for your first
login of the NVR as Administrator. If you are prompted to install an element
required to view the live view page of the NVR, please follow the on-screen
instructions to install the element.

9
Chapter II. Getting Started with the NVR
Log in to the NVR
Log in to the NVR - Method I. - by using the Network Device Search Tool
Application
The Network Device Search Tool is an application that can detect Plustek NVR(s) that
are connected to an organization’s network or your PC.
1. Insert the Installation CD into your CD-ROM drive.
2. Open the “SearchTool” folder on the Installation CD and double-click on
“Plustek_Network_Device_Search_Tool.exe”.
3. The Network Device Search Tool window is displayed.
Attention
Depending on your LAN environment (DHCP or Static IP), you
may want to configure the NVR’s network settings at this point.
Contact your network administrator for the correct values to
enter, then enter a valid “Account” / “Password” before clicking
“Submit”.
4. Select and double click on the desired NVR.
5. The System Login page appears on the screen. You may choose the system
language from the drop-down list.
Information
The NVR interface uses ActiveX controls. Should you get any
error messages when opening the page, please ensure that
ActiveX controls are enabled and allowed.
6. When you log in to your NVR for the first time, enter “admin” as your user name
and “admin” as your password.

10
7. Click “Login” to enter the system.
Attention
The “admin” and “admin” are the default user name and
password for your first login of the NVR as Administrator. Please
change the default password as soon as possible. To change
the password, please refer to the section “Users”.
Log in to the NVR - Method II. - by using the Internet Explorer (IE)
When you connect the NVR to the LAN with a static IP address, you may log in to the
NVR by directly entering the IP address in the IE Address Bar.
Information
If you are provided with a dynamic IP address in an
organization’s network, please refer to the “1Use the NVR with
Dynamic IP Address” section for more instructions.
1. Start the Internet Explorer, enter the IP address of the NVR in the IE address bar,
and press “Enter“ on the keyboard to launch the System Login page.
2. The System Login page is displayed. You may choose the system language from
the drop-down list.
3. Enter “admin” as your user name, “admin” as your password and click “Login”.
Attention
The “admin” and “admin” are the default user name and
password for your first login of the NVR as Administrator. Please
change the default password as soon as possible. To change
the password, please refer to the section “Users”.
Log in to the NVR - Method III. - by using EasyLink and UDID
The EasyLink program allows you to easily connect to your NVR from any computer
using the NVR’s Unique Device Identification (UDID).
1. Connect a USB drive to the NVR.
2. Press the “Multi-function” button.
3. The NVR will beep and copy the files required to establish a connection via
EasyLink to the USB drive (including a .bmp file containing a QR-code image with
the UDID).
4. The NVR will beep twice to indicate that the files have been copied successfully.
Please wait 5 seconds before removing the USB drive from the NVR, and then
connect it to any desired computer.
5. Launch the EasyLink.exe file on your USB-drive. The UDID will be loaded
automatically. If you are prompted to allow the program through the Windows
Firewall, please click on the “Allow access” button to allow it.
6. Click on the “Create Tunnel” button.

11
7. Click on the “Connect” button. The NVR’s login window will open in your default
web browser.
Attention
The connection dialog of the EasyLink program has to be
kept open when using this method to connect to your NVR. If
you accidently close the EasyLink program, just launch it
again and click on the “Create Tunnel” button to continue
using your NVR.
If the NVR system times out due to inactivity, you need to
close and re-launch the EasyLink program. Then click on the
“Create Tunnel” button to continue using your NVR.
When you are done using the NVR, click on the “LogOut”
button on the NVR homepage, then click on the “Close” and
“Exit” button in the EasyLink program.
Easy Accessibility with EasyLink and UDID
The EasyLink program allows you to easily connect to your NVR from any computer
using the NVR’s Unique Device Identification (UDID).
How to obtain the UDID
Method I – by using a USB drive
1. Connect a USB drive to the NVR.
2. Press the “Multi-function” button.
3. The NVR will beep and copy the files required to establish a connection via
EasyLink to the USB drive (including a .bmp file containing a QR-code image with
the UDID).
4. The NVR will beep twice to indicate that the files have been copied successfully.
Please wait 5 seconds before removing the USB drive from the NVR.
Method II – by using a mobile device
1. Scan the QR-code on the side or bottom of the device with your mobile device to
obtain the 20-digit UDID.
Note: An application capable of scanning QR-codes is required
Method III – by using a computer
1. Log in to your NVR using the IP address of the NVR and open the “Setup” >
“System” > “Status” page. The UDID will be listed there.
2. Write down the UDID.

12
Connect to your NVR from any computer using EasyLink and UDID
1. Visit our website to download the EasyLink setup program or insert the installation
CD into your CD-ROM drive. Launch the setup program to install the EasyLink
program. If you used the USB drive method to obtain the UDID, connect it to your
computer.
2. Launch the EasyLink program from the shortcut from your desktop. If you used the
USB drive method to obtain the UDID, launch the EasyLink.exe file on your USB
drive. If you are prompted to allow the program through the Windows Firewall,
please click on the “Allow access” button to allow it.
3. Enter the 20-digit UDID into the UDID field. If you used the USB drive method
described earlier, the UDID will be loaded automatically. Enter the HTTP port
number if needed. The default port number is 80.
4. Click on the “Create Tunnel” button.
5. Click on the “Connect” button. The NVR’s login window will open in your default
web browser.
6. Enter the NVR’s “Username” and “Password” and change the “Language” if
necessary, then click on the “Login” button to log in to the NVR.
Attention
The connection dialog of the EasyLink program has to be
kept open when using this method to connect to your NVR. If
you accidently close the EasyLink program, just launch it
again and click on the “Create Tunnel” button to continue
using your NVR.
If the NVR system times out due to inactivity, you need to
close and re-launch the EasyLink program. Then click on the
“Create Tunnel” button to continue using your NVR.
When you are done using the NVR, click on the “LogOut”
button on the NVR homepage, then click on the “Close” and
“Exit” button in the EasyLink program.

13
NVR Viewer Windows
Live
Click the “Live” button at the top right corner to display the live view page. The “Live”
page will show the camera screens, displaying the live video stream captured by the
cameras. For 4-channel models, the live view page will be split into 4 even windows;
for 8-channel models, the live view page will be split into 1+7 windows, where window
1 is called the “focus” window and will be streamed at the highest resolution, while the
7 smaller windows will be streamed at low resolution to conserve bandwidth. The
yellow frame indicates the selected camera channel. Click on the gray title bar on top
of each window to select that channel. There are a few lights in the top-right corner of
each window to indicate the channel status. The red light indicates that the video
stream is being recorded. The walking man indicates that an alarm is being
triggered.
Toolbar functions5
The buttons in the Toolbar and their respective functions are shown in the following
table:
Button Function
Click this button to display one channel at a time.
Click this button to display 4 channels at a time.
Click this button to display 4 channels at a time in higher video
quality. It is recommended to only use this mode in an Intranet
environment since displaying 4 channels in high quality
requires more network bandwidth.
5The following functions are available only when the connected IP Camera is supported.

14
Click this button to display 8 channels at a time in a 1+7
configuration. Window 1 will be streamed at the highest
resolution, while the 7 smaller windows will be streamed at low
resolution to conserve bandwidth (This function may or may not
be available depending on the NVR model you purchase.)
Click this button to switch to the next group of channels.
Click this button to fit the video into each screen window.
If currently not recording, click this button to immediately start
the recording process. Click this button again to stop the
recording process.
Click this button to capture a snapshot of the channel. A note
will be displayed to tell you the folder and filename the
snapshot was saved under. You may open the folder and find
the snapshot image.
Click this button to mute the selected channel.
Select the preset position from the drop-down list to move to
the predefined position of the supported camera. Please go to
the “Setup” page and click on “Camera”, “Channel” tab to
create the drop-down list options in advance.
Tick the check box to perform pan, tilt, and zoom operations
digitally by moving the mouse pointer on the 1x1 viewer window
of the selected channel. Select the desired channel and click
to make that window the focus window. Click to zoom in
and move the mouse pointer on the viewer window to perform
digital PTZ operations.
If you are using a PTZ network camera, the PTZ Setting button
will be activated. Click on the button to make PTZ adjustment of
the camera. By PTZ control, you may focus the network
camera to a desired position.
Click these arrow buttons to adjust the direction of the camera
lens. Click to reset the camera to its home position.
Click this button to zoom in.
Click this button to zoom out.
Click this button to automatically adjust lens focus.

15
Click this button to focus near.
Click this button to focus far.
Click this button to automatically adjust Iris levels. The
camera’s iris (aperture) will adjust itself automatically to control
the amount of light that will reach the camera sensor.
Click this button to close the iris.
Click this button to open the iris.
Playback
Click the “Playback” button at the top right corner to display the records playback
page.
1. The “Search” dialog appears. Clicking the button will also open this
dialog window.
Select Date
Click on the date you want to review in the calendar. The dates with
video records are displayed in bold fonts.
Camera
Select the camera to play back its video footage.
2. Select the options of the “Video Quality” and “Record Type” to submit the
search conditions.

16
3. Click the button to export the selected record. The “Video Export” dialog
appears. Enter the desired “Start Time” and “End Time” then click “Export” to
export the selected record. Tick the checkbox of “Use 24-hour format” to
display in 24-hour format. You can cancel an ongoing export operation by
clicking on the “Stop” button. Tick the checkbox of “Post Time Information on
Video” to display time on the video. You can specify an export folder by
clicking on the “…” button, then selecting the desired folder in the dialog that
appears. Click on the “Exit” button to close the “Video Export” dialog.
4. Click the button to take a snapshot of the currently displayed image.
5. Click the button to switch to full screen mode. Click this button again or
press the “Esc” button on your keyboard to exit the full screen mode.
This manual suits for next models
4
Table of contents
Other Plustek DVR manuals