PNI B5000 User manual

AUDIO BABY MONITOR B5000
User manual
Manuel utilisateur
Használati utasítás
Manuale d’uso
Instrukcja obsługi
Manual de utilizare
EN User manual ............................................. 2
FR Manuel utilisateur ..................................... 5
HU Használati utasítás ................................... 8
IT Manuale utente ........................................ 11
PL Instrukcja obsługi ..................................... 14
RO Manual de utilizare ................................... 17

2
This Baby monitor has been designed to help you look after your baby and is not Intended as a tool for substituting
the adults’ supervision & care in any circumstances.
Main features:
- 2.4 Ghz wireless digital transmission
- High sensitivity
- Voice Activation (VOX), power saving mode
- Power supply: 4.5V (3 AAA alkaline batteries per unit, batteries not included) or 5V (220V - 5V power adapter included
in the package)
- Maximum coverage 250 m in open eld
- 32 channels to avoid interference. Thus, sound is as clear and clear as possible.
Package contents:
- Child unit (1 piece)
- Parent unit (1 piece)
- Power adapter (2 pieces)
(Batteries are not included in the package)
Safety:
Position the transmitter at a distance of 1.5 - 2 m from the child.
For your safety, use the power adapters provided in the package.
To reduce the risk of re or electric shock, do not expose this Baby Monitor to rain or moisture.
Connect the device to an accessible AC power source. If you notice a malfunction of the device, disconnect it
immediately from the power source.
DO NOT open the device housing to avoid the risk of electrical shock.
For service, refer only to qualied personnel and consult the warranty certicate.
If it is not used properly, the battery may explode. Do not disassemble or burn batteries.
Product description:
Parent unit
Child unit
1. Antenna 7. Talk key
2. Device power LED 8. Volume control
3. Volume level LED indicator 9. DC Input
4. Power key 10. Device pairing key
5. Microphone 11. Battery compartment
6. Loudspeaker 12. Reset Button

EN
3
Operation:
Connect both the baby unit and the parent unit to the power adapter included in the package or insert 3 AAA alkaline
batteries (batteries are not included in the package).
Push up the on/o key. The green LEDs conrming the device power will light up.
Place the child unit in the child’s room at a distance of about 2 m from the child. Parents can hear the child’s voice with
the receiver unit. You can adjust the volume using the volume control keys. The volume level LEDs indicate the level of
sound emitted by the child. Parents can talk to the child by pressing the Talk key. Releasing the Talk key, you can hear
your child’s voice again.
In extreme cases, such as strong interference, poor signal or complete signal loss, try changing the channel by pressing
the Reset and Pair Device buttons, as shown below. The two units, parent and child, will look for an uninterrupted
channel and will continue to function. (Avoid doing this if the transmission is good)
Press the button inside the hole by a pin if there is interference.
Reset & Pairing:
Typically, the two units are associated from the factory.
This operation is only required if the parent unit (the receiver) loses the signal emitted by the child unit (the transmitter).
1. Turn the two units on, using the power adapter. Press for one second, at the same time, Reset buttons placed in the
battery compartment in both units. Both units are now reset. Immediately after this operation you must proceed with
the pairing of the two units.
2. Press for one second, at the same time, the pairing keys on both devices. When the LEDs that conrm the operation
begin to blink at amble units, it means that the two devices have been paired. Restarts normal operation.
Reset buttons
Battery supply:
1. Use only AAA 1.5V alkaline batteries (6 batteries for both units are required. Batteries are not included in the package.)
2. Remove the battery compartment cover, loosen the screw, and insert the batteries in accordance with the polarity.
3. Put the cover back and close the screw securely.
4. Turn on the device and check that the power LED is on and green.

4
Mains power supply:
The 2 units can be operated with batteries as well as direct power to a power source.
1. Plug the power adapter included in the package into a power source
2. Turn on the unit and check that the power LED is on and green.
Low battery indicator and Out of range alert:
When the batteries are unloaded, the power LEDs of the two units become orange. In this situation, the batteries must
be replaced. If you intend to use the device for a long time, it is recommended to use the included power adapter.
If the receiver is too far from the transmitter, the two units will not work properly. You will hear an alert tone indicating
that you are outside the coverage area. At the same time, all volume LEDs will blink. In this situation, you will need to
position the two units closer together.
If the receiver is too close to the transmitter, you may hear an acoustic feedback. In this case, either move the two units
away or lower the volume.
If the receiver emits a background sound, it means the batteries are low and you have to replace them. Also, if the LED
lights are orange, the batteries will have to be replaced.
Troubleshooting:
Trouble Solution
The presence of an upsetting background sound while
the unit is running on batteries.
Check if the batteries are dischalowrged. Replace the
batteries if the LEDs become orange.
The signal from the receiver is suddenly interrupted.
If the child unit does not perceive any sound, it will cease
to emit to the parent unit. The parent unit is in VOX mode
(stand by mode). When the transmitter sounds again,
it sends a signal to the receiver unit, putting it back on
again.
Weak signal
Ensure that the two units are not out of range. In extreme
cases, you can try changing the channel, pairing again
the two units.
Technical details:
Frequency transmission 2400MHz-2480MHz
Power transmission 20dBm / 0.1Watt / 0.1Watt
Range (in open eld) Up to 250 m
Modulation mode FHSS
Current consumption 25mA - 125mA (child unit)
50mA - 240mA (parent unit)
Power voltage 4.5 - 5V / 1A
Operating temperature -20 ~ +50°C
Sensitivity of reception -88dBm
Audio Output 300 mW

FR
Cette moniteur de bébé a été conçu pour vous aider à garder un œil sur votre bébé et ne peut pas être utilisé sous
quelque forme que ce soit en tant que dispositif pouvant remplacer les soins d’un adulte.
Caractéristiques principales:
- Transmission numérique sans l 2,4 Ghz
- Haute sensibilité
- Fonction d’activation vocale pour économiser l’énergie
- Source de courant: 4.5V (3 piles alcalines AAA pour chaque unité, les batteries ne sont pas incluses dans le paquet)
ou 5V (adaptateur secteur 220V - 5V, inclus dans le paquet)
- Couverture maximale de 250 m en champ libre
- L’appareil dispose de 32 canaux pour éviter les interférences.
Le paquet contient:
- Unité enfant (1 pièce)
- Unité parentale (1 pièce)
- Adaptateur d’alimentation (2 pièces)
(Les piles ne sont pas incluses dans l’emballage)
Instructions de sécurité:
Positionnez l’émetteur à une distance de 1,5 - 2 m de l’enfant.
Pour votre sécurité, utilisez les adaptateurs d’alimentation fournis dans l’emballage.
Pour réduire le risque d’incendie ou d’électrocution, n’exposez pas ce bébé moniteur à la précipitation ou l’humidité.
Connectez l’appareil à une source d’alimentation AC accessible. Si vous remarquez un mauvais fonctionnement de
l’appareil, débranchez-le immédiatement de la source d’alimentation.
N’ouvrez PAS le boîtier de l’appareil pour éviter tout risque de choc électrique.
Pour l’entretien, ne consulter que le personnel qualié en consultant le certicat de garantie.
Si elle n’est pas utilisée correctement, la batterie peut exploser. Ne pas démonter ou brûler les piles.
Description des unités:
Unité parentale
Unité d’enfant
1. Antenne 7. Touche d'appel
2. LED d'alimentation de l'appareil 8. Contrôle du volume
3. Indicateur de niveau de volume LED 9. Entrée DC
4. Touche d'alimentation 10. Clé de couplage de l'appareil
5. Microphone 11. Compartiment de la batterie
6. Haut-parleur 12. Bouton de réinitialisation

Mettre en fonctionnement:
Connectez l’unité bébé et l’unité parents à l’adaptateur d’alimentation ou insérez les 6 piles alcalines AAA (les piles ne
sont pas incluses dans l’emballage).
Poussez la touche de démarrage de l’appareil vers le haut. Les LED vertes qui conrment la puissance de l’appareil
s’allument. Placez l’unité enfant dans la chambre de l’enfant à une distance d’environ 2 m de l’enfant. Les parents
peuvent entendre la voix de l’enfant avec le récepteur. Vous pouvez régler le volume à l’aide des touches de contrôle
du volume. Les voyants de niveau de volume indiquent le niveau de son émis par l’enfant. Les parents peuvent parler
à l’enfant en appuyant sur la touche d’appel. En relâchant la touche d’appel, vous pouvez à nouveau entendre la voix
de votre enfant.
Dans les cas extrêmes, par exemple, forte interférence, signal très faible ou perte de signal complète, essayez de
changer de canal en appuyant sur le bouton Reset and Pair Device, comme indiqué ci-dessous. Les deux unités,
parent et enfant, chercheront un canal ininterrompu et continueront à fonctionner. (Évitez de le faire si la transmission
est bonne)
Appuyez sur le bouton de réinitialisation en vous aidant
si vous remarquez des interférences.
Réinitialiser et associer les appareils:
Habituellement, les deux unités sont bien usine associés. L’association des deux unités par l’utilisateur peut être
nécessaire dans des cas isolés. Cette opération est nécessaire que si l’unité mère (récepteur) le signal perd de l’unité
bébé (émetteur).
1. Allumez les deux unités à l’aide de l’adaptateur secteur. Appuyez pendant une seconde, en même temps, les boutons
de réinitialisation vont dans le compartiment de la batterie dans les unités amble, tendant la main pour une aiguille. Les
deux unités sont maintenant réinitialisées. Immédiatement après cette opération, vous devez procéder à l’appariement
des deux unites.
2. Appuyez pendant une seconde, en même temps, sur les touches de couplage des deux appareils. Lorsque les
voyants qui conrment le fonctionnement commencent à clignoter au niveau des unités ambiophoniques, cela signie
que les deux dispositifs ont été couplés. Redémarre le fonctionnement normal..
Reset
Alimentation par batterie:
1. Utilisez uniquement des piles alcalines AAA 1.5V (6 piles pour les deux unités sont requises.) Les piles ne sont pas
incluses dans l’emballage.

FR
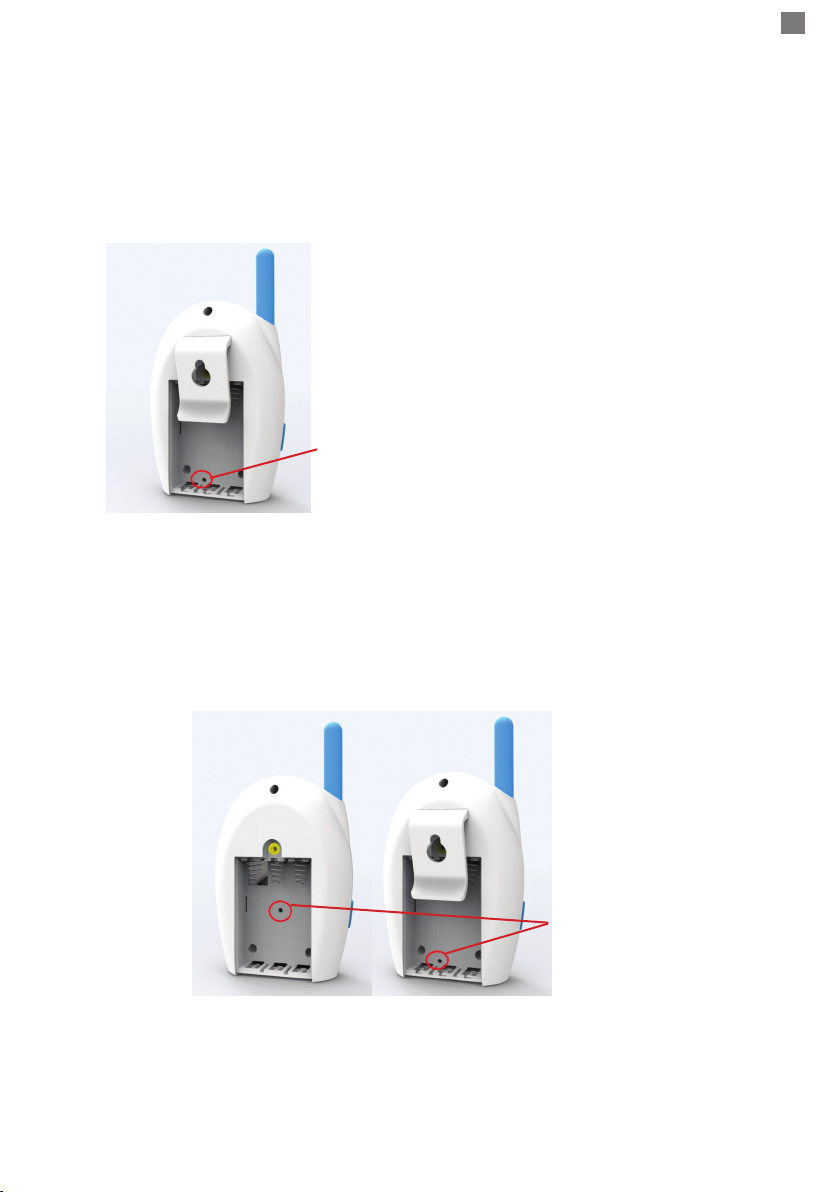
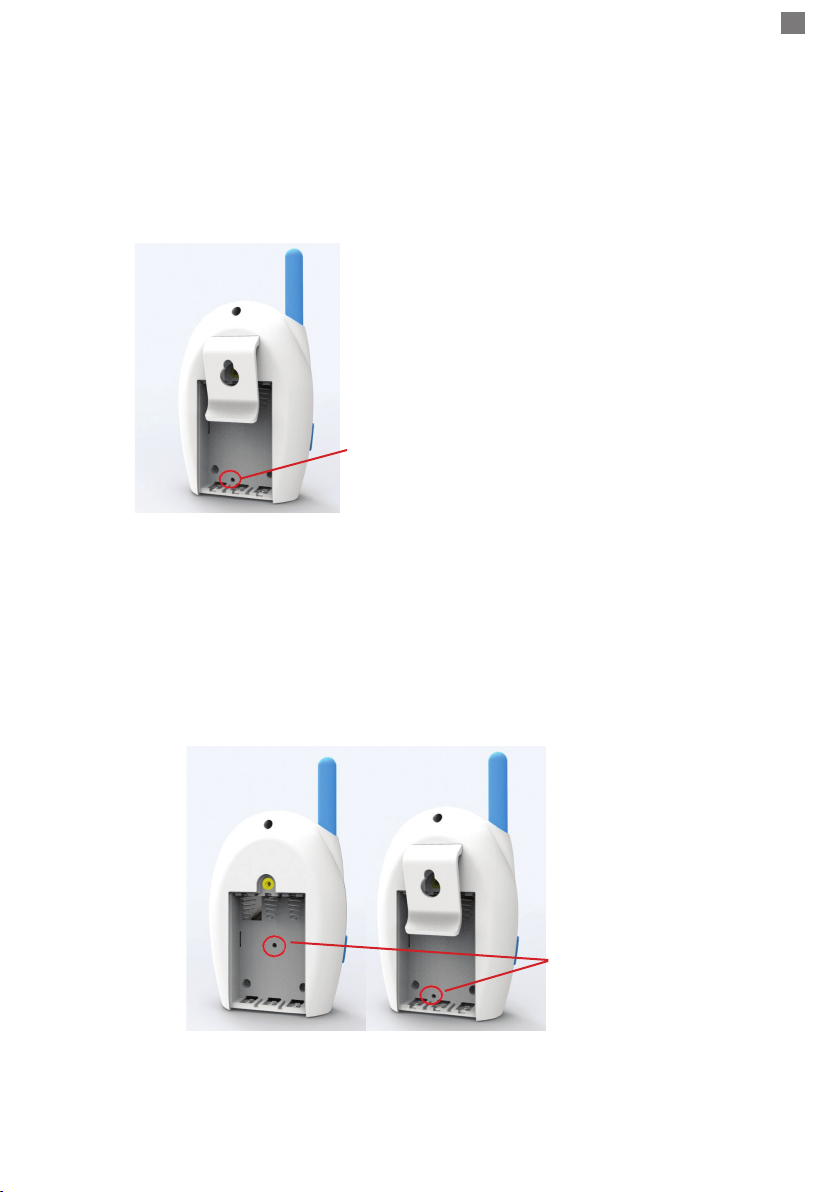
2. Retirez le couvercle du compartiment des piles, desserrez la vis et insérez les piles en respectant la polarité.
3. Replacez le couvercle et fermez la vis fermement.
4. Allumez l’appareil et vériez que le voyant d’alimentation est allumé et vert
Alimentation:
Les 2 unités peuvent être utilisées avec des batteries ainsi que l’alimentation directe à une source d’alimentation.
1. Branchez l’adaptateur d’alimentation inclus dans l’emballage dans une source d’alimentation
2. Allumez l’unité et vériez que le voyant d’alimentation est allumé et vert.
Indicateur de batterie téléchargé et alerte hors de portée:
Lorsque les piles sont déchargées, les voyants d’alimentation des deux unités deviennent orange. Dans ce cas, les piles
doivent être remplacées. Si vous avez l’intention d’utiliser l’appareil pendant une longue période, il est recommandé
d’alimenter une alimentation électrique.
Si le combiné est trop éloigné de l’émetteur, les deux unités ne fonctionneront pas correctement. Vous entendrez une
tonalité d’alerte indiquant que vous êtes en dehors de la zone de couverture. En même temps, tous les voyants de
volume clignotent. Dans cette situation, vous devrez rapprocher les deux unités.
Si le combiné est trop proche de l’émetteur, vous pouvez entendre un retour acoustique. Dans ce cas, supprimez les
deux unités ou abaissez le volume.
Si le combiné émet un son d’arrière-plan, cela signie que les piles sont épuisées et que vous devez les remplacer. De
plus, si les lumières DEL sont orange, les piles devront être remplacées.
Dépannage:
Défaut Solution
La présence d'un bruit de fond bouleversant pendant
que l'appareil fonctionne sur piles.
Vériez si les piles sont déchargées. Remplacez les piles
si les LED deviennent orange.
Le signal du récepteur est brusquement interrompu.
Si l'unité enfant ne perçoit aucun son, elle cessera de
signaler à l'unité parents. L'unité parents est en mode
VOX (mode veille). Lorsque l'émetteur retentit à nouveau,
il envoie un signal à l'unité réceptrice et le rallume.
Mauvais signal
Assurez-vous que les deux unités ne sont pas hors de
portée. Dans les cas extrêmes, vous pouvez essayer de
changer le canal, en réassemblant les deux unités.
Détails techniques:
Transmission de fréquence 2400MHz-2480MHz
Transmission de puissance 20dBm / 0.1Watt
Champ d'action en champ libre jusqu’à 250 m
Mode de modulation FHSS
Consommation actuelle 25mA - 125mA (Unité d’enfant)
50mA - 240mA (Unité parentale)
Alimentation 4.5 - 5V / 1A
Température de fonctionnement -20 ~ +50°C
Sensibilité de réception -88dBm
Sortie audio 300 mW

8
Ez a baba monitor célja, hogy segítsen gyelni a baba, és semmilyen formában nem használható olyan eszköz,
amely helyettesítheti egy felnőtt gondozását.
Tulajdonságok:
- 2,4 Ghz vezeték nélküli digitális átvitel
- Nagy érzékenység
- Hangaktiválás (VOX) funkció az akkumulátor energiájának megtakarításához
- Tápellátás: 4.5V (3 AAA alkáli elem egységenként, nem tartozék az elemeknél) vagy 5V (220V - 5V tápegység a
csomagban)
- Legfeljebb 250 m nyitott területen
- 32 csatorna az interferencia elkerülése érdekében. Így a hang olyan tiszta és világos, amennyire csak lehetséges.
A csomag tartalma:
- Gyermekegység (1 darab)
- Szülői egység (1 db.)
- Hálózati adapter (2 db)
(Az elemek nem szerepelnek a csomagban)
Biztonsági utasítások:
Helyezze az adóegységet a gyermektől 1,5-2 m távolságra.
Biztonsága érdekében használja a csomagban található tápegységeket.
A tűz és az áramütés kockázatának csökkentése érdekében ne tegye ki a baba monitornak eső vagy nedvességet.
Csatlakoztassa a készüléket egy hozzáférhető hálózati áramforráshoz. Ha az eszköz hibás működését észleli, azonnal
húzza ki az áramforrásból.
NEM nyissa ki a készülék házát az áramütés veszélyének elkerülése érdekében.
Szervizelés esetén csak a szakképzett személyzethez forduljon a jótállási jegyen.
Ha nem megfelelően használja, az akkumulátor felrobbanhat. Ne szerelje szét, és ne égesse el az elemeket.
Termékleírás:
1. Antenna 7. Hívás gomb
2. Eszköz teljesítmény LED 8. Hangerőszabályzás
3. Hangerő szint LED kijelző 9. DC bemenet
4. Bekapcsológomb 10. Eszköz párosítási kulcs
5. Mikrofon 11. Elemtartó rekesz
6. Hangszóró 12. Reset gomb

HU
9
Üzemeltetés:
Csatlakoztassa mind a babaegységet, mind a szülõegységet a csomagban található tápegységhez, vagy helyezzen be
3 db AAA alkáli elemet (az elemeket a csomag nem tartalmazza).
Nyomja fel az eszközindító kulcsot. A zöld LEDek világítanak a készüléken.
Helyezze a gyermek egységet a gyermek szobájába kb. 2 m távolságra a gyermekétől. A szülők hallják a gyermek
hangját a vevőegységgel. A hangerőt a hangerőszabályzó gombokkal állíthatja be. A hangerőszint LED-ek jelzik a
gyermek által kibocsátott hangerőt. A szülők a Hívás gomb megnyomásával beszélhetnek a gyermekkel. A Hívás gomb
megnyomása után újra hallhatja a gyermek hangját.
Szélsőséges esetekben, például erős interferencia, rossz jelzés vagy teljes jelvesztés esetén próbálkozzon a csatorna
megváltoztatásával a Reset és a Pair Device gomb megnyomásával, az alábbiak szerint. A két egység, szülő és
gyermek, megszakítás nélküli csatornát keres, és továbbra is működni fog. (Kerülje el ezt, ha az átvitel jó)
Ha interferenciát észlel, nyomja meg a Reset gombott.
Eszközök törlése és párosítása:
Jellemzően a két egység a gyárból van társítva.
Ez a művelet csak akkor szükséges, ha a szülői egység (vevő) elveszíti a gyermekegység (az adó) által kibocsátott
jelet,.
1. Kapcsolja be a két egységet a hálózati adapter használatával. Nyomja meg egy másodpercig, egyidejűleg a Reset
gombokat az elemtartóban, amble egységekben, elérve a tűt. Mindkét egység most visszaáll. Közvetlenül a művelet
után folytassa a két egység párosítását.
2. Nyomja meg egy másodpercig, egyidejűleg mindkét eszköz párosító gombját. Amikor a LED-ek, amelyek megerősítik
a műveletet, villogni kezd az amble egységekben, akkor azt jelenti, hogy a két készüléket párosították. Újraindítja a
normál működést.
Reset Gombok
Elemellátás:
1. Csak AAA 1,5 V-os alkáli elemeket használjon (mindkét készülékhez 6 elem szükséges, az elemek nem tartoznak
a csomagoláshoz.)
2. Távolítsa el az elemtartó fedelét, lazítsa meg a csavart, és helyezze be az elemeket a polaritásnak megfelelően.
3. Tegye vissza a fedelet és szorosan csavarja be a csavart.
4. Kapcsolja be a készüléket, és ellenőrizze, hogy a tápfeszültség LED világít-e.

10
Tápellátás:
A 2 egység akkumulátorral működtethető, valamint közvetlen áramforrással működtethető.
1. Csatlakoztassa a csomagban található tápegységet egy tápforráshoz
2. Kapcsolja be a készüléket, és ellenőrizze, hogy a tápfeszültség LED világít-e.
Az akkumulátort jelző levehető és riasztási tartományon kívül esik:
Ha az elemeket kirakodják, a két egység tápellátó LED-jei narancssárgára változnak. Ebben az esetben az elemeket ki
kell cserélni. Ha hosszabb ideig szeretné használni az eszközt, ajánlott tápellátást táplálni.
Ha a kézibeszélő túl messze van az adóegységtől, a két egység nem működik megfelelően. Figyelmeztető hangjelzés
hallható, amely jelzi, hogy kívül esik a lefedett területen. Ugyanakkor minden hangerő LED villogni fog. Ebben a
helyzetben a két egységet egymáshoz közel kell elhelyezni.
Ha a kézibeszélő túl közel van a távadóhoz, hangjelzés hallható. Ebben az esetben távolítsa el a két egységet, vagy
csökkentse a hangerőt.
Ha a kézibeszélő háttérzajt ad ki, akkor azt jelenti, hogy az akkumulátorok vége, és ki kell cserélni őket. Továbbá, ha a
LED-ek narancssárga színűek, az elemeket ki kell cserélni.
Problémák és megoldások:
Hibák Hibaelhárittás
A zavaró háttérhang jelenléte, miközben a készülék az
elemeken fut.
Ellenőrizze, hogy az elemek lemerültek-e. Cserélje ki az
elemeket, ha a LED-ek narancsszínűvé válnak.
A vevőről érkező jel hirtelen megszakad.
Ha a gyermekegység nem érzékel semmilyen hangot,
akkor a szülői egységtől jelet nem jelez. Az alapegység
VOX üzemmódban van (készenléti üzemmódban).
Amikor az adó ismét hangzik, jelet küld a vevőegységnek,
és újra üzembe helyezi.
Rossz jel
Győződjön meg róla, hogy a két egység nincs a
hatótávolságon kívül. Szélsőséges esetekben
megpróbálhatja megváltoztatni a csatornát, és újra
összeszerelni a két egységet.
Technikai részletek:
Frekvenciaátvitel 2400MHz-2480MHz
Teljesítményátvitel 20dBm / 0.1Watt
Tevékenységi kör a nyitott területen Pana la 250 m
Modulációs mód FHSS
Áramfelvétel 25mA - 125mA ()
50mA - 240mA ()
etetés 4.5 - 5V / 1A
Működési hőmérséklet -20 ~ +50°C
A fogadás érzékenysége -88dBm
Audió kimenet 300 mW

IT
Questo Baby Monitor è stato progettato per aiutarla a sorvegliare il suo bambino e non può essere utilizzato in alcuna
forma come dispositivo in grado di sostituire la cura di un adulto.
Caratteristiche:
- Trasmissione digitale wireless da 2,4 Ghz
- Alta sensibilità
- Funzione Voice Activation (VOX) per risparmiare la batteria
- Alimentazione: 4,5 V (3 batterie alcaline AAA per unità, batterie non incluse) o 5 V (adattatore 220V - 5V incluso nella
confezione)
- Massima copertura 250 m in campo aperto
- 32 canali per evitare interferenze. Quindi, il suono è il più chiaro e chiaro possibile.
Contenuto della confezione:
- Unità bambino (1 pezzo)
- Unità genitore (1 pz.)
- Alimentatore (2 pezzi)
(Le batterie non sono incluse nella confezione)
Istruzioni di sicurezza:
Posizionare il trasmettitore a una distanza di 1,5 - 2 m dal bambino.
Per la tua sicurezza, usa gli adattatori di alimentazione forniti nella confezione.
Per ridurre il rischio di incendi o scosse elettriche, non esporre questo Baby Monitor alla pioggia o all’umidità.
Collegare il dispositivo a una fonte di alimentazione AC accessibile. Se si nota un malfunzionamento del dispositivo,
scollegarlo immediatamente dalla fonte di alimentazione.
NON aprire la scocca del dispositivo per evitare il rischio di scosse elettriche.
Per assistenza, contattare il personale qualicato dopo aver consultato il certicato di garanzia.
Se non viene usata correttamente, la batteria potrebbe esplodere. Non smontare o buttare nel fuoco le batterie.
Descrizione del prodotto:
Unità genitore
Unità bambino
1. Antenna 7. Tasto appello
2. Indicatore LED dello stato di alimentazione 8. Controllo del volume
3. Indicatore LED del livello del volume 9. Ingresso DC
4. Tasto Start 10. Chiave di accoppiamento del dispositivo
5. Microfono 11. Scomparto della batteria
6. Altoparlante 12. Pulsante di Reset

Messa in funzione:
Alimentare sia l’unità bambino che l’unità genitore con l’adattatore incluso nella confezione o inserire 3 batterie alcaline
AAA (le batterie non sono incluse nella confezione).
Spingere verso l’alto la chiave di avvio del dispositivo. I LED verdi che confermano l’limentazione del dispositivo si
accenderanno.
Posizionare l’unità bambino nella stanza del bambino ad una distanza di circa 2 m dal bambino. I genitori possono
ascoltare la voce del bambino attraverso l’unità ricevente. È possibile regolare il volume utilizzando i pulsanti di controllo
del volume. I LED del livello del volume indicano il livello sonoro del bambino. I genitori possono parlare al bambino
premendo il tasto Chiama. Rilasciando il tasto Chiama, è possibile ascoltare di nuovo la voce del bambino.
In casi estremi, come forti interferenze, segnale scadente o perdita completa del segnale, provare a cambiare canale
premendo il pulsante Reset e Pair Device, come mostrato di seguito. Le due unità, genitore e glio, cercheranno un
canale senza interferenze e continueranno a funzionare. (Evita questo se la trasmissione è buona)
Se si notano delle interferenze, premi il tasto Reset.
Reset e accoppia i dispositivi:
In genere, le due unità sono associate dalla fabbrica.
Questa operazione è necessaria solo se l’unità genitore (ricevente) perde il segnale emesso dall’unità bambino (il
trasmettitore).
1. Avviare le due unità utilizzando l’alimentatore. Premere per un secondo, allo stesso tempo, i pulsanti di Reset
posizionati nello scomparto della batteria in entrambe unità, con l’aiuto di un ago. Entrambe le unità sono ora ripristinate.
Subito dopo questa operazione è necessario continuare con l’abbinamento delle due unità.
2. Premere per un secondo, allo stesso tempo, i pulsanti Pair su entrambi i dispositivi. Quando i LED che confermano
l’operazione iniziano a lampeggiare su entrambe le unità, signica che i due dispositivi sono stati accoppiati. Riavvia il
normale funzionamento.
Tasti Reset
Alimentazione della batteria:
1. Utilizzare solo batterie alcaline AAA da 1,5 V (sono necessarie 6 batterie per entrambe le unità. Le batterie non sono
incluse nella confezione).
2. Rimuovere il coperchio del vano batteria, allentare la vite e inserire le batterie in conformità con la polarità.
3. Rimontare il coperchio e chiudere saldamente la vite.

IT
4. Accendere il dispositivo e vericare che il LED di alimentazione sia acceso e verde.
Alimentazione con l’aiuto dell’adattatore:
Le 2 unità possono funzionare sia con delle batterie che con l’alimentazione diretta a una fonte di alimentazione.
1. Inserire l’alimentatore incluso nella confezione in una fonte di alimentazione
2. Accendere l’unità e vericare che il LED di alimentazione sia acceso e verde.
Indicatore di batteria scarica e avviso fuori intervallo:
Quando le batterie sono scaricate, i LED di alimentazione delle due unità diventano arancioni. In questo caso, le
batterie devono essere sostituite. Se si intende utilizzare il dispositivo per un lungo periodo, si consiglia di alimentarlo
con alimentatore.
Se il l’unità emitente è troppo lontana dall’unità ricevente, le due unità non funzioneranno correttamente. Sentira un
tono di avviso che indica che si è fuori dall’area di copertura. Allo stesso tempo, tutti i LED del volume lampeggiano. In
questa situazione, dovra posizionare le due unità più vicine.
Se il l’unità emitente è troppo vicina dall’unità ricevente, è possibile che si senta un feedback acustico. In questo caso,
allontanare le due unità o abbassare il volume.
Se il ricevitore emette un suono di sottofondo, signica che le batterie sono nite e sarà necessario sostituirle. Inoltre,
se i LED sono di colore arancione, è necessario sostituire le batterie.
Risoluzione dei problemi:
Difetto Soluzione
La presenza di un rumore di sottofondo mentre l’unità
funziona a batterie.
Controlla se le batterie sono scariche. Sostituire le
batterie se i LED diventano arancioni.
Il segnale dal ricevitore viene bruscamente interrotto.
Se l’unità per bambino non percepisce alcun suono,
cesserà di segnalare all’unità genitore. L’unità genitore
è in modalità VOX (modalità stand-by). Quando il
trasmettitore emetterà nuovamente un suono, invierà un
segnale al ricevitore, rimettendolo in funzione.
Cattivo segnale
Assicurarsi che le due unità non siano fuori portata. In casi
estremi, puoi provare a cambiare canale, riaccoppiando
le due unità.
Dettagli tecnici:
Frequenza trasmissione 2400MHz-2480MHz
Potenza trasmissione 20dBm / 0.1Watt
Campo d'azione in campo aperto Fino a 250 m
Modalità di modulazione FHSS
Consumo corrente 25mA - 125mA (unità bambino)
50mA - 240mA (unità genitore)
Alimentazione 4.5 - 5V / 1A
Temperatura di esercizio -20 ~ +50°C
Sensibilità di ricezione -88dBm
Uscita audio 300 mW

Ten Baby Monitor został zaprojektowany, aby pomóc Ci nadzorować dziecko i nie może być używany w żadnej formie
jako urządzenie, które może zastąpić opiekę osoby dorosłej.
Główne cechy:
- Bezprzewodowa transmisja cyfrowa 2,4 GHz
- Wysoka czułość
- Funkcja aktywacji głosowej w celu oszczędzania energii
- Moc: 4.5V (3 baterie alkaliczne AAA dla każdej jednostki, baterie nie są dołączone do opakowania) lub 5V (Zasilacz
220V - 5V, zawarte w pakiecie)
- Maksymalne pokrycie 250 mw otwartym polu
- Urządzenie ma 32 kanały, aby uniknąć zakłóceń. Zatem dźwięk jest tak wyraźny i klarowny, jak to tylko możliwe.
Pakiet zawiera:
- Jednostka dla dzieci (1 sztuka)
- Jednostka dla rodziców (1 sztuka)
- Zasilacz (2 sztuka)
- Instrukcja obsługi
(Baterie nie są zawarte w opakowaniu)
Instrukcje bezpieczeństwa:
Ustaw nadajnik w odległości 1,5 - 2 m od dziecka.
Ze względów bezpieczeństwa używaj adapterów zasilania dostarczonych w opakowaniu
Aby zmniejszyć ryzyko pożaru lub porażenia prądem, nie wystawiaj Niani elektronicznej na opady atmosferyczne lub
wilgoć.
Podłącz urządzenie do dostępnego źródła zasilania prądu. Jeśli zauważysz awarię urządzenia, odłącz je natychmiast
od źródła zasilania.
NIE otwieraj obudowy urządzenia, aby uniknąć ryzyka porażenia prądem.
Aby uzyskać pomoc, należy się zwrócić do wykwalikowanego personelu, korzystając z certykatu gwarancyjnego.
NIE używaj uszkodzonych zasilaczy.
Opis produktu: Jednostka rodzicielska
Jednostka dla dzieci
1. Antena 7. Klawisz połączenia
2. Dioda LED zasilania urządzenia 8. Kontrola głośności
3. Wskaźnik LED poziomu głośności 9. Wejście prądu stałego
4. Klucz zasilania 10. Klawisz parowania urządzenia
5. Mikrofon 11. Komora baterii
6. Głośnik 12. Przycisk resetowania

PL
Uruchomienie:
Połączyć zarówno jednostkę dla dziecka, jednostka dominująca oraz zasilacz lub wprowadzić baterie alkaliczne AAA
6 (baterie nie ujęte w pakiecie).
Naciśnij przycisk uruchamiania urządzenia. Zapalą się zielone diody LED potwierdzające moc urządzenia.
Umieszczenie dziecka w jednostce przedszkola w odległości około 2 m od niego. Rodzice mogą usłyszeć głos dziecka
z odbiornikiem. Głośność można regulować za pomocą klawiszy regulacji głośności. Diody LED do wskazywania
poziomu głośności poziom dźwięku dziecka. Rodzice mogą rozmawiać z dzieckiem, naciskając klawisz połączenia.
Zwalniając klawisz połączenia, można usłyszeć znów głos dziecka.
Technologia FHSS, dzięki której te urządzenia są zainstalowane, pozwala na swobodną komunikację radiową ze
względu na złożony system transmisji.
W skrajnych przypadkach, na przykład silnej interferencji, słabego sygnału lub całkowitej utraty sygnału, spróbuj
zmienić kanał, naciskając przycisk Resetuj i Paruj, jak pokazano poniżej. Dwie jednostki, jedno dla rodzica i dziecko
będzie wyglądać dla kanału bez interefente i nadal będzie działać. (Unikaj tego, jeśli transmisja jest dobra)
Naciśnij przycisk resetowania, pomagając, jeśli zauważysz zakłócenia.
Zresetuj i Połącz urządzenia:
Zazwyczaj obie jednostki są dobrze powiązane w fabryce. Parowanie obu jednostek przez użytkownika może być
wymagane w sytuacjach izolowanych. Ta operacja jest wymagana tylko wtedy, gdy jednostka rodzica (odbiornik) utraci
sygnał wysyłany przez jednostkę podrzędną (nadajnik). instrukcje:
1. Włącz oba urządzenia, używając zasilacza. Naciśnij przez jedną sekundę w tym samym czasie. Przyciski resetowania
traają do komory baterii w gotowych jednostkach, pomóż sobie igłą. Obie jednostki są teraz resetowane. Natychmiast
po tej operacji musisz przystąpić do parowania dwóch jednostek.
2. Wciśnij na jedną sekundę jednocześnie klawisze parowania na obu urządzeniach. Gdy diody LED, które potwierdzają
działanie zaczynają migać w jednostkach, oznacza to, że dwa urządzenia zostały sparowane. Ponownie uruchamia
normalną pracę.
Przyciski Reset
Przydatne informacje:
Baterie do obu jednostek, dziecka i rodzica:
1. Należy używać wyłącznie baterii alkalicznych AAA 1,5 V (wymagane są 6 baterii do obu jednostek) Baterie nie
znajdują się w opakowaniu).
2. Zdejmij pokrywę komory baterii, poluzuj śrubę i włóż baterie zgodnie z biegunowością.

3. Załóż z powrotem osłonę i dokładnie dokręć śrubę.
4. Włącz urządzenie i sprawdź, czy dioda LED zasilania świeci się na zielono.
Zasilanie:
Urządzenie dla dziecka może pracować z bateriami i z bezpośrednim źródłem zasilania.
1. Włóż zasilacz do źródła prądu stałego
2. Jeśli źródło prądu stałego ma przycisk bezpieczeństwa, upewnij się, że jest otwarte
3. Włącz urządzenie i sprawdź, czy diody LED zasilania są zielone i zielone.
Wskaźnik akumulatora załadowany i alarm poza zakresem:
Gdy baterie są rozładowane, diody LED zasilania obu urządzeń stają się pomarańczowe. W tej sytuacji baterie należy
wymienić. Jeśli zamierzasz korzystać z urządzenia przez dłuższy czas, zaleca się zasilanie zasilacza.
Jeśli słuchawka znajduje się zbyt daleko od nadajnika, oba urządzenia nie będą działać poprawnie. Usłyszysz sygnał
ostrzegawczy wskazujący, że znajdujesz się poza obszarem zasięgu. W tym samym czasie wszystkie diody LED
głośności będą migać. W tej sytuacji będziesz musiał ustawić te dwie jednostki bliżej siebie.
Jeśli słuchawka znajduje się zbyt blisko nadajnika, możesz usłyszeć akustyczne sprzężenie zwrotne. W takim
przypadku usuń obie jednostki lub zmniejsz objętość.
Jeśli słuchawka emituje dźwięk tła, oznacza to, że baterie się skończyły i trzeba je wymienić. Ponadto, jeżeli diody LED
są pomarańczowe, należy wymienić baterie.
Rozwiązywanie problemów:
Defekty Rozwiązania
Obecność niepokojącego dźwięku w tle, gdy urządzenie
działa na bateriach.
Sprawdź, czy baterie są rozładowane. Wymień baterie,
jeśli diody LED zmienią kolor na pomarańczowy.
Sygnał z odbiornika zostaje nagle przerwany.
Jeśli jednostka dziecięca nie odbierze żadnego dźwięku,
przestanie sygnalizować jednostce macierzystej.
Jednostka nadrzędna działa w trybie VOX (tryb
gotowości). Gdy nadajnik odbiera dźwięki ponownie,
wysyła sygnał do odbiornika, ponownie go załączając.
Słaby sygnał
Upewnij się, że te dwa urządzenia nie są poza zasięgiem.
W skrajnych przypadkach możesz spróbować zmienić
kanał, ponownie składając obie jednostki.
Dane techniczne:
Transmisja częstotliwości 2400MHz-2480MHz
Przeniesienie mocy 20dBm / 0.1Watt
Pole działania w otwartym polu aż do 250 m
Tryb modulacji FHSS
Pobór prądu 25mA - 125mA (jednostka dziecka)
50mA - 240mA (jednostka rodzicielska)
Napięcie 4.5 - 5V / 1A
Temperatura robocza -20 ~ +50°C
Czułość odbioru -88dBm
Wyjście audio 300 mW

RO
17
Acest Baby Monitor a fost creat pentru a va ajuta sa va supravegheati copilul si nu poate folosit sub nicio forma ca
un dispozitiv care poate inlocui grija unui adult.
Caracteristici:
- Transmisie digitala wireless 2.4 Ghz
- Sensibilitate ridicata
- Functie de activare vocala (VOX), pentru economisire a bateriei
- Alimentare: 4.5V (3 baterii alcaline AAA pentru ecare unitate, bateriile nu sunt incluse in pachet) sau 5V (adaptor
alimentare 220V - 5V, inclus in pachet)
- Acoperire maxim 250 m in camp deschis
- 32 de canale pentru a evita interferentele. Astfel, se obtine un sunet cat mai clar si curat posibil.
Continut pachet:
- Unitate copil (1 buc.)
- Unitate parinte (1 buc.)
- Adaptor alimentare (2 buc.)
(Bateriile nu sunt incluse in pachet)
Instructiuni de siguranta:
Pozitionati emitatorul la o distanta de 1,5 - 2 m fata de copil.
Pentru siguranta dumneavoastra, folositi adaptorii pentru alimentare prevazuti in pachet.
Pentru a reduce riscul de foc sau soc electric, nu expuneti acest Baby Monitor la precipitatii sau umezeala.
Conectati aparatul la o sursa AC accesibila. Daca observati o functionare defectuoasa a dispozitivului, deconectati-l
imediat de la sursa de curent.
NU deschideti carcasa dispozitivlui pentru a evita riscul de soc electric.
Pentru service, adresati-va doar personalului calicat, consultand certicatul de garantie.
Daca nu este folosita in mod corespunzator, bateria poate exploda. Nu dezasamblati si nu aruncati in foc bateriile.
Descriere produs:
Unitate parinte
Unitate copil
1. Antena 7. Tasta apel
2. LED alimentare dispozitiv 8. Control volum
3. Indicator LED pentru nivel volum 9. Intrare DC
4. Tasta pornire 10. Tasta asociere dispozitiv
5. Microfon 11. Compartiment baterii
6. Difuzor 12. Buton Reset

18
Punerea in functiune:
Conectati atat unitatea pentru copil cat si unitatea pentru parinte la adaptorul pentru alimentare inclus in pachet sau
introduceti cate 3 baterii alcaline AAA (bateriile nu sunt incluse in pachet).
Impingeti in sus tasta pentru pornire dispozitiv. LED-urile verzi care conrma alimentarea dispozitivului se vor aprinde.
Pozitionati unitatea pentru copil in camera copilului, la o distanta de aproximativ 2 m de acesta. Parintii pot auzi vocea
copilului cu ajutorul unitatii receptoare. Puteti regla volumul, folosind tastele de control volum. LED-urile pentru nivel
volum indica nivelul sunetului emis de copil. Parintii pot vorbi copilului, apasand tasta Apel. Eliberand tasta Apel, puteti
auzi din nou glasul copilului.
In cazuri extreme, cum ar interferente puternice, semnal foarte slab sau pierderi complete de semnal, incercati sa
schimbati canalul apasand butonul de Reset si Asociere dispozitiv, dupa cum este indicat mai jos. Cele doua unitati,
cea pentru parinte si cea pentru copil vor cauta un canal fara interefente si vor continua sa functioneze. (Evitati sa faceti
aceasta operatiune daca transmisia este buna)
Daca observati interferente, apasati butonul Reset.
Reset si asociere dispozitive:
De obicei, cele doua unitati sunt asociate din fabrica.
Este necesara aceasta operatiune doar daca unitatea pentru parinte (receptorul) pierde semnalul emis de unitatea
pentru copil (emitatorul).
1. Puneti in functiune cele doua unitati, folosind adaptorul pentru alimentare. Apasati timp de o secunda, in acelasi timp,
butoanele Reset aflate in compartimentul pentru baterii in amble unitati, ajuntandu-va de un ac. Ambele unitati sunt
acum resetate. Imediat dupa aceasta operatiune trebuie sa continuati cu asocierea celor doua unitati.
2. Apasati timp de o secunda, in acelasi timp, tastele de Asociere unitati de pe ambele dispozitive. In momentul cand
LED-urile care conrma functionarea incep sa clipeasca la amble unitati, inseamna ca cele doua dispozitive au fost
asociate. Reincepe functionarea normala.
Butoane Reset
Alimentarea cu baterii:
1. Folositi doar baterii alcaline AAA 1.5V (sunt necesare 6 baterii pentru ambele unitati. Bateriile nu sunt incluse in
pachet.)
2. Indepartati capacul compartimentului pentru baterii, desfacand surubul si introduceti bateriile respectand polaritatea.
3. Puneti capacul la loc si inchideti surubul bine.

RO
19
4. Aprindeti dispozitivul si vericati ca LED-ul pentru alimentare sa e aprins si de culoare verde.
Alimentarea la curent:
Cele 2 unitati pot functiona atat cu baterii, cat si prin alimentarea directa la o sursa de curent.
1. Introduceti adaptorul pentru alimentare inclus in pachet la o sursa de curent
2. Aprindeti unitatea si vericati daca LED-ul pentru alimentare este aprins si este de culoare verde.
Indicator de baterii descarcate si alerta in afara razei de acoperire:
Cand bateriile sunt descarcate, LED-urile pentru alimentare ale celor doua unitati devin de culoare portocalie. In
aceasta situatie trebuie schimbate bateriile. Daca intentionati sa folositi timp indelungat dispozitivul, este recomandata
alimentarea la o sursa de curent.
Daca receptorul este prea departe de emitator, celor doua unitati nu vor functiona in mod corect. Veti auzi un sunet de
alerta care indica faptul ca sunteti in afara zonei de acoperire. In acelasi timp, toate LED-urile pentru volum vor clipi
intermitent. In aceasta situatie va trebui sa pozitionati cele doua unitati mai aproape una de alta.
Daca receptorul este prea aproape de emitator, s-ar putea auzi un feedback acustic. In acest caz, ori indepartati cele
doua unitati ori dati volumul mai incet.
Daca receptorul emite un sunet de fundal, inseamna ca bateriile sunt de terminate si va trebuie sa le inlocuiti. De
asemenea, daca luminile LED sunt de culoare portocalie, bateriile vor trebui inlocuite.
Probleme si solutii:
Defectiune Solutie
Prezenta unui sunet de fundal suparator in timp ce
unitatea functioneaza pe baterii.
Vericati daca bateriile sunt descarcate. Inlocuiti bateriile,
daca luminile LED devin portocalii.
Brusc se intrerupe semnalul de la receptor.
Daca unitatea pentru copil nu percepe niciun sunet,
aceasta va inceta sa emita semnal catre unitatea pentru
parinte. Unitatea pentru parinte este in modul VOX (mod
stand by). Cand emitatorul percepe iarasi sunete, va
transmite semnal catre unitatea receptor, punand-o din
nou in functiune.
Semnal slab
Asigurati-va ca cele doua unitati nu sunt in afara razei de
acoperire. In cazuri extreme, puteti incerca schimbarea
canalului, reasociind cele doua unitati.
Detalii tehnice:
Frecventa transmisie 2400MHz-2480MHz
Putere transmisie 20dBm / 0.1Watt
Raza de actiune in camp deschis Pana la 250 m
Mod modulatie FHSS
Consum curent 25mA - 125mA (unitate copil)
50mA - 240mA (unitate parinte)
Alimentare 4.5 - 5V / 1A
Temperatura de functionare -20 ~ +50°C
Sensibilitate receptie -88dBm
Iesire audio 300 mW
Other manuals for B5000
1
Table of contents
Languages:
Other PNI Baby Monitor manuals