manuals.online logo
Brands
  1. Home
  2. •
  3. Brands
  4. •
  5. POCTech
  6. •
  7. Blood Glucose Meter
  8. •
  9. POCTech CT100C Instruction Manual

POCTech CT100C Instruction Manual

This manual suits for next models

1

Other POCTech Blood Glucose Meter manuals

POCTech CT10 User manual

POCTech

POCTech CT10 User manual

POCTech CT3 Series User manual

POCTech

POCTech CT3 Series User manual

Popular Blood Glucose Meter manuals by other brands

Beurer GL50 Instructions for use

Beurer

Beurer GL50 Instructions for use

AgaMatrix Presto owner's guide

AgaMatrix

AgaMatrix Presto owner's guide

Medisana GlucoDock instruction manual

Medisana

Medisana GlucoDock instruction manual

Dexcom G4 Professional user guide

Dexcom

Dexcom G4 Professional user guide

Medisana MediTouch 2 instruction manual

Medisana

Medisana MediTouch 2 instruction manual

Infopia Element Instructions for use

Infopia

Infopia Element Instructions for use

ReliOn Prime User instruction manual

ReliOn

ReliOn Prime User instruction manual

Polymer Technology Systems A1C Now Self Check user manual

Polymer Technology Systems

Polymer Technology Systems A1C Now Self Check user manual

Contour TS user guide

Contour

Contour TS user guide

Arkray ASSURE PLATINUM quick start guide

Arkray

Arkray ASSURE PLATINUM quick start guide

Acon On Call user manual

Acon

Acon On Call user manual

ACONLABS ON CALL EXPRESS user manual

ACONLABS

ACONLABS ON CALL EXPRESS user manual

FOR-A G71a user manual

FOR-A

FOR-A G71a user manual

Accu-Chek Mobile Getting started guide

Accu-Chek

Accu-Chek Mobile Getting started guide

Avital 6276 user guide

Avital

Avital 6276 user guide

Roche Accu-Chek Aviva Combo manual

Roche

Roche Accu-Chek Aviva Combo manual

Acon on call vivid pal user manual

Acon

Acon on call vivid pal user manual

Accu-Chek Guide Me user manual

Accu-Chek

Accu-Chek Guide Me user manual

manuals.online logo
manuals.online logoBrands
  • About & Mission
  • Contact us
  • Privacy Policy
  • Terms and Conditions

Copyright 2025 Manuals.Online. All Rights Reserved.

POCTech CT100C (CT10) CGM
Frequently Asked Questions
March 2020 –Global FAQ Master
Page 1 of 21
Question
Response
1.
For what is POCTech CT-10 indicated?
POCTech CT-10 CGM system is indicated for detecting glucose trends and tracking patterns in
adults with diabetes. (Reference: User Guide)
2.
What does the POCTech CT-10 CGM system
include?
The POCTech CT-10 CGM system consists primarily of three parts: a glucose sensor, a
Transmitter, and a Receiver. The Receiver also includes a USB-C cable in the Receiver box for
connecting the Receiver for charging and downloading data into the POCTech CT-10 Software.
(Reference: User Guide)
Figure 1. System: Sensor, Transmitter, and Receiver
Figure 2. The Sensor Assembly (Sensor & Inserter)
POCTech CT100C (CT10) CGM
Frequently Asked Questions
March 2020 –Global FAQ Master
Page 2 of 21
Question
Response
3.
What is included in the POCTech CT-10 Welcome
Kit?
The POCTech CT-10 Welcome Kit includes:
CGM Kit
Receiver (contains USB cable inside box)
Transmitter (contains extra battery cover in box)
1 - 10-day Sensor
User Guide
Quick Start Guide
4.
What is included in the POCTech CT-10 Sensor kit?
The POCTech CT-10 Sensor Kit includes:
1 - 10-day Sensor
Quick Start Guide
5.
Does the POCTech CT-10 kit include alcohol wipes
to clean the skin before inserting a new sensor?
No, alcohol wipes are not included.
6.
Where is POCTech CT-10 manufactured?
POCTech CT-10 is manufactured by POCTech in Zhejiang, China.
7.
How is POCTech CT-10 sterilized?
The sensor is sterile in its unopened, undamaged package. Do not use any sensor if its sterile
package has been previously damaged or opened. The sensor is Sterilized using irradiation.
(Reference: User Guide)
8.
How does POCTech CT-10 work?
The POCTech CT-10 glucose sensor is applied by the user to their upper arm or abdomen using
the sensor inserter as per the device’s user manual. The sensor contains a tiny filament which
measures the amount of glucose in the interstitial fluid inside the body. A transmitter which is
attached to the sensor sends real time sensor signals every 3 minutes via Bluetooth®to the
receiver where glucose readings are continuously displayed to the user throughout the day and
night.
9.
Does POCTech CT-10 have a warranty?
Yes, the POCTech CT-10 Receiver and Transmitter are covered by a 2 year warranty.
10.
Is Sensor/Transmitter available in different colors?
No. At this time, it is only available in white.
11.
How should POCTech CT-10 sensors be stored?
POCTECH CT-10 sensors should be stored away from heat and direct light at temperatures
between 2C –30C (35F –86F). Keep POCTech CT-10 Sensors in the individual sealed
package until ready for use. When ready for use, allow sensor 30 minutes to warm up to room
temperature. During normal wear time, sensor should be maintained between temperature 15C –
40C (59F –104F). (Reference: User Guide)
Used POCTech CT-10 sensors should be discarded according to local medical waste
regulations.
Do not use POCTech CT-10 sensor after the expiration date shown on the carton.
Do not use any POCTech CT-10 Sensors that are damaged or shows signs of tampering.
Keep POCTech CT-10 out of the reach of children.
POCTech CT100C (CT10) CGM
Frequently Asked Questions
March 2020 –Global FAQ Master
Page 3 of 21
Question
Response
12.
What if I forget to remove POCTech CT-10 after 10
days?
The POCTech CT-10 system is programmed to collect data for up to 10 full days. To ensure
sensors are not used after 10 days of use, the Receiver will stop data collection automatically
when a 10-day wear period is complete.
13.
Can I wear it longer than 10 days?
To ensure optimum performance the POCTech CT-10 sensors can be worn for up to 10 days. The
Receiver will stop data collection automatically when a 10-day wear period is complete.
14.
How do I prepare my skin before applying the
POCTech CT-10 Sensor?
1. First, choose the upper arm or abdomen for sensor insertion. Avoid skin area with scars,
irritation, rash or other skin problems in the area that you wish to apply the sensor.
2. Use alcohol wipes (or pads) to clean and disinfect the skin.
3. Before you apply the sensor, make sure your skin is clean, dry and hairless.
4. Your skin should be free of any creams, oils, powder, makeup, moisturizer or lotion. These
products may cause the Sensor adhesive to become loose.
5. After transmitter initialization and attachment to the sensor, a medical adhesive dressing tape
((3x4inch) or (7,6x10,2cm), water proof) can be applied over the transmitter/sensor assembly
if desired.
(Reference: User Guide)
15.
Can lotions (moisturizing, tanning, etc.) affect the
POCTech CT-10 Sensor?
To prevent interference with the adhesive properties, the Sensor should not be applied to a skin
area where cream, lotion or powder has recently been applied.
16.
Is it ok to shave the application site before I insert
the Sensor?
It would be best not to shave the insertion site immediately before inserting the Sensor, as the
skin may become sensitive or slightly irritated from shaving. If it is necessary, check the site prior
to application and if irritation or broken skin is present, select another site for application.
17.
Can I open the Sensor packages ahead of time?
Once the individual Sensor package is opened, the Sensor should be inserted immediately.
Always check the expiration date on the Sensor packaging before opening the Sensor. Do not use
expired Sensors.
18.
Can POCTech CT-10 be worn when bathing or
swimming?
Showering: The sensor/transmitter assembly, when properly installed and maintained, is water
resistant to an Ingress Protection Rating of IP27. This means you can submerge in water 1 meter
(3 feet) deep for up to 30 minutes. You can take showers without extra protection. However, due
to differences in wearing times and differences in people’s skin conditions, it is strongly
recommended that you take necessary precautions and measures when engaging in activities
involving water. The additional measures that can be taken include a medical adhesive dressing
tape ((3x4inch) or (7,6x10,2cm), water proof) can be applied over the transmitter/sensor assembly
if desired.
POCTech CT100C (CT10) CGM
Frequently Asked Questions
March 2020 –Global FAQ Master
Page 4 of 21
Question
Response
(Reference: User Guide)
19.
Recommendations for oily skin?
Although unlikely, the sensor may accidentally fall off, usually due to excessive sweating or
movement. Oily skin can make it difficult for the sensor adhesive to adhere firmly. For best results,
gently clean the insertion area with alcohol wipes (or pads) to clean and disinfect the skin. Once
completely dry, immediately insert the Sensor, pressing firmly on the Sensor base and adhesive
tape to achieve a firm adhesion to the skin.
After initializing and attaching the transmitter to the sensor, if desired a medical adhesive dressing
tape ((3x4inch) or (7,6x10,2cm), water proof) can be applied over the transmitter/sensor for extra
security.
20.
Recommendations for athletes?
Depending on the type of athletic activity that you are performing, it is possible that the Sensor
could be affected by sweat, physical impact to the sensor or vigorous body movement in the area
of the body that the sensor is inserted. For best results, gently clean the insertion area with
alcohol wipes (or pads) to clean and disinfect the skin. Once completely dry, immediately insert
the Sensor, pressing firmly on the Sensor base and adhesive tape to achieve a firm adhesion to
the skin.
After initializing and attaching the transmitter to the sensor, if desired a medical adhesive dressing
tape ((3x4inch) or (7,6x10,2cm), water proof) can be applied over the transmitter/sensor for extra
security.
21.
How do I start using POCTech CT-10?
1. First, prepare the Transmitter by installing a new CR1620 battery into the transmitter. You can
use a coin to open and close the battery cover.
2. Second, prepare the Receiver to pair with the Transmitter. Turn on the power of the Receiver
by pressing the ON/OFF switch on the side of the device for more than 3 seconds. The receiver
will search for all nearby Transmitters and displays a list of available Transmitters for pairing.
Check receiver battery. Charge the battery if necessary.
3. Select your transmitter’s serial number on the Receiver screen, and tap “Yes”.
POCTech CT100C (CT10) CGM
Frequently Asked Questions
March 2020 –Global FAQ Master
Page 5 of 21
Question
Response
If you need to adjust the time or date, tap “Config”. Please note, once the transmitter is
synchronized, you will not be able to go back and change the time or date setting.
4. Once you are satisfied with the time and date setting, tap “Sync” to synchronize the Transmitter
and Receiver to each other.
5. Next you will prepare your skin for applying the sensor. Choose upper arm or abdomen for the
sensor location. Then use alcohol wipes (or pads) to clean the skin.
6. You are now ready to apply the sensor. Be sure that you have given the sensor time to warm to
room temperature. Take the sensor from the package and remove the protection film on the
sensor base adhesive tape. Place the sensor on the selected area of cleaned skin, and press the
sensor base firmly onto the skin to secure the adhesive.
7. Remove the orange protection cap from the release button. Adjust the inserter handle until the
skin under the front end of the sensor lifts up slightly. Press the release button to insert the
sensor. You will hear a “click” from the spring release of the insertion.
POCTech CT100C (CT10) CGM
Frequently Asked Questions
March 2020 –Global FAQ Master
Page 6 of 21
Question
Response
8. Now you can remove the inserter lock pin to separate the inserter from the sensor. Press the
arms on the sides of the inserter to disengage the sensor. Discard the inserter.
9. Press down the sensor connection block to lock it into the sensor base.
10.Then slide the transmitter onto the sensor base until it locks in place.
11. It is now time to initialize the sensor. On the Receiver screen you should see the transmitter
serial number and “Start sensor?” If you are now ready, select “Yes” to start the initialization
(warm-up) period which will last for 3 hours.
12. Your sensor is now started! If you like, you can now place medical adhesive tape (3x4inch) or
(7,6x10,2cm) to cover the entire Transmitter/sensor assembly for additional protection.
(Reference: User Guide)
22.
Does POCTech CT-10 require finger stick
calibration?
Yes. The 1st and 2nd day of using a new sensor requires 2 finger stick calibrations. The remaining
days (3 -10) only requires 1 fasting BG calibration in the morning.
POCTech CT100C (CT10) CGM
Frequently Asked Questions
March 2020 –Global FAQ Master
Page 7 of 21
Question
Response
Enter the Blood Glucose (BG) value into the Receiver within 5 minutes of taking the BG
reading.
Do not enter a BG value taken within 2 hours after a meal.
Do not enter BG values when an up or down arrow appears next to the glucose value on
the Receiver. When an up or down arrow appears next to the glucose value, it indicates
the glucose is quickly rising or falling. The Receiver may also give you an alert that “Blood
glucose is unstable. Please recalibrate when glucose becomes stable.”
oIf customer probes for more information: When glucose is increasing or
decreasing quickly, the difference between the blood glucose meter and the CGM
reading can be substantially different. The CGM reading follows behind the finger
stick BG reading. It may be behind by at least 10 minutes or more, especially
during quick or rapid glucose changes.
If there is a large gap between the BG meter reading and the Receiver reading, (30-40%
difference in readings) wash your hands and take a 2nd finger stick. (Reference: Andreas)
EXAMPLE CALIBRATION SCHEDULE
23.
Why is the reading on the CGM different from
BGM?
The CGM reading follows behind the finger stick BG reading. It may be behind by at least 10
minutes or more, especially during quick or rapid glucose changes. When glucose is increasing or
POCTech CT100C (CT10) CGM
Frequently Asked Questions
March 2020 –Global FAQ Master
Page 8 of 21
Question
Response
decreasing quickly, the difference between the blood glucose meter and the CGM reading can be
substantially different.
If there is a large gap between the BG meter reading and the Receiver reading, (30-40%
difference in readings) wash your hands and take a 2nd finger stick. (Reference: Andreas)
24.
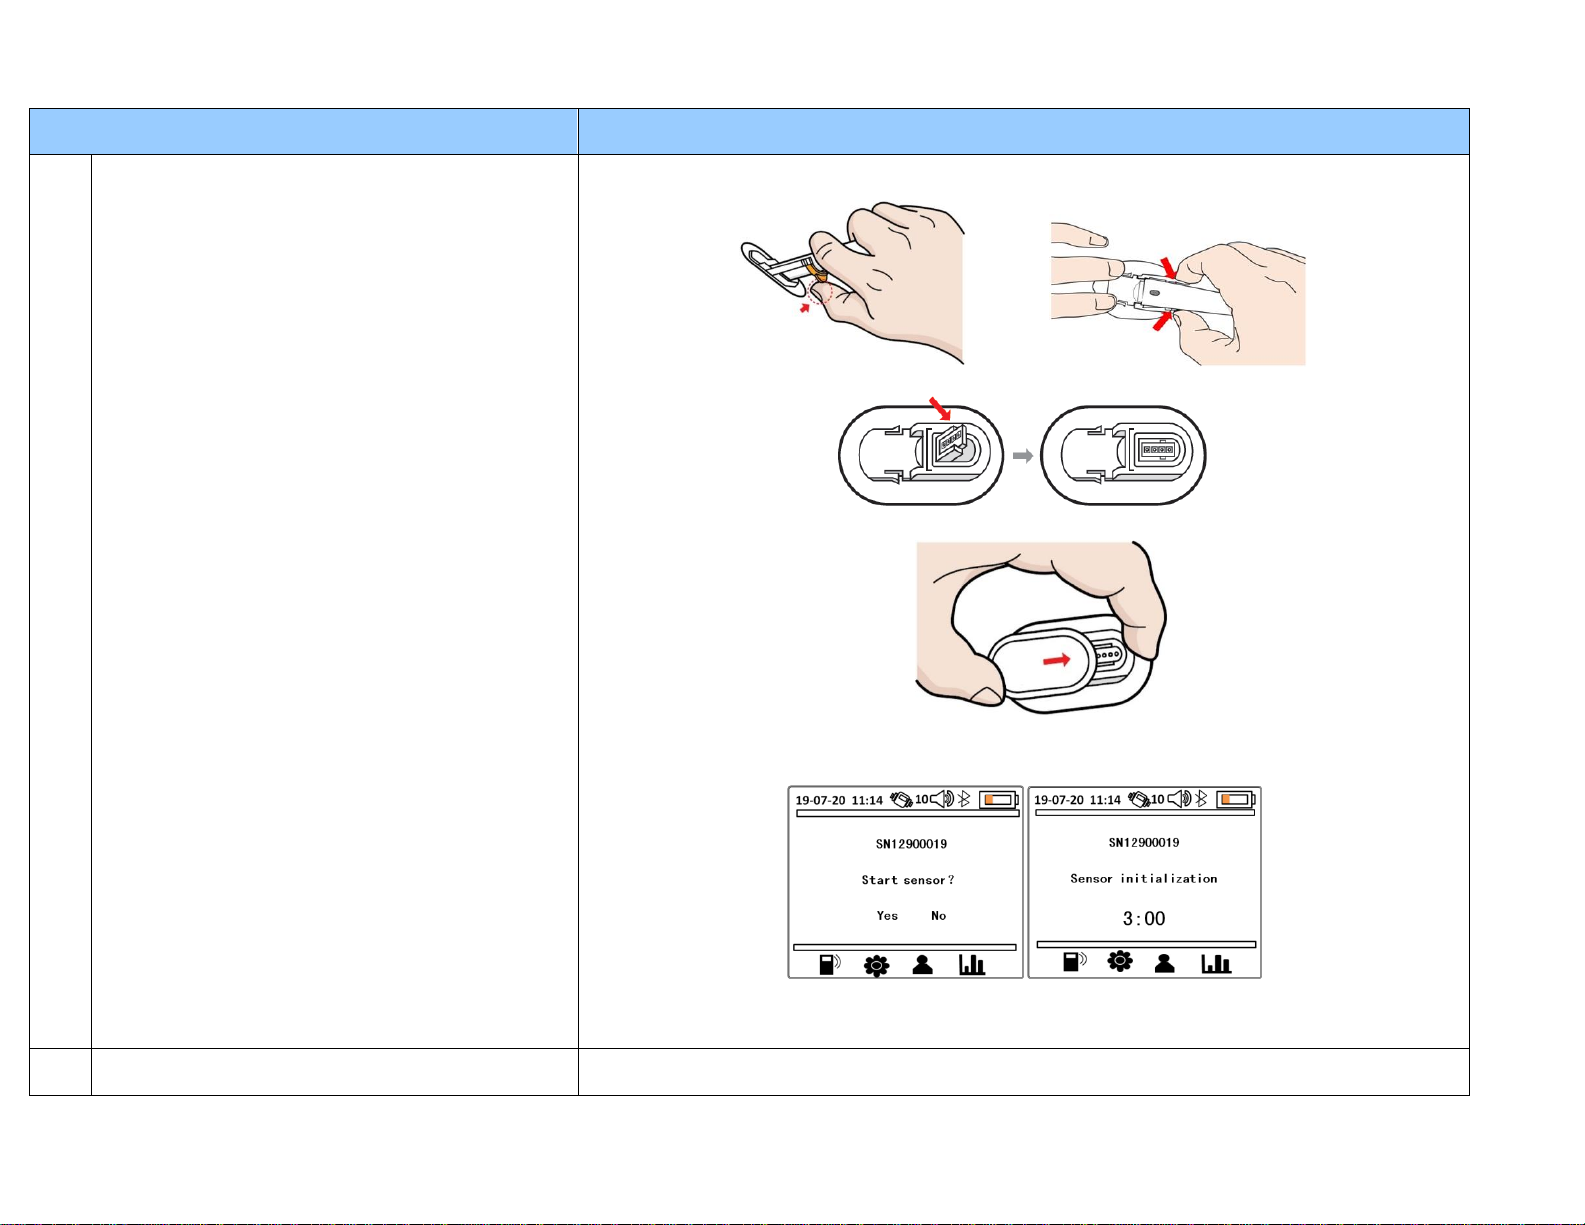
What should I do if there is bleeding after the
sensor is inserted?
If there is bleeding when the sensor is inserted, remove the sensor and insert a new sensor in a
new location.
25.
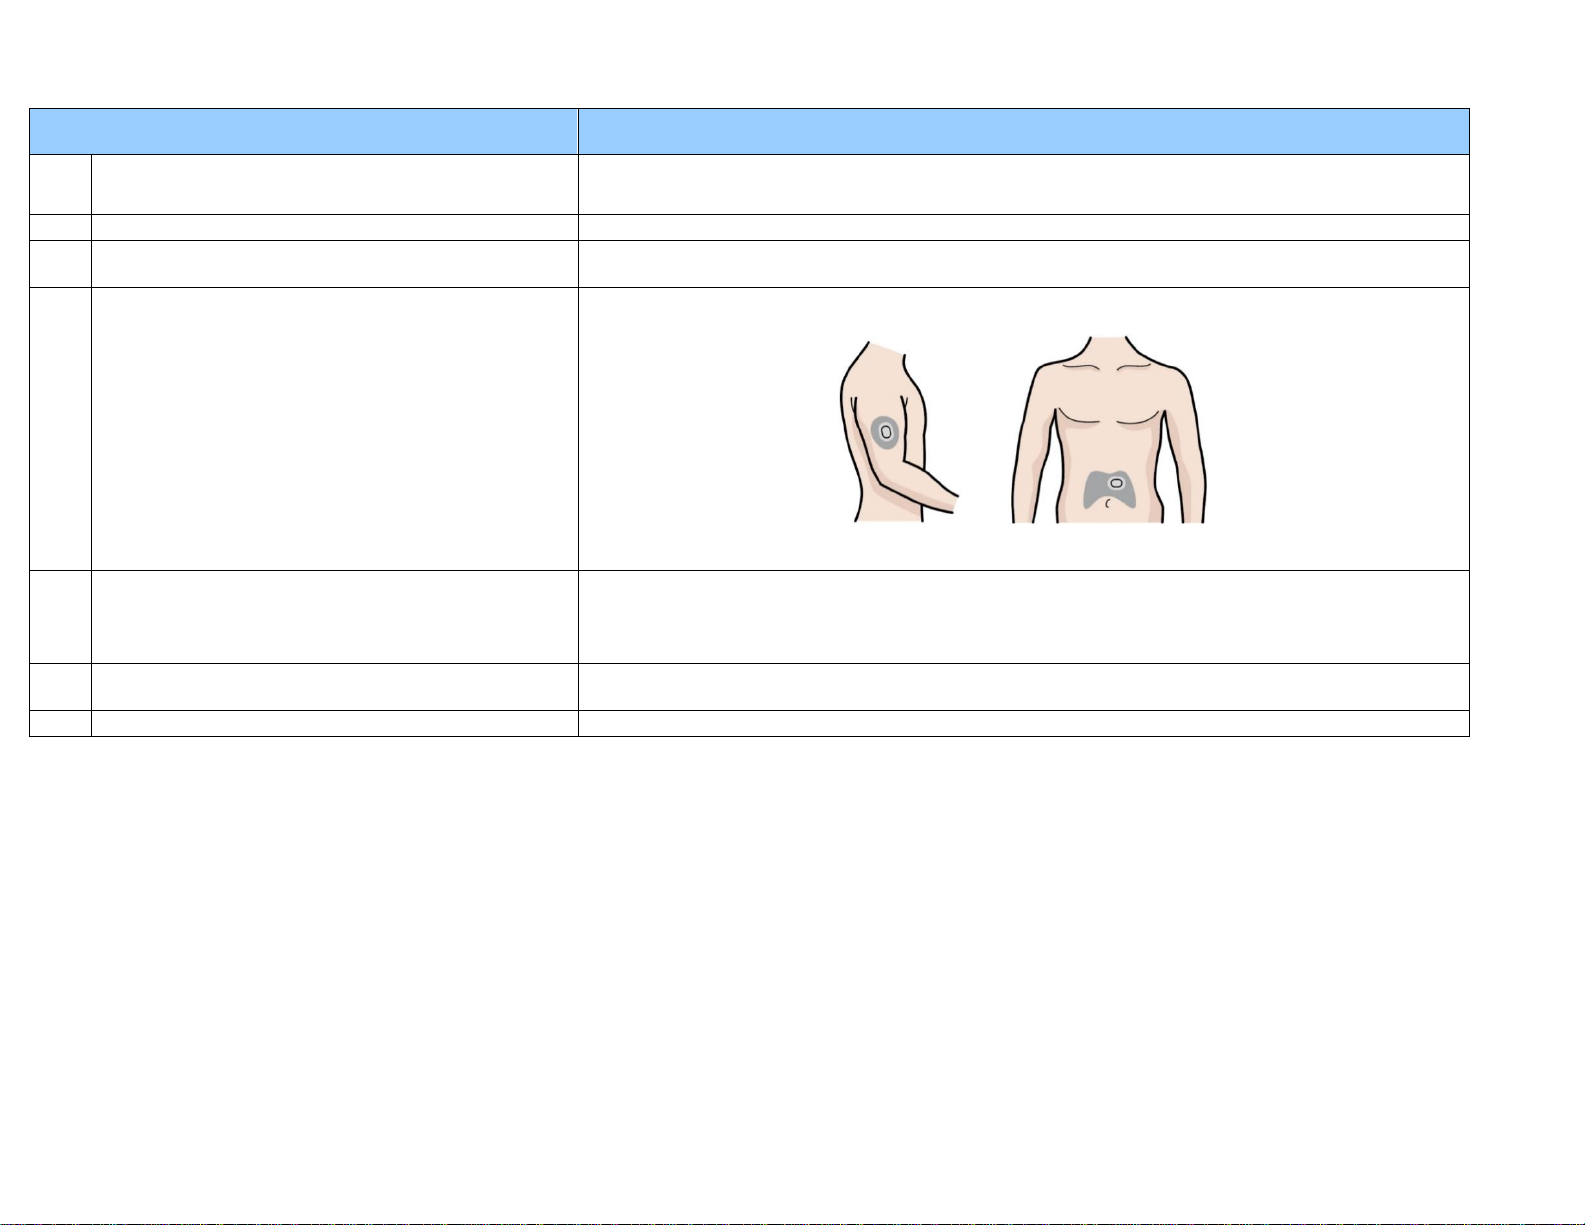
What should I do if the sensor adhesive starts to
peel off?
If the sensor is stable and has not fallen out, you can place medical adhesive tape (3x4inch) or
(7,6x10,2cm) to cover the entire Transmitter/Sensor assembly for additional protection.
26.
When and how often should the POCTech CT-10
Sensor be changed?
The Sensor should be removed after 10 days. (The sensor will last for 9 days and 21 hours after
the 3 hour initialization/warm up period, for a total of 10 full days.)
In case the sensor comes off by accident, do not re-use. Apply a new sensor.
27.
How close does the POCTech CT-10 Transmitter
and Receiver need to be to transfer data?
Keep the receiver within 4 meters. The designated effective distance of the wireless
communication is 4 meters. It is recommended that you carry the receiver at a‖ times. The alert
function will not be available when the transmitter is out of range.
28.
What happens if I am too far away from the
Receiver and the data is interrupted…
When you are too far away from the Receiver, i.e. more than 4 meters, it may lose the connection
with the Transmitter. Once you are back in range of the Receiver, it should automatically
reconnect to the Transmitter. The Receiver will retrieve all of the data from the time period that it
was not connected.
If the Receiver is not able to reconnect to the Transmitter on its own, or if it takes more than 5
minutes, please restart the Receiver. Hold the ON/OFF button on the right side of the Receiver for
at least 3 seconds to shut down the Receiver. Then hold button down again for at least 3 seconds
to restart the Receiver. The Receiver should now automatically reconnect to the Transmitter and
retrieve all of the data from the time period that it was not connected.
29.
How much glucose data is stored on the
Transmitter?
The Transmitter is able to hold all 10-days of the glucose data for the entire wear-time of the
sensor.
30.
How often do I need to charge the Receiver
battery?
The Receiver has a rechargeable battery. The battery indicator on the upper right corner of the
receiver changes color when the battery is low. Make sure to check it regularly and charge the
battery as needed. When the receiver’s battery indicator displays an orange/red color, there are
10 hours of charge left and the receiver should be recharged when convenient.
If the Receiver is not in use for a long period of time, it should be given a full charge at least once
a month.
31.
How do I know when the Receiver is done being
charged?
When charging the receiver, a green battery indicator shows the charging is in progress. It turns
white when the charging is complete. It is recommended that you leave the Receiver plugged in
until the battery indicator turns WHITE.
POCTech CT100C (CT10) CGM
Frequently Asked Questions
March 2020 –Global FAQ Master
Page 9 of 21
Question
Response
32.
How often do I need to change the Transmitter
battery?
The Transmitter battery should be changed every time you insert a new Sensor. A new Sensor
should be applied after 10 days. The Transmitter uses a CR1620 battery.
33.
Can I cut the adhesive tape around the Sensor?
Do not cut or trim the Sensor adhesive tape.
34.
Can I use more than one POCTech CT-10 Sensor
at a time?
The Receiver can only connect to one Transmitter at a time.
35.
Where do I apply the POCTech CT-10 Sensor?
The POCTech CT-10 Sensor can be inserted into the upper arm or abdomen. Avoid skin area with
scars, irritation, rash or other skin problems in the area that you wish to apply the sensor.
Avoid places where the Sensor can be rubbed off by tight clothing.
(Reference: User Guide)
36.
Will the sensor/transmitter collect a full 10 days of
glucose data?
The sensor will last for 9 days and 21 hours after the 3 hour initialization/warm up period, for a
total of 10 full days.
For example: If you start a new sensor on a Monday morning at 9am, the sensor wear time period
will end 10 days later on a Wednesday at 9am.
37.
Can I insert the POCTech CT-10 Sensor over a
tattoo?
The sensor should not be applied on an area of skin with scar tissue. Therefore it is not
recommended to apply the Sensor over a tattoo.
38.
What to do if POCTech CT-10 Sensor falls off?
If the Sensor falls off un-expectantly, do not re-use the sensor. Start a new sensor.
POCTech CT100C (CT10) CGM
Frequently Asked Questions
March 2020 –Global FAQ Master
Page 10 of 21
Question
Response
39.
How do I end the Sensor session?
If you are at the end of the sensor period:
The system is programmed to collect data for up to 10 full days. Data collection automatically
ends when the 10-day period is complete.
If you need to remove the sensor before the end of the sensor period:
Turn off the sensor from the Sensor Menu by holding finger down on the sensor button on the
bottom left of the Receiver screen. Then select “Sensor Off” to disconnect the signal of the
Transmitter to the Receiver.
Remove the sensor together with the transmitter. When removing the
sensor from the skin, peel and lift the sensor base adhesive from one
edge and pull up it firmly until the entire sensor/transmitter assembly
is separated from the skin.
40.
How do I remove the POCTech CT-10 Sensor?
Remove the sensor together with the transmitter. When removing the sensor from the skin, peel
and lift the sensor base adhesive from one edge and pull up it firmly until the entire
sensor/transmitter assembly is separated from the skin.