point POHPC6007 User manual

MULTIFUNCTION
PRESSURE COOKER
1

multifunction pressure cooker.
multifunksjonell trykkkoker. Denne
monitoimipainekeitin.
multifunktions trykkoger
Tack för ditt köp av POINT multifunktionstryckkokare. Dessa
driftinstruktioner hjälper dig att använda den på korrekt och säkert sätt. Vi
rekommenderar att du ägnar lite tid åt att läsa denna bruksanvisning så att
du fullt ut förstår alla operativa funktioner som produkten erbjuder. Läs alla
säkerhetsinstruktioner noggrant innan användning, och förvara
Instruktionsmanualen för framtida referens.
2

4- 21
40- 57
22- 39
58- 75
76- 93
GB
Instruction manual - English.......................page
Bruksanvisning - Norsk................................ side
Käyttöohjeet - Suomi .................................. sivu
Brugsanvisning - Dansk .............................. side
Användarmanua - Svenska ......................... sida
NOFIDKSE
3

Safety instructions
1. Read all the instructions
2. This appliance is for household use only. Do not use
outdoors.
3. This appliance shall not be used by children. Keep the
appliance and its cord out of reach of children;
4. Appliances can be used by persons with reduced physical,
sensory or mental capabilities or lack of experience and
knowledge if they have been given supervision or
instruction concerning use of the appliance in a safe way
and if they understand the hazards involved.
5. Children should be supervised to ensure that they do not
play with the appliance;
6. The heating element surface is subject to residual heat
after use, do not touch.
7. Warning: Avoid spillage on the connector.
8. Warning: Misuse may cause potential injury;
9. The appliance is not intended to be operated by means of
an external timer or a separate remote-control system.
10. Improper installation could cause danger. Please mind of
the right installation.
11. Do not put the pressure cooker into a heated oven.
12. Move the pressure cooker under pressure with the
greatest care. Do not touch hot surfaces. Use the handles
and knobs. If necessary, use protection.
13. Do not let children near the pressure cooker when in use.
14. Do not use the pressure cooker for a purpose other than
the one for which it is intended.
Satety Warning!
4

15. This appliance cooks under pressure. Scalds may result
from inappropriate use of the pressure cooker. Make sure
that the cooker is property closed before applying heat, see
“instructions for use”.
16. Never use your pressure cooker without adding water or
food, this would seriously damage it.
17. After cooking meat with a skin (e.g. ox tongue) which may
swell under the effect of pressure, do not prick the meat
which the skin is swollen; you might be scalded.
18. When cooking doughy food, gently shake the cooker
before opening the lid to avoid food ejection.
19. Never use the pressure cooker in its pressurized mode for
deep or shallow frying of food.
20. Do not tamper with any of the safety systems beyond the
maintenance instructions specified in the instructions for
use.
21. Only use manufacturer’s spare parts in accordance with
the relevant model. In particular, use a body and a lid from
the same manufacturer indicated as being compatible.
22. KEEP THESE INSTRUCTIONS.
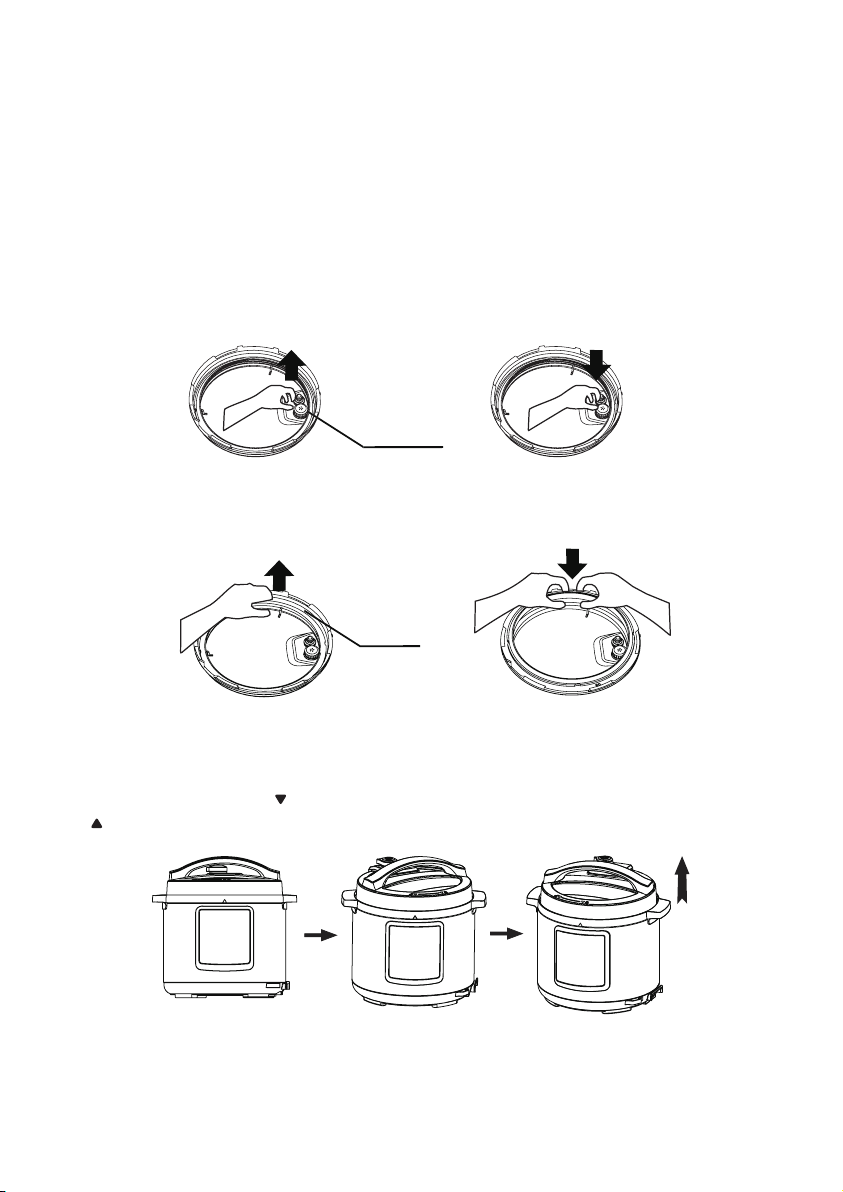
23. When the electric pressure cooker is working, pressure in
the cooker rises, float valve ascends; do not fiercely open
the lid before the pressure has been completely released.
24. If it is difficult to open the lid, please do not open it
fiercely, otherwise, it may cause scalding or physical injury.
25. Do not use in unstable locations.
26. Do not use in locations near water and fire.
27. Do not use near walls and furniture.
28. Do not use in locations exposed to direct sunlight and oil
splatter.
29. Do not approach the stove for avoiding fire.
GB
5

Use 220-240V~ power outlet.
• Failure to use AC 220-240V~ electricity can
cause fire or electric shock.
• Danger of fire if the bad socket is adopted.
A socket shall be used alone.
• A socket of more than 10A rated current
with grounding wire shall be used alone;
• If shared with other electrical appliances,
the socket may cause abnormal heat and
result in fire.
It is strictly prohibited to use other lid.
• It is strictly prohibited to use other lid for
heating, and in the (switching on) process,
the use of non-original lid is not allowed.
• As this may cause electric shock or safety
hazards.
Stop using if the power cord is damaged.
• Replace the damaged power cord with
special soft cord or replace it with special
assembly purchased from the
manufacturer or authorized repair center.
Do not put foreign objects.
• It is prohibited to insert metal shavings,
needles and other foreign matter in the
gap.
• As this may cause electric shock or
movement anomalies.
6

Place the appliance in a location out of reach
of infants.
• Place the appliance in a location out of
reach of infants.
• To avoid electric shock and scald.
Modification is prohibited.
• Modification or repair by nonprofessionals
is prohibited.
• Violation may cause a fire or electric shock.
• Repair or replacement of parts shall be
made in a designated service center.
Check periodically.
• Be sure to check periodically the block
proof cover and exhaust valve core to make
sure that they are not be blocked;
• Do not cover the exhaust valve with heavy
object or replace it with other object.
When pulling the plug, you must pinch the
plug.
• When pulling the plug, you must pinch the
plug;
• Do not pull the power cord, otherwise it
will damage the cord, causing electric
shock and short circuit.
Products may not be immersed or prinkled in
water.
• Doing so could cause electric shock and
electrical short circuits.
Never pull the plug with a wet hand.
• To avoid electric shock.
GB
7

Please turn off and unplug the appliance
before cleaning, maintenance or relocation
and whenever it is not in use.
• Otherwise, it may produce leakage, fire or
failure.
In working, never move your hands to close
to the exhaust port.
• In cooking process, never move your hands
to close to the exhaust port to avoid burns.
• During cooking, do not cover the vent with
a cloth and other items.
When the cooker is working, please do not
touch the lid.
• When the cooker is working, lid has high
temperature, do not touch it;
• Otherwise, it may possibly cause scalding.
The total amount of food and water can not
exceed Max scale.
• Do not fill the cooker beyond 2/3 of its
capacity. When cooking foodstuffs which
expand during cooking, such as rice or
dehydrate vegetables, do not fill the
cooker to more than half of its capacity.
Do not use a pot other than the dedicated
pot.
• When there is foreign object on the
bottom of pot and heating plate surface,
remove the foreign object before use.
• Otherwise, it may cause overheating and
work abnormalities etc.
8

Do not put the inner pot on other appliance
for heating.
• In order to avoid deformation or fault.
• Please use the special inner pot.
When moving the product, please hold the
handle of cooker body.
• When moving the product, do not directly
hold the handle of lid for avoiding lid
dropping.
Product Overview
Spoon
Measuring cup Power Cord
Components
Soup Spoon User Manual
Exhaust valve
Cover
handle
Inner
pot
Handle
Control panel
Control
panel
Power cord socket
Water box
Base
Float valve
Seal ring
Block
proof
cover
GB
Low Normal High
9

Before first use:
Get started:
1. When use for the first time, please take out all accessories from the cooker
body, read the user manual carefully, particularly for the usage and cautions
for avoiding property loss or physical injury for you.
2. Confirm that the float valve, block proof cover and seal ring are correctly
installed before use each time.
1. Opening the lid correctly. Hold the handle of upper cover, turn it anticlockwise
for about 30° till the “ ” mark on the edge of the upper cover aiming at the
“ ” mark on the edge of the housing cover, and then lift the upper cover.
2. Check if the parts and accessories of lid are well installed. Check if the floater
valve and exhaust valve are jammed, confirm if the sealing ring and block
proof cover are well installed.
Disassemble
Pull it out upwards
Install
Press it down to install
block proof
cover
Disassemble
Pull it out upwards
Install
Press it down to install
Seal ring
Operation
10

6. Put the exhaust valve well
• When working, please turn the exhaust valve
to the sealing place, which means the electric
pressure cooker keeps at sealing state;
• For manual exhaust, please turn the exhaust
valve handle to the exhaust place, the
electric pressure cooker keeps at the exhaust
state; when exhausting, do not keep the
hands or face above the exhaust opening;
• Check if the floater valve drops down before
working (before heating, the floater valve is
down).
3. Take out the inner pot, put the foods and water into the inner pot.
• The total amount of foods and
water shall not exceed the Max
marked on the inner pot.
• The max rice and water amount
when cooking shall not exceed
the Max on the inner pot.
4. Put the inner pot into the cooker.
• Wipe to clean the external
surface of inner pot, foreign
object and water are not
allowed on the inner surface of
electric pressure cooker;
• Turn the inner pot to left and right to ensure good contact with
the heating plate.
5. Safely close the lid
• Before closing the lid, check if the sealing ring is well installed.
• Hold the handle of upper cover, aim the “ ” mark on the edge of the upper
cover aiming at the “ ” mark on the edge of the housing cover, put the top
cover horizontally on the cooker body, turn the upper cover clockwise for
about 30° to the lock place, and aim the “ ” mark on the edge of the
housing cover at the “ ” mark on the lid.
Usable Capacity
Max
Sealing schematic
diagram
Exhaust schematic
diagram
GB
11

7. Switch on if the buttons are inactive when use, please confirm if the lid is
closed at the right place, the buttons are inactive if the lid is not closed
correctly for product of this series.
8. Select the required function under the standby
state, refer to the “Operation Guidelines” and
“Cooking program” sections for different function
setting.
9. 10s after selecting the function, the electric
pressure cooker starts working. When the cooker
is working, press the “Cancel” button to cancel
the current work state and return standby state.
10. After cooking, the cooker may automatically enter into the keep warm
state. After cooking, the indicator of corresponding function lights off, the
keep warm indicator lights on, the cooker makes sound and enters into the
keep warm state.
Note: The suggested time of keep warm shall not exceed 2 hours.
11. When the cooker is working, it is normal that it makes some sound.
12. To cook a small amount of foods, the inner pot may possibly be lifted when
opening the lid, please shake the lid to drop the inner pot in the cooker body
and then remove the lid.
Operation Guidelines:
Function Operation Guidelines
• Multigrain
• Soup
• Meat/stew
• Poultry
• Fish
• Steam
• Beans/chili
• Porridge
1. Under standby state, press the function buttons
(Multigrain, Soup, Meat/stew, Poultry, Fish, Steam,
Beans/chili, Porridge) to select function.
2. Press “Adjust” button to change the food flavor to
“Less” or “normal” or “more”.
3. The cooking time is refer to section “Cooking program”
4. 10s later, if no button is pressed, or press “Start”
button, the product automatically starts cooking.
5. The digital screen starts countdown as soon as the
pressure rise to working pressure.
Low Normal High
12

1. Under standby state, press “Rice” button.
2. The cooking time is 14-18min which will be automatic
adjusted by rice quantity.
3. 10s later, if no button is pressed, or press “Start”
button, the product automatically starts cooking.
4. Starts countdown and enters to standby state when it
finishes working.
1. Under standby state, press “Manual” button, the
indicator light is on and the digital screen shows
default working time.
2. Press “+” or “-” button to adjust the pressure cooking
time from 0~90 minutes.
3. 10s later, if no button is pressed, or press “Start”
button, the product automatically starts cooking.
4. Starts countdown and enters to standby state when it
finishes working.
Rice
Manual
1. Under standby state, press “Yoghurt” button, the
indicator light is on and the digital screen shows
default working time.
2. Press “+” or “-” button to adjust the pressure cooking
time from 4~8 hours.
3. 10s later, if no button is pressed, or press “Start”
button, the product automatically starts cooking.
4. Starts countdown and enters to standby state when it
finishes working.
Yoghurt
1. Under standby state, press “Sear” button, the indicator
light is on and the digital screen shows default working
time.
2. The cooking time is 30 min which can not be adjusted.
3. 10s later if no button is pressed or press “Start”
button, the product automatically.
4. Starts countdown and enters to standby state when it
finishes working.
Sear
GB
13

1. Under standby state, press “Slow Cook” button, the
indicator light is on and the digital screen shows
default working time.
2. Press “+” or “-” button to adjust the pressure cooking
time from 2~12 hours.
3. 10s later if no button is pressed or press “Start”
button, the product automatically.
4. Starts countdown and enters to standby state when it
finishes working.
1. After cooking, the electric pressure cooker
automatically enters into the keep warm state, the
keep warm indicator lights on.
2. Under standby state, you may also press the “Keep
Warm” button to keep warm.
3. The digital screen shows the keep warm time, 1 hour
later the screen will show “1H” and 2 hours later it will
show “2H”.
4. Keep warm temperature is 60°C~80°C;
Slow cook
Keep warm
Under any state, press “Cancel” button to cancel the
current work state and return standby state.
Cancel
1. Before the program start, press “Delay” button. The
screen shows the preset beginning time.
2. Press “+” or “-” to adjust the delay time.
3. Then press “Hours/minutes” button to change Hour
and minute.
4. 10s after setting or press “Start” button, the unit
starts delay time countdown. When it countdown to the
end, the program starts working.
Preset cooking
14

Cooking program:
No.
1Rice \
Low
Normal
High
Low
Normal
High
Low
Normal
High
Low
Normal
High
Low
Normal
High
Multigrain
Soup
Meat/Stew
Poultry
Fish
2
3
4
5
6
Functions Flavor
Time of
keeping
pressure
Adjustable
cooking time
range
*14~18min NA
NA
NA
NA
NA
NA
20min
35min
50min
20min
30min
40min
25min
35min
45min
10min
20min
30min
3min
5min
8min
GB
15

Steam
Beans/Chili
7
8
NA
NA
5min
15min
25min
30min
35min
40min
Porridge9NA
10min
20min
30min
10 Manual \30min 0~90min
11 Yoghurt \4:00~8:00
12 Sear \NA
13 Slow Cook \2:00-12:00
14 Keep Warm \
\
\
\
\2:00-12:00
* It will automatic adjust the pressure time per rice quantity
Low
Normal
High
Low
Normal
High
Low
Normal
High
16

After cooking:
Safely open the lid:
1. Cut off power supply or remove the power plug.
2. Exhaust method
• Quickly open the lid. Turn the exhaust valve to the exhaust place for exhausting,
till the float valve drops down. (For non-fluid foods)
• Generally open the lid. Keep the electric pressure cooker cool naturally till the
float valve drops down.
3. Open the lid.
4. Turn the upper cover anticlockwise with the left hand, turn it to the cover open
limit place, lift the upper cover with the right hand to open the lid.
• Note:Do not open the lid before the pressure in the pot has been completely
released, do not open the lid fiercely if it is difficult to open.
• Note: Do not pull out the exhaust valve when turning the exhaust valve.
• Note: After cooking fluid foods (porridge and soup), do not turn the exhaust
valve, please cut off power supply to make it cool naturally till the float drops
before opening the lid.
• Note: After cooking a large amount of foods, please do not immediately
exhaust, it is suggested to keep warm for a certain moment before opening the
lid.
Exhaust valve:
• Pull out the exhaust valve from the lid after open the lid. Clean the internal side
of the exhaust valve and the exhaust valve and float valve of the lid with brush
and cloth at least once a month.
Sealing gate:
• Remove oil and dirt from the sealing gate with detergent and brush. The
remained oil and dirt in it may appear in yellowish. After washing, it may recover
to the original color as stainless steel. It is suggested to clean the sealing gate
once every 2 months.
Water box:
• After cooking, the steam may stay in the water box of the external pot as water.
Water in the box should be removed for avoiding bad odor, please clean it with
clean cloth.
GB
17

Block proof cover and seal ring:
1. After use, please clean the seal ring and around of block proof cover for avoiding
jamming the cover, keep it clean to avoid bad odor.
2. Please do not pull the seal ring, otherwise, the distorted seal ring may influence
the seal and pressure effect.
3. Do not use the damaged seal ring, please replace it at the authorized repair
office.
Inner pot:
1. Do not empty
It may cause yellowish and spotted inner pot or distorted bottom if it is empty
for a long time.
2. Do not use it to store the acid, alkali and preserved foods for a long period.
3. Keep it clean to prolong the service life
4. Do not immerse it in water for a long period.
1. Clean after each use.
2. Before cleaning and maintenance, please unplug the power cord until the product
cools.
3. Remove the lid and inner pot, clean with detergent first, then rinse well with
water, and wipe dry with a soft cloth. Do not use a metal shovel or other hard
tool, otherwise it will damage the inner surface of pot.
4. Clean the internal side of the lid with water, the seal ring, block proof cover,
exhaust valve core and float valve can be removed for washing, timely and
correctly install them after washing, and then dry the internal side of lid with
cloth.
5. Wipe clean the cooker body with a rag, and it is prohibited to soak the cooker
body in water or spray water to it.
Cleaning:
1. Periodically clean the cooker and remove oil and dirt if it is stored on the table.
2. Put the electric pressure cooker 30cm away from other kitchen appliances.
Maintenance:
18

Trouble shooting
Problem
Difficult to
close the lid
Sealing ring not installed
properly
The floater valve clamps the
push rod
Position the sealing ring well
Lightly push the push rod
Difficult to
open the lid
Float valve in the popped-up
position
Pressure exists inside the
cooker
Press the float valve lightly with a
chopstick.
Open the lid after the pressure is
completely released.
Steam leaks
from the lid
Sealing ring installed
improperly
Food debris attached to the
sealing ring
Sealing ring damaged
The lid is not closed correctly
Install the sealing ring as required
Clean the sealing ring
Replace the sealing ring
Close the lid correctly
Steam leaks
from float
valve
Food debris on the float valve
gasket
Float valve gasket worn-out
Clean the float valve gasket
Replace the float valve gasket
Float valve
unable to rise
Too little food and water in
inner pot
Steam leaks from the lid or
exhaust valve
Add water and food according to
the recipe
Send to the service center for repair
Steam comes
out from
exhaust valve
non-stop
Exhaust valve not in sealing
position
Pressure control fails
Turn the exhaust valve to the
sealing position
Send to the service center for repair
Power
indicator
doesn’t light
on
Power socket bad contact Please check the power socket
Display
screen
displays E1
Bottom sensor fault Send to the service center for repair
Display
screen
displays E2
Bottom sensor fault Send to the service center for repair
Reason Cause
GB
19

Display
screen
displays C1
High temperature since there
isn’t water in the inner pot
Add water according to the
requirement
Put the inner pot correctely
Display
screen
displays E8
Pressure switch fault Send to the service center for repair
Rice half
cooked or
too hard
Too little water
Lid opened prematurely
Add water accordingly
After cooking cycle completes,
leave the lid on for 5 more minutes.
Rice too soft Too much water Reduce water accordingly
Specifications
POHPC6007
1000 W
AC 220-240 V, 50/60 Hz
5.7 L
80 kPa
5.3 kg
330 x 310 x 320 mm
- Multi pressure cooker
- Measuring cup
- Rice scoop
- Soup spoon
- Power cable
- User manual
Model no
Rated power
Rated voltage
Pot capacity
Working pressure
Included in the
packaging
Size
Weight
20
Table of contents
Languages: