Pokini Tab K11B User manual

Pokini Tab K11B
Quick Start Guide
English

2
Table of Contents
Before you start .................................................................................................................
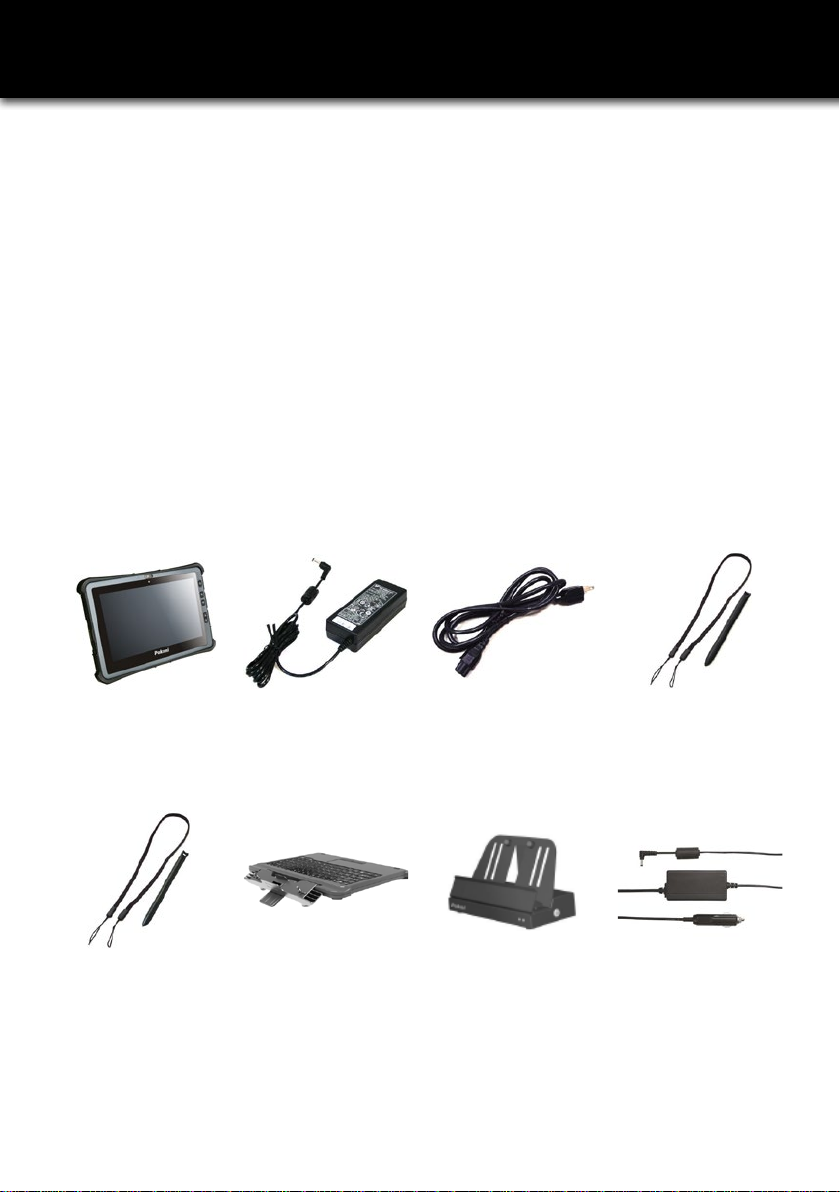
Package Contents .............................................................................................................
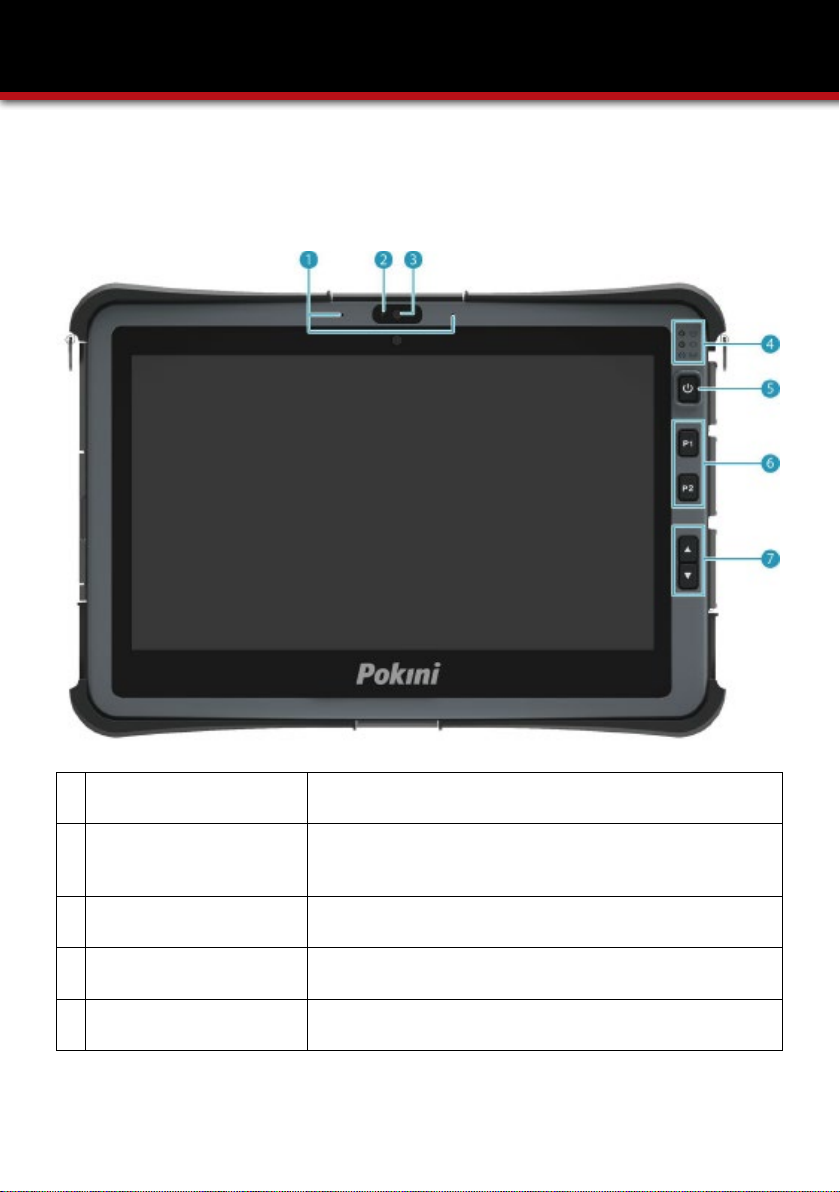
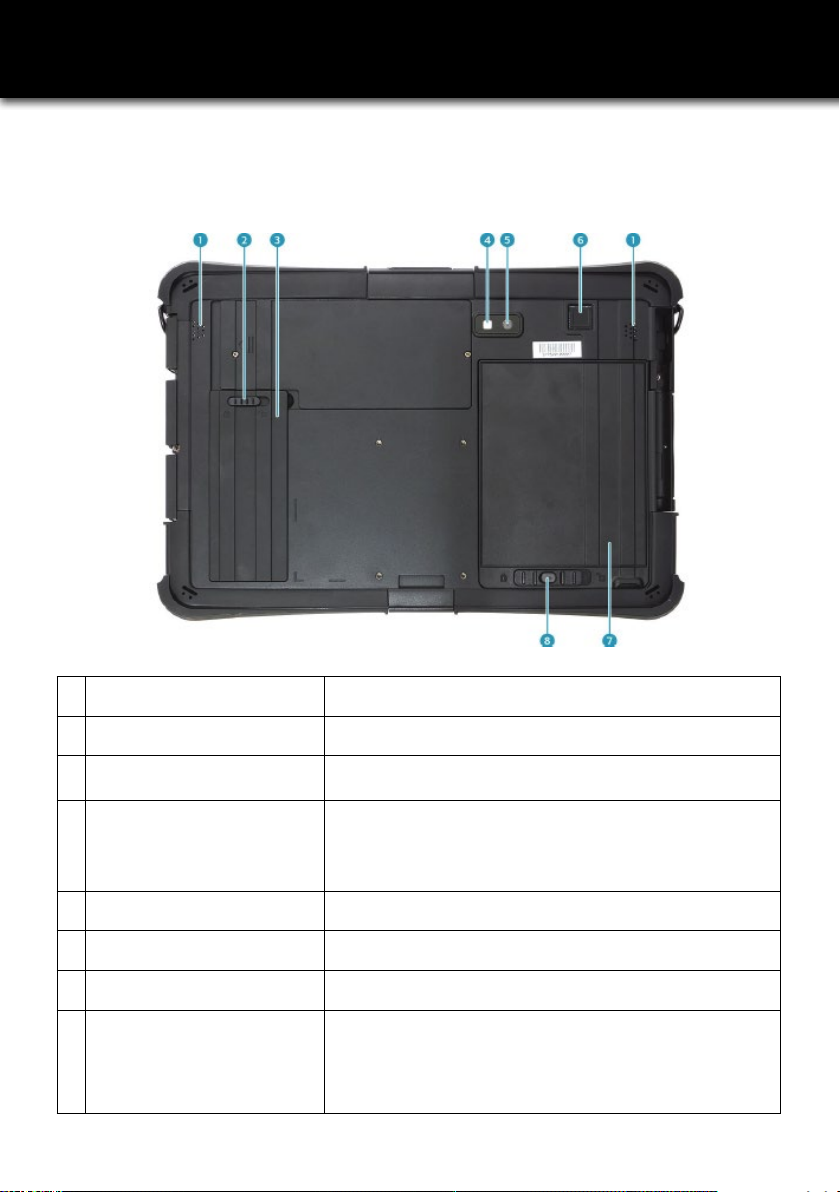
Product Overview ..............................................................................................................
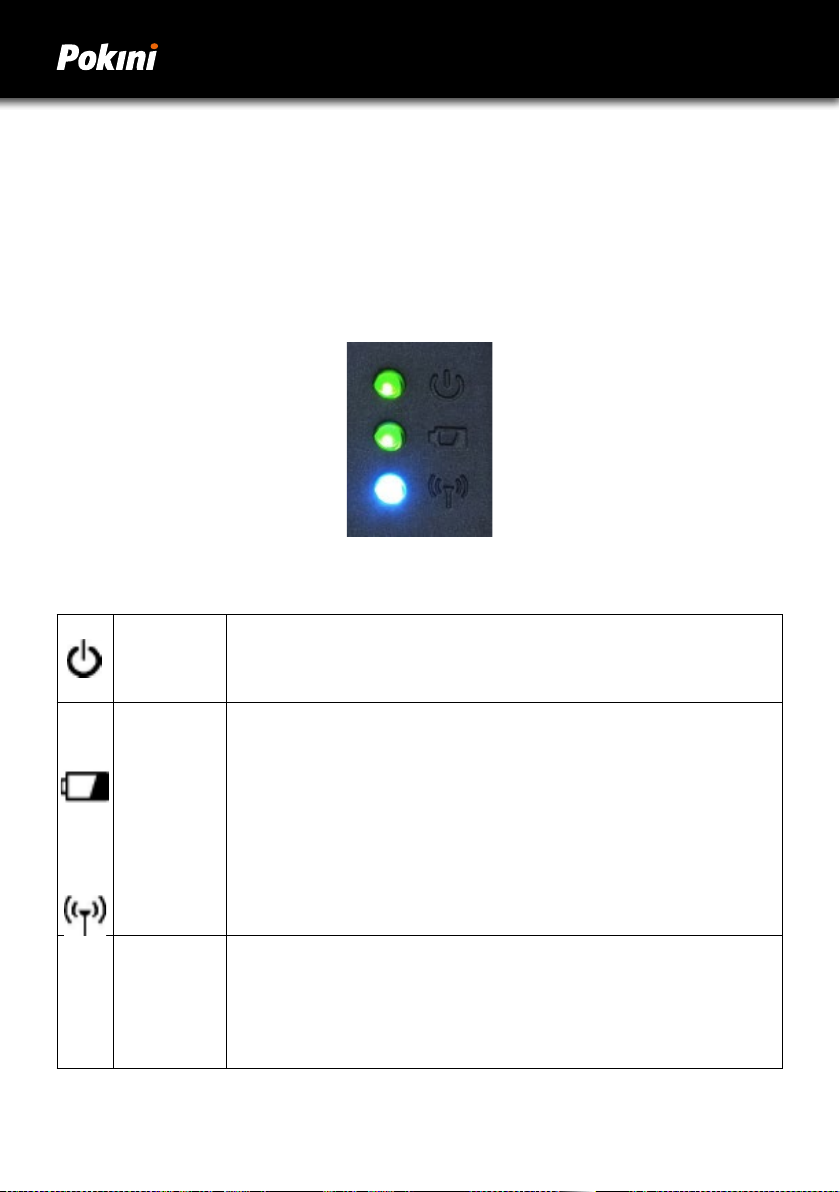
Status Indicators ...............................................................................................................
Getting started ..................................................................................................................
Installing the Battery
Removing the SSD Kit
Installing the SSD Kit
Connecting the Power
Starting your Tablet Pc
Operating your Tablet PC ................................................................................................
Using the Quick Menu
Unsing the Camera
Making Connections ........................................................................................................
Installing the Memory Card
Installing the SIM Card
Installung the Smart Card
Connecting the Microphone / Headset
Connecting USB Devices
Connecting external Display
Connecting to Wireless Connections
Using the BIOS Setup Utility ...........................................................................................
Bios Setup Menu
Main Menu
Advanced Menu
Boot Menu
Security Menu
Save & Exit Menu
Appendix .............................................................................................................................
Copyright
Regulatory Statement
Safety Instructions
3
3
5
10
11
15
23
32
39

3
English
Before You Start
Congratulations on your purchase of this Tablet PC. This fully-rugged Tablet PC is
portable and provides users with maximum mobile computing experience in a wide
range of working enviroments. Bevor you begin using your tabelt PC, read this chap-
ter to familiarize yourself with the main computents installed in the system.
Package Contents
If any of following items is damaged, please contact your retailer.
Tablet PC AC adapter Power cord Capacitive
stylus pen
Digitizer pen
(for panel with DG
function)(optional)
Keyboard dock
(optional)
Oce dock
(optional)
Car adapter
(optional)

4
bay battery
charger (optional)
2-bay battery
charger (optional)
Folio Case
(optional)
Rotate strap
(optional)
Shoulder
strap
(optional)
Soft handle
(optional)
Note: The pictures are for reference only, actual items may slightly differ. Decla-
ration of product weight: 1,39kg. The actual weight may varies by conguration.

5
English
Product Overview
Front View
1 Microphones Record the surrounding sound.
2 Ambient light sensor Use to detect the current level of visible light in the
surrounding environment.
3 Front camera Use for video conference.
4Status indicators Indicate the corresponding function status.
5 Power button Press to turn your tablet PC on or off.

6
6Programmable
buttons
P1: Press to activate the assigned function.
- Stealth mode button (by default).
- Night Vision button.
- Disable (no function).
P2: Press to activate the assigned function. Scanner
button (if the barcode scanner is integrated).
- Touch screen mode selection.
- Shortcut key for launching the specic application.
- Disable (no function).
7Up/Down buttons
Press Up to activate the assigned function.
- Increase the LCD panel brightness level
(by default).
- Increase the volume level.
- Disable (no function).
Press Down to activate the assigned function.
- Decrease the LCD panel brightness level (by default).
- Decrease the volume level.
- Disable (no function).

7
English
Product Overview
Back View
1Speakers Emit sound.
2 SSD kit latch vck the SSD kit in place.
3 SSD kit compartment Contain the SSD module.
4Camera LED ash Provide additional lighting when taking
pictures under low light environment.
5 Rear camera Use to take pictures.
6Fingerprint scanner Scan the ngerprint for biometric identication.
7 Battery compartment Contain the battery.
8Battery latch
release button
Press and hold the button to slide the battery
latch to the unlock position.

8
Top View
1 RS232 port (for selected model) Connect a serial peripheral device.
2 USB port (for selected model) Connect a USB peripheral device.
3 Barcode scanner (for selected model) Scan barcodes.
4 USB-Type-C-Port (for selected model) Connect a USB peripheral device.
Bottom View
1
RF Pass-thru
connector
(for selected model)
Use for the external WLAN antenna.
2 Use for the external GNSS antenna.
3 Scan barcodes.
4Docking connector Connect the tablet PC to a docking station.

9
English
Left View
1 Strap holes Attach the strap for the stylus pen.
2 Kensington lock slot Connect a Kensington-compatible security lock.
3Smart card reader
(for selected model) Use to insert smart cards.
Right View
1DC-in jack Connect the power adapter.
2HDMI Port Connect to an external display.
3 USB 3.1 port Connect USB 3.1 peripheral devices.
4 RJ-45 jack Connect to a local area network (LAN) using an Ethernet cable.
5 Memory card slot
Use to insert memory cards to transfer pictures, music,
and data between your Tablet PC and ash compatible
devices. The card reader supports micro-SDHC and
micro-SDXC.
6 SIM card slot Use to insert a SIM card for WWAN module connection.
7 Audio Combo jack Connect a headphone or an external speakers or microphone.

10
Status Indicators
The status indicators of the tablet PC light up when a particular function of the tablet
PC is active.
Power The LED always lights on (green) when the system is running.
When the system is in sleep mode, the LED blinks.
Battery
Indicate the battery status:
Green: when battery is fully charged (95% or above)
Orange: when battery is charging
Flashing orange: charging error
Red: when battery capacity is lower than 10%
Off: when discharged
Windows
Airplane
mode
Indicate the airplane mode status:
Blue: the airplane mode is disabled
Off: the airplane mode is activated

11
English
Getting Started
This chapter will help you get started using the device.
Installing the Battery
To install the battery, follow the steps below:
1. Align and insert the battery to the
battery compartment.
2. Push completely until the battery locks into place.
3. Slide the battery latch to the lock
position to secure the battery.
Charging the Battery
The Lithium-ion battery is not fully-charged upon purchase. To charge the battery,
follow the steps below:
1. Install the battery to your tablet PC. See procedures above.
2. Connect the AC adapter to the DC-in jack of your tablet PC.
3. Connect the AC adapter to the power cord.
4. Plug the power cord to an electrical outlet.

12
When to replace the Battery Pack
The battery performance gradually decreases over time and usage. We recommend
you to replace your battery pack after 18 to 24 months of usage.
Removing the Battery
To remove the battery, follow the steps below:
1. Press and hold the battery latch release
button to slide the battery latch to the
unlock position.
2. Remove the battery out of the battery
compartment.
2. Remove the SSD kit out of its
compartment.
Removing the SSD Kit
To remove the SSD kit, follow the steps below:
1. Slide the SSD kit latch to the unlock position.

13
English
Installing the SSD Kit
To install the SSD kit, follow the st
eps below:
1. Align and insert the SSD kit to its
compartment.
2. Slide the SSD kit latch to the lock
position to secure the SSD kit.
Connecting the Power
Your tablet PC can be powered up using the AC adapter or the Lithium-ion battery.
Connecting the AC Adapter
The AC adapter powers up your tablet PC and charges the battery.
1. Connect the AC adapter to the DC-in jack of your tablet PC.
2. Connect the AC adapter to the power cord.
3. Plug the power cord to an electrical outlet.

14
Using Battery Power
1. Install a charged battery in the battery compartment.
2. Remove the AC adapter (if plugged). Your tablet PC will automatically use the
battery power.
Note: If your tablet PC is connected to an electrical outlet and the battery is
installed, your tablet PC uses power from the electrical outlet.
Starting Your Tablet PC
Turning On Your Device
Press the button until the Power LED
lights up.
Turning Off Your Device
It is important to properly shut down
your tablet PC to avoid the loss of unsa-
ved data. To shut down your tablet PC,
do the following:
Tab > > Shut down.
Wait for your notebook to turn off power
completely before removing the power
source (if necessary).

15
English
This chapter will guide you on how to use your Tablet PC.
Using the Quick Menu
To enter the Quick menu, tap the arrow on
the task bar to display hidden icons. Then
tap the Quick Menu icon
You can also access the Quick menu
in the All apps list.
Quick Menu Overview
Operating Your Tablet PC
Note:
If the tab is green (i.e. ),
this indicates the current function
is activated.

16
Viewing the Version Information
On the Version section, you can view the Bios
version, EC version, and Quick Menu version.
Viewing the Battery Charge Cycles
On the Battery Charge Cycles section,
you can view the battery charge cycle
and battery status.
Conguring the Programmable Button
(P1)
On the P1 Button Setting section, you
can assign the function for the P1 but-
ton.
There are three available options for P2:
- Touch Screen Mode: Toggle the touch screen mode.
- Launch Application: Shortcut key for launching the specic application. To assign
The application, refer to the “Assigning an Application the P2 Button” section.
The default application is Quick menu.
- Barcode trigger: Scan the barcode (if the barcode scanner is integrated).
- Off: No function.
Conguring the Programmable Button
(P2)
On the P2 Button Setting section, you
can assign the function for the P2 but-
ton.
There are three available options for P1:
- Stealth Mode:
Turn off the LCD backlight, LEDs, speakers, camera ash, and RF devices.
- Night Vision Mode: Adjust the brightness of the LCD under 1.7 nits and turn off the
LEDs and camera ash.
- Off: No function.

17
English
Assigning an Application the P2 Button
Tap the P-Key tab to assign an application to the P2 button. Select the desired appli-
cation and click Open.
Configuring the Up/Down Keys (UP / Down)
On the Up/Down Button Setting section, you can assign the function for the Up and
Down buttons.
There are three available options:
- Brightness adjustment: Adjust the LCD panel brightness level.
- Volume adjustment: Adjust the volume level.
- Off: No function.

18
Accessing the Mobility Center
Tap the Mobility Center tab to adjust or congure the brightness, volume level, bat-
tery status, screen orientation, external display, sync, and presentation settings.
Configuring the Touchscreen Settings
Your tablet PC is equipped with a touchscreen. Using the touchscreen, you can na-
vigating the screen by using touch gestures (any input from your nger, a glove, or
a stylus).
CAUTION! - Do not use any sharp object on the touchscreen to prevent scratches.
Note: An optional protect lm has been attached to the screen before ship-
ment. You should change the lm when it gets worn out.
Select one of the available options:
: Select Finger/Water if you are using your ngertips.
: Select Glove if you are wearing gloves.
: Select Stylus if you are using a stylus.
Note:
- If the touch screen mode is set to Glove or Stylus and the touchscreen is wet
(i.e. spilled by liquid), the touch function will not respond to any input. Make
sure to keep the screen dry to ensure proper operation.
- If you assign the P2 button as Touch Screen Mode (refer to page 20), you can
easily switch the touch screen mode by simply pressing the P2 button.

19
English
Configuring External Antenna Switching Mode
Select the respective external antenna tab to congure the setting.
- Tap the Wi-Fi Antenna tab to enable/disable the device to automatically switch to
the external WLAN antenna when it is axed on a docking station.
- Tap the LTE Antenna tab to enable/disable the device to automatically switch to
the external WWAN antenna when it is axed on a docking station.
- Tap the GPS Antenna tab to enable/disable the device to automatically switch to
the external GPS antenna when it is axed on a docking station.
Note: If the tab is green, this indicates the current function is activated.
Configuring Adaptive Brightness Settings
Tap the Adaptive Brightness tab to enable/disable the device to automatically adjust
the brightness level according to the ambient light.

20
Using the Camera
Using the Camera application, you can use this tablet PC to take photos or videos.
Opening Camera App
To access the Camera application, do one the following:
a. Tap > Camera.
Taking Photos
Tap to capture a photo
Note: To switch between front and
rear cameras, tap
Table of contents
Other Pokini Tablet manuals

Pokini
Pokini Tab M10 User manual

Pokini
Pokini Tab K11 User manual

Pokini
Pokini Tab G10 User manual

Pokini
Pokini tab E10B User manual

Pokini
Pokini Tab A8B User manual

Pokini
Pokini Tab A10B User manual

Pokini
Pokini Tab K10 User manual

Pokini
Pokini K11 User manual

Pokini
Pokini Tab K11 User manual

Pokini
Pokini Tab E11 User manual