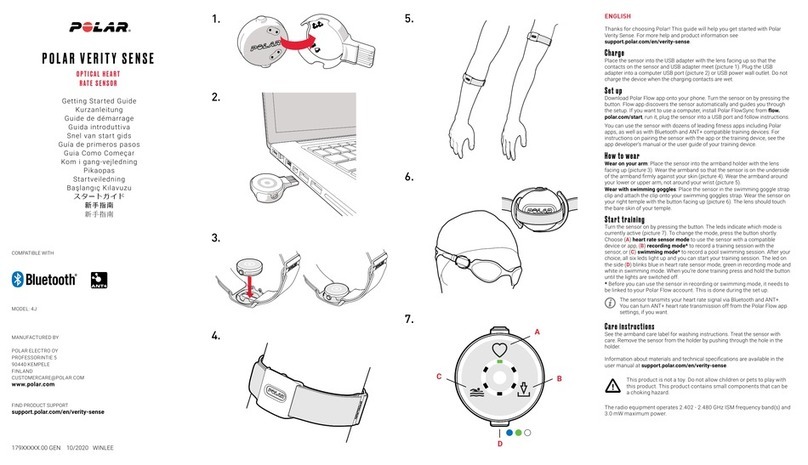
Polar Electro Polar OH1 User manual

USER MANUAL

2
CONTENTS
Contents 2
Polar OH1 User Manual 5
Introduction 5
Get connected to the Polar ecosystem and get the most out of your OH1 6
Setting up your OH1 7
Choose one option for setup 7
Option A: Set up with your computer via FlowSync 7
Option B: Mobile setup with Polar Flow app when you have a Polar wrist unit 7
Option C: Mobile setup with Polar Beat when you don't have a Polar wrist unit 8
Button functions and LEDs 8
Button Functions 9
LED Guide 9
During charging 9
After setting power on 9
When used as a sensor 9
When used as an independent training device 9
During fitness test 9
Other 10
Wearing your OH1 10
When measuring heart rate from your forearm or upper arm 10
When measuring heart rate from your temple in swimming 10
Pairing 11
Pair a mobile device with your OH1 11
Pair OH1 with a Polar wrist unit 12
Pair OH1 with Polar Beat 12
Updating the firmware 12
With mobile device or tablet 12
With computer 13
Heart rate training 14
Measuring heart rate with your OH1 14
Start a training session 14
Start a training session as an independent training device 14
Start a training session with a Polar wrist unit 15
Start a training session with Polar Beat 15
Polar Flow App 16
Training data 16
Activity data 16
Sleep data 16
Sport profiles 16
Image sharing 16
Start using the Flow app 17
Polar Flow Web Service 17
Diary 17
Reports 17
Programs 18

3
Syncing 18
Sync with Flow mobile App 18
Sync With Flow Web Service Via FlowSync 19
Battery 20
Charging OH1 battery 20
Caring for your OH1 21
Keep your OH1 clean 21
Take good care of the optical heart rate sensor 21
Storing 21
Service 21
Precautions 21
Interference during training 22
Minimizing risks when training 22
Technical specification 23
OH1 23
Polar FlowSync Software 23
Polar Flow mobile application compatibility 24
Water resistance of Polar products 24
Limited International Polar Guarantee 25
Disclaimer 26
Contents 2
Polar OH1 User Manual 5
Introduction 5
Get connected to the Polar ecosystem and get the most out of your OH1 6
Setting up your OH1 7
Choose one option for setup 7
Option A: Set up with your computer via FlowSync 7
Option B: Mobile setup with Polar Flow app when you have a Polar wrist unit 7
Option C: Mobile setup with Polar Beat when you don't have a Polar wrist unit 8
Button functions and LEDs 8
Button Functions 9
LED Guide 9
During charging 9
After setting power on 9
When used as a sensor 9
When used as an independent training device 9
During fitness test 9
Other 10
Wearing your OH1 10
When measuring heart rate from your forearm or upper arm 10
When measuring heart rate from your temple in swimming 10
Pairing 11
Pair a mobile device with your OH1 11
Pair OH1 with a Polar wrist unit 12
Pair OH1 with Polar Beat 12
Updating the firmware 12
With mobile device or tablet 12
With computer 13
Heart rate training 14

4
Measuring heart rate with your OH1 14
Start a training session 14
Start a training session as an independent training device 14
Start a training session with a Polar wrist unit 15
Start a training session with Polar Beat 15
Polar Flow App 16
Training data 16
Activity data 16
Sleep data 16
Sport profiles 16
Image sharing 16
Start using the Flow app 17
Polar Flow Web Service 17
Diary 17
Reports 17
Programs 18
Syncing 18
Sync with Flow mobile App 18
Sync With Flow Web Service Via FlowSync 19
Battery 20
Charging OH1 battery 20
Caring for your OH1 21
Keep your OH1 clean 21
Take good care of the optical heart rate sensor 21
Storing 21
Service 21
Precautions 21
Interference during training 22
Minimizing risks when training 22
Technical specification 23
OH1 23
Polar FlowSync Software 23
Polar Flow mobile application compatibility 24
Water resistance of Polar products 24
Limited International Polar Guarantee 25
Disclaimer 26

5
POLAR OH1 USER MANUAL
This user manual helps you get started with your new OH1. For OH1 video tutorials and FAQs, go to
support.polar.com/en/OH1.
INTRODUCTION
Congratulations on your new Polar OH1!
Polar OH1 is a compact optical heart rate sensor that measures heart rate from your arm or temple. It's
versatile and offers a great option to heart rate chest straps and wrist-based heart rate devices. With Polar
OH1 you can broadcast your real-time heart rate to your sports watch, smart watch or Polar Beat or other
fitness app via Bluetooth, and simultaneously to ANT+ devices. Polar OH1 has an inbuilt memory so you
can start your workout with OH1 alone and transfer the training data to your phone afterwards. It comes
with a comfortable machine-washable armband and a swimming goggle strap clip (in Polar OH1 + product
package).
It can also be used with Polar Club, Polar GoFit and Polar Team app.

6
GET CONNECTED TO THE POLAR ECOSYSTEM AND GET THE MOST OUT OF
YOUR OH1
Get the Polar Flow app or Polar Beat from the App Store®or Google PlayTM. Sync your OH1 with one of the
apps after training, and get an instant overview and feedback of your training results and performance.
Sync your training data to the Polar Flow web service with the FlowSync software on your computer or via
the mobile apps. In the web service you can plan your training, track your achievements, get guidance and
see detailed analysis of your training results. Let all your friends know about your achievements, find
fellow exercisers and get motivation from your social training communities. Find all this at flow.polar.com.

7
SETTING UP YOUR OH1
We recommend that you charge the battery before you start using your OH1. If the battery is completely
empty, it may take a moment for the charging to start. See Batteries for detailed information on charging
the battery.
Note that when your OH1 battery has enough power it will advertise itself to all compatible receivers
nearby.
Choose one option for setup
A. Wired computer setup is quicker and you can charge your OH1 at the same time, but you need a
computer available. This method requires an internet connection.
B&C. Mobile setup is convenient if you don't have access to a computer with a USB port, but it might take
longer. This method requires an internet connection.
Fill in all the physical details required for accurate training data at once, and get the latest firmware for
your OH1.
OPTION A: SET UP WITH YOUR COMPUTER VIA FLOWSYNC
1. Place the sensor into the USB adapter
with the lens facing up so that the
contacts on the sensor and the USB
adapter meet (picture 1).
2. Plug the USB adapter into your
computer USB port (picture 2), and go
to flow.polar.com/start and install
Polar FlowSync data transfer software
to your computer.
3. Sign in with your Polar account or
create a new one. We’ll walk you
through the sign-up and setup within
the web service.
After the setup is done, you’re ready to
go. Have fun!
OPTION B: MOBILE SETUP WITH POLAR FLOW APP WHEN YOU HAVE A POLAR
WRIST UNIT
Polar OH1 connects to the Polar Flow mobile app wirelessly via Bluetooth and ANT+, so remember to have
Bluetooth turned on in your mobile device.

8
ANT+ is by default on when you train and sends your HR signal to compatible devices nearby. You can
turn off ANT+ in the Polar Beat app settings if you want.
Check the Polar Flow app compatibility at support.polar.com.
1. Download the Polar Flow app onto your mobile device.
2. Turn Bluetooth® on, and open Flow app on your mobile device.
3. Turn OH1 on by pressing the button until the LED is switched on, Flow app then prompts you to
start pairing. Accept the pairing request and follow the on-screen instructions.
After the setup is done, you’re ready to go. Have fun!
OPTION C: MOBILE SETUP WITH POLAR BEAT WHEN YOU DON'T HAVE A POLAR
WRIST UNIT
Polar OH1 connects to the Polar Beat mobile app wirelessly via Bluetooth and ANT+, so remember to have
Bluetooth turned on in your mobile device.
ANT+ is by default on when you train and sends your HR signal to compatible devices nearby. You can
turn off ANT+ in the Polar Beat app settings if you want.
Check the Polar Beat app compatibility at support.polar.com.
1. Download the Polar Beat app onto your mobile device.
2. Turn Bluetooth on, and open Beat app on your mobile device.
3. Turn OH1 on by pressing the button until the LED is switched on, find your sensor in the Beat app
settings under HR sensor and tap Pair. Follow the on-screen instructions.
After the setup is done, you’re ready to go. Have fun!
BUTTON FUNCTIONS AND LEDS
OH1 has one button that has different functions depending on the situation of use, and how long it is
pressed. The LED on the device indicates different modes. See below what functions the button has in
different modes, and what the different colored LEDs mean.
Quick Instructions Inside Armband Holder
The following markings are visible inside the sensor holder in the armband. The markings explain the OH1
basic button functions.
1X = ON (Set power ON: Short button press)
2X = REC (Set training recording ON - Use as an independent training device: Press button twice when
OH1 is on)
1X LONG - OFF (Set power OFF: Long button press)
9
BUTTON FUNCTIONS
Set power ON: Short button press
Set training recording ON (Use as an
independent training device):
Press button twice when OH1 is on
Set power OFF: Long button press
LED GUIDE
During charging
Charging: Yellow LEDblinks slowly
Battery full: Green LEDcontinuously on
After setting power on
Battery status normal: Green LED blinks five times
Battery status low: Red LED blinks five times
When used as a sensor
Heart rate not detected: White LED blinks once every two
seconds
Heart rate detected: Green LED blinks once every two
seconds
When used as an independent training device
Training recording set on but first time
use not done:
Red LEDblinks three times
Heart rate not detected: White LEDblinks quickly twice
Heart rate detected: Green LEDblinks quickly twice
Battery low: Green and Red LED alternate every other
second
Battery critical: Red LED blinks quickly
During fitness test
Heart rate not detected: White LEDblinks once every two
seconds

10
Heart rate detected: Purple LEDblinks once every two
seconds
Other
Connecting, Syncing or Pairing: Blue LED blinks
Searching or waiting for confirmation: Blue LED blinks quickly
Updating firmware: Blue LEDcontinuously on
Error: Red LEDcontinuously on
WEARING YOUR OH1
WHEN MEASURING HEART RATE FROM YOUR FOREARM OR UPPER ARM
To measure heart rate accurately, you need to wear the OH1 snugly on your forearm or upper arm, not on
your wrist.
1. Place the sensor into the armband holder with the lens facing up.
2. Wear the armband so that the sensor is on the underside of the armband firmly against your skin.
3. Wear the OH1 around your forearm or upper arm.
The sensor must be in firm skin contact, but not too tight to prevent blood flow. For most accurate heart
rate measurement, we advise you to wear your OH1 for a few minutes prior to starting the heart rate
measurement.
WHEN MEASURING HEART RATE FROM YOUR TEMPLE IN SWIMMING
The OH1 set has been available with two different types of swimming goggle clips. Your set can include
two clips (picture A) or one clip (picture B). Both types of clips are well suited to be worn when swimming,
their design is just slightly different. If your set included two clips (picture A), try both to see which one fits
your swimming goggles better and keeps the sensor securely in place on your temple.

11
1. Put the sensor inside the holder with the leds facing your skin and the button facing up.
2. Push the holder as far as it goes so that it sits snugly on the strap.
3. Wear the sensor on your left temple if you breathe in from your left side when swimming freestyle,
and vice-versa if you breathe in from your right side.
The sensor must constantly touch the skin of your temple.
PAIRING
PAIR A MOBILE DEVICE WITH YOUR OH1
If you've done the setup for your OH1 with a mobile device as described in chapter "Setting up your OH1"
on page7, your OH1 has already been paired with your mobile device.
If you did the setup with a computer, and would like to use your OH1 with Polar Flow app you need to
perform one training session with OH1 as an independent training device before it can be paired with Flow
app. See detailed instructions below.
Before pairing make sure:

12
•You have a Polar account and Flow app.
•Your mobile device has Bluetooth turned on, and airplane mode/flight mode is not turned on.
•You have performed at least one training session with OH1 as an independent training device. For
details, see "Start a training session" on page14
Once all the criteria above is met:
1. Sign in to Flow app with your Polar account.
2. On OH1, press the button until the LED is switched on, and release. OH1 is now on.
3. Flow app automatically prompts you to pair your OH1 with it if it is within Bluetooth range.
Your OH1 syncs with the Flow app automatically if your phone is within the Bluetooth range. When
your OH1 syncs with Flow app, your training data is also synced automatically via an internet connection
to the Flow web service.
PAIR OH1 WITH A POLAR WRIST UNIT
On OH1, press the button until the LEDis switched on, and release. OH1 is now on.
Check the user manual of your Polar wrist unit at support.polar.com for specific pairing instructions.
PAIR OH1 WITH POLAR BEAT
1. Download Polar Beat onto your mobile device from the App Store®or Google PlayTM.
2. Make sure your mobile device has Bluetooth turned on, and airplane mode/flight mode is not turned
on.
3. On your mobile device, open Polar Beat and sign in with your Polar account, which you have created
when setting up your OH1 or create a new account if you don't have one.
4. On OH1, press the button until the LED is switched on, and release. OH1 is now on.
5. On Beat, go to Settings > HR sensor and tap Pair next to your OH1 under Found sensor.
UPDATING THE FIRMWARE
You can update the firmware of your OH1 yourself to keep it up to date. You'll be notified via Flow when a
new version is available. Firmware updates are performed to improve the functionality of your OH1. They
can include improvements to existing features, completely new features or bug fixes. We recommend that
you update the firmware of your OH1 every time a new version is available.
You won't lose any data due to the firmware update. Before the update begins, the data from your OH1
is synced to the Flow web service.
WITH MOBILE DEVICE OR TABLET
You can update the firmware with your mobile device if you're using the Polar Flow mobile app to sync
your training and activity data. The app will let you know if there's an update available and will guide you
through it. We recommend that you plug the OH1 into a power source before starting the update to ensure
flawless update operation.

13
The wireless firmware update may take up to 20 minutes, depending on your connection.
WITH COMPUTER
Whenever a new firmware version is available, FlowSync will notify you when you connect the OH1 to your
computer. The firmware updates are downloaded via FlowSync.
To update the firmware:
1. Place the sensor into the USB adapter with the lens facing up so that the contacts on the sensor
and the USB adapter meet.
2. Plug the USB adapter into your computer USB port.
3. FlowSync starts syncing your data.
4. After syncing, you are asked to update the firmware.
5. Choose Yes. New firmware is installed (this may take up to 10 minutes). Please wait until the
firmware update has been finalized before you detach the OH1 from your computer.

14
HEART RATE TRAINING
Although there are many subjective clues as to how your body is doing during exercise (perceived exertion,
breathing rate, physical sensations), none of them are as reliable as measuring heart rate. It is objective
and affected by both internal and external factors—meaning that you will have a dependable measure of
your physical state.
MEASURING HEART RATE WITH YOUR OH1
To measure heart rate accurately you need to wear your OH1 snugly around your forearm or upper arm or
with the swimming goggle strap holder on you temple. The sensor must be in constant touch with your
skin, but the armband should not be too tight to prevent blood flow. The sensor in the swimming goggle
strap holder should be attached as far as you can on your temple without getting your hair between the
sensor and your skin. For most accurate heart rate measurement, we advise you to wear your OH1 for a
few minutes prior to starting the heart rate measurement.
Do not press the sensor button while under water to maintain water resistance.
If you have tattoos avoid placing the sensor right on them as it may prevent accurate readings.
Also, it's a good idea to warm up the skin if your hands and skin get cold easily. Get the blood going before
starting your session!
For detailed instructions on wearing OH1, see "Wearing your OH1" on page10
START A TRAINING SESSION
Wear the OH1 around your forearm or upper arm, for details see "Wearing your OH1" on page10
START A TRAINING SESSION AS AN INDEPENDENT TRAINING DEVICE
Before using OH1 as an independent training device, it needs to be registered and linked to a Polar
Flow account. For details, see "Setting up your OH1" on page7.
1. Switch OH1 on by pressing the button until the LED is switched on and release.
2. OH1 is now on, press the button shortly twice to switch recording on.
3. When your heart rate is detected, the green LED will blink rapidly, and you can start your session.
After your training session, you can stop the recording by pressing the button until the LED is switched off.
Then sync your training session to the Flow app and web service to view the details of your session. See
"Syncing" on page18 for more information.
When used as an independent training device training sessions are stored under the Other indoor
Sport Profile. The memory capacity is up to 200 hours of training.

15
START A TRAINING SESSION WITH A POLAR WRIST UNIT
Before starting, make sure the OH1 is paired with your Polar wrist unit. For details see "Pairing" on page11
1. Switch OH1 on by pressing the button until the LEDis switched on and release.
2. OH1 is now on, and can be used as a heart rate sensor with a Polar wrist unit.
3. When your heart rate is detected, the green LED blinks once every two seconds.
4. Start the session from your Polar wrist unit.
After your training session, you can stop the recording from your Polar wrist unit. Then sync your training
session to the Flow app and web service to view the details of your session. See "Syncing" on page18 for
more information.
Note that the Polar Fitness Test and Orthostatic Test available on certain Polar wrist units and bike
computers cannot be performed with Polar OH1.
When using OH1 with a Polar wrist unit your training session may in some cases be shown twice in
Polar Flow web service and app. This is can happen if the OH1 recording is accidentally switched on when
starting your session. The duplicate session can be deleted in the Flow web service and app.
START A TRAINING SESSION WITH POLAR BEAT
Before starting, make sure the OH1 is paired with Polar Beat. For details see "Pairing" on page11
1. Switch OH1 on by pressing the button until the LED is switched on and release.
2. OH1 is now on, and can be used as a heart rate sensor with Polar Beat.
3. When your heart rate is detected, the green LED blinks once every two seconds.
4. Start the session from Polar Beat.
After your training session, you can stop the recording by tapping the stop button in Polar Beat.

16
POLAR FLOW APP
In the Polar Flow mobile app, you can see an instant visual interpretation of your training and activity data.
You can also plan your training in the app.
TRAINING DATA
With the Polar Flow app, you can easily access the information of your past and planned training sessions
and create new training targets. You can choose to create a quick target or a phased target.
Get a quick overview of your training, and analyze every detail of your performance right away. See weekly
summaries of your training in the training diary. You can also share the highlights of you training with your
friends with the Image sharing function.
ACTIVITY DATA
See details of your 24/7 activity. Find out how much you're missing from your daily activity goal and how
to reach it. See steps, covered distance based on steps and burned calories.
SLEEP DATA
Follow your sleeping patterns to see if they’re affected by any changes in your daily life and find the right
balance between rest, daily activity and training. With the Polar Flow app, you can view the timing, amount,
and quality of your sleep.
You can set your preferred sleep time to define how long you aim to sleep every night. You can also rate
your sleep. You'll receive feedback on how you slept based on your sleep data, your preferred sleep time
and your sleep rating.
SPORT PROFILES
You can add, edit, remove and reorganize sport profiles easily in the Flow app. You can have up to 20 sport
profiles active in Flow app and in your watch.
For more information, see Sport profiles in Polar Flow.
IMAGE SHARING
With Flow app's image sharing function you can share images with your training data on them to most
common social media channels, like Facebook and Instagram. You can either share an existing photo or
take a new one and customize it with your training data. If you had GPS recording on during your training
session, you can also share a snapshot of your training route.

17
To see a video, click on the following link:
Polar Flow app | Sharing training results with a photo
START USING THE FLOW APP
You can set up your watch using a mobile device and the Flow app.
To start using the Flow app, download it from the App Store or Google Play onto your mobile device. For
support and more information about using the Polar Flow app, go to support.polar.com/en/support/Flow_
app.
Before taking a new mobile device (smartphone, tablet) into use, it has to be paired with your watch. See
Pairing for more details.
Your watch syncs your training data to the Flow app automatically after your session. If your phone has an
internet connection, your activity and training data are also synced automatically to the Flow web service.
Using the Flow app is the easiest way to sync your training data from your watch with the web service. For
information on syncing, see Syncing.
For more information and instructions on Flow app features, visit Polar Flow app product support page.
POLAR FLOW WEB SERVICE
In the Polar Flow web service, you can plan and analyze your training in detail and learn more about your
performance. Set up and customize your watch to perfectly fit your training needs by adding sport profiles
and editing their settings. You can also share the highlights of you training with your friends in the Flow
community, sign up for your club's classes and get a personalized training program for a running event.
The Polar Flow web service also shows your daily activity goal completion percentage and the details of
your activity, and helps you understand how your daily habits and choices affect your well-being.
You can set up your watch with your computer at flow.polar.com/start. There you are guided to download
and install the FlowSync software for syncing data between your watch and the web service, and to create
a user account for the web service. If you did the setup using a mobile device and the Flow app, you can
log into the Flow web service with the credentials you created in the setup.
DIARY
In Diary you can see your daily activity, sleep, planned training sessions (training targets), as well as review
past training results.
REPORTS
In Reports you can follow your development.
Training reports are a handy way to follow your progress in training over longer periods. In week, month
and year reports you can choose the sport for the report. In custom period, you can choose both the period

18
and the sport. Choose the time period and sport for report from the drop-down lists, and press the wheel
icon to choose what data you want to view in the report graph.
With the help of the activity reports, you can follow the long-term trend of your daily activity. You can
choose to view either daily, weekly or monthly reports. In the activity report you can also see your best
days regarding daily activity, steps, calories and sleep from your chosen time period.
PROGRAMS
The Polar Running Program is tailored for your goal, based on Polar heart rate zones, taking your personal
attributes and training background into account. The program is intelligent, it adapts along the way based
on your development. The Polar Running Programs are available for 5k, 10k, half marathon and marathon
events, and consist of two to five running exercises per week depending on the program. It’s super simple!
For support and more information about using the Flow web service, go to,
support.polar.com/en/support/flow.
SYNCING
You can transfer data from your OH1 to the Polar Flow app wirelessly via the Bluetooth connection. Or, you
can sync your OH1 with the Polar Flow web service by using a USB port and the FlowSync software. To be
able to sync data between your OH1 and the Flow app you need to have a Polar account. If you want to
sync data from your OH1 directly to the web service, in addition to a Polar account, you need the FlowSync
software. If you've set up your OH1, you have created a Polar account. If you set up your OH1 using a
computer, you have the FlowSync software on your computer.
Remember to sync and keep your data up-to-date between your OH1, the web service and the mobile app
wherever you are.
SYNC WITH FLOW MOBILE APP
Before syncing make sure:
•You have a Polar account and Flow app.
•Your mobile device has Bluetooth turned on, and airplane mode/flight mode is not turned on.
•You have paired your OH1 with your mobile. For more information, see "Pairing" on page11.
Sync your data:
1. Sign in to Flow app with your Polar account.
2. On OH1, press the button until the LED is switched on, and release. OH1 is now on.
3. Your OH1 syncs with Flow app automatically if your phone is within Bluetooth range.
Your OH1 syncs with the Flow app automatically after you finish a training session if your phone is
within the Bluetooth range. When your OH1 syncs with the Flow app, your training data is also synced
automatically via an internet connection to the Flow web service.

19
For support and more information about using the Polar Flow app, go to
support.polar.com/en/support/Flow_app.
SYNC WITH FLOW WEB SERVICE VIA FLOWSYNC
To sync data with the Flow web service you need the FlowSync software. Go to flow.polar.com/start, and
download and install it before trying to sync.
1. Place the sensor into the USB adapter with the lens facing up so that the contacts on the sensor
and USB adapter meet.
2. Plug the USB adapter into a computer USB port. Make sure FlowSync software is running.
3. The FlowSync window opens on your computer, and the syncing starts.
4. Completed is displayed when you are done.
Every time you plug in your OH1 to your computer, the Polar FlowSync software will transfer your data to
the Polar Flow web service and sync any settings you may have changed. If the syncing does not
automatically start, start FlowSync from the desktop icon (Windows) or from the applications folder (Mac
OS X). Every time a firmware update is available, FlowSync will notify you, and request you to install it.
If you change settings in the Flow web service while your OH1 is plugged into your computer, press
the synchronize button on FlowSync to transfer to the settings to your OH1.
For support and more information about using the Flow web service, go to
support.polar.com/en/support/flow.
For support and more information about using FlowSync software, go to
support.polar.com/en/support/FlowSync.

20
BATTERY
At the end of the working life of the product Polar encourages you to minimize possible effects of waste
on the environment and human health by following local waste disposal regulations and, where possible,
utilizing separate collection of electronic devices. Do not dispose of this product as unsorted municipal
waste.
CHARGING OH1 BATTERY
The OH1 has an internal, rechargeable battery. Rechargeable batteries have a limited number of charge
cycles. You can charge and discharge the battery over 300 times before a notable decrease in its capacity.
The number of charge cycles also varies according to use and operating conditions.
Do not charge the battery in temperatures under 0 °C/+32 °F or over +40 °C/+104 °F or when the
charging contacts are wet.
Use the USB adapter included in the product set to charge it via the USB port on your computer. You can
also charge the battery via a wall outlet. When charging via a wall outlet, use a USB power adapter (not
included in the product set). If you use a USB power adapter, make sure that the adapter is marked with
"output 5Vdc" and that it provides a minimum of 500mA. Only use an adequately safety approved USB
power adapter (marked with "LPS", "Limited Power Supply" or "UL listed").
Before charging, make sure there’s no moisture, hair, dust or dirt on the OH1 or OH1 USB adapter
connectors. Gently wipe off any dirt and blow off the dust. Do not use any sharp tools for cleaning to avoid
scratching.
To charge with your computer, just plug your OH1 to
your computer, and at the same time, you can have it
synced it with FlowSync.
1. Place the sensor into the USB adapter with the
lens facing up so that the contacts on the
sensor and USB adapter meet (picture 1).
2. Plug the USB adapter into a computer USB port
or USB power wall outlet (picture 2).
Other manuals for Polar OH1
2
Table of contents
Other Polar Electro Fitness Tracker manuals

Polar Electro
Polar Electro WM42 User manual

Polar Electro
Polar Electro A360 User manual

Polar Electro
Polar Electro A370 User manual

Polar Electro
Polar Electro FT80 User manual

Polar Electro
Polar Electro 4J User manual

Polar Electro
Polar Electro H6 User manual

Polar Electro
Polar Electro M200 User manual

Polar Electro
Polar Electro A360 User manual

Polar Electro
Polar Electro Verity Sense User manual

Polar Electro
Polar Electro Loop 2 User manual