Polaroid PBT9075 User manual

PBT9075
Light Show Karaoke Speaker
With Tripod and Wired Microphone
User Manual

Before You Begin...
READ CAREFULLY AND KEEP THIS MANUAL
Caution
To ensure safe and proper use, read all safety information before using the device. Only
use with manufacturer-approved batteries, chargers, accessories, and supplies.
• THIS DEVICE IS NOT A TOY, keep away from children and pets.
• Do not disassemble, modify, or repair the device.
• Do not expose to extreme temperatures (heat or cold), open flames, humid, or wet
conditions.
• Do not submerge in water.
• Low power may cause poor Bluetooth connection or sound distortion.
• Do not overcharge battery.
• If using with a USB adapter, make sure the adapter is not damaged.
• Do not allow the USB port or the connectors of the supplied USB cable to be exposed
to dust or water, or to come into contact with any conductive materials such as
liquids, metallic powders, etc.
• The speaker contains a built-in battery and should not be disposed of with regular
household waste. Please consult the local authorities on the correct way to dispose of
this device.
In the Box
• PBT9075 - Wireless Speaker (x1)
• Wired Microphone (x1)
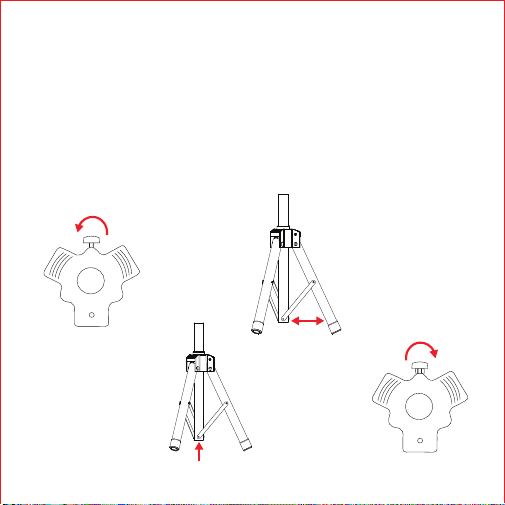
• Tripod (x1)
• Remote Control w/ Battery (x1)
• 13.5V 1.3A Adapter (x1)
• User Manual (x1)

Location of Controls
[VOLUME] Dial:
Power ON/OFF,
Adjust Volume
DC 13.5V
Charging Port
[M] Button:
Change Input Mode
LED Screen
[ ] | [ ]
Buttons:
Skip Tracks/Stations
3.5 mm AUX Input
TF Card Slot
[ECHO VOL] Dial:
Adjust Mic Echo
[MIC VOL] Dial:
Adjust Mic Volume
Microphone
Input Port
[LED MODE] Button:
Switch LED Mode
USB Device
Input Port
[ ] Button:
Press: Pause/Resume,
Press + Hold: Scan Radio
Back Panel
of Speaker
PBT9075
Tripod
[ ] Button: Repeat
Power LED
Indicator

Getting Started
Charging the Speaker
Plug the pin of the included charging adapter into the 13.5V charging port on the
back of the speaker. Plug into a wall outlet.
When the speaker is low on power, a tone will be heard indicating that it needs
to be recharged.
Powering ON/OFF
• Flip the [POWER] switch to power the speaker ON.
• When powered ON, the speaker will enter Bluetooth
pairing mode, and may automatically re-pair to any
available previously-paired device nearby.
• Flip the [POWER] switch to power the speaker OFF.
Changing Input Modes
Press the [M] button on the back panel of the speaker to switch between input
modes. The LED screen on the back of the speaker will indicate the mode, and a
voice will be heard indicating the mode.
You must have a micro TF card or USB device inserted or AUX cable connected
to switch to these modes.

Adjusting Volume & Playback
• Adjust volume with the [VOLUME] dial or the controls on a connected device.
• Press the [ ] and [ ] buttons on the speaker to skip tracks or stations in
Bluetooth mode, FM Radio mode, USB mode and TF card mode.
• Press the [ ] button to pause and resume playback.
Bluetooth Pairing
1. Power the speaker ON. A tone will be heard and the LED screen will display the
word “BLUE.”
2. Set your mobile device to search for Bluetooth devices. When it appears, select
PBT9075 from the found devices.
3. After a successful pairing, a tone will be heard and you will be able to play music
on the speaker.
In Bluetooth mode, volume & playback can be adjusted using the controls on your
paired device, or the controls on the speaker listed in the Adjusting Volume &
Playback section above.
Using the Speaker Lights
• Press the LED power switch on the back of the
speaker to power ON/OFF.
• Press the [LED MODE] button on the back of the
speaker to change LED light modes.

Using the FM Radio
Power the speaker ON and switch to FM mode. A voice will be heard, and the LED
screen will display the current FM frequency.
If it is your first time using the FM radio, it’s recommended to do a full scan of
nearby stations. Press and hold the [ ] button to start scanning and saving
available stations.
Radio functions can be controlled with the buttons on the speaker.
• Press and hold the [ ] button to start or stop scanning.
• Press the [ ] and [ ] buttons to flip through saved stations.
Using the AUX Input
Insert one end of a 3.5 mm auxiliary cable (not included) into the AUX input port
on the back of the speaker. Insert the other end into the headphone jack or 3.5 mm
aux output port on your media-playing device.
Press the [M] button until you enter AUX mode.
In AUX mode, all playback will be controlled by your connected device.

USB Device and TF Card Input
Insert a USB device, such as a USB flash drive, or micro SD/TF card into the USB
or TF card input ports on the back of the speaker.
Note: To listen to music on your USB device, you may need to have files stored in
the root folder of the device. Check your USB device’s manufacturer information
for more details.
If the speaker does not automatically switch to the correct mode, press the [M]
button until you enter USB or TF card mode. A voice will be heard indicating the
mode, and the speaker will automatically begin playing music off the device.
In USB and TF mode, playback and volume adjustment will be controlled with
controls on the back of the speaker.
Using the Microphone
Plug the 1/4” connector of the included microphone into the MIC input port on the
back of the speaker. Switch the mic ON.
• Adjust mic echo using the [ECHO VOL] dial on the back of the speaker.
• Adjust mic volume using the [MIC VOL] dial on the back of the speaker.
Note: In order to avoid loud feedback, keep the microphone behind the speaker
and pointed away from the speaker, and switch the microphone off when not in
use.

Remote Control
• Button: Enter/exit standby
• Button: Repeat playlist (TF/USB)
• MODE Button: Change input mode
• Button: Play/pause
• Button: Skip to previous
track/station
• Button: Skip to next track/station
• Button: Mute/unmute audio
• VOL- Button: Decrease volume
• VOL+ Button: Increase volume
• EQ Button: Change EQ mode
• U/TF Button: Enter USB/TF mode
• Numbers 0-9: Select track in USB or
TF mode (When selecting a track #10
or higher, press the numbers
quickly.)
Note: You may need to remove the
plastic tab from the remote control’s
battery department in order to use.

Unfolding the Tripod
1. Turn the thumb screw handle on the tripod base counterclockwise until the
tripod is able to open.
2. Holding the center column firmly in one hand, grip and carefully pull one of the
legs outward until the tripod begins to unfold, and the center column slides up.
3. Push the center column up until the tripod is fully opened and the center
column cannot be pushed up any more.
4. Turn the thumb screw handle clockwise until tight.
(Top of Tripod Base)
Turn handle
counterclockwise
Turn handle
clockwise
1 2
3 4

Adjusting the Tripod’s Height
1. Turn the thumb screw handle on the upper part
of the tripod’s center column counterclockwise
until loose.
2. Raise or lower the adjustable rod to the desired
height.
3. Turn the thumb screw handle clockwise until
tight to secure.
Mounting the Speaker
Unfold the tripod and adjust to the desired height.
Mount the hole on the bottom of the speaker onto
the rod of the tripod.
Turn the thumb screw handle on the speaker
clockwise until tight to secure the speaker.
NOTE: The tripod can be used with any speaker with a
mounting hole that fits onto the rod of the tripod - a
diameter of approximately 1.45”.
1.45”

Compliance Information
FCC Information
This device complies with Part 15 of the FCC Rules.
Caution: Any changes or modifications not expressly approved could void the user's authority to operate the
equipment.
Note: This equipment has been tested and found to comply with the limits for a Class B digital device, pur-
suant to part 15 of the FCC Rules. These limits are designed to provide reasonable protection against harmful
interference in a residential installation. This equipment generates, uses and can radiate radio frequency
energy and, if not installed and used in accordance with the instructions, may cause harmful interference to
radio communications. However, there is no guarantee that interference will not occur in a particular installation.
If this equipment does cause harmful interference to radio or television reception, which can be determined
by turning the equipment off and on, the user is encouraged to try to correct the interference by one or more
of the following measures:
• Reorient or relocate the receiving antenna.
• Increase the separation between the equipment and receiver.
• Connect the equipment into an outlet on a circuit different from that to which the receiver is connected.
• Consult the dealer or an experienced radio/TV technician for help.
This device complies with Part 15 of the FCC Rules. Operation is subject to the following two conditions: (1) This
device may not cause harmful interference, and (2) this device must accept any interference received, including
interference that may cause undesired operation.
Radiation Exposure Information
The device has been evaluated to meet general RF exposure requirement. The device can be used in portable
exposure condition without restriction.
WARNING Li-ion Battery Inside
This product is fitted with a Li-ion battery. Do not damage, open, or dismantle the battery
and do not use it in damp and/or corrosive conditions. Use only with compatible
chargers. Never dispose of batteries in a fire, and never expose them to high
temperatures. Do not expose the product to temperatures exceeding 60°C (140°F).
Direct current symbol.
This symbol signifies the product must not be discarded as household waste, and
should be delivered to an appropriate collection facility for recycling. Proper disposal
and recycling helps protect natural resources, human health and the environment.
This symbol signifies and declares that this equipment has battery charging which
complies with California CEC and energy efficiency.
This symbol signifies that this is a wireless device powered by Bluetooth® technology.
This symbol represents FCC Declaration of Conformity and compliance.
Rating Label
Denitions

Warranty Information
90-day Limited Warranty
Territory: United States/Canada
LIMITED WARRANTYTO ORIGINAL CONSUMER
This product (including any accessories included in the original packaging) as supplied and distributed new by an authorized retailer
is warranted by Southern Telecom, Inc. to the original consumer purchaser against defects in materials and workmanship
(“Warranty”) as follows:
To obtain warranty service:
• Visit our customer support portal: www.customersupport123.com
• Select the brand and model of your device
• Select “Service Request” and fill out the form to begin your inquiry
• Exchanges require dated proof of purchase from an authorized retailer
Your product will be repaired or replaced, at our option, for the same or similar model of equal value if examination by the service
center determines this product is defective. Products received damaged as a result of shipping will require you to file a claim with
the carrier.
Warranty service not provided
This warranty does not cover damage resulting from accident, misuse, abuse, improper installation or operation, lack of
reasonable care, unauthorized modification including software modifications such as the installation of custom firmware. This
warranty is voided in the event any unauthorized person opens, alters or repairs this product. All products being returned to the
authorized service center for repair must be suitably packaged.
NO WARRANTIES, WHETHER EXPRESS OR IMPLIED, INCLUDING, BUT NOT LIMITED TO, ANY IMPLIED WARRANTIES OF
MERCHANTABILITY OR FITNESS FOR A PARTICULAR PURPOSE, OTHER THAN THOSE EXPRESSLY DESCRIBED ABOVE
SHALL APPLY. DISTRIBUTOR FURTHER DISCLAIMS ALL WARRANTIES AFTER THE EXPRESS WARRANTY PERIOD STATED
ABOVE. NO OTHER EXPRESS WARRANTY OR GUARANTY GIVEN BY ANY PERSON, FIRM OR ENTITY WITH RESPECT TO THE
PRODUCT SHALL BE BINDING ON DISTRIBUTOR. REPAIR, REPLACEMENT, OR REFUND OF THE ORIGINAL PURCHASE PRICE
- AT DISTRIBUTOR’S SOLE DISCRETION - ARE THE EXCLUSIVE REMEDIES OF THE CONSUMER. IN NO EVENT WILL
DISTRIBUTOR OR ITS MANUFACTURERS BE LIABLE FOR ANY INCIDENTAL, DIRECT, INDIRECT, SPECIAL, PUNITIVE OR
CONSEQUENTIAL DAMAGES (SUCH AS, BUT NOT LIMITED TO, DAMAGES FOR LOSS OF PROFITS, BUSINESS, SAVINGS,
DATA OR RECORDS) CAUSED BY THE USE, MISUSE OR INABILITY TO USE THE PRODUCT. EXCEPT AS STATED HEREIN, NO
OTHER WARRANTIES SHALL APPLY. NOTWITHSTANDING THE FOREGOING, CONSUMER’S RECOVERY AGAINST
DISTRIBUTOR SHALL NOT EXCEED THE PURCHASE PRICE OF THE PRODUCT SOLD BY DISTRIBUTOR. THIS WARRANTY
SHALL NOT EXTEND TO ANYONE OTHER THAN THE ORIGINAL CONSUMER WHO PURCHASED THE PRODUCT AND IS NOT
TRANSFERABLE.
Some countries, states or provinces do not allow the exclusion or limitation of incidental or consequential damages or allow
limitations on warranties, so limitation or exclusions may not apply to you. This warranty gives you specific legal rights, and you
may have other rights that vary from state to state or province to province. Contact your authorized retailer to determine if another
warranty applies.

Designed in US
Printed in China
v1. 12-2021
All product names, trademarks, and registered trademarks are property of their respective
owners. All company, product, and service names used in this document are for identification
purposes only. Use of these names, trademarks, and brands does not imply endorsement.
The Bluetooth® word mark and logos are registered trademarks owned by Bluetooth SIG, Inc.,
used under license.

Have questions?We’ve got
answers.
Visit us at customersupport123.com
©2021. All rights reserved.
Polaroid, Polaroid Color Spectrum and Polaroid Classic Border Logo are trademarks of PLR IP Holdings, LLC, used under
license. PLR IP Holdings LLC, does not manufacture this product or provide any manufacturer’s warranty or support.
Table of contents
Other Polaroid Speakers manuals

Polaroid
Polaroid PBT2001 User manual

Polaroid
Polaroid CQL1604-B User manual

Polaroid
Polaroid PWFSK2000 User manual

Polaroid
Polaroid PBT620 User manual

Polaroid
Polaroid PBT555 User manual

Polaroid
Polaroid EBT950 User manual

Polaroid
Polaroid PLOK901 User manual

Polaroid
Polaroid PLS92SP User manual

Polaroid
Polaroid PL808BM User manual