manuals.online logo
Brands
  1. Home
  2. •
  3. Brands
  4. •
  5. POLTI
  6. •
  7. Vacuum Cleaner
  8. •
  9. POLTI LECOLOGICO AS810 User manual

POLTI LECOLOGICO AS810 User manual

ESPRESSO
2000
ESPRESSO
SUPERAUTOMATIC
ESPRESSO
AUTOMATIC
ESPRESSO
3000
VAPORELLA
STIRA E ASPIRA
LUXPRO
FE 503FE 701-700FE 603FE 901-900
FOREVER 1000
SUPER PRO LUX
FOREVER SUPER PRO
5100 R
4500 R 4200 R
2H PROFESSIONAL
PROF 1000
PROF 3000 R INOX 1000
PROF 1200
PROFESSIONAL
STIROSMACCHIA
FOREVER CLEAN
AS 810
ECO PRO 3000
ECO PRO 3000 LUX
2400
HUMIDIFIER FA 20
IONO-HUMIDIFIER FA 30
DRYER FA 110
ECO PRO 3300 PLUS 2001R
2300
2085 2300 IT PRO
1300 1000
910 IT
VAPORETTINO 900
910
AS 404 AS 610 AS 600
AS 300 AS 310 E
AS 800
AS 810
A
S
P
I
R
A
L’ECOLOGICO AS810 - Cod. M0S04076 - Edizione 1F04
20
21
22
23
24
M
N
16
17b
17a
17c
W
D
M
6
15
12
A
19
4
5
3
14
1
8
9
11 10 13 2
22
21 14 20
C
B
I
C1
B1
F
L
E
H
G
O
L’ECOLOGICO AS810 - Cod. M0S05405 - Edizione 2G09
L’ECOLOGICO AS810- Cod. M0S05612 - Edizione 1G12
6-A
ENGLISH L’Ecologico AS 810
Polti S.p.A. reserves the right to change
equipment or accessory specification without
prior notice.
ACCESSORIES
A. Telescopic tube
B. Joker brush
B1. Accessory for parquet
C. Universal brush
C1. Brush selector
D. Flexible tube
E. Multipurpose nozzle
F. Lance for cleaning corners/skirting boards
G. Small brush
H. Accessories holder
I. Patented Flexo joint
L. Radiators brush
M. Handle with remote control
N. Remote control battery cover
W. Floater
Y. Flexo joint ring (Fig. 10)
O. Turbo brush (optional)
6-A. Water tank cleaning brush
KEY
1. Mains ON/OFF switch
2. Cable winder button
3. Carrying handle
4. Cover
5. Cover opening lever
6. "EcoActive-Filter" water container
7. MAX level indicator (fig. 4)
8. Air outlet filter cover grill
9. Opening lever for air outlet filter grille
10. Air outlet filter
10a. Opening cover of the air outlet filter (fig. 19)
11. Accessories holder hook
12. Pivoting wheels
13. Supply cable plug
14. Indicator lights
15. Junction
16. Filter cage cover
17. Cage of the water filter of the
“EcoActive -Filter”(fig. 15)
17a. Filter body with micropore sponge
17b. Sponge filter
17c. Filter tube
18. Hepa filter cartridge (fig. 16)
19. Telescopic tube spring button
20. "Stand-by" button
21. + button (suction power increase)
22. - button (suction power decrease)
23. Remote control indicator light
24. Remote control transmitters
This unit conforms with EC-directives 89/336 as amended by 93/68
(EMC) and 73/23 as amended by 93/68 (low voltage).
AS 810
L’Ecologico AS 810 ENGLISH
Dear Customer,
Thank You for choosing this Polti product.
By choosing L'Ecologico, you have thought of your family's health because
L'Ecologico is a friend to the environment, but an enemy of dust, pollen, mites and
their allergens. Thanks to the EcoActive-filter, its green heart, it traps the dirt in
the water which, when it is dirty, can be poured away without the risk of dust
escaping into the air.
With L'Ecologico Polti you can really relax, its filtering system of 8 layers Hepa
filter retains 99,99% of the particles down to 0,3µ, therefore the exiting air is
perfectly pure.
In addition, EcoActive-Filter eliminates dusty bags and all the problems related to
them.
With L'Ecologico you can suck up dry dirt, or liquids, satisfying all your domestic
cleaning needs.
The full accessory set will allow you to face cleaning problems, solving them
quickly and easily.
The controls of the appliance are both on the body and on the handle. This allows
you to choose at your pleasure how to operate. The use of the controls on the
handle allows you to have all the functions at hand without bending down to make
the necessary adjustments.
Before using L’Ecologico, read these instructions carefully.
What is the EcoActive-Filter ?
The EcoActive-Filter is the “green” heart of L’Ecologico and is composed of a
revolutionary water filter.
The EcoActive-Filter employs the natural purifying strength of water to catch the
dirt, avoiding irritating contact with dust and harmful dispersion of dust into the
environment.
It is specifically the flow of water contained in the special filter and its bubbling
that make cleaning operations with L'Ecologico so much more effective.
What is the HEPA filter ?
L'Ecologico is more than a vacuum cleaner, it is also an air purifier. In fact, it is
equipped with a special and very powerful HEPA filter, already used in professional
applications where the maximum hygiene is necessary.
It is able to retain 99,99% of the particles right down to 0,3µ, i.e. very thin dust,
pollen, mites and other micro-organisms.
ENGLISH L’Ecologico AS 810
CC
CCOO
OORR
RRRR
RREE
EECC
CCTT
TTUU
UUSS
SSEE
EEOO
OOFF
FFTT
TTHH
HHEE
EEPP
PPRR
RROO
OODD
DDUU
UUCC
CCTT
TT
This appliance is intended for use as an aspirator for solids
and liquids according to the descriptions and instructions in
this manual. It is recommended to read these instructions
carefully and to keep them for future use.
PP
PPRR
RREE
EEPP
PPAA
AARR
RRAA
AATT
TTII
IIOO
OONN
NNSS
SSFF
FFOO
OORR
RRUU
UUSS
SSEE
EE
•Unhook the lever (5) under the handle (3) (fig.1)
•Lift the cover (4) and remove the water container (6) (fig.2)
•Take out the cage with the floater (17) (fig.3).
Fill the container (6) with normal tap water until the MAX
level indicator is covered as in fig.4.
The quantity of water necessary is about 1,5 litres.
•Put the filter cage back in its initial position (fig.3)
•Close the cover (4) until it clicks shut.
•Insert the suction hose into the junction (fig.5)
To clean floors, connect the steel telescopic tube (A) to the
flexible hose. You have two brushes at your disposal: the
Joker brush (B) and the universal brush (C). With the Joker
brush you can clean all kinds of solid or liquid dirt and it is
suitable for all surfaces.
The universal brush is appropriate for polished parquet and,
in the right position, for carpets and rugs.
See the instructions at the "use of the universal brush"
paragraph.
Choose the most suitable brush and connect it to the
telescopic tube.
For correct length of the stainless steel telescopic tube,
see the "use of the telescopic tube"paragraph.
To clean other surfaces, choose the most suitable accessory
and connect it to the junction.
The telescopic tube is useful to reach difficult areas and can
be used with all the accessories.
Insert the battery into the remote control handle (M), as
shown in the "how to replace the remote control battery"
paragraph.
UU
UUSS
SSEE
EEOO
OOFF
FFTT
TTHH
HHEE
EETT
TTEE
EELL
LLEE
EESS
SSCC
CCOO
OOPP
PPII
IICC
CCTT
TTUU
UUBB
BBEE
EE
The tube is about 500 mm long when closed and about
1000 mm. at its maximum extension. To make it longer or
shorter, move the lock as shown in fig.6 and extend or
reduce to suit your height.
U
US
SO
OC
CO
OR
RR
RE
ET
TT
TO
OD
DE
EL
LP
PR
RO
OD
DO
OT
TT
TO
O
P
PR
RE
EP
PA
AR
RA
AZ
ZI
IO
ON
NE
EA
AL
LL
L'
'U
US
SO
O
U
US
SO
OD
DE
EL
LT
TU
UB
BO
OT
TE
EL
LE
ES
SC
CO
OP
PI
IC
CO
O(
(A
A)
)
Fig. 1
Fig. 2
Fig. 3
Fig. 4
Fig. 5
MAX
Fig. 6
L’Ecologico AS 810 ENGLISH
AA
AAUU
UUTT
TTOO
OOMM
MMAA
AATT
TTII
IICC
CCCC
CCAA
AABB
BBLL
LLEE
EEWW
WWII
IINN
NNDD
DDEE
EERR
RR
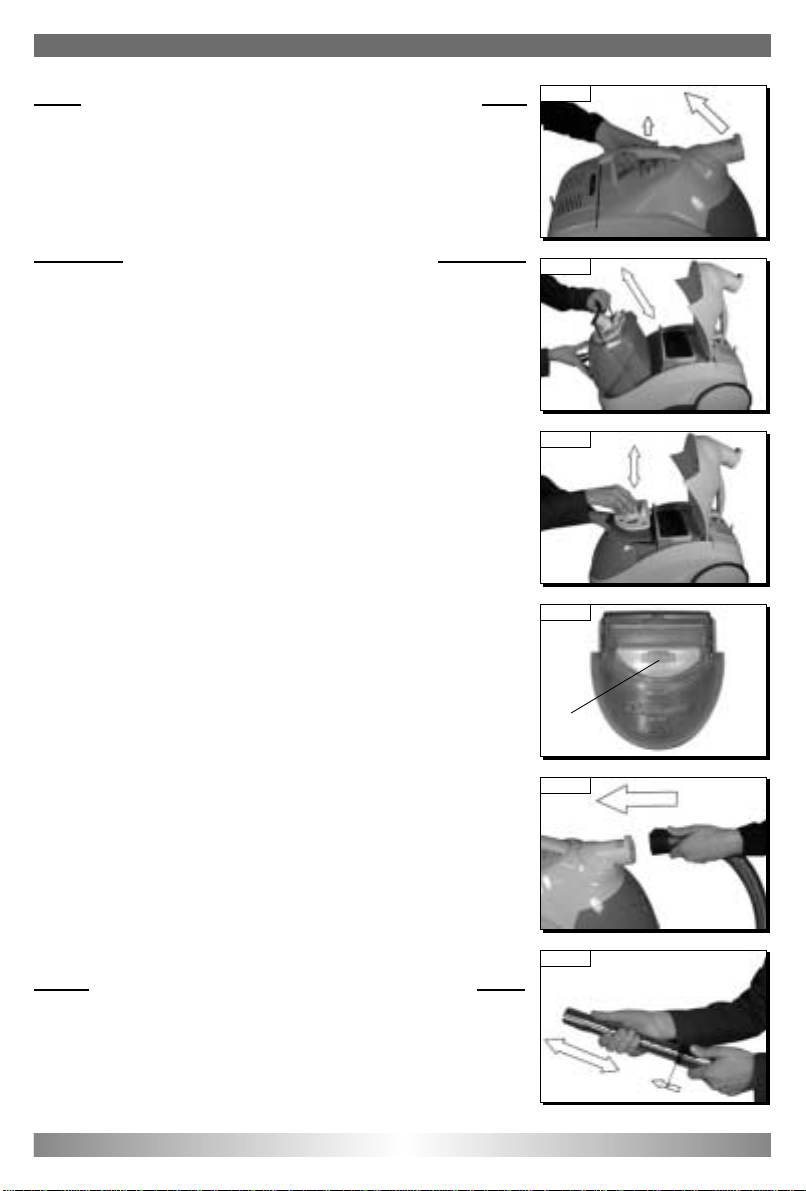
•Before storing the vacuum cleaner, rewind the power supply
cable by pushing the button (2) as indicated in fig. 7.
OO
OOPP
PPEE
EERR
RRAA
AATT
TTII
IIOO
OONN
NN
Unwind the cable (13) until it is completely outside its
storage compartment by pulling the plug towards you (fig.
7bis). Connect the plug to the mains.
•Push the mains On/Off switch (1) (fig.8), the first stage of
the indicator lights (14) will start to flash. L'Ecologico is
now in a "stand-by" position.
•Push the button (20), L'Ecologico will start to operate at
minimum speed, the first indicator light (14) will become
constant.
•The power levels are four. We suggest you use at the
minimum level for curtains, at the medium- low for couches,
armchairs and pillows, medium-high for carpets, and high
for floors and hard surfaces (ceramic, marble etc.)
•To increase the speed, push the button (21), each press on
the button (21) will increase the motor power by one level.
•The increase by one level is indicated by the switching on
of one stage of the indicator lights.
•By pushing the button (22), at each press the motor power will decrease and one stage
will switch off.
•To take the appliance back to the "stand-by" position, push the button (20).
•To start vacuum cleaning again, push the button (20) again.
•L'Ecologico offers you the advantage to operate either by using the buttons on the
machine body or on the remote control handle. Thus you can have all the functions at
hand, without bending down.
•The buttons (20) (21) (22) on the remote control have the same functions as the
buttons (20) (21) (22) on the machine body.
Note: to make the remote control work outdoors, direct the two transmitters on the handle
towards the appliance.
DD
DDRR
RRYY
YY
AA
AANN
NNDD
DDLL
LLII
IIQQ
QQUU
UUII
IIDD
DDVV
VVAA
AACC
CCUU
UUUU
UUMM
MMII
IINN
NNGG
GG
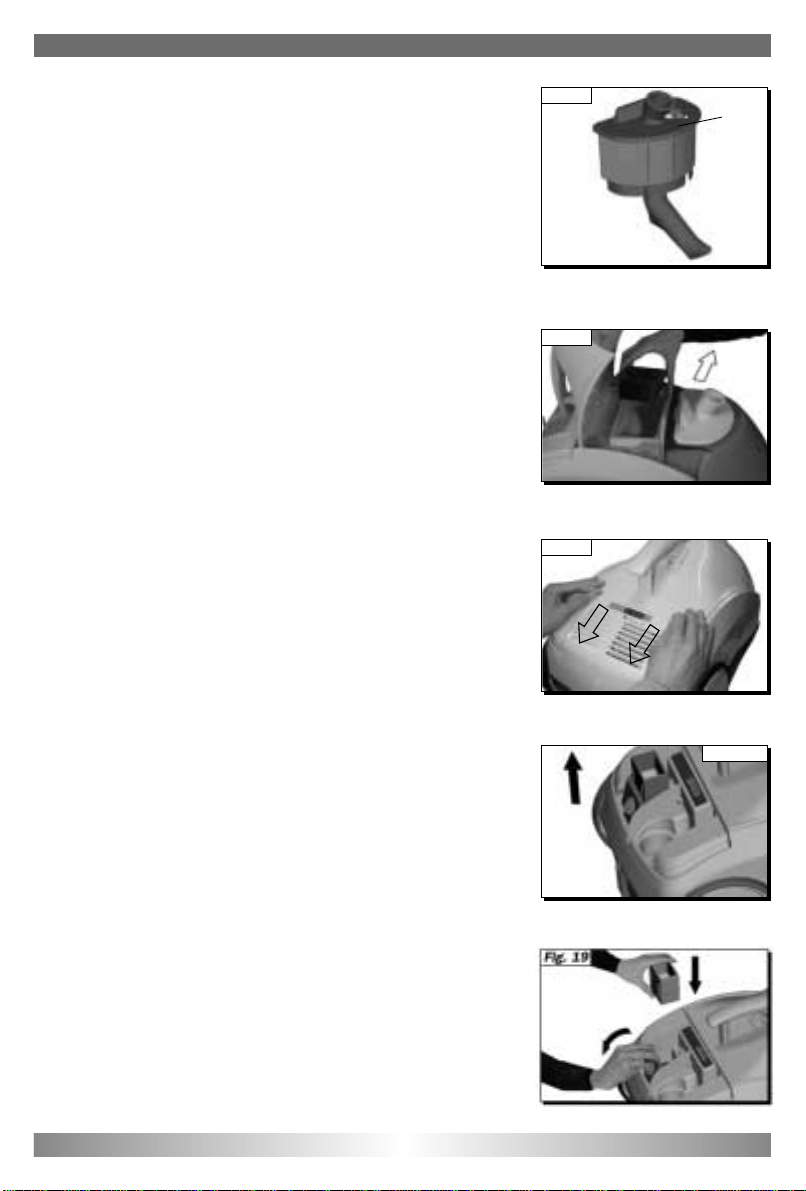
•You can use the machine to suck up dust or liquids.
If the water becomes very dirty, replace it as described in the "how to empty and clean
the water container" paragraph. When the sucked up dirt reaches the maximum level in
the water container (6), the suction is automatically blocked by the safety float (you will
notice an increase in the motor revolutions).
•After 10 seconds the appliance will go automatically to pause and the four indicator lights
will flash. To start cleaning again, proceed as shown in the "how to empty and clean the
water container" paragraph, restoring the water level in the container.
A
AV
VV
VO
OL
LG
GI
IC
CA
AV
VO
OA
AU
UT
TO
OM
MA
AT
TI
IC
CO
O
F
FU
UN
NZ
ZI
IO
ON
NA
AM
ME
EN
NT
TO
O
A
AS
SP
PI
IR
RA
AZ
ZI
IO
ON
NE
EA
AS
SE
EC
CC
CO
O-
-L
LI
IQ
QU
UI
ID
DI
I
Fig. 7
Fig. 7bis
Fig. 8
““
““BB
BBII
IIOO
OOEE
EECC
CCOO
OOLL
LLOO
OOGG
GGII
IICC
CCOO
OO””
””
"Bioecologico" is available for sanitising while using the suction function. It is a scented
antibacterial product with natural-based anti-allergenic substances. If it is added regularly
to the water used to fill the water container (6) of the L’ecologico, it will prevent the
proliferation of bacteria and micro-organisms and inhibit the action of allergens. In addition
to ensuring a sanitising action, "Biecologico" will eliminate smells due to the presence of
dust in the water, leaving a pleasant smell of cleanness in the room.
Use: Normally add 10 ml each time you fill the water-based filter.
Bioecologico is sold in household appliance shops or direct from our authorised
Assistance Centres.
HH
HHOO
OOWW
WWTT
TTOO
OOEE
EEMM
MMPP
PPTT
TTYY
YYAA
AANN
NNDD
DDCC
CCLL
LLEE
EEAA
AANN
NNTT
TTHH
HHEE
EEWW
WWAA
AATT
TTEE
EERR
RRTT
TTAA
AANN
NNKK
KK
((
((66
66))
))
•Switch off the appliance at the mains switch (1) and disconnect the power supply cable
from the mains. This precaution also allows the reset of the operation of the appliance
from the safety device.
•After sucking up liquids, be careful, when opening the cover, that no fluid remaining in
the suction tube falls on the Hepa filter.
•Unhook the lever (5) which is under the handle (3) (fig.1)
•Lift the cover (4) and take out the container (6) (fig.2)
•Remove the filter cage (fig.3), empty the container tilting
it towards the groove (fig. 9) and rinse it
•If you want to keep on vacuuming, restore the water level.
•Insert the filter cage back and put everything back in the
appliance.
•Close the cover until it clicks shut.
•The appliance is now ready to be stored.
Note: water remaining in the container does not damage the appliance but it is always
better to empty it before storing L'Ecologico. One of the biggest advantages of
L'Ecologico is the ability to store it clean, unlike vacuum cleaners with a dust
container which are stored together with the dirt they have picked up.
UU
UUSS
SSEE
EEOO
OOFF
FFTT
TTHH
HHEE
EEFF
FFLL
LLEE
EEXX
XXOO
OOJJ
JJOO
OOII
IINN
NNTT
TT((
((II
II))
))
This special joint - Polti exclusive patent - allows to reach the
most difficult areas without bending down.
Insert the Flexo joint between the handle and the telescopic
tube keeping the indentation on the front part of the handle.
To change the inclination, turn the ring (Y) (fig.10) half way
round. This way the joint is showing and it will allow you to
change the angle of operation of the tube fig.10.
When operations are over, put the joint back in its original
position, covering it with the ring to lock it into position.
ENGLISH L’Ecologico AS 810
B
BI
IO
OE
EC
CO
OL
LO
OG
GI
IC
CO
O
S
SV
VU
UO
OT
TA
AM
ME
EN
NT
TO
OE
EP
PU
UL
LI
IZ
ZI
IA
AD
DE
EL
LS
SE
ER
RB
BA
AT
TO
OI
IO
OA
AC
CQ
QU
UA
A(
(6
6)
)
U
US
SO
OD
DE
EL
LL
LO
OS
SN
NO
OD
DO
O"
"F
FL
LE
EX
XO
O"
"(
(I
I)
)
Fig. 9
B
BI
IO
OE
EC
CO
OL
LO
OG
GI
IC
CO
O
S
SV
VU
UO
OT
TA
AM
ME
EN
NT
TO
OE
EP
PU
UL
LI
IZ
ZI
IA
AD
DE
EL
LS
SE
ER
RB
BA
AT
TO
OI
IO
OA
AC
CQ
QU
UA
A(
(6
6)
)
U
US
SO
OD
DE
EL
LL
LO
OS
SN
NO
OD
DO
O"
"F
FL
LE
EX
XO
O"
"(
(I
I)
)
Fig. 10
Y
L’Ecologico AS 810 ENGLISH
UU
UUSS
SSEE
EEOO
OOFF
FFTT
TTHH
HHEE
EEAA
AACC
CCCC
CCEE
EESS
SSSS
SSOO
OORR
RRII
IIEE
EESS
SSHH
HHOO
OOLL
LLDD
DDEE
EERR
RR
((
((HH
HH))
))
The accessories holder allows you to fix the accessories on
the body of the appliance or on the handle.
Installation on the handle: insert one of the rings of the
accessories holder on the handle. Insert in the rings the
accessories you want to keep at hand.
Installation on the appliance body: make the groove of the
accessories holder run into the guide on the back of the
appliance, as shown in fig. 11, fixing the accessories as
described above.
UU
UUSS
SSEE
EEOO
OOFF
FFTT
TTHH
HHEE
EEUU
UUNN
NNII
IIVV
VVEE
EERR
RRSS
SSAA
AALL
LLBB
BBRR
RRUU
UUSS
SSHH
HH
((
((CC
CC))
))
If you move the selector on the brush (C1) by pressing with
your foot, you can change the suction surface without
bending down. The position with the bristles extended is
recommended for all floors. The position without bristles is
recommended for carpets and rugs.
UU
UUSS
SSEE
EEOO
OOFF
FFTT
TTHH
HHEE
EEAA
AACC
CCCC
CCEE
EESS
SSSS
SSOO
OORR
RRYY
YY
FF
FFOO
OORR
RR
PP
PPAA
AARR
RRQQ
QQUU
UUEE
EETT
TT
((
((BB
BB11
11))
))
Position the Joker brush on the parquet accessory as shown
in fig. 12. Fit the brush on the accessory as indicated by the
arrow in order to make them match and hook.
To unhook the parquet accessory from the Joker brush, pull
the two levers on the sides of the frame outwards and lift the
brush (fig. 13).
BB
BBLL
LLOO
OOWW
WW
FF
FFUU
UUNN
NNCC
CCTT
TTII
IIOO
OONN
NN
This function is recommended for collecting scattered
quantities of light waste such as leaves, confetti and so on.
Open the air outlet grill (8) as described in the “How to
remove the air outlet filter grille”, insert the flexible tube in
its place (fig. 14) and switch on the vacuum cleaner.
GG
GGEE
EENN
NNEE
EERR
RRAA
AALL
LL
MM
MMAA
AAII
IINN
NNTT
TTEE
EENN
NNAA
AANN
NNCC
CCEE
EE
Before maintenance, make sure that the supply cable is not connected to the mains.
Cleaning the water filter cage of the "EcoActive-Filter"
We recommend you clean it after each session.
•Unhook the lever (5) under the handle (3) and lift the cover (4) (fig. 1).
U
US
SO
OD
DE
EL
LP
PO
OR
RT
TA
AA
AC
CC
CE
ES
SS
SO
OR
RI
I(
(H
H)
)
U
US
SO
OD
DE
EL
LL
LA
AS
SP
PA
AZ
ZZ
ZO
OL
LA
AU
UN
NI
IV
VE
ER
RS
SA
AL
LE
E(
(C
C)
)
U
UT
TI
IL
LI
IZ
ZZ
ZO
OD
DE
EL
LL
L’
’A
AC
CC
CE
ES
SS
SO
OR
RI
IO
O
P
PE
ER
RP
PA
AR
RQ
QU
UE
ET
T(
(B
B1
1)
)
F
FU
UN
NZ
ZI
IO
ON
NE
ES
SO
OF
FF
FI
IO
O
M
MA
AN
NU
UT
TE
EN
NZ
ZI
IO
ON
NE
EG
GE
EN
NE
ER
RA
AL
LE
E
Fig. 14
Fig. 12
Fig. 13
Fig. 11
ENGLISH L’Ecologico AS 810
•Remove the filter cage (17) by pulling it upwards (fig. 3)
•Empty the water container (6) tilting it towards the groove
(fig. 9).
•Rinse the group under running water (fig. 15).
•Allow the filter to dry before replacing in the machine for
storage.
•Put the filter cage back in its correct position in the
container.
Cleaning or replacing the sponge filter
•Pull the tube (17c) from the filter cage until it slips off
•Divide the body of the cage (17a) from the filter cover (16)
•Remove the sponge filter (17b) from the cage. If the filter
is damaged, replace it.
•Rinse all the components under running water.
•Allow the sponge filter to dry before replacing in the
machine.
•Reassemble the filter group. Make sure that the filter tube
is correctly fitted (13).
•In case of replacement, only use Polti original spare parts.
•We suggest to clean the filter every 3-5 times you empty
the container
Replacing the HEPA filter cartridge
•Unhook the lever (5) under the handle (3) and lift the
cover (4)
•Remove the HEPA filter from its location (fig. 16) and
replace it with an original Polti spare part.
Note: the filter lasts about 100 hours (about every 6
months) in normal domestic use. If the suction
power noticeably decreases, replace the filter even
before the 100 hours.
Replacing the air outlet filter
•Move both levers (9) at the same time towards the grille
(fig. 17). Once the blocks have been removed, raise the
grille (8) (fig. 17).
•Take out the air outlet filter (10) (fig. 18) and replace it with
a Polti original spare part.
•Lift the cover (10a) and put the new filter back in its place
as shown in fig. 19.
•Before switching on the appliance, replace the grille
inserting the tang in the relevant lock and push until it
clicks.
Note: the filter lasts about 100 hours (about every 6
months). If the filter is torn or visibly damaged,
replace it even before the 100 hours. If the filter is
used in dusty environments, it is suggested to
increase the frequency of replacement.
Fig. 16
Fig. 17
Fig. 18
Fig. 19
Fig. 15 17
L’Ecologico AS 810 ENGLISH
Replacing the remote control battery
The remote control handle uses a 12V battery type MN21.
The life of the battery depends on the use frequency. If the
indicator light (23) does not light up when pushing the button
(21) or (22) of the remote control, replace the battery.
Take the remote control handle (M), press the lever of the
battery cover (N) pulling it towards the control board of the
remote control.
Remove the cover and replace the battery taking care that
the marks + and - match with the indication.
Put the cover back.
Note: Respect the environment, we recommend you
dispose of the battery in the appropriate bin.
R
RI
IC
CE
ER
RC
CA
AG
GU
UA
AS
ST
TI
I
Fig. 20
TT
TTRR
RROO
OOUU
UUBB
BBLL
LLEE
EESS
SSHH
HHOO
OOOO
OOTT
TTII
IINN
NNGG
GG
The vacuum cleaner does not
start and the thermic protection
intervenes
The engine switches off owing to
the intervention of the thermic
protection
The vacuum cleaner does not
start
The vacuum cleaner switches off
during suction
and the four indicator lights flash
The suction power decreases
Water leak during liquid vacuum
cleaning
The remote control does not
work
The Hepa filter may be wet
The air outlet filter is not present
The air outlet filter is inserted
Lack of current
The liquid level in the container
is too high
The selected power is too high
for the type of surface
The mouth, the flexible hose or
the telescopic tube are
obstructed
The HEPA filter is exhausted.
The switch float is blocked
The battery is probably
exhausted
Remove the Hepa filter and
leave it to dry
Put the filter back in its place
Check the state of preservation
of the filter
Check the cable plug and socket
Push the switch (1), disconnect
the supply cable from the mains
and reduce the water to the
indicated level in the container
Pushtheswitch(1), disconnect the
supply cable from the mains and
keep the appliance disconnected
at least 30 seconds to allow the
safety device to reset
Clean the filter and take out any
obstructions in the tubes
Replace the filter
Clean it
Check the battery load and
replace if necessary
Trouble Cause Solution
ENGLISH L’Ecologico AS 810
PP
PPRR
RREE
EECC
CCAA
AAUU
UUTT
TTII
IIOO
OONN
NNSS
SS
Attention! Do not use the appliance without reading the instructions.
•In case of damage or malfunction, do not attempt to disassemble the appliance but
contact the nearest Polti Authorised Service Centre.
•The mains the appliance is connected to must conform with regulations
•Do not allow children to use the machine or any others who may not know how to
operate it.
•In order not to compromise the safety of the appliance, only use original spare parts
and accessories, approved by the manufacturer.
•Do not use the appliance if the supply cable or other important parts of the unit are
damaged
•Do not touch the plug with wet hands
•Do not suck up acids or solvents, which may cause serious damage to the appliance
and especially do not suck up explosive powders or liquids, which may cause explosions
if they come in contact with the internal parts of the appliance.
•You must not use the appliance in environments where there is danger of explosion
•Do not suck up objects in flames or glowing, such as embers, ash and other materials
while burning.
•Should there be a liquid or foam leak during aspiration, immediately switch off the
appliance and contact the nearest Polti Authorised Service Centre.
•Always throw the exhausted batteries in the proper containers.
•Polti declines liability for any damage or accident derived from any use of
ECOLOGICO AS 810 which is not in conformity with the instructions contained
in this booklet.
L’Ecologico AS 810 ENGLISH
FOR YOUR OWN SAFETY READ FOLLOWING INSTRUCTIONS CAREFULLY
BEFORE ATTEMPTING TO CONNECT THIS UNIT TO THE MAINS.
MM
MMAA
AAII
IINN
NNSS
SS
((
((AA
AACC
CC))
))
OO
OOPP
PPEE
EERR
RRAA
AATT
TTII
IIOO
OONN
NN
((
((oo
oonn
nnll
llyy
yy
UU
UU..
..KK
KK..
..))
))
This unit is designed to operate on 240V, 50 Hz current only. Connecting it to other power
sources may damage the unit.
WARNING - This appliance must be earthed.
This appliance may be fitted with a non rewirable plug, if it is necessary to change the fuse
in a non rewirable plug the fuse cover must be refitted. If the fuse cover is lost or
damaged, the plug must not be used until a replacement, available from the appliance
manu-facturer, is obtained. It is important that the colour of the replacement fuse cover
corre-sponds with the colour marking on the base of the plug.
If the plug requires to be changed because it is not suitable for your socket, or becomes
damaged, it should be cut off and an appropriate plug fitted following the wiring instruction
(below). The plug removed must be disposed of safely as insertion into a 13A socket is
likely to cause an electrical hazard.
IMPORTANT
This wires in this mains lead are coloured in accordance with the following code.
•Green-and-yellow: Earth •Blue: Neutral •Brown: Live
As the colours of the wires in the mains leads of this appliance may not correspond with
the coloured markings identifying the terminals in your plug, proceed as follows:
The wire which is coloured green-and-yellow must be connected to the terminal in the plug
which is marked with the letter “E”or by the earth symbol or green-and-yellow.
The wire which is coloured blue must be connected to the terminal which is marked with
the letter “N”or coloured black.
The wire which is coloured brown must be connected to the terminal which is marked with
the letter “L”or coloured red.
GREEN
&
YELLOW
(Earth)
BLUE
(Neutral)
FUSE
(13 amp)
BROWN
(Live)

Other manuals for LECOLOGICO AS810

1

Other POLTI Vacuum Cleaner manuals

POLTI Vaporetto SMART 40 MOP User manual

POLTI

POLTI Vaporetto SMART 40 MOP User manual

POLTI CINDERELLA AS500 Parts list manual

POLTI

POLTI CINDERELLA AS500 Parts list manual

POLTI Forzaspira Lecologico Aqua Allergy_Turbo... User manual

POLTI

POLTI Forzaspira Lecologico Aqua Allergy_Turbo... User manual

POLTI lecoaspira vaporetto FAV 20 User manual

POLTI

POLTI lecoaspira vaporetto FAV 20 User manual

POLTI LECOASPIRA 690 User manual

POLTI

POLTI LECOASPIRA 690 User manual

POLTI Vaporetto PRO 100 ECO POWER User manual

POLTI

POLTI Vaporetto PRO 100 ECO POWER User manual

POLTI SE110 User manual

POLTI

POLTI SE110 User manual

POLTI Vaporetto FOCUS User manual

POLTI

POLTI Vaporetto FOCUS User manual

POLTI Forzaspira SR25.9 User manual

POLTI

POLTI Forzaspira SR25.9 User manual

POLTI FORZASPIRA MC 330-TURBO User manual

POLTI

POLTI FORZASPIRA MC 330-TURBO User manual

POLTI FORZASPIRA AG220 PLUS User manual

POLTI

POLTI FORZASPIRA AG220 PLUS User manual

POLTI Vaporetto SV440_DOUBLE User manual

POLTI

POLTI Vaporetto SV440_DOUBLE User manual

POLTI VAPORETTO LECOASPIRA User manual

POLTI

POLTI VAPORETTO LECOASPIRA User manual

POLTI Forzaspira MC330 Turbo User manual

POLTI

POLTI Forzaspira MC330 Turbo User manual

POLTI Forzaspira Slim SR110 User manual

POLTI

POLTI Forzaspira Slim SR110 User manual

POLTI LECOWATER Basic Parts list manual

POLTI

POLTI LECOWATER Basic Parts list manual

POLTI FORZASPIRA C 110 User manual

POLTI

POLTI FORZASPIRA C 110 User manual

POLTI VAPORETTO LECOASPIRA FRIENDLY User manual

POLTI

POLTI VAPORETTO LECOASPIRA FRIENDLY User manual

POLTI VAPORETTO LECOASPIRA 707 User manual

POLTI

POLTI VAPORETTO LECOASPIRA 707 User manual

POLTI Vaporetto SMART 40 MOP User manual

POLTI

POLTI Vaporetto SMART 40 MOP User manual

POLTI CIMEX ERADICATOR User manual

POLTI

POLTI CIMEX ERADICATOR User manual

POLTI lecoaspira vaporetto FAV 20 User manual

POLTI

POLTI lecoaspira vaporetto FAV 20 User manual

POLTI EcoSteamVac Dual User manual

POLTI

POLTI EcoSteamVac Dual User manual

POLTI FORZASPIRA C 115 User manual

POLTI

POLTI FORZASPIRA C 115 User manual

Popular Vacuum Cleaner manuals by other brands

Westfalia 22 70 74 instruction manual

Westfalia

Westfalia 22 70 74 instruction manual

iHome AUTOVAC LUNA owner's guide

iHome

iHome AUTOVAC LUNA owner's guide

Kenwood JETFORCE VC2791/2 manual

Kenwood

Kenwood JETFORCE VC2791/2 manual

TSM ARIA 240 operating manual

TSM

TSM ARIA 240 operating manual

KENT KC-B502 instruction manual

KENT

KENT KC-B502 instruction manual

Parkside PNTS 1300 A1 Operation manual

Parkside

Parkside PNTS 1300 A1 Operation manual

Sunbeam 27509 instruction manual

Sunbeam

Sunbeam 27509 instruction manual

Fakir Prestige 1805 operating instructions

Fakir

Fakir Prestige 1805 operating instructions

LG A9N Series owner's manual

LG

LG A9N Series owner's manual

Makita XCV11Z instruction manual

Makita

Makita XCV11Z instruction manual

SINTERIT ATEX Vacuum Cleaner user manual

SINTERIT

SINTERIT ATEX Vacuum Cleaner user manual

Zelmer ZVC301SK user manual

Zelmer

Zelmer ZVC301SK user manual

Shark Rocket Zero-M ZS352 owner's guide

Shark

Shark Rocket Zero-M ZS352 owner's guide

Bosch Professional GAS 25 L SFC Original instructions

Bosch

Bosch Professional GAS 25 L SFC Original instructions

VALBERG OPTIFIRE Instructions for use

VALBERG

VALBERG OPTIFIRE Instructions for use

Parkside PASP 18 A1 Operation and safety notes

Parkside

Parkside PASP 18 A1 Operation and safety notes

Clatronic BS 1229 instruction manual

Clatronic

Clatronic BS 1229 instruction manual

AmazonBasics B07C3N686Y Service and repair manual

AmazonBasics

AmazonBasics B07C3N686Y Service and repair manual

manuals.online logo
manuals.online logoBrands
  • About & Mission
  • Contact us
  • Privacy Policy
  • Terms and Conditions

Copyright 2025 Manuals.Online. All Rights Reserved.