manuals.online logo
Brands
  1. Home
  2. •
  3. Brands
  4. •
  5. Polygroup
  6. •
  7. Artificial Pine Tree
  8. •
  9. Polygroup TGA0M4865C00 User manual

Polygroup TGA0M4865C00 User manual

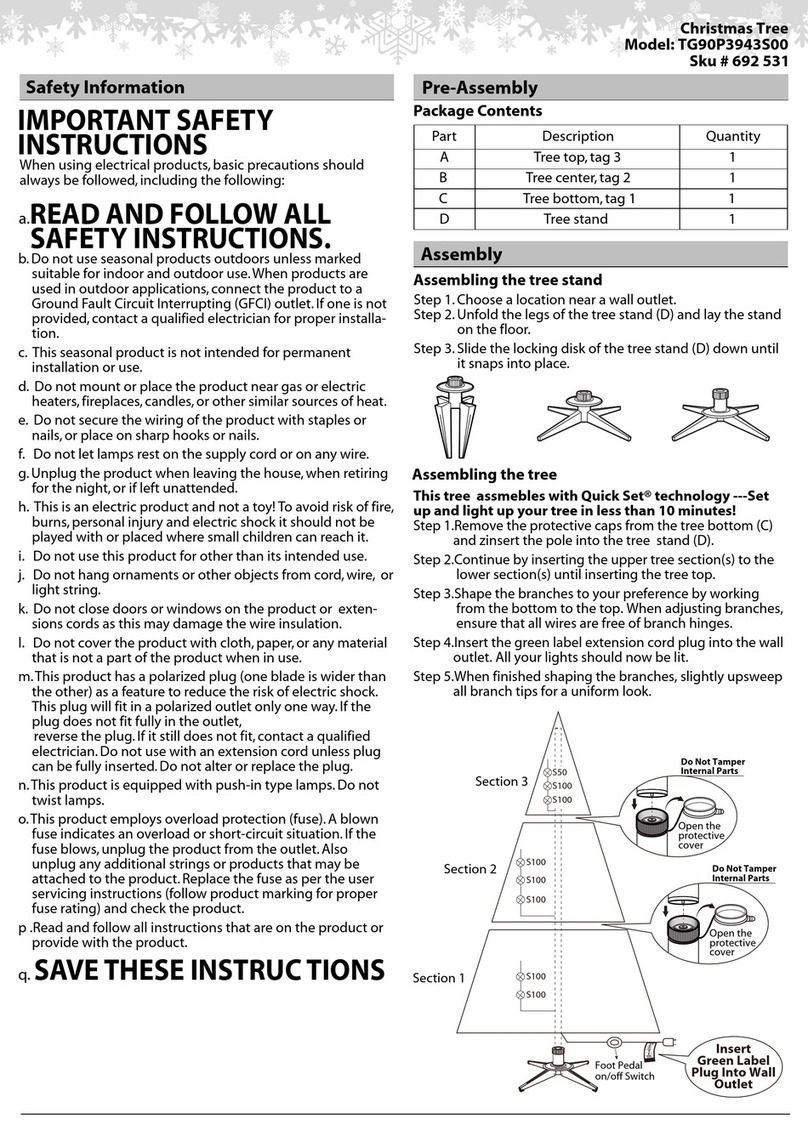
ASSEMBLY INSTRUCTIONS MADE IN CHINA
1
*Electrical Rating For The Tree
(For Indoor Use Only)
2.21A 120VAC 60Hz
MODEL #: TGA0M4865C00 SKU: 090-759
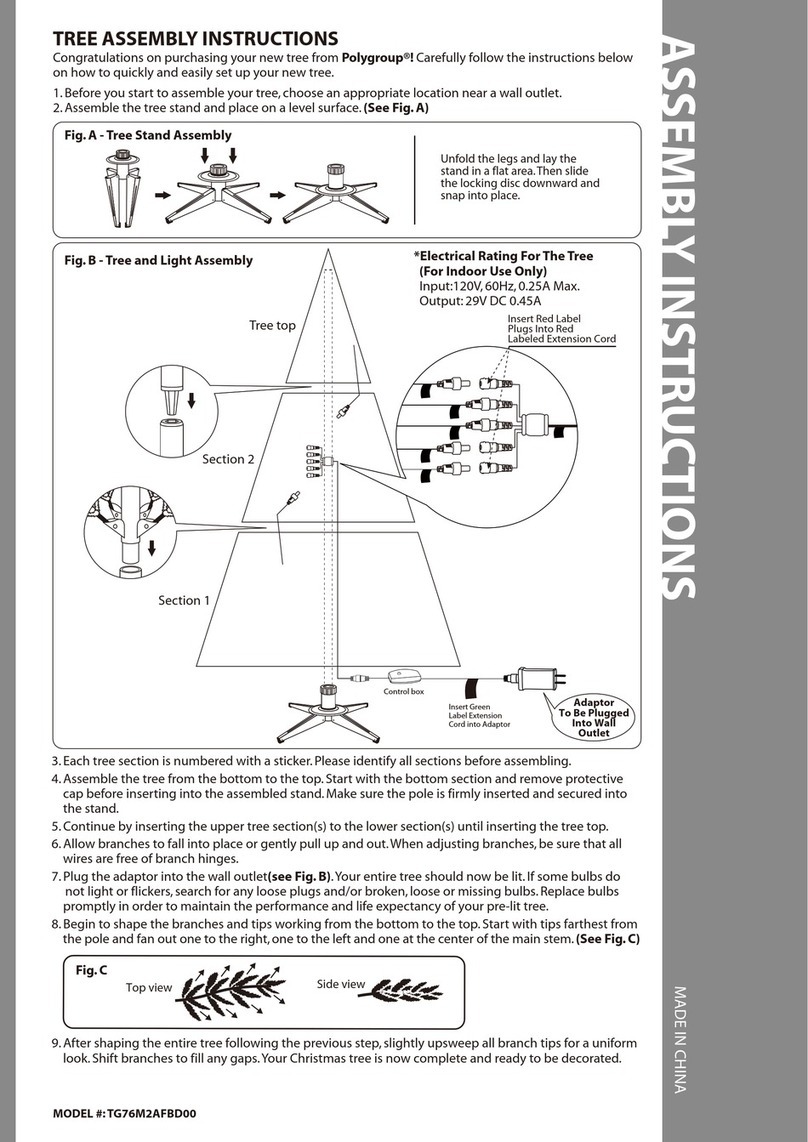
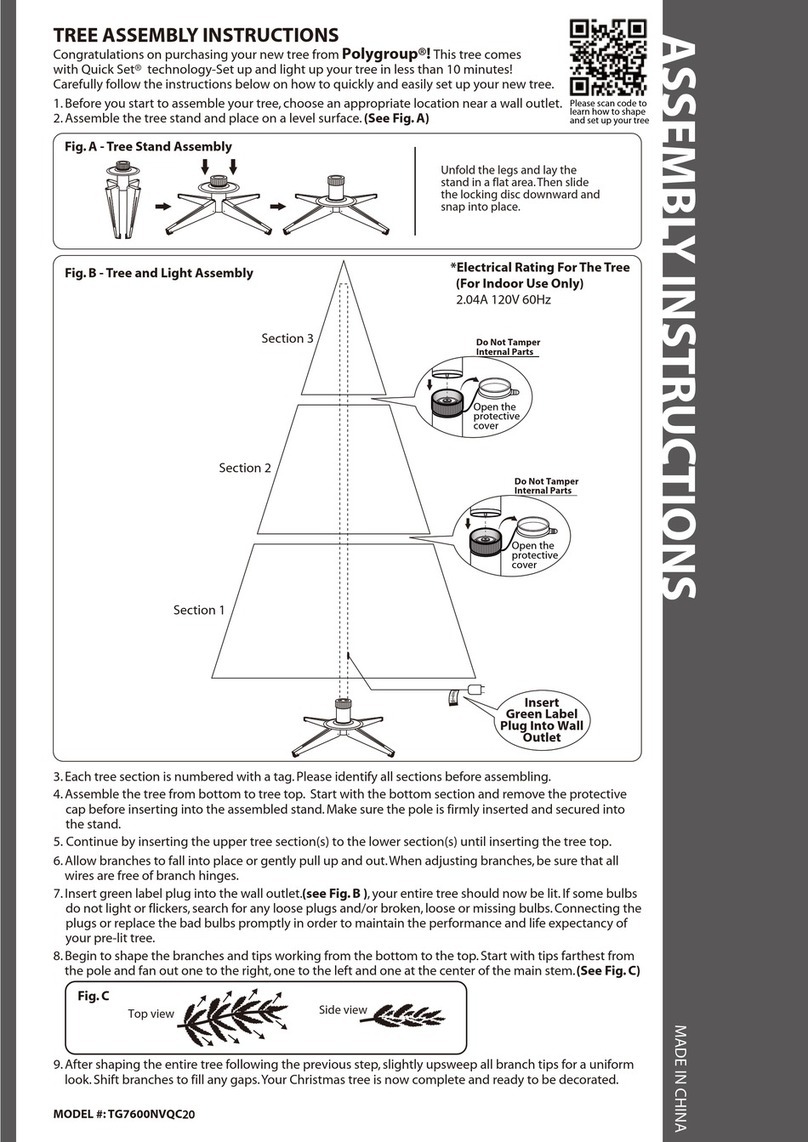
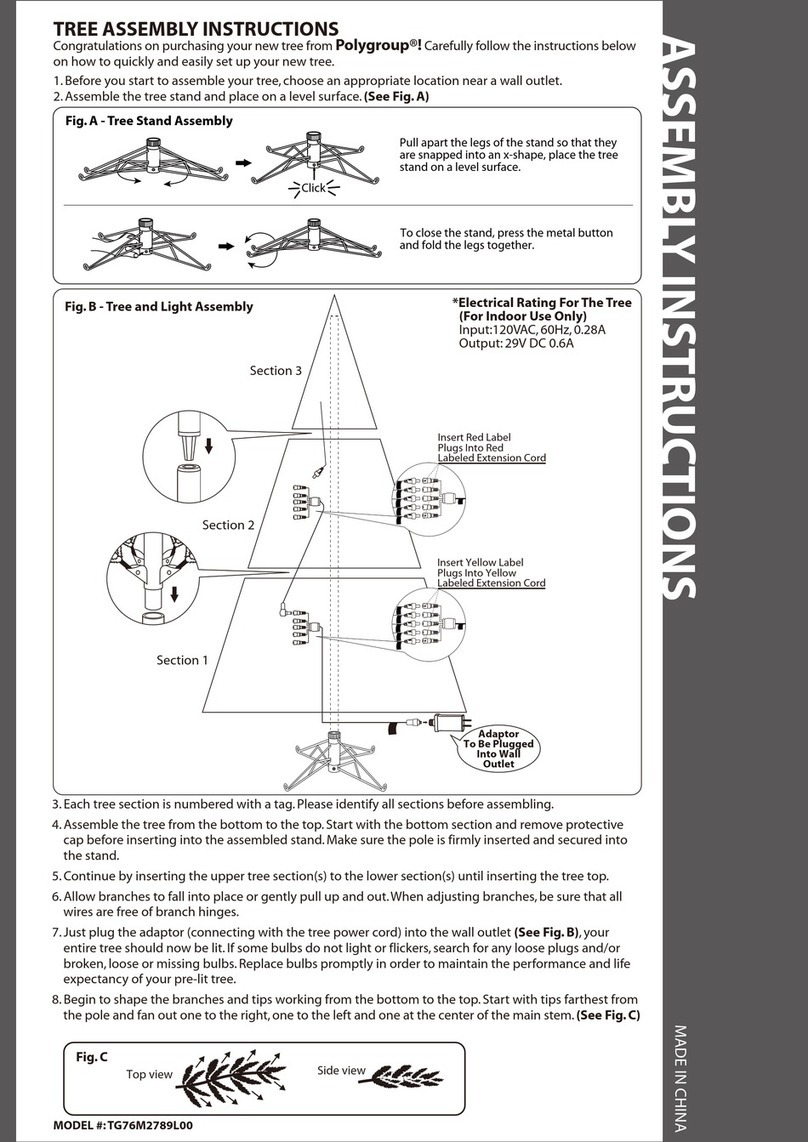
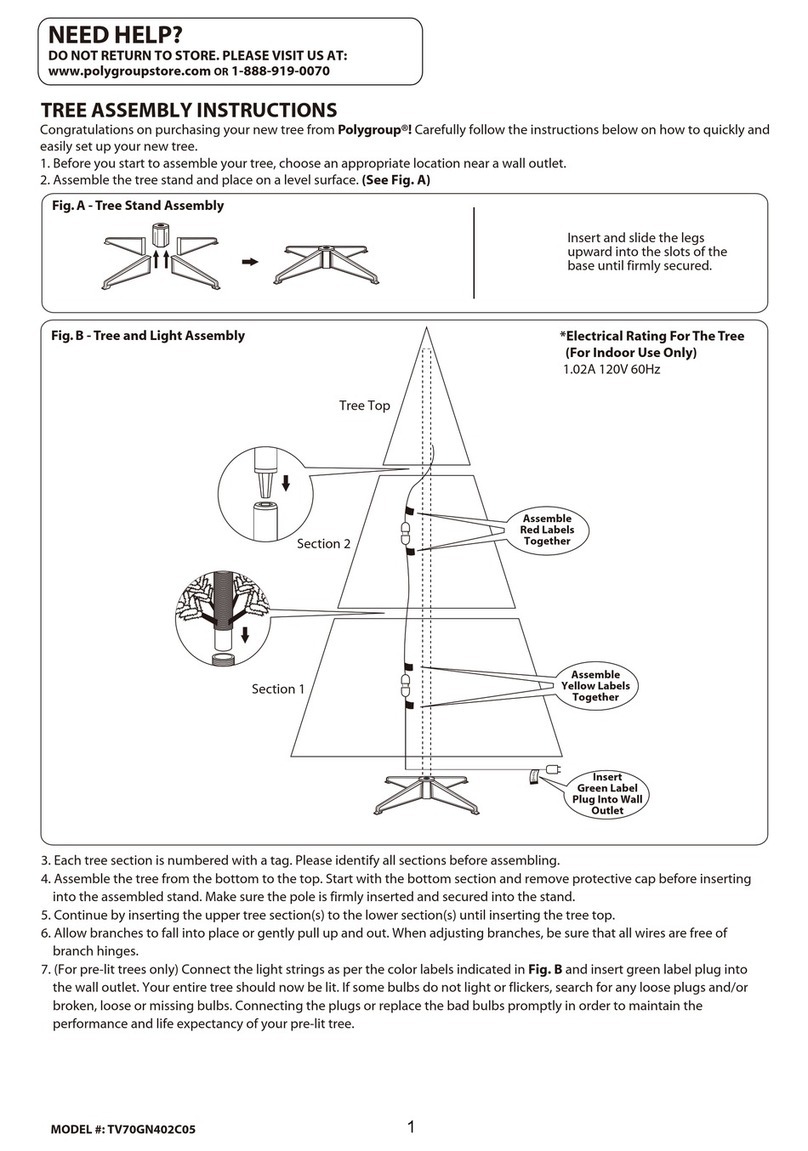
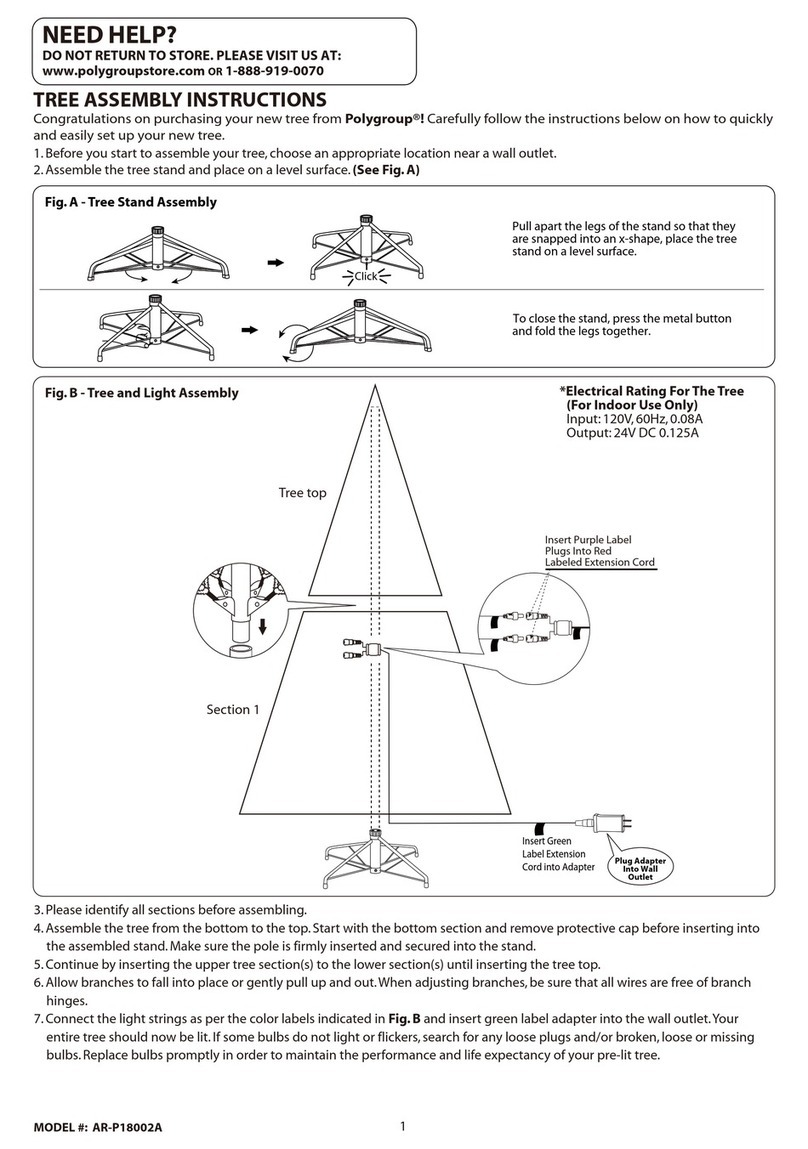
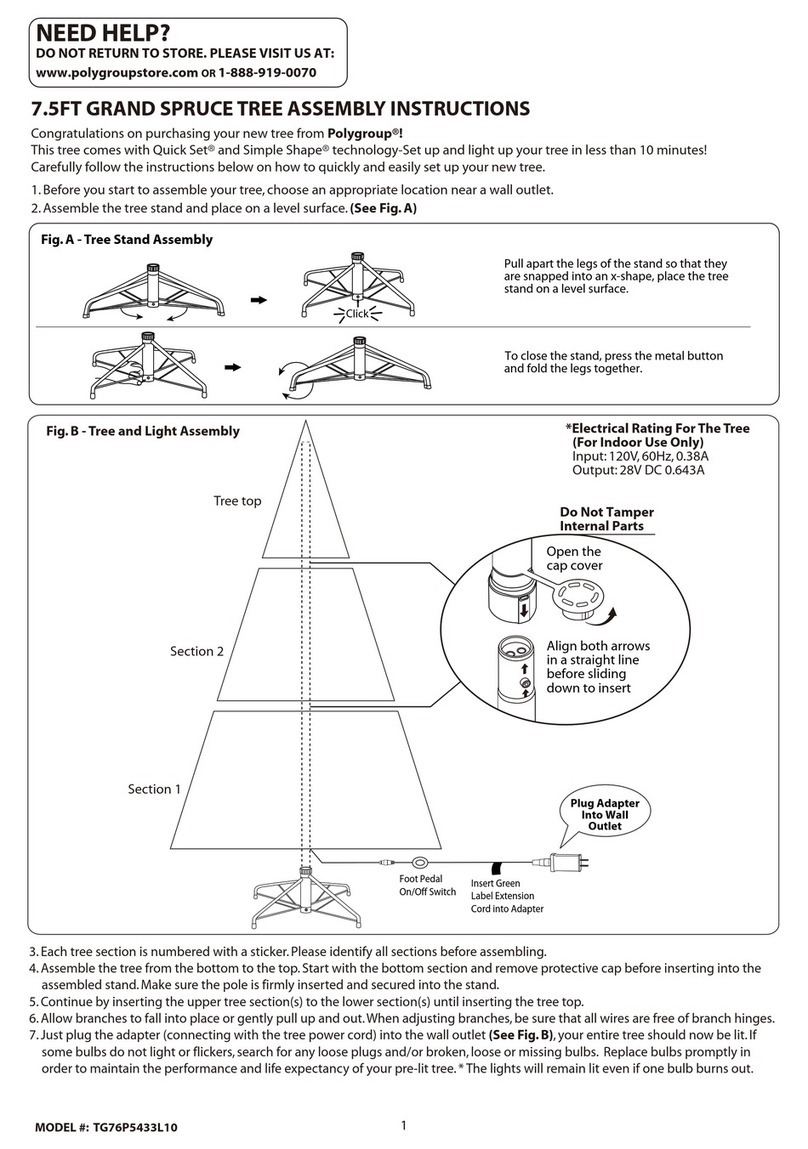
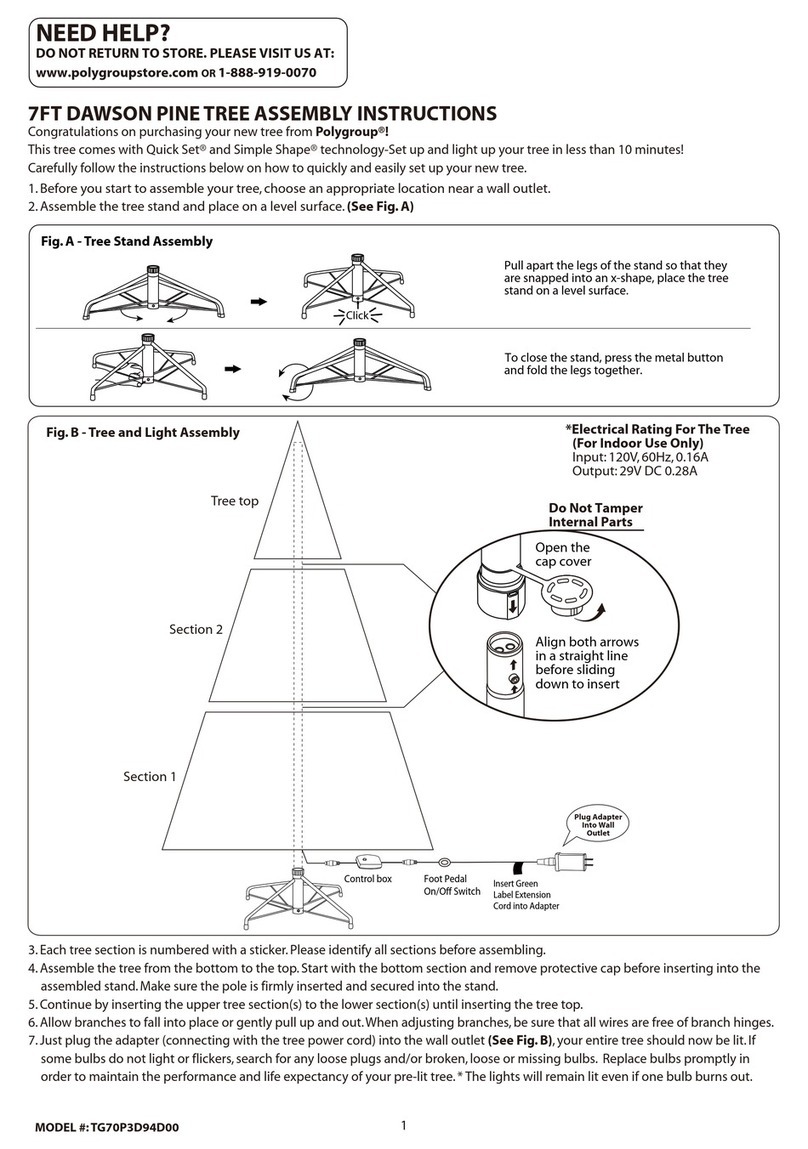
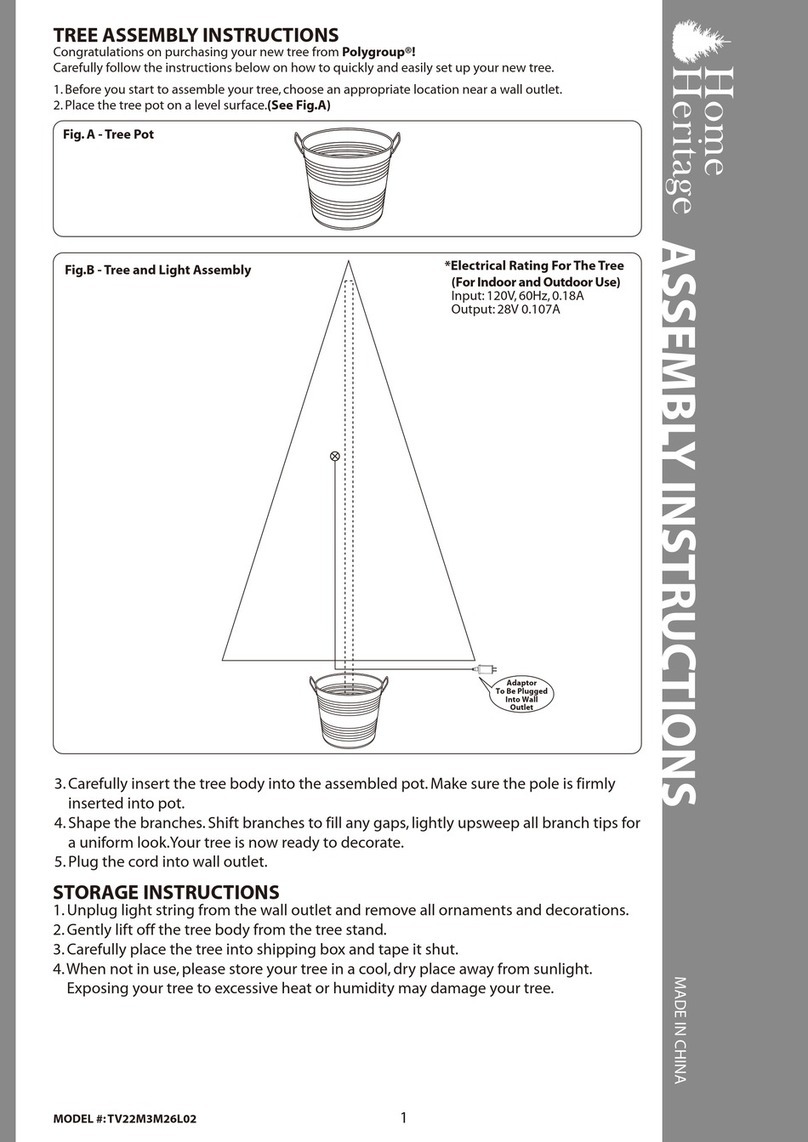
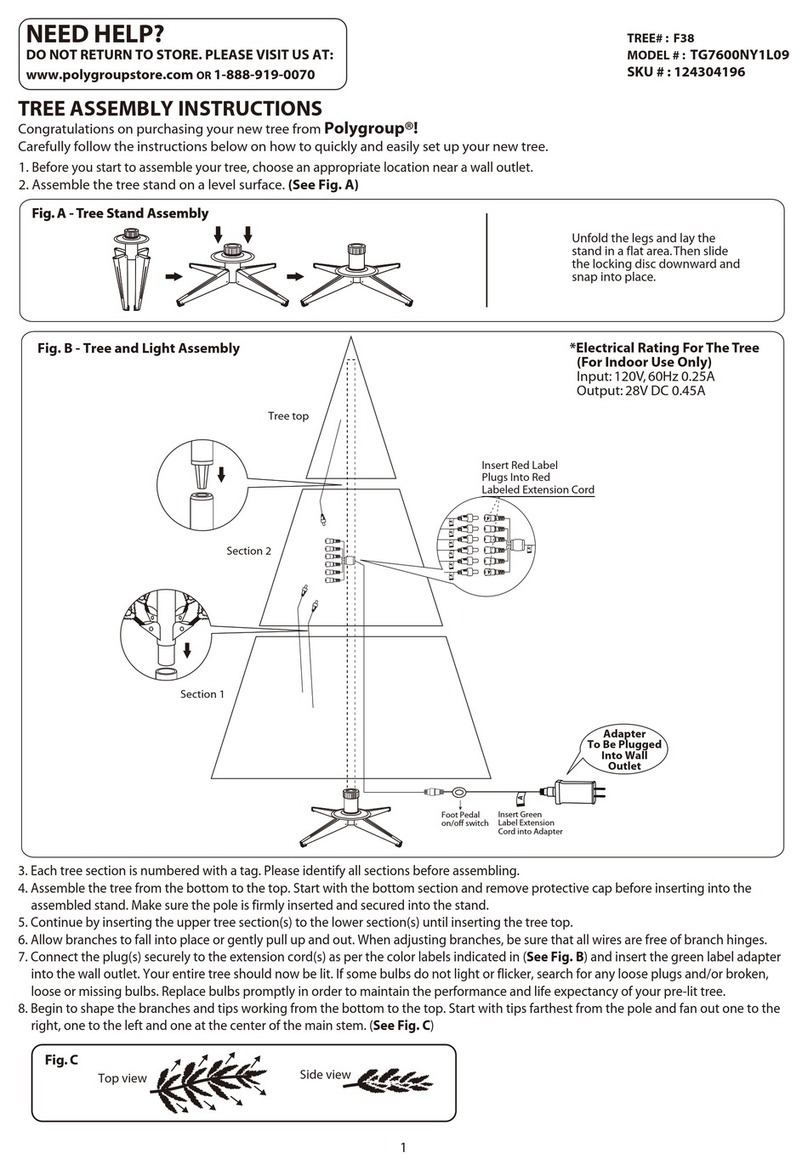
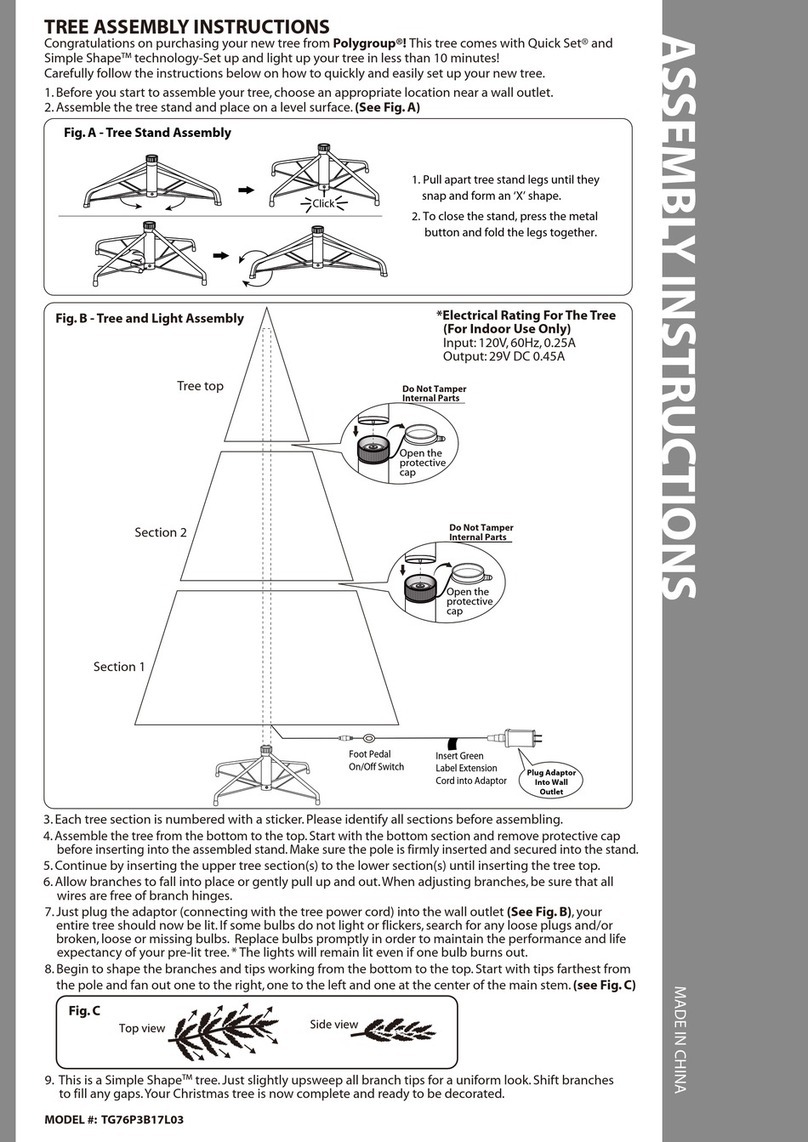
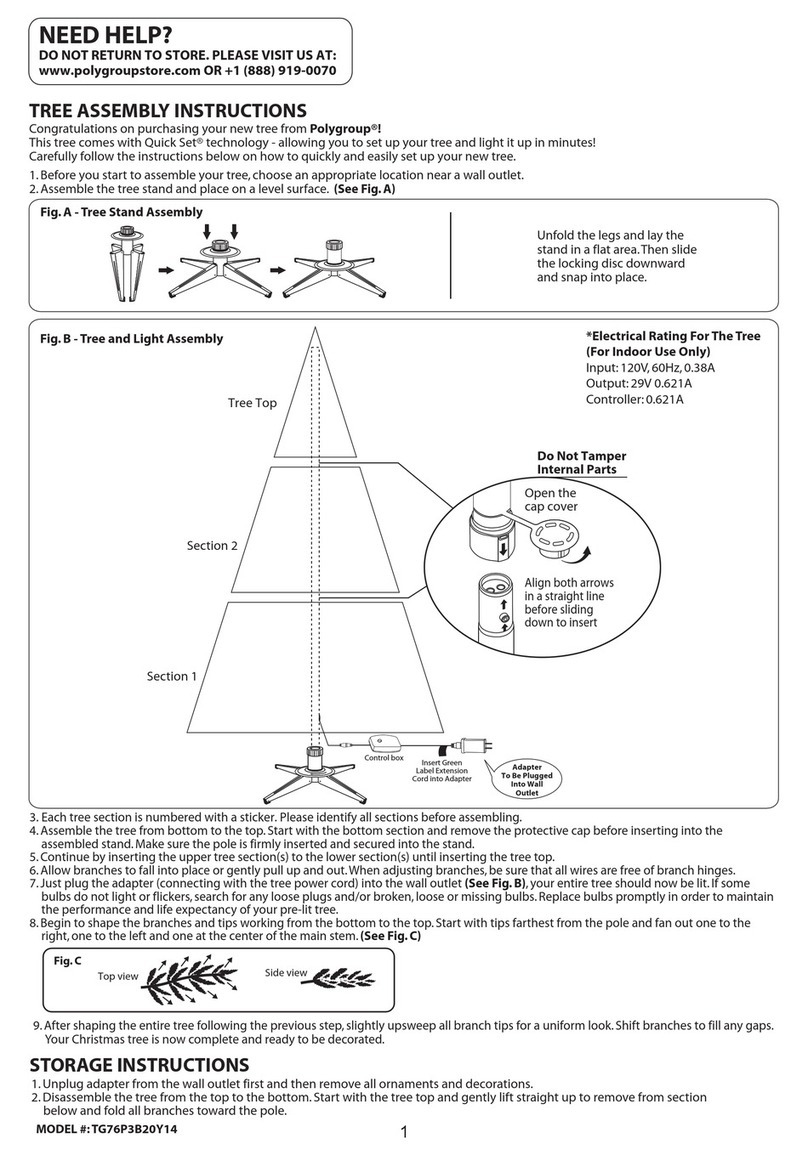
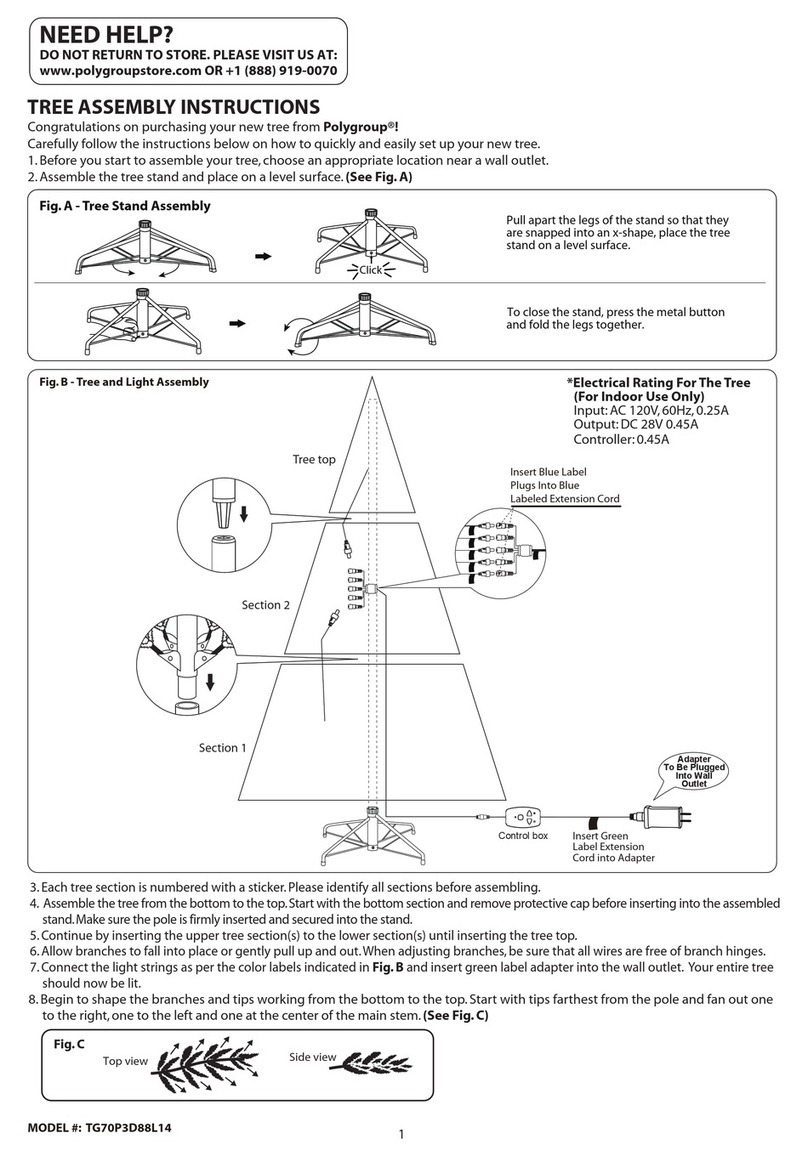
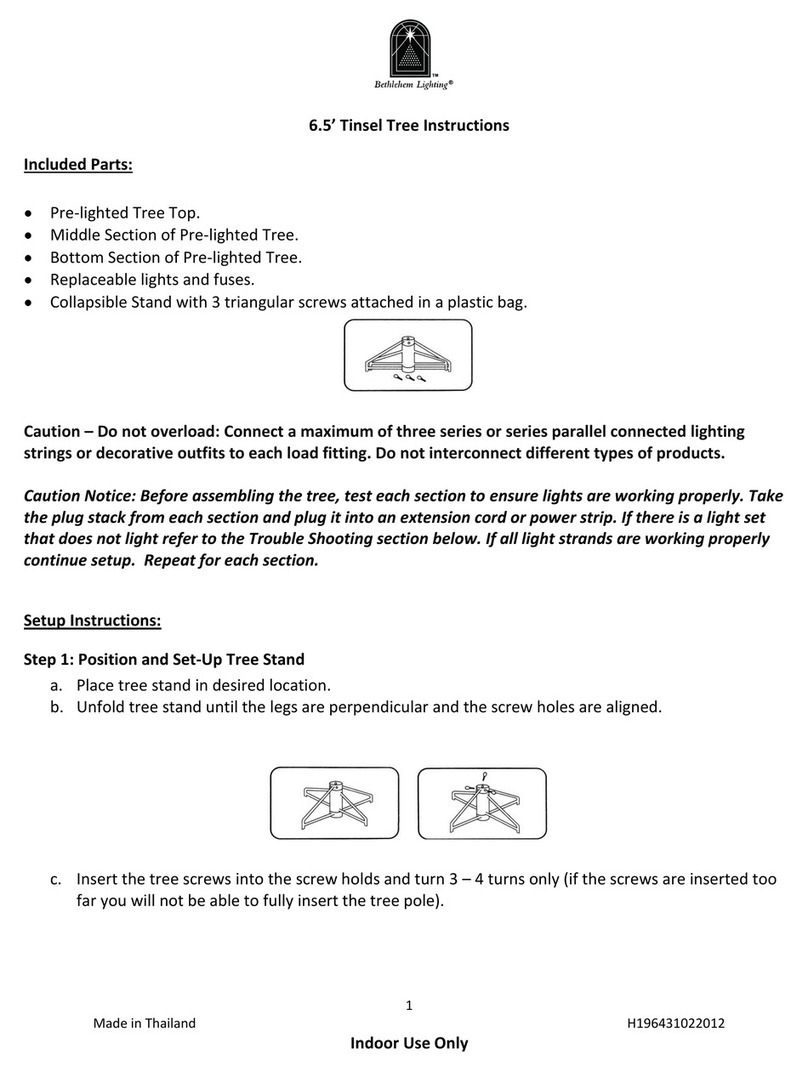
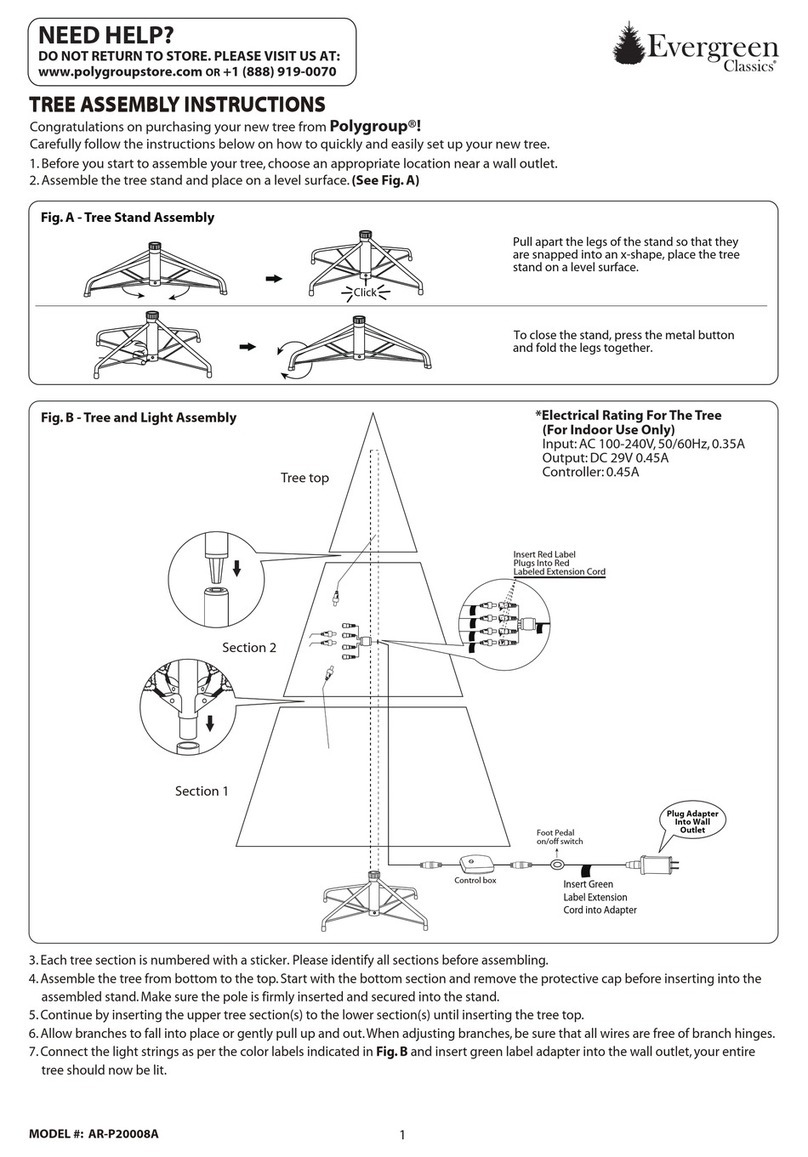
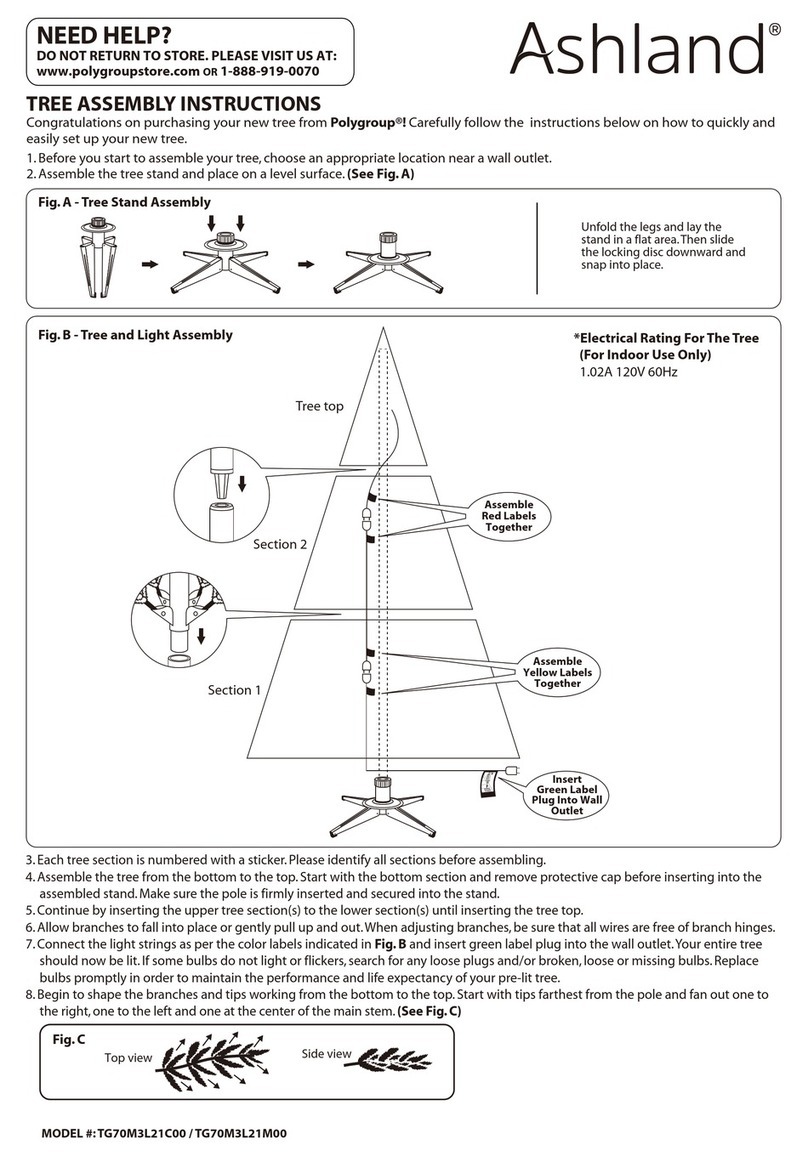
• Before you start to assemble your tree, choose an appropriate location near a wall outlet.
• Assemble the tree stand and place on a level surface. (See Fig. B)
Congratulations on purchasing your new tree from Polygroup®!
Carefully follow the instructions below on how to quickly and easily set up your new tree.
TREE ASSEMBLY INSTRUCTIONS
B
C
12
Section 1
Tree top
Section 2
Section 3
Each tree section is numbered
with a sticker. Please identify all
sections before assembling.
Insert Section 1 into the tree stand.
SET UP INSTRUCTIONS WITH QUICK FOLDTM
3
A. Locate “Pull Here” tab and corresponding
Cinch Handle
B. Hold Cinch Clip firmly with one hand and
press down on clip
C. With Cinch Clip depressed, pull clip away from
tree until all branches are released.
A
Section 1
Cinch
Handle
Tree stand Tree stand
Cinch Clip
Fig. A - Tree and Light Assembly
1
2
3
4
Insert
Green Label
Plug Into Wall
Outlet
Do Not Tamper
Internal Parts
Open the
protective
cover
Quick Set®
Connections
Do Not Tamper
Internal Parts
Open the
protective
cover
Quick Set®
Connections
Do Not Tamper
Internal Parts
Open the
protective
cover
Quick Set®
Connections
Quick FoldTM Cinch
Quick FoldTM Cinch
Quick FoldTM Cinch
1.Unfold the legs and lay the stand in
a flat area.Then slide the locking
disc downward and snap into place.
2.When inserting the bottom section
of the tree into the assembled stand,
thread the eyebolt into the stand
and tighten until the pole is firmly
secured.
Fig. A - Tree Stand Assembly
Eye Bolt
ASSEMBLY INSTRUCTIONS MADE IN CHINA
2
Top view Side view
Fig. C
• Insert green label plug into the wall outlet. (See Fig. A), your entire tree should now be lit.If some bulbs
do not light or flickers, search for any loose plugs and/or broken, loose or missing bulbs. Connecting the
plugs or replace the bad bulbs promptly in order to maintain the performance and life expectancy of
your pre-lit tree.
• Begin to shape the branches and tips working from the bottom to the top. Start with tips farthest from
the pole and fan out one to the right, one to the left and one at the center of the main stem. (See Fig. C)
• After shaping the entire tree following the previous step, slightly upsweep all branch tips for a uniform
look. Shift branches to fill any gaps.Your Christmas tree is now complete and ready to be decorated.
6
Remove the protective cap of Section 3
and add Tree top.
Tree top
Tree top
Section 1
Section 3
Section 2
Tree top
6
1 2
STORAGE INSTRUCTIONS WITH QUICK FOLDTM
• Unplug extension cord from the wall outlet first and then remove all ornaments and decorations.
• When not in use, please store your tree in a cool, dry place away from sunlight. Exposing your tree to
excessive heat or humidity may damage your tree.
Detach tree top and store it
in box.
Detach section1 from the tree stand
and place into box. Then fold up tree
stand by unlock the disc and then
store in box.
A. Cover the protective cap of the Section 3.
B. Hold Cinch Handle with one hand.
C. Hold Cinch Clip firmly with other hand and press down on clip.
D. Pull handle toward you while pushing away cinch clip
until the upper branches of tree middles Section 3 are
folded completely.
A
Tree stand
Tree stand
5
Section 1
Section 2
Section 3
Tree stand
B
C D
Section 2
Section 1
3
Fold the Section 2 like step 2. Detach
Section 2, and put it into the box.
Tree stand
Section 3
Section 1
Section 2
3
Fold the lower layer of Section 3
like step 2. Detach Section 3, and
put it into the box.
4
Remove the protective cap of Section 1
and add Section 2. Release all branches
using the same procedures described
in step 3.
Remove the protective cap of Section 2
and add Section 3. Release all branches
using the same procedures described
in step 3.
Section 1
Section 2
Tree stand
5
Cover the protective cap of tree
bottom Section 1, then follow step 2
to fold tree.
Section 1
Tree stand
ASSEMBLY INSTRUCTIONS MADE IN CHINA
3
TROUBLESHOOTING TIPS
SPARE PARTS
For Pre-lit Trees, If The Tree Does Not Illuminate
1. Please check to make sure that all plugs are properly connected and power cord is plugged into the
wall outlet.
2.Turning the poles gently to make sure pole to pole are connected into place.
3. Check for loose connection between light string plugs and extension cords.
4. Please check for loose, broken or missing light bulbs and replace as needed.
1. Extra hinge pins are included for repairing the hinges.
Place the branch into the slot of the bracket.
2. Insert a new hinge pin through the hole and secure
using the retainer washer.(See Fig. D)
Each tree includes hinge pins/washers, and for pre-lit trees spare bulbs and fuses are also included. If extra
parts are needed, please contact our customer service center.
Loose Hinge Pin
Fig.D
CUSTOMER SERVICE FOR CHRISTMAS TREES
For any questions, assistance, or missing parts, Do Not Return To Place Of Purchase.Please contact
us at 1-888-919-0070 or visit our website at www.polygroupstore.com. One of our customer service
representatives will be happy to assist you.
TREE ID# IS LOCATED ON END PANEL OF BOX.TREE ID# IS REQUIRED WHEN REQUESTING REPLACEMENT PARTS.
Customer Name:
Address(No P.O. Boxes):
City & State:
Zip Code:
Day Phone:
Date Purchased:
Tree ID#:
Tree UPC#:
Store Purchased:
Specify Problem:

This manual suits for next models

1

Other Polygroup Artificial Pine Tree manuals

Polygroup TG70M3AOMC04 User manual

Polygroup

Polygroup TG70M3AOMC04 User manual

Polygroup TG76M2I41L01 User manual

Polygroup

Polygroup TG76M2I41L01 User manual

Polygroup TM30P7001X00 User manual

Polygroup

Polygroup TM30P7001X00 User manual

Polygroup TG76M3Z79C00 User manual

Polygroup

Polygroup TG76M3Z79C00 User manual

Polygroup TV70M3AHYC00 User manual

Polygroup

Polygroup TV70M3AHYC00 User manual

Polygroup TGC0P4766C00 User manual

Polygroup

Polygroup TGC0P4766C00 User manual

Polygroup Home Heritage TG90M3W92D00 User manual

Polygroup

Polygroup Home Heritage TG90M3W92D00 User manual

Polygroup TG60P3D94L01 Manual

Polygroup

Polygroup TG60P3D94L01 Manual

Polygroup TG76M4244L04 User manual

Polygroup

Polygroup TG76M4244L04 User manual

Polygroup HOLIDAY SYMPHONY Evergreen Classics Manual

Polygroup

Polygroup HOLIDAY SYMPHONY Evergreen Classics Manual

Polygroup TV60M2389C01 User manual

Polygroup

Polygroup TV60M2389C01 User manual

Polygroup TG70P3D88L14 User manual

Polygroup

Polygroup TG70P3D88L14 User manual

Polygroup ENCHANTED FOREST TG70M3ANYP01 User manual

Polygroup

Polygroup ENCHANTED FOREST TG70M3ANYP01 User manual

Polygroup TG76P2657D30 User manual

Polygroup

Polygroup TG76P2657D30 User manual

Polygroup Home Heritage TG6600MZAC00 User manual

Polygroup

Polygroup Home Heritage TG6600MZAC00 User manual

Polygroup TG76P3A08D00 User manual

Polygroup

Polygroup TG76P3A08D00 User manual

Polygroup TG76M3P06C03 User manual

Polygroup

Polygroup TG76M3P06C03 User manual

Polygroup EZ Connect Color Blast TG66P4826P00 User manual

Polygroup

Polygroup EZ Connect Color Blast TG66P4826P00 User manual

Polygroup TG80M3AWVL01 User manual

Polygroup

Polygroup TG80M3AWVL01 User manual

Polygroup Home Heritage TV70M2D31L03 User manual

Polygroup

Polygroup Home Heritage TV70M2D31L03 User manual

Polygroup TG66M3545X06 User manual

Polygroup

Polygroup TG66M3545X06 User manual

Polygroup FL18 User manual

Polygroup

Polygroup FL18 User manual

Polygroup Home Heritage TGG0M5311L00 User manual

Polygroup

Polygroup Home Heritage TGG0M5311L00 User manual

Polygroup TG76P5458D00 User manual

Polygroup

Polygroup TG76P5458D00 User manual

Popular Artificial Pine Tree manuals by other brands
Trim a Home 6.5' Van Buren Pine owner's manual

Trim a Home

Trim a Home 6.5' Van Buren Pine owner's manual

GE 18331HDC quick start guide

GE

GE 18331HDC quick start guide

anko JT-DC12V7.2W-E4 quick start guide

anko

anko JT-DC12V7.2W-E4 quick start guide

Frontgate Holiday 151883 CLE quick start guide

Frontgate

Frontgate Holiday 151883 CLE quick start guide

Home Accents Holiday TV50CY339L01 quick start guide

Home Accents Holiday

Home Accents Holiday TV50CY339L01 quick start guide

Home Accents Holiday TY029-1414 Assembly instructions

Home Accents Holiday

Home Accents Holiday TY029-1414 Assembly instructions

Home Accents Holiday TG76M4J17L04 quick start guide

Home Accents Holiday

Home Accents Holiday TG76M4J17L04 quick start guide

Home Accents Holiday TG76P2647L03 quick start guide

Home Accents Holiday

Home Accents Holiday TG76P2647L03 quick start guide

Mon Sapin Woody MSW1300 quick start guide

Mon Sapin Woody

Mon Sapin Woody MSW1300 quick start guide

Sunnydaze Decor MERRY BERRIES manual

Sunnydaze Decor

Sunnydaze Decor MERRY BERRIES manual

CASARIA DBPB001 instructions

CASARIA

CASARIA DBPB001 instructions

DS Produkte LK20135 instructions

DS Produkte

DS Produkte LK20135 instructions

Frontgate SNOW ANGEL PINE 7.5ft Assembly instructions

Frontgate

Frontgate SNOW ANGEL PINE 7.5ft Assembly instructions

Home Accents Holiday TG70M3W89D01 manual

Home Accents Holiday

Home Accents Holiday TG70M3W89D01 manual

Holiday Living TG90P3813S03 manual

Holiday Living

Holiday Living TG90P3813S03 manual

Anslut 422-951 User instructions

Anslut

Anslut 422-951 User instructions

Anslut 422424 User instructions

Anslut

Anslut 422424 User instructions

Coopers of Stortford H955 Instructions for use

Coopers of Stortford

Coopers of Stortford H955 Instructions for use

manuals.online logo
manuals.online logoBrands
  • About & Mission
  • Contact us
  • Privacy Policy
  • Terms and Conditions

Copyright 2025 Manuals.Online. All Rights Reserved.