Pope POWER TRIM 101LET500 User manual

POWER TRIM
Electric Line Trimmer 500W
Model No. 101LET500
Operator’s Manual
To reduce the risk of injury, the user must read and understand the
Operator’s Manual. Save this manual.
WARNING

Introduction
Thank you for purchasing a Pope product.
We would like you to be completely satisfied with your new product, so feel free to contact
Pope for help with any information you require.
Pope's Customer Service centre number is 1300 134 880.
Please read this manual carefully to learn how to operate and maintain your product correctly.
It is important to consult these instructions in order to acquaint yourself with the tool, its proper
use and safety precautions.
Please observe the general maximum operating times as well as local regulations for tool
operation.
Should this product require repair under the conditions of the warranty, please return it to the
place of purchase. You will need to provide proof of purchase to obtain a free of charge repair,
or a replacement.
Keep these instructions in a safe place.
For your records, attach your receipt here.
2

SAFETY RULES
•Physical Condition of the Operator. Do not operate this product when tired, ill or under the
influence of alcohol, drugs or medication.
•Clothing Requirements. Always wear long heavy pants, boots and gloves. Do not wear
loose clothing, jewellery, short pants, sandals or go barefoot. Secure hair so that it is above
shoulder level to avoid entanglement in moving parts.
•Protective Accessories Requirements. Wear safety eye protection when operating this
product. Wear hearing protection during extended periods of operation.
•Condition of Product Before Use. Inspect condition of the product before use. Only operate
the tool when it is in good working order and is not damaged in any way. Damaged parts have
to be replaced immediately by a qualified electrician. Never use the tool if any of its safety
devices or guards are damaged or missing.
•Proper Stance. Keep firm footings and balance. Do not overreach.
•Dangerous Environments. Do not use the product in damp or wet locations. Do not expose
the tool to wet conditions.
•Work Area. Clear the area to be cut before each use. Remove all objects such as rocks,
broken glass, nails, wire, or string that can be thrown or become entangled in the cutting
attachment. Clear the area of bystanders, pets and children. At a minimum, keep all
bystanders, pets and children outside a 15 m radius. Because there still may be a risk to
bystanders from thrown objects, bystanders should be encouraged to wear eye protection.
If you are approached while operating the product, stop the motor and ensure the line trimmer
head has stopped moving.
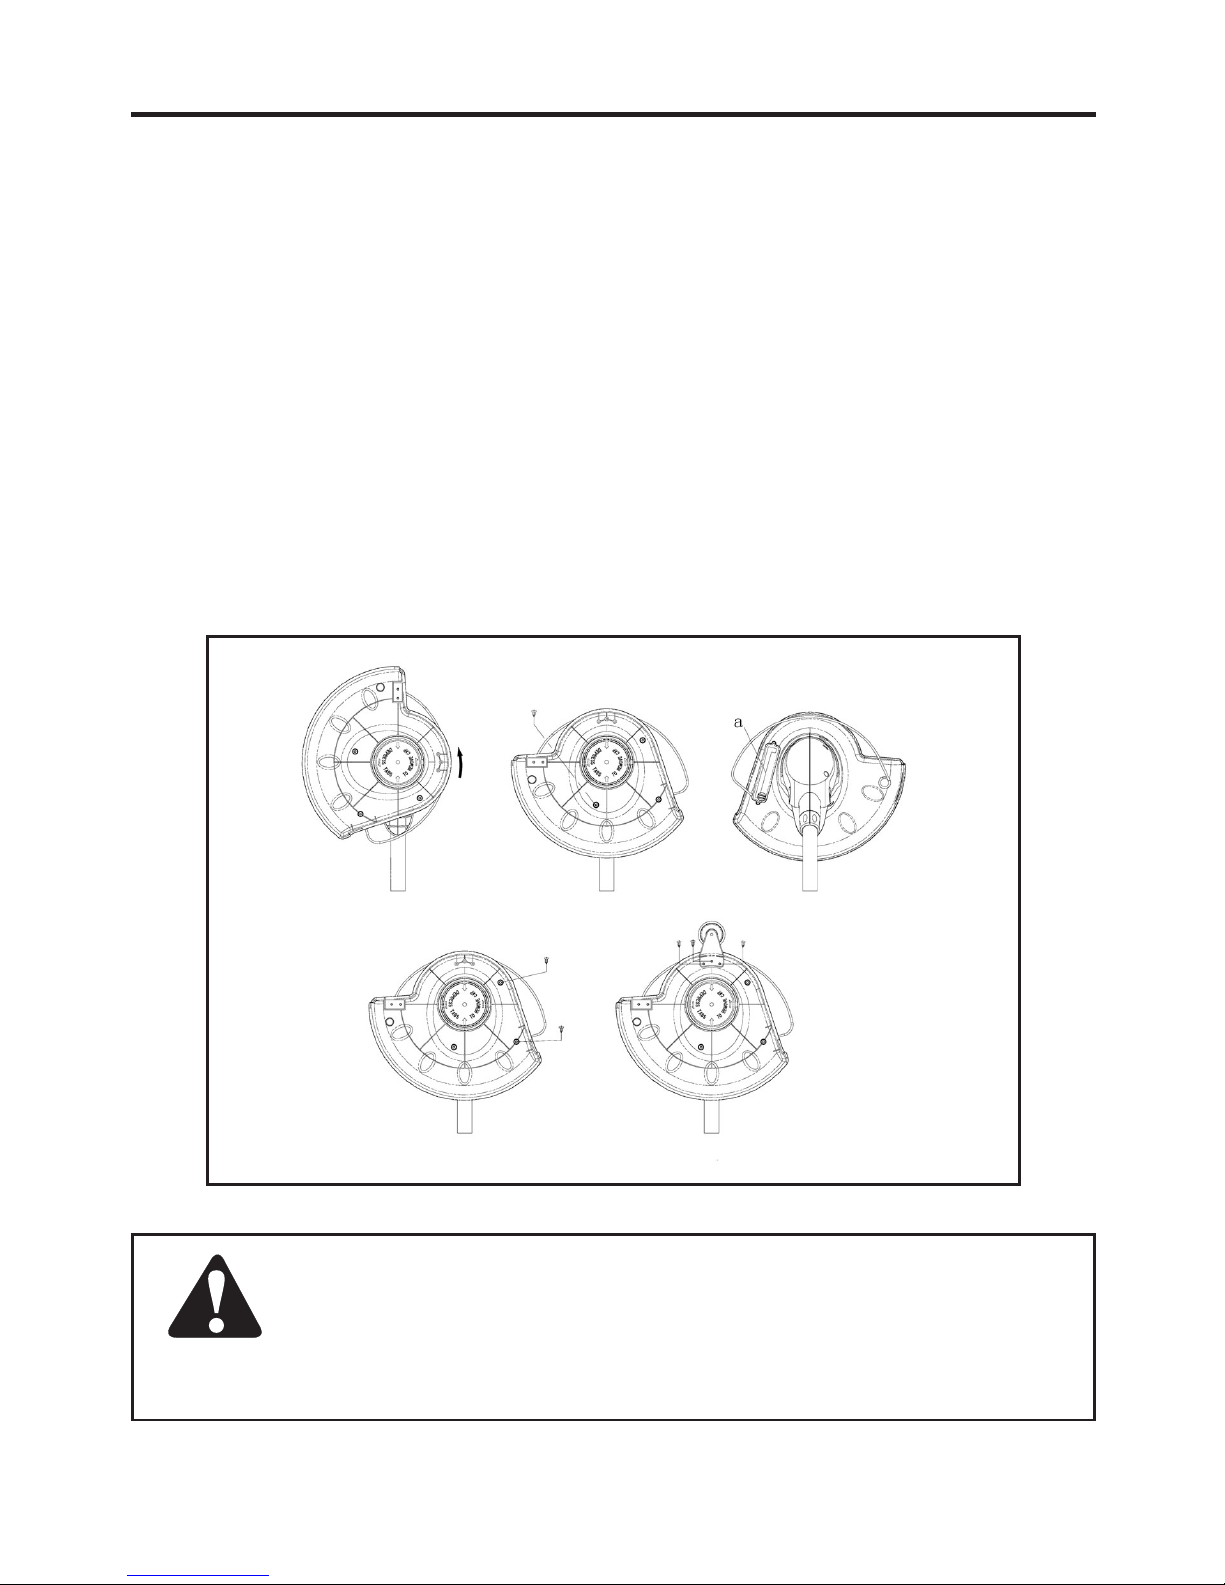
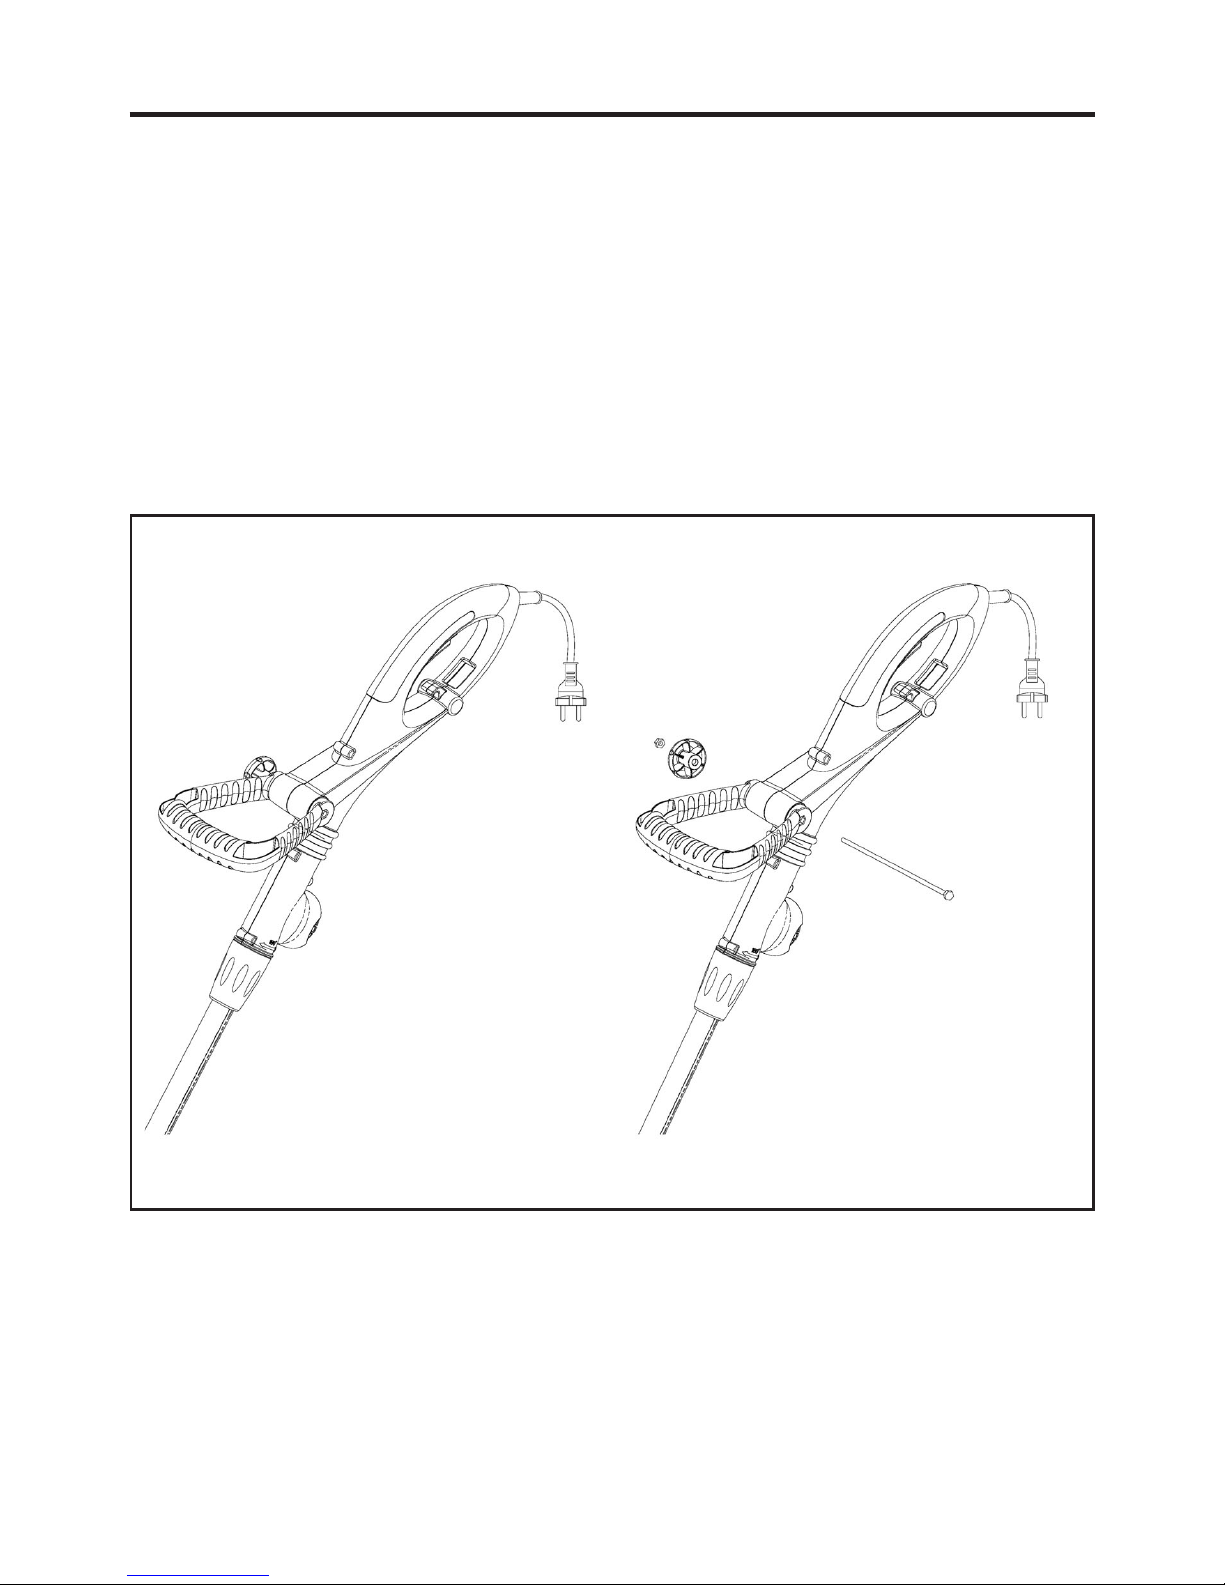
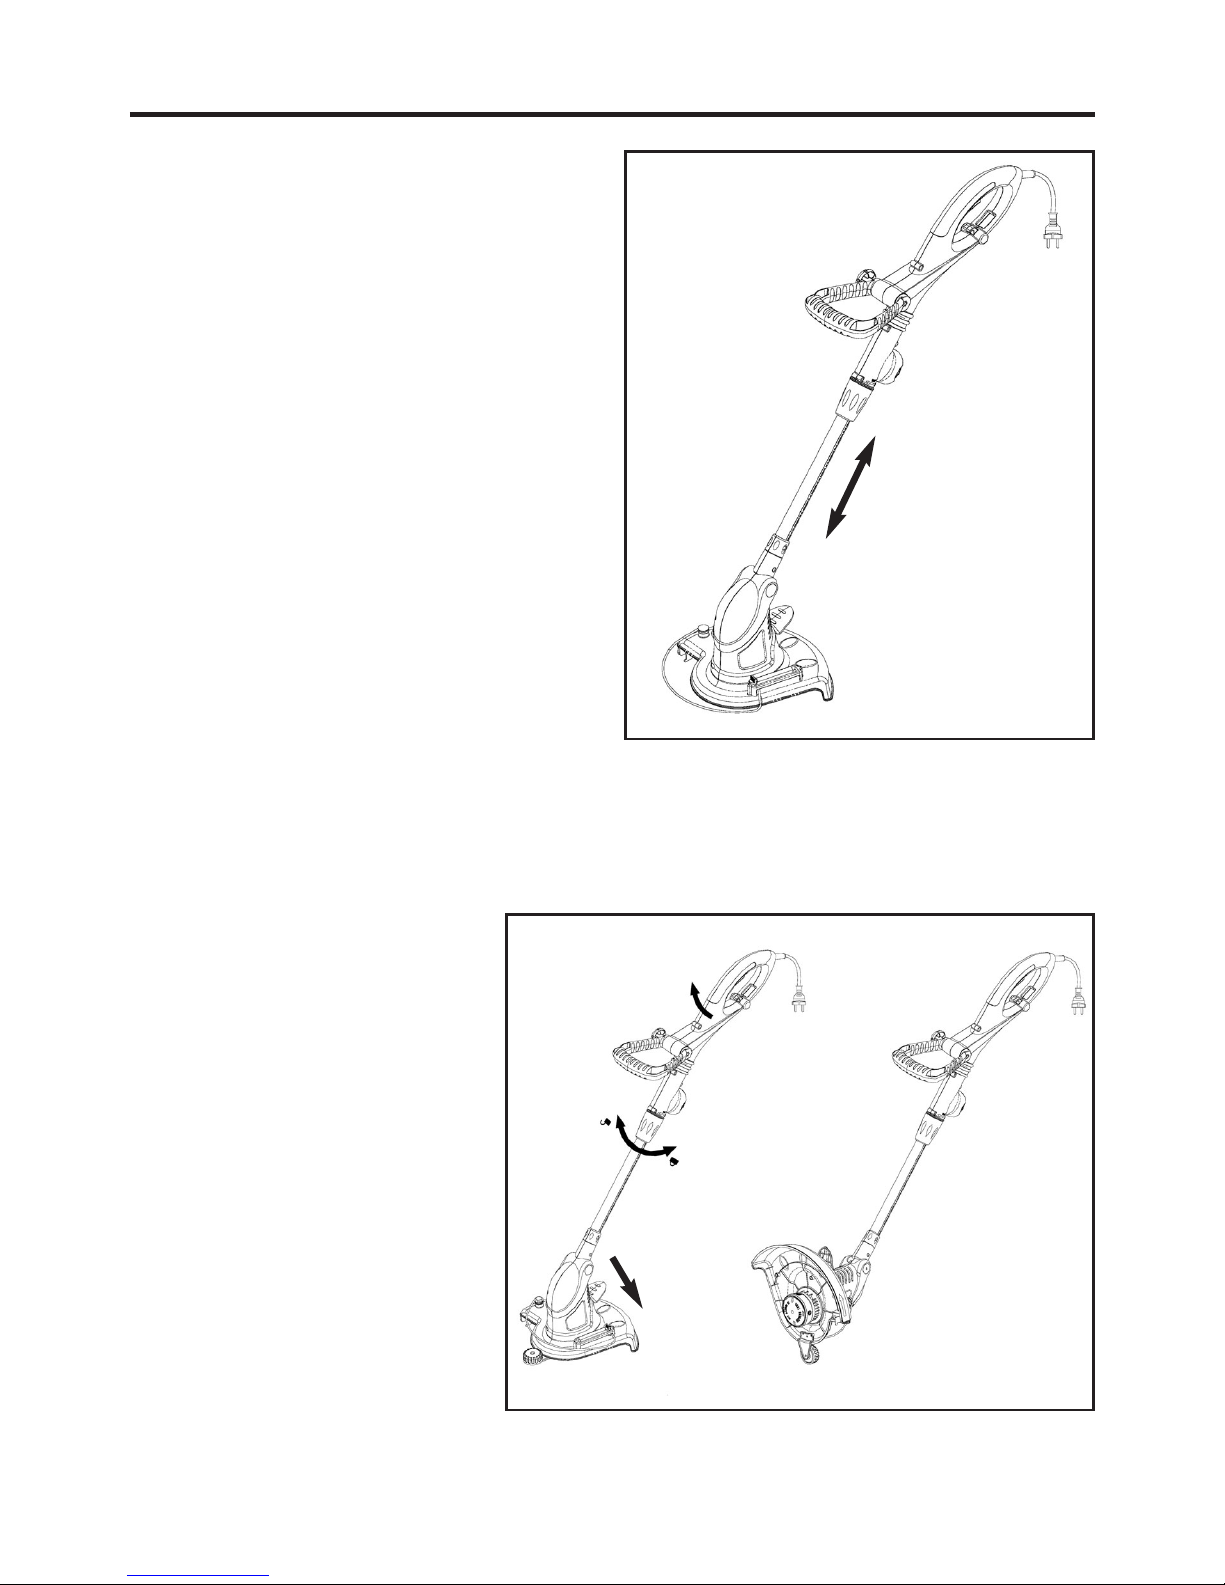
•Condition of Line Trimmer before use. The Line Trimmer shall be assembled according to
the manufacturer's instructions. Failure to use the proper parts may cause product failure or
increase the risk of injury to the user.
•Use the Right Product. This line trimmer should be used exclusively for trimming grass,
weeds and light undergrowth. Do not use it for any other purpose.
•Use of Product. Never allow children to use the tool. Never allow other persons who are not
familiar with the operating instructions to use the tool. Never use the tool when there are
people, particularly children or pets nearby.
•Responsibility. The user is responsible for any accidents or hazards suffered by third parties
or their property.
•Maintenance. Switch off the tool and pull plug from the socket before carrying out any
cleaning or maintenance work.
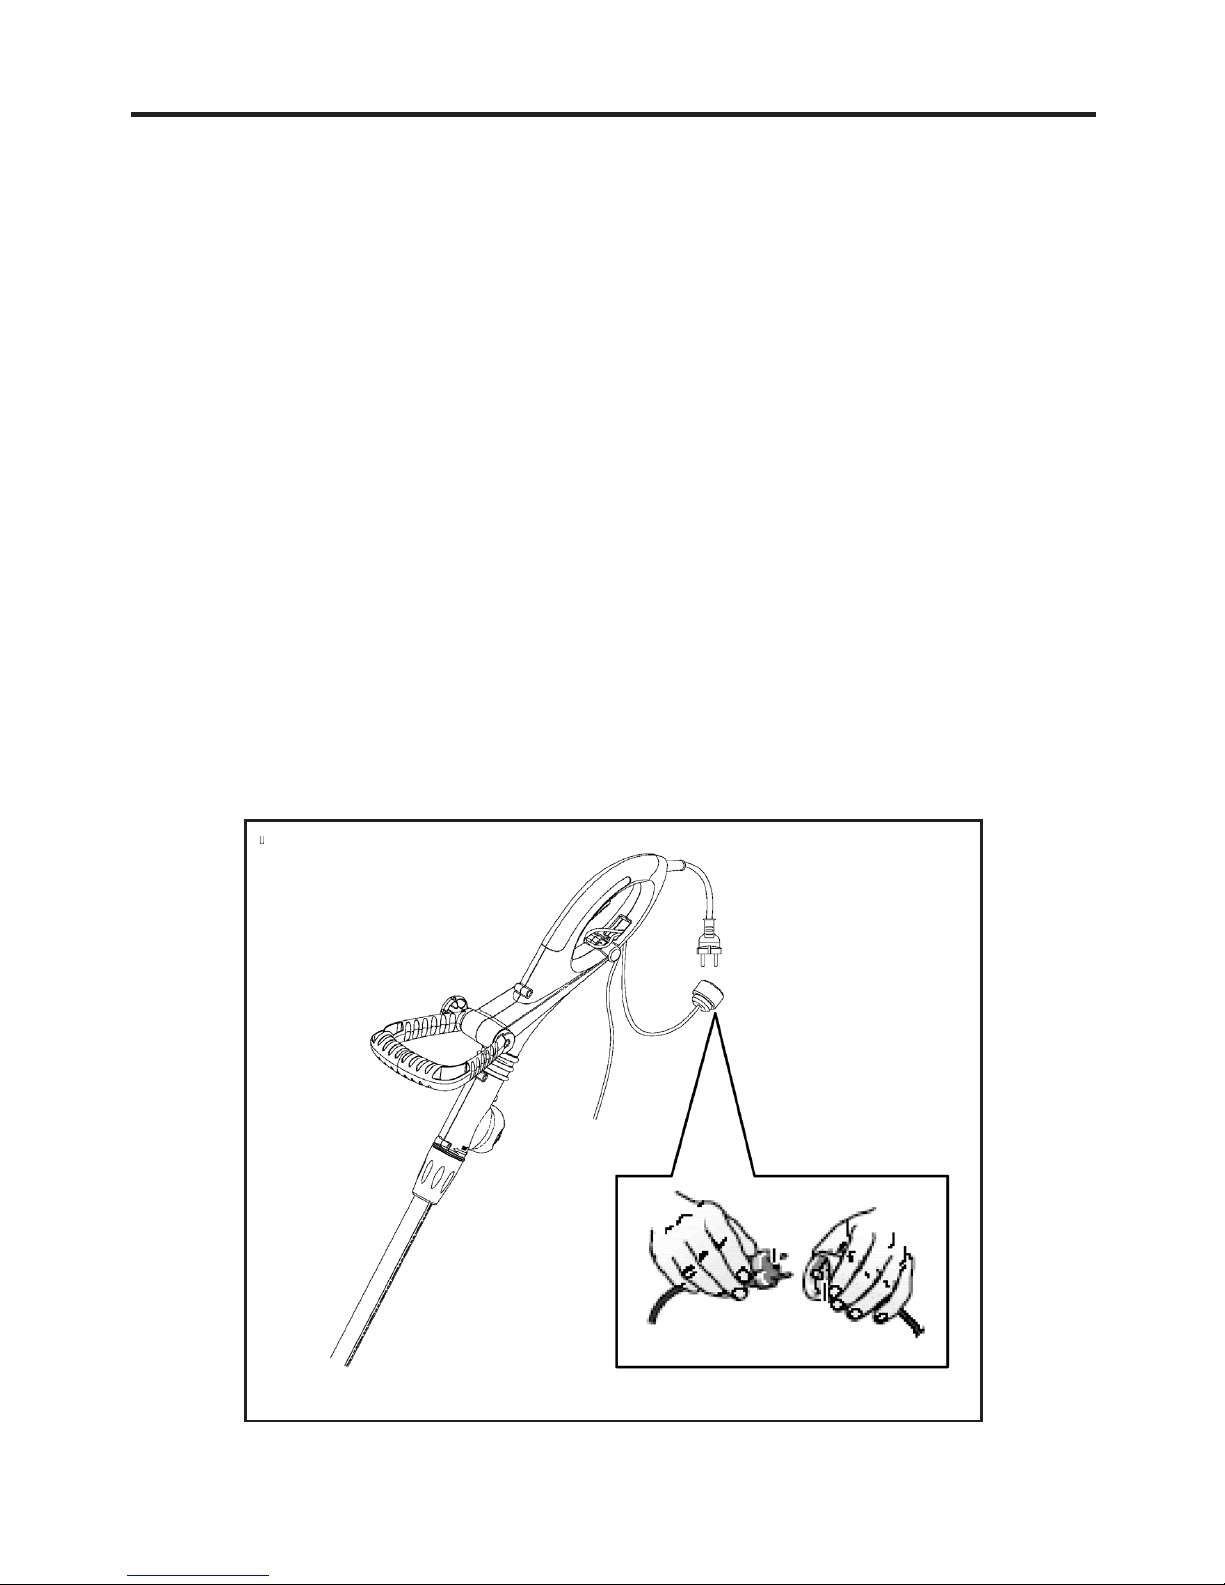
•Outdoor Use. When working outdoors, use only extension cables which are approved for
outdoor use.
•Electrical. Extension cables must have a minimum cross section of 1.5 mm2.
•Plugs. Plug connections must have earthing contacts and be protected from water.
Read and understand all instructions. Failure to follow all instructions
may result in serious personal injury as well as damage to the product.
WARNING
3

4
Applications
Use this product for the following applications:
•Cutting grass, weeds and light undergrowth.
•Edging along paths and driveways.
The Pope POWER TRIM Electric Line Trimmer is designed to be used around the home and
should only be operated within its design limitations. Tools of this category which are designed for
home and garden use should only be operated in such settings. Tools of this category are not
suitable for use in public facilities, parks and sports centres, on farms or in the forestry sector.
Unpacking
•Carefully remove the product from the box.
•Inspect the product carefully to make sure no breakage or damage occurred during shipping.
•Do not discard the packing material until you have carefully inspected and satisfactorily
operated the product.
•If any parts are damaged or missing please call the Pope Customer Service Centre on
1300 134 880 for assistance.
Packing List
Line trimmer (1)
Auxiliary handle (1)
Grass Deflector Guard with Adjustable Tree guard (1)
Edging Wheel (1)
Screws (6)
Operator’s Manual (1)

Product Layout and Descriptions
1. Control handle
2. Auxiliary handle
3. Adjustment collar to
extendible or lower shaft
4. On/Off lever
5. Integrated spool holder
6. Cord lock
7. Trimmer head
8. Grass deflector guard
9. Adjustable Tree Guard
10. Footplate
11. Edge Guide Wheel
SPECIFICATIONS
Name Pope Power TRIM Line Trimmer 500
Model Number 101LET500
AC motor 230V 50Hz
Cutting Diameter 300 mm
Rated power 500W
Cutting line thickness 1.4 mm
5
1
2
5
6
3
4
7
9
8
10
11

ASSEMBLY
6
Attaching the Grass Deflector Guard and Edge Guide Wheel
See Fig 1
Follow these steps to attach the Grass Deflector Guard and Edge Guide Wheel:
1. Take your trimmer and grass deflector guard out of the packaging.
2. Place the guard over the spool holder on your trimmer lining up the lugs on the guard with the
spaces on the trimmer. It should be positioned at about 90 degrees to the correct position (1).
3. Once fully engaged, turn the grass deflector guard to lock it in place. The guard should be
facing the rear of the trimmer.
4. Affix the Grass Deflector Guard with one screw to secure in place (2).
5. Connect the Adjustable Tree Guard to the top of the grass deflector plate (3). It should be
secured with two screws (4).
6. To attach the Edge Guide Wheel, position over the back of the Grass Deflector Guard and affix
with the three remaining screws. This should be securely screwed through the screw holes in
the guard (5).
Never use the trimmer without the guard. This guard is essential for safety
and for the correct operation of the tool.
WARNING
Fig 1
1
45
23

ASSEMBLY – continued
7
Attaching the Auxiliary Handle
See Fig 2
Follow these instructions to attach the auxiliary handle:
1. Place the handle on the handle mount as shown.
2. Adjust the handle to the most comfortable position.
3. Pass the bolt through the auxiliary handle and the handle mount through to the other side.
Note: the hex head on the handle bolt only fits one way.
4. Tighten so that the handle is secure. DO NOT OVERTIGHTEN.
5. To adjust, loosen the handle bolt and reposition accordingly. Retighten handle bolt.
Fig 2

To Operate the Line Trimmer
See Fig 3
Follow these steps to operate the Line Trimmer:
1. Make a loop with the extension power cable and insert it through the cord lock.
2. Place the end of the loop around cable securing hook and ensure it is pulled firmly enough to
prevent it coming loose while operating the trimmer.
3. Insert the plug from the line trimmer into the extension cable.
4. Hold the trimmer at waist level.
5. Hold the auxiliary handle in one hand, place the other hand on the main handle (the index
finger should be ready to squeeze the trigger).
6. Start the Line Trimmer and approach the area to be cut.
7. For best cutting, swing the trimmer gently from side to side and walk forward while keeping
the shaft of trimmer at an angle of 30 degrees to achieve best cutting results. (i.e. the base
plate will be parallel to the surface to be cut. Do not overload your trimmer. It operates best at
high speed).
8. To cut long grass, start at the top, take several small cuts. Working downwards, in a sweeping
action. Never cut wet or very damp grass.
9. The line should be protected against premature wear caused by striking hard obstacles.
A worn line will reduce cutting capacity.
OPERATION
8
Fig 3

OPERATION – continued
9
Adjusting the Shaft Length
See Fig 4
Follow these steps to adjust the shaft length:
1. The shaft height can be adjusted up or
down according to the user's optimum
operating height.
2. To adjust, twist the black adjustment collar
to loosen the collar. The shaft length can
then be changed.
3. After adjustment lock the shaft firmly into
place by twisting the collar in the opposite
direction.
Converting to an Edger
See Fig 5
Follow these steps to convert the line trimmer into a lawn edger:
1. Depress the footplate and
push down the handle to the
lowest position.
2. By loosening the black
adjustment collar, the handle
of the line trimmer can be
rotated in either direction up
to 180 degrees.
3. Once in position ensure the
black adjustment collar is
securely tightened.
4. Ensure the adjustable tree
guard is out of the way for
edging.
5. By placing the guide wheel
on the paved surface the
nylon cutting line will be
placed in the correct position
to ensure a neat edge.
Fig 4
Fig 5

OPERATION – continued
10
To replace the line spool
See Fig 6
Follow these instructions to replace the Line Spool.
Replacement Spools are available from your supplier.
1. Disconnect line trimmer from the power source. Remove and loosen grass and dirt that may
have accumulated during operation.
2. Hold the spool holder in one hand.
3. Depress the two tabs either side of the spool cover to release from the holder (1).
4. Remove the empty spool from the spool cover, taking care that the spring (2) is retained.
5. Place the new spool (3) into the boss in the spool cover (4). Rotate the spool slightly until it is
seated.
6. Unclip the end of one of the cutting lines and thread it through one of the metal eyelets (5) the
line should extend approximately 11 cm from the spool. Repeat this with the other line passing
it through the other eyelet.
7. Align the tabs with the cutouts in the housing and push the spool cover back into the spool
housing until the two tabs lock into position.
Fig 6

11
MAINTENANCE
Follow these general maintenance guidelines before each use.
•Check that all nuts, bolts and screws are securely tightened in order to be sure that the
machine is in a safe working condition.
•Frequently check for an accumulation of grass and soil around the cutting head, remove
accumulations with a stiff brush.
•Only use replacement cutting spools.
•For your own safety, replace worn or damaged parts without delay.
Cleaning
Do not use high-pressure cleaners or running water to clean the product.
•Do not use any aggressive cleaning agents.
•Use a damp rag to wipe dirt marks off of the product.
Storage
Electric tools should be kept in a dry place when not in use. Do not store with an accumulation of
grass around the cutting head, moisture is the grass may cause damage.
The Line Trimmer head will continue to rotate after the motor is switched off.
WARNING
All maintenance, service and cleaning work must be performed after the
power cord has been disconnected from the socket.
WARNING

12
WARRANTY
You must keep your receipt as proof of purchase for return of the product under the
terms of this warranty.
Your Pope product is guaranteed to be free from defects in materials or workmanship for a period
of 24 months from the date of purchase provided the product has been used in accordance with
the manufacturer's recommendations.
If the product becomes defective within the warranty period we guarantee to either replace or
repair the product at our option, provided that:
•The product is returned to the place of purchase with evidence of purchase i.e. the receipt.
•The product is used for general household use only, where household use means use of the
product on the same lot as your home. Use at more than one location is considered
commercial use and no warranty applies for commercial use.
•The product has not been used for hire purposes.
•Repairs, alterations or modifications have not been attempted to the product.
•The failure is not as a result of normal wear and tear.
Failures due to the following are not covered:
•Replacing worn or damaged blades, nylon line or chains or cables damaged in storage or
during use. These are regarded as replacement items which wear during normal usage.
•Failures as a result of sudden impact or obvious abuse.
•Failures due to usage not in accordance with instructions and recommendations contained in
this manual.
To the fullest extent permitted by law Toro Australia Pty Ltd is not liable for any indirect, incidental,
or consequential loss or damage in connection with the use of the Pope product covered by this
warranty or for any cost or expense of providing substitute equipment or service during any period
of malfunction or non-use pending completion of repairs under this warranty.
The above warranty does not exclude any condition or warranty implied by the Trade Practices Act
1974 or any other relevant legislation which implies any condition which cannot be excluded.
Pope®is a Registered Trademark of Toro Australia Pty Ltd
53 Howards Rd Beverley South Australia 5009
Made in China to Pope's Specifications
Table of contents
Other Pope Trimmer manuals
Popular Trimmer manuals by other brands

FRANCK PROVOST
FRANCK PROVOST THE BARB' XPERT FPH-004 instruction manual

Echo
Echo GT-225i Operator's manual

GÜDE
GÜDE GHS 620 Translation of the original instructions

FUXTEC
FUXTEC E522D Original operating instructions

Craftsman
Craftsman WEEDWACKER 316.791910 Operator's manual

Ryobi
Ryobi RBC42FSBO user manual

Draper
Draper HTC14 instructions

BETTCHER INDUSTRIES
BETTCHER INDUSTRIES Whizard AirMax MACH 3 Operating instructions & parts list

EINHELL
EINHELL GE-CH 18/60 Li operating instructions

Philips
Philips Norelco MG3750 quick start guide

Dolmar
Dolmar AT-3623 AT-3630 instruction manual

Stanley
Stanley FATMAX SFMCSTB933 Original instructions