PORT S31A User manual

Smart Lock User Manual
Model: S31A


Table of Contents
In the Box
Product Specications
Features
Preparing the Lock
Installation Instructions
Programming Your Lock
Setting Your Passcode
Adding IC Card
Lock Records
Remote WiFi Management
Troubleshooting
3
4
6
8
9
10
13
15
18
20
21
23
22 Manual Key

In the Box
1.) Front Panel (1) 2.) Back Panel (1) 3.) Mortise Lock (1)
4.) IC Card (1) 5.) Manual Key (2) 6.) Waterproof Rubber
Gasket (2)
7.) U-Clip (1)
8.) Strike (1) 9.) Dust Box (1)
4
10.) Spindle for Door
Thickness 35mm-55mm
(1 3/8’’-2 1/8’’) (1)

11.) Spindle for Door
Thickness 50mm-75mm
(2 3/8’’- 3’’) (1)
12.) Screw Casing:
35x8mm (2)
13.) Sliding Screws:
16x5mm (2)
14.) Mortise Screws:
10x5mm (For Aluminum
Door) (4)
15.) Mortise Screws:
25x4mm (For Wooden
Door) (4)
16.) M5x30mm
for door thickness
35mm-55mm
(1 3/8’’-2 1/8’’) for
upper (1)
17.) M5x50mm for door
thickness 35mm-55mm
(1 3/8’’-2 1/16’’) for
lower, door thickness
45-75mm (1 3/4’’-3’’) (for
lower) (1)
18.) M5x70mm for door
thickness
45mm-75mm (1 3/4’’-3’’)
(for lower) (1)
5
19.) Gateway
(optional) (1)

Product Specications
Model S31
Materials 304 Stainless Steel & Zinc Alloy
Front Panel Lock Size 280x38x25mm (11x1 1/2x1’’)
Back Panel Lock Size 280x38x25mm (11x1 1/2x1’’)
Lock Weight 2.5KG (5.5 lbs)
Unlocking Methods Bluetooth
Fingerprint (S31B)
Password
Card
Manual Key
WiFi Remote
Finish Satin Stainless Steel
Satin Black
Golden
Gray
Door Types Metal & Wood Sliding Door
Metal & Wood Swing Door
Working Voltage 6V/4x AAA Batteries
Door Thickness to Fit 1 3/8’’-3’’
Data Capacity Passcode: 150 sets
IC Card: 200 sets
Working Temperature -22°F - 140°F
Working Humidity 20%-90%
Low Wattage Alarm Less than 4.5V
6

1. Trim Details
2. Mortise Lock Options
7
*For narrow style metal frame backset available for 28mm, 30mm and
35mm. Minimum style required 46mm for 28mm & 35mm

Features
Lock/Unlock
• Unlock using Passcode, Bluetooth app (iOS and Android), IC Card,
remotely using Wi-Fi and manual key
• Bluetooth keys based on duration can be generated and shared
with guests. The mobile app can generate user passcodes, with
validity duration from One-Time, Permanent, or a Duration based on
Date-Time. Included in admin rights (limited)
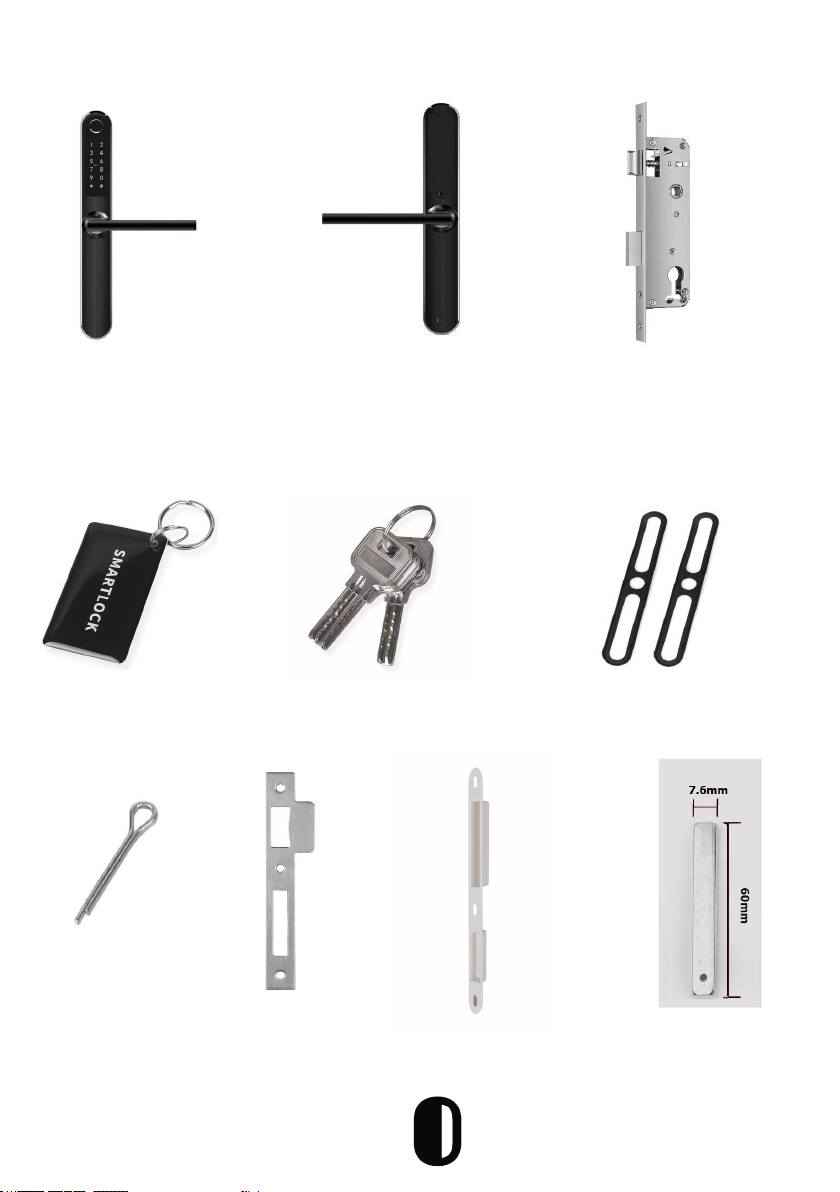
• Manual key can be used to lock and unlock the door
• Auto locking time setting option: After successfully unlocking, the
Port Smart Lock will re-lock after a period of time (between 5 to 120
seconds). The owner sets this function
• Voice guided lock/unlock command
Security
• Smart Freeze: After entering the passcode wrong 5 times the entry
lock will freeze for 30 seconds
• Activity Logs: Up to 500 operational records saving in the lock
• Anti-Theft Passcode: Decoy digits can be ADDED to passcode when
entered to prevent passcode from being exposed to the person
standing next to the user
• Tamper Alarm: The lock will sound if intruders try to pry the lock
from the door
Other Features
• 304 Stainless Steel lever and panel
• 304 Stainless Steel and Zinc lock body
• Easy switch from Passage mode and locking
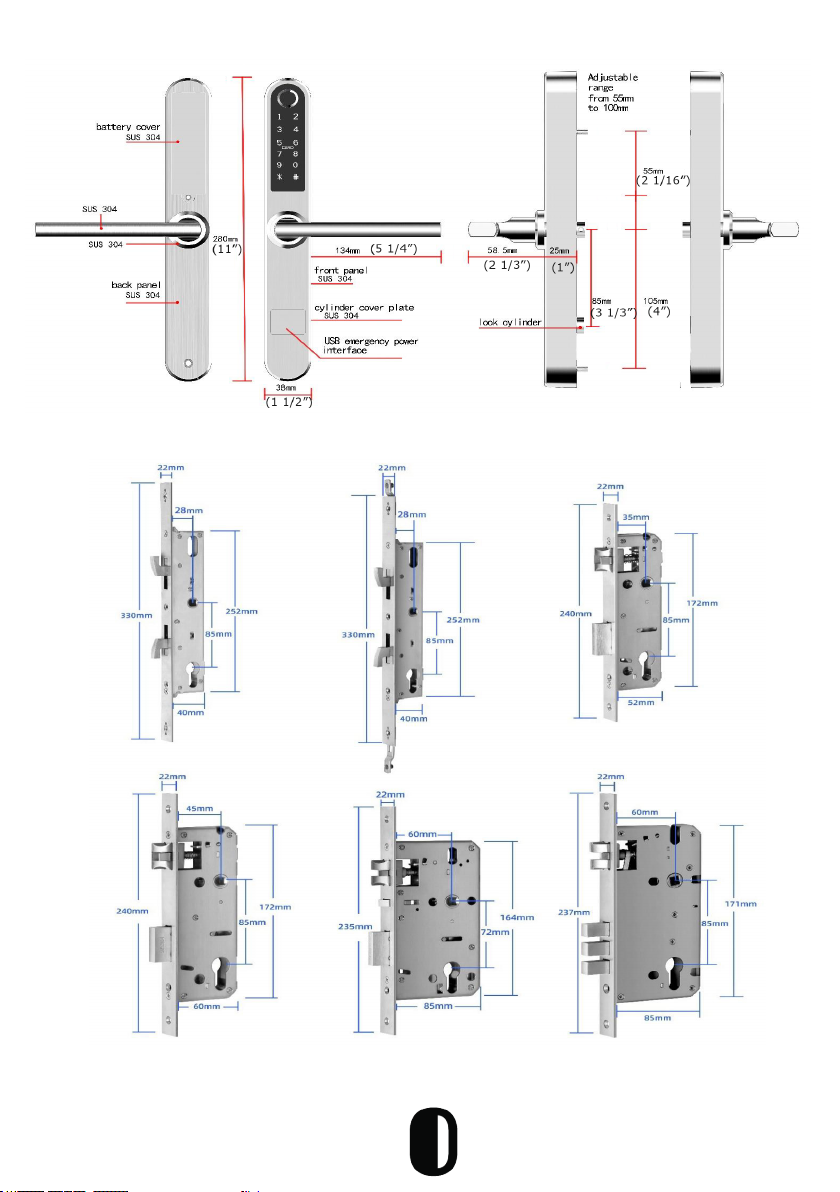
• Emergency Power Supply through USB (can use a smartphone
charger and plug into wall outlet). USB cable supplied but not
battery pack
• Unlimited e-Key generation capabilities
• Only the owner can authorize administrators
• Authorized administrator cannot authorize others
**Additional features can be found during the programming process
8

Preparing the Lock
Adjust the levers to match the swing hand of the door
1. Turn the handle on
the front panel.
Loosen the inner
hexagon screw of the
handle counterclockwise
2. Remove the handle 3. After adjusting the
direction of the handle,
insert it into the handle
seat and re-lock the
hexagon screw of the
handle to complete the
turning
Exterior Panel
Interior Panel
1. Turn the handle on
the back panel.
Loosen the inner
hexagon screw of the
handle counterclockwise
2. Remove the handle 3. After adjusting the
direction of the handle,
insert it into the handle
seat and re-lock the
hexagon screw of the
handle to complete the
turning
9

Installation Instructions
Install Mortise
1. Use the template enclosed to cut holes for the
door.
٭It is important to follow the template
2. Install the mortise lock (Part #3) using the
25x4mm (Parts #15) for wood doors and 10x5mm
(Parts #14) for aluminium doors
3. Set the front and back panel (Parts #1 & 2) on the
door
Install Spindle
1. Insert the spindle (Part #10 or 11) into the
hole and turn the front end to set the spindle
*If the handle faces the left, turn the
triangle point to the left. If the handle faces the
right, turn the triangle point to the right
10

Installing Sliding Screw Casing
1. Install the 35x8mm screw casing
(Parts #12)
*The screw casing location is adjustable and
can be xed anywhere between 55mm to
100mm from the spindle
2. Depending on the location of where the
hole was drilled set the screw casing, then
tighten
Connecting Interior & Exterior Panel and Wires
1. Set the front and back panel (Part #1 & 2)
along with the rubber gaskets (Part #6) on
the door
2. Connect the wires from the interior panel
to the exterior panel (just plug and click)
3. Connect the front & back panel using the
screw
11

Installing the Batteries
1. Install (4) new AAA batteries into the
battery chamber
2. Put the battery cover back
12

Programming Your Lock
1.) Search for TTLock in the App Store or Google Play to download
Login Register
Phone number/Email
Password
Login
Forgot Password?
Register
Phone Email
Country/Region American Samoa+1684
Enter your Phone number
Password between 6-20 characters
Confirm Password
Verification Code Get Code
Register
Login Register
X
18520265893
.........
Login
Forgot Password?
13

2. Register a new account with your email address or login with an existing
account (skip this step if you have an existing account)
• The verication code will be sent to the user’s mobile phone or email.
Registration will be successful after verication
3. Touch the lock screen to light, click “+Add Lock” on the app (TTLock
supports multiple types of lock devices,
4. The lock nearby will appear on the phone screen, click “+”
5. Rename the lock if you wish (EX: front door, back door, oce, etc.)
6. Wait for “lock added” conrmation (Often times it will be a soft sound once
conrmation is received.)
TTLock
Press to Add Lock
+
The phone must be within 6 feet of the
Smart Lock during the Pairing process
Choose Lock Type
All Locks
Scan all types of locks
Door Lock Padlock
Safe Lock Lock
Cylinder
Parking
Lock
Bicycle
Lock
Remote
Control
Nearby Locks
BL01_63230b
+
S202C_f4324e
14
Add Lock
Lock Name
S31A
OK

15
Bluetooth Management
Make sure there is no problem with Bluetooth communication. After connecting
the phone to the door lock, click “ “ to unlock. (The phone needs to be
within 16 feet of the door to unlock. The door will always remain locked until or
unless it is changed to passage mode-see setting).
On the app a voice command will sound “unlock”, and if there is any
communcation problem with bluetooth, voice command will sound “operation
failed”. Then close the app and start over.
Setting Your Passcode
Passcodes can be used to unlock the door. Create a passcode by clicking
“Generate Passcode” on the app. The system will create a generic passcode
and it can be changed to your favorite code after using the generic code once.
To change the passcode click “Passcode” and type in your desired code; and
click ok. Passcodes can be generated for: permanent, limited time, single use
and custom schedule.
Generate Passcode
anent Timed One-Time Erase Custom Recurri
Permanent
Start Time 2020-03-06 09:00
End Time 2020-03-06 09:00
Name Enter a name for this passcode
You can Configure the Customized Passcode via
Bluetooth or Remotely via a Gateway
Set Passcode
You can Configure the Customized Passcode via
Bluetooth or Remotely via a Gateway
Generate Passcode
anent Timed One-Time Erase Custom Re
Permanent
Nam 1
4-9 Digits in length
Cancel OK
Set Passcode
%-+x
1 2 3
4 5 6
7 8 9
0
,
@
Generate Passcode
anent Timed One-Time Erase Custom Recurruring
Succeeded. The passcode is
25097
Complete
Share
TTLock
S31A
Touch to Unlock. Long Press to Lock
TTLock
S31A
Touch to Unlock. Long Press to Lock
*Owners can share the
Passcode with other users
via WeChat, SMS, Email,
Messenger and WhatsApp

Passcode Types
Passcode Type Description Type
Permanent General use passcode
Time-Limited Passcode with set time frame
Single Use Single-use short term password
Custom Schedule Set your own passcode and time
frame
Passcode Management
All generated passwords can be viewed and managed in the password
management module. This includes a password change, password deletion,
password reset and password unlock record.
Sending E Keys
1) Click on the “ “ as shown in the gure below; you can send the eKey
to other users of TTLock to authorize the unlock (the receiver must download
the app and set up an account)
2) Select e-Key format (timed, permanent, one-time, recurring)
3) Enter the recipient’s account of TTLock, then set the name and eective time
of the eKey. (The admin can choose to allow remote unlocking or disallowing,
authorized administrator or not, as shown below)
4) Then click “Send”. (The recipient’s account has Bluetooth unlock permission.
Only the administrator can authorize ordinary key).
5) After the authorization is successful, the authorized key is the same as the
administrator’s interface.
16
Unlock with Passcode
In order to open the door using the passcode enter the code & “#”
1. You will hear a voice command “unlock” and then the door will open
2. If the wrong passcode is entered, you will hear “operation failed” and
re-enter
3. You can enter a decoy code along with the actual code followed by “#”

*The owner can send keys, passwords, etc. to others; however the authorized
administrator can not authorize others. Only the main administrator.
TTLock
S31A
Touch to Unlock. Long Press to Lock
Send eKey
Timed Permanent One-Time Recurring
Recipient Enter Recipient’s Account
Name Please enter a name for this eKey
Allow Remote Unlocking
Authorized Admin
Send
TTLock
Door Name
Touch to Unlock, Long Press to Lock
Authorized Admin
+
Create Admin
Admin List
The owner can
authorize
admin status to
other users
Managing E Keys
1) Click ” ” to manage the eKeys you send. the key management here
refers to the Bluetooth key management
17

2) After the administrator has successfully added the lock, the administrator
will have the highest rights of the lock. The administrator can do the
following:
• They can send keys to other people, specify the time limit, and select
time-limited, permanent, or single-time Bluetooth key permissions
• Add management of expiring keys (reminders of expired keys)
• The administrator can manage all keys issued by them including:
* Deleting the keys
* Resetting the keys
* Sending the keys
* Adjusting the validity period of the keys
◊ Lock users about to expire (Yellow shows the number of days re-
maining)
◊ Expiration Reminders are shown in red
Adding IC Cards
The S31A supports opening doors through various IC cards. Before an IC Card
is used to open the door, it needs to be added rst. The adding process needs
to be performed by the app. The validity period of the IC can be set, it can be
permanent, or it can be limited in time. After setting, you can also modify it.
a) Add Card
TTLock
Touch to unlock. Long press to lock
IC Cards
No Data
...
Clear IC Cards
Add IC Card
Upload IC Cards
18

Add IC Card
Name
Permanent
Start Time
End Time
A
2020-03-06 10:18
2020-03-06 10:19
Next
Add IC Card
Connecting with lock. Please wait...
b) Add card remotely (You must add gateway rst!)
TTLock
Touch to Unlock. Long Press to Lock.
IC Cards
Clear IC Cards
Add IC Card
Add card remotely
Upload IC Cards
Add card remotely
Name Please enter a name
Permanent
Start Time 2020.01.06 11:26
End Time 2020.01.06 11:26
Next
19

Add card remotely
Please place the Card near your phone
Card
Card Number
Next
Add card remotely
Please place the Card near your phone
Card
Card Number:1777986718
Next
20
Lock Records
Click “ ” as shown below. With “Lock Records” you can view: eKeys, save
passcodes and unlock history.
TTLock
H11
Touch to Unlock. Long Press to Lock
eKeys
...
Li
2020.03.06 11:14-2021.03.06 11:14
Pending...
Passcodes
...
...
...
...
...
...
...
...
...
...
444335
2020.01.14 15:00- 2020.01.14 16:00 Timed
Invalid
23175003
2020.01.14 15:00 One-Time
Invalid
1
2020.01.14 10:54 Permanent Custom
Table of contents
Other PORT Lock manuals
Popular Lock manuals by other brands

SALICE
SALICE F70 Clips quick start guide

Stanley
Stanley Omnilock 9KOM Installation

Sargent
Sargent ASSA ABLOY SN Series installation instructions

Simons Voss Technologies
Simons Voss Technologies SmartHandle 3062 quick guide

Securefast
Securefast SBL365.SL.94 installation instructions

Maclean
Maclean Manta Ray LL-1 operating manual