manuals.online logo
Brands
  1. Home
  2. •
  3. Brands
  4. •
  5. Portfolio
  6. •
  7. Landscape Lighting
  8. •
  9. Portfolio RS187M-M43-PMB-2 User manual

Portfolio RS187M-M43-PMB-2 User manual

The manufacturer warrants this product to be free of defects in material and workmanship for one (1) year from date of original
purchase. The manufacturer agrees to repair or replace the defective product, at its own option. This warranty does not include
any costs associated with the physical installation, removal or return of the product. This warranty only extends to the original
purchaser and is not transferable or assignable to subsequent purchasers. No warranty work will be provided under this warranty
without reasonable proof of purchase. Please call us at 1-800-643-0067 to receive your warranty service. This warranty does not
extend to the following: (1) LED bulbs or batteries; (2) defects caused by and resulting from misuse, neglect, accident or i
mproper operation, maintenance and storage, disassembly of parts; (3) surface scratches or weathering as this is considered
normal wear; (4) any other failure not related to defects in materials and workmanship. There are no other warranties except
those stated above. Some states do not allow the exclusion or limitation of special or consequential damages or allow limitations
on how long an implied warranty lasts, so the above limitation may not apply to you. This warranty gives you specific legal rights,
and you may have other rights that vary from state to state.
El fabricante garantiza que este producto no presentará defectos en los materiales ni en la mano de obra durante un (1) año
desde la fecha de compra original. El fabricante, a su elección, acepta reparar o reemplazar el producto defectuoso. Esta
garantía no cubre los costos relacionados con la instalación física, el retiro o la devolución del producto. Esta garantía se
extiende solo al comprador original y no es transferible ni asignable a compradores posteriores. No se llevará a cabo ningún
tipo de trabajo en virtud de esta garantía sin un comprobante de compra válido. Llámenos al 1-800-643-0067 para recibir su
servicio de garantía. Esta garantía no se extiende a lo siguiente: (1) bombillas LED o baterías; (2) defectos causados por y
resultantes del uso incorrecto, negligencia, accidentes o la operación, mantenimiento y almacenaje o desensamblaje de piezas
indebidos; (3) rayones en las superficies o deterioro por condiciones climáticas, ya que esto se considera desgaste normal;
(4) cualquier otra falla no relacionada con defectos en los materiales y la mano de obra. No hay otras garantías excepto las
señaladas anteriormente. Algunos estados no permiten la exclusión o limitación de daños especiales o resultantes, ni permiten
limitaciones en cuanto a la duración de una garantía implícita, de modo que la limitación anterior puede no aplicarse en su caso.
Esta garantía le otorga derechos legales específicos, pero podría tener también otros derechos que varían según el estado.
ITEM/ARTÍCULO #0688480
MODEL/MODELO #RS187M-M43-PMB-2
WARRANTY/GARANTÍA
Questions?/¿Preguntas?
Call customer service at 1-800-643-0067,
8 a.m. - 6 p.m., EST, Monday - Thursday,
8 a.m. - 5 p.m., EST, Friday.
Llame al Servicio al Cliente al 1-800-643-0067,
de lunes a jueves de 8 a. m. a 6 p.m.,
y los viernes de 8 a.m. a 5 p. m., hora estándar del Este.
ATTACH YOUR RECEIPT HERE
ADJUNTE SU RECIBO AQUÍ
Serial Number/Número de serie
Purchase Date/Fecha de compra
PACKAGE CONTENTS/CONTENIDO DEL PAQUETE
REPLACEMENT PARTS LIST/LISTA DE PIEZAS DE REPUESTO
For replacement parts, call our customer service department at 1-800-643-0067./Para solicitar una pieza de repuesto, llame a
nuestro Departamento de Servicio al Cliente al 1-800-643-0067.
2 CT
PATH LIGHTS
LUCES PARA SENDEROS
EB15262
Printed in China
Impreso en China
Portfolio is a registered trademark of LF, LLC. All Rights Reserved.
Portfolio es una marca registrada de LF, LLC. Todos los derechos reservados.
Lowes.com/portfolio Lowes.com/portfolio
A
B
C
D
DESCRIPTION
DESCRIPCIÓN
PART
PIEZA
PART #
PIEZA #
Top Housing/Carcasa superior RS187M-M43-PMB-TH
RS187M-LENS
CM002-PMB
BP007-BK
Lens/Lente
Mounting Pole/Varilla de montaje
Ground Spike/Estaca para tierra
A B C D
x 2
Top Housing
Carcasa superior
x 2
Lens
Lente
x 2
Mounting Pole
Varilla de montaje
x 2
Ground Spike
Estaca para tierra
A
B
C
D
Portfolio is a registered trademark of LF, LLC.
All Rights Reserved.
Portfolio es una marca registrada de LF, LLC.
Todos los derechos reservados.
Please read and understand this entire manual before attempting to assemble, operate or install the product.
Lea y comprenda completamente este manual antes de intentar ensamblar, usar o instalar el producto.
SAFETY INFORMATION/INFORMACIÓN DE SEGURIDAD
PREPARATION/PREPARACIÓN
CARE AND MAINTENANCE/CUIDADO Y MANTENIMIENTO
Before beginning to assemble or install lighting fixture, make sure all parts are present. Compare parts with package contents list.
If any part is missing or damaged, do not attempt to assemble the product.
Estimated Assembly Time: 5 minutes
No Tools Required for Assembly.
Antes de comenzar a ensamblar o instalar la lámpara, asegúrese de tener todas las piezas. Compare las piezas con la lista del
contenido del paquete. No intente ensamblar el producto si falta alguna pieza o si estas están dañadas.
Tiempo estimado de ensamblaje: 5 minutos
No se necesitan herramientas para el ensamblaje.
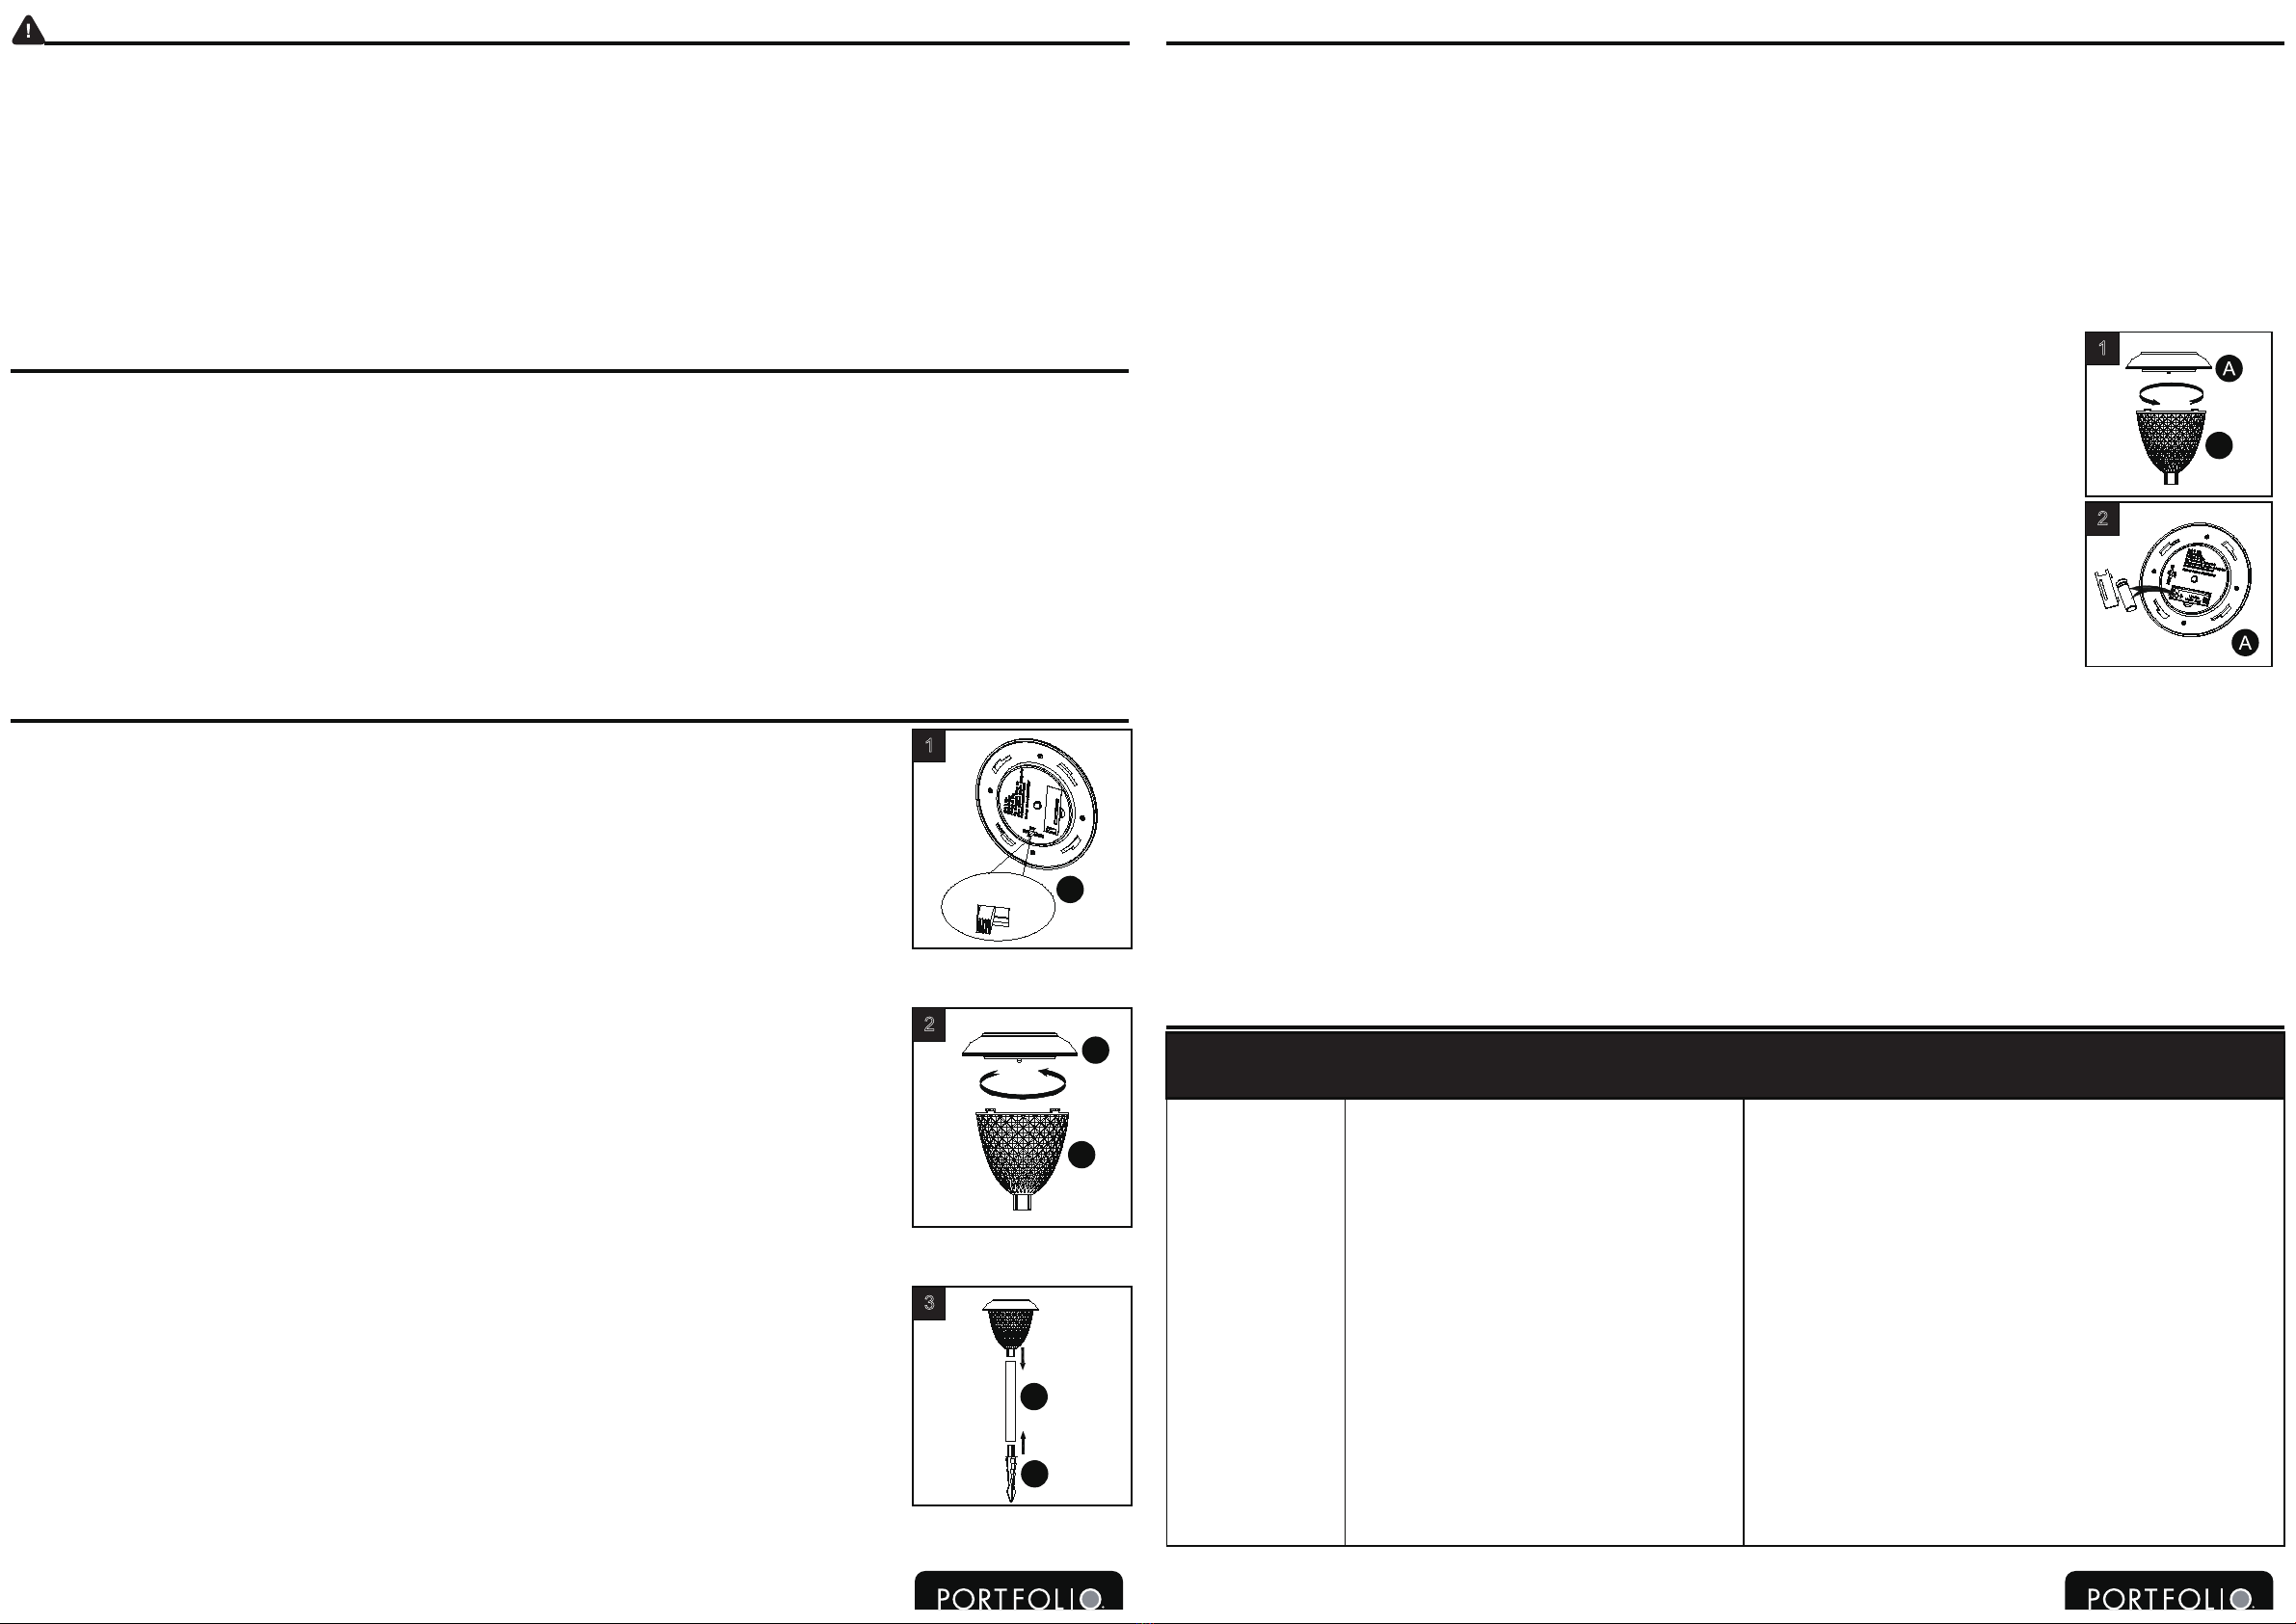
1. Before assembly, choose preferred working mode (6H or 10H) of light using the switch on the bottom
of the top housing (A). Note: 6H provides 10 lumens of light output for 6 hours and 10H provides
8 lumens of light output in the first 5 hours, 4 lumens in next 5 hours.
Antes de ensamblar, elija el modo de funcionamiento de la lámpara que desee (6H o 10H) usando el
interruptor ubicado en la parte inferior de la carcasa superior (A). Nota: 6H brinda 10 lúmenes de
salida de luz por 6 horas y 10H brinda 8 lúmenes de salida de luz durante las primeras 5 horas y
4 lúmenes en las 5 horas siguientes.
ASSEMBLY INSTRUCTIONS/INSTRUCCIONES DE ENSAMBLAJE
CAUTION/PRECAUCIÓN
• This product contains lithium phosphate batteries. Batteries must be recycled or disposed of properly.
• Este producto contiene baterías de fosfato de litio. Las baterías se deben reciclar o desechar adecuadamente.
• CHARGING THE BATTERIES/CARGA DE LAS BATERÍAS
Allow solar panel to receive 10-12 hours of full and direct sunlight with the switch in the 6H or 10H position. Note: Batteries
CANNOT be charged when placing the switch in the OFF position. Allow the light to run at least 8-12 complete charging and
discharging cycles to reach batteries’maximum capacity.
Permita que el panel solar reciba de 10 a 12 horas de luz solar completa y directa con el interruptor en la posición de 6H o 10H.
Nota: las baterías NO SE PUEDEN cargar cuando el interruptor está en la posición de apagado. Deje que la lámpara complete
al menos 8 a 12 ciclos de carga y descarga para que se alcance la capacidad máxima de las baterías.
• REPLACING THE BATTERIES/REEMPLAZO DE LAS BATERÍAS
The included rechargeable batteries will usually last two years. Replace batteries only when you notice the performance of the
solar light is weaker than its normal operation.
To replace the battery, twist and remove the lens from the top housing. Remove the battery compartment
cover and replace the old battery with a new 3.2V 14430 lithium phosphate solar rechargeable battery.
Note: A minimum capacity of 250 mAh is required. Ensure the battery is installed correctly with regard to
polarity (+ and -). Replace the battery compartment cover and lens.
Normalmente, las baterías recargables incluidas duran dos años. Reemplace las baterías solo cuando
observe que el rendimiento de la lámpara solar es más débil que su funcionamiento normal.
Para reemplazar la batería, gire y retire la mica de la carcasa superior. Retire la cubierta del
compartimiento de baterías y reemplace la batería antigua con una batería solar recargable de fosfato
de litio 14430 de 3,2 V nueva. Nota: se requiere una capacidad mínima de 250 mAh. Asegúrese de que
la batería esté instalada de manera correcta en lo que se refiere a la polaridad (+ y -). Vuelva a colocar
la cubierta del compartimiento para batería y la mica.
• CAUTION/PRECAUCIÓN
Do not attempt to replace LEDs./No intente reemplazar las bombillas LED.
• WINTER TIPS/CONSEJOS PARA EL INVIERNO
Keep debris and snow off the solar panel to allow the batteries to recharge. If lights have been covered by snow for a long time,
allow batteries to recharge in full, direct sunlight for at least 10-12 hours so that they maintain maximum capacity.
Mantenga el panel solar libre de desechos y nieve para permitir que las baterías se recarguen. Si la nieve ha cubierto las
lámparas durante un tiempo prolongado, deje que las baterías se recarguen a plena luz solar directa durante 10 a 12 horas
como mínimo para que mantengan su capacidad máxima.
TROUBLESHOOTING/SOLUCIÓN DE PROBLEMAS
Solar light does
not turn on at
night or its nightly
run time is shorter.
La lámpara solar
no se enciende de
noche o su tiempo
de funcionamiento
nocturno es más
breve.
PROBLEM
PROBLEMA
POSSIBLE CAUSE
CAUSA POSIBLE
CORRECTIVE ACTION
ACCIÓN CORRECTIVA
1. Battery is not fully charged./La batería no
está completamente cargada.
2. The solar light is installed close to other
light sources, which may keep the solar
light from turning on at nigh automatically./
La lámpara solar está instalada cerca de
otras fuentes de luz, lo que puede impedir
que se encienda automáticamente de
noche.
3. The batteries are reaching the end of their
useful life./Las baterías están llegando al
fin de su vida útil.
1. Make sure the solar light is located in an area where it can
receive the maximum amount of full, direct sunlight
everyday. Keeping the solar panel clean is equally
important to ensure maximum charging performance./
Asegúrese de que la lámpara solar se encuentre en un
área donde pueda recibir a diario la cantidad máxima de
plena luz solar directa. Mantener el panel solar limpio es
igualmente importante para asegurar el máximo
rendimiento de la carga.
2. Relocate the fixture or eliminate other light sources./
Cambie la ubicación de la lámpara o elimine otras
fuentes de luz.
3. Replace old battery with new 14430 lithium phosphate
solar rechargeable batteries./Reemplace la batería antigua
por baterías solares recargables de fosfato de litio 14430
nuevas.
Lowes.com/portfolioLowes.com/portfolio
2. Twist and secure top housing (A) to lens (B).
Gire y asegure la carcasa superior (A) a la mica (B).
3. Attach the light assembly to mounting pole (C) and ground spike (D) to the bottom of mounting
pole (C). Then push light into the ground. CAUTION: Do not use a hammer.
Fije el ensamble de la lámpara a la varilla de montaje (C) y la estaca para tierra (D) a la parte inferior
de la varilla de montaje (C). Luego, presione la lámpara hacia el suelo. PRECAUCIÓN: no use un
martillo.
Assembly is complete. Repeat steps 1-3 for the remaining fixtures./El ensamblaje está listo. Repita
los pasos 1 a 3 con las demás lámparas.
C
3
D
1
A
A
2
B
A
B
1
2
6H OFF
10H

Other Portfolio Landscape Lighting manuals

Portfolio SL27P-S15N-BK-1 User manual

Portfolio

Portfolio SL27P-S15N-BK-1 User manual

Portfolio HUMMINGBIRD YARD LIGHT User manual

Portfolio

Portfolio HUMMINGBIRD YARD LIGHT User manual

Portfolio 00901 User manual

Portfolio

Portfolio 00901 User manual

Portfolio 00299 User manual

Portfolio

Portfolio 00299 User manual

Portfolio QS73P-K3-BK-6 User manual

Portfolio

Portfolio QS73P-K3-BK-6 User manual

Portfolio 7404280540 User manual

Portfolio

Portfolio 7404280540 User manual

Portfolio RS40Pb-R8-RS-C8 User manual

Portfolio

Portfolio RS40Pb-R8-RS-C8 User manual

Portfolio CB117-6 User manual

Portfolio

Portfolio CB117-6 User manual

Portfolio 19548-000 User manual

Portfolio

Portfolio 19548-000 User manual

Portfolio SLS10BR User manual

Portfolio

Portfolio SLS10BR User manual

Popular Landscape Lighting manuals by other brands

Malibu Boats LZ25030V instructions

Malibu Boats

Malibu Boats LZ25030V instructions

Malibu Boats LZ306 instructions

Malibu Boats

Malibu Boats LZ306 instructions

Malibu Boats LZ413 instructions

Malibu Boats

Malibu Boats LZ413 instructions

Cariboni M48 STREET Series installation instructions

Cariboni

Cariboni M48 STREET Series installation instructions

LIGMAN MATRIX 1 installation manual

LIGMAN

LIGMAN MATRIX 1 installation manual

Volt 3601 Series installation instructions

Volt

Volt 3601 Series installation instructions

Cooper Lighting Lexington LXT70SR2554 Specification sheet

Cooper Lighting

Cooper Lighting Lexington LXT70SR2554 Specification sheet

LIGMAN BENTON 3 installation manual

LIGMAN

LIGMAN BENTON 3 installation manual

Kasco marine WaterGlow LL1020 owner's manual

Kasco marine

Kasco marine WaterGlow LL1020 owner's manual

Alpine CRD100L-GN owner's manual

Alpine

Alpine CRD100L-GN owner's manual

Volt Big Par36 Brass Black Flood installation instructions

Volt

Volt Big Par36 Brass Black Flood installation instructions

Cooper Lighting Lumiere Aspen 1900-AA Specification sheet

Cooper Lighting

Cooper Lighting Lumiere Aspen 1900-AA Specification sheet

Endless Summer Endless Summer GTL7179SP owner's manual

Endless Summer

Endless Summer Endless Summer GTL7179SP owner's manual

Landscape Vibrations CRISP 6 install guide

Landscape Vibrations

Landscape Vibrations CRISP 6 install guide

Perel CSOL08 quick start guide

Perel

Perel CSOL08 quick start guide

Dot-Spot clarios eco 6 W Operator's manual

Dot-Spot

Dot-Spot clarios eco 6 W Operator's manual

Amtra HALO 3 LED manual

Amtra

Amtra HALO 3 LED manual

EuroLite Landscape Spot with Bracket user manual

EuroLite

EuroLite Landscape Spot with Bracket user manual

manuals.online logo
manuals.online logoBrands
  • About & Mission
  • Contact us
  • Privacy Policy
  • Terms and Conditions

Copyright 2025 Manuals.Online. All Rights Reserved.