Portwell RS4U-8172-M2M User manual

RS4U-8172-M2M
Copyright © Portwell 2017 RS4U-8172-M2M User's Guide
1
Industrial Box PC
Version 1.1
RS4U-8172-M2M

RS4U-8172-M2M
Copyright © Portwell 2017 RS4U-8172-M2M User's Guide
2
Revision History
R0.1
Preliminary
R1.1
Remove Extra AddOn ROM Display item

RS4U-8172-M2M
Copyright © Portwell 2017 RS4U-8172-M2M User's Guide
3
Contents
1 Introduction .............................................................................................................................................................................................................................. 7
2 Specifications........................................................................................................................................................................................................................... 8
2.1 Supported Operating Systems........................................................................................................................................................................................... 9
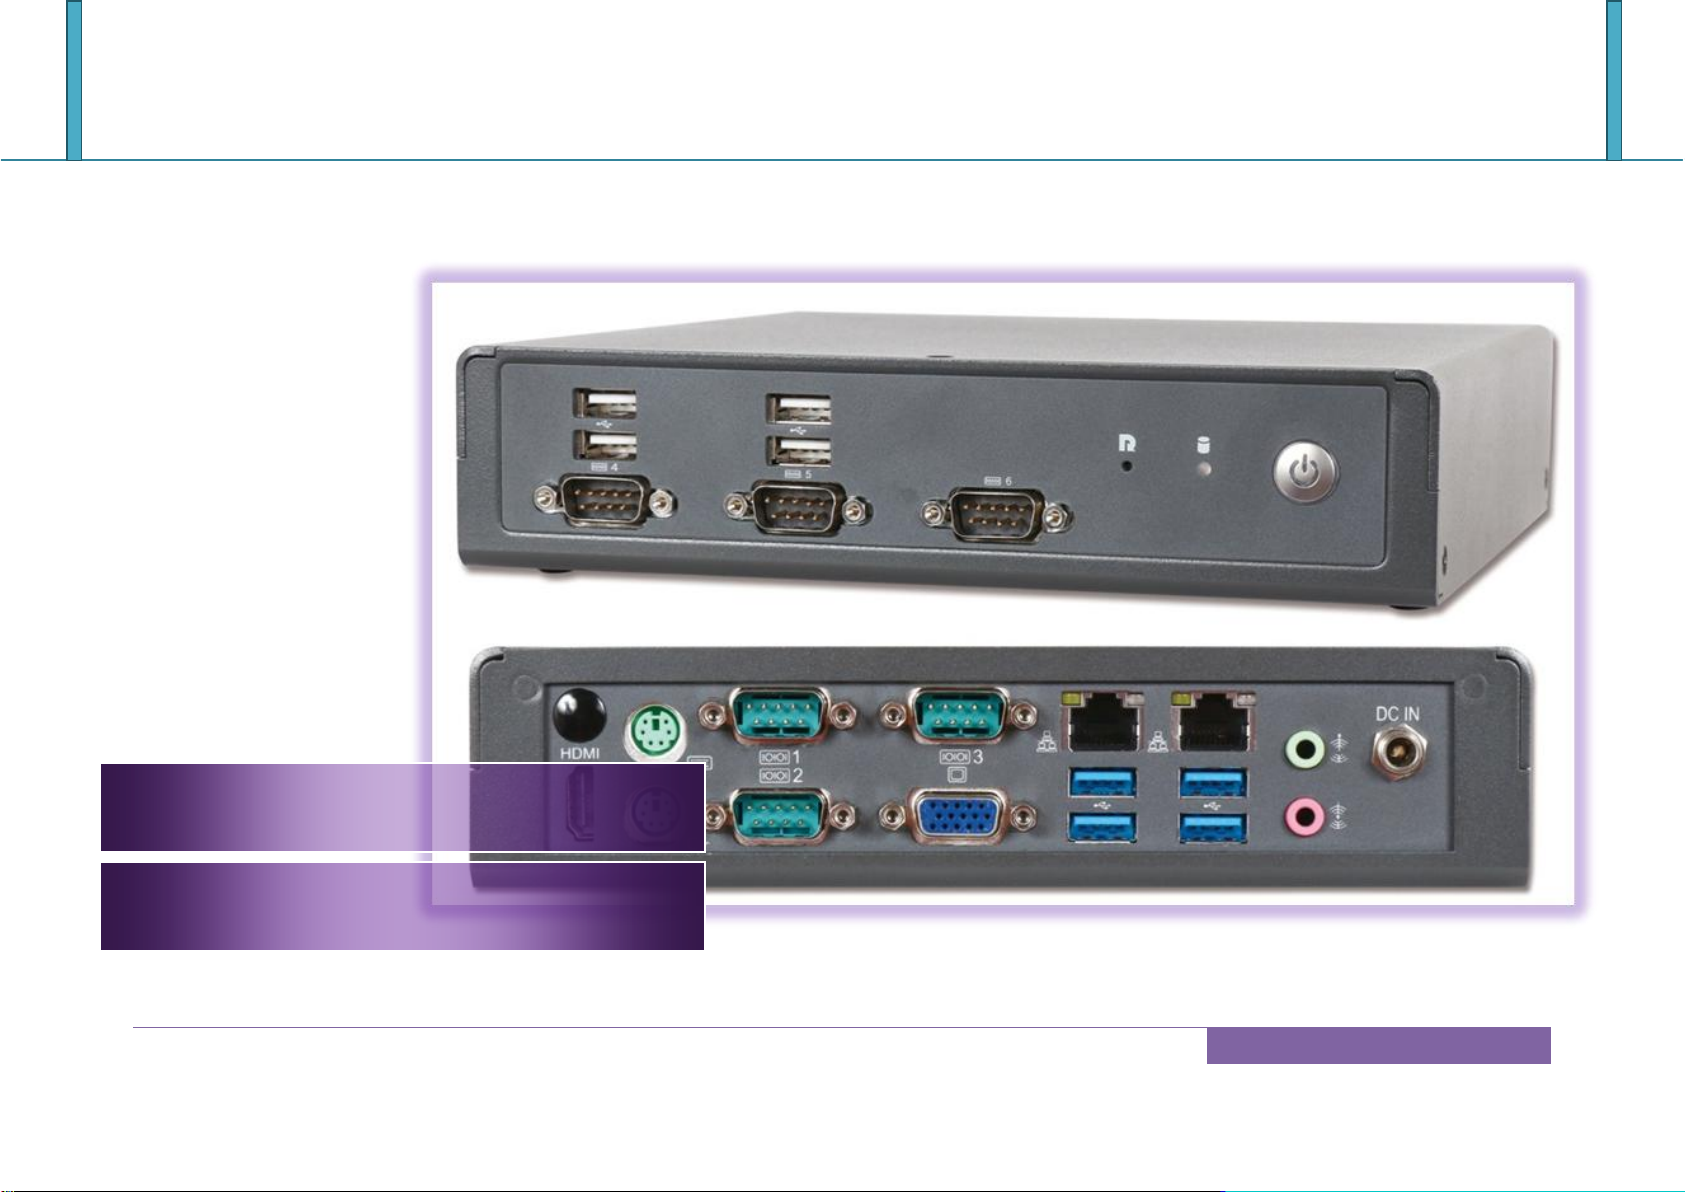
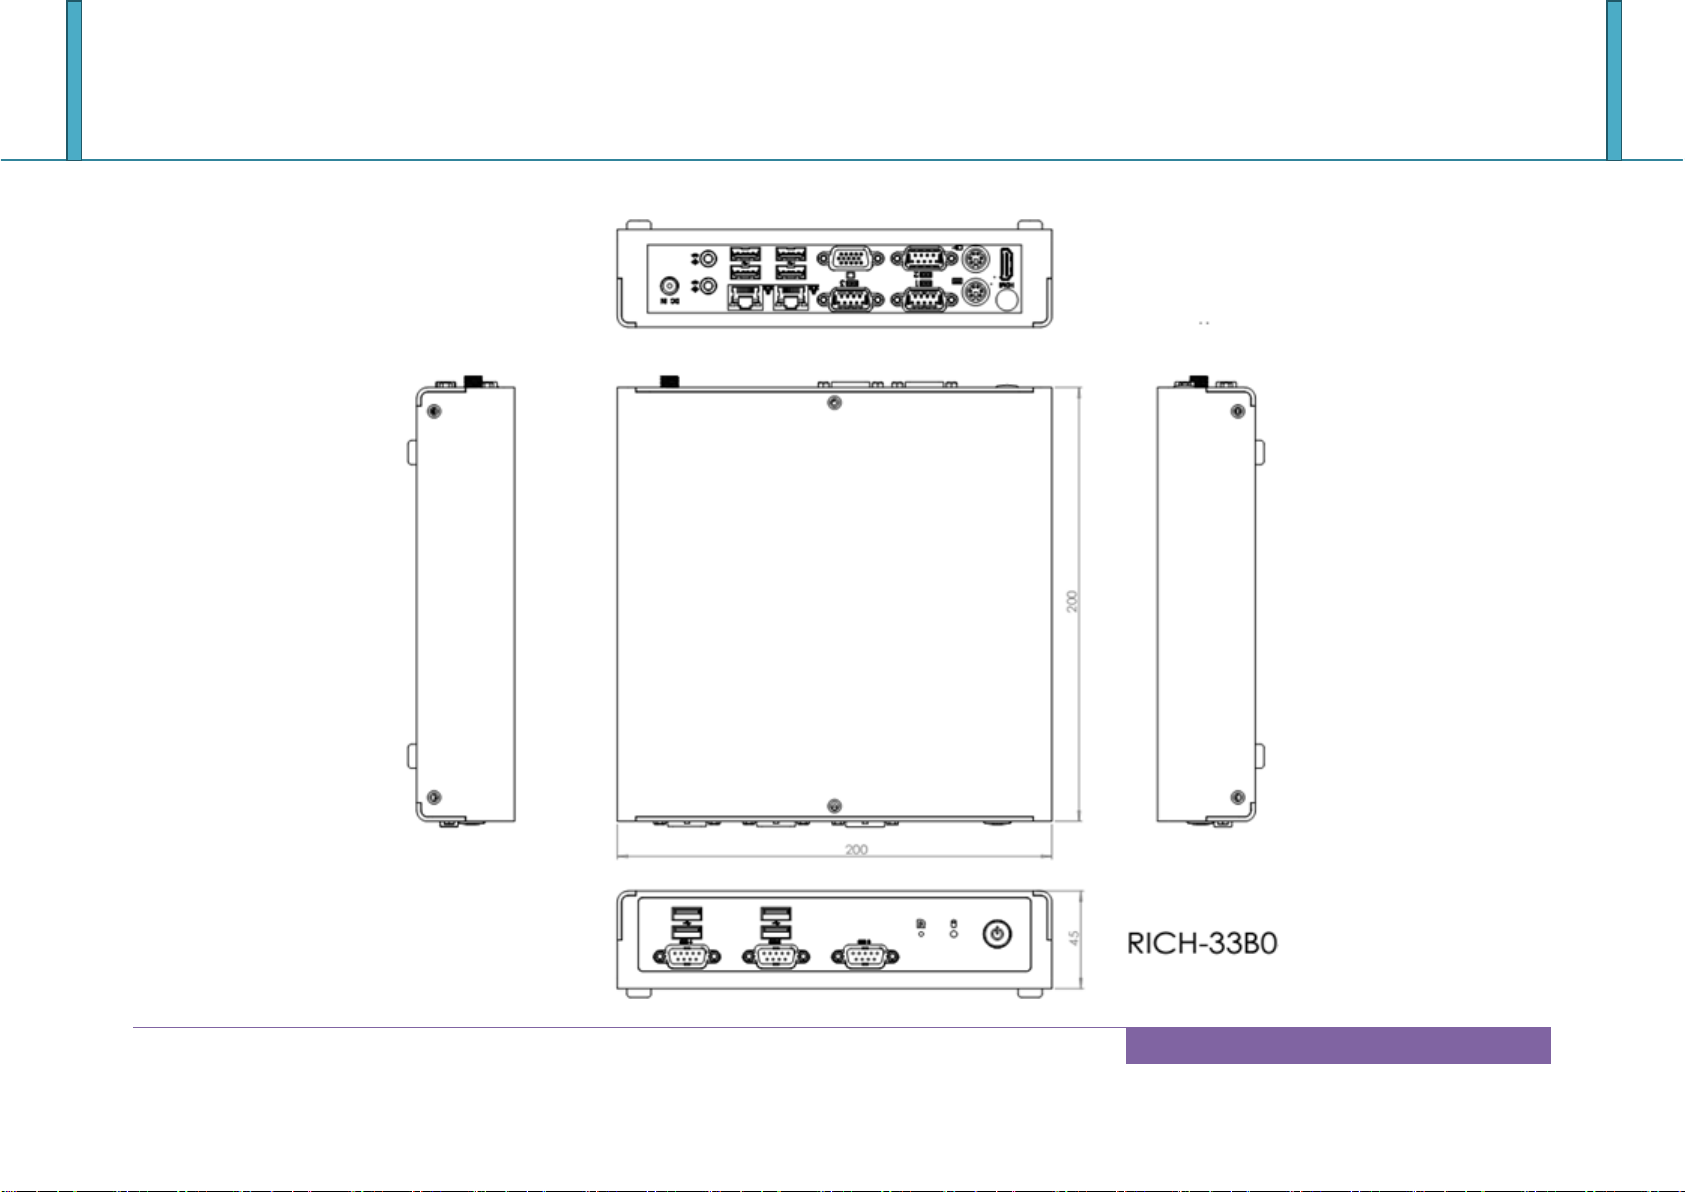
2.2 Mechanical Dimensions ................................................................................................................................................................................................... 10
3 BIOS Setup Items......................................................................................................................................................................................................................11
3.1 Introduction .......................................................................................................................................................................................................................11
3.2 BIOS Setup.......................................................................................................................................................................................................................11
3.2.1 Main ........................................................................................................................................................................................................................ 13
3.2.2 Advanced ................................................................................................................................................................................................................ 15
3.2.3 H / W Monitor .......................................................................................................................................................................................................... 29
3.2.4 Security ................................................................................................................................................................................................................... 32
3.2.5 Boot......................................................................................................................................................................................................................... 34
3.2.6 Exit .......................................................................................................................................................................................................................... 37
4 Troubleshooting........................................................................................................................................................................................................................ 39
4.1 BIOS Setting .................................................................................................................................................................................................................... 39
4.2 FAQ.................................................................................................................................................................................................................................. 40
5 Portwell Software Service ........................................................................................................................................................................................................ 48
6 Industry Specifications ............................................................................................................................................................................................................. 49

RS4U-8172-M2M
Copyright © Portwell 2017 RS4U-8172-M2M User's Guide
4
Preface
This user‟s guide provides information about the components, features, connectors and BIOS Setup menus available on the RS4U-8172-M2M. This document
should be referred to when designing system application. The other reference documents that should be used include the following:
Intel Apollo lake Design Guide
Intel Apollo lake Specification
Please contact Portwell Sales Representative for above documents.
Disclaimer
The information contained within this user‟s guide, including but not limited to any product specification, is subject to change without notice.
Portwell provides no warranty with regard to this user‟s guide or any other information contained herein and hereby expressly disclaims any implied warranties
of merchantability or fitness for any particular purpose with regard to any of the foregoing. Portwell assumes no liability for any damages incurred directly or
indirectly from any technical or typographical errors or omissions contained herein or for discrepancies between the product and the user‟s guide. In no event
shall Portwell be liable for any incidental, consequential, special, or exemplary damages, whether based on tort, contract or otherwise, arising out of or in
connection with this user‟s guide or any other information contained herein or the use thereof.
Trademarks
Product names, logos, brands, and other trademarks featured or referred to within this User‟s guide or the Portwell website, are the property of their respective
trademark holders. These trademark holders are not affiliated with Portwell, our products, or our website.

RS4U-8172-M2M
Copyright © Portwell 2017 RS4U-8172-M2M User's Guide
5
Warranty
Portwell makes no representation, warranty or guaranty, express or implied regarding the products except its standard form of limited warranty (“Limited
Warranty”). Portwell may in its sole discretion modify its Limited Warranty at any time and from time to time.
Beginning on the date of shipment to its direct customer and continuing for the published warranty period, Portwell represents that the products are new and
warrants that each product failing to function properly under normal use, due to a defect in materials or workmanship or due to non conformance to the agreed
upon specifications, will be repaired or exchanged, at Portwell‟s option and expense.
Certification
Portwell is certified to DIN EN ISO 9001:2000 standard.
Technical Support
Portwell technicians and engineers are committed to providing the best possible technical support for our customers so that our products can be easily used and
implemented.
We request that you first visit our website at http://www.portwell.com.tw/support/ for the latest documentation, utilities and drivers, which have been made
available to assist you. If you still require assistance after visiting our website then contact our technical support department by email at
[email protected]for further assistance. Thank you!

RS4U-8172-M2M
Copyright © Portwell 2017 RS4U-8172-M2M User's Guide
6
Additional safety instructions
Caution 1:
This guide is for technically qualified personnel who have experience installing and configuring system boards. Disconnect the system board
power supply from its power source before you connect/disconnect cables or install/remove any system board components. Failure to do this
can result in personnel injury or equipment damage.
Caution 2:
Safety instructions state that thumbscrews should be tightened with a tool after both initial installation and subsequent access to the panel. ;
User should make sure that all the thumbscrews are secured by a tool during installation or after repair;
Service personnel must make sure all the thumb screws are secured by a tool during installation or after repair.
Caution3:
Risk of explosion if battery is replaced by an incorrect type. Dispose of used batteries according to the instructions please.

RS4U-8172-M2M
Copyright © Portwell 2017 RS4U-8172-M2M User's Guide
7
1Introduction
RS4U-8172-M2M, designed with Apollo Lake Intel Atom processor E3900 series or N3350 / N4200 processor , features two DDR3L 1333/1600/1866 MHz
SO-DIMM socket equipped with up to 16GB DDR3L memory.
Atom solution is still popular in the market of Kiosk, Digital Signage, DVR and Factory Automation which can fulfill most of these applications; therefore, with
high performance and high-end specifications, Apollo Lake SoC is our first generation Atom chip architecture on Mini-ITX line.

RS4U-8172-M2M
Copyright © Portwell 2017 RS4U-8172-M2M User's Guide
8
2Specifications
Main Processor
◆Intel® Apollo lake SoC Processors
System BIOS
◆AMI UEFI BIOS
Main Memory
◆Up to 16 GB in 2 slots DDR3L SO-DIMM sockets. Supports dual channel DDR3L 1867 MHz SDRAM
Graphics
◆Controller: Intel®HD Graphics 50X series
◆VGA: Supports VGA up to resolution 1920 x 1200
◆LVDS: Supports Dual Channel 24bit up to resolution 1920 x 1200
◆HDMI: Supports HDMI up to resolution 4096x 2160@ 24Hz
Expansion Interface
◆One Mini-PCIe socket
◆Two M.2 socket(Key M & Key E)
SATA Interface
◆One SATA ports(SATA 6Gb/s)
Input/Output
◆Serial Ports: 3 x RS-232 on board & 3 x RS-232/422/485 on Rear I/O
◆Support Keyboard and PS/2 mouse connector (Rear I/O)
◆USB Port: 4 x USB 3.0 & 4 x USB 2.0
◆Audio Interface: Connector for Mic-In and Line-Out
Ethernet
◆Supports dual 10/100/1000 Mbps Ethernet port (s) via PCI Express x1 bus which provides 500 MB/s data
transmission rate
High Drive GPIO
◆One pin-header for GPIO(8bit in &8bit out)

RS4U-8172-M2M
Copyright © Portwell 2017 RS4U-8172-M2M User's Guide
9
Mechanical
and
environmental specifications
◆Operating temperature: 0 ~ 50° C
◆Storage temperature:-20 ~ 80° C
◆Humidity: 5 ~ 90% non-condensing
◆Board size: 170mm x 170 mm
2.1 Supported Operating Systems
The RS4U-8172-M2M supports the following operating systems.
Windows 10* (64 bit), IoT Core(32/64bit)
Yocto* Tool-based Embedded Linux Distribution (64 bit)
Android* 6.0(64bit)
VxWorks*7.0 (RTOS) (64 bit)

RS4U-8172-M2M
Copyright © Portwell 2017 RS4U-8172-M2M User's Guide
10
2.2 Mechanical Dimensions

RS4U-8172-M2M
Copyright © Portwell 2017 RS4U-8172-M2M User's Guide
11
3 BIOS Setup Items
3.1 Introduction
The following section describes the BIOS setup program. The BIOS setup program can be used to view and change the BIOS settings for the module.
Only experienced users should change the default BIOS settings.
3.2 BIOS Setup
Power on the computer and the system will start POST (Power on Self Test) process. When the message below appears on the screen, press <Delete> or <F2>
key will enter BIOS setup screen.
Press<Delete> or <F2> to enter SETUP
If the message disappears before responding and still wish to enter Setup, please restart the system by turning it OFF and On or pressing the RESET button. It
can be also restarted by pressing <Ctrl>, <Alt>, and <Delete> keys on keyboard simultaneously.

RS4U-8172-M2M
Copyright © Portwell 2017 RS4U-8172-M2M User's Guide
12
Press <F1> to Run General Help or Resume
The BIOS setup program provides a General Help screen. The menu can be easily called up from any menu by pressing <F1>. The Help screen lists all the
possible keys to use and the selections for the highlighted item. Press <Esc> to exit the Help Screen.

RS4U-8172-M2M
Copyright © Portwell 2017 RS4U-8172-M2M User's Guide
13
3.2.1 Main
Use this menu for basic system configurations, such as time, date etc.

RS4U-8172-M2M
Copyright © Portwell 2017 RS4U-8172-M2M User's Guide
14
Feature
Description
Options
System Date
The date format is <Day>, <Month> <Date> <Year>. Use [+] or [-] to configure system Date.
System Time
The time format is <Hour> <Minute> <Second>. Use [+] or [-] to configure system Time.

RS4U-8172-M2M
Copyright © Portwell 2017 RS4U-8172-M2M User's Guide
15
3.2.2 Advanced
Use this menu to set up the items of special enhanced features

RS4U-8172-M2M
Copyright © Portwell 2017 RS4U-8172-M2M User's Guide
16
CPU Configuration
CPU Configuration Parameters

RS4U-8172-M2M
Copyright © Portwell 2017 RS4U-8172-M2M User's Guide
17
Feature
Description
Options
Intel SpeedStep Technology
Intel SpeedStep technology allows processors to switch between multiple frequencies and
voltage points for better power saving and heat dissipation.
★Enabled, Disabled
CPU C States Support
Enable CPU C States Support for power saving. It is recommended to keep C1, C6, C7, C8 ,
C9 and C10 all enabled for better power saving .
★C10, C9,C8,C7,C6,
C1,Disabled
Enhanced Halt State(C1E)
Enable Enhanced Halt State(C1E) for lower power consumption
★Enabled, Disabled
Intel Virtualization Technology
Intel Virtualization Technology allows a platform to run multiple operating systems and
applications in independent partitions, so that one computer system can function as multiple
virtual systems.
★Enabled, Disabled
VT-d
Enable/Disable CPU VT-d.
★Disabled, Enabled

RS4U-8172-M2M
Copyright © Portwell 2017 RS4U-8172-M2M User's Guide
18
Chipset Configuration
Configuration Chipset feature

RS4U-8172-M2M
Copyright © Portwell 2017 RS4U-8172-M2M User's Guide
19
Feature
Description
Options
DRAM Frequency
DRAM Frequency
★Auto, DDR3-1333 ,
DDR3-1600, DDR3-1866
Primary Graphics Adapter
Select a primary VGA
★Onboard,PCI Express
Share Memory
Select DVMT 5.0 Pre-Allocated(Fixed) Graphics Memory size used by the Internal
Graphics Device
★Auto, 64M,128M,
256M,512M
Active LFP
Select eDP or LVDS to Display
★eDP , LVDS
Panel Type Selection(Select LVDS)
★1440x900/24-bit/2-ch/LED
1366x768/18-bit/1-ch/LED
800x600/18-bit/1-ch/CCFL
1024x768/24-bit/1-ch/CCFL
1280x1024/24-bit/2-ch/CCFL
1366x768/24-bit/1-ch/CCFL
1440x900/24-bit/2-ch/CCFL
1024x600/18-bit/1-ch/LED
1280x1024/24-bit/2-ch/LED
1024x768/24-bit/1-ch/LED
1600x900/18-bit/2-ch/LED
1366x768/24-bit/1-ch/LED
1920x1080/24-bit/2-ch/LED
800x600/24-bit/1-ch/LED

RS4U-8172-M2M
Copyright © Portwell 2017 RS4U-8172-M2M User's Guide
20
640x480/24-bit/1-ch/LED
1024x768/18-bit/1-ch/LED
Primary IGFX Boot Display
Select the Video Device which will be activated during POST. This has no effect if
external graphics present.
Secondary boot display selection will appear based on your selection.
VGA modes will be supported only on primary display.
★VBIOS Default,
HDMI,LFP,CRT
Onboard HD Audio
Auto/enable/disable onboard HD audio. Set to Auto to enable onboard HD audio
and automatically disable it when a sound card is installed.
★Auto ,Enabled,
Disabled
Front Panel
Select Front Panel Type.
★HD , AC 97
Onboard Lan1
Enable or disable the onboard Lan1 network interface controller
★Enabled, Disabled
Onboard Lan2
Enable or disable the onboard Lan2 network interface controller
★Enabled, Disabled
PCIE1 Link Speed
Configure PCIE1 Slot Link Speed.
★Auto, Gen1 , Gen2
Deep S5
Select system deep S5 configuration.
„Auto‟ will disable the deep S5 configuration if RTC/LAN/USB device power on
settings enabled.
★Disabled ,Auto
Table of contents
Other Portwell Industrial PC manuals