ECV-645-MD Installation Instructions,Anchorless Method M-54186-1 Rev. A. (1/4) March 2015
ECV-645-MD hurricane louver
installation instructions - anchorless method
page 1 of 4
IMPORTANT: READ ALL INSTRUCTIONS BEFORE PROCEEDING WITH INSTALLATION
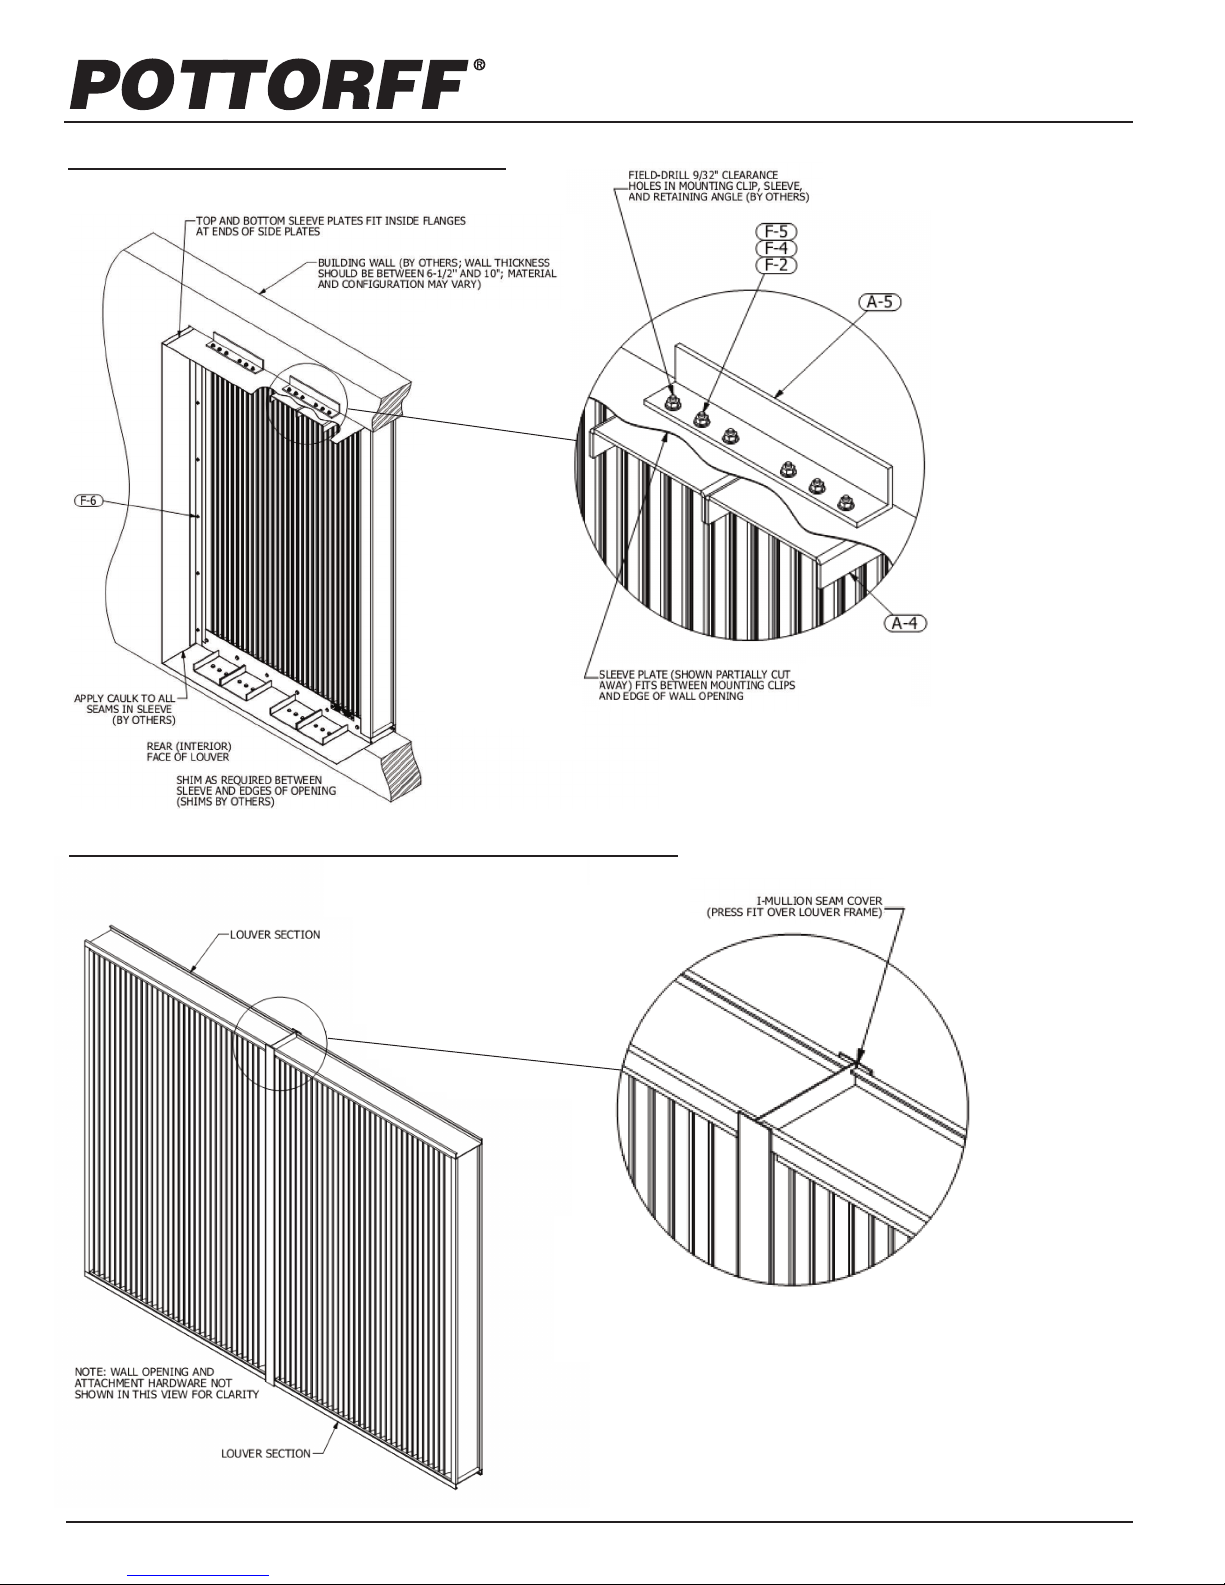
Single Section Louver Installation
Locate all crates, boxes, cartons, etc.
Remove louvers from packaging, inspect for damage, confirm
quantities and sizes with packing list and organize parts in order of
installation. To verify installation hardware quantities, refer to Table
1. Installation hardware will typically be shipped in a separate box.
Notify your Pottorff representative immediately of any shortages or
shipping damage.
First, locate the Hat Channel Clips (A-3) and attach to the top and
bottom of each louver section using #12 Hex-Head Screws (F-6).
Refer to Figure 1 for details and required locations.
Next, attach the Mounting Clips (A-4) to the Hat Channel Clips
using #12 Flat-Head screws (F-11) as illustrated in Figure 2. When
installed, each pair of Mounting Clips should sit side-by-side.
If the louver includes the fully sleeved option, attach the Sleeve
Side Plates to the sides of the louver section using #12 Hex-Head
Screws (F-6) running through the existing clearance holes in the
pre-welded sleeve attachment angle into the back of the louver
frame. Refer to Figure 5 and 6. The ends of the attachment angle
should be roughly flush with the top and bottom of the louver frame.
If no sleeve is required, omit steps 3-4 and proceed to step 5.
Inspect openings for damage, repair as needed and remove any
obstructions or debris.
Prior to installation, verify that openings are square and plumb and
that the louvers will fit properly.
Louvers and Hardware:
1.
2.
3.
Openings:
1.
2.
1.
2.
3.
Preparation
The following guidelines provide basic assembly and installation
instructions for ECV-645-MD extruded aluminum stationary blade
louvers installing via the “anchorless” method. The ECV-645-MD is
designed to withstand the severe weather effects typically associated
with hurricanes and is certified by Miami-Dade County for resistance
to impacts, cyclic fatigue and static pressures up to 150 psf.
General
POTTORFF ®5101 Blue Mound Road, Fort Worth, Texas 76106 www.pottorff.com
1.
2.
3.
For additional details, refer to product NOA submittal drawings
posted at www.pottorff.com as well as any job-specific submittal
drawings when provided.
Carefully lift louver sections by their frames using multiple lifting
points if necessary to avoid distortion, racking or damage. Do not
apply excessive force to a single point and NEVER LIFT UNITS
BY LOUVER BLADES. Take necessary precautions to prevent
marring the louver finish.
Caulk and anchors to the building condition are by others. Per the
Florida Building Code, proper isolation (also by others) is required
between aluminum louver components and steel building condi-
tions in order to prevent corrosion.
Table 1: Standard Installation Hardware,
“Anchorless Method”
Part Description
A-3
A-4
A-5
F-2
F-4
F-5
F-6
F-11
Hat Channel
Clip
Formed
Mounting Clip,
Flanged
2'' x 2'' x 1/4'' x
12'' - Long
Retaining Angle
1/4'' I.D. x 5/8''
O.D. Flat
Washer
1/4-20 UNC
Hex Nut
1/4-20 UNC x
1'' Hex Bolt
#12-14 x 3/4''
Hex-Head Tek
Self-Drilling
Machine Screw
#12-14 x 3/4''
Flat-Head Tek
Self-Drilling
Machine Screw
Four (4)
per section
Four (4)
per section
Two (2)
per section
Twenty-four
(24) per
section
Twelve (12)
per section
Twelve (12)
per section
Sixteen (16)
per section*
Sixteen (16)
per section
Eight (8)
per section
Eight (8)
per section
Four (4)
per section
Forty-eight
(48) per
section
Twenty-four
(24) per
section
Twenty-four
(24) per
section
Thirty-two
(32) per
section*
Thirty-two
(32) per
section
Quantity Required
Louver Louver
Sections Sections
< 26'' wide ≥ 26'' wide
Working from the rear (interior) side of the louver, slide the Sleeve
Top and Bottom Plates into place. The Top and Bottom Plates
should fit inside the formed flanges at the ends of the Side Plates,
and will rest just outside the Mounting Clips. Refer to Figure 5. If no
sleeve is required, omit steps 3-4 and proceed directly to step 5.
Lift the louver section up and place it into the opening as shown in
Figure 3.
As necessary, shim around the perimeter to level the louver and to
maintain an approximate 1/4'' clearance between the louver frame
and the edges of the opening (shims by others.)
4.
5.
6.
* Note: Additional #12 Hex-Head Screws will be shipped for louvers with an optional sleeve.