Power Fist 8904120 User manual

V4.0 8904120
Please read and understand all instructions before use. Retain this manual for
future reference.
User Manual
550 lb 6 cu. ft
Mini Power Wheelbarrow

8904120 550 lb 6 cu. ft Mini Power Wheelbarrow V4.0
2 For technical questions call 1-800-665-8685
SPECIFICATIONS
Capacity 550 lb (249.5 kg)
Start Type Recoil
Theoretical Horsepower 5.5 HP
Engine Type 196cc gasoline
Number of Speeds Forward 4
Reverse
1
Speed Rating Forward 3.78 km/h
Reverse 1.88 km/h
Tray Size 35-1/2 x 28 x 21 in.
Number of Tires 4
Tire Type R1TT
Tire Size Front 4.00-10 in.
Rear 4.00-8 in.
Material Steel/rubber
Colour/Finish
Blue/black
Dimensions 66 x 30 x 36 in.
Weight 240 lb
INTRODUCTION
The 550 lb 6 cu. ft Mini Power Wheelbarrow is great for landscaping and
construction applications including hauling dirt, sod, sand, gravel, shrubs, etc.
The 4 speed gearbox makes it easy to transport loads up to 550 lb (249.5 kg)
across rough terrain. The dump box is easy to empty and is secured in place by
the latched tipping handle.
550 lb 6 cu. ft
Mini Power Wheelbarrow

V4.0 550 lb 6 cu. ft Mini Power Wheelbarrow 8904120
Visit www.princessauto.com for more information 3
SAFETY
WARNING! Read and understand all instructions before using this tool. The
operator must follow basic precautions to reduce the risk of personal injury
and/or damage to the equipment.
Keep this manual for safety warnings, precautions, operating or inspection and
maintenance instructions.
HAZARD DEFINITIONS
Please familiarize yourself with the hazard notices found in this manual. A notice
is an alert that there is a possibility of property damage, injury or death if certain
instructions are not followed.
DANGER! This notice indicates an immediate and specific hazard that will
result in severe personal injury or death if the proper precautions
are not taken.
WARNING! This notice indicates a specific hazard or unsafe practice that
could result in severe personal injury or death if the proper
precautions are not taken.
CAUTION! This notice indicates a potentially hazardous situation that may result
in minor or moderate injury if proper practices are not taken.
NOTICE! This notice indicates that a specific hazard or unsafe practice will
result in equipment or property damage, but not personal injury.
WORK AREA
1. Operate in a safe work environment. Keep your work area clean, well lit and
free of distractions.
2. Keep anyone not wearing the appropriate safety equipment away from the
work area.
3. Store unused tools properly in a safe and dry location to prevent rust or
damage. Lock tools away and keep out of the reach of children.
4. Do not install or use in the presence of flammable gases, dust or liquids.

8904120 550 lb 6 cu. ft Mini Power Wheelbarrow V4.0
4 For technical questions call 1-800-665-8685
PERSONAL SAFETY
WARNING! Wear personal protective equipment approved by the
Canadian Standards Association (CSA) or American National Standards
Institute (ANSI).
PERSONAL PROTECTIVE EQUIPMENT
1. Always wear impact safety goggles that provide front and side protection
for the eyes. Eye protection equipment should comply with CSA Z94.3-07
or ANSI Z87.1 standards based on the type of work performed.
2. Wear gloves that provide protection based on the work materials or to
reduce the effects of tool vibration.
3. Wear protective clothing designed for the work environment and tool.
4. Non-skid footwear is recommended to maintain footing and balance in the
work environment.
5. Wear steel toe footwear or steel toe caps to prevent a foot injury from
falling objects.
6. This tool can cause hearing damage. Wear hearing protection gear with an
appropriate Noise Reduction Rating to withstand the decibel levels.
PERSONAL PRECAUTIONS
Control the tool, personal movement and the work environment to avoid
personal injury or damage to tool.
1. Do not operate any tool when tired or under the influence of drugs, alcohol
or medications.
2. Avoid wearing clothes or jewelry that can become entangled with the
moving parts of a tool. Keep long hair covered or bound.
3. Do not overreach when operating a tool. Proper footing and balance
enables better control in unexpected situations.
4. Securely hold this tool using both hands. Using a tool with only one hand
can result in loss of control.

V4.0 550 lb 6 cu. ft Mini Power Wheelbarrow 8904120
Visit www.princessauto.com for more information 5
SPECIFIC SAFETY PRECAUTIONS
WARNING! DO NOT let comfort or familiarity with product (gained from
repeated use) replace strict adherence to the tool safety rules. If you use
this tool unsafely or incorrectly, you can suffer serious personal injury.
1. Use the correct tool for the job. This tool was designed for a specific function.
Do not modify or alter this tool or use it for an unintended purpose.
2. Do not exceed the power wheelbarrow’s load capacity (see Specifications).
3. Do not use the machine if the engine’s switch does not turn it on or off.
Any gasoline powered machine that cannot be controlled with the engine
switch is dangerous and must be replaced.
4. Position the machine in such a way that it cannot move during maintenance,
repairs, cleaning, adjustments, assembly of accessories or storage.
Unexpected movement can cause a crushing injury during these procedures.
5. Do not reach under the wheelbarrow if the engine is running or it is
moving. You may suffer a crushing injury. Shut the machine off, if it is
necessary to reach underneath.
6. Do not operate the machine in confined areas where there may be a risk of
crushing the operator between the machine and another object. Use
extreme caution when in reverse or pulling the machine towards you.
7. Never carry passengers on the power wheelbarrow.
8. Drive at a safe speed and adjust for the surface conditions and the load.
a. Make sure to keep your feet away from the wheels when moving
forward or backwards to avoid a foot injury.
9. Never operate the machine on slopes where angle is over 18°.
a. Do not shift gears while on a slope.
b. Ensure the load is evenly balanced when moving over a slope in
forward or reverse.
c. Only travel downslope by walking backwards while in reverse when
the slope is between 10 to 18º.
10. The power wheelbarrow’s center-of-gravity will change when tipping a load
out. Ensure the machine is on firm, stable ground capable of supporting
the change as the load shifts.
8904120 550 lb 6 cu. ft Mini Power Wheelbarrow V4.0
6 For technical questions call 1-800-665-8685
a. Soft or slick surfaces may cause the power wheelbarrow to tip or slip
during unloading.
UNPACKING
WARNING! Do not operate the tool if any part is missing. Replace the
missing part before operating. Failure to do so could result in a malfunction
and personal injury.
Remove the parts and accessories from the packaging and inspect for damage.
Make sure that all items in the parts list are included.
Contents:
• Main Frame
• Handlebar Assembly
• Tipping Handle
• Dump Box
• Hardware
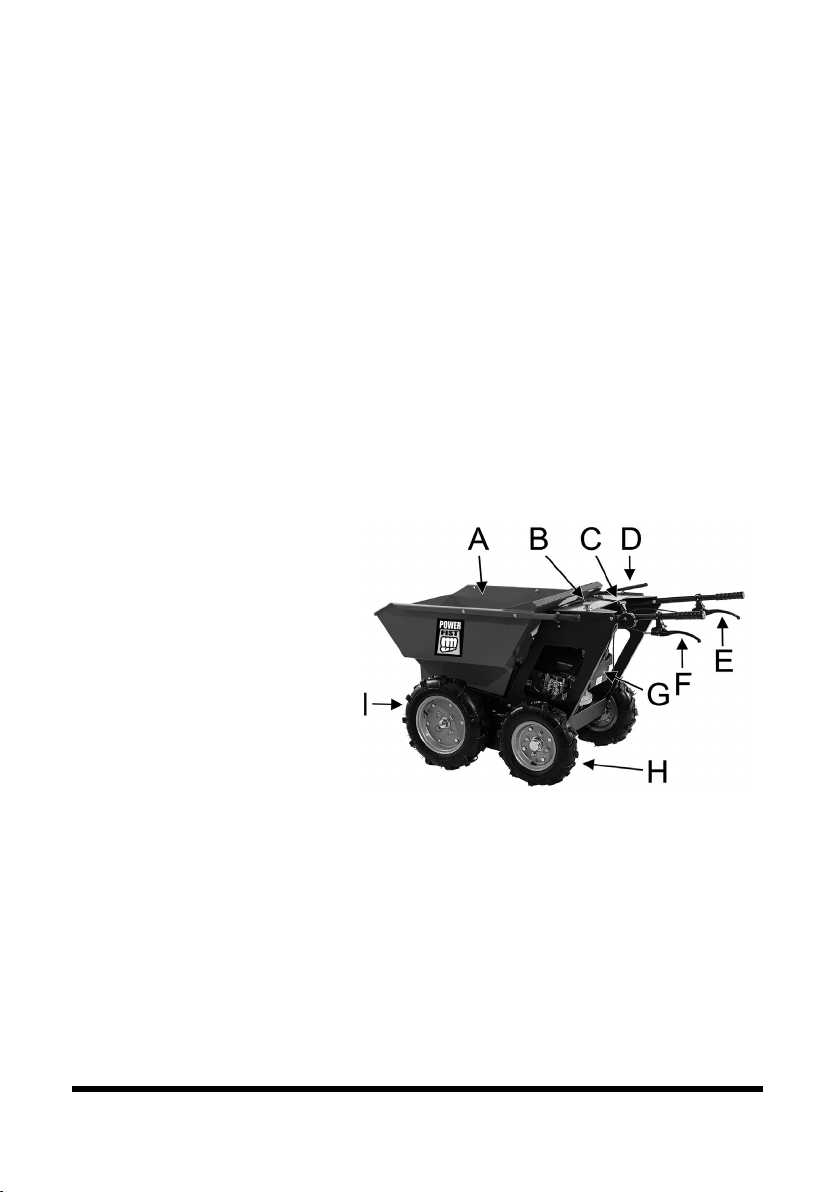
IDENTIFICATION KEY
A Dump Box
B Emergency Button
C Throttle Control
D Gear Selection Lever
E Dump Box Release Lever
F Clutch Control Lever
G Engine
H Rear Tire
I Front Tire
ASSEMBLY & INSTALLATION
Numbered references in parenthesis (#1) refer to the included Parts List. Letter
references in parenthesis (A) refer to the included Identification Key.
The Mini Power Wheelbarrow comes preassembled.
Fig. 1

V4.0 550 lb 6 cu. ft Mini Power Wheelbarrow 8904120
Visit www.princessauto.com for more information 7
OPERATION
IMPORTANT! Release the left clutch control lever (F) immediately when an
emergency stop is required, then press the red emergency button, then turn
the motor off. Release the emergency button by turning it in the direction
shown on the button.
Consult the engine manual for the correct procedure to start and stop
the engine.
1. Start the engine. After the engine warms up, adjust the throttle control (C)
to increase the engine speed.
2. Choose a gear with the gear selection lever (D) and slowly squeeze the
clutch control lever (F) to start moving. If the gear does not engage
straight away, slowly release the clutch lever and try again.
3. Changing direction by directly applying force to the handles. Push the
handles to the left to turn right or push the handles right to turn left. The
wheelbarrow will turn as it continues to move forward.
Travelling in reverse will have the opposite effect. You will turn in the
direction you pull.
4. When the clutch control lever is released, the machine will stop automatically.
5. Move the gear selection lever to the zero (0) to place the gear in neutral.
a. Switch the engine OFF as an additional safety precaution.
6. Dump the load by pulling the dump box release lever (E) up to release the
dump box's locking device. Manually raise the dump box to dump the load.
Lower the dump box and the locking mechanism will automatically lock the
box into place. Confirm the dump box is locked into position.
DIFFICULT TERRAIN
The power wheelbarrow may be hard to control when carrying a full load on
difficult terrain. The following steps can reduce the chance of losing control of
the equipment.
1. Reduce the power wheelbarrow’s speed to low on difficult terrain such as
soft or frozen ground, on an incline or on loose gravel or stones. This will
allow more time to react to a potential loss of control.

8904120 550 lb 6 cu. ft Mini Power Wheelbarrow V4.0
8 For technical questions call 1-800-665-8685
2. Do not allow rapid acceleration, sudden stops or sharp turns. The load’s
momentum can cause the power wheelbarrow to tip or slide in an
unexpected direction.
3. The power wheelbarrow will tilt when the wheels pass over obstacles or
rough terrain.
4. Adverse weather conditions such as wind, rain, snow and ice can make the
power wheelbarrow more difficult to control. Reduce speed and evaluate
the terrain.
a. Rough terrain can wear down the wheels quickly, impairing their
function and reducing their operational life,
5. Place a wedge against one of the wheels if the machine is stopped on a
steep slope.
CARE & MAINTENANCE
1. Maintain the tool with care. A tool in good condition is efficient, easier to
control and will have fewer problems.
2. Inspect the tool components periodically. Repair or replace damaged or
worn components. Only use identical replacement parts when servicing.
3. Follow instructions for lubricating and changing accessories.
4. Keep the tool handles clean, dry and free from oil/grease at all times.
5. Maintain the tool’s labels and name plates. These carry important information.
If unreadable or missing, contact Princess Auto Ltd. for replacements.
WARNING! Only qualified service personnel should repair the tool. An
improperly repaired tool may present a hazard to the user and/or others.
ENGINE MAINTENANCE
Refer to the Engine Manual included in your unit for the information on engine
maintenance. Your engine manual provides detailed information and a
maintenance schedule for performing the tasks.
V4.0 550 lb 6 cu. ft Mini Power Wheelbarrow 8904120
Visit www.princessauto.com for more information 9
MAINTENANCE SCHEDULE
Component Daily Weekly Action
Check extension spring X Replace if damaged or
overstretched.
Check belt tension X Replace if abraded or
overstretched.
Check brake adjustment X
Check control cable X Replace if damaged.
Check tire X Repressurize as needed. Replace if
deformed or damaged.
Check all bolts & nuts X Tighten as needed.
Check chain X
Clean machine X
PREVENTIVE MAINTENANCE
Turn off the engine and place the gear selection lever into neutral. Wait until the
engine is cool. Remove all debris and other materials that may have
accumulated on the wheels, engine or chassis.
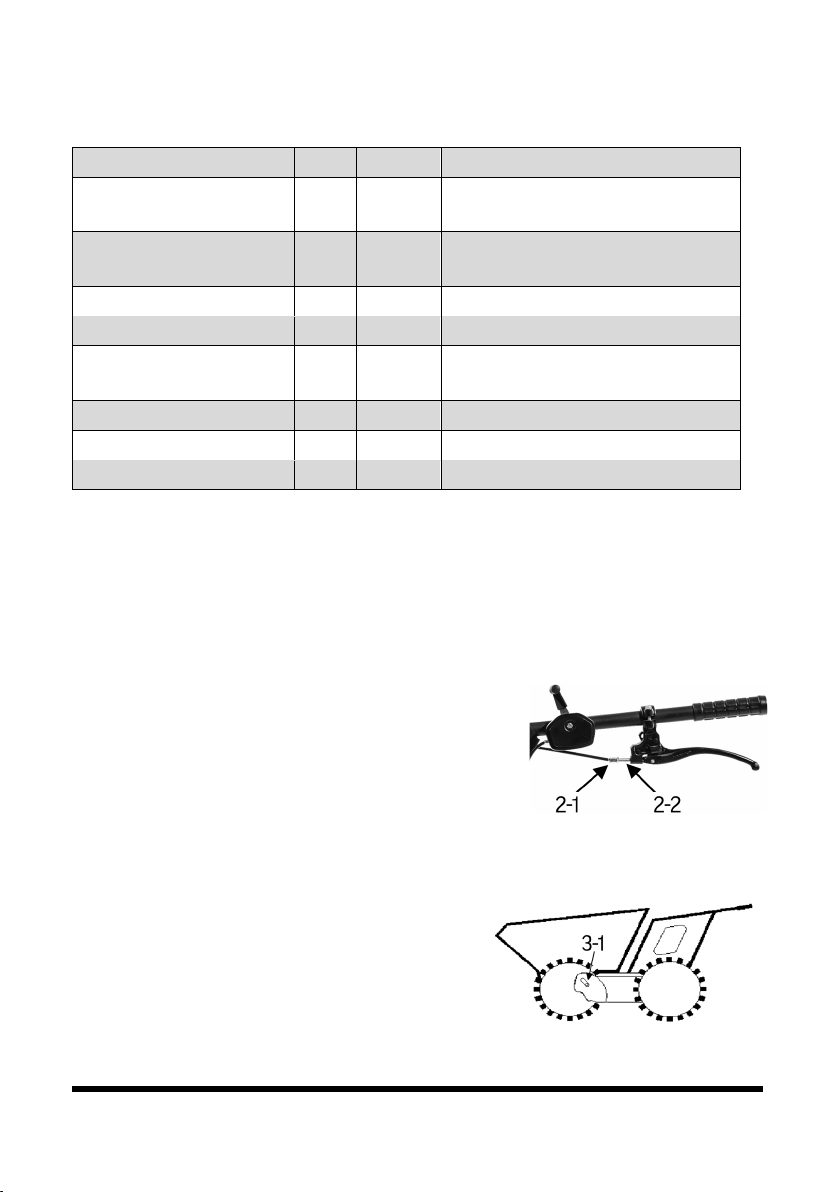
ADJUSTING THE CLUTCH
A worn clutch may require moving the clutch lever
farther before the clutch engages.
1. Set the clutch lever to its original position.
2. Remove slack from the clutch lever cable by
loosening the nut (Fig. 2-2), then tighten the
cable control (Fig. 2-1).
3. Tighten the nut once the cable is tight.
ADJUST THE BRAKE
Rotate the nut (Fig. 3-1) behind the front
wheel to tighten the brake once a month.
Fig. 2
Fig. 3
8904120 550 lb 6 cu. ft Mini Power Wheelbarrow V4.0
10 For technical questions call 1-800-665-8685
REMOVING THE BOTTOM COVER
WARNING! Use safe lifting practices during these procedures to avoid a
back strain or other injuries.
Removing the wheelbarrow’s bottom cover is necessary when repairing or
maintaining the dump box release cable or the drive chain.
1. Chock the back wheels and place the gear in neutral.
2. Pull the linch pin (#8) to free the dump box.
3. Slide the dump box off the fixed pins. Take care as the dump box weighs
50.7 lb (23 kg). Set aside.
4. Grasp the front of the chassis and lift upward so the machine rotates
around the rear tires. Lift until the handle grips touch the ground.
5. Secure the handles to the ground or support the chassis to prevent it from
falling while you work under the chassis.
6. Remove each set of screw from the four corners and set aside. Remove
the bottom screws first.
7. Pull the bottom plate (#25) and place aside.
8. Reverse these steps to reinstall the components.
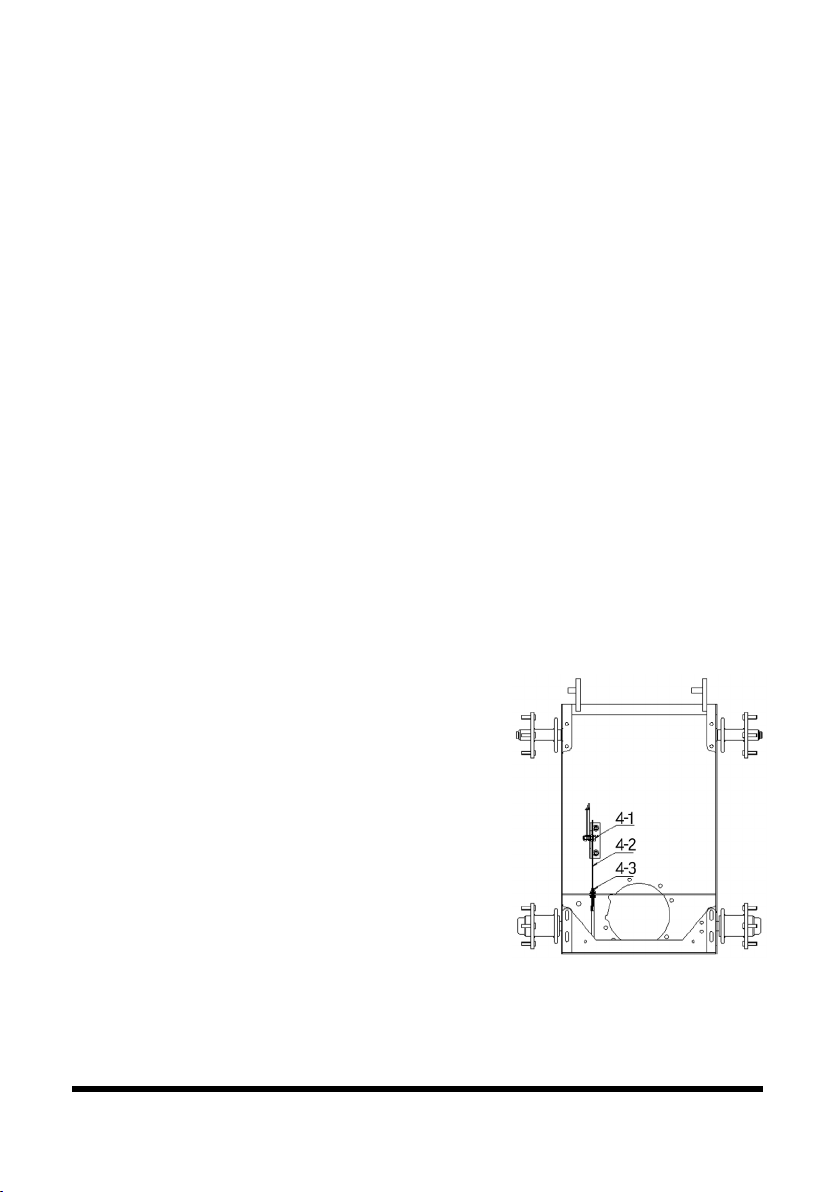
DUMP BOX CABLE TENSION
1. Loosen the nut (Fig. 4-1), but do not
remove it from the bolt.
2. Pull the cable wire (Fig. 4-2) forward to
tighten or push backward to introduce
slack.
3. Tighten the nut (Fig. 4-1)
4. Complete the fine adjustment by turning
the tension nut (Fig. 4-3) clockwise to
tighten and counterclockwise to loosen.
5. Reinstall the bottom plate if no further
tasks are required.
Fig. 4
V4.0 550 lb 6 cu. ft Mini Power Wheelbarrow 8904120
Visit www.princessauto.com for more information 11
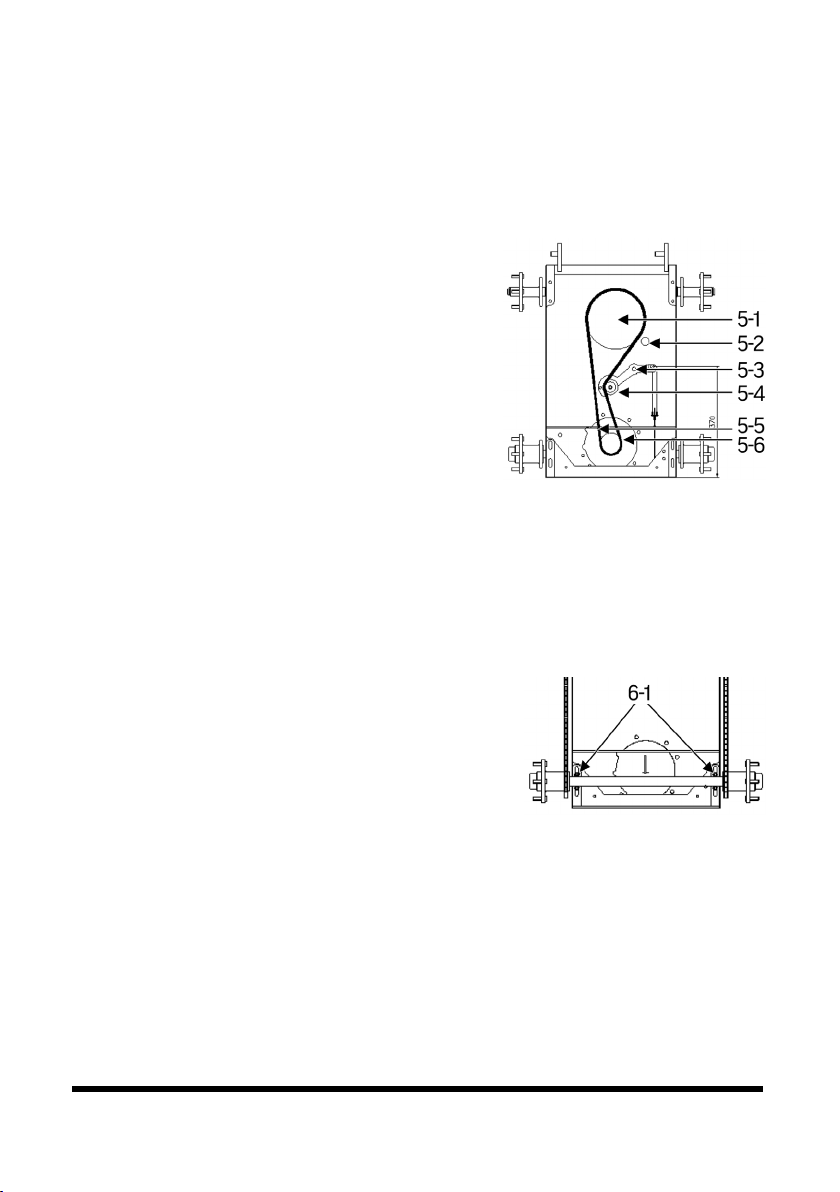
REPLACING THE DRIVE BELT
1. Loosen the clutch cable. See Adjusting the Clutch.
2. Loosen the drive belt’s retaining nut and ring (Fig. 5-1).
3. Remove the worn belt.
4. Loop the new belt around the drive pulley
(Fig. 5-2). Make sure the belt teeth are in
the drive pulley’s groove.
5. Loop the drive belt around the engine’s
pulley (Fig. 5-6) and seat in the groove.
6. Push the belt onto the tension pulley
(Fig. 5-4) and seat in the groove.
7. Adjust the clutch cable tension so the
tension pulley arm is parallel with the
machine’s front (Fig. 5-3).
8. Tighten cable. See Adjusting the Clutch
9. Reinstall the bottom plate if no further tasks are required.
ADJUSTING THE DRIVE CHAIN
1. Loosen the nuts (Fig. 6-1) on each side of the rear axle.
2. Adjust the axle position until the chain on
each side is tight. Make sure the axle is
square with the chassis.
3. Check that the cog’s teeth on each wheel
lines up with the chain links.
4. Tighten the nuts to secure the axle in place.
5. Reinstall the bottom plate if no further tasks are required.
CLEANING
Never use a pressure washer to clean the power wheelbarrow. Water can
penetrate tight areas of the machine or its gearbox case and damage the
spindles, gears, bearings or the engine. This can shorten the equipment’s
operational life and reduce serviceability.
Fig. 5
Fig. 6

8904120 550 lb 6 cu. ft Mini Power Wheelbarrow V4.0
12 For technical questions call 1-800-665-8685
Do not use strong detergents or petroleum based cleaners when cleaning
plastic parts. Chemicals can damage plastics.
LUBRICATION
Inspect and lubricate the tool when required. Use a premium quality lithium
machine oil to lubricate the tool. Other lubricants may not be suitable and could
damage the tool or cause a malfunction during use.
STORAGE
If the power wheelbarrow will not be used for a period be used for a period
longer than 30 days, follow the steps below to prepare your unit for storage.
Consult the engine manual for storage steps involving the engine.
1. Use clean cloths to clean off the outside of the machine and to keep the air
vents free of obstructions.
2. Inspect for any loose or damaged parts. Repair or replace damaged parts
and tighten loose screws, nuts or bolts.
3. Store your unit on flat ground in a clean, dry building that has good ventilation.
DISPOSAL
Recycle a tool damaged beyond repair at the appropriate facility.
Contact your local municipality for a list of disposal facilities or by-laws for
electronic devices, batteries, oil or other toxic liquids.
IMPORTANT! DO NOT pollute the environment by allowing uncontrolled
discharge of waste oil.

V4.0 550 lb 6 cu. ft Mini Power Wheelbarrow 8904120
Visit www.princessauto.com for more information 13
TROUBLESHOOTING
Visit a Princess Auto Ltd. location for a solution if the tool does not function
properly or parts are missing. If unable to do so, have a qualified technician
service the tool.
Consult the engine manual for further troubleshooting steps and solutions.
Problem(s) Possible Cause(s) Suggested Solution(s)
Machine does not
move while engine is
running.
1.
Gear is not properly
selected.
2. Clutch fails to
engage gears.
1. Ensure gear lever is not in-between two
different gears.
2. Follow steps in Adjusting The Clutch in
Care & Maintenance.
Machine fails to
immediately stop
when clutch is
released.
Brake cable is loose. 1.
Follow step in Adjust The Brake in Care &
Maintenance.
2. Replace brake cable if adjustment fails to
fix issue.
Dump box lock does
not release or
requires additional
effort to release.
Dump box lock cable
is loose.
1. Follow steps in Dump Box Cable Tension
in Care & Maintenance.
2.
Replace the cable if adjustment fails to fix
issue.
Machine movement
is jerky or is slower
than normal for the
gear selected.
1. The drive belt is
loose.
2. The drive belt is
damaged.
Follow the steps in Replacing the Drive Belt.
1. Inspect and adjust the tension pulley if it
out of position.
2. Replace the drive belt if needed.
Front wheels not
receiving the same
power as back
wheels. Drive chain
slips.
1. Chain drives are
loose.
2. Chains drives are
worn.
3. Wheel hub cogs
are worn down.
Follow the steps in Adjusting The Drive
Chain.
1. Adjust the axle position.
2. Replace the drive chains.
3. Also inspect the hub cog on all four
hubs. Replace the cogs if they are worn
and rounded.
8904120 550 lb 6 cu. ft Mini Power Wheelbarrow V4.0
14 For technical questions call 1-800-665-8685
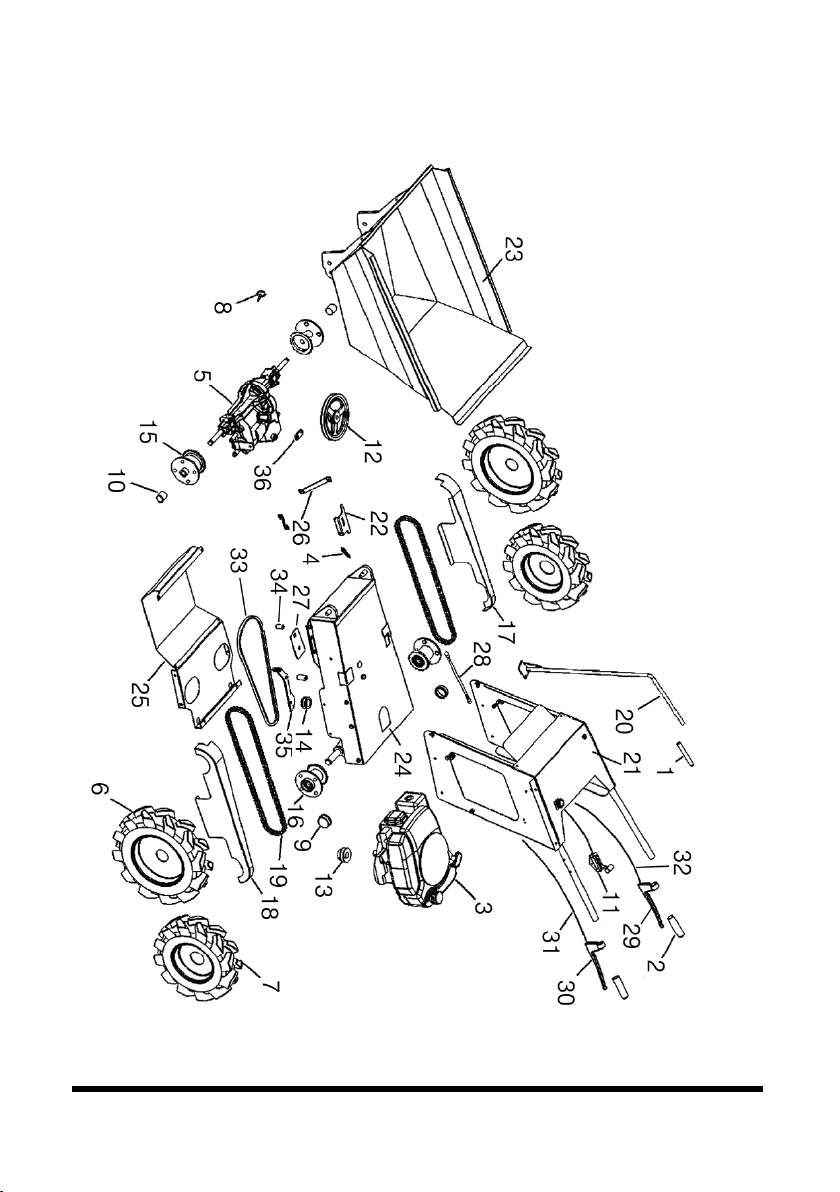
PARTS BREAKDOWN

V4.0 550 lb 6 cu. ft Mini Power Wheelbarrow 8904120
Visit www.princessauto.com for more information 15
PARTS LIST
# DESCRIPTION QTY
1 Grip (Forward/Reverse Lever) 1
2 Grip (Handlebar) 2
3 Ducar 196cc OHV Vertical
Engine
1
4 Clutch/Dump Cable Spring 2
5 Transaxle 1
6 Front Wheel Complete (10 In.) 2
7 Rear Wheel Complete (8 In.) 2
8 Linch Pin 1
9 Rear Hook Screw Cap 2
10 Front Hook Screw Cap 2
11 Throttle Lever C/W Cable 1
12 Drive Pulley 1
13 Engine Pulley 1
14 Clutch Pulley (With Bearing) 1
15 Front Wheel Hub 2
16 Rear Wheel Hub 2
17 Right Chain Protection 1
18 Left Chain Protection 1
19 Chain 2
20 Forward/Reverse Lever 1
21 Handle Bar Cowling 1
22 Dump box Catch 1
23 6 Cu Ft Dump Box 1
24 Main Plate 1
25 Bottom Plate 1
26 Left/Right Torque Stays 2
27 Clutch Reinforcement Plate 1
28 Forward / Reverse Tie Rod 1
29 Dump Box Catch Lever 1
30 Clutch/Brake Lever 1
31 Clutch/Brake Cable 1
32 Dump Box Catch Cable 1
33 Drive Belt 1
34 Belt Guide Tube 1
35 Clutch Pulley Bracket 1
36 Shifter Plate 1

8904120 550 lb 6 cu. ft Mini Power Wheelbarrow V4.0
16 For technical questions call 1-800-665-8685

V 4,0 8904120
Vous devez lire et comprendre toutes les instructions avant d'utiliser l'appareil.
Conservez ce manuel afin de pouvoir le consulter plus tard.
Manuel d'utilisateur
Mini-brouette à essence
de 6 pi cubes, 550 lb

8904120 Mini-brouette à essence de 6 pi cubes, 550 lb V 4,0
2 En cas de questions techniques, appelez le 1-800-665-8685
SPÉCIFICATIONS
Capacité
550 lb (249.5 kg)
Type de démarrage Démarrage à rappel
Puissance théorique 5,5 CV
Type de moteur Essence, 196 cm cubes
Nombre de vitesses Avant 4
Arrière 1
Vitesse nominale Avant max. 3,78 km/h
Arrière 1,88 km/h
Taille de caisse 35 1/2 x 28 x 21 po
Nombre de pneus 4
Type de pneu
R1TT
Taille de pneu Avant 4,00-10 po
Arrière 4,00-8 po
Matériau Acier/caoutchouc
Couleur/fini Bleu/noir
Dimensions 66 x 30 x 36 po
Poids 240 lb
INTRODUCTION
La brouette à essence d'une capacité de 660 lb convient idéalement pour vos travaux
d'aménagement paysager et de construction, comme transporter de la terre, des
semences, du sable, du gravier, des buissons, etc. La boîte d’engrenages à 4 rapports
facilite le déplacement de charges pouvant atteindre 249.5 kg (550 lb) sur des terrains
accidentés. La benne est facile à vider en plus d'être maintenue en place au moyen
d'une poignée de bascule verrouillée.
Mini-brouette à essence
de 6 pi cubes, 550 lb

V 4,0 Mini-brouette à essence de 6 pi cubes, 550 lb 8904120
Visitez www.princessauto.com pour plus d'informations 3
SÉCURITÉ
AVERTISSEMENT ! Veuillez lire et comprendre toutes les instructions avant
d'utiliser cet outil. L'utilisateur doit respecter les précautions de base
lorsqu'il utilise cet outil afin de réduire le risque de blessure ou de
dommage à l'équipement.
Conservez ce manuel qui contient les avertissements de sécurité, les
précautions, les instructions de fonctionnement ou d'inspection et d'entretien.
DÉFINITIONS DE DANGER
Veuillez-vous familiariser avec les avis de danger qui sont présentés dans ce
manuel. Un avis est une alerte indiquant qu'il existe un risque de dommage à la
propriété, de blessure ou de décès si on ne respecte pas certaines instructions.
DANGER ! Cet avis indique un risque immédiat et particulier qui
entraînera des blessures corporelles graves ou même la
mort si on omet de prendre les précautions nécessaires.
AVERTISSEMENT ! Cet avis indique un risque particulier ou une pratique non
sécuritaire qui pourrait entraîner des blessures
corporelles graves ou même la mort si on omet de
prendre les précautions nécessaires.
ATTENTION ! Cet avis indique une situation possiblement dangereuse qui
peut entraîner des blessures mineures ou modérées si on
ne procède pas de la façon recommandée.
AVIS ! Cet avis indique un risque particulier ou une pratique non
sécuritaire qui entraînera des dommages au niveau de
l'équipement ou des biens, mais non des blessures corporelles.
AIRE DE TRAVAIL
1. Travaillez dans un environnement de travail sécuritaire. Gardez votre aire
de travail propre, bien éclairée et exempte de toute distraction.
2. Assurez-vous que les personnes qui ne portent pas l'équipement de
sécurité approprié ne se trouvent pas à proximité de l'aire de travail.
3. Rangez les outils correctement dans un lieu sécurisé et sec. Gardez les
outils hors de la portée des enfants.

8904120 Mini-brouette à essence de 6 pi cubes, 550 lb V 4,0
4 En cas de questions techniques, appelez le 1-800-665-8685
4. N'installez pas et n'utilisez pas d'outils électriques en présence de gaz, de
poussière ou de liquides inflammables.
SÉCURITÉ PERSONNELLE
AVERTISSEMENT ! Portez de l'équipement de protection personnelle
homologué par l'Association canadienne de normalisation (CSA) ou
l'American National Standards Institute (ANSI).
ÉQUIPEMENT DE PROTECTION PERSONNELLE
1. Portez toujours des lunettes antiprojections qui offrent une protection
frontale et latérale pour les yeux. L'équipement de protection des yeux
devrait être conforme à la norme CSA Z94.3-07 ou ANSI Z87.1 fonction du
type de travail effectué.
2. Portez des gants qui protègent en fonction des matériaux de travail et pour
réduire les effets des vibrations de l'outil.
3. Portez des vêtements de protection conçus pour l'environnement de travail
et pour l'outil.
4. Les chaussures antidérapantes sont recommandées pour maintenir la
stabilité et l'équilibre au sein de l'environnement de travail.
5. Portez des chaussures à embout d'acier ou à coquilles d'acier pour éviter
les blessures aux pieds dues à la chute d'objets.
6. Cet outil peut causer des dommages à l'ouïe. Portez un dispositif de
protection anti-bruit présentant une cote de réduction du bruit adéquate en
fonction du niveau de décibels.
PRÉCAUTIONS PERSONNELLES
Gardez le contrôle de l'outil, de vos mouvements et de l'environnement de
travail pour éviter les blessures ou le bris de l'outil.
1. N'utilisez pas l'outil si vous êtes fatigué ou sous l'effet de drogues, d'alcool
ou de médicaments.
2. Évitez de porter des vêtements ou des bijoux pouvant se prendre dans les
pièces mobiles d'un outil. Gardez les cheveux longs recouverts ou attachés.
3. N'utilisez pas l'outil si vous devez étirer les bras pour vous en servir. Une
stabilité et un équilibre appropriés sont nécessaires afin d'avoir un meilleur
contrôle en cas de situations inattendues.
Table of contents
Languages:
Other Power Fist Outdoor Cart manuals

Power Fist
Power Fist 8973158 User manual

Power Fist
Power Fist 8436099 User manual

Power Fist
Power Fist 8781080 User manual

Power Fist
Power Fist 8642530 User manual

Power Fist
Power Fist 8648479 User manual

Power Fist
Power Fist 8704546 User manual

Power Fist
Power Fist 8773335 User manual

Power Fist
Power Fist 8813768 User manual

Power Fist
Power Fist 8781155 User manual

Power Fist
Power Fist Welding Cart User manual


