Power Glide 60101211 User manual

ASSEMBLY AND OPERATING INSTRUCTIONS
MODEL 60101211
18 VOLT CORDLESS CUTOUT TOOL
Please keep this instruction manual for future reference
MADE IN CHINA
Distributed By:
World Factory, Inc.
Southlake, Tx.
1-888-422-7800
©2002 World Factory, Inc.
IF YOU HAVE ANY PROBLEMS OR QUESTIONS CONCERNING THIS PRODUCT,
DO NOT RETURN IT TO YOUR RETAILER. CONTACT CUSTOMER SERVICE AT
1-888-422-7800.
IF YOU HAVE ANY PROBLEMS OR QUESTIONS CONCERNING THIS PRODUCT,
DO NOT RETURN IT TO YOUR RETAILER. CONTACT CUSTOMER SERVICE AT
1-888-422-7800.
Power Glide Limited Warranty
Consumer Power Tools for Home Use
World Factory, Inc. (Seller) warrants to the original Buyer only, that each POWER GLIDE™ portable power
tool will be free from defects in material and workmanship for a period of one (1) year from date of
purchase. SELLER’S SOLE OBLIGATION AND BUYER’S EXCLUSIVE REMEDY UNDER THIS LIMITED
WARRANTY SHALL BE THE REPAIR OR REPLACEMENT OF PARTS, WITHOUT CHARGE, WHICH
ARE DEFECTIVE IN MATERIAL OR WORKMANSHIP. ANY PARTS AS DETERMINED BY THE SELLER
WHICH HAVE BEEN MISUSED; ABUSED OR DAMAGED EITHER DIRECTLY OR INDIRECTLY FROM
REPAIRS OR ALTERATIONS ATTEMPTED BY UNAUTHORIZED PERSONS; IMPROPER
MAINTENANCE, NEGLECT OR ACCIDENT ARE NOT COVERED BY THIS LIMITED WARRANTY. To
make a claim under this Limited Warranty, you must return the complete power tool, transportation prepaid,
to any World Factory authorized service center. Call 1-888-422-7800 for the location of the nearest
authorized power tool service center.
Additional Limitations
THIS LIMITED WARRANTY DOES NOT APPLY TO ACCESSORY ITEMS SUCH AS CIRCULAR SAW
BLADES, DRILL BITS, ROUTER BITS, JIGSAW BLADES, SANDING BELTS OR PADS, GRINDING
WHEELS AND OTHER RELATED ITEMS. ALL IMPLIED WARRANTIES SHALL BE LIMITED IN
DURATION TO ONE (1) YEAR FROM DATE OF PURCHASE. IN NO EVENT SHALL SELLER BE LIABLE
FOR ANY INCIDENTAL OR CONSEQUENTIAL DAMAGES, INCLUDING BUT NOT LIMITED TO
LIABILITY FOR LOSS OF PROFITS, ARISING FROM THE SALE OR USE OF THIS PRODUCT.
If any provision of this Limited Warranty is for any reason held to be invalid or unenforceable, such provision
shall not affect any other provision herein, this Limited Warranty shall be construed as if such invalid and/or
unenforceable provision had never been contained herein.
This Warranty contains the entire agreement between Seller and Buyer and supersedes any and all prior
agreements, arrangements, or understandings between the parties relating to product warranty.

6.1.
Cautions: When using power tools, the following basic safety measures should be followed to
reduce and/or eliminate the risk of injury. Read and carefully observe these instructions while
using the device.
1. MAINTAIN SAFE WORKING ENVIRONMENT.
Never expose power tools to rain or moisture and do not use power tools in moist or wet
environments. Ensure that there is good lighting. Do not use power tools in the vicinity of
combustible liquids or gases. Disorder in the working area increases the risk of accidents.
2. PREVENT ELECTRIC SHOCKS.
Avoid bodily contact with grounded parts, e.g. pipes, radiators, stoves, or refrigerators.
3. KEEP POWER TOOLS AWAY FROM CHILDREN.
Do not let children or other people touch the tool or the power cable during operation and keep
people out of your work area.
4. STORE TOOLS IN A SAFE PLACE.
Unused tools should be stored in a dry, secure area where children cannot reach them.
5. SELECT THE PROPER TOOL FOR THE TASK.
Do not use tools for any purpose other than those for which they were intended. The tool will
operate more efficiently and safely in the specified performance range. Do not use any tools or
attachments that are not suited for the work.
6. WEAR APPROPRIATE WORK CLOTHES.
Do not wear any loose-fitting clothing or jewelry (they could get caught up in moving parts). If
you have long hair, wear a hairnet. Make sure your hair, body and clothing remain clear of
moving parts
7. WEAR SAFETY EQUIPMENT.
Always wear safety glasses and hearing protection. When performing any work that generates
dust, use a breathing mask. For outdoor work, it is recommended that you wear gloves and
non-slip footwear.
8. DO NOT INCORRECTLY USE THE POWER CABLE.
Do not carry the tool by the power cable and do not use the power cable to pull the plug out of
the socket. Protect the power cable from heat, oil, and sharp edges.
9. SECURE THE WORK-PIECE.
Use clamping devices or a vice in order to hold the work-piece in a secure position that allows
you to operate the tool with both hands.
10. DO NOT OVER REACH OR STRETCH BEYOND YOUR STANDING AREA.
Avoid any abnormal postures. Ensure that you are standing securely and keep your balance at
all times while operating a power tool.
11. PROPERLY MAINTAIN YOUR TOOLS.
Keep your tools ready for use (e.g. sharp and clean) in order to assure proper operation. Follow
the maintenance regulations and the instructions for tool changes. Check the plug and the cable
regularly and if these are damaged, have them replaced by a recognized electrical specialist.
Always keep handles dry and free from oil and grease.
SAFETY INSTRUCTIONS
1. (SEE FIGURE 5) Loosen the guide base adjusting screws (1) and
slide the guide base until the desired depth of cut is achieved.
Before doing any work on the tool, always remove the battery pack. Clean the tool with a moist cloth
and a littlelubricating soap. Do not use any cleaning agents or solvents these could attack the plastic
parts of the tool. Always keep the surface of the device free from dust and dirt.
This cordless drill has been manufactured in accordance with the applicable standards and
equipment safety legislation. When using electrical appliances, it is important to take some safety
precautions in order to avoid possible injury and damage. For that reason, you should carefully read
and store these instructions such that this information is available to you at all times.
USING THE GUIDE ASSEMBLY
MAINTENANCE AND CLEANING
• Voltage: 18V (DC)
• No Load Speed: 0 - 18,0000
• Capacity: 1-7/8" max. cutting depth
• Weight: 3.75 lbs. W/battery
• Charger Input: 120V ~ 60Hz
• Replacement Battery No.: 601080004
SPECIFICATIONS
(FIGURE 5) 1
IF YOU HAVE ANY PROBLEMS OR QUESTIONS CONCERNING THIS PRODUCT,
DO NOT RETURN IT TO YOUR RETAILER. CONTACT CUSTOMER SERVICE AT
1-888-422-7800.
NOTES

2.5.
WARNING: MAKE SURE THE TOOLS IS TURNED OFF AND THE BATTERY IS REMOVED
BEFORE MAKING CHANGING BITS OR MAKING ANY ADJUSTMENTS TO THE TOOL
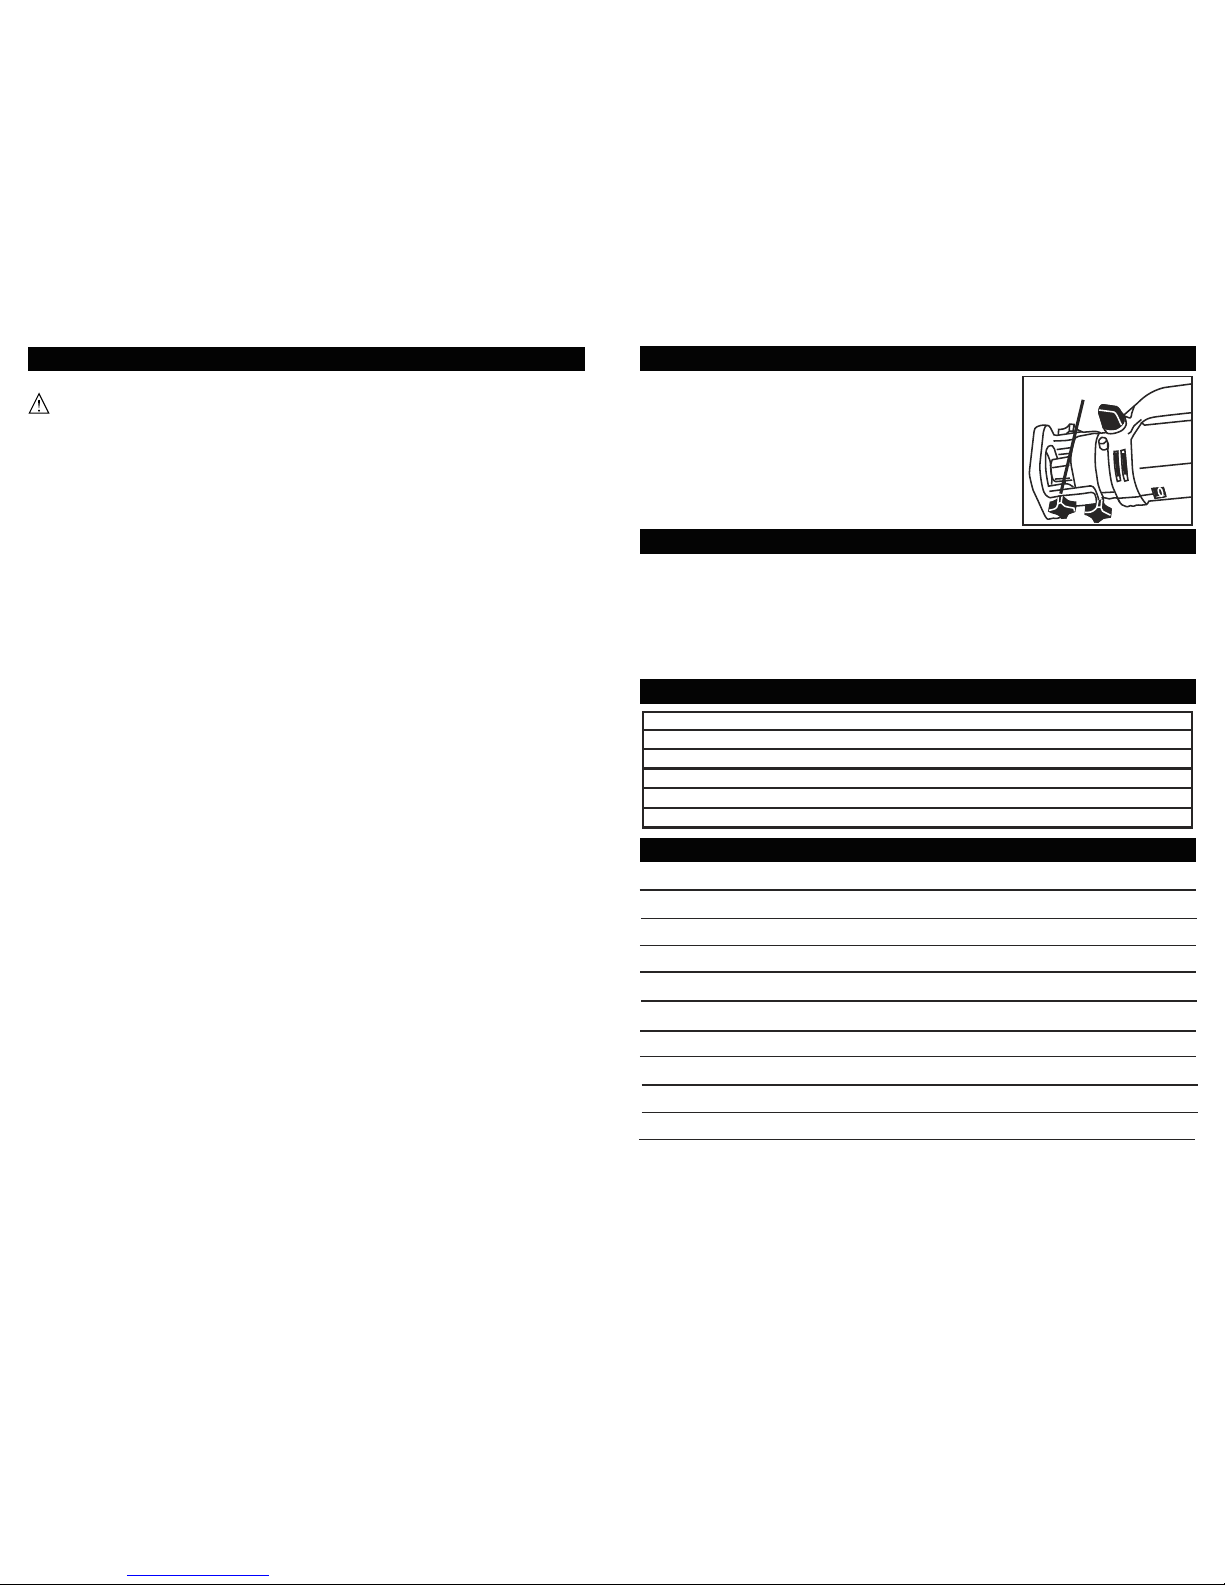
1.(SEE FIGURE 1)Turn the tool OFF and remove the battery.
2.Press and hold the spindle lock button (1)
3.Use the wrench supplied, rotate the collet nut (2) counter clock
wise to loosen the collet and remove the cutting bit.
Note: you will feel some resistance as the bits slides in the collet.
Select and insert the correct collet (1/8" or 1/4") for the size bit to
be installed. To change collet sizes the collet nut must be
completely removed, the old collet removed from the tool shaft
and the appropriate size collet inserted and the collet nut replaced.
Note: The collets are symmetrical and have no "UP" or "DOWN".
5. Insert the shank end of the selected bit through the opening in the
collet nut a minimum of 3/4" (19mm) into the collet.
6. Press and hold the spindle lock button.
7. Use the wrench, rotate the collet nut clock wise to tighten the collet and secure the cutting bit.
Note: Tighten firmly but do not over tighten.
12. DISCONNECT THE TOOL FROM THE POWER SUPPLY.
When not in use, prior to maintenance and during the tool change, e.g. saw blade, drill bit and
machine tools of all kinds disconnect from the power supply.
13. DO NOT LEAVE ANY TOOL KEYS INSERTED.
Before switching on, check that keys, adjustment or setting tools have been removed from the
power tool.
14. AVOID ANY UNINTENTIONAL OPERATION OR STARTING-UP OF THE DEVICE.
Do not place your finger on the switch when carrying tools connected to the power supply. Make
sure that the switch is off when connecting the device to the power supply.
15. POWER EXTENSION CABLES.
Use only those extension cables that have been manufactured for this purpose and are marked as
appropriately tested and approved.
16. BE ALERT.
Observe your work. Proceed sensibly. Do not use the tool if you are physically or mentally
impaired in any manner. Do not operate tools under the influence of drugs, alcohol or medication.
17. CHECK YOUR TOOL FOR DAMAGE.
Before using the tool, carefully check the protective devices for problem-free operation and
intended function. Verify there are no damaged parts. Check whether the function of moving parts
is in order, whether they stick and whether parts are damaged.
DAMAGED PROTECTIVE DEVICES AND PARTS MUST BE PROPERLY REPAIRED
OR REPLACED BY A CUSTOMER-SERVICE WORKSHOP PRIOR TO "TOOL USE".
NEVER USE TOOLS AND SWITCHES THAT CANNOT BE SWITCHED ON AND OFF.
18. REPAIRS ONLY BY AN ELECTRICAL SPECIALIST.
This power tool complies with all known safety regulations. Only an electrical specialist may carry
out repairs.
19. USE ONLY ACCESSORIES AND ADDITIONAL DEVICES RECOMMENDED BY THE
TOOL MANUFACTURER.
The use of any insert tools or accessories other than those recommended in the operating
instructions increase risk of injury.
INSTALLING BITS
1. Do not overload the tool. If the speed drops dramatically, decrease the pressure immediately.
2. Do not apply excessive pressure to the tool while cutting.
3. Always use sharp bits. If the bit becomes dull, stops abruptly or becomes blocked, turn off
immediately.
4. Use the power switch properly. Be aware the tool will continue to operate while the power switch is
ON. It must be switch manually to OFF to stop the motor.
5. Do not attempt to start the tool with the bit in contact with the material. Allow the motor to reach full
speed before engaging the work piece.
6. Never touch the bit, collet nut or any moving parts while the tool is in operation.
7. Hold the tool firmly during start-up and while cutting. Install and use the adjustable side handle to
improve you grip when needed. Maintain control of the tool at all times while the blade is rotating.
8. Wear safety glasses at all times when using this tool.
9. Do not touch the cutting bit immediately after use, it may be very hot.
10. Make sure the bit is properly installed and secure before using the tool.
11. Make sure the are to be cut is free of nails, staples or other debris that could damage the blade or
cause loss of tool control.
WARNING:This tool can cause serious injury if not used properly. Read this entire manual
before using. Before each use, verify that the tool bit is securely tightened
1.Select and install the proper cutting bit for the material you will
be cutting.
Note: The High Speed Steel spiral bits supplied with this tool are
suitable for wood, drywall, plastic, fiberglass and other soft
materials. They are not intended for use on metal, stone,
concrete, ceramic tile or other hard materials.
2.Mark the desired path of the blade and ensure that the area
around, above and below is clear of obstructions.
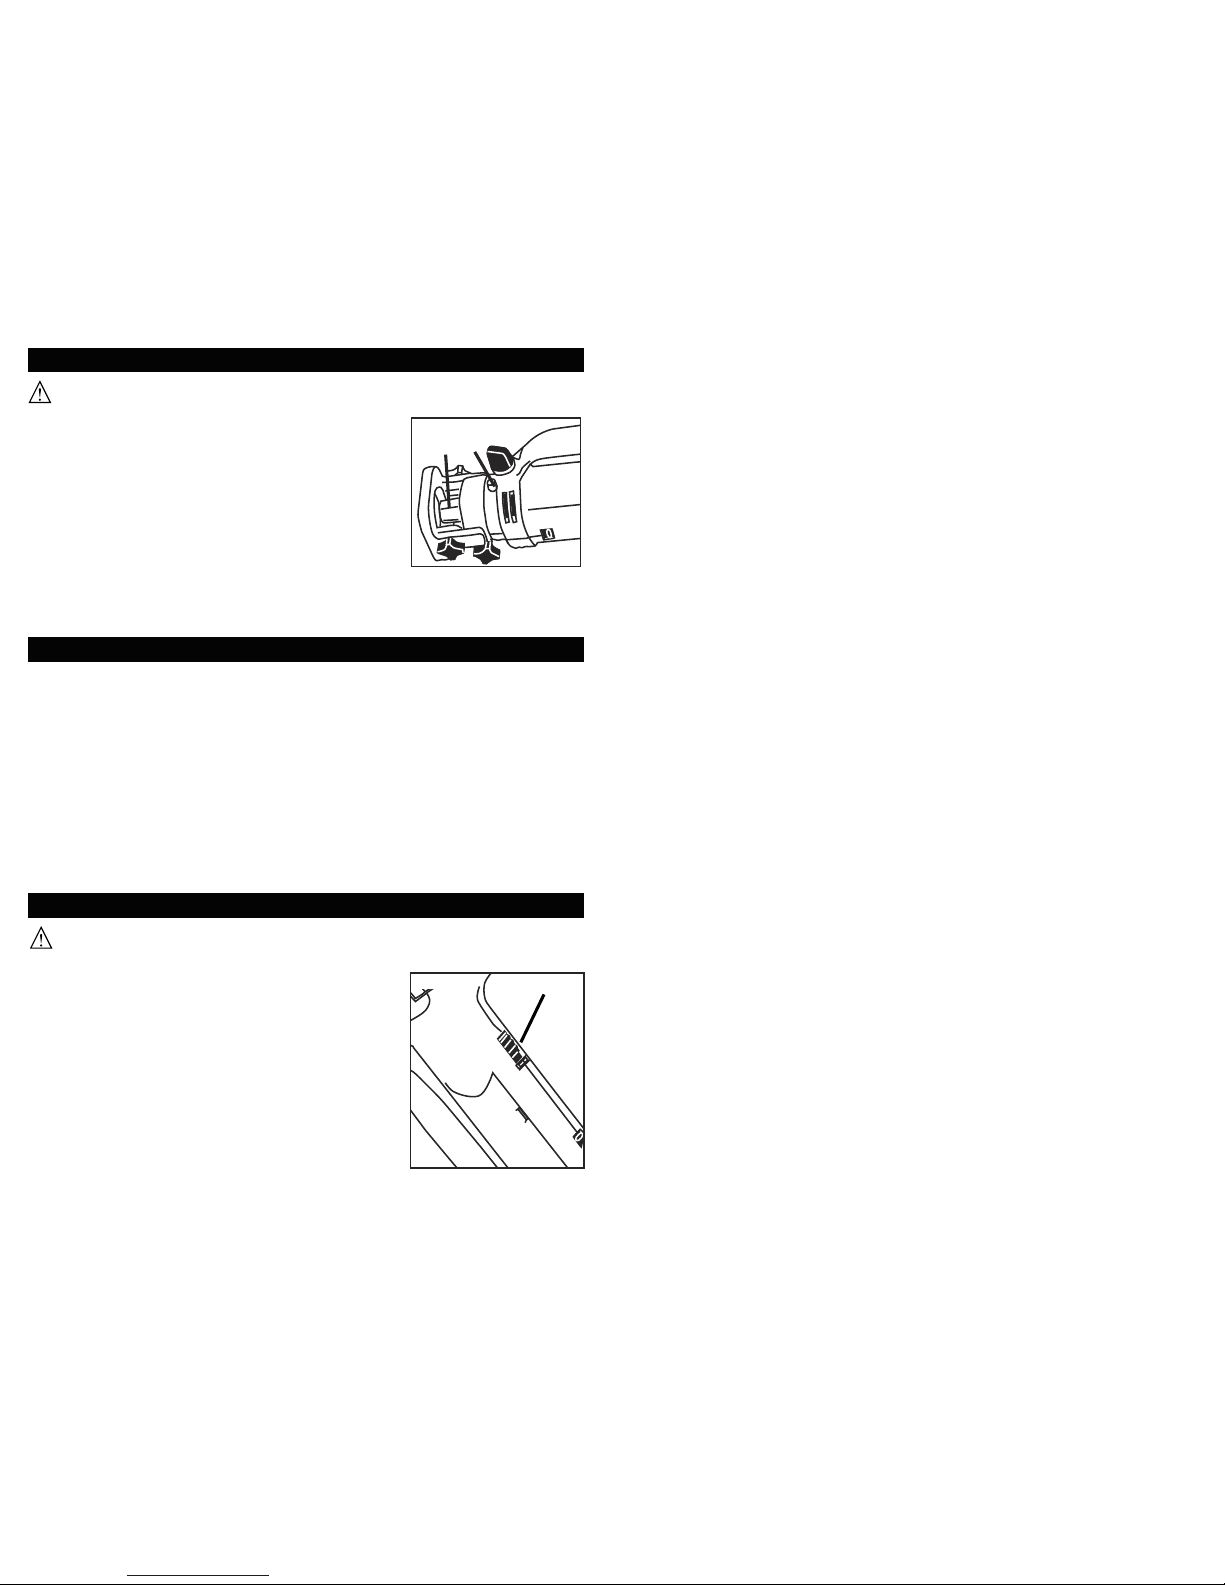
3.(SEE FIGURE 4) Start the tool by sliding the power switch (1) to
the on position and allow the tool to reach full speed.
4.Using both hands, carefully plunge the bit through the material
and maneuver the blade to the desired path. Move slowly and at
a steady rate of speed.
Note: Due to the rotation direction of the bit, a clockwise
"left-to-right" motion generally produces the best results.
5.After the completion of the cut, remove the tool and turn the power switch to the off position.
6.Maintain control of the tool until the bit has stopped turning.
SPECIAL WARNINGS WHEN USING THIS CUTOUT TOOL
USING THE CUTOUT TOOL
IF YOU HAVE ANY PROBLEMS OR QUESTIONS CONCERNING THIS PRODUCT,
DO NOT RETURN IT TO YOUR RETAILER. CONTACT CUSTOMER SERVICE AT
1-888-422-7800.
(FIGURE 3)
1
2
(FIGURE 4) 1

4.3.
O
N
O
F
F
S
E
T
1. Cutout tool
2. Collet nut
3. Shaft locking button
4. On-Off switch
5. Adjustable side handle
6. Battery packet
7. AC Plug
8. Charger base
9. Indicator lights
10. Charger set button
11. Guide assembly
12. Wrench
13. Collet
14. 1/4" and 1/8" diameter spiral bits
1
13
12 14
8
3
4
6
6
7
9
2
11
5
10
1. If under extreme conditions, any electrolyte should escape from the battery, it is essential to
avoid contact with skin. If electrolyte does come into contact with your skin, rinse it off with water
immediately. In the event of electrolyte contact with your eyes, consult a physician immediately.
Before use of the charger and the Battery Packet, read the Instruction Manual carefully.
2. Verify the available current corresponds to the current required by the battery charger.
3. Never let moisture, rain, or splashed water reach the charging location.
4. Do not charge your Battery Packet when the temperature is below 10˚C (+ 50˚F) or above
40˚C(+ 105˚F).
5. Battery packets that are damaged or can no longer be recharged must be disposed of as
hazardous waste. Do not throw the Battery Packet into the trash, into fire, or into water. Consult
your local telephone listing for a battery recycling center in your area.
6. If the electrical cable is damaged, the wire should be replaced by the supplier or by its authorized
repair shop. Repairs should only be made by an authorized specialist.
7. Use only Battery Packets and chargers that have been produced by the original manufacturer.
DO NOT USE OTHER BATTERY PACKETS, OR CHARGERS WITH THIS TOOL.
8. Always keep the charger free from dust and dirt.
9. Insert the Battery Packet into the charger. Verify correct polarity before charging.
10. Always remove Battery Packet before working on the tool. Cover the Battery Packet contacts to
avoid short-circuiting the Battery Packet.
11. Avoid the risk of explosion! Do not throw Ni-Cd batteries into water or fire.
12. Protect the Battery Packet from impacts. Do not open packet.
13. Never completely discharge the Battery Packet. Recharge occasionally if Battery
Packet is not in use for a prolonged period.
SPECIAL SAFTEY INSTRUCTIONS AND CONTENTS
OPERATING INSTRUCTIONS AND CONTENTS:
BATTERY PACK INSTALLATION & REMOVAL
1. To install the battery insert the charged battery in the tool handle until the release buttons snap into
place.
2. To remove the battery from the tool depress the release buttons on the side of the battery pack and
pull straight down, away from the tool handle.
Caution: Use only Power Glide supplied battery and charger with this tool. Do not use other
manufacturers batteries or chargers.
1. (SEE FIGURE 1)To install the battery insert the
charged battery (2) in the tool handle (1) until the
release buttons (3) snap into place.
2. To remove the battery (2) from the tool depress the
release buttons (3) on the side of the battery pack
and pull straight down, away from the tool handle.
Caution: Use only Power Glide supplied battery
and charger with this tool. Do not use other
manufacturers batteries or chargers.
12
3
BATTERY PACK INSTALLATION & REMOVAL (FIGURE 1)
1.Insert the chargers power cord into a standard
110/120v ~ 60Hz power outlet.
2.(SEE FIGURE 2)Carefully insert the battery pack into the
charging base. The battery pack fill fit properly in only one
direction, take care not to force the battery pack in the
wrong direction. The green light over the word "off" will
come on. If it does not, check the power supply to the
charger.
3.To begin charging, press the "Set" button on the charger
base. The red light over the word "On" will come on
indicating charging in process.
4. When the red light goes off, the battery has been
recharged. For normal charging this process takes 1-1.5 hours. Unplug the charger and remove the
battery from the charger base.
O
N
O
F
F
S
E
T
BATTERY CHARGING (FIGURE 2)
Do not dispose of Ni-Cd batteries in household waste! Consult your local telephone listing for a
battery recycling center in your area.
Ni-Cd
RECYCLING
Other Power Glide Power Tools manuals