Power Glide 60109410 User manual

Model No: 60109410
®
Jig Saw
Instruction Manual
Type 60109410
Input Voltage 120V ~ 60Hz
Input Power 3.5 Amp
No Load Speed 500 - 3,000 SPM
Stroke Length 3/4" (19mm)
Max. Cutting Depth
@ 90 Degrees 2" (55mm)
Power Cord 18/2 x 6'
Double Insulated Yes
Dimensions 8.25" L x 2.5" W x 7.5" H
Net Weight 3.95 lbs. (1.79 kgs)
Technical Data
IF YOU HAVE ANY PROBLEMS OR QUESTIONS CONCERNING THIS PRODUCT,
DO NOT RETURN IT TO YOUR RETAILER. CONTACT CUSTOMER SERVICE AT
1-888-424-3354
Made in China
©2007 World Factory, Inc.
Distributed by:
World Factory, Inc.
Coppell TX 75019
Due to ongoing product development the actual product or products may
vary from the illustrations or photos shown within this manual.
Model No. 60900015
Read the instructions and precautions before use of this product
Please keep this instruction manual for future reference
IF YOU HAVE ANY PROBLEMS OR QUESTIONS CONCERNING THIS PRODUCT,
DO NOT RETURN IT TO YOUR RETAILER, CONTACT CONSUMER SUPPORT AT
1-888-424-3354
OR
IF YOU ARE A STORE MANAGER OR EMPLOYEE IN NEED OF ASSISTANCE CALL
1-888-851-5569
PLEASE HAVE YOUR STORE NUMBER READY
170807rev3
Power Glide Limited Warranty
Consumer Power Tools for Home Use to Original Buyer
World Factory, Inc. (Seller) warrants to the original Buyer only, that each POWER GLIDE power tool will
be free from defects in material and workmanship for a period of one (1) year from date of purchase.
SELLER’S SOLE OBLIGATION AND BUYER’S EXCLUSIVE REMEDY UNDER THIS LIMITED
WARRANTY SHALL BE THE REPAIR OR REPLACEMENT OF PARTS, WITHOUT CHARGE, WHICH ARE
DEFECTIVE IN MATERIAL OR WORKMANSHIP. ANY PARTS AS DETERMINED BY THE SELLER WHICH
HAVE BEEN MISUSED; ABUSED OR DAMAGED EITHER DIRECTLY OR INDIRECTLY FROM REPAIRS OR
ALTERATIONS ATTEMPTED BY UNAUTHORIZED PERSONS; IMPROPER MAINTENANCE, NEGLECT OR
ACCIDENT ARE NOT COVERED BY THIS LIMITED WARRANTY. To make a claim under this Limited
Warranty, you must return the complete power tool with proof of purchase, transportation prepaid, to
any World Factory, Inc. authorized service center. Call 1-888-424-3354 or E-mail;
customer.service@worldfactory.com for the location of the nearest authorized power tool service center.
Additional Limitations
THIS LIMITED WARRANTY DOES NOT APPLY TO COMMERCIAL USER OR ACCESSORY ITEMS SUCH
AS CIRCULAR SAW BLADES, DRILL BITS, ROUTER BITS, JIGSAW BLADES, SANDING BELTS OR PADS,
GRINDING WHEELS AND OTHER RELATED ITEMS. ALL IMPLIED WARRANTIES SHALL BE LIMITED IN
DURATION TO ONE (1) YEAR FROM DATE OF PURCHASE. IN NO EVENT SHALL SELLER BE LIABLE
FOR ANY INCIDENTAL OR CONSEQUENTIAL DAMAGES, INCLUDING BUT NOT LIMITED TO LIABILITY
FOR LOSS OF PROFITS, ARISING FROM THE SALE OR USE OF THIS PRODUCT.
If any provision of this Limited Warranty is for any reason held to be invalid or unenforceable, such
provision shall not affect any other provision herein, this Limited Warranty shall be construed as if such
invalid and/or unenforceable provision had never been contained herein.
This Warranty contains the entire agreement between Seller and Buyer and supersedes any and all prior
agreements, arrangements, or understandings between the parties relating to product warranty.
Rev 08072007

Notes:

12
A or Amp Amperes
V Volts
Double Insulated
RPM Revolutions per minute
~ or AC Alternating Current
HZ Hertz
ACCESSORIES
Amp Volts
25 ft. 50ft 100ft 150 ft
1-5 120V 18 16 16 14
6-10 120V 16 16 14 12
11-12 120V 14 14 14 12
12-16 120V 14 12 Not Recommended
Table 1.
Minimum Gage For Power Cord
Total Length of cord in feet
Rating
AWG
CAUTION: Use only Accessories that are recommended by Power Glide for your model.
Accessories that may be suitable for one tool may become hazardous when used on
another tool.
Extension Cords
1. Make sure your extension cord is in good condition. When using an extension cord, be sure to
use one heavy enough to carry the current your product will draw. An undersized cord will
cause a drop in line voltage resulting in loss of power and overheating. Table 1 shows the
correct size to use depending on cord length and nameplate Ampere rating. If in doubt, use
the next heavier gauge. The smaller the gauge number, the heavier the cord.
2. When operating a power tool outside, use an outdoor extension cord marked "W-A" or "W".
These cords are rated for outdoor use and reduce the risk of electrical shock.
3. Use only UL listed extension cords. Inspect extension cord before use and never use damaged
or altered extension cords. Follow extension cord manufacturer safety instruction.
4. Keep cord away from heat, oil, sharp edges or moving parts. Replace damaged cords
immediately. Damaged cords increase the risk of electrical shock.
Recommended Accessories
• Jig Saw Blades
WARNING: Read all instructions. Failure to follow all instructions listed below may result in
electrical shock, fire and/or serious injury. The term “power tool” in all of the warnings listed
below refers to your mains-operated (corded) power tool or battery-operated (cordless)
power tool.
SAVE THESE INSTRUCTIONS
Work Area
1. Keep your work area clean and well lit. Cluttered and dark areas invite accidents
2. Do not operate power tools in explosive atmospheres, such as in the presences of
flammable liquids, gases, or dust. Power tools create sparks, which may ignite the dust
or fumes.
3. Keep bystanders, children and visitors away while operating a power tool. Distractions can
cause you to loose control.
Electrical Safety
1. Power tool plugs must match the outlet. Never modify the plug in any way. Do not use any
adapter plugs with earthed (grounded) power tools. Unmodfied plugs and matching outlets
will reduce risk of electrical shock.
2. Avoid body contact with earthed or grounded surfaces such as pipes, radiators, ranges,
and refrigerators. There is an increased risk of electrical shock if your body is earthed
or grounded.
3. Do not expose power tool to rain or wet conditions. Water entering a power tool will
increase the risk of electrical shock.
4. Do not abuse the cord. Never use the cord for carrying, pulling or unplugging the power
tool. Keep cord away from heat, oil, sharp edges or moving parts. Damaged or entaqngled
cords increase the risk of electrical shock.
5. When operating a power tool outdoors, use an extension cord suitable for outdoor use.
Use of a cord suitable for outdoor use reduces the risk of electrical shock.
Personal Safety
1. Stay alert, watch what you are doing and use common sense when operating a power tool.
Do not use a power tool while tired or under the influence of drugs, alcohol or medication.
A moment of inattention while operating power tools may result in serious personal injury.
2. Use safety equipment. Always wear eye protection. Safety equipment such dust mask, non-
skid safety shoes, hard hat, or hearing protection must be used for appropriate conditions to
reduce personal injuries.
3. Avoid accidental starting. Ensure switch is in the off-position before plugging in. Carrying
tools with your finger on the switch or plugging in power tools that have the switch on
invites accidents.
4. Remove any adjusting key or wrench before turning the power tool on. A wrench or a key
left attached to a rotating part of the power tool may result in personal injury.
5. Do not overreach. Keep proper footing and balance at all times. This enables better control
of the tool in unexpected situations.
6. Dress properly. Do not wear loose clothing or jewellery. Keep your hair, clothing and gloves
away from moving parts. Loose clothes, jewelry or long hair can be caught in moving parts.
7. If devices are provided for connection of dust extraction and collection facilities, ensure
these are connected and properly used. Use of these devices can reduce dust-
related hazards.
GENERAL SAFETY RULES
1

2
A or Amp Amperes
V Volts
Double Insulated
RPM Revolutions per minute
~ or AC Alternating Current
HZ Hertz
11
Power Tool Use And Care
1. Do not force the power tool. Use the correct power tool for your application. The correct
power tool will do the job better and safer at the rate for which it is designed.
2. Do not use power tool if switch does not turn it on or off. Any power tool that cannot be
controlled with the switch is dangerous and must be repaired.
3. Disconnect the plug from the power source and/or battery pack from the power tool before
making any adjustments, changing accessories, or storing the tool. Such preventative
safety measures reduce the risk of starting the tool accidentally.
4. Store idle power tools out of reach of children and do not allow persons unfamiliar with the
power tool or these instructions to operate the power tool. Tools are dangerous in the hands
5. Maintain power tools. Check for misalignment or binding of moving parts, breakage of
parts and any other condition that may affect the power tools operation. If damaged, have
the power tool repaired before using. Many accidents are caused by poorly maintained tools.
6. Keep cutting tools sharp and clean. Properly maintained tools with sharp cutting edges are
less likely to bind and are easier to control.
7. Use the power tool, accessories and tool bits etc., in accordance with these instructions
and in a manner intended for the particular type of power tool, taking into account the
working conditions and the work to be performed. Use of the power tool for operations
different from those intended could result in hazardous situation.
Service
1. Have your power tool serviced by a qualified repair person using only identical
replacement parts. This will ensure that the safety of the power tool is maintained.
Cleaning
WARNING: RISK OF PERSONAL INJURY. Always disconnect tool from power source before
making any adjustment, installing or changing accessories.
1. Clean the tool housing and motor vents after each use.
2. Keep the grip dry, clean and free from oil and grease.
3. Store the tool on a safe and dry place, out of reach of children.
4. Do not use cleaning agents or solvents that could attach the plastic parts of the tool.
5. Turn the tool off immediately and do not operate, until repaired, if tool begins to make
abnormal noise, vibrations, produces smoke or burning odor.
Service
WARNING: Tools service must be performed only by qualified repair personal. Service or
maintenance performed by unqualified personnel could result in a risk of injury. When
servicing a tool, use only identical replacement parts. Follow instruction in the maintenance
section of this manual. Use of unauthorized parts or failure to follow maintenance instructions
may create a risk of electric shock or injury.
Contact World Factory, by phone at 1-888-424-3354, or be E-mail at
service center.
MAINTENANCE

10 3
Plunge Cutting
WARNING: RISK OF PERSONAL INJURY OR DAMAGE TO WORKPIECE. It is not recommended
to plunge cut any material other than wood. To avoid loss of control, broken blades or
damage to the workpiece, always use extreme caution when making plunge cuts. Whenever
possible, drill a 3/8" or bigger pilot hole in the area to be cut and start cutting with the blade
in the pilot hole. This will avoid the need to plunge cut.
1. (SEE FIGURE 9) To plunge cut an inside
hole, clearly mark the cutting line on
the workpiece.
2. Set the bevel angle at 0º then lock the base
plate. Note: Use a protractor or square to
check the bevel angle between the blade
and the base. Make a test cut in a scrap
piece of material and measure the
bevel angle.
3. Adjust the variable speed control knob (2) to
the desired setting.
4. Hold the tool firmly by the grip (4) and tilt
the saw forward so it rests on the front
edge of the base plate and in a position so
the blade will not touch the workpiece when
the switch is turned on. Note: Make sure the
saw blade is within the perimeter of the
area to be cut.
5. Start the saw and allow it to reach full
speed. Slowly lower the tip of the blade
onto the workpiece while making sure the
front of the saw remains in contact with the
workpiece. Allow the blade to cut through
the wood.
6. Continue lowering the blade into the work-
piece until the saw base rests flat on
the workpiece.
7. Continue sawing toward the cutting line
and complete the cut as required.
Tips for Metal Cutting
Metals such as pipe, steel rods, sheet steel, aluminum, brass and copper can be cut with
your saw.
• To cut thin sheet material, “sandwich” the material between hardboard or plywood and
clamp the layers to limit vibration and material tearing.
• Always use a fine tooth metal cutting blade and run the saw at medium speeds when
cutting metal.
• Use cutting oil to keep blade cool, increase cutting action and prolong blade life.
• Do not force the saw blade. Let it cut at its own speed.
Figure 9
2
4
1. Hold power tool by insulated gripping surfaces when performing an operation where the
cutting tool may contact hidden wiring or its own cord. Contact with a "live"wire will make
exposed metal parts of the tool "live" and shock the operator.
2. Use clamps or another practical way to secure and support the workpiece to a stable
platform. Holding the work by hand or against your body leaves it unstable and may lead to
loss of control.
SPECIFIC SAFETY RULES
CALIFORNIA PROPOSITION 65
SYMBOLS
WARNING: RISK OF CHEMICAL EXPOSURE. Use of this tool can generate dust containing
chemicals known to the state of California to cause cancer, birth defects or other reproductive
harm. To reduce exposure to these chemicals, always use approved safety equipment, work
in a well-ventilated area and wear dusk mask that filters out microscopic particles.
Amperes
Volts
Watts
Alternating Current
Direct Current
Double Insulated Class II Tool
Hertz
Revolutions per Minute
No Load Speed
Strokes per Minute
Symbol Name
The following symbols are used for this tool:
A or Amp
V
W
~
Hz
.../min or RPM
N
SPM
o

9
CONNECTION TO THE POWER SUPPLY
Electrical Safety
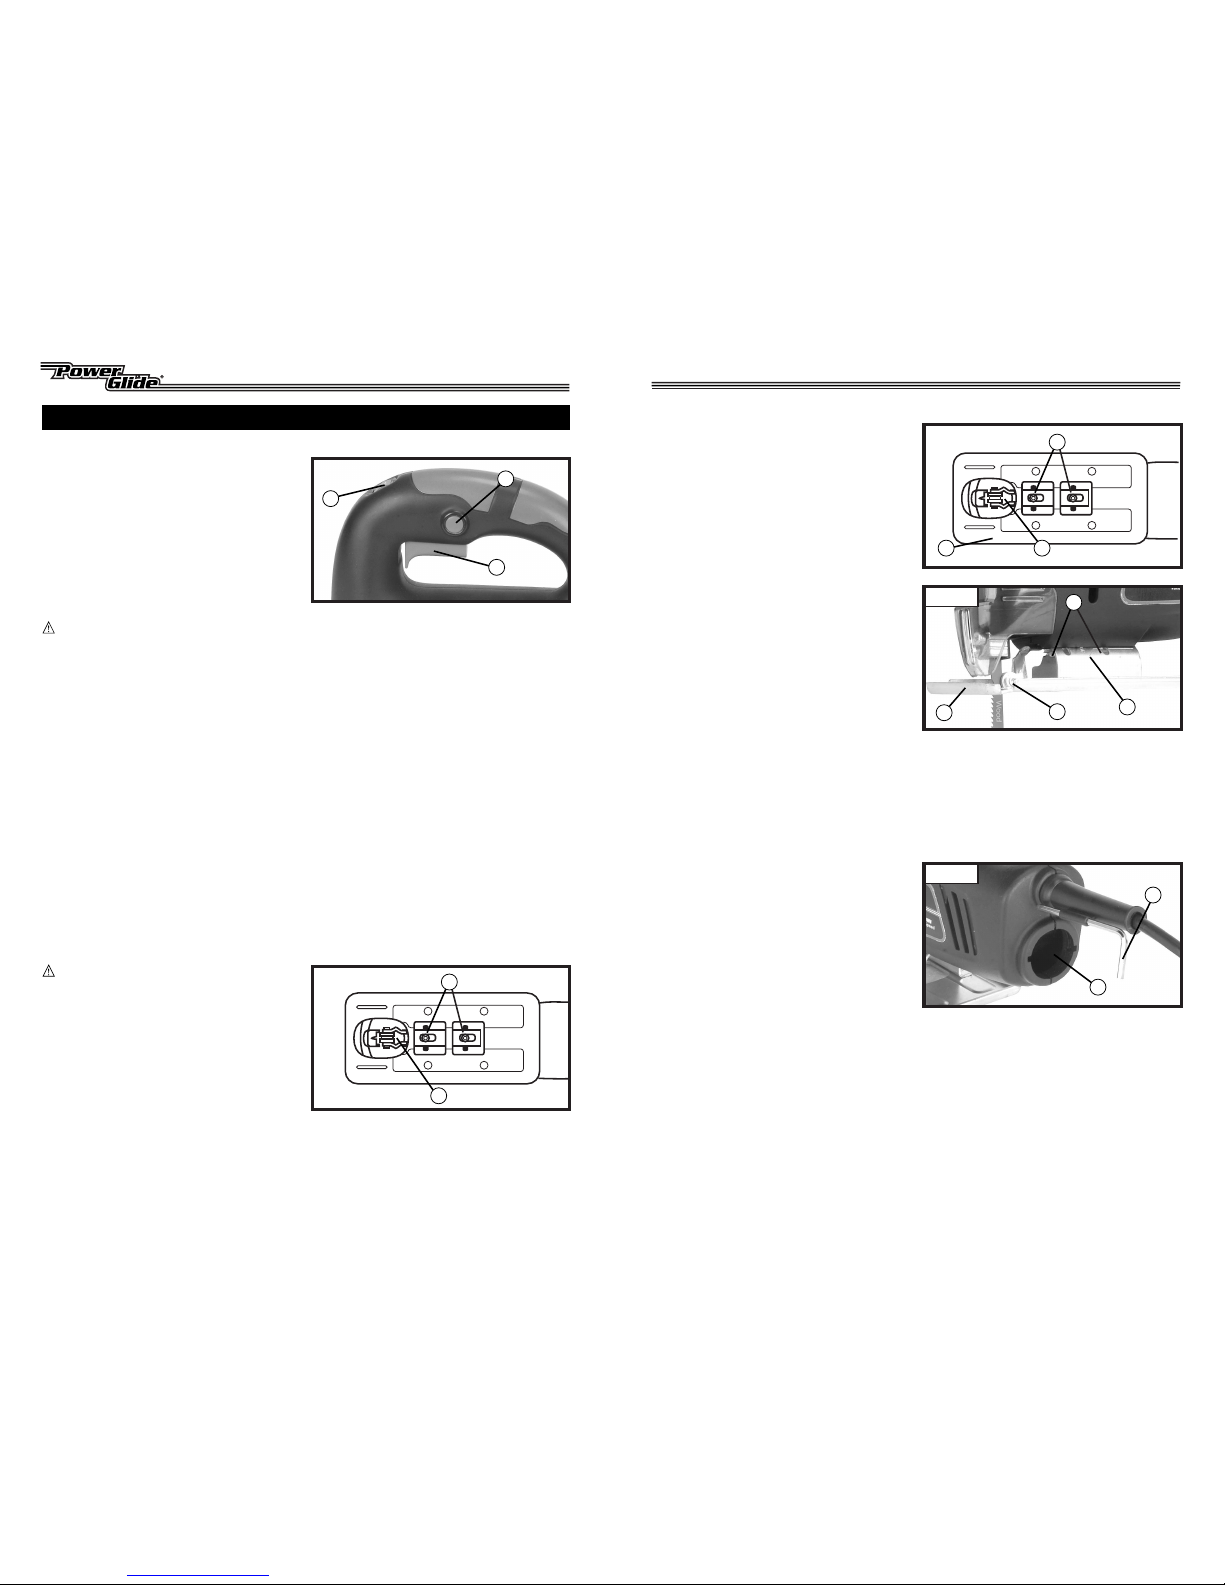
1. Double Insulated tools are equipped with a polarized plug (one blade is wider than the other.)
This plug will fit in a polarized outlet only one way. If the plug does not fit fully in the outlet,
reverse the plug. If it still does not fit, contact a qualified electrician to install a polarized
outlet. Do not change the plug in any way. Double insulation eliminates the need for the three
wire grounded power cord and grounded power supply system.
2. Avoid body contact with grounded surfaces such as pipes, radiators, ranges and refrigerators.
There is an increased risk of electrical shock if your body is grounded.
3. Don't expose power tools to rain or wet conditions. Water entering a power tool will increase
the risk of electrical shock.
4. Do not abuse the cord. Never use the cord to carry the tools or pull the plug from the outlet.
Keep cord away from heat, oil, sharp edges or moving parts. Replace damaged cords
immediately. Damaged cords increase the risk of electrical shock.
Extension Cords
1. Make sure your extension cord is in good condition. When using an extension cord, be sure to
use one heavy enough to carry the current your product will draw. An undersized cord will
cause a drop in line voltage resulting in loss of power and overheating. Table 1 shows the
correct size to use depending on cord length and nameplate Ampere rating. If in doubt, use
the next heavier gauge. The smaller the gauge number, the heavier the cord.
2. When operating a power tool outside, use an outdoor extension cord marked "W-A" or "W".
These cords are rated for outdoor use and reduce the risk of electrical shock.
3. Use only UL listed extension cords. Inspect extension cord before use and never use damaged
or altered extension cords. Follow extension cord manufacturer safety instruction.
4. Keep cord away from heat, oil, sharp edges or moving parts. Replace damaged cords
immediately. Damaged cords increase the risk of electrical shock.
Amp Volts
25 ft. 50ft 100ft 150 ft
1-5 120V 18 16 16 14
6-10 120V 16 16 14 12
11-12 120V 14 14 14 12
12-16 120V 14 12 Not Recommended
Table 1.
Minimum Gage For Power Cord
Total Length of cord in feet
Rating
AWG
4
Basic Operation
WARNING:
• RISK OF INJURY - Always keep hands and body away from saw blade at all times
during operation
• RISK OF ELECTRICAL SHOCK - Do not expose the tool to rain or water. Do not use in damp
locations. Do note use tool to cut pipe or conduit containing water.
• RISK OF EXPLOSION - Do not operate the tool in explosive atmospheres or in presence of
flammable liquids or gases.
• Never touch the saw blade while it is moving. Do not touch the saw blade after operation, it
will be very hot.
• Never hold workpiece in your hand. Any workpiece that is not adequately clamped in place
may come loose and cause serious injury
CAUTION: Remove all nails, staples, fasteners, foreign objects or other debris before sawing.
Make sure there is enough space under and behind the work piece for the saw blade.
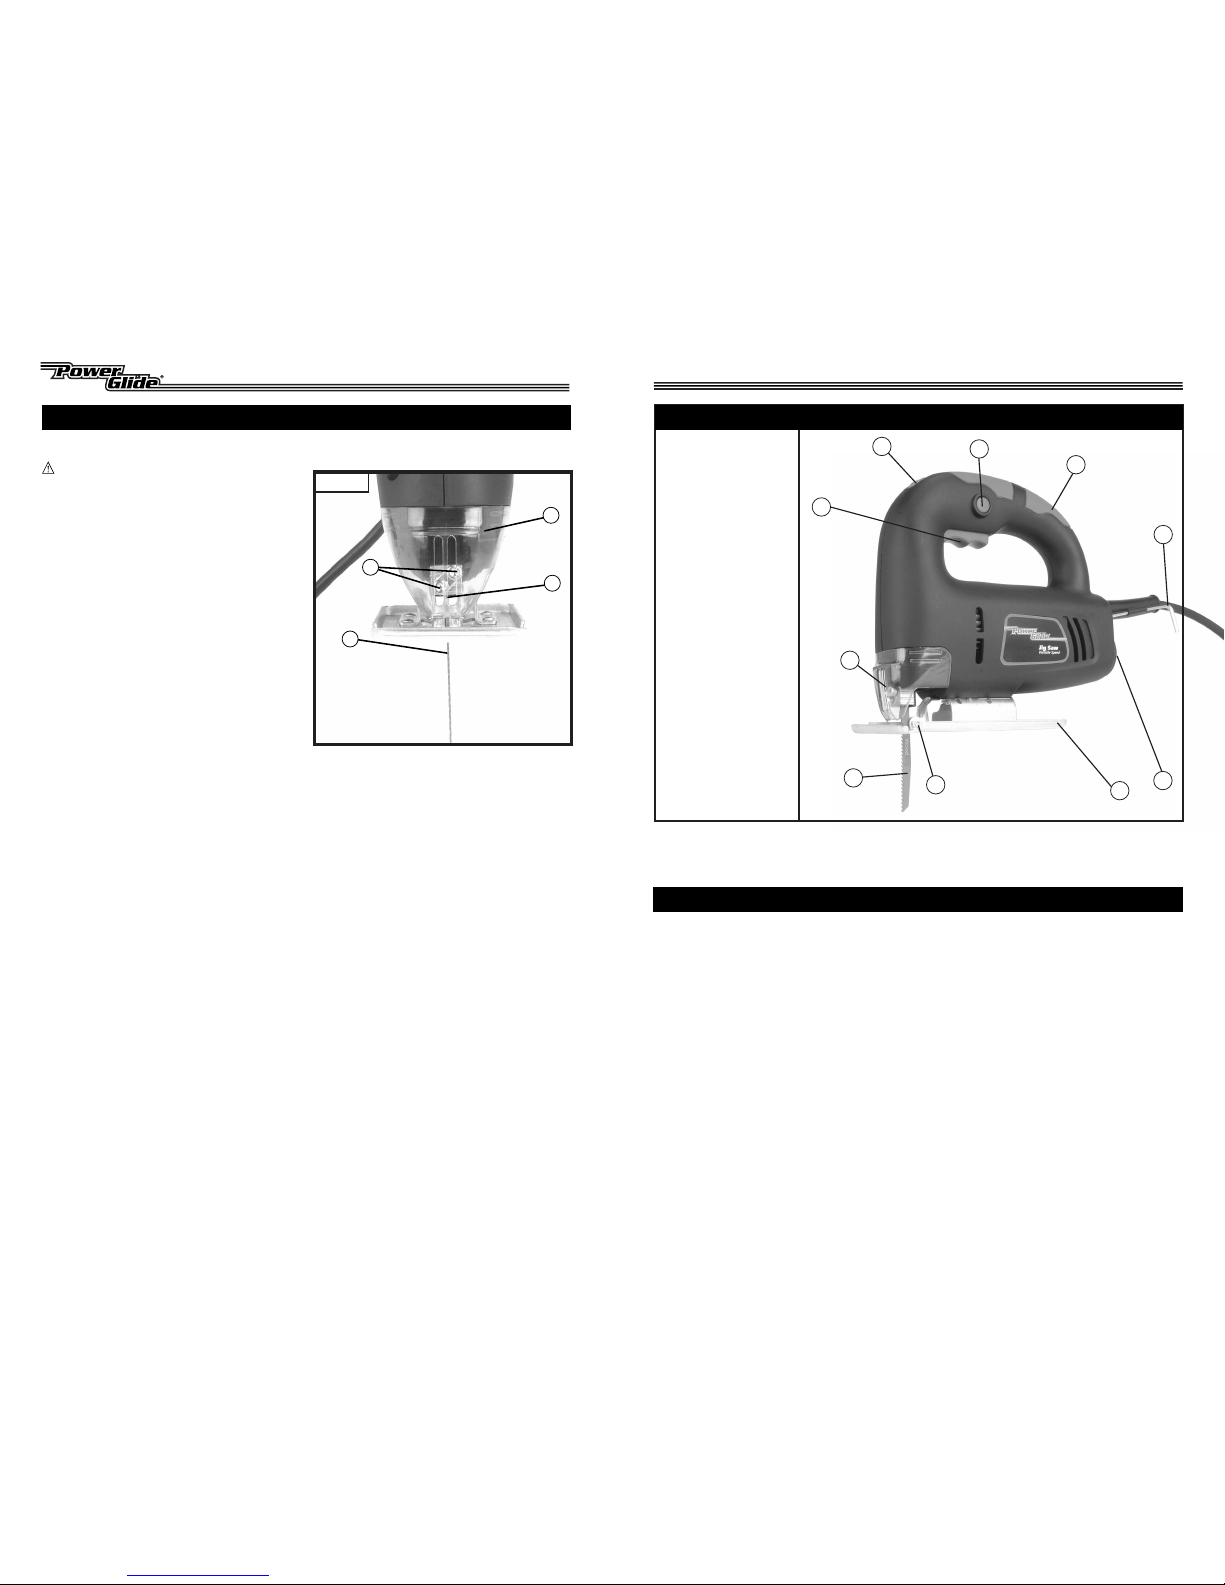
1. (SEE FIGURE 8) Adjust base plate (1) to the
desired bevel angle.
NOTE: Use a protractor or square to check
the bevel angle between the blade and the
base. Make a test cut in a scrap piece of
material and measure the bevel angle.
2. Adjust the variable speed control knob (2)
to the desired setting.
3. Clearly mark the desired cut-line (3) on
the workpiece
4. Secure workpiece for the cut: Hold smaller
workpieces with a vise. Clamp larger
workpiece to a workbench or table.
5. Hold the tool firmly by the grip (4) during
start-up and while in use.
6. Place the front of the saw base (5) against
the workpiece and align the cutting edge of
the blade with the cut-line on the work-
piece. Start the saw and allow it to reach
full speed.
7. Apply enough downward pressure to keep the base plate flush with the workpiece. Slowly
move the saw forward to start the cut. Work slowly, do not force the tool, allow the saw blade
to do the work.
NOTE: Uneven base contact with the workpiece can cause excessive vibration, blade
damage or breakage. Whenever possible, keep the base in firm contact with the workpiece.
8. When sawing curves, proceed slowly and do not use excessive twisting or side-to-side
pressure - blade damage will occur.
9. Never cut material thicker than the retracted length of the blade.
10. Starter holes are recommended for all inside edge cutting.
OPERATING INSTRUCTIONS
Figure 8
1
2
3
4
5

8
ASSEMBLY
5
Installing and Changing Saw Blades
WARNING: RISK OF PERSONAL INJURY.
Always disconnect tool from power source
before making any adjustment, installing or
changing accessories
1. (SEE FIGURE 7) Slide the clear blade
guard (1) forward and remove to access the
blade retainer assembly.
2. Using the supplied hex key (stored on the
power cord strain relief at the rear of the
tool above the dust chute), loosen both
blade retaining screws (2). Note: it is not
necessary top completely remove the
screws or blade clip.
3. Insert a saw blade (3), teeth facing forward
and up, into the slot of the blade clip (4).
Push in firmly until fully seated against the
top of the blade clip. Tighten the blade
retaining screws to secure the blade.
NOTE: When tighten blade-retaining
screws, work slowly alternating between
left and right to avoid uneven pressure on
the blade clip.
4. Adjust saw blade ball support.
5. Slide the blade guard (1) back into position
until it locks into place on the base.
Figure 7
1
2
3
4
CONTENTS
1. Jig Saw
2. Hex Key
3. Saw Blades (2)
4. Instruction Manual
1. Grip
2. Hex Key
3. Dust Chute
4. Base
5. Blade Roller
6. Saw Blade
Red- Metal Cutting
Blue- Wood Cutting
7. Blade Guard
8. On/Off Trigger Switch
9. Variable Speed Control
10.Lock On Button
1
4
5
6
GETTING TO KNOW YOUR TOOL
7
2
Figure 1Figure 1
3
8
910

67
FUNCTIONAL DESCRIPTION
On/Off Switch
1. (SEE FIGURE 2) To start the saw, pull the
On-Off trigger switch (1). To stop the tool,
release the trigger switch.
2. For continuous operation, pull the trigger
switch (1) and depress the lock-on
button (2). The saw will continue to run
until the trigger is pulled fully and
then released.
Variable Speed Control
CAUTION: Do not force the speed adjust-
ment knob beyond its minimum and
maximum range "1" or "6." Damage to the
tool could result. Do not use the tool at low
speed settings for prolonged periods. Over-
heating may occur.
1. Use the speed control thumb wheel (3) to
vary the saw's speed from 500 to 3000
strokes per minute.
2. Rotate the wheel backward, toward the
number "1" for slower speed and forward
toward the number "6" for higher speeds.
NOTE: Optimum blade speed is
determined by the workpiece type and
condition of sawblade. Generally, slow
speeds are used for precision work in
delicate materials, while higher speeds
produce rapid material removal and lower
blade life.
Saw Blade Ball Support
CAUTION: Use ball support with blades
having a straight back at the ball
contact point.
1. (SEE FIGURE 3) Loosen the ball support/
base plate adjustment screws (1) with the
hex key.
2. Slide the ball support (2) forward until it
contacts the back of the saw blade.
3. Tighten the adjustment screws.
NOTE: Because the ball support screws
also secure the base, check bevel angle
before cutting.
Figure 2 2
1
3
Figure 3 1
2
Base Plate Adjustment
1. (SEE FIGURE 4 and 5) Loosen the two ball
support / base plate adjustment screws (1)
with the hex key.
2. For 90-degree cuts: slide the base plate (2)
forward in the slots, adjust ball support (3)
as required. Then secure by tightening the
adjustment screws to secure the base.
3. For bevel cuts: slide the base plate (2) to
the rear, adjust to the desired angle (left or
right). The edge of the motor housing and
gradient lines on the base plate (4) indicate
the angle. Adjust the ball support (3) as
required and secure by tightening the
adjustment screws.
Dust Collection & Hex Key Storage
1. (SEE FIGURE 6) Saw may be connected to a
dust collection system by means of the 1"
diameter dust evacuation chute (1) at the
rear of the saw.
2. Hex key storage is provide on the power
cord strain relief (2) located at the rear of
the tool.
Figure 4
Figure 5
Figure 6
1
1
1
2
2
2
3
34
Table of contents
Other Power Glide Power Tools manuals