Powerfix Profi HG01477A-1 User manual

LUGGAGE STRAP SET /
RATCHET STRAPS WITH QUICK-RELEASE FASTENING
Operation and Safety Notes
SPÆNDEREMME OG BAGAGEBÅND-SÆT /
SPÆNDEREMME MED SNAPLÅS
Brugs- og sikkerhedsanvisninger
SET DE SANGLES DE SERRAGE ET D‘ARRIMAGE/
SANGLES AVEC FERMETURE RAPIDE
Instructions d‘utilisation et consignes de sécurité
SPANRIEMENSET / SPANRIEMEN MET SNELSLUITING
Bedienings- en veiligheidsinstructies
SPANN- UND ZURRGURT- SET /
SPANNGURTE MIT SCHNELLVERSCHLUSS
Bedienungs- und Sicherheitshinweise
IAN 276393
LUGGAGE STRAP SET (MODEL NO. HG01477A-1)
RATCHET STRAPS WITH QUICK-RELEASE
FASTENING (MODEL NO. HG01477A-2)

GB/IE/NI Operation and Safety Notes Page 5
DK Brugs- og sikkerhedsanvisninger Side 13
FR/BE Instructions d‘utilisation et consignes de sécurité Page 22
NL/BE Bedienings- en veiligheidsinstructies Pagina 31
DE/AT/CH Bedienungs- und Sicherheitshinweise Seite 40

HG01477a-1
HG01477a-2

I
II

A
B1
123
14 2
3
I II III

C
5
6

5GB/IE/NI
Introduction..........................................................................................................Page 6
Intended use...............................................................................................................Page 6
Technical data............................................................................................................Page 6
Scope of Delivery ......................................................................................................Page 7
Safety instructions..........................................................................................Page 7
General Safety Instructions .......................................................................................Page 7
Safety instructions for lashing straps.........................................................................Page 7
Practical information regarding the use
and care of lashing straps.......................................................................Page 9
Use...............................................................................................................................Page 11
Attaching the lashing strap........................................................................................Page 11
Releasing the lashing strap........................................................................................Page 12
Cleaning and care...........................................................................................Page 12
Disposal...................................................................................................................Page 12

6 GB/IE/NI
Luggage strap set (HG01477A-1)
Ratchet straps with quick-release fastening (HG01477A-2)
Q
Introduction
We congratulate you on the purchase of your new product. You have chosen a
high quality product. Familiarise yourself with the product before using it for the
first time. In addition, please carefully refer to the operating instructions and the
safety advice below. Only use the product as instructed and only for the indicated field of
application. Keep these instructions in a safe place. If you pass the product on to anyone
else, please ensure that you also pass on all the documentation with it.
Q
Intended use
The product is designed to lash, attach and secure loads. The lashing straps serve to “press“
the load down to the loading surface of a vehicle or to connect it directly with the vehicle.
They are not designed to lift or carry loads. The permissible load must not be exceeded.
Any use other than previously mentioned or any product modification is prohibited and can
lead to injuries and/or product damage. The manufacturer is not liable for any damages
caused by any use other than for the intended purpose. The product is not intended for
commercial use.
Q
Technical data
HG01477A-1
Length: LGF (length – fixed end): 0.5m
LGL (length – adjustable end): 3.5 m
Permissible load (LC): 125daN (1250N = Newton/ 125 kg (m / s2)) / SHF 25daN
Material: Polypropylene (PP)
HG01477A-2
Length: approx. 2.5m
Permissable load (LC): 125 daN (1250N = Newton/125kg (m/s2)) /
Looped: 250 daN
Material: Polypropylene (PP)

7GB/IE/NI
Q
Scope of Delivery
Check the delivery for completeness and condition of the product immediately after
opening and ensure all parts are included.
2x Lashing strap with ratchet tensioner and S hook, approx. 0.5m (HG01477A-1)
2x Lashing strap with S-hook, approx. 3.5m (HG01477A-1)
2 x Lashing straps with clamping lock, approx. 2.5m (HG01477A-2)
1 x Directions for use
Q
Safety instructions
KEEP ALL THE SAFETY ADVICE AND INSTRUCTIONS IN A SAFE PLACE FOR FUTURE
REFERENCE!
General Safety Instructions
J WARNING!DANGER TO LIFE AND RISK OF ACCIDENTS FOR
INFANTS AND CHILDREN! Never leave children unattended with the
packaging material. The packaging poses a risk of suffocation and danger
of life due to strangulation. Children often underestimate this danger. Always keep
children away from this product. This product is not a toy.
J Do not use the product if you see it is damaged in any way.
J Check that all parts have been assembled correctly. Improper assembly may result in injury.
Safety instructions for lashing straps
J Always check the lashing strap for damage before using it. On no account use the
lashing strap if the strap is damaged.
J Carefully check dirty straps or straps that have been contaminated with corrosive or other
materials that may damage them. You may have to ask the manufacturer to check them.
J Have the lashing straps and all components checked by an expert at least once a year.
In accordance with the conditions of use and the operational circumstances, further
checks by a professional may be necessary from time to time.

8 GB/IE/NI
J On no account use the lashing strap if:
- there are broken threads or cuts in the thread, especially if the edges have been
nicked or there are other alarming cases of damage
- the labelling is missing or is no longer legible
- there is damage to the connections, or deformation due to exposure to heat (friction,
radiation)
- there is damage due to the effect of corrosive substances.
J On no account use the ratchets if:
- there are incipient tears, breakages or considerable cases of or damage from corrosion
- there is widening > 5% (5% in the hook mouth or general deformation)
- there is visibly permanent deformation of load-bearing parts
J Repairs to the lashing straps may only be carried out if the information regarding the
manufacturer, material and maximum permissible tensile load is clearly designated on
the label. They may only be carried out by the manufacturer or a person specified by
him. Following repair, the manufacturer or the person designated by the manufacturer
must ensure that the maximum permissible tensile load of the lashing straps as originally
specified on the label is maintained.
J Never exceed the permissible tensile load of the lashing strap as stated on the label.
(see also “Technical data”).
J Choose the most suitable lashing strap in accordance with the intended load that needs
to be lashed down, the tensile load and loading surface (see label).
CAUTION! DANGER OF ACCIDENT! When lashing using additional fittings and
lashing devices, make sure that they are suitable for the lashing strap.
J Check that the vehicle parts you wish to strap the load to are sturdy enough.
CAUTION! In addition to the accelerating forces, wind may cause lateral forces to arise
during the journey.
J Never pull the lashing strap over rough surfaces or sharp edges if they are not furnished
with suitable protection.
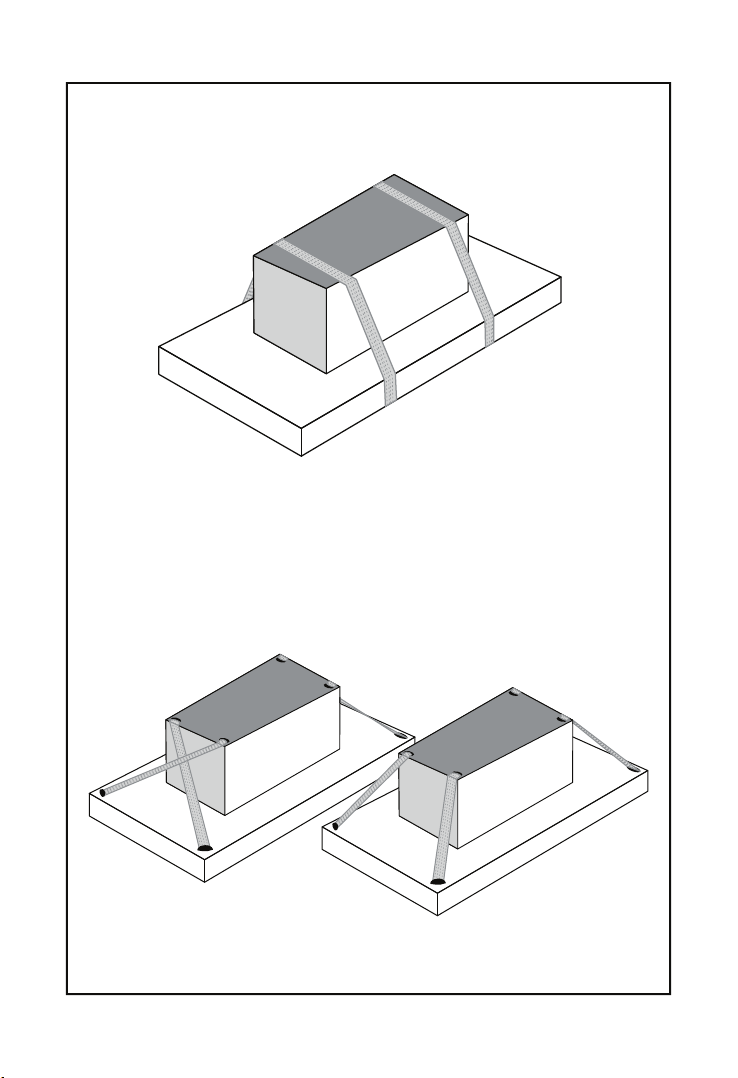
J Make sure that the lashing straps are not twisted and that the load is distributed across
their entire width.
J Do not place any objects onto the lashing strap if this may damage it.
J Keep lashing strap away from hot surfaces.
J Evenly distribute the lashing straps on the load to be secured.
J Never use the lashing straps to lift loads.
J Make sure you do not put any load on the tip of the S hook unless it is a hook that is
designed for such a purpose. To avoid detachment of a lashing hook without a lock in
a lashing point on the loading surface, suspend from the inside outwards.
J Never attach S hooks and ratchets to edges.
J Never extend the ratchet handle to achieve greater tensioning forces if this is not
expressly allowed by an instruction.

9GB/IE/NI
CAUTION! DANGER OF ACCIDENT! Always choose suitable lashing straps, lashing
points and lashing methods. The size, shape and weight of the cargo as well as the
intended mode of use, the transport environment and the type of cargo determine the
correct choice.
J To ensure the load is secured properly, the webbing needs to be wrapped around the
ratchet at least 1.5 times.
J Tighten the webbing manually as far as possible so that the belt does not need to be
wrapped more than 3 times around the ratchet to tighten the load.
J Do not exceed the roof load indicated by the vehicle manufacturer.
CAUTION! DANGER OF ACCIDENT! When lashing down, pay attention to the
required preload force. At least 2 lashing straps are required. For reasons of stability,
at least two lashing straps of the same kind must be used for lashing down and two
pairs of lashing straps of the same kind used for diagonal lashing.
CAUTION! DANGER OF ACCIDENT! During transportation, regularly check that
the cargo is correctly lashed and tighten the lashing strap if necessary.
Q
Practical information regarding the use
and care of lashing straps
1. In selecting and using lashing equipment, you must consider the required lashing force,
the mode of use and the type of cargo to be lashed. The size, shape and weight of
the cargo as well as the intended mode of use, the transport environment and the type
of cargo determine the correct choice. For stability reasons, at least two lashing straps
must be used for lashing down and two pairs of lashing straps used for diagonal lashing.
2. Due to different characteristics and because of different changes in length under load,
only identical lashing device combinations (e.g. lashing chains and lashing strap made
of synthetic fibres) may be used in parallel for lashing the same load. When using
additional fittings and lashing devices, make sure that they fit the lashing strap.
3.
During use, flat hooks must engage over the entire width of the bearing surface of the hook.
4. Opening the lashing: Before opening, make sure that the cargo is stable even without
being secured and does not endanger unloading personnel by falling down. If necessary,
attach blocking devices to the cargo that has been planned for further transport
beforehand in order to prevent the load falling or tipping over. This also applies if
one uses tensioning elements that make safe removal possible.
5. Before starting to unload, you must loosen the lashing until the load is free.
6. During loading and unloading attention has to be paid to proximity of any low
overhead power lines.

10 GB/IE/NI
7. The materials from which lashing straps are made have selective resistance to chemical
attacks. Seek the advice of the manufacturer or supplier if exposure to chemicals is
anticipated. It should be noted that the effects of chemicals may increase with rising
temperatures. The resistance of synthetic fibres to chemical reactions is summarised
below:
- Polypropylene is affected less by acids and alkalis and is suitable for applications in
which high resistance to chemicals is required, with the exception of some organic
solvents.
- Harmless acid solutions or alkalis can become so concentrated through evaporation
that they cause damage. Contaminated lashing straps should immediately be taken
out of use, rinsed in cold water and dried in the open air.
8. This lashing straps are suitable for the following temperature ranges:
– –40 °C to +80 °C for Polypropylene (PP);
These temperature ranges may alter depending on the chemical environment. In this
event, you must seek the advice of the manufacturer or supplier. A change in the
environmental temperature during transport may affect the forces in the webbing.
Check the lashing force after entering warm regions.
9. Lashing straps must be taken out of use or returned to the manufacturer for repair if
they show any signs of damage. The following points are considered to be signs of
damage:
- for webbing (that must be taken out of use): tears, cuts, nicks and breaks in load-
bearing fibres and stitches; deformations resulting from exposure to heat.
- with end fittings and tensioning devices: deformations, cracks, pronounced signs of
wear, signs of corrosion. Only lashing straps bearing identification labels shall be
repaired. If there is any accidental contact with chemical products, the lashing strap
must be removed from service and the manufacturer or supplier consulted.
10. Care should be taken that the lashing strap is not damaged by the sharp edges of
the load on which it is used. Regular visual inspection before and after each use is
recommended.
11. Only legibly marked and labelled lashing straps may be used.
12. Lashing straps must not be overloaded: The maximum hand force of 250N (25daN
on the label; 1daN ≈ 1kg) may be applied with only one hand. Mechanical aids
such as bars or levers etc. may not be used unless they are part of the tensioning
device. (HG01477A-1)
13. Lashing straps may not be used when knotted.
14. Damage to labels must be prevented by keeping them away from sharp edges of
the load and, if possible, from the load.
15. Webbing must be protected against friction, abrasion and damage from loads with
sharp edges by using protective sleeves and/or corner protectors.

11GB/IE/NI
Q
Use
Lashing down (HG01477A-1, HG01477A-2):
With lashing straps stretched over it, the load is pressed down onto the loading area
(see Fig. I).
Diagonal lashing (HG01477A-1):
The load is secured by 4 lashing straps and directly connected to the vehicle (see Fig. II).
Q
Attaching the lashing strap
The selected lashing equipment must be strong and long enough for the intended purpose
and have the correct length for the type of lashing. Responsible users plan cargo security in
advance: they plan the attachment and removal of the lashing devices before the start of
the journey. With longer trips, partial unloading must be considered. Calculate the number
of lashing devices according to EN 12195-1. Only lashing systems labelled for lashing down
with STF (standard tension force) may be used for friction lashing.
HG01477A-1:
j Use the S hook to securely attach the lashing strap to the load.
j Open the ratchet handle 1and place the slotted shaft 3into the position so that the
webbing
4can be inserted into it (see Fig. A III).
j Insert the webbing 4into the slotted shaft 3of the ratchet. Carefully pull it through
the slotted shaft 3until the webbing 4lies snug against the load.
j Tighten the lashing strap by moving the handle of the ratchet backwards and forwards
(see Fig. A I - III). Tighten the lashing strap until you have obtained the tension you wish
to have.
Note: Make sure that webbing 4is wound at least 1.5 times to a maximum of 3
times around the slotted shaft 3.
j Bring the ratchet handle 1into the basic position (see Fig. A I). The load is now
secure.
HG01477A-2:
j Loop the lashing strap around the load.
j Press the clamping lock 5down and pass the webbing 6through the clamping lock
from below (see Fig. C).
j Carefully pull the webbing 6through the clamping lock until you get the tension you
want. Then release the clamping lock 5.

12 GB/IE/NI
Q
Releasing the lashing strap
CAUTION! Check before releasing the strap that the load is stable. Make sure that
the load is stable even without the lashing strap and that it cannot fall down.
CAUTION! RISK OF INJURY! Make sure that nobody is near the load when you
release the lashing strap. Falling parts could cause injuries.
CAUTION! RISK OF INJURY! When opening the lashing equipment, the preload
force is released at a stroke. That is why you should open the lashing strap with the utmost
caution.
Note: Before starting to unload, make sure that the lashing equipment is released so that
the load can be lifted freely.
HG01477A-1:
j Open the ratchet handle 1into the maximum position (see Fig. A III).
j Press the ratchet lock 2and open the ratchet handle 1until the end stop
(see Fig. B).
j Pull the webbing 4completely out of the slotted shaft 3.
j Release the S hook and thus the lashing strap from the load.
HG01477A-2:
j Press the clamp 5down (see Fig. C).
j Pull the webbing 6out of the clamping lock completely.
Q
Cleaning and care
Note: Regular care will maintain the quality and functionality of the lashing strap.
j Clean the lashing strap with lukewarm water and pH-neutral cleaning agents. Avoid
corrosive detergents.
j The ratchet tensioner should be regularly cleaned and then lightly greased. When greasing
it, make sure that parts that come into contact with the webbing are not greased.
j Store the lashing strap in a dry, well-ventilated cool place.
j Avoid contact with chemicals, acids and alkalis as they may damage the lashing strap.
Q
Disposal
The packaging is made entirely of recyclable materials, which you may dispose
of at local recycling facilities.
Contact your local refuse disposal authority for more details of how to dispose of your worn-
out product.

13DK
Indledning .............................................................................................................Side 14
Hensigtsmæssig anvendelse......................................................................................Side 14
Tekniske Data .............................................................................................................Side 14
Leveringsomfang ........................................................................................................Side 15
Sikkerhedshenvisninger ...........................................................................Side 15
Almene sikkerhedshenvisninger.................................................................................Side 15
Sikkerhedshenvisninger for bæltestropper................................................................Side 15
Praktiske henvisninger til anvendelse
og pleje af bæltestropper........................................................................Side 17
Betjening.................................................................................................................Side 19
Bæltestroppen anbringes...........................................................................................Side 19
Bæltestroppen løsnes.................................................................................................Side 20
Rensning og pleje............................................................................................Side 21
Bortskaffelse.......................................................................................................Side 21

14 DK
Spænderemme og bagagebånd-sæt (HG01477A-1)
Spænderemme med snaplås (HG01477A-2)
Q
Indledning
Hjerteligt tillykke med købet af deres nye produkt. Du har besluttet dig for et
produkt af høj kvalitet. Gør Dem fortrolig med apparatet inden første
ibrugtagning. Læs derfor den efterfølgende brugsvejledning og
sikkerhedsanvisningerne omhyggeligt. Brug kun produktet som beskrevet og kun til de
angivne anvendelsesområder. Denne vejledning bør opbevares. Hvis De giver produktet
videre til andre, skal alle dokumenter følge med.
Q
Hensigtsmæssig anvendelse
Produktet er beregnet til at surre, fæstne og sikre last med. Bæltestropperne tjener til at
”presse” lasten mod et køretøjs lad eller til at forbinde den direkte med køretøjet. De er
ikke beregnet til at løfte eller bære laster med. Den tilladte kraft må ikke overskrides. Anden
anvendelse end beskrevet forinden eller en ændring på produktet er ikke tilladt og kan
resultere i tilskadekomst og/eller produktets beskadigelse. For skader, som er opstået på
grund af anvendelse mod bestemmelsen, stiller producenten ingen garanti. Produktet er ikke
beregnet til erhvervsmæssig indsats.
Q
Tekniske Data
HG01477A-1
Længde: LGF (længde fast ende): 0,5m
LGL (længde løst ende): 3,5m
Tilladt kraft (LC): 125daN (1250 N = Newton / 125kg (m /s2)) / SHF 25daN
Materiale: Polypropylen (PP)
HG01477A-2
Længde LG: ca. 2,5m
Tilladt kraft (LC):: 125daN (1250 N = Newton / 125kg (m /s2)) /
Looped: 250 daN
Materiale: Polypropylen (PP)

15DK
Q
Leveringsomfang
Kontroller umiddelbart efter udpakningen, at alle dele er leveret med og at produktet og
alle delene befinder sig i en upåklagelig tilstand.
2x bæltestrop med spændeskralde og S-krog, ca. 0,5m (HG01477A-1)
2x bæltestrop med S-krog, ca. 3,5m (HG01477A-1)
2 x Zurrgurte mit Klemmschloss ca. 2,5m (HG01477A-2)
1x betjeningsvejledning
Q
Sikkerhedshenvisninger
ALLE SIKKERHEDSANVISNINGER OG ANDRE DOKUMENTER BØR OPBEVARES TIL
FREMTIDIG BRUG!
Almene sikkerhedshenvisninger
J ADVARSEL! LIVSFARE OG RISIKO FOR ULYKKER FOR
SMÅBØRN OG BØRN! Lad aldrig børn være uden opsyn med
emballage og produkt. Der er risiko for kvælning på grund af emballagen
emballagen og livsfare på grund af strangulation. Børn undervurderer oftest farerne.
Hold altid børn borte fra produktet. Produktet er ikke noget legetøj!
J Anvend ikke produktet, hvis det viser beskadigelser.
J Kontroller, om alle dele er monteret sagkyndigt. Usagkyndig montering resulterer i risiko
for tilskadekomst.
Sikkerhedshenvisninger for bæltestropper
J Kontroller bæltestroppen inden hver anvendelse for mulige beskadigelser. Anvend
bæltestroppen under ingen omstændigheder ved brandskader.
J Kontroller snavsede bæltestropper eller bæltestropper, der er behæftet med aggressive
stoffer eller stoffer, der på anden måde kan være til fare for anvendelsen, omhyggeligt.
Lad i givet fald producenten kontrollere den.
J Lad mindst engang om året en fagmand kontrollere bæltestropperne og alle byggedele.
Svarende til indsatsbetingelserne og driftssituationerne kan midlertidigt flere kontroller
af en fagmand blive nødvendige.

16 DK
J Anvend bæltestroppen under ingen omstændigheder ved:
- garnbrud eller garnsnit, især kantindskæringer og andre tvivlsomme skader
- manglende eller ikke mere læselig mærkning
- forbindelsers beskadigelse, deformation på grund af varmeindflydelse (gnidning,
stråling)
- skader på grund af aggressive stoffers påvirkning.
J Anvend skralderne under ingen omstændigheder ved:
- rifter, brud eller alvorlige korrosionstilsynekomster hhv. -skader
- udvidelse > 5% (5% i kroggabet eller almene deformationer)
- konstaterbar blivende deformation på bærende dele
J Reparationer må udelukkende gennemføres, hvis mærkning af producent, værkstof og
tilladt maksimal trækkraft kan konstateres utvetydigt på etiketten. De må udelukkende
gennemføres af producenten eller personer, som er blevet pålagt det af ham. Disse skal
sikre, at de brugsklare bæltestropper efter reparationen igen opnår den oprindeligt på
etikken nævnte tilladte maksimal trækkraft.
J Belast aldrig bæltestroppen med mere end den på etikken nævnte tilladte trækkraft (se
også ”Tekniske data”).
J Vælg svarende til den tilsigtede fastgørelsesmåde, trækkraft og ladoverflade den egnede
bæltestrop (se mærkningsetiketten).
PAS PÅ! RISIKO FOR ULYKKER! Valg altid de egnede bæltestropper,
fastgørelsespunkter og fastgørelsesmetoder. Størrelsen, formen og lastens vægt
bestemmer det rigtige valg, men også den tiltænkte anvendelsesmåde,
transportomgivelsen og lastens type.
J Forvis Dem om, at de køretøjdele, som lasten skal fastgøres på, er tilstrækkelig stabile.
PAS PÅ! Udover accelerationskræfter under farten kan der opstå sidekræfter på grund
af blæst.
J Træk aldrig bæltestroppen over ru overflader eller skarpe kanter, hvis disse ikke er
forsynet med en egnet beskyttelse.
J Vær opmærksom på, at bæltestropperne ikke er forvredet og bærer med hele bredden.
J Stil ingen genstande på bæltestroppen, hvis denne kan beskadiges på grund af det.
J Hold bæltestroppen borte fra varme overflader.
J Fordel bæltestroppen jævnt hen over lasten, som skal sikres.
J Anvend aldrig bæltestropperne som anslagsmiddel.
J Vær opmærksom på, at S-krogene ikke belastes på deres spids: hvis ikke det handler
om en krog, som er beregnet til dette specielle formål. Hæng altid krogene ind indefra
udad, for at undgå udhængning uden sikring i et fastgørelsespunkt på ladet.
J Læg aldrig S-kroge og skralder til på kanter.
J Forlæng aldrig skraldehåndtaget, for at opnå en højere spændekraft, hvis dette ikke
udtrykkeligt er nævnt i betjeningsvejledningen.

17DK
PAS PÅ! RISIKO FOR ULYKKER! Hvis yderligere beslagdele og
fastgørelsesmekanismer anvendes, vær opmærksom på, at disse passer til
bæltestroppen.
J Til sikring af lasten skal mindst 1,5 viklinger af bæltestroppen opbringes på skralden.
J Spænd bæltestroppen forud allerede so meget i hånden, at der ikke skal opbringes
mere end 3 stropviklinger, for at spænde lasten.
J Overskrid aldrig producenthenvisningerne ved taglast.
PAS PÅ! RISIKO FOR ULYKKER! Vær opmærksom på den påkrævede
præspændekraft ved fastgørelsen nedad. Mindst 2 bæltestropper er nødvendige. På
grund af stabiliteten skal anvendes mindst to bæltestropper af samme slags til
fastgørelse nedad og mindst to par bæltestropper af samme slags til fastgørelse
diagonalt.
PAS PÅ! RISIKO FOR ULYKKER! Kontroller under kørslen jævnligt, om lasten stadig
er fastgjort efter forskrifterne og spænd i givet fald bæltestroppen efter.
Q
Praktiske henvisninger til anvendelse
og pleje af bæltestropper
1. Ved valg og anvendelse af bæltestropper skal der tages hensyn til trækkraft, samt
anvendelsestype og lasttypen, som skal fastgøres. Størrelsen, formen og lastens vægt
bestemmer det rigtige valg, men også den tiltænkte anvendelsesmåde,
transportomgivelsen og lastens type. På grund af stabiliteten skal anvendes mindst to
bæltestropper til fastgørelse nedad og mindst to par bæltestropper til fastgørelse
diagonalt.
2. På grund af forskellig opførsel og på grund af længdeændring under belastning må
forskellige fastgørelsesmidler (f. eks. fastgørelseskæder og bæltestropper af kemiske
fibre) ikke anvendes til fastgørelses af samme last. Hvis yderligere beslagdele og
fastgørelsesmekanismer anvendes, skal man være opmærksom på, at disse passer til
bæltestroppen.
3. Under anvendelse skal fladkroge ligge på i krogbunden med den samlede bredde.
4. Åbning af fastgørelsen: Inden åbning skal det sikres, at lasten også uden sikring stadig
står sikkert og ikke truer med at falde ned på den, der læsser af. Om nødvendigt, skal
de til videre transport tilsigtede anslagsmidler anbringes på lasten allerede inden, for at
forhindre at lasten falder ned og/eller vælter. Dette gælder også, hvis man anvender
spændeelementer, som gør en sikker fjernelse mulig.
5. Inden aflæsning skal fastgørelserne løsnes så vidt, at lasten står frit.
6. Under be- og aflæsning skal man være opmærksom på enhver overledning i
nærheden, som hænger langt ned.

18 DK
7. Værkstofferne, som bæltestropperne er lavet af, råder over forskellig modstandskraft
overfor kemiske påvirkninger. Man skal være opmærksom på producentens eller
leverandørens henvisninger, hvis bæltestropperne sandsynligvis udsættes for kemikalier.
I den sammenhæng skal man være opmærksom på, at den kemiske påvirknings
virkning øges med stigende temperaturer. I det følgende er modstandsdygtigheden
for kunststoffibre overfor kemiske påvirkninger fattet sammen:
- Polypropylen angribes lidt af syrer og baser og egner sig til anvendelser, der kræver en
høj modstandsdygtighed overfor kemikalier (undtagen nogle organiske
løsningsmidler).
- Harmløse syre- og baseløsninger kan koncentreres på grund af fordampning so
meget, at de kan fremkalde skader. Forurenede bæltestropper skal tages ud af drift
med det samme, skyldes i koldt vand og tørres i luften.
8. Disse bæltestropper er egnet til anvendelse i følgende temperaturområder:
- –40°C til +80°C for polypropylen (PP);
Disse temperaturomgivelser kan ændres alt efter kemisk omgivelse. I dette tilfælde
skal producentens eller leverandørens anbefalinger indhentes. En ændring i
omgivelsestemperaturen under transporten kan tage indflydelse på bæltestroppens
kraft. Spændekraften skal kontrolleres efter at man er kommet ind i varme regioner.
9. Hvis bæltestropper viser tegn på skader, skal de tages ud af drift eller sendes tilbage
til producenten for istandsættelse. Følgende punkter skal betragtes som tegn på skade:
- ved bæltestropper (som skal tages ud af drift): flænger, snit, hak og brud i
lastbærende fibre og søm, deformation på grund af varmepåvirkning:
- ve slutbeslagdele og spændeelementer, deformationer, flænger, alvorlige tegn på
slid og korrosion. Udelukkende bæltestropper, som viser etiketter til deres
identifikation, må sættes i stand. Hvis det kommer til en tilfældig kontakt med
kemikalier, skal bæltestroppen tages ud af drift, og producenten eller leverandøren
skal spørges.
10. Man skal være opmærksom på, at bæltestroppen ikke bliver beskadiget af lastens
kanter. Der anbefales et regelmæssigt gennemsyn inden og efter enhver anvendelse.
11. Anvend udelukkende bæltestropper, som er læsbar mærket eller forsynet med etiketter.
12. Bæltestropper må ikke overbelastes: Den maksimale håndkraft på 250N (25 daN
på etiketten; 1daN ≈ 1kg) må kun opbringes med en hånd. Der må ikke anvendes
mekaniske hjælpemidler som stænger eller håndtage osv., medmindre disse er del af
spændeelementet. (HG01477A-1)
13. Bæltestropper, som der er slået knuder på, må ikke anvendes.
14. Skader på etiketten kan forhindres, idet man holer dem borte fra lastens kanter og,
om muligt, fra lasten.
This manual suits for next models
1
Table of contents
Languages:
Other Powerfix Profi Safety Equipment manuals
Popular Safety Equipment manuals by other brands

Petzl
Petzl Ring Open TECHNICAL NOTICE

Petzl
Petzl TACTIKKA ADAPT TECHNICAL NOTICE

Honeywell
Honeywell N70462910 user guide

Scott
Scott Flowhood 1 Instructions for use

TEUFELBERGER
TEUFELBERGER ENERGY PRO Manufacturer's information and instructions for use

GEZE
GEZE SecuLogic TZ320 Installation, wiring and operation instructions