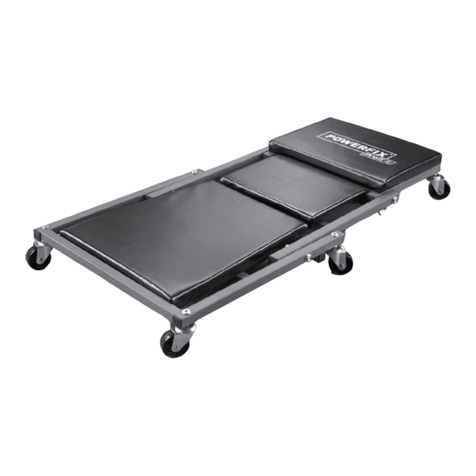
Powerfix Profi PRW 2 A1 User manual

MONTAGE-ROLLBRETT & WERKSTATTHOCKER 2IN1 /
2-IN-1 CAR CREEPER & STOOL /
CHARIOT DE
MÉCANICIEN & TABOURET D’ATELIER 2 EN 1
PRW 2 A1
CHARIOT DE MÉCANICIEN &
TABOURET D’ATELIER 2 EN 1
Mode d’emploi
MONTAGE-ROLLBRETT &
WERKSTATTHOCKER 2IN1
Bedienungsanleitung
2-IN-1 CAR CREEPER & STOOL
Operating instructions
MONTAGE-ROLPLANK &
WERKPLAATSKRUK 2-IN-1
Gebruiksaanwijzing
MONTÁŽNÍ POJÍZDNÉ LEHÁTKO &
STOLIČKA DO DÍLNY 2 V 1
Návod k obsluze
IAN 322310_1901
MONTAŻOWA LEŻANKA
NA KÓŁKACH I STOŁEK
WARSZTATOWY 2W1
Instrukcja obsługi
MONTÁŽNA DOSKA NA KOLIESKACH
A STOLČEK DO DIELNE 2 V 1
Návod na obsluhu

DE/AT / CH Bedienungsanleitung Seite 1
GB/IE Operating instructions Page 9
FR/BE Mode d’emploi Page 17
NL/BE Gebruiksaanwijzing Pagina 25
PL Instrukcja obsługi Strona 33
CZ Návod k obsluze Strana 41
SK Návod na obsluhu Strana 49
Klappen Sie vor dem Lesen die Seite mit den Abbildungen aus und machen Sie sich anschließend mit
allen Funktionen des Gerätes vertraut.
Before reading, unfold the page containing the illustrations and familiarise yourself with all functions of the
device.
Avant de lire le mode d‘emploi, ouvrez la page contenant les illustrations et familiarisez-vous ensuite avec
toutes les fonctions de l‘appareil.
Vouw vóór het lezen de pagina met de afbeeldingen open en maak u vertrouwd met alle functies van het
apparaat.
Przed przeczytaniem proszę rozłożyć stronę z ilustracjami, a następnie proszę zapoznać się z wszystkimi
funkcjami urządzenia.
Před čtením si otevřete stranu s obrázky a potom se seznamte se všemi funkcemi přístroje.
Pred čítaním si odklopte stranu s obrázkami a potom sa oboznámte so všetkými funkciami prístroja.


DE│AT│CH │ 1 ■
PRW 2 A1
Inhaltsverzeichnis
Einführung ....................................................2
Informationen zu dieser Bedienungsanleitung................................... 2
Bestimmungsgemäße Verwendung ........................................... 2
Technische Daten...............................................2
Sicherheit.....................................................3
Lieferumfang/Teilebeschreibung .................................4
Verwendung ..................................................4
Montage ............................................................... 4
Umbau vom Rollbrett zum Hocker ............................................ 6
Aufbewahrung ................................................7
Wartung......................................................7
Reinigung.....................................................7
Entsorgung. . . . . . . . . . . . . . . . . . . . . . . . . . . . . . . . . . . . . . . . . . . . . . . . . . . . 7
Produkt entsorgen ........................................................ 7
Verpackung entsorgen..................................................... 7
Service .......................................................8
Importeur ....................................................8

■ 2 │ DE│AT│CH PRW 2 A1
Einführung
Informationen zu dieser Bedienungsanleitung
Herzlichen Glückwunsch!
Mit Ihrem Kauf haben Sie sich für ein hochwertiges Produkt entschieden. Machen
Sie sich vor der ersten Inbetriebnahme mit dem Produkt vertraut. Lesen Sie hierzu
aufmerksam die nachfolgende Bedienungsanleitung. Benutzen Sie das Produkt nur
wie beschrieben und für die angegebenen Einsatzbereiche. Bewahren Sie diese
Bedienungsanleitung gut auf. Händigen Sie alle Unterlagen bei Weitergabe des
Produkts an Dritte ebenfalls mit aus.
Bestimmungsgemäße Verwendung
Das Produkt dient ausschließlich als hilfreiches Instrument bei gelegentlichen Arbeiten
in niedrigen Arbeitshöhen, die nur liegend oder tief sitzend erfolgen können im
privaten Hausgebrauch. Das Produkt dient nicht der Verwendung auf Treppen oder
abschüssigem Gelände. Die gewerbliche oder industrielle Verwendung ist nicht
zulässig. Für nicht bestimmungsgemäße Verwendung wird nicht gehaftet.
Für Schäden, die von missbräuchlicher oder unsachgemäßer Behandlung, von
Gewaltanwendung oder unautorisierter Modifikation herrühren, wird ebenfalls keine
Haftung übernommen. Das Risiko trägt allein der Benutzer.
Technische Daten
Herstellungsdatum 2019 – 07
Maße
Rollbrett ca. 91 × 41 × 12 cm
Hocker ca. 46 × 41 × 36 cm
Gewicht
Maximale Traglast als Rollbrett 150 kg
Maximale Traglast als Hocker 120 kg
Leergewicht ca. 5,4 kg

DE│AT│CH │ 3 ■
PRW 2 A1
Sicherheit
VERLETZUNGSGEFAHR!
► Kontrollieren Sie das Produkt vor jedem Gebrauch auf einwandfreien Zustand.
Sollten Schäden festgestellt werden, darf das Produkt nicht mehr verwendet
werden.
► Lassen Sie das Produkt, wenn es nicht einwandfrei funktioniert oder beschädigt
wurde, sofort vom Kundendienst untersuchen und reparieren.
► Dieses Produkt ist nicht dafür bestimmt, durch Personen (einschließlich Kinder)
mit eingeschränkten physischen, sensorischen oder geistigen Fähigkeiten oder
einem Mangel an Erfahrung und/oder Wissen benutzt zu werden, es sei
denn, sie werden durch eine für ihre Sicherheit zuständige Person beaufsichtigt
oder erhielten von ihr Anweisungen, wie das Produkt zu benutzen ist. Kinder
müssen beaufsichtigt werden, um sicherzustellen, dass sie nicht mit dem Produkt
spielen.
►
Max.
150
kg
Belasten Sie das Produkt, in Verwendung als Rollbrett, niemals mit einer
höheren Traglast als 150 kg.
► Max.
120
kg
Belasten Sie das Produkt, in Verwendung als Hocker, niemals mit einer
höheren Traglast als 120 kg.
► Verwenden Sie das Produkt nicht mehr, wenn es überladen wurde.
Dadurch könnten nicht sofort sichtbare Schäden aufgetreten sein.
► Verwenden Sie das Produkt niemals als Steighilfe oder zur Personenbeförderung,
weder als Rollbrett noch als Hocker.
► Arbeiten auf dem Produkt dürfen nur unter Bereichen, die gegen Abstürzen
gesichert sind, durchgeführt werden!
► Verwenden Sie das Produkt nur auf harten, ebenen Flächen, nicht auf Treppen
oder abschüssigem Gelände. Rollen Sie nicht über Gegenstände.
► Verstellen Sie niemals die Sitz- oder Liegeposition, solange sich jemand auf
dem Produkt befindet.
► Umfassen Sie niemals die seitlichen Stahlholme, solange Sie auf dem Produkt
sitzen. Damit verhindern Sie Quetschgefahr, falls im Fehlerfall Ihre Finger im
Scherenbereich sind.
► Greifen Sie niemals in den Scherbereich, solange das Produkt nicht vollständig
in Liegeposition ausgeklappt ist.
► Greifen Sie nicht unter das Produkt, wenn Sie darauf liegen. Es besteht
Quetschgefahr, wenn Sie beim Rollen die mittleren Räder berühren.
► Das Produkt ist entflammbar. Halten Sie das Produkt von offenem Feuer
(z.B. Kerzen oder glimmenden Zigaretten) fern.
► Seien Sie vorsichtig beim Auseinander-/Zusammenklappen des Produkts.
Klemmen Sie sich nicht Ihre Hände oder Finger ein.
► Prüfen Sie in regelmäßigen Abständen jede einzelne Schraubverbindung auf
ihre Festigkeit.
► Missbrauchen Sie das Produkt nicht für andere Zwecke, als in dieser Anleitung
beschrieben.


■ 4 │ DE│AT│CH PRW 2 A1
Lieferumfang/Teilebeschreibung
▯ 2in1 Montage Rollbrett/Werkstatthocker
–Oberer Rahmen mit Polsterung
–Mittlerer Rahmen mit Polsterung
–Unterer Rahmen mit Polsterung
–6 × Schwenkbare Rollen
–Sicherungsloch
–Sicherungsstift
–Sicherungshaken
▯ Diese Bedienungsanleitung
▯ Montagematerial:
A B C D E F G H
4×4×4×4×4×4×2×1×
HINWEIS
► Prüfen Sie die Lieferung auf Vollständigkeit und auf sichtbare Schäden.
Verwendung
Montage
ACHTUNG
► Platzieren Sie alle Teile des Produkts und das Montagematerial z.B. auf einer
Decke, um den Boden und das Produkt nicht zu zerkratzen. Führen Sie die
Montage ebenfalls z.B. auf einer Decke aus.
♦ Legen Sie den unteren Rahmen und den mittleren Rahmen mit den Unter-
seiten auf den Boden.
♦ Schieben Sie den mittleren Rahmen zwischen die Stahlholme des unteren
Rahmens .
♦ Ziehen Sie den Sicherungsstift des unteren Rahmens maximal heraus und
lassen ihn wieder langsam los, bis er in das Sicherungsloch des mittleren
Rahmens einrastet (siehe Abb. 1).

DE│AT│CH │ 5 ■
PRW 2 A1
♦ Verbinden Sie den unteren Rahmen und den mittleren Rahmen mit den
Schrauben A , Unterlegscheiben D und Sicherungsmuttern C (siehe Abb. 1).
1
♦ Drehen Sie die bereits montierten Rahmen mit den Oberseiten auf den Boden.
♦ Schieben Sie den oberen Rahmen zwischen die Stahlholme des mittleren
Rahmens .
♦ Verbinden Sie den mittleren Rahmen und den oberen Rahmen mit den
Schrauben A , Unterlegscheiben D und Sicherungsmuttern C (siehe Abb. 2).
♦ Stecken Sie vier Rollen jeweils in den unteren Rahmen . Schrauben Sie mit
dem Innensechskantschlüssel H die Hülsenmuttern F mit den Federringen B
und Unterlegscheiben E auf die Gewinde der Rollen auf. Kontern Sie dabei
die Rollen mit dem Schraubenschlüssel G . Schrauben Sie die übrigen zwei
Rollen direkt in den oberen Rahmen (siehe Abb. 2).
2
A
D
C
D
F
B
E
H
G
♦ Drehen Sie das fertig montierte Produkt um, sodass es auf den Rollen steht.
Das Produkt ist als Rollbrett einsatzbereit.
A
D
C

■ 6 │ DE│AT│CH PRW 2 A1
Umbau vom Rollbrett zum Hocker
♦ Ziehen Sie den Sicherungsstift des unteren Rahmens maximal heraus und
behalten die Position bei.
♦ Klappen Sie den mittleren Rahmen nach oben (siehe Abb. 3).
♦ Lassen Sie den Sicherungsstift langsam los, bis er in den Sicherungshaken
einrastet (siehe Abb. 3).
3
♦ Klappen Sie den oberen Rahmen herunter, bis er eine waagerechte Position
erreicht (siehe Abb. 4). Das Produkt ist als Hocker einsatzbereit.
4

DE│AT│CH │ 7 ■
PRW 2 A1
Aufbewahrung
♦ Bewahren Sie das Produkt als Hocker auf. Legen Sie das Produkt seitlich auf
den Rahmen, damit es nicht umkippen oder wegrollen kann. Wählen Sie einen
sauberen, trockenen Ort ohne direkte Sonneneinstrahlung.
Wartung
♦ Prüfen Sie in regelmäßigen Abständen, ob alle Schraubverbindungen ausreichend
fest angezogen sind.
♦ Ziehen Sie ggf. alle Schraubverbindungen nach.
♦ Lassen Sie beschädigte Schraubverbindungen von einem autorisierten Fachmann
auswechseln.
Reinigung
ACHTUNG
► Verwenden Sie keine aggressiven oder scheuernden Reinigungsmittel, da diese
die Oberfläche des Produkts angreifen können.
♦ Reinigen Sie das Produkt mit einem leicht angefeuchteten Tuch und einem handels-
üblichen Haushaltsreiniger.
Entsorgung
Produkt entsorgen
Entsorgen Sie das Produkt über einen zugelassenen Entsorgungsbetrieb oder über
Ihre kommunale Entsorgungseinrichtung. Beachten Sie die geltenden Vorschriften.
Setzen Sie sich im Zweifelsfall mit Ihrer Entsorgungseinrichtung in Verbindung.
Möglichkeiten zur Entsorgung des ausgedienten Produkts erfahren Sie bei Ihrer
Gemeinde- oder Stadtverwaltung.
Verpackung entsorgen
Entsorgen Sie die Verpackung umweltgerecht.
Beachten Sie die Kennzeichnung auf den verschiedenen Verpackungsmaterialien
und trennen Sie diese gegebenenfalls gesondert. Die Verpackungsmaterialien
sind gekennzeichnet mit Abkürzungen (a) und Ziffern (b) mit folgender Bedeutung:
1–7: Kunststoffe,
20–22: Papier und Pappe,
80–98: Verbundstoffe.

■ 8 │ DE│AT│CH PRW 2 A1
Service
Service Deutschland
Tel.: 0800 5435 111 (kostenfrei aus dem dt. Festnetz/Mobilfunknetz)
E-Mail: [email protected]
Service Österreich
Tel.: 0820 201 222 (0,15 EUR/Min.)
E-Mail: [email protected]
Service Schweiz
Tel.: 0842 665566 (0,08 CHF/Min., Mobilfunk max. 0,40 CHF/Min.)
E-Mail: [email protected]
IAN 322310_1901
Importeur
Bitte beachten Sie, dass die folgende Anschrift keine Serviceanschrift ist.
Kontaktieren Sie zunächst die benannte Servicestelle.
KOMPERNASS HANDELS GMBH
BURGSTRASSE 21
DE-44867 BOCHUM
DEUTSCHLAND
www.kompernass.com

GB│IE│NI │ 9 ■
PRW 2 A1
Contents
Introduction..................................................10
Information about these operating instructions .................................10
Proper use .............................................................10
Technical data ................................................10
Safety. . . . . . . . . . . . . . . . . . . . . . . . . . . . . . . . . . . . . . . . . . . . . . . . . . . . . . . 11
Contents of package/parts description............................12
Use .........................................................12
Assembly ..............................................................12
Converting from the dolly to a stool..........................................14
Storage .....................................................15
Maintenance .................................................15
Cleaning.....................................................15
Disposal .....................................................15
Disposal of the product ................................................... 15
Disposal of packaging....................................................15
Service ......................................................16
Importer.....................................................16

■ 10 │ GB│IE│NI PRW 2 A1
Introduction
Information about these operating instructions
Congratulations!
You have purchased a high-quality product. Familiarise yourself with the product
before using it for the first time. To do this, read the following operating instructions
thoroughly. Use the product only as described and for the range of applications
specified. Keep these operating instructions in a safe place. Please also pass these
operating instructions on to any future owner(s).
Proper use
The product is designed as a useful aid for occasional work at low working heights
that can only be carried out in a lying or crouching position. For use in private
households only. The product is not designed for use on stairways or steep slopes.
Commercial or industrial use is not permitted. No liability will be assumed in cases
of improper use.
No liability will be assumed for damage caused by misuse or improper handling,
the use of force or unauthorised modification. The risk is borne solely by the user.
Technical data
Date of manufacture 2019 – 07
Dimensions
Dolly approx. 91 × 41 × 12 cm
Stool approx. 46 × 41 × 36 cm
Weight
Maximum load (as dolly) 150 kg
Maximum load (as stool) 120 kg
Unladen weight approx. 5.4 kg

GB│IE│NI │ 11 ■
PRW 2 A1
Safety
RISK OF INJURY!
► Check the product before every use to make sure it is in perfect condition.
Do not use the product if it is damaged in any way.
► If it does not work properly or has been damaged, have the product be
checked immediately and repaired by customer service.
► This product is not intended for use by individuals (including children) with
reduced physical, sensory, or mental capabilities. It may also not be used by
individuals who lack experience and/or knowledge unless they are supervised
by a person responsible for their safety or have received instructions on how to
use the product from such a person. Children should be supervised to ensure
they do not play with the product.
►
Max.
150
kg
When using the product as a dolly, never apply a load of more than
150 kg.
► Max.
120
kg
When using the product as a stool, never apply a load of more than
120 kg.
► Do not continue to use the product if it is overloaded.
This could lead to damage that is not immediately visible.
► Do not use the product as a step or to transport passengers, neither in dolly
mode nor in stool mode.
► Only use the product to work underneath areas that have been secured
against falling!
► Use the product only on hard, even surfaces, not on stairways or steep slopes.
Do not roll over objects.
► Never adjust the sitting or lying position while someone is on the product.
► Never hold onto the lateral steel waling while you are sitting on the product.
This will prevent the risk of crushing injury in the event that your fingers are in
the shear area when a fault occurs.
► Never reach into the shear area if the product is not fully unfolded in the lying
position.
► Never reach under the product if you are lying on it. There is risk of crushing
injury if you touch the middle wheels while rolling.
► The product is flammable. Keep the product away from open flames (e.g.
candles or smouldering cigarettes).
► Take care when folding or unfolding the product.
Avoid getting your fingers or hands caught.
► Check each screw connection at regular intervals.
► Never use the product for purposes other than those described in these instruc-
tions.

■ 12 │ GB│IE│NI PRW 2 A1
Contents of package/parts description
▯ 2-in-1 car creeper & stool
–Upper frame with padding
–Middle frame with padding
–Lower frame with padding
–6 × swivelling castors
–Locking hole
–Locking pin
–Locking hook
▯ These operating instructions
▯ Assembly material:
A B C D E F G H
4×4×4×4×4×4×2×1×
NOTE
► Check the package for completeness and signs of visible damage.
Use
Assembly
CAUTION
► Place all the parts of the product and the assembly material on a blanket to
protect the floor and the product from scratches. Carry out the assembly also
on a blanket or similar.
♦ Place the lower frame and the middle frame on the floor with the bottom
side facing down.
♦ Push the middle frame between the steel walings of the lower frame .
♦ Pull out the locking pin on the lower frame as far as it will go and slowly let
go of it until it clicks into the locking hole in the middle frame (see fig. 1).

GB│IE│NI │ 13 ■
PRW 2 A1
♦ Connect the lower frame and the middle frame using the screws A ,
washers D and lock nuts C (see fig. 1).
1
♦ Turn the now-assembled frame so that the top side is on the floor.
♦ Push the upper frame between the steel walings of the middle frame .
♦ Connect the middle frame and the upper frame using the screws A ,
washers D and lock nuts C (see fig. 2).
♦ Push the four castors into the four holes on the lower frame . Use the hex
key H to screw the sleeve nuts F with the spring washers B and washers E
onto the threads of the castors . Counter the castors with the screw
wrench G . Screw the two remaining castors directly into the upper frame
(see fig. 2).
2
A
D
C
D
F
B
E
H
G
♦ Turn the now fully assembled product over so that it is standing on its castors.
The product is ready for use as a dolly.
A
D
C

■ 14 │ GB│IE│NI PRW 2 A1
Converting from the dolly to a stool
♦ Pull the locking pin on the lower frame fully out and keep it held out.
♦ Fold the middle frame upwards (see fig. 3).
♦ Let the locking pin slowly go until it clicks into the locking hook (see fig. 3).
3
♦ Fold the upper frame downwards until reaches a horizontal position (see fig. 4).
The product is ready for use as a stool.
4

GB│IE│NI │ 15 ■
PRW 2 A1
Storage
♦ Store the product as a stool. Lay the product on its side on the frame so it cannot
tip over or roll away. Select a clean, dry place away from direct sunlight.
Maintenance
♦ Check that all the screw connections are sufficiently tightened at regular intervals.
♦ Tighten the product's screw connections if necessary.
♦ Any damaged screw joints should be replaced by a specialist.
Cleaning
CAUTION
► Do not use aggressive or abrasive cleaning agents, as these can damage the
outer surfaces of the product.
♦ Clean the product using a moistened cloth and a standard commercial house-
hold detergent.
Disposal
Disposal of the product
Dispose of the product via an approved waste disposal company or your
municipal waste disposal facility. Observe the currently applicable regulations.
Please contact your waste disposal facility if you are in any doubt.
Your local community or municipal authorities can provide information on how to
dispose of the worn-out product.
Disposal of packaging
Dispose of the packaging in an environmentally friendly manner.
Note the labelling on the packaging and separate the packaging material
components for disposal if necessary. The packaging material is labelled with
abbreviations (a) and numbers (b) with the following meanings:
1–7: plastics,
20–22: paper and cardboard,
80–98: composites.

■ 16 │ GB│IE│NI PRW 2 A1
Service
Service Great Britain
Tel.: 0800 404 7657
E-Mail: [email protected]
Service Ireland
Tel.: 1890 930 034
(0,08 EUR/Min., (peak))
(0,06 EUR/Min., (off peak))
E-Mail: [email protected]
IAN 322310_1901
Importer
Please note that the following address is not the service address. Please use the
service address provided in the operating instructions.
KOMPERNASS HANDELS GMBH
BURGSTRASSE 21
DE-44867 BOCHUM
GERMANY
www.kompernass.com

FR│BE │ 17 ■
PRW 2 A1
Table des matières
Introduction..................................................18
Informations relatives à ce mode d’emploi ....................................18
Utilisation conforme......................................................18
Caractéristiques techniques .....................................18
Sécurité .....................................................19
Matériel livré/Description des pièces .............................20
Utilisation....................................................20
Montage ..............................................................20
Transformation de la planche à roulettes en tabouret ............................ 22
Rangement ..................................................23
Entretien.....................................................23
Nettoyage...................................................23
Recyclage....................................................23
Recyclage du produit.....................................................23
Recycler l'emballage ..................................................... 23
Service après-vente ...........................................24
Importateur..................................................24
Other manuals for PRW 2 A1
1
Table of contents
Languages:
Other Powerfix Profi Service Equipment manuals
Popular Service Equipment manuals by other brands

Metro DataVac
Metro DataVac B3-CD instruction manual

Carriage House CycleWorks
Carriage House CycleWorks TrikeTable Assembly & user's guide

Snap-On
Snap-On ECO NEXT ONE instruction manual

Bosch
Bosch ACS 251 Original instructions

Torin BIG RED
Torin BIG RED T70401 owner's manual

Sealey
Sealey RE901 instructions