Slime 40080 User manual

PART# 40080 | REV061523ART
ATTENTION! READ ALL INSTRUCTIONS CAREFULLY
FAILURE TO FOLLOW WARNING INSTRUCTIONS CAN RESULT IN FIRE,
PERSONAL INJURY OR PROPERTY DAMAGE.
LIGHT
• Bright LED for night-
time emergencies
CORDLESS
TIRE INFLATOR
AIR ADAPTER
STORAGE
• Snap-in-place
storage
ON/OFF
BUTTON
QUICK CONNECT
AIR HOSE
POWER SOURCE
• Rechargeable lithium-ion
baery
• Plugs into USB A
power block
INFLATABLES |BALLS
INTEGRATED
HOSE
MANAGEMENT
DIGITAL GAUGE
• 0 - 99 PSI / 0 - 7 BAR
• Inflate® Right Technology
Auto shut-off at set
pressure
QUICK GRAB
HANDLE

Ensure that the vehicle is outside, or in an open, well-ventilated area and NOT INSIDE A
CONFINED AREA, SUCH AS A GARAGE as bodily injury or asphyxiation resulting in death
could occur. Always operate the inflator in a well-ventilated area free of combustible materials,
gasoline, or solvent vapors. Always set parking/emergency brake and ensure vehicle is in Park
(or neutral if equipped with manual transmission).
CAUTION: HOT!
• Do not aempt to disassemble inator.
• No user serviceable parts inside.
• Keep inator out of reach of children.
• Ensure air hose chuck touches the core of the valve stem for proper ination.
• DO NOT use inator continuously for more than 10 minutes. Allow unit to cool
approximately 25 minutes between uses. Do not leave inator unaended.
• ALWAYS use a pressure gauge to check tire pressure. DO NOT over-inate.
• So inatables (i.e. ras, balls, etc.) may not have recommended pressure markings. Be
careful not to inate items beyond their capacity.
• While operating, never block the inator input or output.
VEHICLE EXHAUST WITHOUT PROPER VENTILATION IS EXTREMELY
DANGEROUS. ALWAYS ALLOW FOR PROPER VENTILATION.
TECH SPECS
* (0-35 PSI, Standard Tire: P195/65 R15)
TIRE INFLATION TIME 4 min*
CFM (LPM) 0.95 CFM (26.9 LPM) @ 0 PSI
DIGITAL GAUGE PSI 0-99, BAR 0-7
TOTAL REACH 2 . (0.6 m)
POWER SOURCE Rechargeable lithium-ion baery
USING THE ADAPTERS
PULL UP
TO LOC K
PULL DOWN
TO UN LOC K
1. To unlock the quick connect, pull
handle down.
2. Place the adapter into connector
and pull up on handle to lock in.

INFLATE TIRES
USING INFLATE RIGHT® TECHNOLOGY
1. Press and hold ON/OFF button for two seconds to turn on display.
2. Press the + or - buttons to set the desired target pressure. The display will flash for 2-3
seconds and then will show the set target pressure value to which the tire will be inflated.
3. Push the ON/OFF button to start the inflator. When the tire pressure reaches the pre-set
value, the inflator will automatically stop inflation.
4. The ON/OFF switch can be used to override the present pressure value if required.
NOTE: The inflator display will automatically turn off after 2 minutes of inactivity.
1. Attach quick connect air hose onto tire’s valve stem and pull lever up to lock.
2. Press and hold ON/OFF button for two seconds to turn on display.
3. Press ON/OFF button again to turn on inflator. Inflate tire to manufacturer’s recommended
air pressure.* When proper pressure is reached, press ON/OFF button to turn off inflator.
Remove air hose connector.
*NOTE: Correct tire pressure can be found in vehicle owner's manual or on driver's side door
jamb.
RECHARGING THE BATTERY
The battery will come with a minimal charge. It will be necessary to charge the battery prior
to initial use. Recharge after each use to prevent compromised battery life.
NOTE: It takes about 4 hours to fully charge your battery from a 2.1A USB outlet. The unit
should be charged every 4 months to keep the battery at peak performance. USB adapter
block not included. Any USB A phone or tablet block charger will work. Do not charge unit
via computer USB port.
BATTERY DISPOSAL: This product contains a rechargeable sealed lithium-ion battery.
The environmental laws in some areas require retailers to accept returns of rechargeable
batteries for proper disposal. Check the city/county/state/federal laws before disposing this
product.
USING THE LIGHT
1. To turn on the LED light, press and hold the ON/OFF button for two seconds to turn on
the display.
2. Press and hold the ON/OFF button again for 3 seconds to turn on the LED light. Repeat
this step to turn off the LED light.

TROUBLESHOOTING
FOR WARRANTY INFORMATION GO TO: WWW.SLIME.COM / WARRANTY
QUESTIONS OR COMMENTS:
Call (888)457-5463 or visit www.slime.com
ITW Global Tire Repair • 125 Venture Drive, Suite 210, San Luis Obispo, CA 93401 USA
Slime®is a trademark of Illinois Tool Works, Inc., registered in the U.S. and other countries.
Inflator does not turn on:
1.Ensure the battery has a charge. You can check the charge level of the battery by pressing
the ON/OFF button to turn on the unit. If the unit does not turn on, the battery is likely dead.
Charge battery.
2.The Inflate-Right™ pressure may be set at/or below the desired pressure. Reset.
Inflator runs but does not inflate:
1. Be sure the connector is fully secured on the tire valve.
2. Check tire for leaks, and check hose for breaks and leaks at fittings.
Inflator runs slowly:
1.The inflator may have overheated from excessive use. Shut it off and allow it to cool for 25
minutes.
NOTE: If tire is totally deflated, it is possible that the tire could separate from the rim allowing
air to leak out when trying to inflate. In the event this occurs, it may be necessary to jack up the
tire prior to inflation.
Dispose of this product at an e-waste recycling collection point or facility.
Do not place in the trash or standard recycling receptacle.

ESPACIO
PARA
COLOCACIÓN
DE MANGUERA
¡ATENCIÓN! LEA TODAS LAS INSTRUCCIONES CON ATENCIÓN
SI NO SIGUE LAS INSTRUCCIONES DE ADVERTENCIA, PUEDE CAUSAR INCENDIO,
LESIONES A PERSONAS O DAÑOS MATERIALES.
LUZ
• LED brilliante para
emergencias de
noche
FUENTE DE ENERGÍA
• Batería recargable de iones
de litio
• Se conecta al bloque de
alimentación USB A
ADAPTORES
DE AIRE
ALMACENA-
MIENTO DEL
ADAPTADOR
DE AIRE
• Localidad de almace-
namiento a presión
MANGUERA DE
AIRE DE CONEXIÓN
RÁPIDA
INTERRUPTOR
DE ENCENDIDO/
APAGADO MANÓMETRO
DIGITAL
• 0 - 99 PSI / 0 - 7 BAR
• Inflate right™ (Tecnología
automotriz) Apagado a la
presión establecida
MANIJA DE
AGARRE RÁPIDO
CORDLESS
TIRE INFLATOR

ESPECIFICACIONES TÉCNICAS
EL ESCAPE DEL VEHÍCULO SIN LA VENTILACIÓN ADECUADA
ES EXTREMADAMENTE PELIGROSO. PERMITA SIEMPRE UNA
VENTILACIÓN ADECUADA.
* (0-35 PSI, Tamaño de Llanta estandar: P195/65 R15)
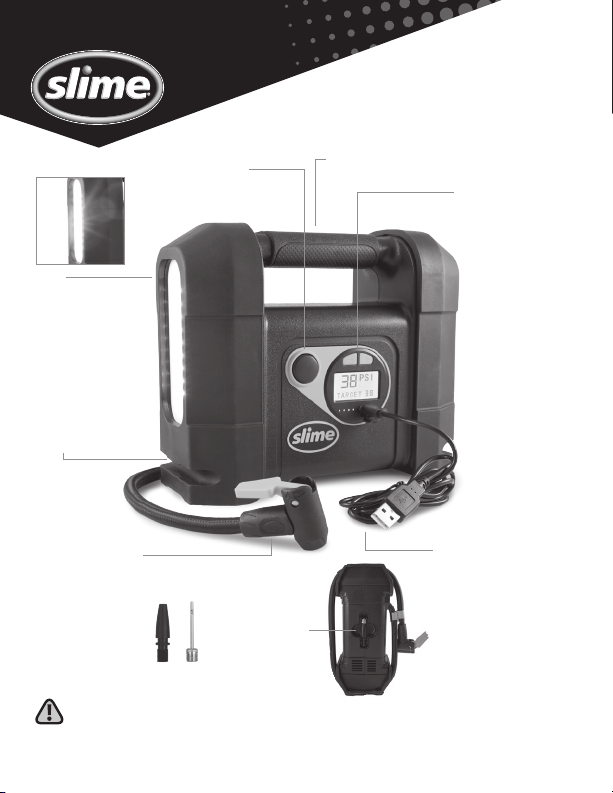
USO DE LOS ADAPTADORES
JALAR HACIA
ARRIBA PARA
ASEGURAR
JALAR HACIA
ABAJO PARA
QUITAR EL
SEGURO
1. Para quitar el seguro de la
conexión rápida, jalar la manija
hacia abajo.
2. Coloque el adaptador en el
conector y tire hacia arriba del
asa para bloquearlo.
TIEMPO DE INFLADO DE LLANTAS 4 min*
PCM (LPM) 0.95 CFM (26.9 LPM) @ 0 PSI
MANÓMETRO DIGITAL PSI 0-99, BAR 0-7
ALCANCE TOTAL 2 . (0.6 m)
FUENTE DE ENERGÍA Batería recargable de iones de litio
Asegúrese de que el vehículo esté al aire libre o en un área abierta y bien ventilada y NO
DENTRO DE UN ÁREA CERRADA, COMO UN GARAJE, ya que podrían producirse lesiones o
asfixia con resultado de muerte. Siempre opere el inflador en un área bien ventilada libre
de materiales combustibles, gasolina o vapores de solventes. Siempre coloque el freno de
mano/emergencia y asegúrese de que el vehículo esté en Punto Muerto (o neutral si está
equipado con transmisión manual).
PRECAUCIÓN: !CALIENTE¡
•No intente desarmar el inador.
•No hay piezas reparables por el usuario en el interior.
•Mantenga el inador fuera del alcance de los niños.
•Asegúrese que la nariz de la manguera de aire toque el núcleo del vástago de la
válvula para inarlo correctamente.
•NO use el inador continuamente por más de 10 minutos. Deje que la unidad se enfríe
durante aproximadamente 25 minutos entre usos. No deje el compresor desatendido.
•Utilice SIEMPRE un manómetro para comprobar la presión de los neumáticos. NO ine
demasiado.
•Es posible que los inables blandos (es decir, balsas, pelotas, etc.) no tengan las
marcas de presión recomendadas. Tenga cuidado de no inar los artículos más allá de
su capacidad.
•Durante el funcionamiento, nunca bloquee la entrada o salida del inador.

TROUBLESHOOTING
UTILIZANDO LA TECNOLOGÍA CORRECTA DE INFLADO
1. Mantenga presionado el botón ON/OFF durante dos segundos para encender la pantalla.
2. Presione los botones + o - para establecer la presión deseada. La pantalla parpadeará
durante 2-3 segundos y luego mostrará el valor de presión establecida al que se inflará la
llanta.
3. Presione el botón ON/OFF para iniciar el inflador. Cuando la presión de los neumáticos
alcance el valor preestablecido, el inflador detendrá automáticamente el inflado.
4. El interruptor de ON/OFF se puede usar para anular el valor de presión actual si es
necesario.
NOTA: La pantalla del inflador se apagará automáticamente después de 2 minutos de
inactividad.
1. Atornille el conector de la manguera en el vástago de la válvula de la llanta.
2. Enchufe el cordón eléctrico en la toma de corriente para accesorios de 12 voltios.
3. Presione el interruptor para encender el inflador. Infle la llanta a la presión recomendada
por el fabricante.* Cuando alcance la presión adecuada, presione el interruptor para
apagar el inflador. Desenchufe el cordón eléctrico y retire el conector de la manguera de
aire.
*NOTA: La presión de la llanta adecuada se encuentra en el manual del propietario del
vehículo o en el panel de la puerta del lado del conductor.
RECARGA DE LA BATERÍA
La batería vendrá con una carga mínima. Será necesario cargar la batería antes del uso
inicial. Recargue después de cada uso para evitar comprometer la duración de la batería.
NOTA: Se tarda unas 4 horas en cargar completamente la batería desde una toma USB
de 2,1 A. La unidad debe cargarse cada 4 meses para mantener la batería al máximo
rendimiento. Bloque adaptador USB no incluido. Cualquier cargador de bloque de teléfono
o tableta USB A funcionará. No cargue la unidad a través del puerto USB de la computadora.
ELIMINACIÓN DE LA BATERÍA: Este producto contiene una batería sellada de iones de
litio recargable. Las leyes ambientales en algunas áreas exigen que los minoristas acepten
devoluciones de baterías recargables para su correcta eliminación. Consulte las leyes de la
ciudad/condado/ estado/federal antes de desechar este producto.

El inflador no enciende:
1.Asegúrese de que la batería tenga carga. Puede verificar el nivel de carga de la batería
presionando el botón ON/OFF para encender la unidad. Si la unidad no se enciende, es
probable que la batería esté agotada. Cargar batería.
2.La presión de Inflate-Right™ puede establecerse en/o por debajo de la presión deseada.
Reiniciar.
El inflador funciona pero no infla:
1. Asegúrese de que el conector esté completamente asegurado en la válvula de la llanta.
2. Revise la llanta en busca de fugas y revise la manguera en busca de roturas y fugas en los
accesorios. El inflador funciona lentamente: minutes. 1. Es posible que el inflador se haya
sobrecalentado debido al uso excesivo. Apágalo y deja que se enfríe durante 25 minutos.
El inflador funciona lentamente:
1.The inflator may have overheated from excessive use. Shut it off and allow it to cool for 25
minutes.
NOTA: Si la llanta está totalmente desinflada, es posible que esté separada del aro y éste
permite que el aire se escape cuando trata de inflarla. Si ocurre esta situación, puede ser
necesario levantar la llanta con un gato para inflarla.
Deshágase de este producto en un punto de recogida de reciclaje de residuos electrónicos o
instalación. No coloque en la basura o recipiente de reciclaje estándar.
SOLUCIÓN DE PROBLEMAS
PARA INFORMACIÓN DE GARANTÍA: WWW.SLIME.COM/WARRANTY
PREGUNTAS O COMENTARIOS: Llamar al +1-888-457-5463 o visitar www.slime.com
ITW Global Tire Repair • 125 Venture Drive, Suite 210, San Luis Obispo, CA 93401 USA
Slime® es una marca registrada de Illinois Tool Works, Inc., registrada en Estados Unidos y en
otros países.
USO DE LA LUZ
1. Para encender la luz LED, mantenga presionado el botón ON/OFF durante dos segundos
para encender la pantalla.
2. Mantenga presionado el botón ON/OFF nuevamente durante 3 segundos para encender
la luz LED. Repita este paso para apagar la luz LED.
Table of contents
Languages:
Other Slime Service Equipment manuals