PowerLite EXITBOX-R-B User manual

Instructions for automatic test option
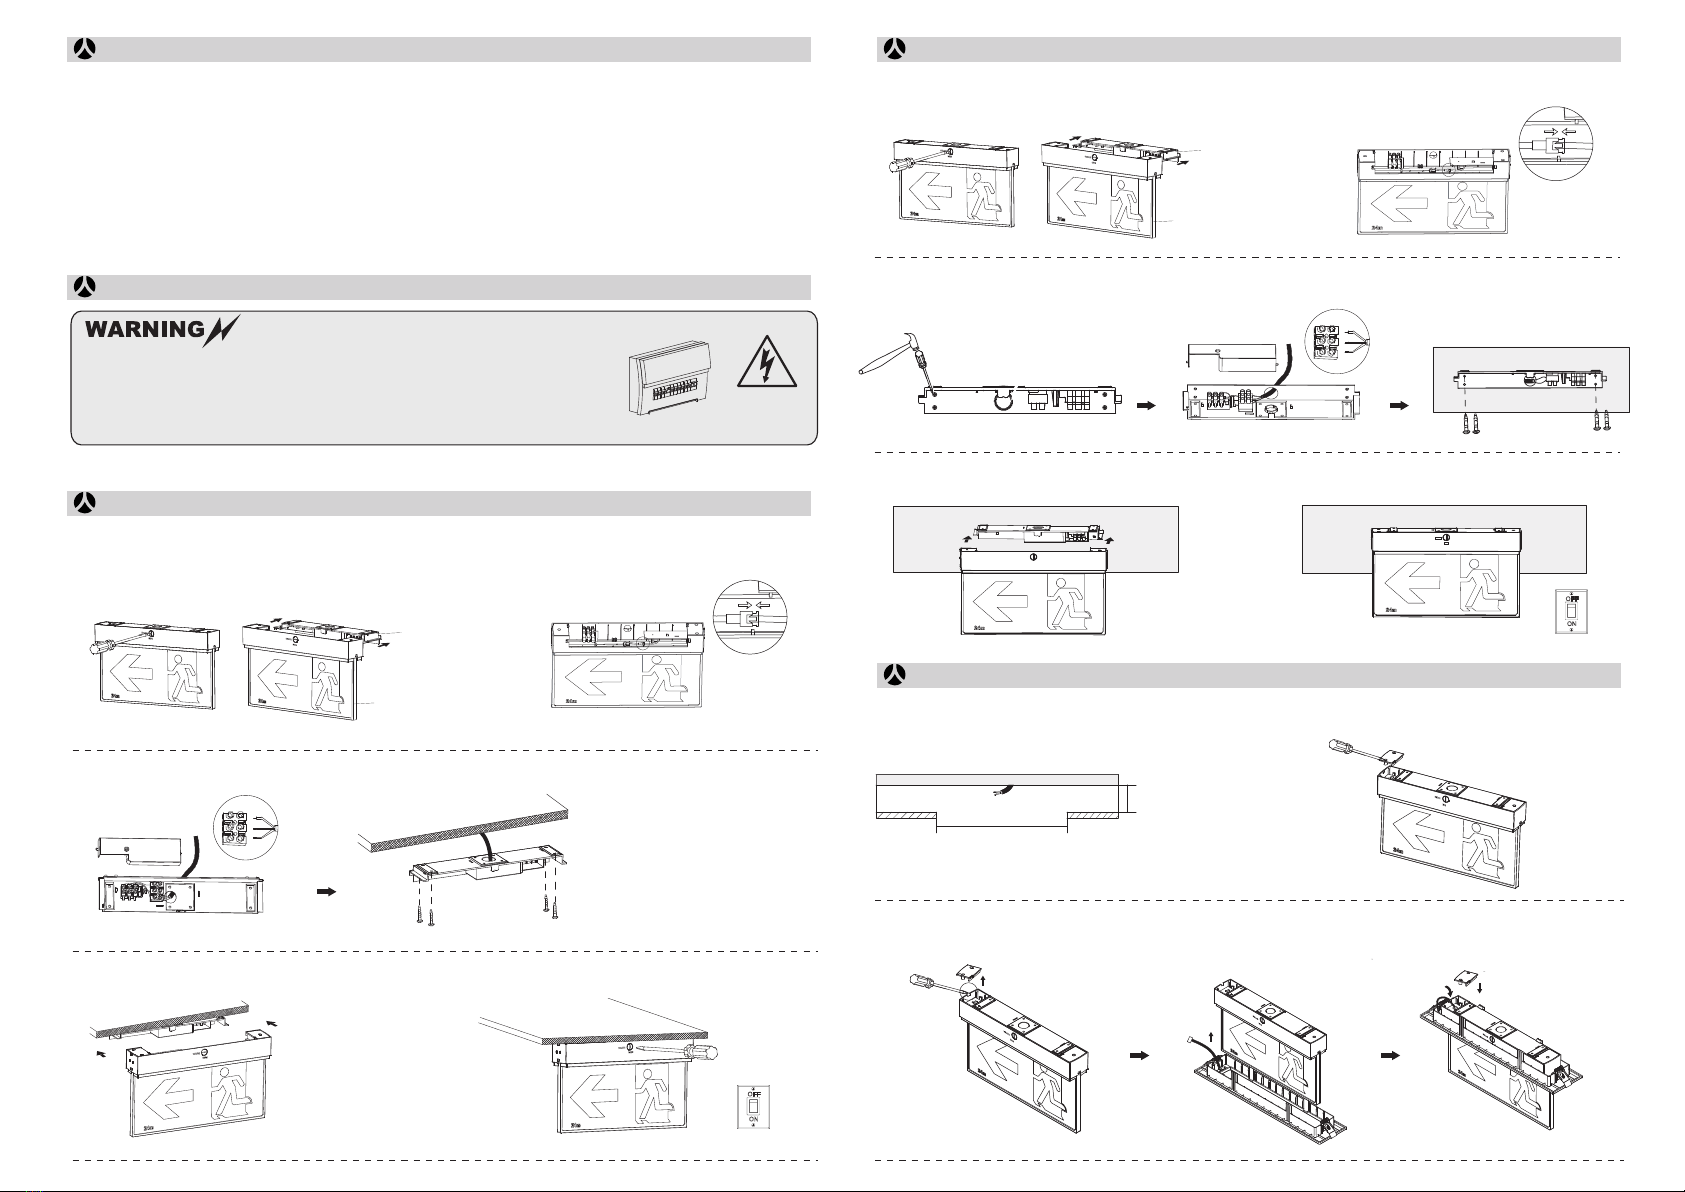
4. Press the springs upwards into the ceiling. 5. Finish installation. Switch on.
3. Button Test
Press test button once run a 30s duration test
Press test button twice within 2s run a 3mins duration test
Press test button 3 times within 2s run a 30mins duration test
Press test button 4 times within 2s run a 2H duration test
IP20 24M
LOCK
UNLOCK
UNLOCK
UNLOCK
1. Instruction for Automatic test function
Once the unit is powered up, a self-diagnostics test
will be automatically initiated:
• Check battery, lamp, charge board and transfer fault
all the time.
• Run 2H duration test every half a year.
Note: All test functions are preset and no need field
adjustment.
2. Dual Colour LED Status Indicator Meaning
• Green indicator solid on: Ready/ Normal Operation
• Red indicator flashes: Require service
• One flash, 4s pause Battery disconnected
•• Two flashes, 4s pause Low battery voltage
••• Three flashes, 4s pause Charge board fault
•••• Four flashes, 4s pause AC/DC transfer fault
••••• Five flashes, 4s pause LED lamp fault
indicator will turn green. The fault is cleared, and the unit is back to normal.
Note: When the fault is recovered, press the test button for 2s, the red flashing
Certainty at The Speed of Light
INSTALLATION
MANUAL
LED
EXIT SIGN
EXITBOX-R-B
Normal Operation: The green LED indicator stays on when connected to mains supply. The indicator will
turn off when the mains supply fails, or when the internal charger malfunctions, or when the luminaire is
in test mode.
Battery: LiFePO4 rechargeable battery pack. Battery should be replaced when it reaches the end of its
lifetime. To avoid damage to the luminiare and ensure its performance, the battery should be replaced
with same type.
Test Switch: Press the test button, LED indicator will turn off and the luminaire will be powered by the
battery pack. The light source is non-replaceable. When the light source reaches the end of its
lifetime, the whole luminaire shall be replaced.
1. Release the clip to UNLOCK status by a screwdriver.
Slide the cover away from the housing.
3. Connect wiring to terminals. Mount the cover onto the ceiling.
4. Slide the housing into the cover. 5. Fasten the clip to LOCK status. Switch on.
2. Unscrew the side cover from fixture.
Read instructions and check you have all the tools and accessories to complete the installation correctly.
Turn O
Power Supply
1.Switch off before installation or maintenance.
2.Switch on only after complete installation and examination of the circuit.
3.Professional electrician for installation and maintenance only.
4.This luminaire is not intended for use in high-risk task area lighting.
Cover
Housing
2. Connect the battery with quick connector.
1. Release the clip to UNLOCK status by a screwdriver.
Slide the cover away from the housing.
3. Knock out the holes for screwing and AC wiring Connect wiring to terminals. Mount the cover onto the
wall.
Cover
Housing
2. Connect the battery with quick connector.
L
E
N
L
E
N
4. Slide the housing into the cover. 5. Fasten the clip to LOCK status. Switch on.
LOCK
UNLOCK
LOCK
UNLOCK
1. Cut out size: L420mm x W80mm.
420mm*80mm
H>65mm
3. Knock out the side hole, put the panel through the recessed kit, and the recessed kit will be fixed onto the fixture.
Plug the recessed kit’s indicator and test button PCBA onto the main PCBA. Screw the side cover back.
Precautions Wall Mount
Recessed Mount
Installation Procedure
Ceiling Mount
Popular Safety Equipment manuals by other brands

Lanex
Lanex PB-20 instruction manual

SKYLOTEC
SKYLOTEC ANCHOR ROPES Instructions for use

Besto
Besto Buoyancy Aid 50N Instructions for use

TEUFELBERGER
TEUFELBERGER NODUS Manufacturer's information and instructions for use

Troy Lee Designs
Troy Lee Designs Tbone Product owners manual

Innova
Innova Xtirpa Instruction and safety manual

bolle SAFETY
bolle SAFETY B810 quick start guide

SHENZHEN FANHAI SANJIANG ELECTRONICS
SHENZHEN FANHAI SANJIANG ELECTRONICS A9060T instruction manual

Hiltron security
Hiltron security POWER8E Installation and use manual

Salewa
Salewa MTN SPIKE user manual

Hatco
Hatco B-950P installation guide

Sitec
Sitec TX MATIC operating manual


