Powertrain V1200 User manual

ELECTRIC TREADMILL –MODEL V1200
INSTRUCTION MANUAL
Please read these instructions carefully before use and keep for future reference
FOR DOMESTIC INDOOR USE ONLY
WARNING: Keep young children away from this machine at all times. Contact with the
moving surface may result in severe friction burns.

1. CAUTION
To avoid injuries please read this manual carefully before using the treadmill.
Before starting any exercise program you should consult your doctor
Ensure you have tightened all the bolts and nuts on this machine before commencing any
exercise
Do not stand on running belt whilst starting the unit
Stop immediately if you feel unwell or nauseous
Adjust speed slowly
Do not adjust the belt while the unit is in use
It is recommended that you wear sports shoes and appropriate clothing when using the
treadmill
Children, elderly, pregnant women and people with medical conditions should not use the
treadmill unless authorized by their doctor and in the presence of an adult who may assist
Clip the safety key on your clothing during use
Keep the safety key away from children when the treadmill is not in use as it may present a
choking hazard or allow them to activate the unit
Keep silicone oil away from children’s reach. If accidentally swallowed or it comes into
contact with eyes, use water to wash out and immediately seek medical assistance
2. SAFETY NOTICE
Operate the machine on sturdy flat ground only.
Do not use the machine in the following situations:
oOutdoors. (The machine is designed for indoor use only)
oUneven or unlevel surfaces
oSunlit area or near a heat source
This machine requires a constant 220-240V AC power connection
An error may be displayed if power is not stable. Do not share power points with other
equipment
Be careful of children or other objects while folding and unfolding the machine
Do not store or use the machine near wet areas or on slippery or wet surfaces, this will
damage the machine and void the warranty

3. CAUTION PRIOR TO USE
Do not use the machine if you are unwell and immediately stop using the machine if you
start feeling unwell whilst using it.
Disconnect the machine from power when not in use.
Prior to relocating or folding the machine, disconnect it from power.
Machine is to be used on a flat surface only.
Ensure a 2m clearance around the machine is available prior to using it.
Do not start the machine when it is folded.
Keep all liquids away from the machine as they will damage the unit and void all warranty.
Machine is not to be used in poorly ventilated spaces or locations with flammable objects
in its vicinity.
Do not put any objects on the machine.
Switch off all functions and disconnect from power when not in use.
Please do not stand directly on the belt while starting the machine.
Do not disassemble the machine without a written authorization from the manufacturer
Ensure the running belt is fastened before use
4. PRODUCT SPECIFICATIONS

Main Specifications and Parts List
Main Specifications
No.
Parameters Names
Description
1
Input power voltage
AC220-240V(50/60Hz)
2
Motor power
3.0HP
3
Speed
1-20Km/h
Packing list
No.
Name
Units
Qty
1
Treadmill Unit
set
1
Screws bag list
NO.
Name
QTY
NO.
Name
QTY
1
Inner hexagon spanner 6mm
1
6
MP3 cable
1
2
Inner hexagon spanner 5mm
1
7
Screw M8*22
4
3
Silicone Oil
1
8
Screw M8*52
2
4
User Manual
1
9
Screw M8*25
4
5
Safety Key
1
10
Power Line
1
5. ASSEMBLY INSTRUCTIONS
During assembly, first insert and moderately tighten screws and when the frame has been
fully assembled, inspect all the screws and tighten them completely.
Lay unit flat on the ground. Cut the nylon cable ties (where supplied) on the base. Lift the
upright columns and console in the direction shown in the diagram below.
WARNING: THIS PRODUCT IS HEAVY. ENSURE TWO PEOPLE ARE ASSEMBLING IT AT ALL TIMES
Use the inner hexagon spanner (#5) and insert screws M8*52 and screws M8*22 to
attach the columns to the base of the treadmill as shown:

Use an inner hexagon spanner (#5) and screw M8*25 to fix the console to the columns.
Use a screwdriver and insert M5*14 to fix the base corner covers to the columns, as shown
in the below diagram.
Remove the console and connect the cables as shown:
CAUTION: Ensure cables are not pinched or jammed as it will damage the unit and void warranty.
Place the exposed surplus cabling inside the case and mount the console on to the console slot.
Adjust the position/angle. Insert screws M8*25 and tighten them as shown:

Position the safety key in the correct position as shown below.
Safety Key Function
oDisconnecting the safety key will immediately stop the running track and the screen
will display “E7”, and the treadmill will emit a beep.
oPlacing the safety key back on the designated area on the console will clear all data
in 2 seconds.
CAUTION: Ensure all screws are correctly tightened according to the requirements and
check no part has been left out prior to connecting to power.
6. USING THE TREADMILL
Power on –Connect the power adapter to a power point and turn on the unit by
using the red switch. The LED will illuminate, and the treadmill will emit a beeping sound.
The screen on the control panel will switch on.
Start - starts after 3 second countdown.
Stop –Pressing the Stop key will gradually stop the treadmill.
Program There are 12 pre-set programs, press the “PROGRAM” button to toggle between
them.
Mode - In standby mode pressing the Mode key will cycle through 3 modes:
1) Time Countdown 2) Distance Countdown 3) Calorie Countdown
Speed Presets -In running mode using these shortcuts will change the running speed
accordingly to 3, 6, 9, and 12km/h
Speed+ / Speed-
oIn running mode these keys are used to adjust the speed up and down

Incline Presets - In running mode these keys are used as shortcuts to set incline levels
to 3%, 6%, 9%, and 12%
Incline+ / Incline-: In running mode these keys will adjust the incline level up and down
Vol+ / Vol- Use these keys to adjust volume when playing music in USB mode
Control Dial
A: When stopped, rotate the control to GO and press, the treadmill will start
B: While running press the control to pause, press again to resume
C: While running rotate the control to increase and decrease the speed
D: While paused, press and hold for 3 seconds to stop the treadmill
(when the treadmill is decelerating the control is inoperative)
Display Functions:
1. SPEED: Shows current value of speed
2. TIME: Shows current time value of exercise or the value of time countdown for
the PROGRAM or MODE
3. DISTANCE: Shows current distance value of exercise or the value of distance countdown
for MODE
4. CALORIES: Shows current calories value of exercise or the value of calories countdown for
MODE
5. HEART RATE: Shows the value of heart rate after a few seconds holding the heart rate
sensors.
NOTICE: The heart rate function is to be used as an exercise reference feature only and is
not to be relied on for accurate heart rate assessment and is not to be used for medical
purposes. Should you feel unwell, stop exercising immediately and contact your doctor.

Preset Programs:
Time
Program
Set time/10=Running time of each segment
1
2
3
4
5
6
7
8
9
10
P1
Speed
3
3
6
5
5
4
4
4
4
3
Incline
0
3
3
3
4
4
4
1
1
0
P2
Speed
3
3
4
4
5
5
5
6
6
4
Incline
2
2
2
3
3
3
3
4
4
2
P3
Speed
2
4
6
8
7
8
6
2
3
2
Incline
3
5
4
4
3
4
4
3
4
2
P4
Speed
3
3
5
6
7
6
5
4
3
3
Incline
0
3
3
2
2
5
5
3
3
2
P5
Speed
3
6
6
6
8
7
7
5
5
4
Incline
3
5
3
4
2
3
4
2
3
2
P6
Speed
2
6
5
4
8
7
5
3
3
2
Incline
3
4
5
6
3
5
5
6
4
3
P7
Speed
2
9
9
7
7
6
5
3
2
2
Incline
0
3
3
3
4
4
4
1
1
0
P8
Speed
3
4
4
4
5
6
8
8
6
2
Incline
1
1
4
4
4
5
5
4
3
2
P9
Speed
2
4
5
5
6
5
6
3
3
2
Incline
3
5
3
4
2
3
4
2
3
2
P10
Speed
2
5
7
5
8
6
5
2
4
3
Incline
1
5
6
8
12
9
10
9
5
3
P11
Speed
2
5
6
7
8
9
10
5
3
2
Incline
3
5
6
8
6
5
8
7
5
2
P12
Speed
2
3
5
6
8
6
9
6
5
3
Incline
5
7
5
8
6
5
9
10
6
2

Error Codes
Error code
Description
Solution
E1
Bad Connection: when the
power is on, the connection
between lower controller and
the console is abnormal.
Possible Cause: the electrical connection between the lower
controller and console is faulty, check each joint between the
controller and console, make sure that each cable is fully plugged
in. Check the connection line, replace it if is damaged.
E2
No signal from motor.
Possible Cause: Check the motor cable to see whether it is
connected well or not, if not, re-connect the motor wire again.
Check the motor cable to see whether it is damaged or has a burnt
smell, if yes, replace the motor.
E5
Current overload
protection:
Whilst in use, the lower
controller detects the current
to be over 6A for more than
3 seconds.
Possible Cause:
Overloading leads to excessive current, and the system stops out of
self-protection, or some part is stuck, causing the motor to stop.
Adjust the treadmill and restart it. Check if there is liquid or burnt
smell while the motor is running, if yes, replace the motor; check if
the controller has a burnt smell, if yes, replace the controller; check
the power supply voltage, if it does not match the specifications,
change into correct voltage and test the machine again.
E6
Explosion-proof impact
protection: the abnormal
voltage or motor cause a
circuit fault which drives the
motor.
Possible Cause:
Check if the power supply voltage is 50% lower than normal
voltage,use the correct voltage and test the machine again;check
if the controller has a burnt smell and replace the controller; Check
if the motor cable is connected and connect the motor wire again.
E7
No safety key
Place the safety key on the correct position on the control panel
7. Maintenance
Warning: Before cleaning or carrying out any maintenance, ensure the treadmill is
disconnected from power
Cleaning will extend the life of your treadmill
Remove dust periodically in order to maintain all parts clean
Be sure to clean running belt with both sides of the exposed portion, which will reduce the
accumulation of impurities
Make sure to wear clean athletic shoes to avoid introducing dirt on to the running board
and belt
Treadmill belts must be cleaned with a damp cloth and mild soap
Ensure none of the components, nor the treadmill itself come into contact with liquids, this
will void the warranty
Warning: Make sure power plug disconnect before moving motor cover away, clean the
dust from the motor and surrounding area at least once a year with a vacuum, do not
use water or damp cloth

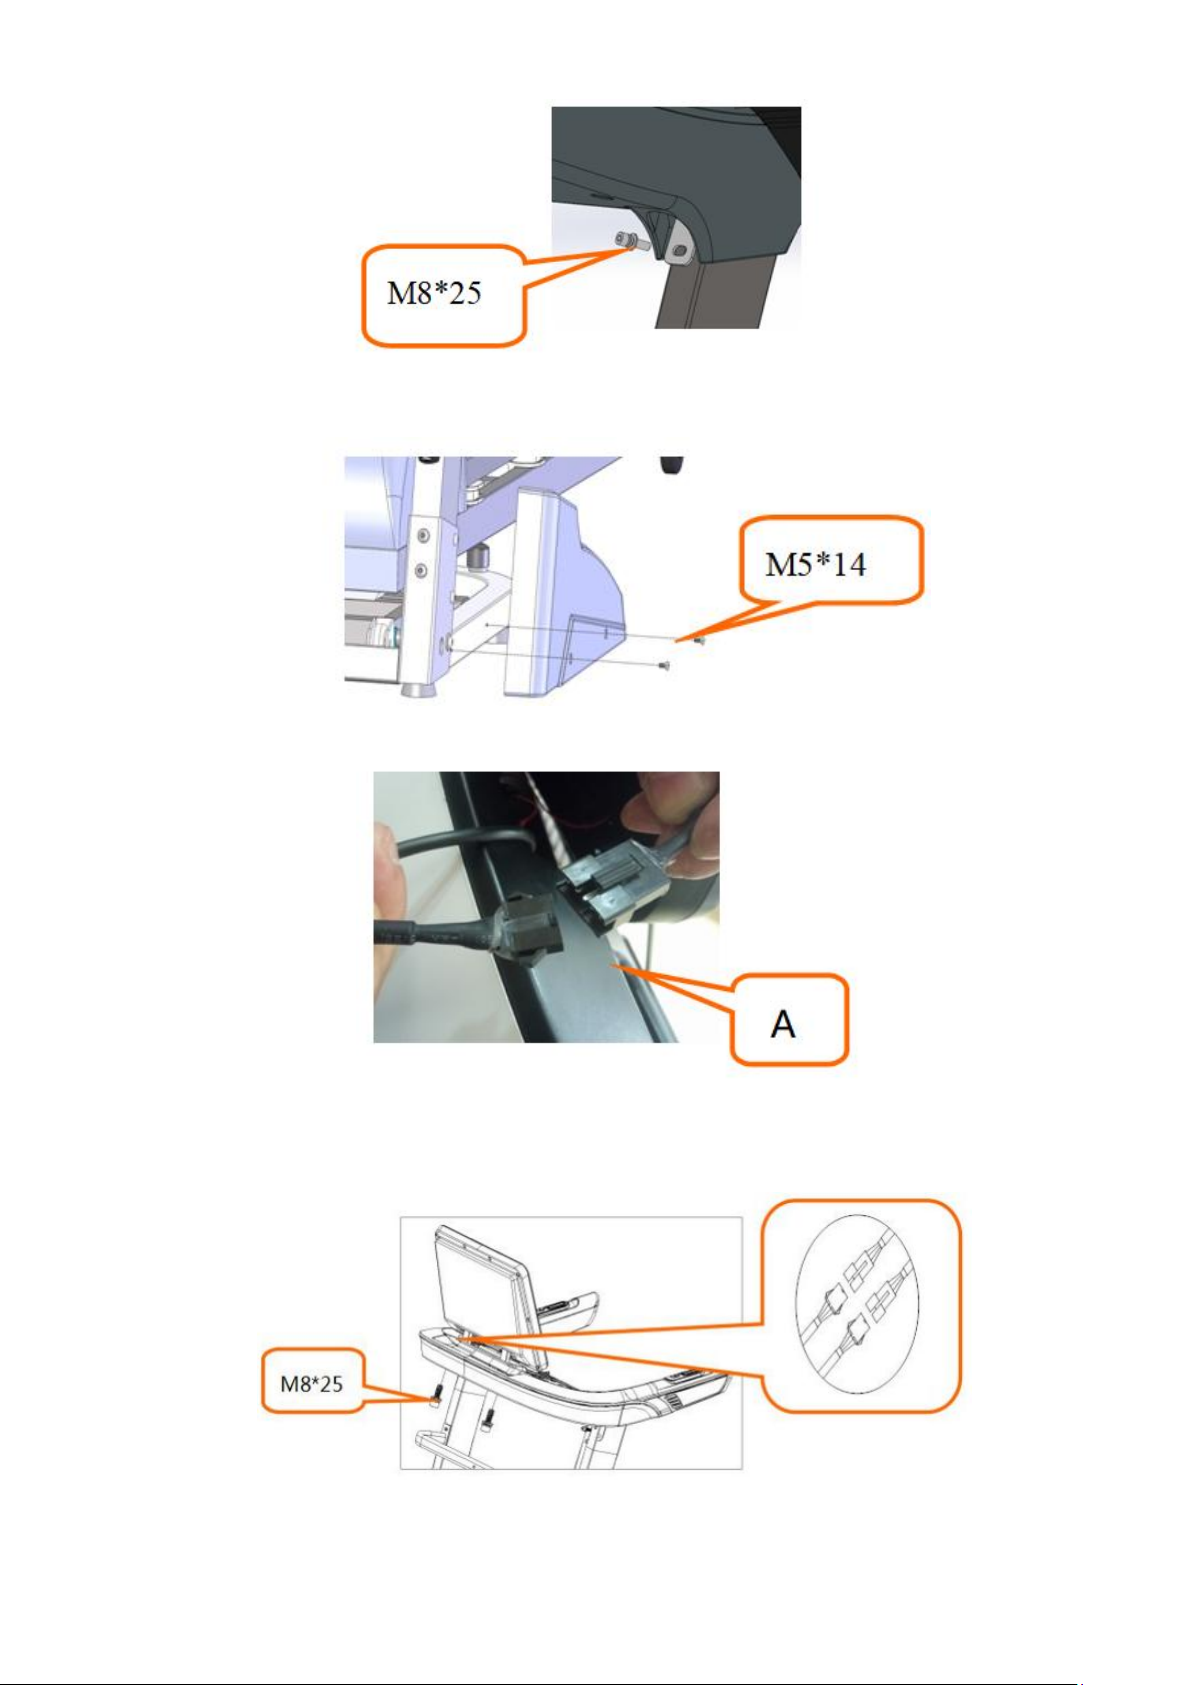
Maintenance of the Running Board and Belt - Lubrication and Cooling
Your treadmill's running board and running belt has been lubricated at the factory
Friction between the running belt and running board will impact on the life and
performance of your treadmill
Regular application of treadmill lubricant is required, check the board regularly
To check if the belt needs to be lubricated, simply lift each side of the belt and feel the top
surface of the running deck. If it is slick to the touch, then no lubrication is required. If it is
dry to the touch, then lubricate with silicon oil
To lubricate (where required):
oLift the edge of the running to expose the running deck
oPlace a few drops of silicone oil along the centre of the running deck
oRun the treadmill without the user at a slow speed for 5 minutes
CAUTION: Do not over lubricate. Wipe away excess lubricant from the belt.
If the board’s surface is damaged contact our customer service centre
We recommend applying lubricant between running belt and running board:
oInfrequent user (use less than 3 hours a week) - once per month
oFrequent user (use more than 7 hours a week) - once a fortnight
To safeguard your treadmill and extend the life of the unit it is recommended that after 2
hours of continued use the machine be switched off and allowed to cool for a minimum of
10 minutes before using it again
If the treadmill belt is loose it will skid and slip when running.
If the treadmill belt is too tight it may reduce motor performance and increase wear and
tear of the roller and running belt
Lift each side of the running belt around 50-75mm to check the tension
Adjusting alignment and tightness
The running belt is adjusted at the factory, however after use it may stretch and will require
re-tensioning. For best use it may be required to adjust the running belt for its optimum
alignment
Running Belt alignment
Place treadmill flat on the floor but do not stand on it.
Turn on treadmill and set the speed at 6-8km/hour .
If the running belt is shifting to the right, rotate the right adjusting bolt with 1/2 turn
clockwise, then rotate the left adjusting bolt with 1/2 turn counter-clockwise. (Diagram A)
If the running belt is shifting to the left, rotate the left adjusting bolt with 1/2 turn clockwise,
then rotate the right adjusting bolt with 1/2 turn counter-clockwise. (Diagram B)
Diagram A Diagram B

Exercise Instructions
Using your Powertrain treadmill provides you with several benefits such improving your
physical fitness, toning muscles and together with a calorie controlled diet may help you lose
weight.
Warm-up Phase
This stage helps get the blood flowing around the body and the muscles working properly. It
will also reduce the risk of cramp and muscle injury. It is advisable to do a few stretching
exercises as shown below. Each stretch should be held for approximately 30 seconds, do not
force or jerk your muscles into a stretch - if it hurts, STOP.
Exercise Phase
This is the stage where you put the effort in. After regular use, the muscles in your legs will
become stronger. Work to your own pace, but it is very important to maintain a steady tempo
throughout. The rate of work should be sufficient to raise your heart beat into the target zone
shown on the graph below.
This stage should last for a minimum of 12
minutes, although most people start at about
15-20 minutes.
As you get fitter you may need to train longer and harder. It is advisable to train at least three
times a week, and if possible space your workouts evenly throughout the week.

Warranty and Contact Details
Kmate Pty Ltd provides a 12 month warranty for this product when used for domestic purposes.
This product is not intended for commercial use and any such use will void all warranty.
The benefits of this warranty are provided in addition to other rights and remedies you may have under a law in
relation to the goods and services to which this warranty relates. Our goods come with guarantees that cannot be
excluded under the Australian Consumer Law. You are entitled to a replacement or refund for a major failure and for
compensation for any other reasonably foreseeable loss or damage. You are also entitled to have goods repaired or
replaced if the goods fail to be of acceptable quality and the failure does not amount to a major failure.
Before making a claim under warranty, please refer to your user/installation manual to ensure that you have
followed correct operating procedures of your product, and refer to the trouble shooting section (if such exists) to
assist solving any problems.
The warranty period begins from the day of purchase.
Your proof of purchase must be produced before assistance will be provided.
Where the Product is replaced pursuant to this Warranty, the replacement Product will be subject to the warranty
terms and warranty commencement date of the original product.
This warranty is only valid if the product is operated and maintained in accordance with the manufacturer’s
instructions.
Damage to property including but not limited to furniture, carpets, walls, ceilings or any other event either directly or
indirectly are excluded from warranty as well as any losses or expenses incurred by you in relation to the product or
making a claim under this warranty including without limitation any costs associated with installation, reinstallation
or transporting the product.
Light globes, remote controls, batteries, filters or similar perishable parts are not covered under this warranty.
A claim may be refused if the defective claim has arisen for reasons other than a manufacturers fault or defective
parts or workmanship. Circumstances in which a warranty claim may be declined include, but are not limited to the
following:
Normal wear and tear;
Misuse or abuse, including failure to properly maintain or service;
Damages caused by improper or incorrect installation, force-majeure, electrical surges, lightning, power
grid fluctuations, water or by connection to alternative power supply sources (such as solar inverters etc),
are not eligible for warranty repair;
Insect or vermin infestation;
Failure to clean or improper cleaning and/or operation of the product;
Failure to periodically lubricate and adjust, maintain the treadmill;
If the product is modified without authorisation from Kmate Pty Ltd in writing;
If you are unable to supply a certificate of compliance for installation of any type as required by State &
Territory Laws
Kmate Pty Ltd
PO Box 133, Braeside VIC 3195
03 9790 0055
Please download the latest version of this manual:
https://kmate.com.au/V120
Table of contents
Other Powertrain Treadmill manuals
Popular Treadmill manuals by other brands

Insportline
Insportline Air-run IN 19903 user manual

Fitfiu
Fitfiu RA-500 instruction manual

PaceMaster
PaceMaster Bronze Basic owner's manual

Keys Fitness
Keys Fitness Alliance Fitness Treadmills Alliance 888HR owner's manual

Weslo
Weslo Cadence 800 Treadmill Gebruiksaanwijzing

Weslo
Weslo WETL59710.0 user manual